
Information | Informazione | Información
EN: The device may need to be charged before use for 30-60 minutes
by inserting into a powered USB port.
DE: Möglicherweise muss das Gerät vor der Verwendung 30 bis 60
Minuten lang geladen werden; schließen Sie es dazu an einer
USB-Anschluss an.
IT: Potrebbe essere necessario caricare il dispositivo prima dell’uso
per 30-60 minuti inserendolo in una porta USB alimentata.
FR: Votre périphérique peut nécessiter d’être chargé pendant 30 à 60
minutes avant utilisation, en l’insérant dans un port USB alimenté.
ES: Puede que necesite cargar el dispositivo durante 30-60 minutos
antes de usarlo. Para ello, insértelo en un conector USB activo.
SE: Enheten kan behöva laddas före användning i 30-60 minuter
genom att sätta in den i en USB-port med strömförsörjning.
www.istorage-uk.com | [email protected] | +44 (0) 20 8991 6260

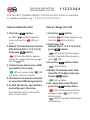
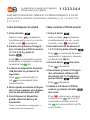
1. Press the button.
all LEDs will ash together
once and then the LED will
blink.
2. Whitin 10 seconds enter the User
PIN (default PIN: 1 1 2 2 3 3 4 4)
and press button.
LED will be solid for approxi-
mately 2 seconds and then change
to solid LED.
3. Connect your device into a USB
port within 30 seconds.
LED will remain solid, LED
will icker and turn to solid.
4. The device can now be accessed
as any other USB storage device.
5. To lock the device, save all data
and safely eject the drive.
All indicators will turn off and the
drive is now locked.
1. Press the button.
all LEDs will ash together and
then the LED will blink.
2. Enter User PIN
(default PIN: 1 1 2 2 3 3 4 4) and
press button.
LED will be solid for approx-
imately 2 seconds then change to
solid LED.
3. Press the button twice.
LED will blink.
4. Within 10 seconds enter New
User PIN (7-15 digit) and press
button twice.
LED will blink.
5. Re - enter New User PIN and
press the button twice.
LED will illuminate and then
change to solid LED if PIN
entries match.
LED will be solid if PIN entries
not matched.
How to unlock the drive How to change User PIN
FOR SECURITY, CHANGE DEFAULT PIN! PIN can NOT contain consecutive
or repetitive numbers e.g. 1 2 3 4 5 6 7 or 3 3 3 3 3 3 3
Your device ships with the
following default User PIN: 1 1 2 2 3 3 4 4

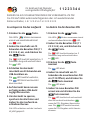
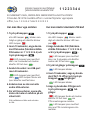
1. Drücken Sie die Taste.
Alle LEDs blinken zusammen
einmal und anschließend blinkt
die LED.
2. Geben Sie innerhalb von 10
Sekunden die Benutzer-PIN (1 1
2 2 3 3 4 4 ) ein, und drücken Sie
die Taste.
Die LED leuchtet konstant ca. 2
Sekunden lang und wechselt dann
zu LED.
3. Schließen Sie das Gerät
innerhalb von 30 Sekunden am
USB-Anschluss an.
Die LED leuchtet weiterhin,
Die LED blinkt und leuchtet
dann konstant.
4. Auf das Gerät kann nun wie
auf jedes andere USB-Gerät
zugegrien werden.
5. Um das Gerät zu sperren,
speichern Sie alle Daten und
ziehen Sie das Laufwerk an-
schließend heraus.
Alle LEDs erlöschen und das Laufwerk
ist jetzt gesperrt.
1. Drücken Sie die Taste.
Alle LEDs blinken zusammen einmal
und anschließend blinkt die LED.
2. Geben Sie die Benutzer-PIN (1 1
2 2 3 3 4 4 ) ein, und drücken Sie
die Taste.
Die LED leuchtet konstant ca. 2
Sekunden lang und wechselt dann
zu LED.
3. Drücken Sie die Taste
zweimal
Die LED blinkt.
4. Geben Sie innerhalb von 10
Sekunden die neue Benutzer-PIN
ein (7-15 Ziern) und drücken Sie
die Taste zweimal.
Die LED blinkt.
5. Geben Sie neue Benutzer-PIN
erneut ein und drücken Sie die
Taste zweimal.
Die LED leuchtet auf und wechselt
dann zu konstant leuchtendem ,
wenn die PIN -Eingaben übereinstim-
men. Die LED leuchtet konstant,
wenn die PIN-Eingaben nicht überein-
stimmen.
So entsperren Sie das Laufwerk So ändern Sie die Benutzer-PIN
ÄNDERN SIE AUS SICHERHEITSGRÜNDEN DIE VOREINGESTELLTE PIN!
Die PIN darf KEINE aufeinanderfolgenden oder sich wiederholenden
Zahlen enthalten, z. B. 1 2 3 4 5 6 7 or 3 3 3 3 3 3 3
Ihr Gerät wird mit folgender
voreingestellter PIN ausgeliefert: 1 1 2 2 3 3 4 4

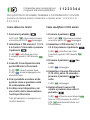
1. Premere il pulsante
tutti i LED s’illuminano insieme
una volta, poi il LED lampeggia.
2. Immettere il PIN utente (1 1 2 2 3
3 4 4) entro 10 secondi e premere
il pulsante
Il LED resta sso per circa
2 secondi, quindi il LED diventa
sso.
3. Connetti il tuo dispositivo alla
porta USB entro 30 secondi.
Il LED rimarrà acceso sso,
Il LED prima lampeggerà, poi
diventerà sso.
4. Ora è possibile accedere al dis-
positivo come a qualsiasi unità
di archiviazione USB.
5. Per bloccare il dispositivo, sal-
vare tutti i dati e disconnettere
l’unità per bloccarla.
Tutti gli indicatori si spengono; ora
l’unità è bloccata.
1. Premere il pulsante
tutti i LED s’illuminano insieme
una volta, poi il LED lampeggia.
2. Immettere il PIN utente (1 1 2 2
3 3 4 4) e premere il pulsante
Il LED resta sso per circa
2 secondi, quindi il LED diventa
sso.
3. Premere il pulsante due
volte.
Il LED lampeggia.
4. Immettere il nuovo PIN utente
(7-15 cifre) entro 10 secondi e
premere il pulsante due
volte.
Il LED lampeggia.
5. Reimmettere il nuovo PIN
utente e premere due volte il
pulsante
Il LED s’illumina e poi diventa
sso se il PIN immesso è esatto. Il
LED sarà illuminato sso se il
PIN immesso.
Come sbloccare l’unità Come modicare il PIN utente
PER QUESTIONI DI SICUREZZA, CAMBIARE IL PIN PREDEFINITO! I PIN NON
possono contenere numeri consecutivi o ripetuti, ad es. 1 2 3 4 5 6 7 or
3 3 3 3 3 3 3
Il dispositivo viene consegnato con
il seguente PIN utente predenito: 1 1 2 2 3 3 4 4

1. Appuyer sur le bouton
Toutes les LED s’allumeront
simultanément une fois, puis la
LED clignotera.
2. Dans les 10 secondes, saisir le
code PIN utilisateur (1 1 2 2 3 3 4
4) et appuyer sur le bouton
La LED restera xe pendant
environ 2 secondes, puis la LED
sera continue.
3. Connecter votre périphérique au
port USB dans les 30 secondes.
La LED restera xe, La LED
clignotera puis deviendra xe.
4. Vous pouvez maintenant
accéder à votre périphérique
comme tout autre périphérique
de stockage USB. Pour verrouill-
er le périphérique, sauvegarder
vos données, déconnectez-le.
Tous les indicateurs s’éteindront et
votre clé est maintenant verrouillée.
1. Appuyer sur le bouton
Toutes les LED s’allumeront
simultanément une fois, puis la LED
clignotera.
2. Saisir le code PIN utilisateur (1 1 2 2
3 3 4 4) et appuyer sur le bouton
La LED restera xe pendant envi-
ron 2 secondes, puis la LED
sera continue.
3. Appuyer sur le bouton
deux fois.
La LED clignotera.
4. Dans les 10 secondes, saisir le nou-
veau code PIN utilisateur (7 à 15
chires) et appuyer sur le bouton
deux fois.
La LED clignotera.
5. Ressaisir le nouveau code PIN
utilisateur et appuyer sur le bouton
deux fois.
La LED s’allumera et deviendra
xe si les saisies du code PIN correspond-
ent. La LED restera xe si les saisies
du code PIN ne correspondent pas.
Comment déverrouiller le
périphérique
Comment modier le code
PIN utilisateur
Pour des raisons de sécurité, veuillez changer le code PIN par défaut!
Le code PIN ne peut PAS contenir des nombres répétitifs ou consécutifs,
tels que: 1 2 3 4 5 6 7 or 3 3 3 3 3 3 3
Votre périphérique est livré avec le
code PIN utilisateur par défaut suivant: 1 1 2 2 3 3 4 4

1. Pulse el botón
todos los ledes parpadearán
simultáneamente una vez y a contin-
uación, el led parpadeará.
2. Durante los próximos 10 segun-
dos, introduzca el PIN de usuario
(1 1 2 2 3 3 4 4) y pulse el
botón
El led se mantendrá jo aproxi-
madamente 2 segundos y, después,
cambiará al led jo.
3. Conecte su dispositivo al puerto
USB durante los próximos 30
segundos.
El led se mantendrá jo, El
led azul parpadeará hasta
mantenerse jo.
4. Ahora puede accederse al dispos-
itivo como cualquier otro disposi-
tivo de almacenamiento USB.
5. Para bloquear el dispositivo,
guarde todos los datos y de-
sconéctelo.
Todos los indicadores se apagarán.La
unidad está ahora bloqueada.
1. Pulse el botón
todos los ledes parpadearán
simultáneamente una vez y a con-
tinuación, el led parpadeará.
2. Introduzca el PIN de usuario (1
1 2 2 3 3 4 4) y pulse el botón
El led se mantendrá jo aproxi-
madamente 2 segundos y, después,
cambiará al led jo.
3. Pulse el botón dos veces.
El led parpadeará.
4. Durante los próximos 10 segun-
dos, introduzca el Nuevo PIN
de usuario (de 7 a 15 dígitos) y
pulse el botón dos veces.
El led parpadeará.
5. Vuelva a introducir el PIN de
usuario y presione el botón
dos veces.
El led se iluminará y, después,
cambiará al led jo si los PIN
introducidos coinciden con el. El
led se mantendrá jo si los PIN
non coinciden.
Cómo desbloquear la unidad Cómo cambiar el PIN de usuario
PARA MAYOR SEGURIDAD, CAMBIE EL PIN PREDETERMINADO! El PIN NO
puede contener números consecutivos o repetidos, p. ej. 1 2 3 4 5 6 7 or
3 3 3 3 3 3 3
Su dispositivo se envía con el siguiente
PIN de usuario por defecto: 1 1 2 2 3 3 4 4

1. Tryck på knappen
alla LED-lampor blinkar sam-
tidigt en gång och därefter blinkar
LED-lampan .
2. Inom 10 sekunder, ange Använ-
dar-PIN-koden (fabriksinställda
PIN-koden är: 1 1 2 2 3 3 4 4) och
tryck på knappen .
LED-lampan lyser med fast
sken i ca 2 sekunder och ändras
därefter till fast sken .
3. Anslut din enhet i en USB-port
inom 30 sekunder.
LED-lampan lyser med fast
sken, LED-lampan imrar och
lyser därefter med fast sken.
4. Enheten kan nu nås som alla
andra USB-enheter.
5. För att låsa enheten, spara alla
data och mata ut enheten på ett
säkert sätt.
Alla indikatorer släcks och enheten
är låst.
1. Tryck på knappen
alla LED-lampor blinkar samti-
digt och därefter blinkar LED-lam-
pan .
2. Ange Användar-PIN (fabriksin-
ställda PIN-koden: 1 1 2 2 3 3 4 4)
och tryck på knappen .
LED-lampan lyser med fast
sken i ca 2 sekunder och därefter
ändras det till fast sken .
3. Tryck två gånger på knappen
LED-lampan blinkar.
4. Inom 10 sekunder, ange ny Använ-
dar-PIN (7-15 siror) och tryck på
knappen två gånger.
LED-lampan blinkar.
5. Ange ny Användar-PIN igen och
tryck på knappen två
gånger.
LED-lampan tänds och ändras
därefter till fast sken om
PIN-inmatningarna matchar.
LED-lampan lyser med fast
sken om PIN-inmatningarna inte
matchar.
Hur man låser upp enheten Hur man ändrar Användar-PIN-kod
AV SÄKERHETS SKÄL, ÄNDRA DEN FABRIKSINSTÄLLDA PIN-KODEN!
PIN-koden får INTE innehålla siror i nummerföljd eller upprepade
siror, t.ex. 1 2 3 4 5 6 7 eller 3 3 3 3 3 3 3
Enheten levereras med följande
fabriksinställda Användar-PIN: 1 1 2 2 3 3 4 4
-
 1
1
-
 2
2
-
 3
3
-
 4
4
-
 5
5
-
 6
6
-
 7
7


iStorage Datashur Personal2 Snabbstartsguide
- Typ
- Snabbstartsguide
- Denna manual är också lämplig för
på andra språk
Relaterade papper
Andra dokument
-
Motorola CLP446 Referens guide
-
Behringer B115W Snabbstartsguide
-
Ebode BTS30 Användarmanual
-
Victron energy SmartSolar charge controller MPPT 150/70 to 150/100 & 250/70 to 250/100 VE.Can Bruksanvisning
-
Jabra JAB50043 Användarmanual
-
Audio Pro Addon T12 Bruksanvisning
-