
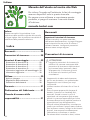
-Please read this assembly manual carefully prior to assembling this product.
- Lesen Sie sich vor der Montage des Produkts diese Montageanleitung sorgfältig durch.
- Veuillez lire attentivement le présent manuel d’assemblage avant de monter ce produit.
- Lees deze montagehandleiding zorgvuldig voordat u dit product in elkaar gaat zetten.
- Leggere attentamente questo manuale di montaggio prima di montare il prodotto.
- Antes de montar este producto, lea atentamente este manual de montaje.
- Läs den här monteringshandboken noggrant före användning av den här produkten.
- Lue tämä asennusohje huolellisesti ennen tämän tuotteen asennusta.
Attention, Achtung, Attention, Attentie, Attenzione, Atención, Giv akt, Huomio
Assembly manual
Montageanleitung
Manuel d’assemblage
Montagehandleiding
Manuale di montaggio
Manual de montaje
Monteringshandbok
Asennusohje
GET YOUR
COMPLETE
USER MANUAL
ONLINE
http://manuals.tunturi.com
WWW
IMPORTANT
FEEL BETTER EVERY DAY
www.tunturi.com
GB
DE
FR
NL
IT
ES
SV
SU
12 - 16
17 - 19
20 - 23
24 - 27
28 - 31
32 - 35
36 - 39
40 - 43
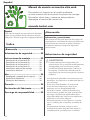
GB The console for this bike is optional
and can be purchased as an
additional part, but is not required.
DE Die Konsole für diesen Trainer ist
optional und kann als Zusatzteil
erworben werden, ist aber nicht
erforderlich.
FR La console pour ce vélo est
optionnelle et peut être achetée en
tant que pièce supplémentaire, mais
n’est pas requise.
NL De console voor deze fietstrainer
is optioneel, en kan als accessoire
worden aangekocht
IT La console per questa bici è
opzionale e può essere acquistata
come parte aggiuntiva, ma non è
necessaria.
ES La consola es opcional para esta
bici, se puede comprar como
elemento adicional, pero no es
necesaria.
SV Kontrollpanelen för denna cykel är
valfri och kan köpas som en extradel,
men är inte nödvändig.
SU Tämän pyörän konsoli on lisävaruste
ja se voidaan ostaa erikseen, mutta
se ei ole välttämätön.
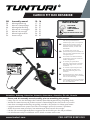
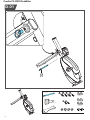
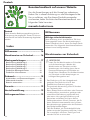
CARDIO FIT D20 DESKBIKE


3
Cardio Fit D20 Deskbike
A

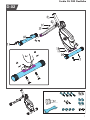
4
Cardio Fit D20 Deskbike
i
B

5
Cardio Fit D20 Deskbike
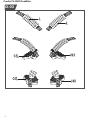
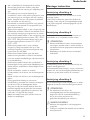
# 9 Quick release knob
M8x60
#11 Carriage bolt
#12 Carriage bolt
M8x50
#13 Flat washer
φ8.3xφ25x2.0t
#15 Curved washer
φ8.3xφ22x1.5t
#16 Domed nut
M8 M8
#17 Nylon nut
#72 Allen wrench
#10 Lock pin
100 cm
100 cm
100 cm
100 cm
C
D

6
Cardio Fit D20 Deskbike
# 9 Quick release knob
M8x60
#11 Carriage bolt
#12 Carriage bolt
M8x50
#13 Flat washer
φ8.3xφ25x2.0t
#15 Curved washer
φ8.3xφ22x1.5t
#16 Domed nut
M8 M8
#17 Nylon nut
#72 Allen wrench
#10 Lock pin
D-01

7
Cardio Fit D20 Deskbike
# 9 Quick release knob
M8x60
#11 Carriage bolt
#12 Carriage bolt
M8x50
#13 Flat washer
φ8.3xφ25x2.0t
#15 Curved washer
φ8.3xφ22x1.5t
#16 Domed nut
M8 M8
#17 Nylon nut
#72 Allen wrench
D-02

8
Cardio Fit D20 Deskbike
D-03

9
Cardio Fit D20 Deskbike
# 9 Quick release knob
M8x60
#11 Carriage bolt
#12 Carriage bolt
M8x50
#13 Flat washer
φ8.3xφ25x2.0t
#15 Curved washer
φ8.3xφ22x1.5t
#16 Domed nut
M8 M8
#17 Nylon nut
#72 Allen wrench
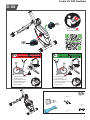
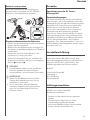
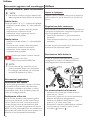
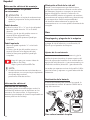
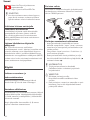
LLeft hand crank
Make sure to use Left hand pedal
L
Fit the left hand pedal into
the left hand crank.
Firstly turn the pedal axle in
counter-clockwise direction by hand.
Use the wrench to fully
tightnen the pedal.
1.
2.
3.
Scan to see
YouTube tutorial
RRight hand crank
Make sure to use Right hand pedal
R
Fit the right hand pedal into
the right hand crank.
Firstly turn the pedal axle in
clockwise direction by hand.
Use the wrench to fully
tightnen the pedal.
1.
2.
3.
D-04

10
Cardio Fit D20 Deskbike
# 9 Quick release knob
M8x60
#11 Carriage bolt
#12 Carriage bolt
M8x50
#13 Flat washer
φ8.3xφ25x2.0t
#15 Curved washer
φ8.3xφ22x1.5t
#16 Domed nut
M8 M8
#17 Nylon nut
#72 Allen wrench
Preassembled
Vormontiert
Pré assemblé
Voorgemonteerd
Pre-assemblato
Pre ensamblado
Förmonterad
Esikoottu
D-05

11
Cardio Fit D20 Deskbike
# 9 Quick release knob
M8x60
#11 Carriage bolt
#12 Carriage bolt
M8x50
#13 Flat washer
φ8.3xφ25x2.0t
#15 Curved washer
φ8.3xφ22x1.5t
#16 Domed nut
M8 M8
#17 Nylon nut
#72 Allen wrench
D-06

12
USER MANUAL ON OUR WEBSITE
To reduce the impact on the environment,
you will only find the assembly steps in this manual.
To learn how to use and maintain this product,
please download the user manual from:
English
manuals.tunturi.com
Welcome
Important Safety Instructions
This manual is an essential part of your training
equipment please read all instructions in this
manual before you start using this equipment. The
following precautions must always be followed:
Index
Welcome ����������������������������������������� 12
Safety warnings ������������������������������ 12
Assembly instructions ��������������������� 13
Description illustration A ������������������������������13
Description illustration B ������������������������������13
Description illustration C ������������������������������13
Description illustration D ������������������������������13
Additional assembly information �����������������13
Additional information ���������������������������������14
Use�������������������������������������������������� 14
Unfolding and folding� ���������������������������������14
Adjusting resistance �������������������������������������14
Replacing the battery �����������������������������������14
Warranty ����������������������������������������� 15
Declaration of the manufacturer ���� 15
Disclaimer ��������������������������������������� 15
Safety warnings
⚠ WARNING
• Read the safety warnings and the
instructions. Failure to follow the safety
warnings and the instructions can cause
personal injury or damage to the equipment.
Keep the safety warnings and the instructions
for future reference.
- The equipment is suitable for domestic
use only. The equipment is not suitable for
commercial use.
- Max. usage is limited to 2 hrs a day.
- The use of this equipment by children or
persons with a physical, sensory, mental
or motorial disability, or lack of experience
and knowledge can give cause to hazards.
Persons responsible for their safety must give
explicit instructions or supervise the use of the
equipment.
- Before starting your workout, consult a
physician to check your health.
- If you experience nausea, dizziness or other
abnormal symptoms, immediately stop your
workout and consult a physician.
- To avoid muscular pain and strain, start each
workout by warming up and finish each workout
by cooling down. Remember to stretch at the
end of the workout.
- The equipment is suitable for indoor use only.
The equipment is not suitable for outdoor use.
- Only use the equipment in environments
with adequate ventilation. Do not use the
equipment in draughty environments in order
not to catch a cold.

13
English
- Only use the equipment in environments with
ambient temperatures between 10°C~35°C /
59°F~95°F.
Only store the equipment in environments with
ambient temperatures between 5°C~45°C /
41°F~113°F.
- Do not use or store the equipment in humid
surroundings. The air humidity must never be
more than 80%.
- Only use the equipment for its intended
purpose. Do not use the equipment for other
purposes than described in the manual.
- Do not use the equipment if any part is
damaged or defective. If a part is damaged or
defective, contact your dealer.
- Keep your hands, feet and other body parts
away from the moving parts.
- Keep your hair away from the moving parts.
- Wear appropriate clothing and shoes.
- Keep clothing, jewellery and other objects away
from the moving parts.
- Make sure that only one person uses the
equipment at a Time. The equipment must not
be used by persons weighing more than 110 kg
(242 lbs).
- Do not open equipment without consulting
your dealer.
Assembly instructions
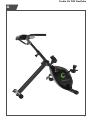
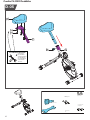
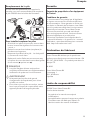
Description illustration A
The illustration shows what the trainer will looks
like after the assembly is completed.
You can use this as a reference during your
assembly, but do follow the assembly steps
always in the correct sequence as showed in the
illustrations.
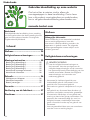
Description illustration B
The illustration shows what components and parts
you should find when un-boxing your product.
‼ NOTE
• Small parts can be hidden/ packed in hollow
spaces in the Styrofoam product protection
• If a part is missing, contact your dealer.
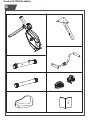
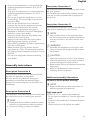
Description illustration C
The illustration shows the hardware kit that comes
with your product.
The hardware kit contains bolts, washers, screws
, nuts etc. and the required tools to properly fit
your trainer.
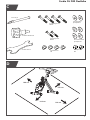
Description illustration D
The illustrations shows you in the correct following
order how to assembly your trainer best.
‼ NOTE
• Part numbers shown in the assembly steps
are commencing with the spare part drawing
that can be found in the online version user
manual.
⚠ WARNING
• Assemble the equipment in the given order.
• Carry and move the equipment with at least
two persons.
⚠ CAUTION
• Place the equipment on a firm, level surface.
• Place the equipment on a protective base to
prevent damage to the floor surface.
• Allow at least 100 cm of clearance around the
equipment.
• Refer to the illustrations for the correct
assembly of the equipment.
Additional assembly information
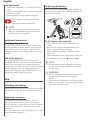
D4 How to fit the pedals correctly�
‼ NOTE
• Right and left side are determined from an
exercising positions perspective.
Right hand pedal
Find the “R” or “L” mark on the pedal axle
- Fit the right hand pedal “R” into the right hand
crank.
- Firstly turn the pedal axle in clockwise direction
by hand.
- Use the wrench to fully tighten the pedal.

14
English
Left hand pedal
- Fit the left hand pedal “L” into the left hand
crank.
- Firstly turn the pedal axle in counter-clockwise
direction by hand.
- Use the wrench to fully tighten the pedal.
Click to see our supportive YouTube
video
https://youtu.be/Devel2ZhCAc
‼ NOTE
• Save the tools provided with this product,
after you completed the product assemly,
for future service purposses.
Additional information
Packaging disposal
Government guidelines ask that we reduce the
amount of waste material disposed of in land fill
sites. We therefore ask that you dispose of all
packaging waste responsibly at public recycling
centres.
End of life disposal
We at Tunturi hope you enjoy many years of
enjoyable use from your fitness trainer. However,
a time will come when your fitness trainer will
come to the end of its useful life. Under ‘European
WEEE Legislation you are responsible for the
appropriate disposal of your fitness trainer to a
recognised public collection facility.
Use
Unfolding and folding�
Please pull out the lock pin from the joint and fold
the aluminium rail, then securing by the lock pin.
Adjusting resistance
To increase or decrease resistance, turn the
adjustment knob at front of the rowing frame
cover clockwise (+ direction) to increase resistance
and Counterclockwise (- direction) to decrease
resistance.
The scale above the knob (1-8) helps you find and
reset a suitable resistance.
Replacing the battery
When you have troubles pairing the console we
recommend to replace the CR2032 battery in the
transmitter housing.
OFF
CR2032 x1
ON
O
P
E
N
C
L
O
S
E
O
P
E
N
C
L
O
S
E
To fit/ Replace the batteries
- Use a coin to twist it counter-clockwise to
“open”.
- Remove the cover and insert (replace) the
battery into the battery housing.
Note the battery polarity: Positive (+) side
facing up.
- Place the battery cover, use a coin to twist the
cover clockwise to close ( points to ).
‼ NOTE
• Empty batteries should always be recycled
per your Local legal regulations to save the
environment.
⚠ WARNING
• Do not expose batteries to big temperature
changes to prevent the batteries from
leaking.
• To prevent your batteries from leaking, take
them out if you plan on not using your device
for longer periods of time.

15
English
Warranty
Tunturi purchaser‘s warranty
Warranty terms
The consumer is entitled to the applicable legal
rights stated in the national legislation concerning
the commerce of consumer goods. This warranty
does not restrict these rights. The Purchaser’s
Warranty is only valid if the item is used in an
environment approved by Tunturi New Fitness BV,
and is maintained as instructed for that particular
equipment. The product-specific approved
environment and maintenance instructions are
stated in the “user manual” of the product. The
“user manual” can be downloaded from our
website. http://manuals.tunturi.com
Declaration of the manufacturer
Tunturi New Fitness BV declares that the product
is in conformity with the following standards
and directives: EN 957 (HC), 2014/30/EU . The
product therefore carries the CE label.
04-2020
Tunturi New Fitness BV
Purmerweg 1
1311 XE Almere
The Netherlands
Disclaimer
© 2020 Tunturi New Fitness BV
All rights reserved.
- The product and the manual are subject to
change.
- Specifications can be changed without further
notice.
- Check our website for the latest user manual
version.

16
Deutsch
Deutsch
Diese deutsche Bedienungsanleitung ist eine
Übersetzung des englischen Textes. Es können
keine Rechte auf diese Übersetzung abgeleitet
werden.
Index
Benutzerhandbuch auf unserer Website
Um die Auswirkungen auf die Umwelt zu reduzieren,
finden Sie in dieser Anleitung nur die Montageschritte.
Um zu erfahren, wie Sie dieses Produkt verwenden
und warten,laden Sie bitte das Benutzerhandbuch von
folgender Seite herunter:
manuals.tunturi.com
Willkommen
Wichtige sicherheitshinweise
Diese Anleitung ist ein unerlässlicher Teil Ihres
Trainingsgeräts: Lesen Sie alle Anweisungen in
diesem Handbuch durch, bevor Sie dieses Gerät
verwenden. Die folgenden Vorsichtsmaßnahmen
müssen immer befolgt werden.
Warnhinweise zur Sicherheit
⚠ WARNUNG
• Lesen Sie die Warnhinweise zur Sicherheit
und die Anweisungen. Werden die
Warnhinweise zur Sicherheit und die
Anweisungen nicht befolgt, kann dies zu
Personenverletzungen und Schäden am
Gerät führen. Bewahren Sie die Warnhinweise
zur Sicherheit und die Anweisungen zur
künftigen Bezugnahme auf.
- Das Gerät ist nur für den Hausgebrauch
geeignet. Das Gerät ist nicht für den
gewerblichen Gebrauch geeignet.
- Die maximale Verwendung ist auf 2 Stunden
pro Tag beschränkt
- Wenn dieses Gerät von Kindern oder Personen
mit körperlicher, sensorischer, geistiger oder
motorischer Behinderung verwendet wird,
oder wenn nicht genügend Erfahrung und
Kenntnisse vorhanden sind, kann dies zu
Gefahrensituationen führen. Personen, die für
deren Sicherheit verantwortlich sind, müssen
klare Anweisungen geben oder den Gebrauch
des Geräts beaufsichtigen.
- Falls Sie Übelkeit, ein Schwindelgefühl oder
andere anormale Symptome verspüren, hören
Sie unverzüglich mit Ihrem Training auf und
wenden Sie sich an einen Arzt.
Willkommen ������������������������������������ 16
Warnhinweise zur Sicherheit ���������� 16
Montageanleitungen ���������������������� 17
Beschreibung Abbildung A ��������������������������17
Beschreibung Abbildung B ���������������������������17
Beschreibung Abbildung C ��������������������������17
Beschreibung Abbildung D ��������������������������17
Zusätzliche Montagehinweise ���������������������18
Zusätzliche Informationen ����������������������������18
Gebrauch ���������������������������������������� 18
Auseinander- und Zusammenklappen� ��������� 18
Widerstand einstellen �����������������������������������18
Batterie austauschen ������������������������������������19
Garantie ������������������������������������������ 19
Herstellererklärung ������������������������ 19
Haftungsausschluss ������������������������� 19

17
Deutsch
- Um einen Muskelkater zu vermeiden, starten
Sie jedes Training mit Aufwärmen und beenden
Sie es mit Abkühlen. Denken Sie daran, sich am
Ende des Trainings zu dehnen.
- Das Gerät ist nur für den Gebrauch in
geschlossenen Räumen geeignet. Das Gerät ist
nicht für den Gebrauch im Freien geeignet.
- Verwenden Sie das Gerät nur in Umgebungen
mit ausreichender Belüftung. Verwenden Sie
das Gerät nicht in zugiger Umgebung, damit
Sie sich nicht erkälten.
- Verwenden Sie das Gerät nur in Umgebungen
mit Umgebungstemperaturen zwischen
10°C~35°C/ 50°F~95°F. Lagern Sie das
Gerät nur in Umgebungen mit einer
Umgebungstemperatur zwischen 5°C~45°C/
41°F~113°F.
- Verwenden und lagern Sie das Gerät nicht in
feuchten Umgebungen. Die Luftfeuchtigkeit
darf niemals 80% überschreiten.
- Verwenden Sie das Gerät nur
bestimmungsgemäß. Verwenden Sie das Gerät
nicht für einen anderen als für den in diesem
Handbuch beschriebenen Zweck.
- Verwenden Sie das Gerät nicht, falls Teile
beschädigt oder defekt sind. Ist ein Teil
beschädigt oder defekt, wenden Sie sich an
Ihren Händler.
- Halten Sie Ihre Hände, Füße und andere
Körperteile von den beweglichen Teilen fern.
- Halten Sie Ihr Haar von den beweglichen Teilen
fern.
- Tragen Sie entsprechende Kleidung und
Schuhe.
- Halten Sie Kleidung, Schmuck und andere
Gegenstände von den beweglichen Teilen fern.
- Vergewissern Sie sich, dass das Gerät nur
von einer Person auf einmal verwendet wird.
Das Gerät darf nicht von Personen verwendet
werden, deren Gewicht 110 kg (242 lbs)
überschreitet.
- Öffnen Sie das Gerät nicht, ohne vorher mit
Ihrem Händler zu sprechen.
Montageanleitungen
Beschreibung Abbildung A
Die Abbildung zeigt, wie das Gerät nach der
Montage aussehen wird.
Sie können diese bei der Montage als Referenz
verwenden, befolgen Sie die Montageschritte
aber immer in der richtigen Reihenfolge, wie in
den Abbildungen gezeigt.
Beschreibung Abbildung B
Die Abbildung zeigt, welche Komponenten und
Teile in der Lieferung enthalten sein sollen.
‼ HINWEIS
• Kleinteile können in Hohlräumen im Styropor-
Produktschutz versteckt/verpackt werden
• Fehlt ein Teil, wenden Sie sich an Ihren
Händler.
Beschreibung Abbildung C
Die Abbildung zeigt den Zubehörsatz, der mit
Ihrem Produkt geliefert wird.
Er enthält Schrauben, Unterlegscheiben, Muttern
usw. sowie die erforderlichen Werkzeuge zur
ordnungsgemäßen Montage Ihres Trainers.
Beschreibung Abbildung D
Die Abbildungen zeigen Ihnen in der richtigen
Reihenfolge, wie Sie Ihren Trainer am besten
montieren.
‼ HINWEIS
• Die in den Montageschritten angegebenen
Teilenummern beginnen mit der
Ersatzteilzeichnung, die Sie in der Online-
Version des Benutzerhandbuchs finden.
⚠ WARNUNG
• Bauen Sie das Gerät in der angegebenen
Reihenfolge zusammen.
• Tragen und bewegen Sie das Gerät mit
mindestens zwei Personen.

18
Deutsch
⚠ VORSICHT
• Stellen Sie das Gerät auf festen, ebenen
Boden.
• Stellen Sie das Gerät auf eine schützende
Unterlage, um Schäden am Bodenbelag zu
vermeiden.
• Sorgen Sie rund um das Gerät für einen
Freiraum von mindestens 100 cm.
• Der richtige Zusammenbau des Geräts geht
aus den Abbildungen hervor.
Zusätzliche Montagehinweise
D4 Pedale korrekt einsetzen
‼ HINWEIS
• Rechte und linke Seite werden aus der
Perspektive der Übungspositionen definiert.
Rechtes Handpedal
Suchen Sie die Markierung “R” oder “L” auf der
Pedalachse
- Stecken Sie das rechte Handpedal “R” in die
rechte Handkurbel.
- Drehen Sie zunächst die Pedalachse von Hand
im Uhrzeigersinn.
- Verwenden Sie den Schraubenschlüssel, um das
Pedal vollständig festzuziehen.
Linkes Handpedal
- Stecken Sie das linke Pedal “L” in die linke
Handkurbel.
- Drehen Sie zunächst die Pedalachse von Hand
gegen den Uhrzeigersinn.
- Verwenden Sie den Schraubenschlüssel, um das
Pedal vollständig festzuziehen.
Klicken Sie hier, um unser
unterstützendes YouTube-Video zu
sehen. https://youtu.be/Devel2ZhCAc
‼ HINWEIS
• Heben Sie die Werkzeuge für künftige
Zwecke auf, die zu diesem Produkt geliefert
wurden, wenn Sie die Montage beendet
haben.
Zusätzliche Informationen
Verpackungsentsorgung
Staatliche Vorschriften sagen, dass wir die in
Deponien entsorgen Abfallmengen verringern
sollen. Daher bitten wir Sie, den gesamten
Verpackungsabfall an öffentlichen Recyclingstellen
abzugeben
Entsorgung am ende der Lebensdauer
Wir bei Tunturi hoffen, dass Sie Ihren
Fitnesstrainer viele Jahre mit Freude nutzen
werden. Jedoch wird irgendwann die Zeit
kommen, wenn die Ende der Nutzungsdauer
des Fitnesstrainers erreicht ist. Gemäß den
europäischen WEEE-Gesetzen sind Sie für eine
geeignete Entsorgung des Fitnesstrainers bei
einer anerkannten öffentlichen Entsorgungsstelle
verantwortlich.
Gebrauch
Auseinander- und Zusammenklappen�
Bitte ziehen Sie den Verriegelungsstift
aus dem Gelenk heraus und falten Sie die
Aluminiumschiene, dann sichern Sie den
Verriegelungsstift.
Widerstand einstellen
Zum erhöhen oder verringern des Widerstands.
Drehen Sie den WiderstandsTaste am Lenker
in der + (Uhrzeigersinn) oder – (gegen den
Uhrzeigersinn) Die Verteilung (1-8) hilft mit dem
Suchen der richtigen Einstellung.

19
Deutsch
Batterie austauschen
Wenn Sie Probleme mit der Kopplung der
Konsole haben, empfehlen wir, die CR2032-
Batterie im Sendergehäuse zu ersetzen.
OFF
CR2032 x1
ON
O
P
E
N
C
L
O
S
E
O
P
E
N
C
L
O
S
E
Einsetzen/Austauschen der Batterien
- Öffnen Sie die Abdeckung mithilfe einer Münze
(gegen den Uhrzeigersinn).
- Nehmen Sie die Abdeckung ab und legen Sie
die Batterie in das Batteriegehäuse ein (Batterie
austauschen).
Achten Sie auf die Pole der Batterie: Der
positive Pol (+) zeigt nach oben.
- Setzen Sie die Abdeckung auf, schließen Sie
diese mit einer Münze, die Sie im Uhrzeigersinn
drehen ( zeigt auf ).
‼ HINWEIS
• Leere Batterien sollten immer gemäß den
örtlichen gesetzlichen Bestimmungen
recycelt werden, um die Umwelt zu schützen.
⚠ WARNUNG
• Setzen Sie die Batterien keinen großen
Temperaturschwankungen aus, um ein
Auslaufen zu verhindern.
• Um zu verhindern, dass die Batterien
auslaufen, sollten Sie sie herausnehmen,
wenn Sie Ihr Gerät längere Zeit nicht
benutzen wollen.
Garantie
Eigentümer-garantie für Tunturi
fitnessgeräte�
Garantiebedingungen
Der Käufer hat Anspruch auf die anwendbaren
Bestimmungen, die in der jeweiligen nationalen
Gesetzgebung für den Handel mit Konsumgütern
festgelegt sind. Diese Garantie schränkt diese
Rechte nicht ein. Die Garantie des Käufers
gilt nur, wenn der Artikel in einer Umgebung
verwendet und nach Anweisung gewartet
wird, die von Tunturi New Fitness BV für dieses
Gerät genehmigt wurde. Die produktspezifisch
zugelassene Umgebung und Wartungshinweise
sind im “Benutzerhandbuch” des Produkts
angegeben. Das “Benutzerhandbuch” kann von
unserer Website heruntergeladen werden. http://
manuals.tunturi.com
Herstellererklärung
Tunturi New Fitness BV erklärt hiermit, dass
das Produkt folgenden Normen und Richtlinien
entspricht: EN 957 (HC), 2014/30/EU . Das
Produkt trägt daher das CE-Kennzeichen.
04-2020
Tunturi New Fitness BV
Purmerweg 1
1311 XE Almere
Die Niederlande
Haftungsausschluss
© 2020 Tunturi New Fitness BV
Alle Rechte vorbehalten.
- Produkt und Handbuch können geändert
werden.
- Die technischen Daten können ohne
Vorankündigung geändert werden.
- Auf unserer Website finden Sie die neueste
Version des Benutzerhandbuchs.

20
Français
Français
Ce manuel français est une traduction de la
version anglaise. Notez que la version anglaise est
en tête dans le contenu lorsque des différences
sont trouvées.
Indice
Manuel de l’utilisateur sur notre site web
Afin de réduire l’impact sur l’environnement, vous ne
trouverez que les différentes étapes d’assemblage dans
ce manuel. Si vous souhaitez apprendre comment utiliser
et entretenir ce produit, veuillez télécharger le manuel
d’utilisation depuis :
manuals.tunturi.com
Bienvenue
Consignes de sécurité importantes
Ce Manuel est un élément essentiel de votre
équipement d’entraînement : veuillez lire toutes
les instructions qu’il contient avant de commencer
à utiliser cet équipement. Les consignes suivantes
doivent toujours être respectées :
Avertissements de sécurité
⚠ AVERTISSEMENT
• Lisez les avertissements de sécurité
et les instructions. Le non respect des
avertissements de sécurité et des instructions
est une source de blessure et de dégâts de
l’équipement. Conservez les avertissements
de sécurité et les instructions pour référence
ultérieure.
- L’équipement est uniquement adapté à un
usage domestique. L’équipement ne convient
pas à un usage commercial.
- La durée d’utilisation maximum est limitée à 2
heures par jour..
- L’emploi de cet équipement par des enfants ou
des personnes affectés d’un handicap physique,
sensoriel, mental ou moteur, voire dont
l’expérience ou les connaissances s’avèrent
insuffisantes est une source de risques. Les
personnes chargées de leur sécurité doivent
leur fournir des instructions explicites ou
superviser leur usage de l’équipement.
- Avant de commencer vos exercices, effectuez
un bilan de santé auprès d’un médecin.
- Si vous êtes pris de nausées ou de vertiges ou
sentez d’autres symptômes normaux pendant
l’entraînement, interrompez immédiatement la
session et consultez votre médecin.
Bienvenue ��������������������������������������� 20
Avertissements de sécurité ������������ 20
Instructions de montage ����������������� 21
Illustration de description A �������������������������21
Illustration de description B �������������������������21
Illustration de description C �������������������������21
Illustration de description D �������������������������21
Informations complémentaires de montage
����������������������������������������������������������������������22
Informations supplémentaires ����������������������22
Usage ���������������������������������������������� 22
Déplier et plier l’équipement �����������������������22
Régler la résistance ��������������������������������������22
Remplacement de la pile ������������������������������23
Garantie ������������������������������������������ 23
Déclaration du fabricant ����������������� 23
Limite de responsabilité ����������������� 23
Sidan laddas ...
Sidan laddas ...
Sidan laddas ...
Sidan laddas ...
Sidan laddas ...
Sidan laddas ...
Sidan laddas ...
Sidan laddas ...
Sidan laddas ...
Sidan laddas ...
Sidan laddas ...
Sidan laddas ...
Sidan laddas ...
Sidan laddas ...
Sidan laddas ...
Sidan laddas ...
Sidan laddas ...
Sidan laddas ...
Sidan laddas ...
Sidan laddas ...
Sidan laddas ...
Sidan laddas ...
Sidan laddas ...
Sidan laddas ...
-
 1
1
-
 2
2
-
 3
3
-
 4
4
-
 5
5
-
 6
6
-
 7
7
-
 8
8
-
 9
9
-
 10
10
-
 11
11
-
 12
12
-
 13
13
-
 14
14
-
 15
15
-
 16
16
-
 17
17
-
 18
18
-
 19
19
-
 20
20
-
 21
21
-
 22
22
-
 23
23
-
 24
24
-
 25
25
-
 26
26
-
 27
27
-
 28
28
-
 29
29
-
 30
30
-
 31
31
-
 32
32
-
 33
33
-
 34
34
-
 35
35
-
 36
36
-
 37
37
-
 38
38
-
 39
39
-
 40
40
-
 41
41
-
 42
42
-
 43
43
-
 44
44


på andra språk
- italiano: Tunturi D20
- eesti: Tunturi D20
- español: Tunturi D20
- Deutsch: Tunturi D20
- français: Tunturi D20
- Nederlands: Tunturi D20