POINT 5-SERIES POHO5080INCB KJØKKENVENTILATOR Bruksanvisning
- Kategori
- Fläktar
- Typ
- Bruksanvisning
Denna manual är också lämplig för

POHO5060INCB
POHO5080INCB
User Manual
Cooker Hood

2
GB
NO
FI
DK
SE
Thank you for purchasing your new
Point Cooker Hood.
These operating instructions will help you use it properly and safely. We recommend
that you spend some time reading this instruction manual in order that you fully
understand all the operational features it oers. Read all the safety instructions
carefully before use and keep this instruction manual for future reference.
Takk for at du kjøpte ditt nye Point Avtrekkshette.
Denne bruksanvisningen vil hjelpe deg med å bruke den på en trygg og riktig måte. Vi
anbefaler at du tar deg tid til å lese gjennom hele bruksanvisningen for å bli fortrolig
med alle funksjonene som tilbys. Les alle sikkerhetsanvisningene nøye før bruk, og
oppbevar bruksanvisningen for fremtidig referanse.
Kiitos, kun valitsit uuden Point Liesituulettimen.
Nämä käyttöohjeet opastavat sinua käyttämään laitetta oikein ja turvallisesti.
Suosittelemme, että käytät hetken tämän käyttöoppaan lukemiseen, jotta ymmärrät
täysin, mitä toimintoja laitteessa on. Lue kaikki turvallisuusohjeet huolellisesti ennen
laitteen käyttöä ja säilytä käyttöopas myöhempää käyttöä varten.
Tak for købet af dit nye Emhætte Fra Point.
Disse brugervejledninger hjælper dig med at bruge dette apparat rigtigt og sikkert. Vi
anbefaler, at du læser denne brugervejledning, så du får en fuld forståelse af hvordan
alle funktionerne virker. Læs sikkerhedsforskrifterne grundigt inden brug, og gem
denne brugervejledning til senere brug.
Tack för att du har köpt ditt nya Fläktkåpa Från Point.
Denna bruksanvisning hjälper dig att använda den på ett säkert och korrekt sätt.
Vi rekommenderar att du tar dig tid att läsa igenom denna bruksanvisning för att till
fullo förstå alla driftfunktioner som den erbjuder. Läs noga igenom alla
säkerhetsinstruktioner före användning och spara bruksanvisningen för framtida bruk.

3
NO
DK
SE FI GB
Instruction Manual – English ..........................page 4 - 15
Bruksanvisning – Norsk ...................................side 16 - 27
Käyttöopas - Suomi .........................................sivu 28 - 39
Brugervejledning – Dansk ................................side 40 - 51
Bruksanvisning – Svenska ...............................sida 52 - 63

4
SAFETY PRECAUTIONS
Never let children operate the machine.
The cooker hood is for home use only, unsuitable for barbe-
cue, roast shop and other commercial purposes.
The cooker hood and its filter should be cleaned regularly
in order to keep in good working condition.
Clean the cooker hood according to the instruction manual
and keep the unit from danger of burning. There is a fire
risk if cleaning is not carried out in accordance with the
instructions.
Do not use the cooking hood for direct baking from the gas
cooker.
Ensure that the kitchen room is well-ventilated to promote
proper convection.
If the supply cord is damaged, do not attempt to repair it
yourself. Contact the manufacturer, its service agent, or a
similarly qualified person for replacement and avoid any
potential hazards.
Use the range hood in an area with adequate ventilation
when using other appliances that burn gas or other fuels.
Do not discharge the air into a flue that is used for
exhausting fumes from appliances burning gas or other
fuels.
Comply with regulations for the discharge of air.
This appliance can be used by children aged 8 years and
above and persons with reduced physical, sensory, or
mental capabilities or lack of experience and knowledge if
they have been given proper supervision or instruction on
how to use the appliance safely and understand the haz-
ards involved. Children should be supervised to ensure that
they do not play with the appliance.

Cleaning and user maintenance shall not be done by chil-
dren without supervision.
Do not use an open flame under the range hood.
CAUTION: Accessible parts may become hot when used
with cooking appliances.
Electrical Shock Hazard
Only plug this unit into a properly earthed outlet. If in
doubt, seek advice from a qualified engineer.
Failure to follow these instructions can result in death, fire,
or electrical shock.
5
GB

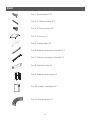
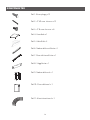
COMPONENTS
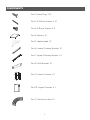
6
Part1: Screw Plug X 12
Part2: 4*30mm Screws X 12
Part3: 4*8mm Screws X 6
Part4: Manual X1
Part5: Cooker Hood X1
Part 6: Lower Chimney Bracket X 1
Part 7: Upper Chimney Bracket X 1
Part 8: Wall Bracket X 1
Part 9: Lower Chimney X 1
Part 10: Upper Chimney X 1
Part 11: Aluminum duct X 1

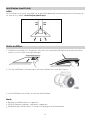
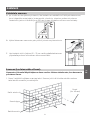
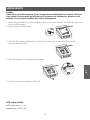
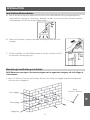
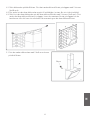
INSTALLATION
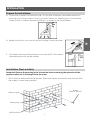
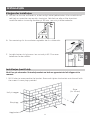
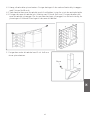
Prepare for installation:
If you have an outlet that leads outside, it is possible to connect your cooker hood to an
extraction duct using materials such as enamel, aluminum, flexible pipe, or inflammable
material with an interior diameter of 150mm, as shown in the picture below.
A.
Before installation, turn the unit o and unplug it from the outlet.
B.
The cooker hood should be placed at a distance of 65~75cm above
the cooking plane for the best eect.
C.
Installation (Vent outside):
Attention! Observe the warning in the instruction sheet concerning the operation of the
appliance when air is discharged from the room.
7
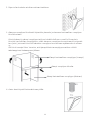
GB
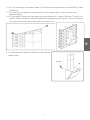
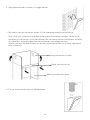
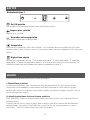
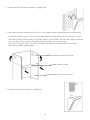
Drill 3 holes to accommodate the bracket. Screw and tighten the bracket onto the wall with
the screws & screw plugs provided.
1.
Holes on wall
Screw plug
Wall bracket
Screw
(4mm x 30mm)

8
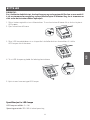
Hang the cooker hood onto the wall bracket hook.
2.
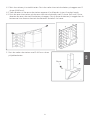
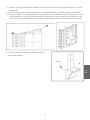
The lower chimney bracket is used to fix the upper and lower decorative chimneys.
Use 2 4x8mm screws to attach the lower and upper chimneys together. Before attaching
the bracket to the chimney, decide the location of the lower chimney bracket fixing holes for
fixing the lower chimney bracket in the later step.
Do not fasten screws too much. Make sure the upper decorative chimney can be telescopi-
cally adjusted after assembly.
3.
Upper decorative chimney (Inner)
Lower Chimney bracket
Lower decorative chimney (Outer)
Place the aluminum duct on the cooker hood.
4.

9
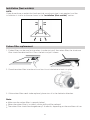
Put the chimney on the cooker hood. Fix the lower chimney bracket on the wall by 2 screws
(4x30mm).
Then pull out the upper chimney upwards to the target height. Adjust to reach the
required height.
Fix the upper chimney on the upper chimney bracket with 2 screws (4x8mm). Then fix the
upper chimney bracket on the wall. Before fixing the bracket on the wall, you can decide on
the upper chimney bracket fixing holes for installation.
4.1.
4.2.
4.3.
Fix the lower chimney with 2 4x8mm screws on the
cooker hood.
5.
Screw
GB

10
Note:
Make sure the carbon filter is securely locked.
When the carbon filter is installed, suction ability will be reduced.
The carbon filter should be changed every 2-4 months, depending on the conditions of use.
Installation (Vent outside):
NOTE:
If you do not have an outlet that leads outside, an exhaust pipe is not required, and the
installation is similar to the one shown in the “Installation (Vent outside)” section.
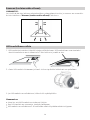
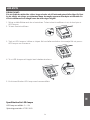
Carbon filter replacement
Carbon filters can be used to trap odors. In order to install the carbon filter, the aluminum
filter should be detached first. Press the lock and pull it down.
1.
Place the carbon filter into the unit and turn it anti-clockwise to lock it in place.
2.
CLOSE
If the carbon filter needs to be replaced, please turn it in the clockwise direction.
3.

11
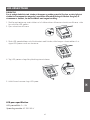
LED REPLACEMENT
Turn o the hood and unplug the power outlet. Detach the aluminum filters in order for you
to replace the LED bulb.
Remove the aluminum filters.
1.
2.
LED light specification
LED light power: 2 x 1W
Voltage range: AC220-240V
GB
CAUTION:
To prevent electric shock, injury to the body, and even potential risks to life, it is essential
to shut down the power before cleaning, repairing, or replacing any accessories. Please
ensure that the power is switched o before proceeding with any operation.
Push the LED lamp holder from the cabinet by hand, or use a screwdriver to prize the LED
lamp around the edges.
3.
Take out the LED light and disconnect the wire terminals.
4.
Replace with the same power LED light.
5.

12
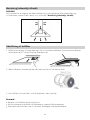
OPERATION
On/O button
It’s used for turning on/o the fan.
Speed plus button
For increasing the speed of the fan.
Speed decrease button
For decreasing the speed of the fan.
Light button
Press once to turn on the LED light to level 1. Press for the second time to turn on the LED
light to level 2, increasing brightness; Press for the third time to turn o the LED light.
Digital display
Fan speed display: "1" for Low speed, "2" for Medium speed, "3" for High speed, "4" for Boost
speed. After running for 10 minutes, it will automatically reduce to the "3" High speed.
MAINTENANCE
Before cleaning, switch the unit o and pull out the plug.
I. Regular Cleaning
When cleaning the unit, it is recommended to use a soft cloth that has been moistened with
warm soapy water or household cleaning detergent. Avoid using metal pads, chemical
cleaners, abrasive materials, or sti brushes, as these can damage the unit.
II. Monthly Cleaning of Aluminum filter
ESSENTIAL: Clean the aluminum filters every month will help prevent the risk of fire.
The filter collects grease, smoke and dust, so the filter directly aects the cooker hood's
eciency. The grease residue (potential flammable) will saturate on the filter if not cleaned.
Clean it with household cleaning detergent.
III. Carbon Filter
The carbon filter should be changed every 2-4 months, depending on the conditions of use.
Replace more often if your cooking style generates lots of grease, such as stir-frying. These
filters are not washable and cannot be reused. Refer to “Carbon filter replacement” part for
the replacement method.
Touch control 1

13
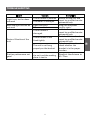
TROBULESHOOTING
GB
Fault
Cause
Solution
Light is on, but fan does
not work
The fan blade is jammed.
Switch o the unit and
repair by qualified service
personnel only.
The motor is damaged.
Both the light and fan do
not work
Light bulb burn.
Plug into the power
supply again.
Power cord is loose.
Serious Vibration of the
unit
The fan blade is
damaged.
Switch o the unit and
repair by qualified service
personnel only.
The fan motor is not
fixed tightly.
Switch o the unit and
repair by qualified service
personnel only.
The unit is not hung
properly on the bracket.
Take down the unit and
check whether the
bracket is in the proper
location.
Suction performance not
good
The distance between
the unit and the cooking
plane is too far
Readjust the distance to
65- 75cm.

14
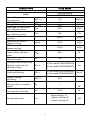
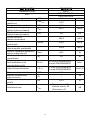
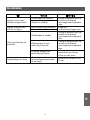
Cooker hood Data sheet
Brand name POINT
Model POHO5060INCB
POHO5080INCB
Annual Energy
Consumption AEC hood
Fluid Dynamic Eciency FDEhood
Energy Eciency Index EEIhood
Measured air flow rate at
best eciency point QBEP
Measured air pressure at
best eciency point PBEP
Maximum air flow at boost
position -
Maximum air flow at
highest setting Qmax
Maximum air flow at
Lowest setting -
Measured electric power
input at best eciency
point
WBEP
Nominal power of the
lighting system WL
Average illumination of the
lighting system on the
cooking surface
Emiddle
Lighting Eciency LEhood
Grease filtering
Efficiency
GFEhood
Measured power
consumption in standby
mode
Ps
Measured power
consumption o mode Po
Sound power level LWA
152 kWh/a
34,9 -
34,5 -
333,1 m3/h
183 Pa
662,9 m3/h
510,0 m3/h
224,8 m3/h
48,5 W
3,8 W
101 for model POHO5060INCB
96 for model POHO5080INCB
lux
27 for model POHO5060INCB
25 for model POHO5080INCB lux/W
61,6 -
/
W
0,35
W
Boost setting: 67
Highest setting: 58
Lowest setting: 42
dB

SPECIFICATION
Model No.: POHO5060INCB, POHO5080INCB
Rated Voltage: AC220-240V 50Hz
Rated motor power: 85W
Lamp power: 2 x 1W
Total power: 87W
This symbol on the product or in the instructions means that your electrical and
electronic equipment should be disposed at the end of its life separately from
your household waste. There are separate collection systems for recycling in the
EU. For more information, please contact the local authority or your retailer where
you purchased the product.
Power International AS,
PO Box 523, N-1471 Lørenskog, Norway
Power Norge:
https://www.power.no/kundeservice/
T: 21 00 40 00
Power Danmark:
https://www.power.dk/kundeservice/
T: 70 33 80 80
Punkt 1 Danmark:
https://www.punkt1.dk/kundeservice/
T: 70 70 17 07
Power Finland:
https://www.power.fi/tuki/asiakaspalvelu/
T: 0305 0305
Power Sverige:
https://www.power.se/kundservice/
T: 08 517 66 000
GB
15

SIKKERHETSTILTAK
La aldri barn betjene maskinen.
Kjøkkenhetten er kun til hjemmebruk. Den er uegnet for
grill, gatekjøkken og andre kommersielle formål.
Kjøkkenhetten og filteret bør rengjøres regelmessig for å
holde seg i god stand.
Rengjør kjøkkenhetten i henhold til bruksanvisningen og
hold enheten vekke fra steder det er fare for brann. Det
utgjør en brannrisiko hvis rengjøring ikke utføres i samsvar
med instruksjonene.
Ikke bruk kjøkkenhetten til direkte baking fra gasskomfyr.
Sørg for at kjøkkenrommet er godt ventilert slik at luften
sirkulerer godt.
Hvis strømledningen er skadet, må du ikke forsøke å repar-
ere den på egen hånd. Kontakt produsenten, dens service-
agent eller en tilsvarende kvalifisert person for utskifting
og for å unngå potensielle farer.
Bruk kjøkkenhetten i et område med tilstrekkelig ventilas-
jon når du bruker andre apparater som brenner gass eller
annet drivsto.
Ikke slipp ut luften inn i en røykkanal som brukes til utslipp
av avgasser fra apparater som brenner gass eller annet
drivsto.
Følg forskrifter for utslipp av luft.
Dette apparatet kan brukes av barn over 8 år og personer
med reduserte fysiske-, sensoriske- eller mentale evner
eller mangel på erfaring og kunnskap hvis de er under
tilsyn eller har mottatt anvisning om hvordan man bruker
apparatet på en sikker måte og forstår farene dette
innebærer. Barn må være under tilsyn for å sikre at de ikke
leker med apparatet.
16

Rengjøring og brukervedlikehold må ikke utføres av barn
uten tilsyn.
Ikke bruk åpen ild under kjøkkenhetten.
FORSIKTIG: Tilgjengelige deler kan bli varme når de brukes
sammen med kjøkkenutstyr.
Fare for elektrisk støt
Koble denne enheten kun til en jordet stikkontakt. Hvis du
er i tvil, må du søke råd fra en kvalifisert ingeniør.
Dersom ikke disse instruksjonene følges, kan det føre til
dødsfall, brann eller elektrisk støt.
NO
17

DELER
Del 1: Skruplugg X 12
Del 2: 4*30 mm-skruer X 12
Del 3: 4*8 mm-skruer X 6
Del 4: Håndbok X1
Del 5: Avtrekkshette x1
Del 6: Nedre skorsteinsbrakett X 1
Del 7: Øvre skorsteinsbrakett X 1
Del 8: Veggbrakett X 1
Del 9: Nedre skorstein X 1
Del 10: Øvre skorstein X 1
18
Del 11: Aluminiumskanal X 1

INSTALLASJON
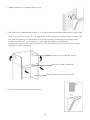
Klargjøre for installasjon
Hvis du har et uttak som leder ut, er det mulig å koble kjøkkenhetten til en avtrekkskanal
ved hjelp av materialer som emalje, aluminium, fleksibelt rør eller et ikke-brennbart
materiale med en innvendig diameter på 150 mm, som vist på bildet nedenfor.
A.
Før montering slår du av enheten og kobler den fra stikkontakt.
B.
Avtrekkshetten skal plasseres i en avstand på 65–75 cm over
kokeflaten for best eekt.
C.
Installasjon (ventil ute):
Obs! Pass på advarselen i instruksjonsarket om bruk av apparatet når luft slippes ut fra
rommet.
Drill 3 holes to accommodate the bracket. Screw and tighten the bracket onto the wall with
the screws & screw plugs provided.
1.
Hull på veggen
Skruplugg
Veggbrakett
Skrue
(4 x 30 mm)
NO
19

Heng kjøkkenhetten på kroken til veggbraketten.
2.
Den nedre skorsteinsbraketten brukes til å feste øvre og nedre pynteskorsteiner.
Bruk 2 4x8-mm skruer for å feste den nedre og øvre skorsteinen sammen. Før du fester
braketten på skorsteinen, må du bestemme hvor den nedre skorsteinsbrakettens festehull
skal være for å feste den nedre skorsteinsbraketten ved påfølgende trinn.
Ikke fest skruene for godt. Sørg for at den øvre pynteskorsteinen kan justeres teleskopisk
etter montering.
3.
Øvre pynteskorstein (indre)
Nedre skorsteinsfeste
Nedre pynteskorstein (ytre)
Plasser aluminiumskanalen på kjøkkenhetten.
4.
20
Sidan laddas...
Sidan laddas...
Sidan laddas...
Sidan laddas...
Sidan laddas...
Sidan laddas...
Sidan laddas...
Sidan laddas...
Sidan laddas...
Sidan laddas...
Sidan laddas...
Sidan laddas...
Sidan laddas...
Sidan laddas...
Sidan laddas...
Sidan laddas...
Sidan laddas...
Sidan laddas...
Sidan laddas...
Sidan laddas...
Sidan laddas...
Sidan laddas...
Sidan laddas...
Sidan laddas...
Sidan laddas...
Sidan laddas...
Sidan laddas...
Sidan laddas...
Sidan laddas...
Sidan laddas...
Sidan laddas...
Sidan laddas...
Sidan laddas...
Sidan laddas...
Sidan laddas...
Sidan laddas...
Sidan laddas...
Sidan laddas...
Sidan laddas...
Sidan laddas...
Sidan laddas...
Sidan laddas...
Sidan laddas...
Sidan laddas...
-
 1
1
-
 2
2
-
 3
3
-
 4
4
-
 5
5
-
 6
6
-
 7
7
-
 8
8
-
 9
9
-
 10
10
-
 11
11
-
 12
12
-
 13
13
-
 14
14
-
 15
15
-
 16
16
-
 17
17
-
 18
18
-
 19
19
-
 20
20
-
 21
21
-
 22
22
-
 23
23
-
 24
24
-
 25
25
-
 26
26
-
 27
27
-
 28
28
-
 29
29
-
 30
30
-
 31
31
-
 32
32
-
 33
33
-
 34
34
-
 35
35
-
 36
36
-
 37
37
-
 38
38
-
 39
39
-
 40
40
-
 41
41
-
 42
42
-
 43
43
-
 44
44
-
 45
45
-
 46
46
-
 47
47
-
 48
48
-
 49
49
-
 50
50
-
 51
51
-
 52
52
-
 53
53
-
 54
54
-
 55
55
-
 56
56
-
 57
57
-
 58
58
-
 59
59
-
 60
60
-
 61
61
-
 62
62
-
 63
63
-
 64
64


POINT 5-SERIES POHO5080INCB KJØKKENVENTILATOR Bruksanvisning
- Kategori
- Fläktar
- Typ
- Bruksanvisning
- Denna manual är också lämplig för
på andra språk
Relaterade papper


Andra dokument
-
 SENZ SH410W20 KJØKKENVENTILATOR Bruksanvisning
-
 SENZ SEHO1050TELW KJØKKENVENTILATOR Användarmanual
-
CIARRA CBCS6906D Användarmanual
-
 CIARRA CBCS6102-OW Användarmanual
-
Eico Firenze 60 W ECO Användarmanual
-
 SENZ SEHO1050STAW KJØKKENVENTILATOR Bruksanvisning
-
Grundig GDKP5460B KJØKKENVENTILATOR Bruksanvisning


