Samsung QE65LS03RAU Användarmanual
- Kategori
- LED-TV
- Typ
- Användarmanual

USER MANUAL
Thank you for purchasing this Samsung product.
To receive more complete service, please register your product at www.samsung.com
Model Serial No.
LS03 SERIES

Before Reading This User Manual
This TV comes with this user manual and an embedded e-Manual.
Before reading this user manual, review the following:
User Manual
Read this provided user manual to see information
about product safety, installation, accessories,
initial configuration, and product specifications.
e-Manual
For more information about this TV, read the
e-Manual embedded in the product.
To open the e-Manual,
> Settings > Support > Open e-Manual
On the website (www.samsung.com), you can download the manuals and see its contents on your PC or mobile
device.
Learning the e-Manual's assistance functions
Some menu screens cannot be accessed from the e-Manual.
Search
Select an item from the search results to load the corresponding page.
Index
Select a keyword to navigate to the relevant page.
– The menus may not appear depending on the geographical area.
Recent pages
Select a topic from the list of recently viewed topics.
Learning the functions of the buttons that appear on e-Manual topic
pages
Try Now
Allows you to access the corresponding menu item and try out the feature
right away.
Link
Access an underlined topic referred to on an e-Manual page immediately.
English
English - 2

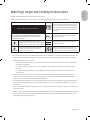
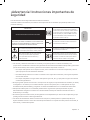
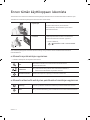
Warning! Important Safety Instructions
Please read the Safety Instructions before using your TV.
Refer to the table below for an explanation of symbols which may be on your Samsung product.
CAUTION
Class II product: This symbol indicates that a
safety connection to electrical earth (ground)
is not required. If this symbol is not present on
a product with a mains lead, the product MUST
have a reliable connection to protective earth
(ground).
RISK OF ELECTRIC SHOCK. DO NOT OPEN.
CAUTION: TO REDUCE THE RISK OF ELECTRIC SHOCK, DO
NOT REMOVE COVER (OR BACK). THERE ARE NO USER
SERVICEABLE PARTS INSIDE. REFER ALL SERVICING TO
QUALIFIED PERSONNEL.
AC voltage: Rated voltage marked with this
symbol is AC voltage.
This symbol indicates that high voltage is
present inside. It is dangerous to make any kind
of contact with any internal part of this product.
DC voltage: Rated voltage marked with this
symbol is DC voltage.
This symbol indicates that this product has
included important literature concerning
operation and maintenance.
Caution. Consult instructions for use: This
symbol instructs the user to consult the user
manual for further safety related information.
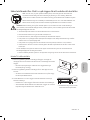
The slots and openings in the cabinet and in the back or bottom are provided for necessary ventilation. To
ensure reliable operation of this apparatus and to protect it from overheating, these slots and openings
must never be blocked or covered.
– Do not place this apparatus in a confined space, such as a bookcase or built-in cabinet, unless proper
ventilation is provided.
– Do not place this apparatus near or over a radiator or heat register, or where it is exposed to direct
sunlight.
– Do not place vessels (vases etc.) containing water on this apparatus, as this can result in a fire or
electric shock.
Do not expose this apparatus to rain or place it near water (near a bathtub, washbowl, kitchen sink, or
laundry tub, in a wet basement, or near a swimming pool, etc.). If this apparatus accidentally gets wet,
unplug it and contact an authorised dealer immediately.
This apparatus uses batteries. In your community, there might be environmental regulations that require
you to dispose of these batteries properly. Please contact your local authorities for disposal or recycling
information.
Do not overload wall outlets, extension cords, or adaptors beyond their capacity, since this can result in fire
or electric shock.
Power-supply cords should be placed so that they are not likely to be walked on or pinched by items placed
upon or against them. Pay particular attention to cords at the plug end, at wall outlets, and at the point
where they exit from the appliance.
English - 3
English

To protect this apparatus from a lightning storm, or when left unattended and unused for long periods of
time, unplug it from the wall outlet and disconnect the antenna or cable system. This will prevent damage
to the set due to lightning and power line surges.
Before connecting the AC power cord to the DC adaptor outlet, make sure that the voltage designation of
the DC adaptor corresponds to the local electrical supply.
Never insert anything metallic into the open parts of this apparatus. This may cause a danger of electric
shock.
To avoid electric shock, never touch the inside of this apparatus. Only a qualified technician should open
this apparatus.
Be sure to plug in the power cord until it is firmly seated. When unplugging the power cord from a wall
outlet, always pull on the power cord's plug. Never unplug it by pulling on the power cord. Do not touch the
power cord with wet hands.
If this apparatus does not operate normally - in particular, if there are any unusual sounds or smells coming
from it - unplug it immediately and contact an authorised dealer or Samsung service centre.
Be sure to pull the power plug out of the outlet if the TV is to remain unused or if you are going to leave the
house for an extended period of time (especially when children, elderly, or disabled people will be left alone
in the house).
– Accumulated dust can cause an electric shock, an electric leakage, or a fire by causing the power cord
to generate sparks and heat or by causing the insulation to deteriorate.
Be sure to contact an authorised Samsung service centre for information if you intend to install your TV in
a location with heavy dust, high or low temperatures, high humidity, chemical substances, or where it will
operate 24 hours a day such as in an airport, a train station, etc. Failure to do so may lead to serious damage
to your TV.
Use only a properly grounded plug and wall outlet.
– An improper ground may cause electric shock or equipment damage. (Class l Equipment only.)
To turn off this apparatus completely, disconnect it from the wall outlet. To ensure you can unplug this
apparatus quickly if necessary, make sure that the wall outlet and power plug are readily accessible.
Store the accessories (batteries, etc.) in a location safely out of the reach of children.
Do not drop or strike the product. If the product is damaged, disconnect the power cord and contact a
Samsung service centre.
To clean this apparatus, unplug the power cord from the wall outlet and wipe the product with a soft, dry
cloth. Do not use any chemicals such as wax, benzene, alcohol, thinners, insecticide, aerial fresheners,
lubricants, or detergents. These chemicals can damage the appearance of the TV or erase the printing on
the product.
Do not expose this apparatus to dripping or splashing.
Do not dispose of batteries in a fire.
Do not short-circuit, disassemble, or overheat the batteries.
There is danger of an explosion if you replace the batteries used in the remote with the wrong type of
battery. Replace only with the same or equivalent type.
* Figures and illustrations in this User Manual are provided for reference only and may differ from the actual
product appearance. Product design and specifications may change without notice.
CIS languages (Russian, Ukrainian, Kazakhs) are not available for this product, since this is manufactured for
customers in EU region.
English - 4

Before Reading This User Manual ---------------------------------------------------------------------------- 2
Warning! Important Safety Instructions
---------------------------------------------------------------------------- 3
01 What's in the Box?
02 Connecting the TV to the One Connect
03 TV Installation
Mounting the TV on a wall ---------------------------------------------------------------------------- 9
Providing proper ventilation for your TV
---------------------------------------------------------------------------- 10
Safety Precaution: Securing the TV to the wall to
prevent falling
---------------------------------------------------------------------------- 11
Using the Cover Cap
---------------------------------------------------------------------------- 12
Precautions when installing the TV with a stand
---------------------------------------------------------------------------- 12
04 Using Art Mode
Viewing images ---------------------------------------------------------------------------- 14
Setting the style of the selected image
---------------------------------------------------------------------------- 16
Setting up Art mode
---------------------------------------------------------------------------- 17
Using Art mode with the SmartThings app
---------------------------------------------------------------------------- 18
05 Controlling External Devices with a Samsung Remote Control -
Using the Universal Remote
06 The Samsung Smart Remote
About the Buttons on the Samsung Smart Remote ---------------------------------------------------------------------------- 20
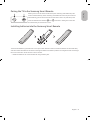
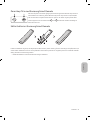
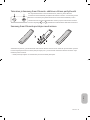
Pairing the TV to the Samsung Smart Remote
---------------------------------------------------------------------------- 21
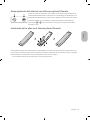
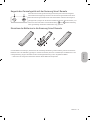
Installing batteries into the Samsung Smart Remote
---------------------------------------------------------------------------- 21
07 Running the Initial Setup
Using the TV Controller ---------------------------------------------------------------------------- 23
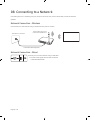
08 Connecting to a Network
Network Connection - Wireless ---------------------------------------------------------------------------- 24
Network Connection - Wired
---------------------------------------------------------------------------- 24
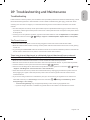
09 Troubleshooting and Maintenance
Troubleshooting ---------------------------------------------------------------------------- 25
Precautions when using Art mode
---------------------------------------------------------------------------- 27
What is Remote Support?
---------------------------------------------------------------------------- 28
Eco Sensor and screen brightness
---------------------------------------------------------------------------- 28
Changing the TV’s password
---------------------------------------------------------------------------- 29
Caring for the TV
---------------------------------------------------------------------------- 29
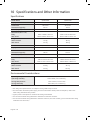
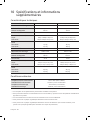
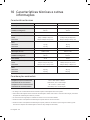
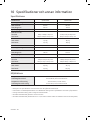
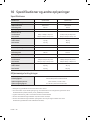
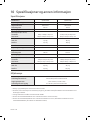
10 Specifications and Other Information
Specifications ---------------------------------------------------------------------------- 30
Environmental Considerations
---------------------------------------------------------------------------- 30
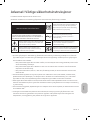
Decreasing power consumption
---------------------------------------------------------------------------- 31
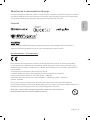
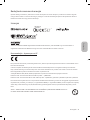
Licences
---------------------------------------------------------------------------- 31
English - 5
English
Contents

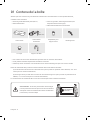
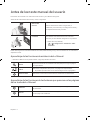
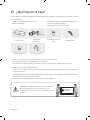
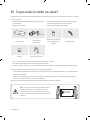
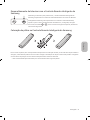
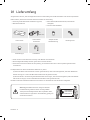
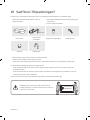
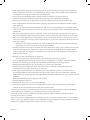
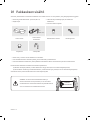
01 What's in the Box?
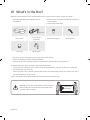
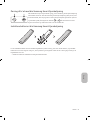
Make sure the following items are included with your TV. If any items are missing, contact your dealer.
Samsung Smart Remote & Batteries (AA x 2)
User Manual
Warranty Card / Regulatory Guide (Not available in
some locations)
One Connect Power Cable
x 1
(M4 x L12)
x 4
One Connect
One Invisible
Connection
Wall Mount Adapter Bending Cover
Cover Cap Holder-Cable
The items’ colours and shapes may vary depending on the models.
Cables not included can be purchased separately.
Check for any accessories hidden behind or in the packing materials when opening the box.
An administration fee may be charged in the following situations:
(a) An engineer is called out at your request, but it is found that the product has no defect (i.e., where the
user manual has not been read).
(b) You bring the unit to a Samsung service centre, but it is found that the product has no defect (i.e., where
the user manual has not been read).
You will be informed of the administration fee amount before a technician visits.
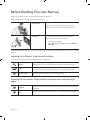
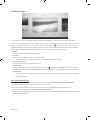
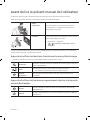
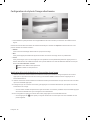
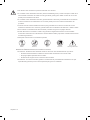
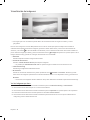
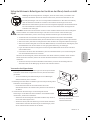
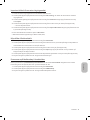
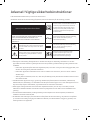
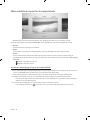
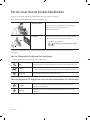
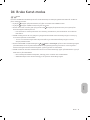
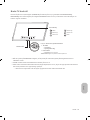
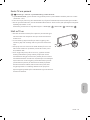
Warning: Screens can be damaged from direct pressure
when handled incorrectly. We recommend lifting the
TV at the edges, as shown.
Do Not Touch
This Screen!
English - 6

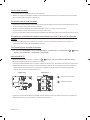
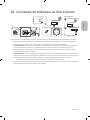
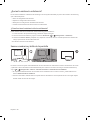
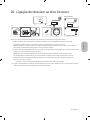
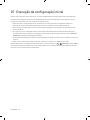
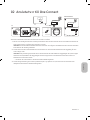
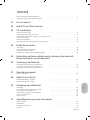
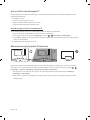
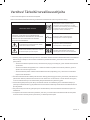
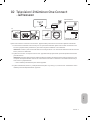
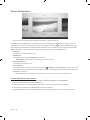
02 Connecting the TV to the One Connect
ONE CONNECT
ONE CONNECT
ONE CONNECT
TV
Bending Cover
ONE CONNECT
5
4
x 1
(M4 x L12)
10 cm
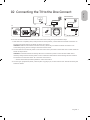
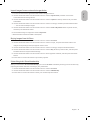
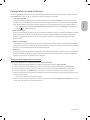
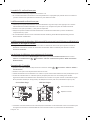
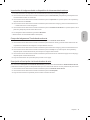
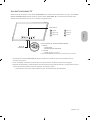
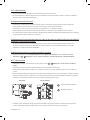
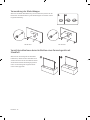
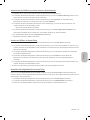
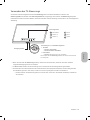
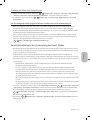
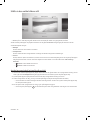
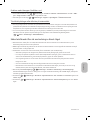
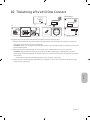
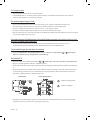
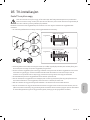
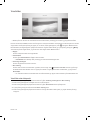
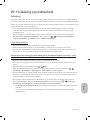
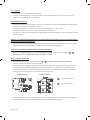
To connect the One Invisible Connection to the One Connect and your TV, follow these steps:
1. After the TV is completely set up and placed in its final position, connect the One Invisible Connection to
the One Connect and the TV as shown in Steps 1 to 4 above.
WARNING: Make sure that both connectors are fully and firmly connected. If either connecter is not
connected properly, there is a danger of severe electric shock.
2. Connect the One Connect AC power cord to the One Connect, and then connect the cord to a wall outlet as
shown in Step 5 above.
WARNING: Follow the directions exactly. Be sure to connect the power cord to the wall outlet as the
last step. Always disconnect the power cord from the wall outlet before disconnecting the One Invisible
Connection from the back of the TV or from the One Connect.
– See the illustrated Quick Setup Guide for more information.
3. Connect your peripherals (aerial, cable box, Blu-ray player, etc.) to the One Connect. See the Accessory Kit
Guide for details.
English - 7
English

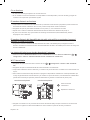
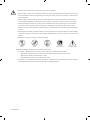
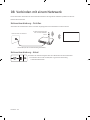
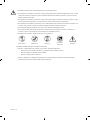
Do not use the One Connect in the upside-down or upright position.
When connecting the One Invisible Connection, use a Bending Cover, which prevents the cable of
the One Invisible Connection from being bent at a 90 degree angle, to bend the cable. Failure to
do so may cause damage to the cable.
When connecting the One Invisible Connection, pay attention to the shapes and sizes of its
connectors so that they are connected correctly. Failure to do so may cause product malfunction.
When connecting the One Invisible Connection, be careful not to twist the cable of the One
Invisible Connection. Failure to do so may cause performance degradation of the TV or damage to
the cable.
When arranging the remaining cable, refer to the figure on the previous page for the correct
arrangement.
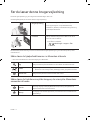
Take care not to subject the cable to any of the actions below. The One Invisible Connection
contains a power circuit. You could damage the cable and subject yourself to an electric shock.
Handle the One Connect carefully. It is heavy.
Bending Twisting Pulling Pressing on Electric shock
CLASS 1 LASER PRODUCT (One Invisible Connection)
Caution - Invisible laser radiation when open. Do not stare into beam.
– Do not bend the One Invisible Connection cable excessively. Do not cut the cable.
– Do not place heavy objects on the cable.
– Do not disassemble either of the cable connectors.
Caution - Use of controls, adjustments, or the performance of procedures other than those
specified herein may result in hazardous radiation exposure.
English - 8

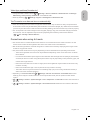
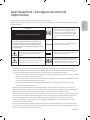
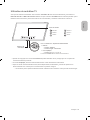
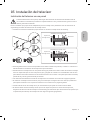
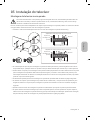
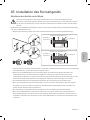
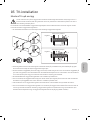
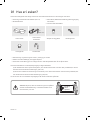
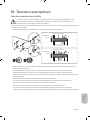
03 TV Installation
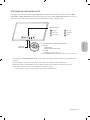
Mounting the TV on a wall
If you mount this TV on a wall, follow the instructions exactly as set out by the manufacturer. Unless
it is correctly mounted, the TV may slide or fall and cause serious injury to a child or adult and
serious damage to the TV.
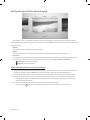
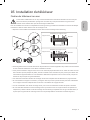
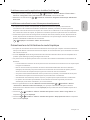
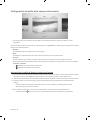
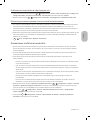
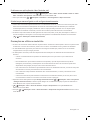
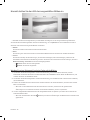
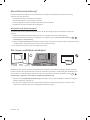
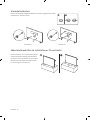
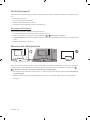
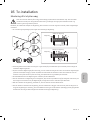
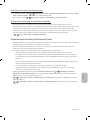
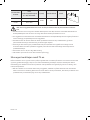
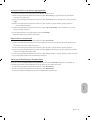
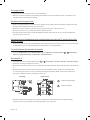
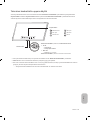
For models providing wall mount adapters, install them as shown in the figure below before installing the wall
mount kit.
Refer to the installation manual included with the Samsung wall mount kit.
TV
TV
Wall mount
bracket
Wall mount
bracket
C
C
Wall mount Adapter
Wall mount Adapter
Samsung Electronics is not responsible for any damage to the product or injury to yourself or others if you
choose to install the wall mount on your own.
You can install your wall mount on a solid wall perpendicular to the floor. Before attaching the wall mount
to surfaces other than plaster board, contact your nearest dealer for additional information. If you install
the TV on a ceiling or slanted wall, it may fall and result in severe personal injury.
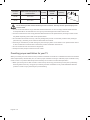
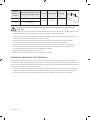
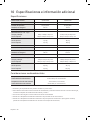
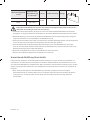
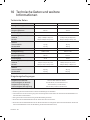
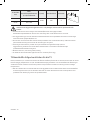
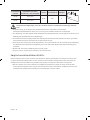
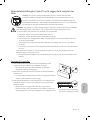
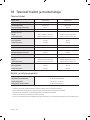
Standard dimensions for wall mount kits are shown in the table on the next page.
If you are installing a third-party wall mount, note that the length of the screws you can use to attach the
TV to the wall mount is shown in column C in the table on the next page.
When installing a wall mount kit, we recommend you fasten all four VESA screws.
If you want to install a wall mount kit that attaches to the wall using two top screws only, be sure to use a
Samsung wall mount kit that supports this type of installation. (You may not be able to purchase this type
of wall mount kit, depending on the geographical region.)
English - 9
English

TV size in
inches
VESA screw hole specs (A * B)
in millimetres
C (mm)
Standard
Screw
Quantity
43-49 200 x 200
43-45 M8 4
55-65 400 x 400
Do not install your wall mount kit while your TV is turned on. This may result in personal injury from
electric shock.
Do not use screws that are longer than the standard dimension or do not comply with the VESA standard
screw specifications. Screws that are too long may cause damage to the inside of the TV set.
For wall mounts that do not comply with the VESA standard screw specifications, the length of the screws
may differ depending on the wall mount specifications.
Do not fasten the screws too firmly. This may damage the product or cause the product to fall, leading to
personal injury. Samsung is not liable for these kinds of accidents.
Samsung is not liable for product damage or personal injury when a non-VESA or non-specified wall mount
is used or when the consumer fails to follow the product installation instructions.
Do not mount the TV at more than a 15 degree tilt.
Always have two people mount the TV onto a wall.
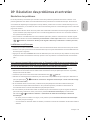
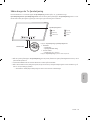
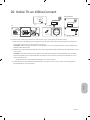
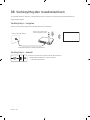
Providing proper ventilation for your TV
When you install your TV and One Connect, maintain a distance of at least 10 cm between the One Connect with
other objects (walls, cabinet sides, etc.) to ensure proper ventilation. Failing to maintain proper ventilation may
result in a fire or a problem with the product caused by an increase in its internal temperature.
When you install your TV with a stand or a wall mount, we strongly recommend you use parts provided by
Samsung Electronics only. Using parts provided by another manufacturer may cause difficulties with the
product or result in injury caused by the product falling.
English - 10

Safety Precaution: Securing the TV to the wall to prevent falling
Caution: Pulling, pushing, or climbing on the TV may cause the TV to fall. In particular,
ensure your children do not hang on or destabilise the TV. This action may cause the TV
to tip over, causing serious injuries or death. Follow all safety precautions provided in the
Safety Flyer included with your TV. For added stability and safety, you can purchase and
install the anti-fall device as described below.
WARNING: Never place a television set in an unstable location. The television set may fall, causing
serious personal injury or death. Many injuries, particularly to children, can be avoided by taking
simple precautions such as:
Using cabinets or stands recommended by the manufacturer of the television set.
Only using furniture that can safely support the television set.
Ensuring the television set is not overhanging the edge of the supporting furniture.
Not placing the television set on tall furniture (for example, cupboards or bookcases) without
anchoring both the furniture and the television set to a suitable support.
Not placing the television set on cloth or other materials that may be located between the
television set and supporting furniture.
Educating children about the dangers of climbing on furniture to reach the television set or its
controls.
If you are retaining and relocating the television set that you are replacing with this new set, you
should apply the same precautions to the old set.
When you have to relocate or lift the TV for replacement or cleaning, be sure not to pull out the
stand.
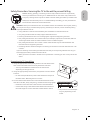
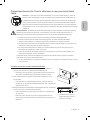
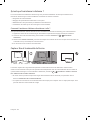
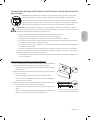
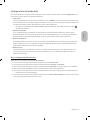
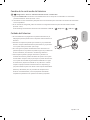
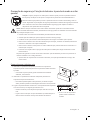
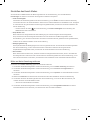
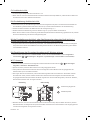
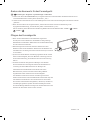
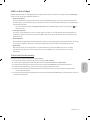
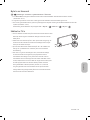
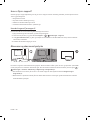
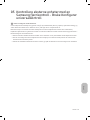
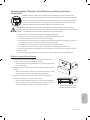
Preventing the TV from falling
1. Using the appropriate screws, firmly fasten a set of brackets to the
wall. Confirm that the screws are firmly attached to the wall.
– You may need additional material such as wall anchors
depending on the type of wall.
2. Using the appropriately sized screws, firmly fasten a set of brackets
to the TV.
– For the screw specifications, refer to the standard screw part in
the table under "Mounting the TV on a wall".
3. Connect the brackets fixed to the TV and the brackets fixed to the
wall with a durable, heavy-duty string, and then tie the string tightly.
– Install the TV near the wall so that it does not fall backwards.
– Connect the string so that the brackets fixed to the wall are at
the same height as or lower than the brackets fixed to the TV.
The product colour and shape
may vary depending on the
model.
English - 11
English

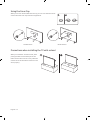
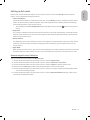
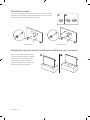
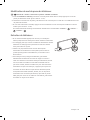
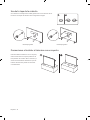
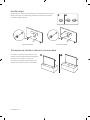
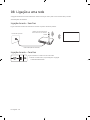
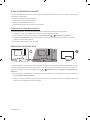
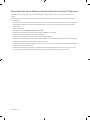
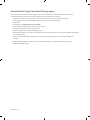
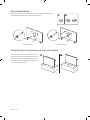
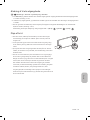
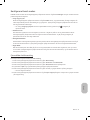
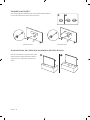
Using the Cover Cap
When you do not use the VESA wall mount, you can cover the wall mount
screw holes with cover caps. See the image below.
<43-49 inches> <55-65 inches>
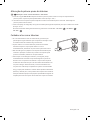
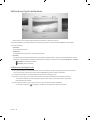
Precautions when installing the TV with a stand
When you install the TV with a stand, avoid
placing the stand on the back part of the
table surface. Failure to do so may cause the
motion sensor at the bottom of the TV not to
work properly.
English - 12

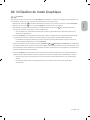
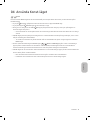
04 Using Art Mode
> Art
You can use Art mode function to display image content such as artworks or photos when you are not watching
TV in full screen mode.
Press the button on the remote control to switch to TV mode or Art mode.
Press the button in Art mode to switch to TV mode.
To turn off the TV completely, press and hold the button on the remote control, or press the TV
Controller button at the bottom of the TV.
– If you use a remote control other than the Samsung Smart Remote, the TV may not be turned off
completely.
In Art mode, the brightness and colour tone of your TV are automatically adjusted depending on the
ambient, and the TV can be automatically turned on or off.
– The TV is set by default so that the screen turns off automatically when the ambient light dims in Art
mode.
You can use Art mode settings ( > Art > Settings) on the TV or SmartThings app on your mobile
device to set the sensitivity of the motion detector so that the TV can detect visual changes including user
movements and turn on or off automatically.
In Art mode, you can connect your mobile device to the TV using the SmartThings app on the mobile device
to view photos on the mobile device.
– This function may not be supported depending on the TV model or mobile device.
– Supported features may differ depending on the version of the SmartThings app.
English - 13
English

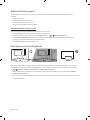
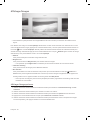
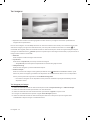
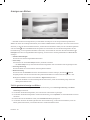
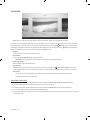
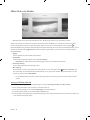
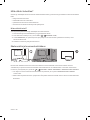
Viewing images
Options
Cantemporary Classic Promotion
Recent Art Store
Samsung Collection
My Collection Settings
The image on your TV may differ from the image above depending on the model and geographical area.
To view an image in Art mode, select one of the menus below. To switch to the sub menu where you can select
images, press the Select button, one of the four directional buttons, or
button in Art mode. Then, use the
directional buttons on the remote control to move to desired image, and then press the Select button.
Set
appears at the top of the selected image, and you can view the selected image in Art mode.
Recent
You can manipulate the last selected images.
Art Store
You can go to Art Store to purchase various images.
– The Art Store may not appear depending on the network connection status.
Samsung Collection
You can choose images from different topics.
My Collection
You can view a list of artworks and photos that you set as
Favourite in Favourites. You can also select
the desired ones among the images saved on an external storage device or a mobile device and save them
in My Photos.
– In order to fetch the images from your mobile device, the SmartThings app must have been installed in
your mobile device.
Viewing images by time
1. Use the directional buttons on the remote control to move to Samsung Collection or My Collection.
2. Use the directional buttons to move to one of the sub menus.
3. Use the directional buttons on the remote control to move to Options at the top of the screen.
4. Press the Select button when the Start Slideshow item appears.
5. Use the directional buttons on the remote control to select the time that images will be replaced, and then
press the Select button.
English - 14

Import images from an external storage device
1. Connect an external storage device that contains images to the TV.
2. Use the directional buttons on the remote control to move to My Collection, and then move to the
connected external storage device.
3. Use the directional buttons on the remote control to move to Options at the top of the screen, and then
select Save.
4. Use the directional buttons on the remote control to move to an image, and then press the Select button.
– You can select multiple images.
5. Use the directional buttons on the remote control to move to Save to My Photos at the top of the screen,
and then press the Select button.
6. The selected image or images are saved in My Photos.
Buying images from Art Store
1. Use the directional buttons on the remote control to move to Art Store.
2. Use the directional buttons on the remote control to move to a topic, and press the Select button. The
images corresponding to the topic appear on the screen.
3. Use the directional buttons on the remote control to move to an image, and press the Select button.
4. Use the directional buttons on the remote control to move to Buy at the top of the screen, and then press
the Select button to buy the selected image.
5. Use the directional buttons on the remote control to select payment methods, and then press the Select
button.
6. Follow the on-screen instructions to procedure payment.
Subscribing to Art Store Membership
When you subscribe to Art Store Membership, you can use Art Store unlimitedly and enjoy various art works by
replacing them with new ones according to your preferences.
1. Use the directional buttons on the remote control to move to Art Store.
2. Use the directional buttons on the remote control to move to Membership.
3. Follow the on-screen instructions to enter your membership information.
English - 15
English

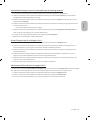
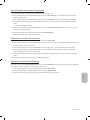
Setting the style of the selected image
Details
Mount Favourites
Cantemporary
The image on your TV may differ from the image above depending on the model and geographical area.
Use the directional buttons on the remote control to move to Options at the top of the screen. You can use the
following menus:
Details
You can find more information about the image.
Mount
You can apply various border styles and colours to the image according to your preferences.
Favourite
You can set (or not set) an image that you prefer as a favourite item by pressing the Select button on the
remote control. You can view a list of items set as your favourites in My Collection > Favourites.
– Favourite: Not set as a favourite.
– Favourite: Set as a favourite.
Apply a border style and a colour to an image
1. Using the directional buttons on the remote control to move to the image whose border style and colour
you want to change, move to Mount at the top of the screen, and then press the Select button.
2. Use the directional buttons on the remote control to select the border style and colour that you want.
3. Change the border style and colour, and then press the Select button to move the focus to the image.
– If you want to change only either the border style or the color, change it, and then press the Select
button to save the changes.
4. To save the selected border style and colour, press the Select button again.
– If you press the button to exit, the border style and colour you changed are not saved.
English - 16

Setting up Art mode
In Art mode, use the directional buttons on the remote control to move to the Settings menu item at the
bottom. You can adjust the following functions:
Colour & Brightness
Use the directional buttons on the remote control to move to Modify at the top, and then press the Select
button. In the next screen, adjust the picture colour and brightness. After selecting the desired settings,
press the Select button on the remote control.
– To immediately set Colour & Brightness while enjoying Art mode, press the button on the remote
control.
Sleep After
If no motion is detected around the TV for the set time, the TV turns off automatically. Use the directional
buttons on the remote control to move to the top items. After selecting the desired time, press the Select
button on the remote control.
Motion Detector
The sensitivity of the motion detector function can be adjusted. Use the directional buttons on the remote
control to move to the top items. After selecting the desired sensitivity, press the Select button on the
remote control.
Night Mode
When this function is turned on, the TV turns off automatically if no light is detected around the TV. Use the
directional buttons on the remote control to move to the top items, and then turn this function on or off.
Remove images from My Collection
You can remove the saved images from My Collection.
1. Use the directional buttons on the remote control to move to My Collection.
2. Use the directional buttons on the remote control to move to Favourites or My Photos.
3. Use the directional buttons on the remote control to move to Options at the top of the screen.
4. Move the focus to Remove, and then press the Select button on the remote control.
5. Use the directional buttons on the remote control to move to an image, and then press the Select button.
– You can select multiple images.
6. Use the directional buttons on the remote control to move to Remove Selected at the top of the screen,
and then press the Select button.
English - 17
English

Using Art mode with the SmartThings app
Once you have installed the SmartThings app on your mobile device, you can use the following functions:
You can download the SmartThings app from Google Play Store, Samsung Apps, or the App Store.
– The features or terminology may vary depending on the version of the SmartThings app.
– On tablet devices, Art mode features may not be supported by the SmartThings app.
Selecting images
Subscribing to Art Store Membership
Creating Collage: Combine multiple images into one image.
Applying border styles and colours to images
Setting the colour tone and the brightness for Art mode
Setting Sleep After: When no motion is detected for the time specified in Art mode, the TV turns off
automatically.
Setting Night Mode: Set The Frame to turn off automatically if no light is detected in the room.
Setting Motion Detector: Set the sensor sensitivity so that the TV turns on automatically when motion is
detected in Art mode.
English - 18

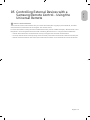
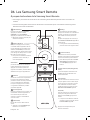
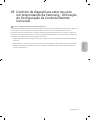
05 Controlling External Devices with a
Samsung Remote Control - Using the
Universal Remote
> Source > Universal Remote
The universal remote control feature lets you control cable boxes, Blu-ray players, home theatres, and other
external devices connected to the TV using the TV's remote control.
For more information on using the Universal Remote function, see the e-Manual chapter, "Remote Control and
Peripherals > Controlling External Devices with a Samsung Remote Control - Using the Universal Remote."
Certain external devices connected to the TV may not support the universal remote feature.
To set up the universal remote by using an IR command, connect the One Connect to the One Connect port.
Put the connected devices near One Connect and make sure there are no obstacles in front of the devices.
English - 19
English

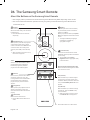
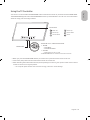
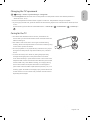
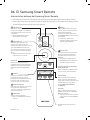
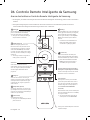
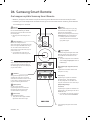
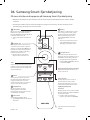
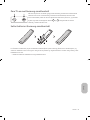
06 The Samsung Smart Remote
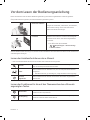
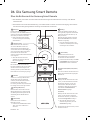
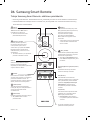
About the Buttons on the Samsung Smart Remote
The images, buttons, and functions of the Samsung Smart Remote may differ depending on the model.
The Universal Remote function operates normally only when you use the Samsung Smart Remote that
comes with the TV.
(Power)
When watching TV, press to switch to
Art mode. In Art mode, press to switch
to watching TV.
Press and hold to turn off the TV
completely.
(Number button)
When pressed, a number strip appears
on the bottom of the screen. Select
numbers and then select Done to enter
a numeric value. Use to change the
channel, enter a PIN, enter a ZIP code,
etc.
When pressed for 1 second or more,
the TTX menu appears.
(Return)
Returns to the previous menu. When
pressed for 1 second or more, the
running function is terminated. When
pressed while you are watching a
programme, the previous channel
appears.
(Play/pause)
When pressed, the playback controls
appear. Using these controls, you
can control the media content that is
playing.
(Smart Hub)
Returns to the Home Screen.
Press in Art mode to switch to TV
mode.
VOL (Volume)
Move the button up or down to adjust
the volume. To mute the sound, press
the button. When pressed for 1 second or
more, the Accessibility Shortcuts menu
appears.
CH (Channel)
Move the button up or down to change
the channel. To see the Guide screen,
press the button.
When pressed for 1 second or more,
the Channel List screen appears.
Press each button to run its function.
Select
Selects or runs a focused item. When
pressed while you are watching a
broadcast programme, detailed
programme information appears.
Directional pad (up/down/left/right)
Moves the focus and changes the values
seen on the TV's menu.
(Bixby)
Runs Bixby. Press and hold the button,
say a command, and then release the
button to run Bixby.
When you press the button, the Explore
Now menu appears at the bottom of the
screen.
The supported Bixby's languages
and features may differ by
geographical region.
(Colour button)
Use these coloured buttons to access
additional options specific to the feature
you are using.
To immediately set Colour &
Brightness while enjoying Art mode,
press the button.
English - 20
Sidan laddas...
Sidan laddas...
Sidan laddas...
Sidan laddas...
Sidan laddas...
Sidan laddas...
Sidan laddas...
Sidan laddas...
Sidan laddas...
Sidan laddas...
Sidan laddas...
Sidan laddas...
Sidan laddas...
Sidan laddas...
Sidan laddas...
Sidan laddas...
Sidan laddas...
Sidan laddas...
Sidan laddas...
Sidan laddas...
Sidan laddas...
Sidan laddas...
Sidan laddas...
Sidan laddas...
Sidan laddas...
Sidan laddas...
Sidan laddas...
Sidan laddas...
Sidan laddas...
Sidan laddas...
Sidan laddas...
Sidan laddas...
Sidan laddas...
Sidan laddas...
Sidan laddas...
Sidan laddas...
Sidan laddas...
Sidan laddas...
Sidan laddas...
Sidan laddas...
Sidan laddas...
Sidan laddas...
Sidan laddas...
Sidan laddas...
Sidan laddas...
Sidan laddas...
Sidan laddas...
Sidan laddas...
Sidan laddas...
Sidan laddas...
Sidan laddas...
Sidan laddas...
Sidan laddas...
Sidan laddas...
Sidan laddas...
Sidan laddas...
Sidan laddas...
Sidan laddas...
Sidan laddas...
Sidan laddas...
Sidan laddas...
Sidan laddas...
Sidan laddas...
Sidan laddas...
Sidan laddas...
Sidan laddas...
Sidan laddas...
Sidan laddas...
Sidan laddas...
Sidan laddas...
Sidan laddas...
Sidan laddas...
Sidan laddas...
Sidan laddas...
Sidan laddas...
Sidan laddas...
Sidan laddas...
Sidan laddas...
Sidan laddas...
Sidan laddas...
Sidan laddas...
Sidan laddas...
Sidan laddas...
Sidan laddas...
Sidan laddas...
Sidan laddas...
Sidan laddas...
Sidan laddas...
Sidan laddas...
Sidan laddas...
Sidan laddas...
Sidan laddas...
Sidan laddas...
Sidan laddas...
Sidan laddas...
Sidan laddas...
Sidan laddas...
Sidan laddas...
Sidan laddas...
Sidan laddas...
Sidan laddas...
Sidan laddas...
Sidan laddas...
Sidan laddas...
Sidan laddas...
Sidan laddas...
Sidan laddas...
Sidan laddas...
Sidan laddas...
Sidan laddas...
Sidan laddas...
Sidan laddas...
Sidan laddas...
Sidan laddas...
Sidan laddas...
Sidan laddas...
Sidan laddas...
Sidan laddas...
Sidan laddas...
Sidan laddas...
Sidan laddas...
Sidan laddas...
Sidan laddas...
Sidan laddas...
Sidan laddas...
Sidan laddas...
Sidan laddas...
Sidan laddas...
Sidan laddas...
Sidan laddas...
Sidan laddas...
Sidan laddas...
Sidan laddas...
Sidan laddas...
Sidan laddas...
Sidan laddas...
Sidan laddas...
Sidan laddas...
Sidan laddas...
Sidan laddas...
Sidan laddas...
Sidan laddas...
Sidan laddas...
Sidan laddas...
Sidan laddas...
Sidan laddas...
Sidan laddas...
Sidan laddas...
Sidan laddas...
Sidan laddas...
Sidan laddas...
Sidan laddas...
Sidan laddas...
Sidan laddas...
Sidan laddas...
Sidan laddas...
Sidan laddas...
Sidan laddas...
Sidan laddas...
Sidan laddas...
Sidan laddas...
Sidan laddas...
Sidan laddas...
Sidan laddas...
Sidan laddas...
Sidan laddas...
Sidan laddas...
Sidan laddas...
Sidan laddas...
Sidan laddas...
Sidan laddas...
Sidan laddas...
Sidan laddas...
Sidan laddas...
Sidan laddas...
Sidan laddas...
Sidan laddas...
Sidan laddas...
Sidan laddas...
Sidan laddas...
Sidan laddas...
Sidan laddas...
Sidan laddas...
Sidan laddas...
Sidan laddas...
Sidan laddas...
Sidan laddas...
Sidan laddas...
Sidan laddas...
Sidan laddas...
Sidan laddas...
Sidan laddas...
Sidan laddas...
Sidan laddas...
Sidan laddas...
Sidan laddas...
Sidan laddas...
Sidan laddas...
Sidan laddas...
Sidan laddas...
Sidan laddas...
Sidan laddas...
Sidan laddas...
Sidan laddas...
Sidan laddas...
Sidan laddas...
Sidan laddas...
Sidan laddas...
Sidan laddas...
Sidan laddas...
Sidan laddas...
Sidan laddas...
Sidan laddas...
Sidan laddas...
Sidan laddas...
Sidan laddas...
Sidan laddas...
Sidan laddas...
Sidan laddas...
Sidan laddas...
Sidan laddas...
Sidan laddas...
Sidan laddas...
Sidan laddas...
Sidan laddas...
Sidan laddas...
Sidan laddas...
Sidan laddas...
Sidan laddas...
Sidan laddas...
Sidan laddas...
Sidan laddas...
Sidan laddas...
Sidan laddas...
Sidan laddas...
Sidan laddas...
Sidan laddas...
Sidan laddas...
Sidan laddas...
Sidan laddas...
Sidan laddas...
Sidan laddas...
Sidan laddas...
Sidan laddas...
Sidan laddas...
Sidan laddas...
Sidan laddas...
Sidan laddas...
Sidan laddas...
Sidan laddas...
Sidan laddas...
Sidan laddas...
-
 1
1
-
 2
2
-
 3
3
-
 4
4
-
 5
5
-
 6
6
-
 7
7
-
 8
8
-
 9
9
-
 10
10
-
 11
11
-
 12
12
-
 13
13
-
 14
14
-
 15
15
-
 16
16
-
 17
17
-
 18
18
-
 19
19
-
 20
20
-
 21
21
-
 22
22
-
 23
23
-
 24
24
-
 25
25
-
 26
26
-
 27
27
-
 28
28
-
 29
29
-
 30
30
-
 31
31
-
 32
32
-
 33
33
-
 34
34
-
 35
35
-
 36
36
-
 37
37
-
 38
38
-
 39
39
-
 40
40
-
 41
41
-
 42
42
-
 43
43
-
 44
44
-
 45
45
-
 46
46
-
 47
47
-
 48
48
-
 49
49
-
 50
50
-
 51
51
-
 52
52
-
 53
53
-
 54
54
-
 55
55
-
 56
56
-
 57
57
-
 58
58
-
 59
59
-
 60
60
-
 61
61
-
 62
62
-
 63
63
-
 64
64
-
 65
65
-
 66
66
-
 67
67
-
 68
68
-
 69
69
-
 70
70
-
 71
71
-
 72
72
-
 73
73
-
 74
74
-
 75
75
-
 76
76
-
 77
77
-
 78
78
-
 79
79
-
 80
80
-
 81
81
-
 82
82
-
 83
83
-
 84
84
-
 85
85
-
 86
86
-
 87
87
-
 88
88
-
 89
89
-
 90
90
-
 91
91
-
 92
92
-
 93
93
-
 94
94
-
 95
95
-
 96
96
-
 97
97
-
 98
98
-
 99
99
-
 100
100
-
 101
101
-
 102
102
-
 103
103
-
 104
104
-
 105
105
-
 106
106
-
 107
107
-
 108
108
-
 109
109
-
 110
110
-
 111
111
-
 112
112
-
 113
113
-
 114
114
-
 115
115
-
 116
116
-
 117
117
-
 118
118
-
 119
119
-
 120
120
-
 121
121
-
 122
122
-
 123
123
-
 124
124
-
 125
125
-
 126
126
-
 127
127
-
 128
128
-
 129
129
-
 130
130
-
 131
131
-
 132
132
-
 133
133
-
 134
134
-
 135
135
-
 136
136
-
 137
137
-
 138
138
-
 139
139
-
 140
140
-
 141
141
-
 142
142
-
 143
143
-
 144
144
-
 145
145
-
 146
146
-
 147
147
-
 148
148
-
 149
149
-
 150
150
-
 151
151
-
 152
152
-
 153
153
-
 154
154
-
 155
155
-
 156
156
-
 157
157
-
 158
158
-
 159
159
-
 160
160
-
 161
161
-
 162
162
-
 163
163
-
 164
164
-
 165
165
-
 166
166
-
 167
167
-
 168
168
-
 169
169
-
 170
170
-
 171
171
-
 172
172
-
 173
173
-
 174
174
-
 175
175
-
 176
176
-
 177
177
-
 178
178
-
 179
179
-
 180
180
-
 181
181
-
 182
182
-
 183
183
-
 184
184
-
 185
185
-
 186
186
-
 187
187
-
 188
188
-
 189
189
-
 190
190
-
 191
191
-
 192
192
-
 193
193
-
 194
194
-
 195
195
-
 196
196
-
 197
197
-
 198
198
-
 199
199
-
 200
200
-
 201
201
-
 202
202
-
 203
203
-
 204
204
-
 205
205
-
 206
206
-
 207
207
-
 208
208
-
 209
209
-
 210
210
-
 211
211
-
 212
212
-
 213
213
-
 214
214
-
 215
215
-
 216
216
-
 217
217
-
 218
218
-
 219
219
-
 220
220
-
 221
221
-
 222
222
-
 223
223
-
 224
224
-
 225
225
-
 226
226
-
 227
227
-
 228
228
-
 229
229
-
 230
230
-
 231
231
-
 232
232
-
 233
233
-
 234
234
-
 235
235
-
 236
236
-
 237
237
-
 238
238
-
 239
239
-
 240
240
-
 241
241
-
 242
242
-
 243
243
-
 244
244
-
 245
245
-
 246
246
-
 247
247
-
 248
248
-
 249
249
-
 250
250
-
 251
251
-
 252
252
-
 253
253
-
 254
254
-
 255
255
-
 256
256
-
 257
257
-
 258
258
-
 259
259
-
 260
260
-
 261
261
-
 262
262
-
 263
263
-
 264
264
-
 265
265
-
 266
266
-
 267
267
-
 268
268
-
 269
269
-
 270
270
-
 271
271
-
 272
272


Samsung QE65LS03RAU Användarmanual
- Kategori
- LED-TV
- Typ
- Användarmanual
på andra språk
- español: Samsung QE65LS03RAU Manual de usuario
- Deutsch: Samsung QE65LS03RAU Benutzerhandbuch
- português: Samsung QE65LS03RAU Manual do usuário
- français: Samsung QE65LS03RAU Manuel utilisateur
- dansk: Samsung QE65LS03RAU Brugermanual
Relaterade papper
-
Samsung QE49LS03RAU Användarmanual
-
Samsung UE55LS003AU Användarmanual
-
Samsung UE43LS003AU Användarmanual
-
Samsung QE43LS03TAU Användarmanual
-
Samsung QE32LS03TBK Användarmanual
-
Samsung QE32LS03TBK Användarmanual
-
Samsung QE65Q85RAT Användarmanual
-
-
Samsung QE55Q950RBT Användarmanual
-
Samsung HG65TS030EB Installationsguide