
www�tunturi�com
- Please read this assembly manual carefully prior to assembling this product�
- Lesen Sie sich vor der Montage des Produkts diese Montageanleitung sorgfältig durch.
- Veuillez lire attentivement le présent manuel d’assemblage avant de monter ce produit.
- Lees deze montagehandleiding zorgvuldig voordat u dit product in elkaar gaat zetten.
- Leggere attentamente questo manuale di montaggio prima di montare il prodotto.
- Antes de montar este producto, lea atentamente este manual de montaje.
- Läs den här monteringshandboken noggrant före användning av den här produkten.
- Lue tämä asennusohje huolellisesti ennen tämän tuotteen asennusta.
Attention, Achtung, Attention, Attentie, Attenzione, Atención, Giv akt, Huomio
GB Assembly manual
DE Montageanleitung
FR Manuel d’assemblage
NL Montagehandleiding
IT Manuale di montaggio
ES Manual de montaje
SV Monteringshandbok
SU Asennusohje
GET YOUR
USER MANUAL
ONLINE
http://manuals.tunturi.com
WWW
IMPORTANT
Cardio Fit T35 Treadmill
EN957
Class HC
Made in China
RoHS
2011/65/EU
i
SN:
HOME USE
MAX USER WEIGHT: 100 KGS
220 LBS
INPUT: AC 210~240V/ 50-60HZ
220 V-AC/ 8A 1.8KW
SKU: 16TCFT3050
Cardio Fit Run T35
11 - 15
16 - 20
21 - 25
26 - 30
31 - 35
36 - 41
42 - 46
47 - 51


3
Cardio Fit T35
A

i
B
100 cm
100 cm
100 cm
100 cm
4
Cardio Fit T35
B
C

X
Hexagon socket
large at head
half tooth bolt
Hexagon socket
short at head
full tooth bolt
2x
4x
5
Cardio Fit T35
C-1

Hexagon socket
large at head
half tooth bolt
Hexagon socket
short at head
full tooth bolt
2x
4x
6
Cardio Fit T35
C-2

Hexagon socket
large at head
half tooth bolt
Hexagon socket
short at head
full tooth bolt
2x
4x
7
Cardio Fit T35
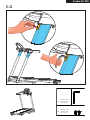
C-3

A
B
8
Cardio Fit T35
E-2
F-1

9
Cardio Fit T35
F-2
F-4

10
Cardio Fit T35
F-7
F-8

11
English
USER MANUAL ON OUR WEBSITE
To reduce the impact on the environment, you will only
find the assembly steps in this manual.
To learn how to use this product, please download the
user manual from:
manuals.tunturi.com
Welcome
Important Safety Instructions
This Owner’s Manual is an essential part of your
training equipment: reading all instructions in this
manual before you start using this appliance. The
following precautions must always be followed:
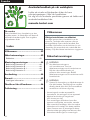
Index
Welcome ����������������������������������������� 11
Safety warnings ������������������������������ 11
Electrical safety ��������������������������������������������12
Assembly instructions ��������������������� 13
Description illustration A ������������������������������13
Description illustration B ������������������������������13
Description illustration B-1 ���������������������������13
Description illustration C ������������������������������13
Use�������������������������������������������������� 13
Warranty ����������������������������������������� 14
Additional information ���������������������������������14
Declaration of the manufacturer ���� 14
Disclaimer ��������������������������������������� 15
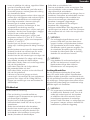
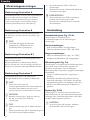
Safety warnings
⚠ WARNING
• Read the safety warnings and the
instructions. Failure to follow the safety
warnings and the instructions can cause
personal injury or damage to the equipment.
Keep the safety warnings and the
instructions for future reference.
⚠ WARNING
• Heart rate monitoring systems may be
inaccurate. Over exercise may result in
serious injury or death. If you feel faint stop
exercising immediately.
- The equipment is suitable for domestic
use only. The equipment is not suitable for
commercial use.
- Max. usage is limited to 2 hrs a day.
- The use of this equipment by children or
persons with a physical, sensory, mental
or motorial disability, or lack of experience
and knowledge can give cause to hazards.
Persons responsible for their safety must give
explicit instructions or supervise the use of the
equipment.
- Before starting your workout, consult a
physician to check your health.
- If you experience nausea, dizziness or other
abnormal symptoms, immediately stop your
workout and consult a physician.
- To avoid muscular pain and strain, start each
workout by warming up and finish each workout
by cooling down. Remember to stretch at the
end of the workout.
- The equipment is suitable for indoor use only.
The equipment is not suitable for outdoor use.

12
English
- Only use the equipment in environments
with adequate ventilation. Do not use the
equipment in draughty environments in order
not to catch a cold.
- Only use the equipment in environments with
ambient temperatures between 10 °C and 35
°C. Only store the equipment in environments
with ambient temperatures between 5 °C and
45 °C.
- Do not use or store the equipment in humid
surroundings. The air humidity must never be
more than 80%.
- Only use the equipment for its intended
purpose. Do not use the equipment for other
purposes than described in the manual.
- Do not use the equipment if any part is
damaged or defective. If a part is damaged or
defective, contact your dealer.
- Keep your hands, feet and other body parts
away from the moving parts.
- Keep your hair away from the moving parts.
- Wear appropriate clothing and shoes.
- Keep clothing, jewellery and other objects away
from the moving parts.
- Make sure that only one person uses the
equipment at a time. The equipment must not
be used by persons weighing more than 100kg
(220 lbs).
- Do not open equipment without consulting
your dealer.
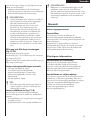
Electrical safety
(Only for equipment with electric power)
- Before use, always check that the mains voltage
is the same as the voltage on the rating plate of
the equipment.
- Do not use an extension cable.
- Keep the mains cable away from heat, oil and
sharp edges.
- Do not alter or modify the mains cable or the
mains plug.
- Do not use the equipment if the mains cable or
the mains plug is damaged or defective. If the
mains cable or the mains plug is damaged or
defective, contact your dealer.
- Always fully unwind the mains cable.
- Do not run the mains cable underneath the
equipment. Do not run the mains cable
underneath a carpet. Do not place any objects
on the mains cable.
- Make sure that the mains cable does not hang
over the edge of a table.
- Make sure that the mains cable cannot be
caught accidentally or tripped over.
- Do not leave the equipment unattended when
the mains plug is inserted into the wall socket.
- Do not pull the mains cable to remove the
mains plug from the wall socket.
- Remove the mains plug from the wall socket
when the equipment is not in use, before
assembly or disassembly and before cleaning
and maintenance.
⚠ CAUTION
• If voltage varies by ten percent (10%) or
more, the performance of your treadmill
may be affected. Such conditions are not
covered under your warranty. If you suspect
the voltage is low, contact your local power
company or a licensed electrician for proper
testing.
⚠ CAUTION
• Route the power mains cord away from any
moving part of the treadmill including the
elevation mechanism and transport wheels.
Grounding Instructions
This product must be grounded. If the treadmill’s
electrical system should malfunction or breakdown
grounding provides a path of least resistance for
electric current, reducing the risk of electric shock.
This product is equipped with a cord having an
equipment-grounding plug. The plug must be
plugged into an appropriate outlet that is properly
installed and grounded in accordance with all
local codes and ordinances.
⚠ WARNING
• Improper connection of the equipment-
grounding conductor can result in a risk
of electric shock. Check with a qualified
electrician or serviceman if you are in doubt
as to whether the product is properly
grounded. Do not modify the plug provided
with the product if it will not fit the outlet;
have a proper outlet installed by a qualified
electrician.

13
English
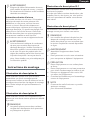
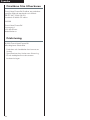
Assembly instructions
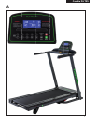
Description illustration A
The illustration shows what the trainer will looks
like after the assembly is completed.
You can use this as a reference during your
assembly, but do follow the assembly steps
always in the correct sequence as showed in the
illustrations.
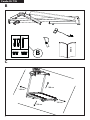
Description illustration B
The illustration shows what components and parts
you should find when un-boxing your product.
‼ NOTE
• Small parts can be hidden/ packed in hollow
spaces in the Styrofoam product protection
Description illustration B-1
The illustration shows the hardware kit that comes
with your product.
The hardware kit contains bolts, washers, screws
, nuts etc. and the required tools to properly fit
your trainer.
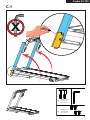
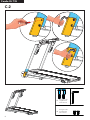
Description illustration C
The illustrations shows you in the correct following
order how to assembly your trainer best.
‼ NOTE
• Part numbers shown in the assembly steps
are commencing with the spare part drawing
that can be found in the online full version
user manual.
⚠ WARNING
• Assemble the equipment in the given order.
• Carry and move the equipment with at least
two persons.
⚠ CAUTION
• Place the equipment on a firm, level surface.
• Place the equipment on a protective base to
prevent damage to the floor surface.
• Allow at least 100 cm of clearance around
the equipment.
• Refer to the illustrations for the correct
assembly of the equipment.
‼ NOTE
• Save the tools provided with this product,
after you completed the product assembly,
for future service purposes.
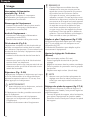
Use
Master power switch (fig� E-2 A)
The equipment is equipped with a master power
switch to shut down the equipment completely.
To start the equipment:
- Insert the mains plug into the wall socket.
- Set the master power switch to the on position.
To stop the equipment:
- Set the mains power switch to the off position.
- Remove the mains plug from the wall socket.
Safety key (Fig F-4)
The equipment is equipped with a safety key that
must be properly inserted into the console to start
the equipment. If you remove the safety key from
the console, the equipment will stop immediately.
- Insert the safety key into the slot in the console.
- Make sure that the clip of the safety key is
properly attached to your clothing.
Make sure that the clip is not removed from
your clothing before the safety key is removed
from the console.
Circuit breaker (Fig� E-2 B)
The equipment is equipped with a circuit breaker
that interrupts the circuit when the electricity load
is above the maximum capacity. When this occurs,
the circuit breaker must be pressed.
⚠ WARNING
• Before pressing the circuit breaker, remove
the mains plug from the equipment.
If the equipment shuts down, proceed as follows
to restart the equipment:
- Remove the mains plug from the equipment.
- Press the circuit breaker to restart the
equipment.
- Insert the mains plug into the equipment.

14
English
‼ NOTE
• Some circuit breakers used in homes are
not rated for high inrush currents that can
occur when a treadmill is first turned on or
even during normal use. If your treadmill is
tripping the circuit breaker (even though it is
the proper current rating and the treadmill
is the only appliance on the circuit) but
the circuit breaker on the treadmill itself
does not trip, you will need to replace the
breaker with a high inrush type. This is not a
warranty defect. This is a condition we as a
manufacture have no ability to control.
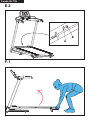
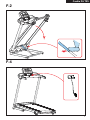
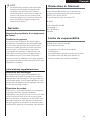
Unfolding and folding the
equipment (fig� F1-F2)
The equipment can be unfolded for use (fig. F1)
and folded for transport and storage (fig. F2).
Refer to the illustrations for the correct way of
unfolding and folding the equipment.
Adjust incline setting (Manual)
- Fold up your treadmill. (Up)
- Take out adjuster pad safety pin.
- Adjust the adjuster pad in desired position.
- Secure the adjuster pad position with the safety
pin.
- Unfold your treadmill. (Down)
‼ NOTE
• Make sure both adjuster-pads are in same
position to avoid your treadmill to become
unstable.
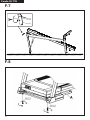
Adjusting the support feet (fig� F-7-8)
The equipment is equipped with 2 support feet. If
the equipment is not stable, the support feet can
be adjusted.
- Turn the support feet as required to put the
equipment in a stable position.
- Tighten the locknuts to lock the support feet.
‼ NOTE
• The machine is the most stable when all
support feet are turned fully in. Therefore
start to level the machine by turning all
support feet fully in, before turning out the
required support feet to stable the machine.
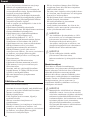
Warranty
Warranty terms
The consumer is entitled to the applicable legal
rights stated in the national legislation concerning
the commerce of consumer goods. This warranty
does not restrict these rights. The Purchaser’s
Warranty is only valid if the item is used in an
environment approved by Tunturi New Fitness BV
for that particular equipment. The product-specific
approved environment is stated in the Owner’s
Manual provided with your equipment.
Additional information
Packaging disposal
Government guidelines ask that we reduce the
amount of waste material disposed of in land fill
sites. We therefore ask that you dispose of all
packaging waste responsibly at public recycling
centres.
End of life disposal
We at Tunturi hope you enjoy many years of
enjoyable use from your fitness trainer. However,
a time will come when your fitness trainer will
come to the end of its useful life. Under ‘European
WEEE Legislation you are responsible for the
appropriate disposal of your fitness trainer to a
recognised public collection facility.
Declaration of the manufacturer
Tunturi New Fitness BV declares that the product
is in conformity with the following standards and
directives: EN 957 (HC), 2014/ 30/ EU.
The product therefore carries the CE label.
04-2020
Tunturi New Fitness BV
Purmerweg 1
1311 XE Almere
The Netherlands

15
English
Disclaimer
© 2020 Tunturi New Fitness BV
All rights reserved.
- The product and the manual are subject to
change.
- Specifications can be changed without further
notice.
- Check our website for the latest user manual
version.

16
Deutsch
Deutsch
Diese deutsche Bedienungsanleitung ist eine
Übersetzung des englischen Textes. Es können
keine Rechte auf diese Übersetzung abgeleitet
werden.
Index
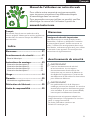
Benutzerhandbuch auf unserer Website
Um die Belastung für die Umwelt zu reduzieren, finden
Sie in dieser Anleitung nur die Montageschritte.
Um zu erfahren, wie Sie dieses Produkt verwenden, laden
Sie bitte das Benutzerhandbuch herunter:
manuals.tunturi.com
Willkommen
Wichtige sicherheitshinweise
Dieses Handbuch ist ein wesentlicher Bestandteil
Ihres Trainingsgerätes. Lesen Sie es bitte
sorgfältig durch, bevor Sie Ihr Trainingsgerät
montieren, mit ihm trainieren oder es warten.
Bitte bewahren Sie dieses Handbuch auf; es wird
Sie jetzt und zukünftig darüber informieren, wie
Sie Ihr Gerät benutzen und warten. Befolgen Sie
diese Anweisungen immer sorgfältig.
Warnhinweise zur Sicherheit
⚠ WARNUNG
• Lesen Sie die Warnhinweise zur Sicherheit
und die Anweisungen. Werden die
Warnhinweise zur Sicherheit und die
Anweisungen nicht befolgt, kann dies
zu Personenverletzungen und Schäden
am Gerät führen. Bewahren Sie die
Warnhinweise zur Sicherheit und die
Anweisungen zur künftigen Bezugnahme
auf.
⚠ WARNUNG
• Herzfrequenz-Überwachungssysteme
können ungenau sein.
• Eine Überanstrengung kann zu schweren
Schädigungen oder zum Tod führen. Wenn
Sie sich schwach oder ohnmächtig fühlen,
stellen Sie die Übungen unverzüglich ein.
- Das Gerät ist nur für den Hausgebrauch
geeignet. Das Gerät ist nicht für den
gewerblichen Gebrauch geeignet.
- Die maximale Verwendung ist auf 2 Stunden
pro Tag beschränkt
Willkommen ������������������������������������ 16
Warnhinweise zur Sicherheit ���������� 16
Elektrische Sicherheit �����������������������������������17
Montageanleitungen ���������������������� 18
Beschreibung Abbildung A ��������������������������18
Beschreibung Abbildung B ���������������������������18
Beschreibung Abbildung B-1 �����������������������18
Beschreibung Abbildung C ��������������������������18
Gebrauch ���������������������������������������� 19
Garantie ������������������������������������������ 20
Zusätzliche Informationen ����������������������������20
Herstellererklärung ������������������������ 20
Haftungsausschluss ������������������������� 20

17
Deutsch
- Wenn dieses Gerät von Kindern oder Personen
mit körperlicher, sensorischer, geistiger oder
motorischer Behinderung verwendet wird,
oder wenn nicht genügend Erfahrung und
Kenntnisse vorhanden sind, kann dies zu
Gefahrensituationen führen. Personen, die für
deren Sicherheit verantwortlich sind, müssen
klare Anweisungen geben oder den Gebrauch
des Geräts beaufsichtigen.
- Bevor Sie Ihr Training starten, nehmen Sie
Kontakt mit einem Arzt auf, um Ihre Gesundheit
kontrollieren zu lassen.
- Falls Sie Übelkeit, ein Schwindelgefühl oder
andere anormale Symptome verspüren, hören
Sie unverzüglich mit Ihrem Training auf und
wenden Sie sich an einen Arzt.
- Um einen Muskelkater zu vermeiden, starten
Sie jedes Training mit Aufwärmen und beenden
Sie es mit Abkühlen. Denken Sie daran, sich am
Ende des Trainings zu dehnen.
- Das Gerät ist nur für den Gebrauch in
geschlossenen Räumen geeignet. Das Gerät ist
nicht für den Gebrauch im Freien geeignet.
- Verwenden Sie das Gerät nur in Umgebungen
mit ausreichender Belüftung. Verwenden Sie
das Gerät nicht in zugiger Umgebung, damit
Sie sich nicht erkälten.
- Verwenden Sie das Gerät nur in Umgebungen
mit Umgebungstemperaturen zwischen 10
°C und 35 °C. Lagern Sie das Gerät nur in
Umgebungen mit einer Umgebungstemperatur
zwischen 5 °C und 45 °C.
- Verwenden und lagern Sie das Gerät nicht in
feuchten Umgebungen. Die Luftfeuchtigkeit
darf niemals 80% überschreiten.
- Verwenden Sie das Gerät nur
bestimmungsgemäß. Verwenden Sie das Gerät
nicht für einen anderen als für den in diesem
Handbuch beschriebenen Zweck.
- Verwenden Sie das Gerät nicht, falls Teile
beschädigt oder defekt sind. Ist ein Teil
beschädigt oder defekt, wenden Sie sich an
Ihren Händler.
- Halten Sie Ihre Hände, Füße und andere
Körperteile von den beweglichen Teilen fern.
- Halten Sie Ihr Haar von den beweglichen Teilen
fern.
- Tragen Sie entsprechende Kleidung und
Schuhe.
- Halten Sie Kleidung, Schmuck und andere
Gegenstände von den beweglichen Teilen fern.
- Vergewissern Sie sich, dass das Gerät nur
von einer Person auf einmal verwendet wird.
Das Gerät darf nicht von Personen verwendet
werden, deren Gewicht 100kg (220 lbs)
überschreitet.
- Öffnen Sie das Gerät nicht, ohne vorher mit
Ihrem Händler zu sprechen.
Elektrische Sicherheit
(Betrifft nur elektrisch betriebene Geräte)
- Vergewissern Sie sich vor der Verwendung stets,
dass die Netzspannung mit der Spannung auf
dem Typenschild des Geräts übereinstimmt.
- Verwenden Sie kein Verlängerungskabel.
- Halten Sie das Netzkabel von Hitze, Öl und
scharfen Kanten fern.
- Verändern Sie nichts am Netzkabel oder am
Netzstecker.
- Verwenden Sie das Gerät nicht, falls das
Netzkabel oder der Netzstecker beschädigt
oder defekt ist. Ist das Netzkabel oder der
Netzstecker beschädigt oder defekt, wenden
Sie sich an Ihren Händler.
- Wickeln Sie das Netzkabel immer vollständig
ab.
- Lassen Sie das Netzkabel nicht unter dem Gerät
entlanglaufen. Lassen Sie das Netzkabel nicht
unter einem Teppich entlanglaufen. Stellen Sie
keine Gegenstände auf das Netzkabel.
- Vergewissern Sie sich, dass das Netzkabel
nicht über der Kante eines Tisches hängt.
Vergewissern Sie sich, dass niemand
versehentlich über das Netzkabel stolpert.
- Lassen Sie das Gerät nicht unbeaufsichtigt,
wenn der Netzstecker in die Wandsteckdose
eingesteckt ist.
- Ziehen Sie nicht am Netzkabel, um den
Netzstecker aus der Wandsteckdose zu ziehen.
- Ziehen Sie den Netzstecker aus der
Wandsteckdose, wenn das Gerät nicht
verwendet wird, bevor es zusammengebaut
oder zerlegt wird sowie vor der Reinigung und
Wartung.
⚠ WARNUNG
• Schwankungen in der Netzspannung
von mehr als 10 Prozent können zu
Fehlfunktionen des Gerätes führen
und die Elektronik beschädigen. Die
Leistungsaufnahme kann maximal 15 A
betragen. Die Garantie erlischt, wenn
das Gerät nicht diesen Anleitungen
entsprechend angeschlossen wird

18
Deutsch
⚠ WARNUNG
• Führen Sie das Stromkabel abseits
aller beweglichen Teile des Laufbands,
einschließlich des Hebemechanismus und
der Transporträder.
Erdungsanweisungen
Dieses Produkt muss geerdet werden. Wenn das
Elektrosystem des Laufbands nicht funktioniert
oder ausfällt, ist die Erdung der letzte Widerstand
für Stromspannung, wodurch Stromschläge
vermieden werden. Dieses Produkt hat eine Kabel
mit einem Erdungsstecker. Der Stecker muss
in eine geeignete Dose gesteckt werden, die
richtig gemäß aller örtlichen Bestimmungen und
Verordnungen installiert und geerdet ist.
⚠ WARNUNG
• Ein ungeeigneter Erdungsanschluss
des Geräts kann zu Stromschlägen
führen. Überprüfen Sie zusammen mit
einem qualifizierten Elektriker oder
Servicemitarbeiter in Zweifelsfällen, ob
das Gerät richtig geerdet ist. Nehmen Sie
am Stecker, der mit dem Produkt geliefert
wurde, keine Veränderungen vor, wenn
dieser nicht in die Steckdose passt; lassen
Sie von einem qualifizierten Elektriker eine
passende Steckdose installieren.
Montageanleitungen
Beschreibung Abbildung A
Die Abbildung zeigt, wie das Gerät nach der
Montage aussehen wird.
Sie können diese bei der Montage als Referenz
verwenden, befolgen Sie die Montageschritte
aber immer in der richtigen Reihenfolge, wie in
den Abbildungen gezeigt.
Beschreibung Abbildung B
Die Abbildung zeigt, welche Komponenten und
Teile in der Lieferung enthalten sein sollen.
‼ HINWEIS
• Kleinteile können in Hohlräumen im
Styropor-Produktschutz versteckt/verpackt
werden
Beschreibung Abbildung B-1
Die Abbildung zeigt den Zubehörsatz, der mit
Ihrem Produkt geliefert wird.
Er enthält Schrauben, Unterlegscheiben, Muttern
usw. sowie die erforderlichen Werkzeuge zur
ordnungsgemäßen Montage Ihres Trainers.
Beschreibung Abbildung C
Die Abbildungen zeigen Ihnen in der richtigen
Reihenfolge, wie Sie Ihren Trainer am besten
montieren.
‼ HINWEIS
• Die in den Montageschritten angegebenen
Teilenummern beginnen mit der
Ersatzteilzeichnung, die Sie in der Online-
Vollversion des Benutzerhandbuchs finden.
⚠ WARNUNG
• Bauen Sie das Gerät in der angegebenen
Reihenfolge zusammen.
• Tragen und bewegen Sie das Gerät mit
mindestens zwei Personen.
⚠ VORSICHT
• Stellen Sie das Gerät auf festen, ebenen
Boden.
• Stellen Sie das Gerät auf eine schützende
Unterlage, um Schäden am Bodenbelag zu
vermeiden.
• Sorgen Sie rund um das Gerät für einen
Freiraum von mindestens 100 cm.
• Der richtige Zusammenbau des Geräts geht
aus den Abbildungen hervor.
‼ HINWEIS
• Heben Sie die Werkzeuge für künftige
Zwecke auf, die zu diesem Produkt geliefert
wurden, wenn Sie die Montage beendet
haben.

19
Deutsch
Gebrauch
Hauptschalter (Abb� E-2 A)
Das Gerät ist mit einem Hauptschalter
ausgestattet, mit dem es komplett abgeschaltet
werden kann.
Um das Gerät zu starten:
- Stecken Sie den Netzstecker in die
Wandsteckdose.
- Schalten Sie den Hauptschalter ein (ON).
Um das Gerät zu stoppen:
- Schalten Sie den Netzschalter aus (OFF).
- Ziehen Sie den Netzstecker aus der
Wandsteckdose.
Sicherheitsschlüssel (Abb� F-4)
Das Gerät ist mit einem Sicherheitsschlüssel
ausgestattet, der zum Starten in die
Konsole gesteckt werden muss. Wird der
Sicherheitsschlüssel aus der Konsole entfernt,
stoppt das Gerät sofort.
- Stecken Sie den Sicherheitsschlüssel in den
Schlitz in der Konsole.
- Vergewissern Sie sich, dass der Clip des
Sicherheitsschlüssels richtig an Ihrer Kleidung
befestigt ist.
Vergewissern Sie sich, dass der Clip nicht
von Ihrer Kleidung entfernt wird, bevor der
Sicherheitsschlüssel aus der Konsole gezogen
wird.
Schutzschalter (Abb� E-2 B)
Das Gerät ist mit einem Schutzschalter
ausgestattet, der den Strom unterbricht,
wenn die elektrische Last die maximale
Kapazität überschreitet. Tritt dies ein, muss der
Schutzschalter gedrückt werden..
⚠ WARNUNG
• Ziehen Sie vor dem Drücken des
Schutzschalters den Netzstecker aus dem
Gerät.
Schaltet das Gerät ab, gehen Sie wie folgt vor, um
das Gerät neu zu starten:
- Ziehen Sie den Netzstecker aus dem Gerät.
- Drücken Sie den Schutzschalter, um das Gerät
neu zu starten.
- Stecken Sie den Netzstecker in das Gerät.
‼ HINWEIS
• Einige Schutzschalter in Gebäuden sind nicht
auf hohen Einschaltstrom ausgelegt, der
beim ersten Einschalten des Laufbands oder
auch bei normaler Verwendung vorkommen
kann. Wenn Ihr Laufband den Schutzschalter
auslöst (auch wenn die Spannung korrekt
ist und das Laufband das einzige Gerät
im Stromkreis ist), aber der Schutzschalter
im Laufband selbst nicht ausgelöst wird,
müssen Sie den Schalter durch einen für
hohen Einschaltstrom ersetzen. Dies ist
nicht Teil der Garantieleistungen. Diese
Bedingungen können vom Hersteller nicht
beeinflusst werden.
Auseinander- und Zusammenklappen des
Geräts (Abb� F1-F2)
Das Gerät kann zum Gebrauch
auseinandergeklappt (Abb.F1) und zum Transport
und zur Aufbewahrung zusammengeklappt
werden (Abb. F2). Aus den Abbildungen geht
hervor, wie das Gerät richtig auseinander- und
zusammengeklappt wird.
Einstellung der Steigung (Manuell)
- Klappe den Trainer zusammen.
- Ziehe den Sicherheits-Pin raus.
- Stellen Sie die Einstellungsvorrichtung in der
gewünschten Position.
- Sichern Sie die Position der
Einstellungsvorrichtung mit dem Sicherheits-
Pin.
- Klappe den Trainer auseinander
‼ HINWEIS
• Stellen Sie sicher das beide
Einstellungsvorrichtungen die gleiche
Position haben um Instabilität vom Laufband
zu vermeiden.
Einstellen der Stützfüße (abb� F-7-8)
Das Gerät hat 2 Stützfüße. Steht das Gerät nicht
stabil, kann es mit den Stützfüßen eingestellt
werden.
- Drehen Sie die Stützfüße wie erforderlich, um
das Gerät in eine stabile Position zu bringen.
- Ziehen Sie die Sicherungsmuttern an, um die
Stützfüße zu sichern.

20
Deutsch
‼ HINWEIS
• Die Maschine steht am stabilsten, wenn alle
Stützfüße vollständig eingeschraubt sind.
Nivellieren Sie die Maschine daher, indem
Sie alle Stützfüße vollständig Eindrehen,
bevor Sie die entsprechenden Füße
zur Stabilisierung der Maschine wieder
herausdrehen.
Garantie
Eigentümer-garantie für Tunturi
fitnessgeräte�
Garantiebedingungen
Der Käufer ist berechtigt die den Handel mit
Konsumgütern betreffenden gesetzlichen
Rechte gemäß der nationalen Gesetzgebung
in Anwendung zu bringen. Diese Rechte
werden durch die Garantie nicht eingeschränkt.
Bedingungen zu ersetzen. Die Eigentümer-
Garantie gilt nur dann, wenn das Gerät in einer
für entsprechende Geräte der Tunturi New
Fitness BV zugelassenen Anwendungsumgebung
verwendet wird. Die für das Gerät zugelassene
Anwendungsumgebung wird in der
Bedienungsanleitung des Geräts genannt.
Zusätzliche Informationen
Verpackungsentsorgung
Staatliche Vorschriften sagen, dass wir die in
Deponien entsorgen Abfallmengen verringern
sollen. Daher bitten wir Sie, den gesamten
Verpackungsabfall an öffentlichen Recyclingstellen
abzugeben
Entsorgung am ende der Lebensdauer
Wir bei Tunturi hoffen, dass Sie Ihren
Fitnesstrainer viele Jahre mit Freude nutzen
werden. Jedoch wird irgendwann die Zeit
kommen, wenn die Ende der Nutzungsdauer
des Fitnesstrainers erreicht ist. Gemäß den
europäischen WEEE-Gesetzen sind Sie für eine
geeignete Entsorgung des Fitnesstrainers bei
einer anerkannten öffentlichen Entsorgungsstelle
verantwortlich.
Herstellererklärung
Tunturi New Fitness BV erklärt hiermit, dass das
Produkt folgenden Normen und
Richtlinien entspricht: EN 957 (HC), 2014/ 30/ EU.
Das Produkt trägt daher das CE-Kennzeichen.
04-2020
Tunturi New Fitness BV
Purmerweg 1
1311 XE Almere
The Netherlands
Haftungsausschluss
© 2020 Tunturi New Fitness BV
Alle Rechte vorbehalten.
- Produkt und Handbuch können geändert
werden.
- Die technischen Daten können ohne
Vorankündigung geändert werden.
- Auf unserer Website finden Sie die neueste
Version des Benutzerhandbuchs.
Sidan laddas...
Sidan laddas...
Sidan laddas...
Sidan laddas...
Sidan laddas...
Sidan laddas...
Sidan laddas...
Sidan laddas...
Sidan laddas...
Sidan laddas...
Sidan laddas...
Sidan laddas...
Sidan laddas...
Sidan laddas...
Sidan laddas...
Sidan laddas...
Sidan laddas...
Sidan laddas...
Sidan laddas...
Sidan laddas...
Sidan laddas...
Sidan laddas...
Sidan laddas...
Sidan laddas...
Sidan laddas...
Sidan laddas...
Sidan laddas...
Sidan laddas...
Sidan laddas...
Sidan laddas...
Sidan laddas...
Sidan laddas...
-
 1
1
-
 2
2
-
 3
3
-
 4
4
-
 5
5
-
 6
6
-
 7
7
-
 8
8
-
 9
9
-
 10
10
-
 11
11
-
 12
12
-
 13
13
-
 14
14
-
 15
15
-
 16
16
-
 17
17
-
 18
18
-
 19
19
-
 20
20
-
 21
21
-
 22
22
-
 23
23
-
 24
24
-
 25
25
-
 26
26
-
 27
27
-
 28
28
-
 29
29
-
 30
30
-
 31
31
-
 32
32
-
 33
33
-
 34
34
-
 35
35
-
 36
36
-
 37
37
-
 38
38
-
 39
39
-
 40
40
-
 41
41
-
 42
42
-
 43
43
-
 44
44
-
 45
45
-
 46
46
-
 47
47
-
 48
48
-
 49
49
-
 50
50
-
 51
51
-
 52
52


på andra språk
- italiano: Tunturi T35
- español: Tunturi T35
- Deutsch: Tunturi T35
- français: Tunturi T35
- English: Tunturi T35
- suomi: Tunturi T35
- Nederlands: Tunturi T35