
Phaser
™
Laserskrivare
4400
Installations-
guide

Copyright © 2002, Xerox Corporation. Med ensamrätt. Rättigheterna för opublicerat material skyddas av de upphovsrättslagar
som gäller i USA. Innehållet i den här publikationen får inte reproduceras i någon form utan tillåtelse från Xerox Corporation.
Upphovsrätten innefattar allt material och all information som är upphovsrättsskyddad enligt lag eller i enlighet med detta avtal.
Detta avser också, utan begränsningar, det material som genereras av programvaran och som visas på bildskärmen, såsom format,
mallar, ikoner, skärmbilder, utseende osv.
XEROX
®
, The Document Company
®
, det stiliserade X:et, CentreWare
®
, DocuPrint
®
och Workset
®
är registrerade varumärken
som tillhör Xerox Corporation. infoSMART™, Phaser™, PhaserPort™, PhaserSMART™ och PhaserTools™ är varumärken
som tillhör Xerox Corporation.
Adobe
®
, Acrobat
®
, Acrobat
®
Reader
®
, Illustrator
®
, PageMaker
®
, Photoshop
®
, PostScript
®
, ATM
®
, Adobe Garamond
®
,
Birch
®
, Carta
®
, Mythos
®
, Quake
®
och Tekton
®
är registrerade varumärken och Adobe Jenson™, Adobe Brilliant Screens™
technology och IntelliSelect™ är varumärken som tillhör Adobe Systems Incorporated eller deras dotterbolag som kan vara
registrerade i vissa områden.
Apple
®
, LaserWriter
®
, LocalTalk
®
, Macintosh
®
, Mac
®
OS, AppleTalk
®
,
TrueType2
®
, Apple Chancery
®
, Chicago
®
, Geneva
®
,
Monaco
®
och New York
®
är registrerade varumärken och QuickDraw™ är ett varumärke som tillhör Apple Computer
Incorporated.
Marigold™ och Oxford™ är varumärken som tillhör AlphaOmega Typography.
Avery™ är ett varumärke som tillhör Avery Dennison Corporation.
PCL
®
och HP-GL
®
är registrerade varumärken som tillhör Hewlett-Packard Corporation.
Hoefler Text är utformat av Hoefler Type Foundry.
ITC Avant Guard Gothic
®
, ITC Bookman
®
, ITC Lubalin Graph
®
, ITC Mona Lisa
®
, ITC Symbol
®
, ITC Zapf Chancery
®
och
ITC Zapf Dingbats
®
är registrerade varumärken som tillhör International Typeface Corporation.
Bernhard Modern™, Clarendon™, Coronet™, Helvetica™, New Century Schoolbook™, Optima™, Palatino™, Stempel
Garamond™, Times™ och Univers™ är varumärken som tillhör Linotype-Hell AG och/eller dess dotterbolag.
MS-DOS
®
och Windows
®
är registrerade varumärken som tillhör Microsoft Corporation.
Wingdings™ i TrueType
®
-format är en produkt som tillhör Microsoft Corporation. WingDings är ett varumärke som tillhör
Microsoft Corporation och TrueType är ett registrerat varumärke som tillhör Apple Computer, Inc.
Albertus™, Arial™, Gill Sans™, Joanna™ och Times New Roman™ är varumärken som tillhör Monotype Corporation.
Antique Olive
®
är ett registrerat varumärke som tillhör M. Olive.
Eurostile™ är ett varumärke som tillhör Nebiolo.
Novell
®
och NetWare
®
är registrerade varumärken som tillhör Novell, Incorporated.
Sun
®
och Sun Microsystems
®
är registrerade varumärken som tillhör Sun Microsystems, Incorporated.
SPARC
®
är ett registrerat varumärke som tillhör SPARC International, Incorporated. SPARCstation(tm) är ett varumärke som
tillhör SPARC International, Incorporated, exklusivt licensierat till Sun Microsystems, Incorporated.
UNIX
®
är ett registrerat varumärke i USA och andra länder, licensierat exklusivt genom X/Open Company Limited.
Xerox Corporation är E
NERGY
S
TAR
®
-partner, och den här produkten uppfyller E
NERGY
S
TAR
-riktlinjerna för energispardrift.
Namnet och logotypen E
NERGY
S
TAR
är märken som är registrerade i USA.
Den här produkten använder kod för SHA-1 skriven av John Halleck och används med tillstånd av honom.
Produkten innehåller en implementering av LZW som är licensierat under amerikanskt patent 4 558 302.
Andra märken är varumärken eller registrerade varumärken som tillhör de företag till vilka de är knutna.

Copyright © 2002 Xerox Corporation. Med ensamrätt. i
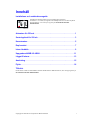
Innehåll
Installations- och snabbreferensguide
Arkmatare för 550 ark . . . . . . . . . . . . . . . . . . . . . . . . . . . . . . . . . . . . . . . . . .1
Sorteringsfack för 500 ark . . . . . . . . . . . . . . . . . . . . . . . . . . . . . . . . . . . . . . 3
Kuvertmatare . . . . . . . . . . . . . . . . . . . . . . . . . . . . . . . . . . . . . . . . . . . . . . . . .5
Duplexenhet . . . . . . . . . . . . . . . . . . . . . . . . . . . . . . . . . . . . . . . . . . . . . . . . . 7
Intern hårddisk . . . . . . . . . . . . . . . . . . . . . . . . . . . . . . . . . . . . . . . . . . . . . . . 9
Uppgradera 4400B till 4400N . . . . . . . . . . . . . . . . . . . . . . . . . . . . . . . . . . .11
Lägga till minne. . . . . . . . . . . . . . . . . . . . . . . . . . . . . . . . . . . . . . . . . . . . . . 13
Anslutning . . . . . . . . . . . . . . . . . . . . . . . . . . . . . . . . . . . . . . . . . . . . . . . . . .15
Flytta. . . . . . . . . . . . . . . . . . . . . . . . . . . . . . . . . . . . . . . . . . . . . . . . . . . . . . . 16
Tillbehör
Om du vill ha en lista över alla tillbehör och tillval till till Phaser™ 4400 laserskrivare, skriv ut
Supportguiden
på
cd-romskivan Interaktiv dokumentation.
Instruktioner om hur du packar upp och installerar skrivaren finns i
Installations- och snabbreferensguiden som medföljer skrivaren. Det finns en pdf-fil
med Installations- och snabbreferensguiden på cd-romskivan Interaktiv
dokumentation.
P4400-114

Phaser™ 4400 laserskrivare
Copyright © 2002 Xerox Corporation. Med ensamrätt. 1
Arkmatare för 550 ark

Arkmatare för 550 ark
Phaser™ 4400 laserskrivare 2

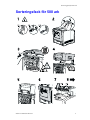
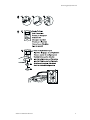
Sorteringsfack för 500 ark
Phaser™ 4400 laserskrivare 3
Sorteringsfack för 500 ark

Sorteringsfack för 500 ark
Phaser™ 4400 laserskrivare 4

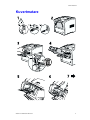
Kuvertmatare
Phaser™ 4400 laserskrivare 5
Kuvertmatare

Kuvertmatare
Phaser™ 4400 laserskrivare 6

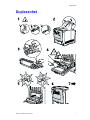
Duplexenhet
Phaser™ 4400 laserskrivare 7
Duplexenhet

Duplexenhet
Phaser™ 4400 laserskrivare 8

Phaser™ 4400 laserskrivare
Copyright © 2002 Xerox Corporation. Med ensamrätt. 9
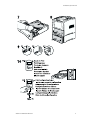
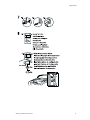
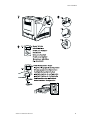
Intern hårddisk
567
2
3
1
1.1 1.2 1.3
4
6.1
6.2

Intern hårddisk
Phaser™ 4400 laserskrivare 10

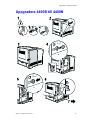
Uppgradera 4400B till 4400N
Phaser™ 4400 laserskrivare 11
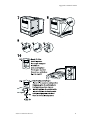
Uppgradera 4400B till 4400N

Uppgradera 4400B till 4400N
Phaser™ 4400 laserskrivare 12

Phaser™ 4400 laserskrivare
Copyright © 2002 Xerox Corporation. Med ensamrätt. 13
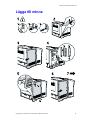
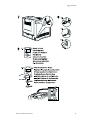
Lägga till minne

Lägga till minne
Phaser™ 4400 laserskrivare 14

Phaser™ 4400 laserskrivare
Copyright © 2002 Xerox Corporation. Med ensamrätt. 15
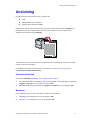
Anslutning
Du kan ansluta skrivaren till datorn på ett av följande sätt:
■
USB
■
Parallell (IEEE 1284 kompatibel)
■
Ethernet (tillval för Phaser 4400B)
Information om hur skrivaren ansluts till ett nätverk finns på den utskrivbara sidan Anslutning, som
tillsammans med andra användbara utskrivbara sidor finns samlade i skrivaren. Följande sidor
innehåller den utskrivbara sidan Anslutning.
Alla utskrivbara sidor har det här formatet, med fält både överst och underst på sidan. Skriv ut de här
sidorna vid skrivarens frontpanel.
För detaljerad information om hur du ansluter till ett nätverk, kan du titta i Nätverksguiden på
cd-romskivan Interaktiv dokumentation.
Visa sidan Anslutning
Du når sidan Anslutning från Menyn för utskrivbara sidor:
1. På frontpanelen bläddrar du till Menyn för utskrivbara sidor med hjälp av tangenterna
Ned-pil eller Upp-pil och trycker sedan på tangenten OK.
2. Bläddra till Anslutning med tangenten Upp-pil eller Ned-pil och tryck på tangenten OK.
Menykarta
För en fullständig lista över utskrivbara sidor kan du skriva ut Menykartan:
1. Välj Menyer på frontpanelen och tryck på tangenten OK.
2. Välj Skriv ut menykarta och tryck på tangenten OK.
P4400-77

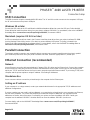
Page 1 of 3
USB Connection
The USB connection requires a standard A/B USB cable. The "A" end of the cable connects to the computer's USB port;
the "B" end connects to the printer's USB port.
Windows 98 or later
Connect the USB cable to the PC and follow the Add New Hardware Wizard to create the USB port. Follow the Add
Printer Wizard to install the printer driver from your printer's software CD-ROM. For more details, refer to the infoSMART
Knowledge Base at www.xerox.com/officeprinting/infoSMART, Document # 18215.
Macintosh (requires OS 9.0.4 or later)
A USB-connected printer will not show in the Chooser. Install the printer driver from your printer's software CD-ROM.
Use the Desktop Printer Utility (version 1.2 or later) to create a desktop USB printer. The utility is located in the
PhaserTools folder created during the software install. For more details, refer to the infoSMART Knowledge Base at
www.xerox.com/officeprinting/infoSMART, Document # 33225.
Parallel Connection
The printer's parallel connection uses a parallel cable to connect your computer's parallel port to the printer's parallel
port. Install the printer driver from your printer's software CD-ROM. Select the appropriate LPT parallel port.
Ethernet Connection (recommended)
Network
Use an Ethernet connection with two twisted-pair (Category 5/RJ-45) cables and an Ethernet hub. Connect the computer
to the hub with one cable and connect the printer to the hub with the second cable. Use any port on the hub except the
uplink port. TCP/IP and EtherTalk are the most common protocols used with Ethernet cables. To print using TCP/IP, each
computer and the printer requires a unique IP address. See Setting IP Addresses.
Standalone Use
Use a crossover cable to connect the printer directly to the computer via the Ethernet port.
Setting an IP address
If your computer is on a large network, contact your network administrator for the appropriate TCP/IP addresses and
additional configurations.
If you are creating your own small Local Area Network, or connecting the printer directly to your computer over Ethernet,
use this basic procedure. The printer and computer(s) should have unique IP addresses. It is important that the
addresses are similar, but not the same. For example, your printer can have the address 192.168.1.2 while your
computer has the address 192.168.1.3. Another device can have the address 192.168.1.4, and so on.
For more details, refer to the infoSMART Knowledge Base at www.xerox.com/officeprinting/infoSMART,
Document # 18545.
PHASER
TM
4400 LASER PRINTER
Connection Setup

Note: If you use the installer from your printer's software CD-ROM, the IP Address is set automatically.
To manually set the printer's IP address:
1. At the printer's front panel, select Menus and press OK.
2. Scroll to the Connection Setup Menu and press OK.
3. Scroll to TCP/IP Address Menu and press OK.
4. Scroll to DCHP/BootP and press OK until it displays OFF.
5. Scroll to TCP/IP Address and press OK.
6. Enter an IP address like the example above.
7. Scroll to TCP/IP Network Mask and press OK.
8. Enter a network (subnet) address. (If you use the IP address in the above example,
set a Subnet Mask of 255.255.255.0)
9. Scroll to TCP/IP Gateway and press OK.
10. Enter a Gateway (router) address. (If you use the IP address in the above example,
set a Gateway address of 192.168.1.1)
11. Scroll to Exit and press OK.
To set a static IP address on your computer:
Windows 95/98/Me
1. From the Start menu, right-click Network Neighborhood and select Properties.
2. On the Configuration tab, select the TCP/IP protocol for your network card, then select Properties.
3. On the IP Address tab, select Specify an IP address. Enter an IP address and Subnet Mask, and click OK.
(If you use the IP address noted above, set a Subnet Mask of 255.255.255.0).
4. Click OK and restart Windows.
Windows 2000/XP
1. From the Start menu, right-click My Network Places and select Properties.
2. Right-click Local Area Connection and select Properties.
3. If you do not have TCP/IP available, you should first click Add and select Protocol. Click Add and select
Internet Protocol TCP/IP.
4. On the General tab, select the TCP/IP protocol for your network card. Click Properties.
5. On the General tab, select Use the following IP address. Enter an IP address and Subnet Mask, and then click
OK. (If you use the IP address in the above example, set a Subnet Mask of 255.255.255.0).
6. Click OK and restart Windows, if prompted.
Windows NT 4.x
1. From the start menu, right-click Network Neighborhood and select Properties.
2. On the Protocols tab, select TCP/IP Protocol and click Properties.
3. On the IP Address tab, select Specify an IP Address. Enter an IP Address and Subnet Mask in the field and
click OK. (If you use the IP address noted above, set a Subnet Mask to 255.255.255.0.)
4. Click OK and restart Windows.
Page 2 of 3
Sidan laddas...
Sidan laddas...
-
 1
1
-
 2
2
-
 3
3
-
 4
4
-
 5
5
-
 6
6
-
 7
7
-
 8
8
-
 9
9
-
 10
10
-
 11
11
-
 12
12
-
 13
13
-
 14
14
-
 15
15
-
 16
16
-
 17
17
-
 18
18
-
 19
19
-
 20
20
-
 21
21
-
 22
22


på andra språk
- English: Xerox 4400 Installation guide
Relaterade papper
-
Xerox 6200 Installationsguide
-
Xerox 7300 Installationsguide
-
-
-
Xerox 4500 Användarguide
-
Xerox 6515 Installationsguide
-
Xerox VersaLink C600 Installationsguide
-
-
Xerox 6200 Installationsguide
-