Parkside PTS 480 A1 Operation and Safety Notes
- Typ
- Operation and Safety Notes

IAN 55728
PLUNGE SAW PTS 480 A1
TAUCHSÄGE
Bedienungs- und Sicherheitshinweise
Originalbetriebsanleitung
UPOTUSSAHA
Käyttö- ja turvaohjeet
Alkuperäisen käyttöohjeen käännös
PLUNGE SAW
Operation and Safety Notes
Translation of original operation manual
SCIE CIRCULAIRE
Instructions d‘utilisation et consignes de sécurité
Traduction du mode d‘emploi d‘origine
S ÄNKS ÅG
Bruksanvisning och säkerhetsanvisningar
Översättning av bruksanvisning i original
INVALZAAG
Bedienings- en veiligheidsinstructies
Vertaling van de originele gebruiksaanwijzing

GB / IE Operation and Safety Notes Page 5
FI Käyttö- ja turvaohjeet Sivu 15
SE Bruksanvisning och säkerhetsanvisningar Sidan 25
FR / BE Instructions d‘utilisation et consignes de sécurité Page 35
NL / BE Bedienings- en veiligheidsinstructies Pagina 45
DE / AT / CH Bedienungs- und Sicherheitshinweise Seite 55
Before reading, unfold the page containing the illustrations and familiarise yourself with all functions of the
device.
Käännä ennen lukemista kuvallinen sivu esiin ja tutustu seuraavaksi laitteen kaikkiin toimintoihin.
Vik ut bildsidan och ha den till hands när du läser igenom anvisningarna och gör dig bekant med
apparatens / maskinens funktioner.
Avant de lire le mode d‘emploi, ouvrez la page contenant les illustrations et familiarisez-vous ensuite avec
toutes les fonctions de l‘appareil.
Vouw vóór het lezen de pagina met de afbeeldingen open en maak u vertrouwd met alle functies van het
apparaat.
Klappen Sie vor dem Lesen die Seite mit den Abbildungen aus und machen Sie sich anschließend mit allen
Funktionen des Gerätes vertraut.

1
4
A
10 5611
D
18
17
16
9
F
7 7 a
11 a
3
6
E
19 20
2221
C
1413 11 a
2
B
8
15
12


5 GB/IE
Table of contents
Introduction
Intended use ........................................................................................................................................ Page 6
Features ...............................................................................................................................................Page 6
Scope of delivery ................................................................................................................................Page 6
Technical Data ....................................................................................................................................Page 6
General safety advice for electrical power tools
1. Workplace safety ...........................................................................................................................Page 7
2. Electrical safety ............................................................................................................................... Page 7
3. Personal safety ................................................................................................................................Page 7
4. Careful handling and use of the electrical power tool.................................................................Page 8
5. Service .............................................................................................................................................Page 8
Safety instructions for all saws ...........................................................................................................Page 9
Safety instructions for plunge saws .................................................................................................... Page 10
Safety recommendations for the correct use of superabrasives.......................................................Page 10
Additional safety information for circular saws .................................................................................Page 11
Start-up
Switching on and off ........................................................................................................................... Page 11
Releasing the plunge blocker .............................................................................................................Page 11
Preselect cutting depth ........................................................................................................................Page 11
Fitting the guide fence .........................................................................................................................Page 11
Handling the plunge saw ...................................................................................................................Page 11
Marking cutting length ........................................................................................................................Page 11
Marking cutting line ............................................................................................................................Page 11
Connecting the saw dust extraction ...................................................................................................Page 12
Replacing the saw blade .................................................................................................................... Page 12
Maintenance and Cleaning ..............................................................................................Page 12
Service ...............................................................................................................................................Page 12
Warranty .........................................................................................................................................Page 12
Disposal ............................................................................................................................................Page 13
Declaration of Conformity / Manufacturer..........................................................Page 13

6 GB/IE
Introduction
Plunge saw PTS 480 A1
Introduction
Congratulations on your purchase. You have select-
ed a high quality product. The instructions for use
are a part of this product. They contain important
information about safety, use and disposal. Before
using the product, please familiarise yourself with all
the operating and safety instructions. Use the product
only as described and for the specified applications.
When passing this product on to others please be
sure to also include all of its documentation.
Intended use
The machine is primarily intended for lengthwise
and across cuts in plunge cut with solid support in
solid wood, chipboard, plywood, aluminium, tiles,
stone, plastic and lightweight construction materials.
Please keep in mind that the pre-fitted saw blade is
only suitable for cutting wood. Any other uses, and /
or modifications to the appliance, are deemed to
be improper usage and may result in serious physi-
cal injury. Not for commercial applications.
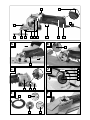
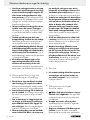
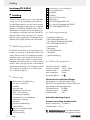
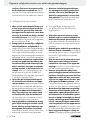
Features
1
Mechanical plunge blocker
2
Power On / Control LED
3
Mains lead
4
Ventilation slits
5
Cover for brushes
6
ON /OFF switch
7
Pre-selector for cutting depth
7 a
Scale for cutting depth
8
Labelling cutting length
9
Base plate
10
Uptake parallel fence
11
Parallel fence
11 a
Screw for parallel fence
12
Window for cutting line
13
Spindle lock
14
Connection for dust extraction
15
Allen key
16
Saw blade
17
Clamping flange
18
Clamping screw and washer
19
Dust extractor hose
20
HW-Circular saw blade Z85 / 30
21
Diamond cutting disc Z85VR
22
HS Circular saw blade Z85 / 36
Scope of delivery
1 Plunge saw PTS 480 A1
1 HW Circular saw blade Z85 / 30
1 Diamond cutting disc Z85VR
1 HS Circular saw blade Z85 / 36
1 Parallel fence
1 Dust extractor hose
1 Allen key
1 Carry case
1 Set of operating instructions
Technical Data
Rated power: 480 W
Rated voltage: 230 V∼, 50 Hz
Idling speed: n
0
4500 min
-1
Max. cutting depth: 25 mm
Protection class: II /
Noise and vibration data:
Measurement for noise level, determined according
to EN 60745. The A-rated noise levels of the elec-
trical power tool are typically at:
Sound pressure level: 82 dB(A)
Sound power level: 93 dB(A)
Uncertainty K: 3 dB
Wear hearing protection!
Evaluated acceleration, typically:
Hand / arm vibration a
h
= 2.266 m / s
2
Uncertainty K = 1.5 m / s
2
The vibration level given in these
operating instructions has been measured in a pro-
Introduction / General safety advice for electrical power tools

7 GB/IE
Introduction
Introduction / General safety advice for electrical power tools
cedure according to EN 60745 and can be used
for the comparison of appliances. The vibration
emission value specified can also serve as a prelim-
inary assessment of the exposure.
Different uses of the device give rise to different vi-
bration levels and in many cases they may exceed
the values given in these instructions. It is easy to
underestimate the vibration load if the electrical
power tool is used regularly in particular circum-
stances.
Note: If you wish to make an accurate assessment
of the vibration loads experienced during a particu-
lar period of work, you should also take into account
the intervening periods of time when the device is
switched off or is running but is not actually in use.
This can result in a much lower vibration load over
the whole of the work period.
General safety advice for
electrical power tools
Please read all safety
information and instructions. Failure to ob-
serve the safety information and instructions can
result in electric shock, fire and / or serious injury.
For future reference keep all the safety
advice and instructions in a safe place.
The term “electrical tool” used in the safety advice
refers to electrical tools powered by mains electric-
ity (by means of a mains lead) and electrical tools
powered by rechargeable batteries (without a
mains lead).
1. Workplace safety
a) Keep your working area clean and
well lit. Untidy or poorly lit working areas
can lead to accidents.
b) Do not work with the device in poten-
tially explosive environments, which
contain inflammable liquids, gases or
dusts. Electrical power tools create sparks,
which can ignite dusts or fumes.
c) Keep children and other people away
while you are operating the electrical
tool. Distractions can cause you to lose con-
trol of the device.
2. Electrical safety
a) The mains plug on the device must
match the mains socket. The plug
must not be modified in any way. Do
not use an adapter plug with devices
fitted with a protective earth. Unmodified
plugs and matching sockets reduce the risk of
electric shock.
b) Avoid touching grounded surfaces
such as pipes, radiators, ovens, and
refrigerators. There is an increased risk of
electric shock if your body is earthed.
c) Keep the appliance away from rain
or moisture. The penetration of water into
the electrical device increases the risk of an
electric shock.
d) Do not use the mains lead for purpos-
es it was not intended for, e.g. to carry
the device, to hang up the device or to
pull the mains plug out of the mains
socket. Keep the mains lead away
from heat, oil, sharp edges or moving
parts of the device. Damaged or tangled
cables increase the risk of an electric shock.
e) If you are working outdoors with an
electrical power tool, always use ex-
tension cords that are approved for
outdoor use. The use of an extension cable
suitable for outdoor use reduces the risk of
electric shock.
f) Use a residual current device (RCD)
for protection if the operation of the
electrical power tool in a moist envi-
ronment cannot be avoided. The use of
an RCD reduces the risk of electric shock.
3. Personal safety
a) Remain alert at all times, watch what
you are doing and always proceed

8 GB/IE
General safety advice for electrical power tools
with caution when using an electrical
tool. Do not use the electrical power
tool if you are tired or under the influ-
ence of drugs, alcohol or medication.
One moment of carelessness when using the
electrical power tool can lead to serious injury.
b) Wear personal protective equipment
and always wear safety glasses. The
wearing of personal protective equipment such
as dust masks, non-slip safety shoes, safety hel-
mets or ear protectors, appropriate to the type
of electrical power tool used and work under-
taken, reduces the risk of injury.
c) Avoid unintentional operation of the
device. Check that the electrical power
tool is switched off before you connect
it to the mains, pick it up or carry it.
Accidents can happen if you carry the electri-
cal tool with your finger on the ON / OFF switch
or with the device switched on.
d) Remove any setting tools or spanners
before you switch on the electrical tool.
A tool or spanner left attached to a rotating
part of an electrical tool can lead to injury.
e) Avoid placing your body in an unnat-
ural position. Keep proper footing and
balance at all times. By doing this, you will
be in a better position to control the electrical
power tool in unforeseen circumstances.
f) Wear suitable clothing. Do not wear
loose clothing or jewellery. Keep your
hair, clothing and gloves clear of mov-
ing parts. Loose clothing, jewellery or long
hair can become trapped in moving parts.
g) If vacuum dust extraction and collec-
tion devices are fitted, do not forget to
check that they are properly connected
and used correctly. The use of dust extrac-
tion reduces the hazard presented by dust.
4. Careful handling and use of
the electrical power tool
a) Do not overload the device. Always use
an electrical power tool that is intended
for the task you are undertaking. By
using the right electrical power tool for the job,
you will work safer and achieve a better result.
b) Do not use an electrical power tool if
its switch is defective. An electrical power
tool that can no longer be switched on and off
is dangerous and must be repaired.
c) Pull the mains plug from the socket
before you make any adjustments to
the appliance, change accessories or
when the device is laid aside. This pre-
caution prevents the unintentional start of the
electrical tool.
d) Always ensure that electrical power
tools are kept out of reach of children
when not in use. Do not let anyone
use the device if they are not familiar
with it or have not read the instructions
and advice. Electrical power tools are dan-
gerous when they are used by inexperienced
persons.
e) Maintain the electrical power tool care-
fully. Check that moving parts are work-
ing properly and move freely. Check for
any parts that are broken or damaged
enough to detrimentally affect the func
-
tioning of the electrical power tool.
Have
damaged parts repaired before you use
the device. Many accidents have their origins
in poorly maintained electrical power tools.
f) Keep cutting tools clean and sharp.
Carefully maintained cutting tools with sharp
cutting edges are less likely to jam and are
easier to control.
g) Use the electrical power tool, accesso-
ries, inserted tools etc. in accordance
with these instructions. When doing
this, take the working conditions into
consideration, as well as the task at
hand. The use of electrical power tools for
purposes other than those intended can lead
to dangerous situations.
5. Service
a) Only have electrical power tools
repaired by qualified specialist per-
sonnel using OEM spare parts. This
General safety advice for electrical power tools

9 GB/IE
General safety advice for electrical power tools
General safety advice for electrical power tools
ensures that the safety of the electrical power
tool is maintained.
Safety instructions for all saws
a) DANGER: Stay with your hands out
of the cutting area and keep off the
cutting disc. If you hold the saw with both
hands, they cannot be injured by the saw blade.
b) Do not reach underneath the work-
piece. The protective cover will not protect
you from the saw blade under the work piece.
c) Adjust the cutting depth to the thick-
ness of the work piece. Less than the full
width of a tooth should be visible from under
the work piece.
d) Never hold the workpiece with the
hand or lay it over a leg. Secure the
workpiece on a stable fixture. It is
important to fix the work piece safely, to mini-
mise the danger of contact with the body,
jamming of the saw blade or loss of control.
e) Hold the electrical power tool by the
insulated handle surfaces when you
are undertaking work where there is
the danger of the tool striking hidden
electricity cables or the device’s mains
lead. Contact with a live wire could cause
metal parts of the electrical power tool to
become live and lead to electric shock.
f) When cutting along the way always
use a fence or a straight edge guide.
That improves the precision of the cut and mini-
mises the possibility that the saw blade jams.
g) Always use saw blades of the correct
size and with matching mounting hole
(e.g. star-shaped or round). Saw blades
not matching the attachments of the saw run
untrue and lead to loss of control.
h) Never use damaged or wrong saw
blade washers or bolts. The saw blade
washers and screws were specifically devel-
oped for your saw, for optimal performance
and operating security.
Reasons for and how to avoid a kickback:
- A kickback is the sudden reaction, if the saw
blade sticks, jams or is misaligned and the
uncontrolled saw moves out of the work piece
in the direction of the operator.
- If the saw blade wedges, sticks or jams itself
into the closing saw gap, it blocks and the mo-
tor power kicks the saw back into the direction
of the operator.
- If the saw blade is twisted or wrongly aligned
in the saw gap, the teeth of the rear blade edge
can jam in the surface of the work piece, caus-
ing the saw blade to move out of the saw gap
and the saw to jump back in the direction of
the operator.
A kickback is the result of wrong or unsuitable use
of the saw. It can be avoided by taking the in the
following described precautions.
a) Hold the saw with both hands and
bring your arms into a position that
allows you to absorb the forces of the
kickback. Always stand to the side of
the saw blade, never bring the saw
blade into a line with your body. Dur-
ing a kickback the saw can jump backwards,
however, the operator can master the forces of
the kickback with suitable preventive measures.
b) Should the saw blade jam, or you stop
the work, switch the saw off and hold
it still in the work piece, until the saw
blade has come to a standstill. Never
attempt to remove the saw from the
work piece or to pull it backwards, as
long as the saw blade moves, as oth-
erwise a kickback could occur. Find out
and rectify the reason for the jamming of the
saw blade.
c) If you want to restart a saw that is
stuck
in the workpiece, centre the saw blade
in the saw gap and check that the teeth
are not stuck in the workpiece. If the
saw blade jams, it can move out of the work
piece or cause a kickback, when the saw is
started anew.
d) Support big boards to reduce the risk
of a kickback due to a jamming saw

10 GB/IE
General safety advice for electrical power tools
blade. Big boards can bend through due to their
own weight. Boards must be supported on both
sides, at the outside and near the cutting edge.
e) Do not use blunt or damaged saw
blades. Saw blades with blunt or wrongly set
teeth cause increased friction, jamming of the
blade and kickback due to a saw gap that is
too tight.
f) Tighten the adjustments for cutting
depth and cutting angle before start-
ing to cut. If the adjustments change during
cutting, the saw blade can jam and cause a
kickback.
g) Take particular care, when plunge
cutting into existing walls or other
areas that you cannot inspect. The saw
blade can jam when cutting into hidden objects
and thereby causing a kickback.
Safety instructions for
plunge saws
a) Before every use check that the safe-
ty cover closes without problems. Do
not use the saw, if the safety cover
does
not move freely and does not close in-
stantly. Never fix or tie back the safety
cover in the opened position. If the saw
is dropped accidentally, the safety cover can be
bent. Ensure that the safety cover moves freely
and does not touch either the saw blade or
other parts.
b) Check condition and function of the
safety cover spring. If safety cover
and spring do not work faultlessly,
get the saw serviced before using it.
Damaged parts, sticky deposits or masses of
wood shavings lead to delayed operation of
the bottom safety cover.
c) If you plunge cut at angles other than
right angles, secure the guide plate of
the saw to prevent sliding sideways.
Lateral movement can lead to jamming of the
saw blade and therewith to kickback.
d) Do not put the saw done on the bench
or on the floor without covering the
saw blade with the safety cover. An
unprotected saw blade moves the saw against
the direction of the cut, and cuts everything
that is in the way. Please keep in mind that the
saw runs on.
Please ensure that only persons over 16 years
of age operate this appliance according to the
instructions in this operating instructions!
Note: Do not use grinding discs. Injuries and dam-
age to objects could result.
Safety recommendations for the
correct use of superabrasives
a) General
Superabrasives are breakable and shall therefore
be handled with utmost care! The use of damaged
or improperly mounted or used superabrasives is
dangerous and can cause serious injuries.
b) Delivery, handling and storage
Superabrasives shall be handled and transportes
with care. Superabrasives shall be stored in such a
manner that they are not subjected to mechanical
damages and harmful environmental influences.
Avoid the danger of death from
electric shock:
Regularly check the condition of the appliance,
mains cable and plug. Do not operate appli-
ances with damaged parts of that description.
Never open the appliance. Damaged appli-
ances, mains cables or plugs main danger to
life due to electric shock. Always have repairs
or parts exchanges carried out at the service
centre or by an electrician.
Do not operate the appliance when it is wet or
in damp environments.
If you work outside, connect the device to a
residual current (RCD) protective switch with
a maximum 30 mA tripping current. Only use
extension leads approved for outdoor use.
General safety advice for electrical power tools / Start-up

11 GB/IE
General safety advice for electrical power tools
General safety advice for electrical power tools / Start-up
Note: Always hold the mains cable out of the op-
erating range of the machine and move it towards
the back of the machine.
Additional safety information
for circular saws
Avoid overheating of the tips of the saw teeth.
When cutting plastic, avoid melting the plastic.
Start-up
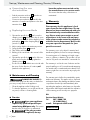
Switching on and off
Switching on:
Pull the ON / OFF switch
6
towards the back
(see Fig. A).
Switching off:
Release the ON / OFF switch
6
.
Releasing the plunge blocker
Push the plunge blocker
1
towards the front
and keep it pressed.
Preselect cutting depth
Note: We recommend adjusting the cutting depth
at least 2 mm deeper than the thickness of the ma-
terial. This will result in a clean cut.
Release the quick release of the cutting depth
pre-selector
7
, adjust the desired cutting depth
at the scale
7 a
and refit the quick release.
Fitting the guide fence
Release the screw of the guide fence
11 a
at
the base plate
9
and insert the guide fence
11
into the guide fence fixture
10
. Retighten these
screws
11 a
.
Handling the plunge saw
1. Put the machine onto the material and switch it on
as described in the chapter “Switching on and off”.
2. If necessary adjust the machine to the guide
fence
11
or a drawn line.
3. Hold the machine as shown in Figure A and
cut with light pressure.
Types of saw blades:
The saw blades included cover the most common
types of application.
HW Circular saw blade
20
Z85 / 30:
Description: ø 85 mm, 30 HW-teeth
Suitable for: Soft wood, hard wood, boards of any
type, plastics
Diamond cutting disc
21
Z85VR:
Description: ø 85 mm, without teeth
Suitable for: Ceramics, plastics
HS Circular saw blade
22
Z85 / 36:
Description: ø 85 mm, 36 teeth – tooth setting
left / right
Suitable for: Soft wood, soft metals such as aluminium,
copper, plastics
Marking cutting length
Orient yourself at the markings for the cutting
length
8
, in order to check where your cut
starts and ends.
Marking cutting line
The cutting line viewing window allows precise
guidance of the machine along the cutting line
applied to the workpiece.
In order to achieve an exact cut, place the
machine on the workpiece so that the cutting
length labelling appears in the cutting line
viewing window
12
, as depicted in Illustration B.

12 GB/IE
Start-up / Maintenance and Cleaning / Service / Warranty
Connecting the saw
dust extraction
Push the extraction air hose
19
onto the con-
nection for dust extraction
14
.
Connect a vacuum device approved for the
extraction of sawdust and splinters to the dust
extraction hose
19
.
Replacing the saw blade
1. Operate the spindle lock
13
and loosen the
clamping screw
18
with the Allen key (to open
turn clockwise). Now lift off the clamping screw
and washer
18
and the clamping flange
17
(see also Fig.D).
2. Adjust cutting depth to the maximum position.
3. Swing the base plate
9
upwards.
4. Take off the saw blade.
5. Refitting of the saw blade is the reversal of the
removal.
6. Operate the spindle lock
13
(until it clicks into
place) and, using the Allen key, tighten the
clamping screw
18
.
The arrow on the saw blade must coincide with
the arrow for the direction of rotation
(marked on the appliance).
Maintenance and Cleaning
DANGER OF INJURY! Re-
move the mains plug from the mains socket before
you carry out any work on the appliance.
Clean the appliance after finishing work.
To clean the appliance, use a cloth and do not
use petrol, solvents or cleaning fluids.
Service
Have your appliance
repaired by qualified specialist per-
sonnel using OEM parts only. This ensures
that the safety of the device is maintained.
If the plug or mains
lead needs to be replaced, always
have the replacement carried out by
the manufacturer or its service centre.
This ensures that the safety of the device is
maintained.
Warranty
The warranty for this appliance is for 3
years from the date of purchase. The ap-
pliance has been manufactured with care
and meticulously examined before deliv-
ery. Please retain your receipt as proof
of purchase. In the event of a warranty
claim, please make contact by telephone
with our Service Department. Only in this
way can a post-free despatch for your
goods be assured.
The warranty covers only claims for material and
maufacturing defects, but not for transport damage,
for wearing parts or for damage to fragile compo-
nents, e.g. buttons or batteries. This product is for pri-
vate use only and is not intended for commercial use.
The warranty is void in the case of abusive and im-
proper handling, use of force and internal tampering
not carried out by our authorized service branch. Your
statutory rights are not restricted in any way by this
warranty.
The warranty period will not be extended by repairs
made unter warranty. This applies also to replaced
and repaired parts. Any damage and defects extant
on purchase must be reported immediately after
unpacking the appliance, at the latest, two days after
the purchase date. Repairs made after the expiration
of the warranty period are subject to payment.
GB
Service Great Britain
Tel.: 0871 5000 720
(0,10 GBP/Min.)
e-mail: k[email protected]
IAN 55728
Warranty / Disposal / Declaration of Conformity / Manufacturer

13 GB/IE
Start-up / Maintenance and Cleaning / Service / Warranty
Warranty / Disposal / Declaration of Conformity / Manufacturer
IE
Service Ireland
Tel: 1890 930 034
(0,08 EUR/Min. (peak)
0,06 EUR/Min. (off peak))
e-mail: k[email protected]
IAN 55728
Disposal
The packaging is made of environmentally
friendly materials, which may be disposed
through your local recycling acilities.
Do not dispose of electrical power
tools with household waste!
According to European Directive 2002 / 96 / EC,
used electrical goods must be collected and recy-
cled in an environmentally friendly manner.
Contact your local refuse disposal authority for
more details of how to dispose of your worn out
electrical appliance.
Declaration of Conformity /
Manufacturer
We, KOMPERNASS HANDELS GMBH, the person
responsible for documents: Mr Semi Uguzlu, BURG-
STRASSE 21, 44867 BOCHUM, GERMANY, hereby
declare that this product complies with the following
standards, normative documents and EU directives:
Directive on Machinery
(2006 / 42 / EC)
EU Low Voltage Directive
(2006 / 95 / EC)
Electromagnetic Compatibility
(2004 / 108 / EC)
RoHS Directive
(2011 / 65 / EU)
Applicable harmonised standards
EN 60745-1/A11:2010
EN 60745-2-5:2010
EN 60745-2-22:2011
EN 55014-1/A2:2011
EN 55014-2/A2:2008
EN 61000-3-2/A2:2009
EN 61000-3-3:2008
Type designation of the machine:
Plunge saw PTS 480 A1
Date of manufacture: 11–2013
Serial number: IAN 55728
Bochum, 30.11.2013
Semi Uguzlu
- Quality Manager -
We reserve the right to make technical modifications
in the course of product development.

14
Sisällysluettelo

15 FI
Aluksi
Määräystenmukainen käyttö ............................................................................................................... Sivu 16
Varusteet ............................................................................................................................................... Sivu 16
Toimitukseen kuuluu ............................................................................................................................. Sivu 16
Tekniset tiedot ....................................................................................................................................... Sivu 16
Sähkötyökaluja koskevat yleiset turvaohjeet
1. Työpaikkaturvallisuus....................................................................................................................... Sivu 17
2. Sähköturvallisuus ............................................................................................................................. Sivu 17
3. Henkilöiden turvallisuus ................................................................................................................... Sivu 17
4. Sähkötyökalujen huolellinen käsittely ja käyttö ............................................................................. Sivu 18
5. Huolto ............................................................................................................................................... Sivu 18
Kaikkien sahojen turvallisuusohjeet ..................................................................................................... Sivu 18
Upotussahojen turvallisuusohjeet ........................................................................................................ Sivu 20
Hiomatyökaluja koskevat turvallisuusohjeet ....................................................................................... Sivu 20
Pyörösahoja koskevat lisäturvaohjeet ................................................................................................. Sivu 20
Käyttöönotto
Päälle- ja poiskytkentä ......................................................................................................................... Sivu 21
Upotuslukituksen avaaminen ............................................................................................................... Sivu 21
Sahaussyvyyden valitseminen ............................................................................................................. Sivu 21
Rinnakkaisvasteen asentaminen .......................................................................................................... Sivu 21
Upotussahan käsittely .......................................................................................................................... Sivu 21
Leikkauspituuden merkintä ................................................................................................................... Sivu 21
Leikkauslinjan merkintä ........................................................................................................................ Sivu 21
Lastuimurin liitäntä ................................................................................................................................ Sivu 21
Sahanterän vaihto ................................................................................................................................ Sivu 21
Huolto ja puhdistus .................................................................................................................. Sivu 22
Huolto.................................................................................................................................................. Sivu 22
Takuu ................................................................................................................................................... Sivu 22
Hävittäminen ................................................................................................................................ Sivu 22
Vaatimustenmukaisuusvakuutus / Valmistaja ................................................. Sivu 23
Sisällysluettelo

16 FI
Aluksi
Upotussaha PTS 480 A1
Q
Aluksi
Onnittelemme sinua hyvästä valinnastasi! Valitsit erit-
täin korkealaatuisen tuotteen. Käyttöohje on osa tätä
tuotetta. Se sisältää tärkeitä turvallisuusohjeita sekä
käyttöä ja hävitystä koskevia ohjeita. Tutustu ennen
tuotteen käyttöä huolellisesti kaikkiin käyttöja turval-
lisuusohjeisiin. Käytä tuotetta ainoastaan ohjeen
mukaan ja siinä mainittuihin tarkoituksiin. Anna kaik-
ki ohjeet mukaan, jos luovutat tuotteen edelleen.
Q
Määräystenmukainen käyttö
Kone on tarkoitettu etupäässä pituus- ja poikittaisleik-
kaukseen upotussahauksessa, alustan on oltava
kiinteä ja sahata voidaan täyspuuta, lastulevyä,
vaneria, alumiinia, laattoja, kiveä, muovia ja kevyt-
rakennemateriaaleja. Ota huomioon, että esiasennettu
sahanterä soveltuu vain puun sahaukseen. Laitteen
käyttö muuhun tarkoitukseen tai muutoksien teko
siihen katsomtaan määräystenvastaiseksi ja on vaa-
rallista. Ei kaupalliseen käyttöön.
Q
Varusteet
1
Mekaaninen upotuslukitus
2
Virta päällä / kontrolli -LED
3
Verkkojohto
4
Tuuletusrako
5
Hiiliharjojen suojuskansi
6
PÄÄLLE- / POIS -kytkin
7
Sahaussyvyyden esivalinta
7 a
Sahaussyvyyden asteikko
8
Leikkauspituuden merkinnät
9
Pohjalevy
10
Rinnakkaisvasteen kiinnitys
11
Rinnakkaisvaste
11 a
Rinnakkaisvasteen ruuvi
12
Leikkauslinjan näköikkuna
13
Karalukitus
14
Pölynimurin liitäntä
15
Kuusiokoloavain
16
Sahanterä
17
Kiinnityslaippa
18
Kiinnitysruuvi ja aluslevy
19
Imuletku
20
HW-pyöräsahanterä Z85 / 30
21
Timanttisahanterä Z85VR
22
HSS-pyörösahanterä Z85 / 36
Q
Toimitukseen kuuluu
1 upotussaha PTS 480 A1
1 HW-pyöräsahanterä Z85 / 30
1 timanttisahanterä Z85VR
1 HSS-pyörösahanterä Z85 / 36
1 rinnakkaisvaste
1 imuletku
1 kuusiokoloavain
1 kantolaukku
1 käyttöohje
Q
Tekniset tiedot
Nimellisteho: 480 W
Nimellisjännite: 230 V
~
, 50 Hz
Tyhjäkäyntikierrosluku: n
0
4500 min
-1
Maksimi sahaussyvyys: 25 mm
Suojausluokka: II /
Melu- ja tärinätiedot:
Melun mittausarvo laskettu EN 60745 standardin
mukaisesti. Sähkötyökalun A-mitattu melutaso on
tyypillisesti:
Äänenpainetaso: 82 dB(A)
Äänitehotaso: 93 dB(A)
Epävarmuus K: 3 dB
Käytä kuulosuojaimia!
Arvioitu kiihtyvyys, tyypillisesti:
Käteen ja käsivarteen
kohdistuva värinä a
h
= 2,266 m / s
2
Epävarmuus K = 1,5 m / s
2
Näissä ohjeissa ilmoitettu vä-
rähtelytaso on määritetty EN 60745 -standardissa
normitetulla mittausmenetelmällä ja sitä voidaan käyt-
tää laitevertailussa. Mainittua värähtelyarvoa void-

17 FI
Aluksi / Sähkötyökaluja koskevat yleiset turvaohjeet
Aluksi
aan käyttää myös altistumisen alustavaan arviointiin.
Värähtelytaso muuttuu sähkötyökalun käytön mukaan
ja se saattaa joissakin tapauksissa ylittää tässä oh-
jeessa mainitun arvon. Värähtelyrasitusta saatetaan
aliarvioida, jos sähkötyökalua käytetään säännölli-
sesti tällä tavalla.
Huomio: Liikekuormituksen arvioimiseksi tietyn
työajan kestäessä on huomioitava myös ajat, jolloin
laite on sammutettuna, tai ajat, jolloin laite on käyn-
nissä, mutta ei työkäytössä. Tämä saattaa vähentää
merkittävästi liikerasitusta kokonaistyöskentelyajan
kestäessä.
Q
Sähkötyökaluja koskevat
yleiset turvaohjeet
Lue kaikki turva- ja muut
ohjeet! Turva- ja muiden ohjeiden laiminlyönti voi
aiheuttaa sähköiskun, tulipalon ja / tai vakavia louk-
kaantumisia.
Säilytä kaikki turva- ja muut ohjeet tulevaa
tarvetta varten!
Turvallisuusohjeissa käytetty käsite ”sähkötyökalu“
koskee verkkokäyttöisiä sähkötyökoneita (verkko-
johdolla) ja akkukäyttösisiä sähkötyökoneita (ilman
johtoa).
1.
Työpaikkaturvallisuus
a) Pidä työskentelypaikka puhtaana ja
hyvin valaistuna. Epäjärjestys ja huono
valaistus voivat johtaa tapaturmiin.
b) Älä käytä laitetta räjähdysvaaralli-
sessa ympäristössä, jossa säilytetään
helposti syttyviä nesteitä, kaasuja tai
jossa kehittyy pölyä. Sähkötyökalut kehit-
tävät kipinöintiä, joka voi sytyttää pölyn tai
höyryn.
c) Lapsien ja asiattomien henkilöiden
läsnäolo työpaikalla laitteen ollessa
käynnissä ei ole sallittua. Voit helposti
menettää kontrollin laitteeseen.
2.
Sähköturvallisuus
a) Laitteen pistokkeen pitää sopia pisto-
rasiaan. Pistoketta ei saa muuttaa
millään tavalla. Älä käytä adapteria
yhdessä suojamaadoitettujen laitteiden
kanssa. Alkuperäinen pistoke ja sopivat pis-
torasia vähentävät sähköiskuvaaraa.
b) Vältä kosketusta maadoitettuihin pin-
toihin, kuten putkiin, lämpöpattereihin,
liesiin sekä jääkaappeihin. Vaarana on
saada sähköisku, jos kehosi on maadoitettu.
c)
Älä pidä laitetta sateessa tai muussa
kosteudessa. Veden pääsy laitteeseen lisää
sähköisku vaaraa.
d) Älä kanna laitetta riiputtamalla sitä
kaapelista ja vedä kaapeli irti pistora-
siasta pitämällä kiinni pistokkeesta.
Älä jätä
kaapelia kuumaan paikkaan,
älä päästä s
iihen öljyä, varo teräviä
reunoja sekä laitteen pyöriviä osia. Vi
-
alliset tai kietou
tuneet kaapelit lisäävät riskiä
saada sähköisku.
e) Jos työskentelet ulkotiloissa, käytä
silloin jatkokaapelia, jonka käyttö on
sallittu myös ulkotilaan. Ulkotilaan sovel-
tuva kaapeli vähentää riskiä saada sähköisku.
f) Jos sähkötyökalua joudutaan käyttä-
mään kosteassa ympäristössä, on
käytettävä vikavirtakytkintä. Vikavirta-
kytkimen käyttö pienentää sähköiskun vaaraa.
3. Henkilöiden turvallisuus
a) Ole aina tarkkaavainen, tarkista aina,
mitä teet ja toimi järkevästi sähkölaitteil-
la työskennellessäsi. Älä käytä laitett
a,
jos olet väsynyt, käyttänyt huumeita,
alkoholia tai lääkkeitä. Epätarkkaavaisuus
laitetta käytettäessä voi aiheuttaa vaikeita
loukkaantumisia.
b) Käytä henkilökohtaisia turvavarustei-
ta ja suojalaseja aina. Henkilökohtaisten
turvavarusteiden käyttö, kuten pölynaamari,
turvakengät, kypärä tai kuulosuoja, vähentä-
vät loukkaantumisriskiä.

18 FI
Sähkötyökaluja koskevat yleiset turvaohjeet
Sähkötyökaluja koskevat yleiset turvaohjeet
c) Varo käynnistämästä laitetta vahin-
gossa. Varmista, että sähkötyökalu on
kytketty pois päältä, ennen kuin liität
sen pistorasiaan, nostat sen tai kannat
sitä. Tapaturmat ovat mahdollisia, jos sormesi
on laitetta kantaessasi virtakytkimellä tai laite
on kytketty päälle.
d) Poista kaikki työkalut ja ruuviavaimet
paikalta ennen kuin kytket laitteen.
Pyörivässä laiteosassa oleva työkalu tai avain
voi johtaa tapaturmaan.
e) V
ältä työskentelemästä epätavallisess
a
asennossa. Asetu tukevaan asentoon
ja pysyttele koko ajan tasapainossa.
Pystyt silloin hallitsemaan laitteen erityisesti
yllättävissä tilanteissa.
f) Käytä sopivaa vaatetusta. Älä käytä
löysiä vaatteita äläkä pidä koruja.
Hiukset, vaatteet ja käsineet on pidet-
tävä etäällä liikkuvista osista. Löysät
vaatteet, korut ja avonaiset hiukset voivat jäädä
kiinni liikkuviin osiin.
g) Jos laitteeseen asennetaan pölynimu-
ri- ja lastunkeruulaite, varmistu sitä
ennen, että osat on liitetty ja niitä käy-
tetään oikein. Näiden laitteiden liittäminen
vähentää pölystä aiheutuvia vaaroja.
4.
Sähkötyökalujen huolellinen
käsittely ja käyttö
a) Ä
lä ylirasita laitetta. Käytä työssäsi tätä
työtä varten tarkoitettua sähkötyöka-
lua. Sopivan sähkötyökalun kanssa työskentelet
paremmin ja varmemmin sen tehoalueella.
b) Älä käytä mitään sähkötyökalua,
jonka käynnistyskytkin on viallinen.
Sähkötyökalu, jota ei voi enää kytkeä päälle
tai päältä, on vaarallinen ja se on korjattava.
c) Irrota pistotulppa pistorasiasta, ennen
kuin säädät laitetta, vaihdat sen va-
rusteita tai laitat sen varastoon. Nämä
varotoimenpiteet estävät sen, että laite käynnistyy
vahingossa.
d) Säilytä sähkötyökaluja silloin, kun nii-
tä ei käytetä, lasten ulottumattomissa.
Älä anna henkilöiden käyttää laitetta,
jos he eivät tunne sitä tai eivät ole luke-
neet näitä käyttöohjeita. Sähkötyökalut
ovat vaarallisia, jos kokemattomat henkilöt
käyttävät niitä.
e) Hoida laitetta huolellisesti. Tarkasta,
toimivatko sen liikkuvat osat moitteet-
tomasti ja että ne eivät jumitu; tarkasta,
onko joku osa katkennut tai murtunut
tai vahingoittunut niin, että se haittaa
laitteen toimintaa. Korjauta vialliset
osat aina ennen kuin käytät laitetta.
Moni tapaturma johtuu huonosti huolletuista
sähkötyökaluista.
f) Pidä terät terävinä ja puhtaina. Huolella
hoidetut leikkuuterät terävine leikkuureunoineen
eivät juutu niin helposti kiinni työkappaleeseen
ja ne toimivat kevyemmin.
g) Käytä sähkötyökaluja, lisätarvikkeita,
käyttötarvikkeita jne. tässä esitettyjen
määräysten mukaisesti ja aina erityis-
tä tyyppiä vastaavasti. Ota huomioon
työolosuhteet ja työ. Sähkötyökalujen k
äyttö
muuhun kuin sille määrättyyn tarkoitukseen voi
aiheuttaa vaarallisia tilanteita.
5. Huolto
a) Anna laitteet huoltoliikkeen tai sähkö-
liikkeen korjattavaksi. Korjauksissa
s
aa käyttää vain alkuperäisiä varaosia
.
Laitteesi säilyy näin turvallisena.
Q
Kaikkien sahojen
turvallisuusohjeet
a)
VAARA: Pidä kätesi loitolla sahaus-
alueelta ja sahanterästä. Kun pidät sa
hasta
kiinni molemmin käsin, sahanterä ei voi aiheut-
taa loukkaantumista.
b) Älä koske työkappaleen alapuolelle.
Suojuskupu ei voi työkappaleen alla suojata
sahanterältä.
c) Sovita sahaussyvyys työkappaleen
vahvuuden mukaan. Työkappaleen alta
tulisi olla näkyvissä vähemmän kuin yksi täysi
hammaskorkeus.

19 FI
Sähkötyökaluja koskevat yleiset turvaohjeet
Sähkötyökaluja koskevat yleiset turvaohjeet
d) Älä koskaan pidä sahattavaa työkap-
paletta kiinni käsin tai jalan päällä.
Varmista työkappale vakaalla kiinni-
tyksellä. On tärkeää kiinnittää työkappale
hyvin, jotta voitaisiin minimoida kehokosketuksen
vaara, sahanterän kiinnijuuttuminen tai hallinnan
menettäminen.
e) Tartu laitteeseen aina pelkästään eris-
tetyistä kahvakohdista suorittaessasi
töitä, joissa on olemassa vaara, että
työkalu koskettaa töiden aikana joko
piilossa olevia sähköjohtoja tai koneen
omaa liitäntäjohtoa. Kosketus jännitteelli-
seen johtoon voi johtaa jännitteen myös sähkö-
työkalun metalliosiin, jolloin seurauksena voi
olla sähköisku.
f) Käytä pituusleikkauksessa aina vas-
tetta tai suoraa reunaohjausta. Tämä
parantaa sahaustarkkuutta ja vähentää sa-
hanterän kiinnijuuttumismahdollisuutta.
g) Käytä aina oikean kokoisia sahanteriä
ja sopivaa kiinnitysreikää (esim. täh-
denmuotoinen tai pyöreä). Sahanterät,
jotka eivät sovi sahan asennusosiin, pyörivät epä-
tasaisesti ja aikaansaavat hallinnan menetyksen.
h) Älä koskaan käytä vaurioituneita tai
vääriä sahanterän aluslevyjä tai ruu-
veja. Sahanterän aluslevyt ja ruuvit on konstru-
oitu erityisesti juuri sahaasi varten optimaalisen
tehon ja käyttöturvallisuuden takaamiseksi.
Takaisiniskun syyt ja niiden välttäminen:
- Takaisku on äkillinen reaktio takertuvasta, kiin-
nijuuttuvasta tai väärin ojennetusta sahanterästä,
josta on seurauksena, että hallitsematon saha
nousee ylös työkappaleesta ja liikkuu käyttö-
henkilöstöä kohden.
- Jos sahanterä takertuu tai juuttuu kiinni sulkeu-
tuvaan sahausrakoon, se lukkiutuu ja moottorin
voima iskee sahan takaisin käyttöhenkilöstöä
kohti.
- Mikäli sahanterä kiertyy tai säätyy sahattaessa
väärin, takimmaisen sahanteränreunan hampaat
voivat takertua työkappaleen pintaan, jonka
seurauksena sahanterä liikkuu pois sahausraosta
ja saha iskee takaisin käyttöhenkilöstön suuntaan.
Takaisku on seuraus sahan väärästä ja / tai määrä-
ysten vastaisesta käytöstä. Tämä voidaan välttää,
kun noudatetaan seuraavassa esitettyjä soveltuvia
varotoimenpiteitä.
a) Pidä sahaa kiinni molemmin käsin ja
katso, että käsivartesi ovat asennossa,
jossa takaiskun mahdollisesti aiheutta-
mat voimat voidaan hallita. Oleskele
aina sahanterän sivulla, vartalosi ei
saa olla koskaan sahanterän kanssa
samassa linjassa. Takaiskussa pyörösaha
voi hypätä taaksepäin, käyttöhenkilöstö voi
kuitenkin sopivilla varotoimilla hallita takaiskun
aiheuttamat voimat.
b) Jos sahanterä juuttuu kiinni tai jos
keskeytät työn, kytke saha pois pääl-
tä, pidä työkappaletta paikallaan, kun-
nes sahanterä on pysähtynyt koko
naan.
Älä koskaan yritä ottaa sahaa työ-
kappaleesta tai vetää sitä taaksepäin
niin kauan, kun sahanterä liikkuu, voit
muuten saada takaiskun. Tarkista, mikä
sai sahanterän juuttumaan kiinni ja korjaa syy.
c) Jos haluat taas käynnistää työkappa-
leessa olevan sahan, keskitä sahanterä
sahausrakoon ja tarkista, etteivät sa-
han hampaat ole takertuneet työkap-
paleeseen. Jos sahanterä on juuttunut kiinni,
se voi liikkua pois työkappaleesta tai aikaansaa-
da takaiskun, kun saha käynnistetään uudelleen.
d) Tue suuret levyt, se pienentää kiinni
juuttuneen sahanterän aikaansaamaa
takaiskuriskiä. Suuret levyt voivat taipua
oman
painonsa alla. Levyt on tuettava kummaltakin
puolelta sekä sahausraon lähellä että reunalla.
e) Älä käytä tylsiä äläkä viallisia sahan-
teriä. Sahanterät, joiden hampaat ovat tylsiä
tai väärin ojennettuja, kohottavat kitkaa liian
ahtaan sahausraon vuoksi, aikaansaavat sa-
hanterän kiinnijuuttumisen ja takaiskun.
f) Määrää ennen sahausta sahaussy-
vyyden ja sahauskulman säädöt. Jos
sahauksen aikana muutat säätöjä, sahanterä
voi juuttua kiinni ja aikaansaada takaiskun.
g) Noudata erityistä varovaisuutta, kun
”upotussahaus” suoritetaan seinään
tai muuhun kohtaan, joka ei ole koko-

20 FI
Käyttöönotto
Sähkötyökaluja koskevat yleiset turvaohjeet
naan näkyvissä. Uppoutuva sahanterä voi
lukkiutua piilossa oleviin kohteisiin ja aikaan-
saada takaiskun.
Q
Upotussahojen
turvallisuusohjeet
a) Tarkista ennen jokaista käyttöönottoa,
että suojuskupu on moitteettomasti
kiinni. Älä käytä sahaa, ellei suojus-
kupu liiku vapaasti eikä sulkeudu heti.
Älä koskaan kiinnitä tai sido suojus-
kupua avoimeen asentoon. Jos saha
putoaa vahingossa maahan, suojuskupu voi
vääntyä. Varmistaudu, että suojuskupu liikkuu
vapaasti eikä missään sahauskulmassa tai -sy-
vyydessä kosketa sahanterää eikä muita osia.
b) Tarkista suojuskuvun jousien kunto ja
toimivuus. Anna huoltaa saha ennen
sen käyttöönottoa, elleivät suojuskupu
ja jouset toimi moitteettomasti. Vioittu
neet
osat, takertuvat kerrostumat tai kertyneet lastut
hidastavat alemman suojuskuvun toimintaa.
c) Turvaa sahan ohjainlevy sivuttaiselta
siirtymiseltä „upotussahauksessa“,
jota ei suoriteta suorassa kulmassa.
Sahanterän sivuttainen siirtymä voi lukita sa-
hanterän ja aikaansaada näin takaiskun.
d) Älä jätä sahaa työpenkille tai maa-
han ellei sahanterä ole suojuskuvun
peittämä. Suojaamaton, vielä jälkikäteen
käyvä sahanterä liikuttaa sahaa sahaussuuntaa
vasten ja se sahaa, mitä eteen sattuu. Huomioi
tässä sahan jälkikäyntiaika.
Takista, että vain yli 16 vuotiaat henkilöt ottavat
laitteen käyttöön käyttöohjeessa esitettyjen oh-
jeiden mukaisesti!
Ohje: Älä käytä hiomalaikkaa. Vammat ja rikkou-
mat saattavat olla seurauksena.
Hiomatyökaluja koskevat
turvallisuusohjeet
a) Yleistä
Hiomatyökalut voivat murtua helposti, siksi niitä täytyy
käsitellä erityisen huolellisesti. Vaurioituneen, väärin
kiinnitetyn tai väärin työstetyn hiomatyökalun käyttö
on vaarallista ja voi johtaa vakaviin vammoihin.
b) Käyttö, kuljetus ja säilytys
Hiomatyökaluja tulee käyttää ja kuljettaa huolellise-
sti. Hiomatyökaluja tulee säilyttää niin, etteivät ne
joudu alttiiksi mekaanisille vaurioille ja haitallisille
ympäristövaikutuksille.
Vältä saamasta hengevaarallista
sähköiskua:
Tarkista laitteen, verkkokaapelin ja pistorasian
kunto säännöllisesti. Älä ota viallisia laitteita
enää käyttöön. Älä koskaan avaan laitetta. Vi-
alliset laitteet, kaapelit ja johdot tai pistokkeet
tarkoittavat hengevaarallista sähköiskuvaaraa.
Anna pätevän sähköliikkeen tai asiakaspalve-
lun korjata laite tai vaihtaa osat siihen.
Älä käytä laitetta kosteassa ympäristössä tai
jos laite itse on kostea.
Liitä laite ulkona työskennellessä max. 30 mA
laukaisuvirran FI-suojakytkimeen. Käytä vain
ulkotilaan sallittua jatkokaapelia.
Huomautus: pidä jatkokaapeli aina etäällä
laitteen liikkuvista osista ja pidä kaapelia aina
laitteesta pois taaksepäin.
Pyörösahoja koskevat lisätur-
vaohjeet
Vältä sahanterien ylikuumenemista.
Vältä muovin sulamista sahatessasi muovia.
Sidan laddas ...
Sidan laddas ...
Sidan laddas ...
Sidan laddas ...
Sidan laddas ...
Sidan laddas ...
Sidan laddas ...
Sidan laddas ...
Sidan laddas ...
Sidan laddas ...
Sidan laddas ...
Sidan laddas ...
Sidan laddas ...
Sidan laddas ...
Sidan laddas ...
Sidan laddas ...
Sidan laddas ...
Sidan laddas ...
Sidan laddas ...
Sidan laddas ...
Sidan laddas ...
Sidan laddas ...
Sidan laddas ...
Sidan laddas ...
Sidan laddas ...
Sidan laddas ...
Sidan laddas ...
Sidan laddas ...
Sidan laddas ...
Sidan laddas ...
Sidan laddas ...
Sidan laddas ...
Sidan laddas ...
Sidan laddas ...
Sidan laddas ...
Sidan laddas ...
Sidan laddas ...
Sidan laddas ...
Sidan laddas ...
Sidan laddas ...
Sidan laddas ...
Sidan laddas ...
Sidan laddas ...
Sidan laddas ...
Sidan laddas ...
-
 1
1
-
 2
2
-
 3
3
-
 4
4
-
 5
5
-
 6
6
-
 7
7
-
 8
8
-
 9
9
-
 10
10
-
 11
11
-
 12
12
-
 13
13
-
 14
14
-
 15
15
-
 16
16
-
 17
17
-
 18
18
-
 19
19
-
 20
20
-
 21
21
-
 22
22
-
 23
23
-
 24
24
-
 25
25
-
 26
26
-
 27
27
-
 28
28
-
 29
29
-
 30
30
-
 31
31
-
 32
32
-
 33
33
-
 34
34
-
 35
35
-
 36
36
-
 37
37
-
 38
38
-
 39
39
-
 40
40
-
 41
41
-
 42
42
-
 43
43
-
 44
44
-
 45
45
-
 46
46
-
 47
47
-
 48
48
-
 49
49
-
 50
50
-
 51
51
-
 52
52
-
 53
53
-
 54
54
-
 55
55
-
 56
56
-
 57
57
-
 58
58
-
 59
59
-
 60
60
-
 61
61
-
 62
62
-
 63
63
-
 64
64
-
 65
65


Parkside PTS 480 A1 Operation and Safety Notes
- Typ
- Operation and Safety Notes
på andra språk
- Deutsch: Parkside PTS 480 A1
- français: Parkside PTS 480 A1
- English: Parkside PTS 480 A1
- suomi: Parkside PTS 480 A1
- Nederlands: Parkside PTS 480 A1
Relaterade papper
-
Parkside PTS 450 A1 Operation and Safety Notes
-
Parkside PHKS 1300 A1 Operation and Safety Notes
-
-
-
-
-
-
Parkside PMFW 310 A1 Användarmanual
-
Andra dokument
-
Scheppach PL305 Multi Användarmanual
-
-
Hilti SCM 18-A Bruksanvisningar
-
-
Pattfield PSC120M1 Bruksanvisning
-
Hilti SR 30 Bruksanvisningar
-
Festool TS 75 EQ Bruksanvisning
-
-
Rothenberger ROCUT UKS 160 - 355 Användarmanual