
Z31408A/Z31408B/
Z31408C/Z31408D
RADIO ALARM CLOCK
Operation and Safety Notes
RADIOSTYRD VÄCKARKLOCKA
Bruksanvisning och säkerhetsanvisningar
RADIO-OHJATTU HERÄTYSKELLO
Käyttö- ja turvallisuusohjeet
RADIOVÆKKEUR
Betjenings- og sikkerhetshenvisninger
FUNKWECKER
Bedienungs- und Sicherheitshinweise
3
86663_aur_Funkwecker_Cover_LB3.indd 2 21.01.13 13:27

GB / IE Operation and Safety Notes Page 7
FI Käyttö- ja turvaohjeet Sivu 25
SE Bruksanvisning och säkerhetsanvisningar Sidan 43
DK Brugs- og sikkerhedsanvisninger Side 60
DE / AT / CH Bedienungs- und Sicherheitshinweise Seite 78
86663_aur_Funkwecker_Cover_LB3.indd 3 21.01.13 13:27

3
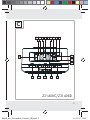
A
Z31408A/Z31408B
13 11
10
5
6
7
8
9
14
15
16
17
18
12
21 3 4
86663_aur_Funkwecker_Content_LB3.indd 3 21.01.13 13:25

4
AAA 1.5V
AAA 1.5V
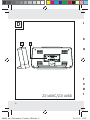
B
Z31408A/Z31408B
19 20
86663_aur_Funkwecker_Content_LB3.indd 4 21.01.13 13:25

5
C
Z31408C/Z31408D
1
18 17 2 3 4 5 6
15
7
8
14 13 12 11 10
16
9
86663_aur_Funkwecker_Content_LB3.indd 5 21.01.13 13:25

6
I
S
O
T
C
D
I
D
19 20
Z31408C/Z31408D
86663_aur_Funkwecker_Content_LB3.indd 6 21.01.13 13:25

7 GB/IE
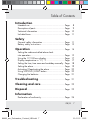
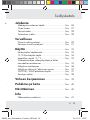
Table of Contents
Introduction
Intended use ................................................................Page 8
Description of parts .....................................................Page 9
Technical information ..................................................Page 10
Included items ..............................................................Page 11
Safety
General safety information .........................................Page 11
Battery safety instructions ............................................Page 13
Operation ................................................................Page 14
Setting the radio-controlled alarm clock
into operation ..............................................................Page 15
Using the 12 / 24 hour display ..................................Page 17
Display temperature in °C / °F ..................................Page 17
Setting the time, time zone and weekday manually ...Page 18
Setting the alarm ..........................................................Page 19
Activating / Deactivating the alarm ............................Page 20
Using SNOOZE / LIGHT button .................................Page 20
Changing the batteries ................................................Page 21
Troubleshooting.................................................Page 21
Cleaning and care ............................................Page 22
Disposal .....................................................................Page 22
Information
Declaration of conformity............................................Page 24
86663_aur_Funkwecker_Content_LB3.indd 7 21.01.13 13:25

8 GB/IE
Introduction
Radio alarm clock
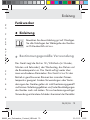
Introduction
Keep this manual in a safe place. If you pass
the product on to anyone else, please ensure
that you also pass on all the documentation.
Intended use
The clock shows the time in 12 / 24-hour mode (in hours,
minutes and seconds), the day of the week, the date and
the room temperature. The clock is also equipped with two
different alarm times. The clock is only suitable for opera-
tion in enclosed spaces at normal room temperature. Any
other use or modification of the clock constitute improper
use and may result in injury and / or damage to the clock.
The manufacturer is not liable for damage caused by im-
proper use. The clock is not intended for commercial use.
1
1
1
1
1
1
1
1
1
1
2
86663_aur_Funkwecker_Content_LB3.indd 8 21.01.13 13:25

9 GB/IE
o
.
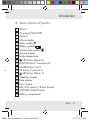
Introduction
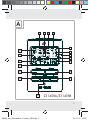
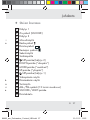
Description of parts
1
Alarm 1
2
Z
Z
symbol (SNOOZE)
3
Alarm 2
4
Minute display
5
Radio symbol
6
Battery symbol
7
Summer time symbol
8
Second display
9
Inside temperature
10
SET button (Alarm 2)
11
DOWN button (“downwards“)
12
MODE button (“set”)
13
UP button (“upwards“)
14
SET button (Alarm 1)
15
Weekday display
16
Date display
17
Hour display
18
AM / PM symbol (12-hour format)
19
SNOOZE / LIGHT button
20
Battery compartment
86663_aur_Funkwecker_Content_LB3.indd 9 21.01.13 13:25

10 GB/IE
Introduction
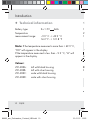
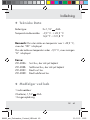
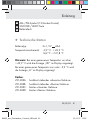
Technical information
Battery type: 2 x 1.5 V AAA
Temperature
measurement range: –9.9 °C - + 49.9 °C
14.2 °F - + 121.8 °F
Note: If the temperature measured is more than + 49.9 °C,
“HH” will appear in the display.
If the temperature measured is less than –9.9 °C, “LL” will
appear in the display.
Colour:
Z31408A: tall with black housing
Z31408B: tall with silver housing
Z31408C: wide with black housing
Z31408D: wide with silver housing
1
2
1
i
n
a
K
I
86663_aur_Funkwecker_Content_LB3.indd 10 21.01.13 13:25

11 GB/IE
C
,
l
Introduction / Safety
Included items
1 radio-controlled alarm clock
2 1.5 V
AAA batteries
1 operating instructions
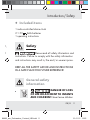
Safety
Please read all safety information and
instructions. Failure to comply with the safety information
and instructions may result in, fire and / or severe injuries.
KEEP ALL THE SAFETY ADVICE AND INSTRUCTIONS
IN A SAFE PLACE FOR FUTURE REFERENCE!
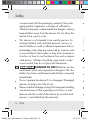
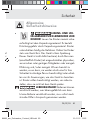
General safety
information
DANGER OF LOSS
OF LIFE OR ACCIDENT TO INFANTS
AND CHILDREN! Never leave children
86663_aur_Funkwecker_Content_LB3.indd 11 21.01.13 13:25

12 GB/IE
Safety
unsupervised with the packaging material. The pack-
aging material represents a danger of suffocation.
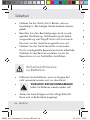
Children frequently underestimate the dangers. Always
keep children away from the device. Do not allow the
device to be used as a toy.
This device is not intended to be used by persons (in-
cluding children) with restricted physical, sensory or
mental abilities or with insufficient experience and/or
knowledge, unless they are supervised by a person who
is responsible for their safety or they have received in-
struction on how to use the device from such a respon-
sible person. Children should be supervised in order
to ensure that they do not play with the device.
DANGER TO LIFE! Batteries can be
swallowed, which may represent a danger to life. If a
battery has been swallowed, medical help is required
immediately.
Do not operate the device if it is damaged. Damaged
devices could put your life at risk.
Please note that damage arising from improper handling,
non-observance of the operating instructions or inter-
ference with the inside of the device by unauthorised
persons is excluded from the warranty.
86663_aur_Funkwecker_Content_LB3.indd 12 21.01.13 13:25

13 GB/IE
s
e
o
-
n
-
d
d
g
,
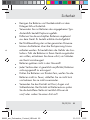
Safety
Never take the device apart. Improper repairs may
place the user in considerable danger. Repairs should
only be carried out by specialist personnel.
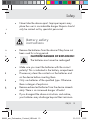
Battery safety
instructions
Remove the batteries from the device if they have not
been used for a long period.
CAUTION! DANGER OF EXPLOSION!
The batteries must never be recharged!
Make sure you insert the batteries with the correct
polarity! This is indicated in the battery compartment.
If necessary clean the contacts on the batteries and
on the device before inserting them.
Only use batteries of the specified type. Otherwise
there is danger of explosion.
Remove exhausted batteries from the device immedi-
ately. There is an increased danger of leaks!
If you disregard the above instructions and advice,
your batteries may discharge beyond their minimum
86663_aur_Funkwecker_Content_LB3.indd 13 21.01.13 13:25

14 GB/IE
Safety / Operation
voltage, thus increasing the chance of leakage. If the
batteries in your device have leaked, remove them im-
mediately to prevent damage to the device!
Batteries do not belong in household refuse!
Every consumer is obliged to dispose of batteries
properly in accordance with the regulations!
Keep batteries away from children. Do not throw
batteries into a fire. Never short-circuit them or take
them apart.
Do not let the fluid from a leaking battery come into
contact with your skin, eyes or mucous membranes.
Any parts of the body coming into contact with battery
acid should be rinsed off with copious amounts of
water and / or a doctor contacted if necessary!
Operation
Make sure that the device is standing safely on a
stable surface.
Do not place the device near to sources of interference
such as televisions, computers, thick walls, etc. These
may disrupt reception of the radio signal.
86663_aur_Funkwecker_Content_LB3.indd 14 21.01.13 13:25

15 GB/IE
-
e
Operation
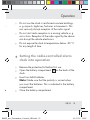
Do not use the clock in reinforced concrete buildings,
e. g. airports, high-rises, factories or basements. This
can seriously disrupt reception of the radio signal.
Do not start radio reception in a moving vehicle, e. g.
car or train. Reception of the radio signal by the device
can disrupt the vehicle electronics.
Do not expose the clock to temperatures below --20 °C
for any length of time.
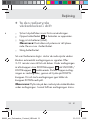
Setting the radio-controlled alarm
clock into operation
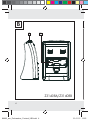
Remove the protective foil before first use.
Open the battery compartment
20
on the back of the
clock.
Insert two AAA batteries.
Note: Make sure that the polarity is correct when
you insert the batteries. This is indicated in the battery
compartment.
Close the battery compartment.
86663_aur_Funkwecker_Content_LB3.indd 15 21.01.13 13:25

16 GB/IE
Operation
As soon as the batteries are inserted, automatic reception
of the radio signal begins. The correct time and the date
are displayed after 3–10minutes. During reception, all
buttons are deactivated except the DOWN button
11
and
the SNOOZE / LIGHT button
19
. You can stop the reception
of the radio signal by pressing the DOWN button. To restart
the reception, press and hold down the DOWN button.
Note: Do not change the location of the projection radio-
controlled alarm clock during reception. This may disrupt
reception.
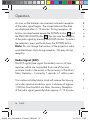
Radio Signal (DCF):
The DCF signal (time signal transmitter) consists of time
impulses, which are transmitted from one of the most
accurate clocks in the world, in the proximity of Frankfurt /
Main, Germany – it varies by 1 seconds in 1 million years.
Your radio-controlled alarm clock will receive the time sig-
nal under optimum conditions up to a distance of approx.
1,500 km from Frankfurt am Main, Germany. Reception
of the radio signal generally takes approx. 3–10 minutes.
R
(
e
o
a
T
86663_aur_Funkwecker_Content_LB3.indd 16 21.01.13 13:25

17 GB/IE
d
n
r
t
o
-
/
.
.
Operation
Reception can be considerably impaired by obstacles
(e.g. concrete walls) or sources of interference (e.g. other
electrical devices). You may have to change the location
of the radio-controlled clock (e.g. near a window) if there
are problems with reception.
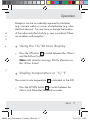
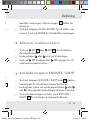
Using the 12 / 24 hour display
Press the UP button
13
to switch between the 12-hour
and the 24-hour format.
Note: AM stand for mornings, PM for afternoons in
the 12-hour format.
Display temperature in °C /°F
The current inside temperature
9
is indicated on the LCD.
Press the DOWN button
11
to switch between the
Celsius and Fahrenheit temperature scales.
86663_aur_Funkwecker_Content_LB3.indd 17 21.01.13 13:25

18 GB/IE
Operation
Setting the time, time zone and
weekday manually
Press and hold down the MODE button
12
for approx.
3seconds. The minute display
4
flashes.
Press the UP or DOWN button
11
,
13
to set the
desired time zone (–12 hours to + 12 hours).
Note: Should you be in a country in which the DCF
signal can be received but the time is different to your
current local time, you can use the time zone setting
to have the clock display your current local time. For
example, if you are in a country where the local time
is one hour behind Central European Time (CET), then
you should set the time zone to + 01. The time continues
to be controlled by DCF but the clock shows one hour
more.
Press the MODE button to confirm your setting.
Set the hours, minutes, the year, the day and the lan-
guage of the weekday in the same manner.
Note: The following languages are available:
GER = German
ENG = English
DAN = Danish
E
N
I
T
F
86663_aur_Funkwecker_Content_LB3.indd 18 21.01.13 13:25

19 GB/IE
x
.
r
n
s
r
Operation
ESP = Spanish
NET = Dutch
ITA = Italian
FRA = French
Setting the alarm
The radio-controlled alarm clock is equipped with
two alarm functions. Press and hold down the
SET
button
14
or the SET button
10
to set Alarm1 or
Alarm2. The hour indicator
17
of the alarm time
flashes in the display.
Press the UP or DOWN button
11
,
13
to set the hours.
Press the MODE button
12
to confirm your setting.
The minute indicator
4
flashes in the display.
Press the UP or DOWN button to set the minutes. Press
the MODE button to confirm your setting.
86663_aur_Funkwecker_Content_LB3.indd 19 21.01.13 13:25

20 GB/IE
Operation
Activating / Deactivating the alarm
Press the SET button
14
or the SET button
10
to
activate the relevant alarm.
The alarm symbol or appears in the LC display.
Press the SET button or the SET button to deacti-
vate the alarm.
Using SNOOZE / LIGHT button
Press the SNOOZE /LIGHT button
19
while the alarm
signal is sounding to activate the snooze function.
The alarm signal is silenced and the displays or
and Zz flash. The alarm signal sounds again after
approx. 5 minutes.
Press any button apart from the SNOOZE- / LIGHT
button
19
to deactivate the snooze function.
Note: Press any button apart from the SNOOZE- /
LIGHT button to stop the alarm signal.
Note: The backlight illuminates when you press the
SNOOZE / LIGHT button.
T
b
i
n
86663_aur_Funkwecker_Content_LB3.indd 20 21.01.13 13:25
Sidan laddas...
Sidan laddas...
Sidan laddas...
Sidan laddas...
Sidan laddas...
Sidan laddas...
Sidan laddas...
Sidan laddas...
Sidan laddas...
Sidan laddas...
Sidan laddas...
Sidan laddas...
Sidan laddas...
Sidan laddas...
Sidan laddas...
Sidan laddas...
Sidan laddas...
Sidan laddas...
Sidan laddas...
Sidan laddas...
Sidan laddas...
Sidan laddas...
Sidan laddas...
Sidan laddas...
Sidan laddas...
Sidan laddas...
Sidan laddas...
Sidan laddas...
Sidan laddas...
Sidan laddas...
Sidan laddas...
Sidan laddas...
Sidan laddas...
Sidan laddas...
Sidan laddas...
Sidan laddas...
Sidan laddas...
Sidan laddas...
Sidan laddas...
Sidan laddas...
Sidan laddas...
Sidan laddas...
Sidan laddas...
Sidan laddas...
Sidan laddas...
Sidan laddas...
Sidan laddas...
Sidan laddas...
Sidan laddas...
Sidan laddas...
Sidan laddas...
Sidan laddas...
Sidan laddas...
Sidan laddas...
Sidan laddas...
Sidan laddas...
Sidan laddas...
Sidan laddas...
Sidan laddas...
Sidan laddas...
Sidan laddas...
Sidan laddas...
Sidan laddas...
Sidan laddas...
Sidan laddas...
Sidan laddas...
Sidan laddas...
Sidan laddas...
Sidan laddas...
Sidan laddas...
Sidan laddas...
Sidan laddas...
Sidan laddas...
Sidan laddas...
Sidan laddas...
Sidan laddas...
Sidan laddas...
-
 1
1
-
 2
2
-
 3
3
-
 4
4
-
 5
5
-
 6
6
-
 7
7
-
 8
8
-
 9
9
-
 10
10
-
 11
11
-
 12
12
-
 13
13
-
 14
14
-
 15
15
-
 16
16
-
 17
17
-
 18
18
-
 19
19
-
 20
20
-
 21
21
-
 22
22
-
 23
23
-
 24
24
-
 25
25
-
 26
26
-
 27
27
-
 28
28
-
 29
29
-
 30
30
-
 31
31
-
 32
32
-
 33
33
-
 34
34
-
 35
35
-
 36
36
-
 37
37
-
 38
38
-
 39
39
-
 40
40
-
 41
41
-
 42
42
-
 43
43
-
 44
44
-
 45
45
-
 46
46
-
 47
47
-
 48
48
-
 49
49
-
 50
50
-
 51
51
-
 52
52
-
 53
53
-
 54
54
-
 55
55
-
 56
56
-
 57
57
-
 58
58
-
 59
59
-
 60
60
-
 61
61
-
 62
62
-
 63
63
-
 64
64
-
 65
65
-
 66
66
-
 67
67
-
 68
68
-
 69
69
-
 70
70
-
 71
71
-
 72
72
-
 73
73
-
 74
74
-
 75
75
-
 76
76
-
 77
77
-
 78
78
-
 79
79
-
 80
80
-
 81
81
-
 82
82
-
 83
83
-
 84
84
-
 85
85
-
 86
86
-
 87
87
-
 88
88
-
 89
89
-
 90
90
-
 91
91
-
 92
92
-
 93
93
-
 94
94
-
 95
95
-
 96
96
-
 97
97


Auriol Z31408B Operation and Safety Notes
- Kategori
- Väckarklockor
- Typ
- Operation and Safety Notes
på andra språk
- Deutsch: Auriol Z31408B
- English: Auriol Z31408B
- dansk: Auriol Z31408B
- suomi: Auriol Z31408B
Relaterade papper
-
Auriol Z31130 Operation and Safety Notes
-
Auriol Z29962A Bruksanvisning
-
-
Milomex Z30237C Bruksanvisning
-
-
-
-
-
-
