Electrolux EUX2245AOX Användarmanual
- Kategori
- Frysar
- Typ
- Användarmanual


CONTENTS
1. SAFETY INFORMATION...................................................................................... 3
2. SAFETY INSTRUCTIONS.....................................................................................4
3. OPERATION........................................................................................................ 5
4. DAILY USE.......................................................................................................... 7
5. HINTS AND TIPS................................................................................................. 8
6. CARE AND CLEANING........................................................................................9
7. TROUBLESHOOTING........................................................................................10
8. INSTALLATION..................................................................................................12
9. NOISES............................................................................................................. 15
10. TECHNICAL INFORMATION............................................................................16
WE’RE THINKING OF YOU
Thank you for purchasing an Electrolux appliance. You’ve chosen a product that
brings with it decades of professional experience and innovation. Ingenious and
stylish, it has been designed with you in mind. So whenever you use it, you can be
safe in the knowledge that you’ll get great results every time.
Welcome to Electrolux.
Visit our website for:
Get usage advice, brochures, trouble shooter, service information:
www.electrolux.com
Register your product for better service:
www.registerelectrolux.com
Buy Accessories, Consumables and Original spare parts for your appliance:
www.electrolux.com/shop
CUSTOMER CARE AND SERVICE
Always use original spare parts.
When contacting our Authorised Service Centre, ensure that you have the following
data available: Model, PNC, Serial Number.
The information can be found on the rating plate.
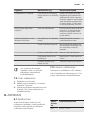
Warning / Caution-Safety information
General information and tips
Environmental information
Subject to change without notice.
www.electrolux.com2

1. SAFETY INFORMATION
Before the installation and use of the appliance, carefully
read the supplied instructions. The manufacturer is not
responsible if an incorrect installation and use causes
injuries and damages. Always keep the instructions with
the appliance for future reference.
1.1 Children and vulnerable people safety
• This appliance can be used by children aged from 8
years and above and persons with reduced physical,
sensory or mental capabilities or lack of experience and
knowledge if they have been given supervision or
instruction concerning use of the appliance in a safe
way and understand the hazards involved.
• Do not let children play with the appliance.
• Cleaning and user maintenance shall not be made by
children without supervision.
•
Keep all packaging away from children.
1.2 General Safety
• This appliance is intended to be used in household and
similar applications such as:
– Farm houses; staff kitchen areas in shops, offices
and other working environments
– By clients in hotels, motels, bed and breakfast and
other residential type environments
• Keep ventilation openings, in the appliance enclosure or
in the built-in structure, clear of obstruction.
• Do not use mechanical devices or other means to
accelerate the defrosting process, other than those
recommended by the manufacturer.
• Do not damage the refrigerant circuit.
• Do not use electrical appliances inside the food storage
compartments of the appliance, unless they are of the
type recommended by the manufacturer.
• Do not use water spray and steam to clean the
appliance.
ENGLISH
3

• Clean the appliance with a moist soft cloth. Only use
neutral detergents. Do not use abrasive products,
abrasive cleaning pads, solvents or metal objects.
• Do not store explosive substances such as aerosol
cans with a flammable propellant in this appliance.
• If the supply cord is damaged, it must be replaced by
the manufacturer, its service agent or similarly qualified
persons in order to avoid a hazard.
2. SAFETY INSTRUCTIONS
2.1 Installation
WARNING!
Only a qualified person must
install this appliance.
• Remove all the packaging.
• Do not install or use a damaged
appliance.
• Obey the installation instruction
supplied with the appliance.
• Always be careful when you move the
appliance because it is heavy. Always
wear safety gloves.
• Make sure the air can circulate around
the appliance.
• Wait at least 4 hours before connecting
the appliance to the power supply. This
is to allow the oil to flow back in the
compressor.
• Do not install the appliance close to
radiators or cookers, oven or hobs.
• The rear of the appliance must stand
against the wall.
• Do not install the appliance where
there is direct sunlight.
• Do not install this appliance in areas
that are too humid or too colds, such
as the construction appendices,
garages or wine cellars.
• When you move the appliance, lift it by
the front edge to avoid scratching the
floor.
2.2 Electrical connection
WARNING!
Risk of fire and electrical
shock.
• The appliance must be earthed.
• All electrical connections should be
made by a qualified electrician.
• Make sure that the electrical
information on the rating plate agrees
with the power supply. If not, contact
an electrician.
• Always use a correctly installed
shockproof socket.
• Do not use multi-plug adapters and
extension cables.
• Make sure not to cause damage to the
electrical components (e.g. mains plug,
mains cable, compressor). Contact the
Service or an electrician to change the
electrical components.
• The mains cable must stay below the
level of the mains plug.
• Connect the mains plug to the mains
socket only at the end of the
installation. Make sure that there is
access to the mains plug after the
installation.
• Do not pull the mains cable to
disconnect the appliance. Always pull
the mains plug.
2.3 Use
WARNING!
Risk of injury, burns, electrical
shock or fire.
• Do not change the specification of this
appliance.
• Do not put electrical appliances (e.g.
ice cream makers) in the appliance
unless they are stated applicable by
the manufacturer.
• Be careful not to cause damage to the
refrigerant circuit. It contains isobutane
(R600a), a natural gas with a high level
www.electrolux.com4

of environmental compatibility. This gas
is flammable.
• If damage occurs to the refrigerant
circuit, make sure that there are no
flames and sources of ignition in the
room. Ventilate the room.
• Do not let hot items to touch the plastic
parts of the appliance.
• Do not put soft drinks in the freezer
compartment. This will create pressure
on the drink container.
• Do not store flammable gas and liquid
in the appliance.
• Do not put flammable products or
items that are wet with flammable
products in, near or on the appliance.
• Do not touch the compressor or the
condenser. They are hot.
• Do not remove or touch items from the
freezer compartment if your hands are
wet or damp.
• Do not freeze again food that has been
thawed.
• Obey the storage instructions on the
packaging of frozen food.
2.4 Care and cleaning
WARNING!
Risk of injury or damage to
the appliance.
• Before maintenance, deactivate the
appliance and disconnect the mains
plug from the mains socket.
• This appliance contains hydrocarbons
in the cooling unit. Only a qualified
person must do the maintenance and
the recharging of the unit.
• Regularly examine the drain of the
appliance and if necessary, clean it. If
the drain is blocked, defrosted water
collects in the bottom of the appliance.
2.5 Disposal
WARNING!
Risk of injury or suffocation.
• Disconnect the appliance from the
mains supply.
• Cut off the mains cable and discard it.
• Remove the door to prevent children
and pets to be closed inside of the
appliance.
• The refrigerant circuit and the insulation
materials of this appliance are ozone-
friendly.
• The insulation foam contains flammable
gas. Contact your municipal authority
for information on how to discard the
appliance correctly.
• Do not cause damage to the part of
the cooling unit that is near the heat
exchanger.
3. OPERATION
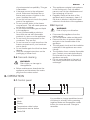
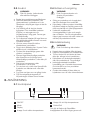
3.1 Control panel
1 2 3 4 5 6
1
ON/OFF
2
Mode
3
Display
4
Temperature colder button
5
Temperature warmer button
6
DrinksChill
It is possible to change predefined sound
of buttons to a loudly one by pressing
together Mode and temperature colder
button for some seconds. Change is
reversible.
ENGLISH
5

Display
A B C D
E
A) Alarm indicator
B) Freezer EcoMode function
C) FastFreeze function
D) Freezer temperature indicator
E) DrinksChill function
After selection of Mode or the
temperature button the
animations starts. After
selection of the temperature
the animation flashes for a
few minutes.
3.2 Switching on
Connect the mains plug to the power
socket
1. Press the ON/OFF if the display is off.
The temperature indicators show the set
default temperature.
2. The alarm buzzer may sound after a
few seconds.
To reset the alarm refer to "High
temperature alarm".
If "DEMO" appears on the display, the
appliance is in demonstration mode.
Refer to "Troubleshooting...".
To select a different set
temperature refer to
"Temperature regulation".
3.3 Switching off
Press ON/OFF for 3 seconds.
The display switches off.
To disconnect the appliance from the
power, disconnect the mains plug from
the power socket.
3.4 Temperature regulation
The set temperature of the freezer may be
adjusted by pressing the temperature
button.
Set default temperature: -18°C for the
freezer.
The temperature indicator shows the set
temperature.
The set temperature will be reached within
24 hours.
After a power failure the set
temperature remains stored.
3.5 DrinksChill mode
The DrinksChill mode is to be used to set
an acoustic alarm at the preferred time,
useful for example when a recipe requires
to cool down a mixture for a certain period
of time, or when a reminder is needed in
order not to forget the bottles placed in
the freezer for fast cooling.
1. To switch on the function press
DrinksChill .
The DrinksChill indicator appears.
The timer shows the set value (30
minutes).
2. Press the temperature colder button
and temperature warmer button to
change the timer set value from 1 to
90 minutes.
The timer indicator is shown (min).
At the end of the countdown the
DrinksChill indicator flashes and an audible
alarm sounds
3. Remove any drinks contained in the
freezer compartment.
4. Press DrinksChill to switch off the
sound and terminate the function.
www.electrolux.com6

It is possible to deactivate
the function at any time
during the countdown by
pressing DrinksChill. The
DrinksChill indicator goes
off
It is possible to change
the time during the
countdown and at the
end by pressing the
temperature colder
button and the
temperature warmer
button.
3.6 EcoMode
For optimal food storage select the
EcoMode.
1. To switch on the function press Mode
until the corresponding icon appears.
The temperature indicator shows the set
temperature for the freezer: -18°C.
2. To switch off the function press Mode
in order to select an other function or
press Mode until you can see none of
the special icons.
The function switches off
by selecting a different
set temperature.
3.7 FastFreeze mode
This function stops automatically after 52
hours.
1. To switch on the function press Mode
until the corresponding icon appears.
The FastFreeze indicator goes on.
2. To switch off the function press Mode
in order to select an other function or
press Mode until you can see none of
the special icons.
The FastFreeze indicator goes off.
The function switches off by
selecting a different freezer
set temperature.
3.8 High temperature alarm
An increase in the temperature in the
freezer compartment (for example due to
an earlier power failure or door is open) is
indicated by:
• flashing the alarm and freezer
temperature indicators;
• sounding of buzzer.
To reset the alarm press any button.
The buzzer switches off.
The freezer temperature indicator shows
the highest temperature reached for a few
seconds. Then show again the set
temperature.
The alarm indicator continues to flash until
the normal conditions are restored.
When the alarm has returned
the alarm indicator goes off.
3.9 Door open alarm
An acoustic alarm will sound if the door is
left open for a few minutes. The door open
alarm conditions are indicated by:
• flashing alarm indicator;
• acoustic buzzer.
When normal conditions are restored
(door closed), the alarm will stop. During
the alarm, the buzzer can be switched off
by pressing any button.
4. DAILY USE
4.1 Freezing fresh food
The freezer compartment is suitable for
freezing fresh food and storing frozen and
deep-frozen food for a long time.
To freeze small amount of fresh foods it is
not necessary to change the present
setting.
To freeze fresh food activate the
FastFreeze function at least 24 hours
before placing the food to be frozen in the
freezer compartment.
Place the fresh food to be frozen in the
two top compartments.
The maximum amount of food that can be
frozen in 24 hours is specified on the
ENGLISH
7

rating plate, a label located on the inside
of the appliance.
The freezing process lasts 24 hours:
during this period do not add other food
to be frozen.
When the freezing process is completed,
return to the required temperature (see
"FastFreeze Function").
4.2 Storage of frozen food
When first starting-up or after a period out
of use, before putting the products in the
compartment let the appliance run at least
2 hours on the higher settings.
In the event of accidental
defrosting, for example due
to a power failure, if the
power has been off for longer
than the value shown in the
technical characteristics chart
under "rising time", the
defrosted food must be
consumed quickly or cooked
immediately and then re-
frozen (after cooling).
4.3 Cold accumulators
The freezer contains at least one cold
accumulator which increases storage time
in the event of a power cut or breakdown.
4.4 Ice-cube production
This appliance is equipped with one or
more trays for the production of ice-
cubes.
Do not use metallic
instruments to remove the
trays from the freezer.
1. Fill these trays with water
2. Put the ice trays in the freezer
compartment.
4.5 Thawing
Deep-frozen or frozen food, prior to being
used, can be thawed in the refrigerator
compartment or at room temperature,
depending on the time available for this
operation.
Small pieces may even be cooked still
frozen, directly from the freezer: in this
case, cooking will take longer.
5. HINTS AND TIPS
5.1 Normal operating sounds
The following sounds are normal during
operation:
• A faint gurgling and bubbling sound
from coils sound when refrigerant is
pumped.
• A whirring and pulsating sound from
the compressor when refrigerant is
pumped.
• A sudden cracking noise from inside
appliance caused by thermic dilatation
(a natural and not dangerous physical
phenomenon).
• A faint click noise from the temperature
regulator when the compressor
switches on or off.
5.2 Hints for energy saving
• Do not open the door frequently or
leave it open longer than absolutely
necessary.
• If the ambient temperature is high and
the Temperature Regulator is set to low
temperature and the appliance is fully
loaded, the compressor may run
continuously, causing frost or ice on
the evaporator. If this happens, set the
Temperature Regulator toward warmer
settings to allow automatic defrosting
and so a saving in electricity
consumption.
• If foreseen, do not remove the cold
accumulators from the freezer basket.
www.electrolux.com8

5.3 Hints for freezing
To help you make the most of the freezing
process, here are some important hints:
• the maximum quantity of food which
can be frozen in 24 hrs. is shown on
the rating plate;
• the freezing process takes 24 hours.
No further food to be frozen should be
added during this period;
• freeze only top quality, fresh and
thoroughly cleaned, foodstuffs;
• prepare food in small portions to
enable it to be rapidly and completely
frozen and to make it possible
subsequently to thaw only the quantity
required;
• wrap up the food in aluminium foil or
polythene and make sure that the
packages are airtight;
• do not allow fresh, unfrozen food to
touch food which is already frozen,
thus avoiding a rise in temperature of
the latter;
• lean foods store better and longer than
fatty ones; salt reduces the storage life
of food;
• water ices, if consumed immediately
after removal from the freezer
compartment, can possibly cause the
skin to be freeze burnt;
• it is advisable to show the freezing in
date on each individual pack to enable
you to keep tab of the storage time.
5.4 Hints for storage of frozen
food
To obtain the best performance from this
appliance, you should:
• make sure that the commercially frozen
foodstuffs were adequately stored by
the retailer;
• be sure that frozen foodstuffs are
transferred from the foodstore to the
freezer in the shortest possible time;
• not open the door frequently or leave it
open longer than absolutely necessary;
• once defrosted, food deteriorates
rapidly and cannot be refrozen;
• do not exceed the storage period
indicated by the food manufacturer.
6. CARE AND CLEANING
WARNING!
Refer to Safety chapters.
6.1 General warnings
CAUTION!
Unplug the appliance before
carrying out any maintenance
operation.
This appliance contains
hydrocarbons in its cooling
unit; maintenance and
recharging must therefore
only be carried out by
authorized technicians.
The accessories and parts of
the appliance are not suitable
for washing in a dishwasher.
6.2 Periodic cleaning
CAUTION!
Do not pull, move or damage
any pipes and/or cables
inside the cabinet.
CAUTION!
Take care of not to damage
the cooling system.
CAUTION!
When moving the cabinet, lift
it by the front edge to avoid
scratching the floor.
ENGLISH
9

The equipment has to be cleaned
regularly:
1. Clean the inside and accessories with
lukewarm water and some neutral
soap.
2. Regularly check the door seals and
wipe clean to ensure they are clean
and free from debris.
3. Rinse and dry thoroughly.
4. If accessible, clean the condenser and
the compressor at the back of the
appliance with a brush.
This operation will improve the
performance of the appliance and
save electricity consumption.
6.3 Defrosting the freezer
The freezer compartment is frost free. This
means that there is no build up of frost
when it is in operation, neither on the
internal walls nor on the foods.
The absence of frost is due to the
continuous circulation of cold air inside the
compartment, driven by an automatically
controlled fan.
6.4 Periods of non-operation
When the appliance is not in use for long
periods, take the following precautions:
1. Disconnect the appliance from
electricity supply.
2. Remove all food.
3. Leave the door/doors open to prevent
unpleasant smells.
WARNING!
If the cabinet will be kept on,
ask somebody to check it
once in a while to prevent the
food inside from spoiling in
case of a power failure.
7. TROUBLESHOOTING
WARNING!
Refer to Safety chapters.
7.1 What to do if...
Problem Possible cause Solution
The appliance does not op-
erate.
The appliance is switched
off.
Switch on the appliance.
The mains plug is not
connected to the mains
socket correctly.
Connect the mains plug to
the mains socket correctly.
There is no voltage in the
mains socket.
Connect a different electrical
appliance to the mains sock-
et. Contact a qualified electri-
cian.
The appliance is noisy. The appliance is not sup-
ported properly.
Check if the appliance stands
stable.
Audible or visual alarm is
on.
The cabinet has been re-
cently switched on or the
temperature is still too
high.
Refer to "Door Open Alarm"or
"High Temperature Alarm".
The temperature in the
appliance is too high.
Refer to "Door Open Alarm"or
"High Temperature Alarm".
www.electrolux.com10

Problem Possible cause Solution
The door is left open. Close the door.
The temperature in the
appliance is too high.
Contact a qualified electrician
or contact the nearest Au-
thorized Service Centre.
A rectangular symbol is
shown instead of numbers
on the Temperature Dis-
play.
Temperature sensor prob-
lem.
Contact the nearest Author-
ized Service Centre (the cool-
ing system will continue to
keep food products cold, but
temperature adjustment will
not be possible).
The lamp does not work. The lamp is in stand-by. Close and open the door.
The lamp does not work. The lamp is defective. Contact the nearest Author-
ized Service Centre.
The compressor operates
continually.
Temperature is set incor-
rectly.
Refer to "Operation" chapter.
Many food products were
put in at the same time.
Wait some hours and then
check the temperature again.
The room temperature is
too high.
Refer to climate class chart
on the rating plate.
Food products placed in
the appliance were too
warm.
Allow food products to cool
to room temperature before
storing.
The door is not closed
correctly.
Refer to "Closing the door".
The FastFreeze function is
switched on.
Refer to "FastFreeze func-
tion".
There is too much frost and
ice.
The door is not closed
correctly or the gasket is
deformed/dirty.
Refer to "Closing the door".
The compressor does not
start immediately after
pressing the FastFreeze, or
after changing the tempera-
ture.
This is normal, no error
has occurred.
The compressor starts after a
period of time.
Water flows on the floor. The melting water outlet is
not connected to the
evaporative tray above the
compressor.
Attach the melting water out-
let to the evaporative tray.
ENGLISH
11

Problem Possible cause Solution
Temperature cannot be set. The FastFreeze or Shop-
pingMode function is
switched on.
Switch off FastFreeze or
ShoppingMode manually, or
wait until the function resets
automatically to set the tem-
perature. Refer to "FastFreeze
or ShoppingMode function".
DEMO appears on the dis-
play.
The appliance is in dem-
onstration mode.
Keep the Mode pressed for
approximately 10 seconds
until a long sound is heard
and display shuts off for a
short time.
The temperature in the ap-
pliance is too low/too high.
The temperature regulator
is not set correctly.
Set a higher/lower tempera-
ture.
The food products' tem-
perature is too high.
Let the food products tem-
perature decrease to room
temperature before storage.
The door has been
opened often.
Open the door only if neces-
sary.
The FastFreeze function is
switched on.
Refer to "FastFreeze func-
tion".
There is no cold air circu-
lation in the appliance.
Make sure that there is cold
air circulation in the appli-
ance.
If the advice does not lead to
the desired result, call the
nearest brand-mark service.
7.2 Closing the door
1. Clean the door gaskets.
2. If necessary, adjust the door. Refer to
"Installation".
3. If necessary, replace the defective
door gaskets. Contact the After Sales
Service.
7.3 Replacing the lamp
The appliance is equipped with a longlife
LED interior light.
Only service is allowed to replace the
lighting device. Contact your After Sales
Service.
8. INSTALLATION
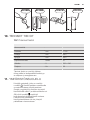
8.1 Positioning
This appliance can be installed in a dry,
well ventilated indoor where the ambient
temperature corresponds to the climate
class indicated on the rating plate of the
appliance:
Climate
class
Ambient temperature
SN +10°C to + 32°C
N +16°C to + 32°C
www.electrolux.com12

Climate
class
Ambient temperature
ST +16°C to + 38°C
T +16°C to + 43°C
Some functional problems
might occur for some types
of models when operating
outside of that range. The
correct operation can only be
guaranteed within the
specified temperature range.
If you have any doubts
regarding where to install the
appliance, please turn to the
vendor, to our customer
service or to the nearest
Service Centre
8.2 Electrical connection
• Before plugging in, ensure that the
voltage and frequency shown on the
rating plate correspond to your
domestic power supply.
• The appliance must be earthed. The
power supply cable plug is provided
with a contact for this purpose. If the
domestic power supply socket is not
earthed, connect the appliance to a
separate earth in compliance with
current regulations, consulting a
qualified electrician.
• The manufacturer declines all
responsibility if the above safety
precautions are not observed.
• This appliance complies with the E.E.C.
Directives.
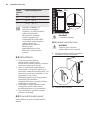
8.3 Ventilation requirements
The airflow behind the appliance must be
sufficient.
5 cm
min.
200 cm
2
min.
200 cm
2
CAUTION!
Refer to the assembly
instructions for the
installation.
8.4 Installing the appliance
CAUTION!
Make sure that the mains
cable can move freely.
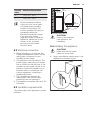
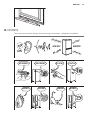
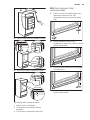
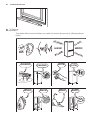
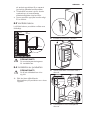
1. Apply the adhesive sealing strip to the
appliance as shown in figure.
2. Install the appliance in the niche.
ENGLISH
13

3. Attach the appliance to the niche with
4 screws.
4. Fix the covers on the screws.
Do a final check to make sure that:
• All screws are tightened.
• The sealing strip is attached tightly to
the cabinet.
• The door opens and closes correctly.
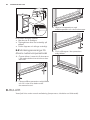
8.5 Assembly instructions for the
compensator lower part of the
door
1. With the door open, loosen the two
screws situated in the lower part
without unscrewing them completely.
2. Position the steel compensator as
indicated in the figure and insert the
upper part under the head of the
screws.
3. Align the compensator with the steel
door panel and tighten the screws.
4. Insert the steel carter inside the
compensator as indicated in the
figure.
www.electrolux.com14

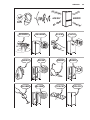
9. NOISES
There are some sounds during normal running (compressor, refrigerant circulation).
BRRR!
HISSS!
CLICK!
BLUBB!
CRACK!
SSSRR
R!
OK
CLICK!
CLICK!
SSSRRR!
SSSRRR!
BRRR!
BRRR!
HISSS!
HISSS!
ENGLISH
15

BLUBB!
BLUBB!
CRACK!CRACK!
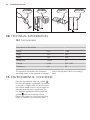
10. TECHNICAL INFORMATION
10.1 Technical data
Dimensions of the recess
Height mm 1780
Width mm 560
Depth mm 550
Rising time Hours 21
Voltage Volts 230 - 240
Frequency Hz 50
The technical information are situated in
the rating plate, on the external or internal
side of the appliance and in the energy
label.
11. ENVIRONMENTAL CONCERNS
Recycle the materials with the symbol .
Put the packaging in applicable containers
to recycle it. Help protect the environment
and human health and to recycle waste of
electrical and electronic appliances. Do
not dispose appliances marked with the
symbol with the household waste.
Return the product to your local recycling
facility or contact your municipal office.
www.electrolux.com16

SISÄLTÖ
1. TURVALLISUUSTIEDOT.................................................................................... 18
2. TURVALLISUUSOHJEET................................................................................... 19
3. KÄYTTÖ............................................................................................................ 20
4. PÄIVITTÄINEN KÄYTTÖ.....................................................................................22
5. VIHJEITÄ JA NEUVOJA..................................................................................... 23
6. HOITO JA PUHDISTUS......................................................................................24
7. VIANMÄÄRITYS.................................................................................................25
8. ASENNUS......................................................................................................... 27
9. ÄÄNET...............................................................................................................30
10. TEKNISET TIEDOT...........................................................................................31
SINUN PARHAAKSESI
Kiitämme teitä Electrolux-laitteen hankinnasta. Olette valinneet tuotteen, joka
perustuu vuosikymmenien aikana saatuun kokemukseen ja innovaatioon. Kekseliäs
ja tyylikäs laite, joka on suunniteltu teitä ajatellen. Laitetta käyttäessänne voitte olla
aina varma erinomaisista tuloksista.
Tervetuloa Electroluxiin.
Vieraile verkkosivullamme:
Saadaksesi käyttöön liittyviä neuvoja, esitteitä, vianmääritysohjeita ja huolto-
ohjeita:
www.electrolux.com
Tuotteen rekisteröimiseksi parempaa huoltoa varten:
www.registerelectrolux.com
Ostaaksesi laitteesi lisävarusteita, kulutusosia ja alkuperäisiä varaosia:
www.electrolux.com/shop
ASIAKASPALVELU JA HUOLTO
Suosittelemme alkuperäisten varaosien käyttöä.
Pidä seuraavat tiedot saatavilla ottaessasi yhteyttä valtuutettuun
huoltoliikkeeseemme. Malli, tuotenumero, sarjanumero.
Kyseiset tiedot löytyvät laitteen arvokilvestä.
Varoitukset/huomautukset ja turvallisuusohjeet
Yleisohjeet ja vinkit
Ympäristönsuojeluohjeita
Oikeus muutoksiin pidätetään.
SUOMI
17

1. TURVALLISUUSTIEDOT
Lue laitteen mukana toimitetut ohjeet ennen laitteen
asennusta ja käyttöä. Valmistaja ei ota vastuuta henkilö-
tai omaisuusvahingoista, jotka aiheutuvat laitteen
virheellisestä asennuksesta tai käytöstä. Pidä ohjeet aina
laitteen mukana tulevia käyttökertoja varten.
1.1 Lasten ja taitamattomien henkilöiden turvallisuus
• Vähintään 8 vuotta täyttäneet lapset ja sellaiset henkilöt,
joiden fyysiset, sensoriset tai henkiset kyvyt eivät ole
tähän riittäviä tai joilla ei ole laitteen tuntemusta tai
kokemusta sen käytöstä, saavat käyttää tätä laitetta
ainoastaan silloin, kun heidän turvallisuudestaan
vastaava henkilö valvoo ja ohjaa heitä käyttämään
laitetta turvallisesti ja ymmärtämään sen käyttöön liittyvät
vaarat.
• Älä anna lasten leikkiä laitteella.
•
Lapset eivät saa suorittaa puhdistusta tai huoltoa ilman
valvontaa.
• Pidä kaikki pakkausmateriaalit lasten ulottumattomissa.
1.2 Yleiset turvallisuusohjeet
• Laite on tarkoitettu käytettäväksi kotiympäristöissä ja
vastaavissa ympäristöissä, kuten:
– henkilöstön kodinomainen keittiöympäristö liikkeissä,
toimistoissa ja muissa työympäristöissä.
– hotellien, motellien ja muiden majatalojen asiakkaiden
kodinomainen käyttöympäristö.
• Pidä kalusteen sisään asennetun laitteen syvennyksen
tai kalustekaapin ilmanvaihtoaukot vapaina.
• Älä yritä nopeuttaa sulatusta mekaanisilla tai muilla
sellaisilla välineillä, joita valmistaja ei ole neuvonut
käyttämään.
• Varo vahingoittamasta jäähdytysputkistoa.
• Älä käytä sähkölaitteita elintarvikkeiden säilytystiloissa,
elleivät ne ole valmistajan suosittelemaa tyyppiä.
www.electrolux.com18

• Älä suihkuta vettä tai käytä höyryä laitteen
puhdistamiseen.
• Puhdista laite kostealla pehmeällä liinalla. Käytä vain
mietoja puhdistusaineita. Älä käytä hankausainetta,
hankaavia pesulappuja, liuottimia tai metalliesineitä.
• Älä säilytä laitteessa räjähtäviä aineita, kuten syttyvien
ponneaineiden aerosolipulloja.
• Jos virtajohto vaurioituu, sen saa vaaratilanteiden
välttämiseksi vaihtaa vain valmistaja, huoltoliike tai
vastaava ammattitaitoinen henkilö.
2. TURVALLISUUSOHJEET
2.1 Asennus
VAROITUS!
Asennuksen saa suorittaa
vain ammattitaitoinen henkilö.
• Poista kaikki pakkausmateriaalit.
• Vaurioitunutta laitetta ei saa asentaa tai
käyttää.
• Noudata koneen mukana toimitettuja
ohjeita.
• Siirrä laitetta aina varoen, sillä se on
raskas. Käytä aina suojakäsineitä.
• Varmista, että ilmankierto on hyvä
laitteen ympärillä.
• Odota vähintään 4 tuntia ennen kuin
kytket laitteen sähköverkkoon. Täten
öljy virtaa takaisin kompressoriin.
• Älä asenna laitetta lämmittimien tai
liesien, uunin tai keittotasojen lähelle.
• Laitteen takaosa on asetettava seinää
kohden.
• Laitetta ei saa asentaa suoraan
auringonvaloon.
• Älä asenna tätä laitetta liian kosteisiin
tai kylmiin tiloihin, kuten
rakennustelineisiin, autotalliin tai
viinikellariin.
• Kun siirrät laitetta, nosta sitä
etureunasta, jottet naarmuta lattiaa.
2.2 Sähköliitäntä
VAROITUS!
Tulipalo- ja sähköiskuvaara.
• Laite on kytkettävä maadoitettuun
pistorasiaan.
• Kaikki sähkökytkennät tulee jättää
asiantuntevan sähköasentajan
vastuulle.
• Varmista, että arvokilven sähkötiedot
vastaavat kotitalouden sähköverkon
arvoja. Ota muussa tapauksessa
yhteyttä sähköasentajaan.
• Kytke pistoke maadoitettuun
pistorasiaan.
• Älä käytä jakorasioita tai jatkojohtoja.
• Varmista, etteivät sähköosat vaurioidu
(esim. pistoke, virtajohto, kompressori).
Ota yhteyttä huoltoliikkeeseen tai
sähköasentajaan sähköosien
vaihtamiseksi.
• Virtajohdon on oltava aina pistokkeen
alapuolella.
• Kytke pistoke pistorasiaan vasta
asennuksen jälkeen. Varmista, että
laitteen verkkovirtakytkentä on
ulottuvilla laitteen asennuksen jälkeen.
• Älä vedä virtajohdosta pistoketta
irrottaessasi. Vedä aina pistokkeesta.
2.3 Käyttö
VAROITUS!
Henkilövahinkojen,
palovammojen tai
sähköiskujen tai tulipalon
vaara.
• Älä muuta laitteen teknisiä
ominaisuuksia.
• Älä aseta sähkölaitteita (esim.
jäätelökoneita) laitteeseen, ellei
valmistaja ole antanut lupaa niiden
käyttöön.
SUOMI
19

• Varo, ettei jäähdytysputkisto vaurioidu.
Se sisältää isobutaania (R600a), joka
on hyvin ympäristöön yhteensopiva
maakaasu. Kyseinen kaasu on
syttyvää.
• Jos jäähdytysputkisto vaurioituu,
varmista, ettei huoneessa ole avotulta
ja sytytyslähteitä. Huolehdi hyvästä
ilmanvaihdosta.
• Älä anna kuumien esineiden koskea
laitteen muoviosia.
• Älä aseta virvoitusjuomia pakastimeen.
Muutoin juomasäiliöön muodostuu
painetta.
• Älä säilytä tulenarkoja kaasuja tai
nesteitä laitteessa.
• Älä aseta laitteeseen, sen lähelle tai
päälle syttyviä tuotteita tai syttyviin
tuotteisiin kostutettuja esineitä.
• Älä kosketa kompressoriin tai
lauhduttimeen. Ne ovat kuumia.
• Älä poista pakastimen tuotteita tai
kosketa niihin, jos kätesi ovat märät tai
kosteat.
• Älä pakasta uudelleen jo sulaneita
elintarvikkeita.
• Noudata pakasteiden pakkauksessa
olevia säilytysohjeita.
2.4 Hoito ja puhdistus
VAROITUS!
Virheellinen käyttö voi
aiheuttaa henkilövahinkoja tai
laitteen vaurioitumisen.
• Ennen kuin aloitat huoltoa tai
puhdistusta, kytke laite pois
toiminnasta ja irrota pistoke
pistorasiasta.
• Laitteen jäähdytysyksikkö sisältää
hiilivetyä. Ainoastaan pätevä alan
ammattilainen saa huoltaa yksikköä ja
täyttää sen uudelleen.
• Tarkista sulamisveden poistoaukko
säännöllisesti ja puhdista se
tarvittaessa. Jos poistoaukko on
tukossa, sulanut vesi kerääntyy laitteen
pohjalle.
2.5 Hävittäminen
VAROITUS!
Henkilövahinko- tai
tukehtumisvaara.
• Irrota pistoke pistorasiasta.
• Leikkaa johto irti ja hävitä se.
• Poista ovi, jotta lapset ja eläimet eivät
voisi jäädä kiinni laitteen sisälle.
• Tämän laitteen jäähdytysputkistossa ja
eristysmateriaaleissa ei ole
otsonikerrokselle haitallisia aineita.
• Eristevaahto sisältää tulenarkaa
kaasua. Kysy lisätietoa laitteen
oikeaoppisesta hävittämisestä
paikalliselta viranomaiselta.
• Älä vaurioita lämmönvaihtimen lähellä
olevaa jääkaapin osaa.
3. KÄYTTÖ
3.1 Käyttöpaneeli
1 2 3 4 5 6
1
ON/OFF
2
Mode
3
Näyttö
4
Lämpötilan alennuspainike
5
Lämpötilan lisäyspainike
6
DrinksChill
Esimääritetyt painikkeiden äänet voidaan
asettaa korkeaksi painamalla
samanaikaisesti Mode-painiketta ja
lämpötilan alennuspainiketta muutaman
sekunnin ajan. Asetusta voidaan säätää.
www.electrolux.com20
Sidan laddas ...
Sidan laddas ...
Sidan laddas ...
Sidan laddas ...
Sidan laddas ...
Sidan laddas ...
Sidan laddas ...
Sidan laddas ...
Sidan laddas ...
Sidan laddas ...
Sidan laddas ...
Sidan laddas ...
Sidan laddas ...
Sidan laddas ...
Sidan laddas ...
Sidan laddas ...
Sidan laddas ...
Sidan laddas ...
Sidan laddas ...
Sidan laddas ...
Sidan laddas ...
Sidan laddas ...
Sidan laddas ...
Sidan laddas ...
Sidan laddas ...
Sidan laddas ...
Sidan laddas ...
Sidan laddas ...
-
 1
1
-
 2
2
-
 3
3
-
 4
4
-
 5
5
-
 6
6
-
 7
7
-
 8
8
-
 9
9
-
 10
10
-
 11
11
-
 12
12
-
 13
13
-
 14
14
-
 15
15
-
 16
16
-
 17
17
-
 18
18
-
 19
19
-
 20
20
-
 21
21
-
 22
22
-
 23
23
-
 24
24
-
 25
25
-
 26
26
-
 27
27
-
 28
28
-
 29
29
-
 30
30
-
 31
31
-
 32
32
-
 33
33
-
 34
34
-
 35
35
-
 36
36
-
 37
37
-
 38
38
-
 39
39
-
 40
40
-
 41
41
-
 42
42
-
 43
43
-
 44
44
-
 45
45
-
 46
46
-
 47
47
-
 48
48


Electrolux EUX2245AOX Användarmanual
- Kategori
- Frysar
- Typ
- Användarmanual
på andra språk
- eesti: Electrolux EUX2245AOX Kasutusjuhend
- English: Electrolux EUX2245AOX User manual
Relaterade papper
-
Electrolux EUF2241AOW Användarmanual
-
Electrolux EUG1343AOW Användarmanual
-
Electrolux KUB1AF22W Användarmanual
-
-
-
-
-
-
Electrolux ERN3313AOW Användarmanual