POINT 5-SERIES POIH5077I4B INDUKSJONSTOPP Bruksanvisning
- Kategori
- Kokplattor
- Typ
- Bruksanvisning

POIH5077I4B
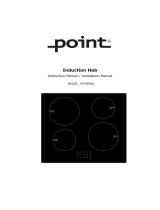
User Manual
Induction Hob

2
GB
Thank you for purchasing your new POINT induction hob . These
operating instructions will help you use it properly and safely. We
recommend that you spend some time reading this instruction manual in
order that you fully understand all the operational features it oers. Read
all the safety instructions carefully before use and keep this instruction
manual for future reference.
NO
Takk for at du kjøpte din nye POINT Induksjonstopp . Denne
bruksanvisningen hjelper deg med å bruke den ordentlig og sikkert.
Vi anbefaler at du tar deg tid til å lese gjennom hele bruksanvisningen for
å bli fortrolig med alle funksjonene den har. Les alle sikkerhetsanvisningene
nøye før bruk, og oppbevar bruksanvisningen for fremtidig referanse.
FI
Kiitos, että ostit uuden POINT-Induktiolieden. Tämä käyttöopas opastaa
sinua käyttämään laitetta oikein ja turvallisesti. Suosittelemme, että vietät
hetken tämän käyttöoppaan parissa, jotta ymmärtäisit täysin kaikki
laitteen tarjoamat toiminnalliset ominaisuudet. Lue kaikki
turvallisuusohjeet huolellisesti ennen laitteen käyttöä ja säilytä käyttöopas
myöhempää käyttöä varten.
DK
Tak for købet af din nye Induktionskogeplade fra POINT. Disse
brugsanvisninger hjælper dig med at bruge den korrekt og sikkert. Vi
anbefaler, at du læser denne brugsanvisning, så du får en fuld forståelse af,
hvordan alle funktionerne virker. Læs alle sikkerhedsinstruktioner nøje før
brug, og behold denne brugsanvisning til senere reference.
SE
Tack för ditt köp av din nya POINT-Induktionshäll. Denna bruksanvisning
hjälper dig att använda den säkert och på rätt sätt. Vi rekommenderar
att du tar dig tid att läsa denna bruksanvisning så att du förstår alla
driftsfunktioner den erbjuder. Läs alla säkerhetsanvisningar noga före
användning och förvara bruksanvisningen för framtida referens.

GB
DKSE
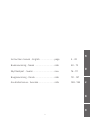
Instruction manual - English ...................... page 4 - 39
Användarmanua - Svenska ......................... sida 148 - 183
Brugsanvisning - Dansk ............................... side 112 - 147
Bruksanvisning - Norsk ............................... side 40 - 75
Käyttöohjeet - Suomi .................................. sivu 76 - 111
NOFI
3

4
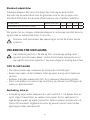
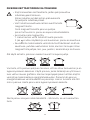
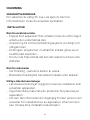
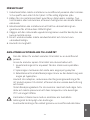
FOREWORD
SAFETY WARNINGS
Your safety is important to us. Please read this information
before using your cooktop.
INSTALLATION
Electrical Shock Hazard
- Disconnect the appliance from the mains electricity
supply before carrying out any work or maintenance on it.
- Connection to a good earth wiring system is essential and
mandatory.
- Alterations to the domestic wiring system must only be
made by a qualified electrician.
- Failure to follow this advice may result in electrical shock
or death.
Cut Hazard
- Take care - panel edges are sharp.
- Failure to use caution could result in injuries or cuts.
Important safety instructions
- Read these instructions carefully before installing or
using this appliance.
- No combustible material or products should be placed on
this appliance at any time.
- Please make this information available to the person
responsible for installing the appliance as it could reduce
your installation costs.

5
GB
- In order to avoid a hazard, this appliance must be
installed according to these instructions for installation.
- This appliance is to be properly installed and earthed only
by a suitably qualified person.
- This appliance should be connected to a circuit which
incorporates an isolating switch providing full
disconnection from the power supply.
- Failure to install the appliance correctly could invalidate
any warranty or liability claims.
- This appliance can be used by children aged from 8 years
and above and persons with reduced physical, sensory or
mental capabilities or lack of experience and knowledge
if they have been given supervision or instruction
concerning use of the appliance in a safe way and
understand the hazards involved.
- Children shall not play with the appliance. Cleaning and
user maintenance shall not be made by children without
supervision.
- If the supply cord is damaged, it must be replaced by the
manufacturer, its service agent or similarly qualified
persons in order to avoid a hazard.
- Warning: If the surface is cracked, switch o the
appliance to avoid the possibility of electric shock, for
hob surfaces of glass-ceramic or similar material which
protect live parts
- Metallic objects such as knives, forks, spoons and lids
should not be placed on the hob surface since they can
get hot
- A steam cleaner is not to be used.

6
- Do not use a steam cleaner to clean your cooktop.
- The appliance is not intended to be operated by means of
an external timer or separate remote-control system.
- WARNING: Danger of fire: do not store items on the
cooking surfaces.
- The cooking process has to be supervised. A short term
cooking process has to be supervised continuously.
- WARNING: Unattended cooking on a hob with fat or oil
can be dangerous and may result in fire. NEVER try to
extinguish a fire with water, but switch o the appliance
and then cover flame e.g. with a lid or a fire blanket.
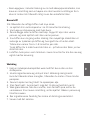
OPERATION AND MAINTENANCE
Electrical Shock Hazard
- Do not cook on a broken or cracked cooktop. If the
cooktop surface should break or crack, switch the
appliance o immediately at the mains power supply
(wall switch) and contact a qualified technician.
- Switch the cooktop o at the wall before cleaning or
maintenance.
- Failure to follow this advice may result in electrical shock
or death.
Health Hazard
- This appliance complies with electromagnetic safety
standards.
- However, persons with cardiac pacemakers or other
electrical implants (such as insulin pumps) must consult

7
GB
with their doctor or implant manufacturer before using
this appliance to make sure that their implants will not
be aected by the electromagnetic field.
- Failure to follow this advice may result in death.
Hot Surface Hazard
- During use, accessible parts of this appliance will become
hot enough to cause burns.
- Do not let your body, clothing or any item other than
suitable cookware contact the Induction glass until the
surface is cool.
- Keep children away.
- Handles of saucepans may be hot to touch. Check
saucepan handles do not overhang other cooking zones
that are on. Keep handles out of reach of children.
- Failure to follow this advice could result in burns and
scalds.
Cut Hazard
- The razor-sharp blade of a cooktop scraper is exposed
when the safety cover is retracted. Use with extreme
care and always store safely and out of reach of children.
- Failure to use caution could result in injuries or cuts.
Important safety instructions
- Never leave the appliance unattended when in use.
Boilover causes smoking and greasy spillovers may
ignite.
- Never use your appliance as a work or storage surface.
- Never leave any objects or utensils on the appliance.

8
- Do not place or leave any magnetisable objects (e.g. credit
cards, memory cards) or electronic devices (e.g.
computers, MP3 players) near the appliance, as they may
be aected by its electromagnetic field.
- Never use your appliance for warming or heating the
room.
- After use, always turn o the cooking zones and the
cooktop as described in this manual (i.e. by using the
touch controls). Do not rely on the pan detection feature
to turn o the cooking zones when you remove the pans.
- Do not allow children to play with the appliance or sit,
stand, or climb on it.
- Do not store items of interest to children in cabinets
above the appliance. Children climbing on the cooktop
could be seriously injured.
- Do not leave children alone or unattended in the area
where the appliance is in use.
- Children or persons with a disability which limits their
ability to use the appliance should have a responsible and
competent person to instruct them in its use. The
instructor should be satisfied that they can use the
appliance without danger to themselves or their
surroundings.
- Do not repair or replace any part of the appliance unless
specifically recommended in the manual. All other
servicing should be done by a qualified technician.

9
GB
- Do not place or drop heavy objects on your cooktop.
- Do not stand on your cooktop.
- Do not use pans with jagged edges or drag pans across
the Induction glass surface as this can scratch the glass.
- Do not use scourers or any other harsh abrasive cleaning
agents to clean your cooktop, as these can scratch the
Induction glass.
- This appliance is intended to be used in household and
similar applications such as:
- sta kitchen areas in shops, oces and other working
environments;
- farm houses;
- by clients in hotels, motels and other residential type
environments;
- bed and breakfast type environments.
- WARNING: The appliance and its accessible parts
become hot during use.
- Care should be taken to avoid touching heating elements.
- Children less than 8 years of age shall be kept away
unless continuously supervised.

10
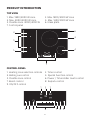
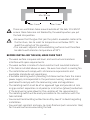
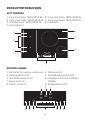
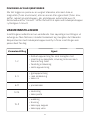
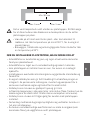
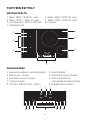
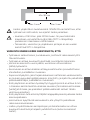
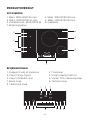
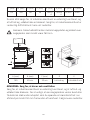
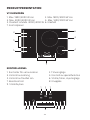
TOP VIEW
PRODUCT INTRODUCTION
1. Max. 1800/3000 W zone
3. Max. 3000/4000 W zone
5. Flexible zone. 3000/4000 W
7. Control panel
2. Max. 1800/3000 W zone
4. Max. 1400/2000 W zone
6. Glass plate
CONTROL PANEL
1. Heating zone selection controls
3. Boiling cue control
5. Flexible zone control
7. Boost control
9. ON/OFF control
2. Timer control
4. Special Function control
6. Power / Timer slider touch control
8. Keylock control
26
3
4
7
1
5
3 7 8 94 5
1 2 1
6

11
GB
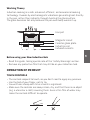
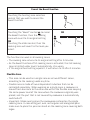
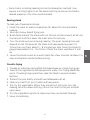
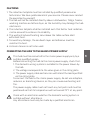
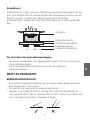
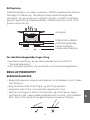
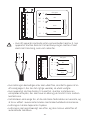
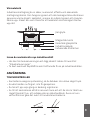
Working Theory
Induction cooking is a safe, advanced, ecient, and economical cooking
technology. It works by electromagnetic vibrations generating heat directly
in the pan, rather than indirectly through heating the glass surface.
The glass becomes hot only because the pan eventually warms it up.
Before using your New Induction Hob
• Read this guide, taking special note of the ‘Safety Warnings’ section.
• Remove any protective film that may still be on your Induction hob.
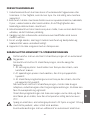
TOUCH CONTROLS
OPERATION OF PRODUCT
• The controls respond to touch, so you don’t need to apply any pressure.
• Use the ball of your finger, not its tip.
• You will hear a beep each time a touch is registered.
• Make sure the controls are always clean, dry, and that there is no object
(e.g. a utensil or a cloth) covering them. Even a thin film of water may
make the controls dicult to operate.
Iron pot
Magnetic circuit
Ceramic glass plate
Induction coil
Induced currents

12
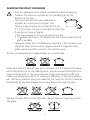
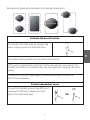
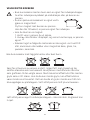
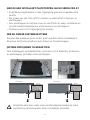
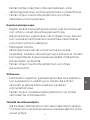
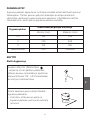
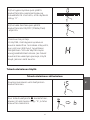
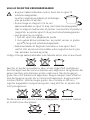
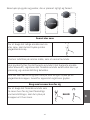
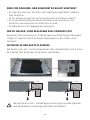
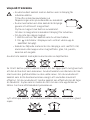
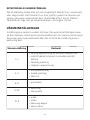
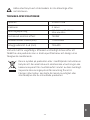
CHOOSING THE RIGHT COOKWARE
• Only use cookware with a base suitable for induction cooking.
Look for the induction symbol on the packaging or on the
bottom of the pan.
• You can check whether your cookware is
suitable by carrying out a magnet test.
Move a magnet towards the base of the pan.
If it is attracted, the pan is suitable for induction.
• If you do not have a magnet:
1. Put some water in the pan you want to check.
2. If does not flash in the display and the water is heating, the
pan is suitable.
• Cookware made from the following materials is not suitable: pure
stainless steel, aluminium or copper without a magnetic base,
glass, wood, porcelain, ceramic, and earthenware.
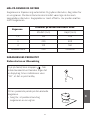
Do not use cookware with jagged edges or a curved base.
Always lift pans o the Induction hob – do not slide, or they may scratch
the glass.
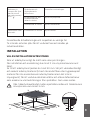
Make sure that the base of your pan is smooth, sits flat against the glass,
and is the same size as the cooking zone. Use pans whose diameter is as
large as the graphic of the zone selected. Using a pot slightly wider will
make sure energy be used at its maximum eciency. If you use a smaller
pot, eciency could be less than expected. Pot less than 140 mm could be
undetected by the hob. Always centre your pan on the cooking zone.

13
GB
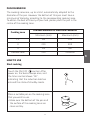
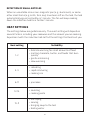
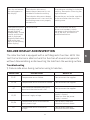
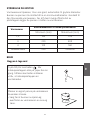
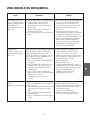
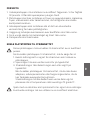
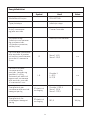
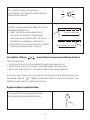
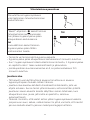
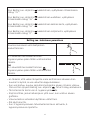
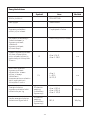
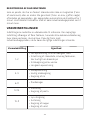
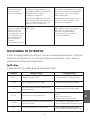
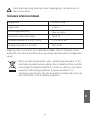
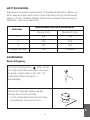
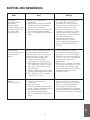
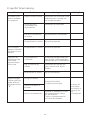
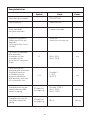
Cooking zone The base diameter of induction cookware
PAN DIMENSION
The cooking zones are, up to a limit, automatically adapted to the
diameter of the pan. However the bottom of this pan must have a
minimum of diameter according to the corresponding cooking zone.
To obtain the best eciency of your hob, please place the pan in the
centre of the cooking zone.
1,2,
3
4
Flexible zone
Minimum (mm)
140
220
120
220
Maximum (mm)
220
300
160
220x400
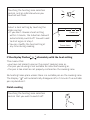
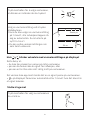
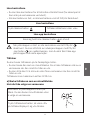
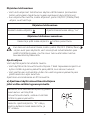
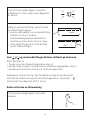
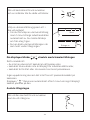
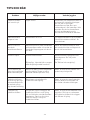
Touch the ON/OFF control. After
power on, the buzzer beeps once, and
the timer control shows “00”,
indicating that the induction hob has
entered the state of standby mode.
Place a suitable pan on the cooking zone
that you wish to use.
• Make sure the bottom of the pan and
the surface of the cooking zone are
clean and dry.
HOW TO USE
Start cooking

14
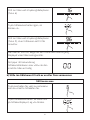
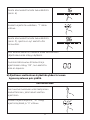
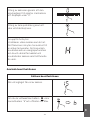
Touching the heating zone selection
control, and an indicator where you
touched will flash.
Select a heat setting by touching the
slider control
• If you don’t choose a heat setting
within 1 minute, the Induction hob will
automatically switch o. You will need
to start again at step 1.
• You can modify the heat setting at
any time during cooking.
Power up
Power down
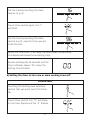
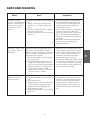
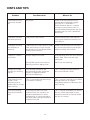
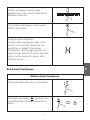
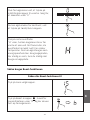
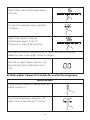
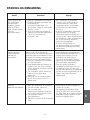
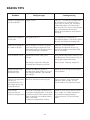
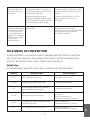
If the display flashes alternately with the heat setting
This means that:
• you have not placed a pan on the correct cooking zone or,
• the pan you’re using is not suitable for induction cooking or,
• the pan is too small or not properly centered on the cooking zone.
No heating takes place unless there is a suitable pan on the cooking zone.
The display “ ”will automatically disappear after 1 minute if no suitable
pan is placed on it.
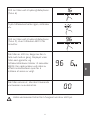
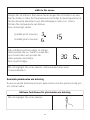
Touching the heating zone selection
control that you wish to switch o.
Finish cooking

15
GB
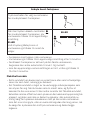
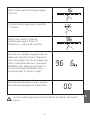
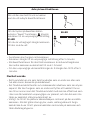
Turn the cooking zone o by touching
the slider to the left.
Make sure the display shows “0”.
Turn the whole cooktop o by touching
the ON/OFF control.
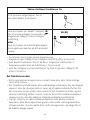
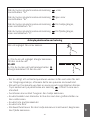
Beware of hot surfaces
H will show which cooking zone is hot
to touch. It will disappear when the
surface has cooled down to a safe
temperature. It can also be used as an
energy saving function if you want to
heat further pans, use the hotplate
that is still hot.
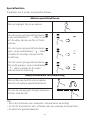
Using the Boost function
control.
Activate the boost function
reaches Max.
zone indicator shows “b” and the power
Touching the heating zone selection
Touching the boost control , the

Touching the "Boost" control to cancel
the Boost function, then the cooking
zone will revert to its original setting.
OR
Touching the slider control, then the
cooking zone will revert to the level you
select.
16
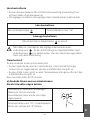
Touching the heating zone selection
control that you wish to cancel the
boost function
OR
Cancel the Boost function
The function can work in all cooking zones
• The cooking zone returns to its original setting after 5 minutes.
• As the boost function of 1st cooking zone is activated, the 2nd cooking
zone is limited under level 2 automatically. Vice versa
• If the original heat setting equals 0, it will return to 15 after 5 minutes.
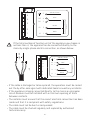
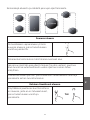
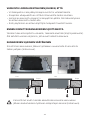
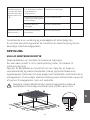
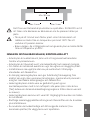
• This area can be used as a single zone or as two different zones,
according to the cooking needs anytime.
• Flexible area is made of two independent inductors that can be
controlled separately. When working as a single zone, a cookware is
moved from one zone to the other one within the flexible area keeping
the same power level of the zone where the cookware originally was
placed, and the part that is not covered by cookware is automatically
switched off.
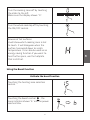
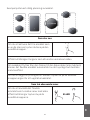
• Important: Make sure to place the cookwares centered on the single
cooking zone. In case of big pot, oval, rectangular and elongated pans
make sure to place the pans centered on the cooking zone covering both
logos.
Flexible Area

17
GB
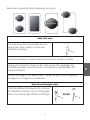
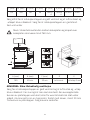
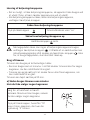
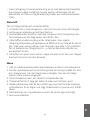
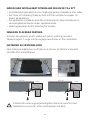
Examples of good pot placement and bad pot placement.
To activate the free area as a single big
zone, simply press the dedicated key.
To use the flexible area as two dierent
zones with dierent power settings,
press the dedicated keys.
The power setting works as any other normal area.
If the pot is moved from the front to the rear part (or vice versa), the
flexible area detects automatically the new position, keeping the same
power.
To add a further pot, press again the dedicated keys, in order to
detect the cookware.
Activate the boost function
As two independent zones
OR

18
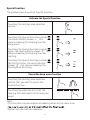
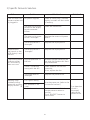
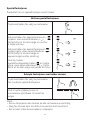
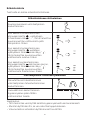
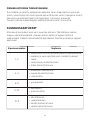
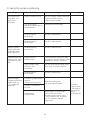
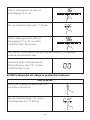
Special function
The product have 3 levels of Special Function.
Note:
•This function may be used on all cooking zones at the same time.
•Better not use cast iron cookware.
Touching the heating zone selection
control.
Touching the heating zone selection
control that you wish to cancel the
Special Function.
Touching the slider control, then the
cooking zone will revert to the level you
select.
, Touching the Special Function control
the zone indicator shows “ ”, this
means choosing the heating level for
keep warm.
Touching the Special Function control
again, the zone indicator shows “ ”, this
means choosing the heating level for
melting.
Touching the Special Function control
for the third time, the zone indicator
shows“ ”, this means choosing the
heating level for Frying.
Activate the Special Function
Cancel the keep warm function

19
GB
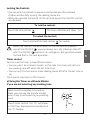
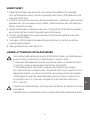
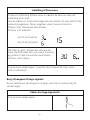
Locking the Controls
• You can lock the controls to prevent unintended use (for example
children accidentally turning the cooking zones on).
• When the controls are locked, all the controls except the ON/OFF control
are disabled.
You can use the timer in two dierent ways:
• You can use it as a minute minder. In this case, the timer will not turn
any cooking zone o when the set time is up.
• You can set it to turn one or more cooking zones o after the set time is
up.
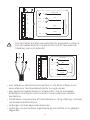
a) Using the Timer as a Minute Minder
If you are not selecting any cooking zone
Timer control
Touch the lock control
Touch and hold the lock control for a while.
The timer indicator will show “ Lo“
To lock the controls
To unlock the controls
except the ON/OFF , you can always turn the induction hob o
with the ON/OFF control in an emergency, but you shall unlock
the hob first in the next operation.
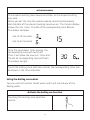
Make sure the cooktop is turned on.
Note: you can use the minute minder
even if you’re not selecting any cooking
zone.
Touch timer control, the “10” will show
in the timer display where touched and
the “0” flashes.
When the hob is in the lock mode, all the controls are disabled
The timer of maximum is 99 minutes.

20
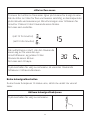
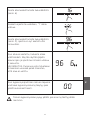
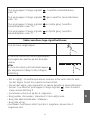
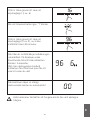
Set one zone
Set the time by touching the slider
control. (e.g. 6)
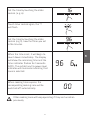
Touch timer control again, the “1”
will flash.
Set the time by touching the slider
control (e.g.9), now the timer you set
is 96 minutes.
Buzzer will beep for 30 seconds and the
timer indicator shows “00” when the
setting time finished.
When the time is set, it will begin to count down immediately.
The display will show the remaining time
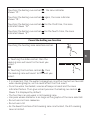
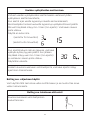
b) Setting the timer to turn one or more cooking zones o
Touching the heating zone selection
control that you want to set the timer
for.
Touch timer control, the “10” will show
in the timer display and the “0” flashes.
Sidan laddas...
Sidan laddas...
Sidan laddas...
Sidan laddas...
Sidan laddas...
Sidan laddas...
Sidan laddas...
Sidan laddas...
Sidan laddas...
Sidan laddas...
Sidan laddas...
Sidan laddas...
Sidan laddas...
Sidan laddas...
Sidan laddas...
Sidan laddas...
Sidan laddas...
Sidan laddas...
Sidan laddas...
Sidan laddas...
Sidan laddas...
Sidan laddas...
Sidan laddas...
Sidan laddas...
Sidan laddas...
Sidan laddas...
Sidan laddas...
Sidan laddas...
Sidan laddas...
Sidan laddas...
Sidan laddas...
Sidan laddas...
Sidan laddas...
Sidan laddas...
Sidan laddas...
Sidan laddas...
Sidan laddas...
Sidan laddas...
Sidan laddas...
Sidan laddas...
Sidan laddas...
Sidan laddas...
Sidan laddas...
Sidan laddas...
Sidan laddas...
Sidan laddas...
Sidan laddas...
Sidan laddas...
Sidan laddas...
Sidan laddas...
Sidan laddas...
Sidan laddas...
Sidan laddas...
Sidan laddas...
Sidan laddas...
Sidan laddas...
Sidan laddas...
Sidan laddas...
Sidan laddas...
Sidan laddas...
Sidan laddas...
Sidan laddas...
Sidan laddas...
Sidan laddas...
Sidan laddas...
Sidan laddas...
Sidan laddas...
Sidan laddas...
Sidan laddas...
Sidan laddas...
Sidan laddas...
Sidan laddas...
Sidan laddas...
Sidan laddas...
Sidan laddas...
Sidan laddas...
Sidan laddas...
Sidan laddas...
Sidan laddas...
Sidan laddas...
Sidan laddas...
Sidan laddas...
Sidan laddas...
Sidan laddas...
Sidan laddas...
Sidan laddas...
Sidan laddas...
Sidan laddas...
Sidan laddas...
Sidan laddas...
Sidan laddas...
Sidan laddas...
Sidan laddas...
Sidan laddas...
Sidan laddas...
Sidan laddas...
Sidan laddas...
Sidan laddas...
Sidan laddas...
Sidan laddas...
Sidan laddas...
Sidan laddas...
Sidan laddas...
Sidan laddas...
Sidan laddas...
Sidan laddas...
Sidan laddas...
Sidan laddas...
Sidan laddas...
Sidan laddas...
Sidan laddas...
Sidan laddas...
Sidan laddas...
Sidan laddas...
Sidan laddas...
Sidan laddas...
Sidan laddas...
Sidan laddas...
Sidan laddas...
Sidan laddas...
Sidan laddas...
Sidan laddas...
Sidan laddas...
Sidan laddas...
Sidan laddas...
Sidan laddas...
Sidan laddas...
Sidan laddas...
Sidan laddas...
Sidan laddas...
Sidan laddas...
Sidan laddas...
Sidan laddas...
Sidan laddas...
Sidan laddas...
Sidan laddas...
Sidan laddas...
Sidan laddas...
Sidan laddas...
Sidan laddas...
Sidan laddas...
Sidan laddas...
Sidan laddas...
Sidan laddas...
Sidan laddas...
Sidan laddas...
Sidan laddas...
Sidan laddas...
Sidan laddas...
Sidan laddas...
Sidan laddas...
Sidan laddas...
Sidan laddas...
Sidan laddas...
Sidan laddas...
Sidan laddas...
Sidan laddas...
Sidan laddas...
Sidan laddas...
Sidan laddas...
Sidan laddas...
Sidan laddas...
Sidan laddas...
Sidan laddas...
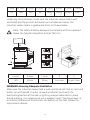
-
 1
1
-
 2
2
-
 3
3
-
 4
4
-
 5
5
-
 6
6
-
 7
7
-
 8
8
-
 9
9
-
 10
10
-
 11
11
-
 12
12
-
 13
13
-
 14
14
-
 15
15
-
 16
16
-
 17
17
-
 18
18
-
 19
19
-
 20
20
-
 21
21
-
 22
22
-
 23
23
-
 24
24
-
 25
25
-
 26
26
-
 27
27
-
 28
28
-
 29
29
-
 30
30
-
 31
31
-
 32
32
-
 33
33
-
 34
34
-
 35
35
-
 36
36
-
 37
37
-
 38
38
-
 39
39
-
 40
40
-
 41
41
-
 42
42
-
 43
43
-
 44
44
-
 45
45
-
 46
46
-
 47
47
-
 48
48
-
 49
49
-
 50
50
-
 51
51
-
 52
52
-
 53
53
-
 54
54
-
 55
55
-
 56
56
-
 57
57
-
 58
58
-
 59
59
-
 60
60
-
 61
61
-
 62
62
-
 63
63
-
 64
64
-
 65
65
-
 66
66
-
 67
67
-
 68
68
-
 69
69
-
 70
70
-
 71
71
-
 72
72
-
 73
73
-
 74
74
-
 75
75
-
 76
76
-
 77
77
-
 78
78
-
 79
79
-
 80
80
-
 81
81
-
 82
82
-
 83
83
-
 84
84
-
 85
85
-
 86
86
-
 87
87
-
 88
88
-
 89
89
-
 90
90
-
 91
91
-
 92
92
-
 93
93
-
 94
94
-
 95
95
-
 96
96
-
 97
97
-
 98
98
-
 99
99
-
 100
100
-
 101
101
-
 102
102
-
 103
103
-
 104
104
-
 105
105
-
 106
106
-
 107
107
-
 108
108
-
 109
109
-
 110
110
-
 111
111
-
 112
112
-
 113
113
-
 114
114
-
 115
115
-
 116
116
-
 117
117
-
 118
118
-
 119
119
-
 120
120
-
 121
121
-
 122
122
-
 123
123
-
 124
124
-
 125
125
-
 126
126
-
 127
127
-
 128
128
-
 129
129
-
 130
130
-
 131
131
-
 132
132
-
 133
133
-
 134
134
-
 135
135
-
 136
136
-
 137
137
-
 138
138
-
 139
139
-
 140
140
-
 141
141
-
 142
142
-
 143
143
-
 144
144
-
 145
145
-
 146
146
-
 147
147
-
 148
148
-
 149
149
-
 150
150
-
 151
151
-
 152
152
-
 153
153
-
 154
154
-
 155
155
-
 156
156
-
 157
157
-
 158
158
-
 159
159
-
 160
160
-
 161
161
-
 162
162
-
 163
163
-
 164
164
-
 165
165
-
 166
166
-
 167
167
-
 168
168
-
 169
169
-
 170
170
-
 171
171
-
 172
172
-
 173
173
-
 174
174
-
 175
175
-
 176
176
-
 177
177
-
 178
178
-
 179
179
-
 180
180
-
 181
181
-
 182
182
-
 183
183
-
 184
184


POINT 5-SERIES POIH5077I4B INDUKSJONSTOPP Bruksanvisning
- Kategori
- Kokplattor
- Typ
- Bruksanvisning