Kenwood KMX750AB Bruksanvisning
- Kategori
- Mixer / matberedare tillbehör
- Typ
- Bruksanvisning

TYPE KMX75
TYPE KMX76
instructions
istruzioni
instrucciones
Bedienungsanleitungen
gebruiksaanwijzing
Instrukcja obsługi
instruções

English 2 - 13
Nederlands 14 - 25
Français 26 - 38
Deutsch 39 - 51
Italiano 52 - 63
Português 64 - 75
Español 76 - 87
Dansk 88 - 99
Svenska 100 - 111
Norsk 112 - 123
Suomi 124 - 135
Türkçe 136 - 147
Česky 148 - 159
Magyar 160 - 171
Polski 172 - 184
Eλληνικά 185 - 197
Slovenčina 198 - 209
Українська 210 - 222
´¸∂w
٢٣٤ - ٢٢٣

1
2
3
4
5
b
15
14
16 17
13
12
11
5
a
9
10
6
7
8

1
2
3
5
6
9
7
8
4


2
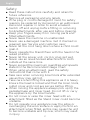
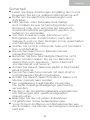
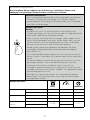
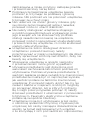
Safety
l
Read these instructions carefully and retain for
future reference.
l
Remove all packaging and any labels.
l
If the plug or cord is damaged it must, for safety
reasons, be replaced by Kenwood or an authorised
Kenwood repairer in order to avoid a hazard.
l
Switch off and unplug before fitting or removing
tools/attachments, after use and before cleaning.
l
Keep your fingers away from moving parts and
fitted attachments.
l
Never leave the machine on unattended.
l
Never use a damaged machine. Get it checked or
repaired: see ‘Service and customer care’.
l
Never let the cord hang down where a child could
grab it.
l
Never operate the Stand Mixer with the head in the
raised position.
l
Never let the power unit, cord or plug get wet.
l
Never use an unauthorised attachment or both
outlets at the same time
l
Never exceed the maximum quantities and speeds
stated in the Recommended Usage Chart.
l
When using an attachment, read the safety
instructions that come with it.
l
Take care when removing bowl tools after extended
use as they may get hot.
l
Take care when lifting this appliance as it is heavy.
Ensure the head is locked and that the bowl, tools,
outlet cover and cord are secure before lifting.
l
When moving the appliance always pick up by the
pedestal base and mixer head. Do not lift or carry
the appliance by the bowl handle.
l
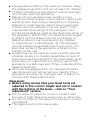
Do not move or raise the mixer head with an
attachment fitted as the Stand mixer could become
unstable.
l
Do not operate your appliance near the edge or
overhanging the work surface or apply force to an
attachment when fitted, as this may cause the unit
to become unstable and tip over, which may result
in injury.
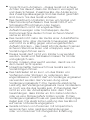
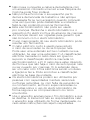
English

O
This appliance shall not be used by children. Keep
the appliance and its cord out of reach of children.
O
Children should be supervised to ensure that they
do not play with the appliance.
O
Misuse of your appliance can result in injury.
O
The short power-supply cord is used to reduce risk
resulting from becoming entangled in or tripping.
Extension cords may be used if care is exercised
in their use. If an extension cord is used: 1) The
marked electrical rating of the extension cord
should be at least as great as the electrical rating of
the appliance; and 2) The cord should be arranged
so that it will not drape over the countertop or
tabletop where it can be pulled on by children
or tripped over unintentionally. 3) The extension
cord should be an earthed-type 3-wire cord. The
electrical rating of the appliance is listed on the
bottom of the unit.
O
Appliances can be used by persons with reduced
physical, sensory or mental capabilities or lack of
experience and knowledge if they have been given
supervision or instruction concerning use of the
appliance in a safe way and if they understand the
hazards involved.
O
Only use the appliance for its intended domestic
use. Kenwood will not accept any liability if the
appliance is subject to improper use, or failure to
comply with these instructions.
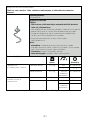
Glass bowl
O
Before using ensure that your bowl tools are
adjusted to the correct height and not in contact
with the bottom of the bowl – refer to “Tool
adjustment” section.
O
Do not allow the bowl to come in contact with
sources of high heat such as an oven or stove top.
O
Do not hit tools on the side of the bowl to remove
ingredients.
O
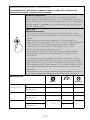
The glass bowl is microwave safe.
3

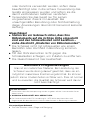
Before plugging in
O
Make sure your electricity supply is the same as the one shown on the underside of your
appliance.
O
WARNING: THIS APPLIANCE MUST BE EARTHED.
O
This appliance conforms to EC Regulation 1935/2004 on materials and articles intended
to come into contact with food.
Before Using For The First Time
O
Wash the parts: see ‘Care and
Cleaning’ section.
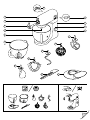
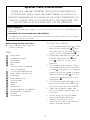
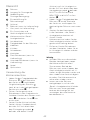
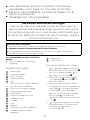
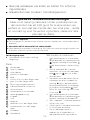
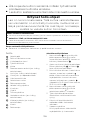
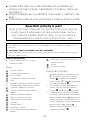
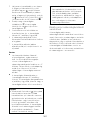
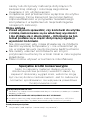
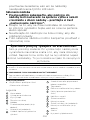
Key
1
Mixer head
2
Attachment outlet
3
Outlet cover
4
Tool socket
5
Bowl
a Stainless steel (if supplied)
b Glass (if supplied)
6
On/Off and speed control
7
Mixer ready indicator light
8
Mixer body
9
Head release lever
10
Cord storage
11
K-beater
12
Whisk
13
Dough tool
14
Creaming beater (if supplied)
15
Folding tool (if supplied)
16
Spatula
17
Splashguard
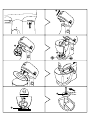
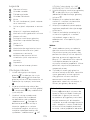
To Use Your Mixer
1 Lift the head release lever
at the
back of the Stand mixer
and at
the same time lift the head
until
it locks in the raised position
.
2 Place the required tool into the
socket. Then push up
and
turn
the tool to lock into
position.
3 Fit the bowl onto the base. Place
the handle directly over the unlock
symbol , then gently turn the bowl
clockwise until the handle is directly
above the lock symbol . DO NOT
USE excessive force and DO NOT
overtighten
.
4 Lift the head release lever
at the
back of the Stand mixer and at the
same time lower the mixer head
.
5 Plug into the power supply and
the ‘mixer ready indicator light’ will
illuminate.
6 Switch on by turning the speed
control to the desired setting.
7 Release the tool by turning
clockwise to unlock from the tool
socket and then remove.
Special Care Instructions
Glass is a natural material, during the manufacture
of this bowl every care has been taken to ensure a
perfect appearance, however some small imperfections
may be visible, this is normal and to be expected, the
performance of the bowl will not be affected.
4

Important
O
If the mixer head is raised during
operation, the machine will stop
working straight away. To re-start
the mixer, lower the mixer head,
turn the speed switch to the ‘O’
position, wait a few seconds and
then re-select the speed. The mixer
should resume operating straight
away.
O
Whenever the mixer head is raised
the ‘mixer ready indicator light’ will
go out. When the head is lowered,
the light will illuminate indicating the
mixer is ready to use.
Hints
O
The fold function can be used for
folding light ingredients into heavier
mixtures for example meringues,
mousses, fruit fools, Genoese
sponges and soufflés, and to slowly
incorporate flour and fruit into cake
mixtures. The mixer will operate at a
constant slow speed.
O
Your Stand mixer has been fitted
with a ‘soft start’ feature to
minimise spillage. However if the
machine is switched on with a
heavy mixture in the bowl such as
bread dough, you may notice that
the mixer takes a few seconds to
reach the selected speed.
Electronic Speed Sensor
Control
Your mixer is fitted with an electronic
speed sensor control that is designed
to maintain the speed under dierent
load conditions, such as when kneading
bread dough or when eggs are added
to a cake mix. You may therefore hear
some variation in speed during the
operation as the mixer adjusts to the
load and speed selected - this is normal.
5

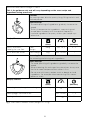
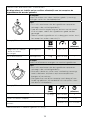
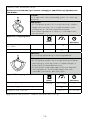
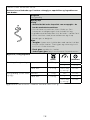
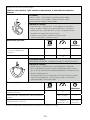
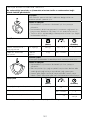
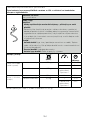
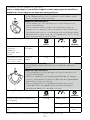
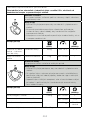
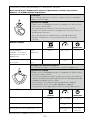
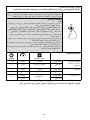
Recommended Usage Chart
This is for guidance only and will vary depending on the exact recipe and
ingredients being processed.
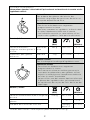
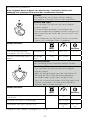
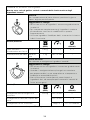
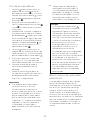
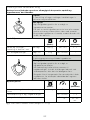
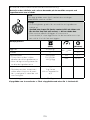
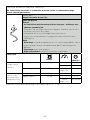
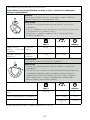
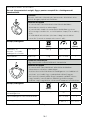
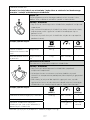
K-beater
For making cakes, biscuits, pastry, icing, fillings, eclairs and
mashed potato.
Hints and Tips
• To avoid splashing of ingredients gradually increase the
speed.
• To fully incorporate the ingredients, stop mixing and
scrape down the bowl with the spatula frequently.
• Use cold ingredients for pastry unless your recipe says
otherwise.
Recipe/ Process
(Max)
(Minutes)
Pastry & Biscuits –
rubbing fat into flour
Flour
Weight
680g
Min
2
2 – 3
All In one cake mixes Total Weight 2kg
Min
Max
1
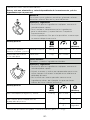
Creaming Beater
For creaming and mixing soft ingredients.
Hints and Tips
• To avoid splashing of ingredients gradually increase the
speed.
• When creaming fat and sugar for cake mixes, always use
the fat at room temperature or soften it first.
• Do not use with heavy recipes such as dough or hard
ingredients, for example those containing fruit stones,
bones or shells.
Recipe/ Process
(Max)
(Minutes)
Creaming butter/margarine and sugar 2.68kg
Min
Max
2
Beating eggs into cake mixes
Min
Max
1 – 4
Folding in flour, fruit etc
Fold
1
30 – 60 secs
Eggs sizes used = medium sized (Weight 53 – 63g)
6

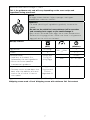
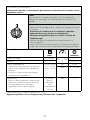
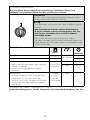
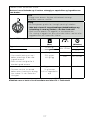
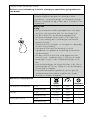
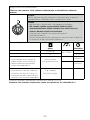
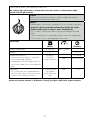
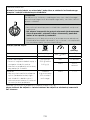
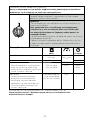
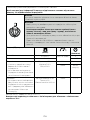
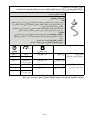
Recommended Usage Chart
This is for guidance only and will vary depending on the exact recipe and
ingredients being processed.
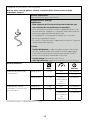
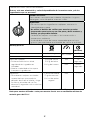
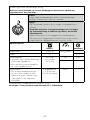
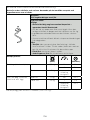
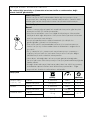
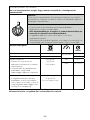
Whisk
For eggs, cream, batters, fatless sponges, meringues,
cheesecakes, mousses, soufflé’s
Important
• To avoid splashing of ingredients gradually increase the
speed.
•
Do not use the whisk for heavy mixtures (all in one cakes
and creaming fat & sugar) as you could damage it.
• Best results achieved when eggs are at room temperature.
Before whisking egg whites, make sure there is no grease or
egg yolk on the whisk or the bowl.
Recipe/ Process
(Max)
(Minutes)
Egg Whites 12 (420g)
Min
Max
3
Cream 1L 2 – 3
Pancake Batter
• Add flour to the bowl first,
followed by the wet ingredients.
• Mix on minimum speed to
incorporate ingredients.
250g Flour
500g Milk
200g Eggs
Min
10 secs
Max
45 – 60 secs
Mayonnaise
• For best results scrape down the
bowl after the addition of the oil
and run for a further 10 secs at
max speed.
2 Egg Yolks
10g Mustard
200mls
Vegetable Oil
Max
1 – 1 ½
Eggs sizes used = medium sized (Weight 53 – 63g)
Whipping cream used = Fresh Whipping cream with minimum 38% Fat content
7

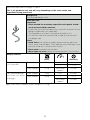
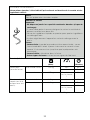
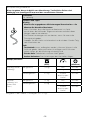
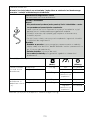
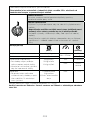
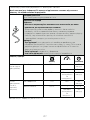
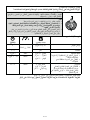
Recommended Usage Chart
This is for guidance only and will vary depending on the exact recipe and
ingredients being processed.
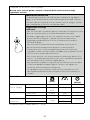
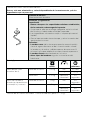
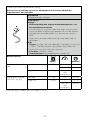
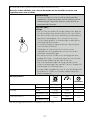
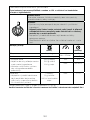
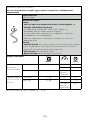
Dough Tool
For yeasted dough mixes
Hints and Tips
Important
• Never exceed the maximum capacities and speeds stated –
you may overload the machine.
• If you hear the machine labouring, switch o, remove half the
dough and do each half separately.
• The ingredients mix best if you put the liquid in first.
• At intervals stop the machine and scrape the mixture off
the dough tool.
Yeast
• Dried Yeast (the type that needs reconstituting): pour the
warm water into the bowl. Then add the yeast and sugar and
leave to stand for 10 minutes until frothy.
• Fresh yeast: crumble into the flour
• Other types of yeast: follow the manufacturer’s instructions.
Recipe/ Process
(Max)
(Minutes)
Bread Dough
(stiff yeasted)
Flour Weight 1.35kg Min 60 secs
1 3 – 4
Total Weight 2.17kg Re-knead
Speed 1
60 secs
Soft yeasted dough
(enriched with butter
and eggs)
Flour Weight 1.3kg Min 60 secs
Total Weight 2.5kg 1 3 – 4
Re-knead
Speed 1
60 secs
Eggs sizes used = medium sized (Weight 53 – 63g)
8

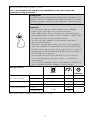
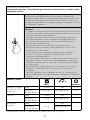
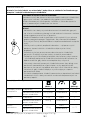
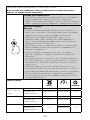
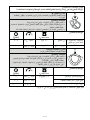
Recommended Usage Chart
This is for guidance only and will vary depending on the exact recipe and
ingredients being processed.
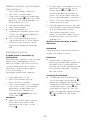
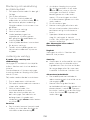
Folding Tool
The folding tool is designed for folding light ingredients into
heavier mixtures for example meringues, mousses, fruit fools,
Genoese sponges, soué’s, and to fold flour into cake mixes.
Hints and Tips
Important
• It is not to be used with heavy recipes such as dough,
creaming fat and sugar or all in one cake mixes.
• When adding flour to a mix, place it on a sheet of grease
proof paper. Fold the side in to form a spout. Gradually add
the flour to the mix using the fold function.
• Do not use a high speed as a low speed is required to
optimise performance
• The tool is not designed to be used to mix hot ingredients,
allow the ingredients to cool before using the folding tool.
• For best results do not over whisk egg whites or cream the
folding tool will not be able to fold the mixture correctly if
the whisked mix is too firm.
• Do not fold the mixture for too long as the air and the
mix will be too loose. Stop once the mix is sufficiently
incorporated.
• Any unmixed ingredients left on the paddle or sides of the
bowl should be carefully folded in using a spatula.
Recipe/ Process
(Max)
(Minutes)
Genoese Sponge/
Whisked Sponge
Whisk 9 Eggs Max 4 – 5
Folding Tool 250g Flour Fold 2 – 8
Soufflés Whisk 6 Eggs Max 1
Folding Tool 900g Fold 1
Chocolate Mousse Whisk
1.5kg
Max
2 – 3
Folding Tool Fold
Eggs sizes used = medium sized (Weight 53 – 63g)
9

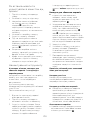
To Fit And Use Your
Splashguard
1 Raise the mixer head until it locks.
2 Fit the bowl onto the base.
3 Push the splashguard onto the
underside of the mixer head
until
fully located. The hinged section should
be positioned as shown.
4 Insert required tool.
5 Lower the mixer head.
O
During mixing, ingredients can be
added directly to the bowl via the
hinged section of the splashguard
.
O
You do not need to remove the
splashguard to change tools.
6 Remove the splashguard by raising
the mixer head and sliding it down.
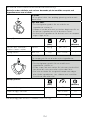
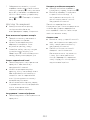
Tool Adjustment
K-beater, Whisk, Creaming beater and
folding tool
The tools are set to the correct height
for the bowl supplied in the factory and
should not require adjustment.
However, if you wish to adjust the tool
use a suitable 15mm spanner:
Then follow the instructions below:
1 Unplug the machine.
2 Raise the mixer head and insert the
whisk or beater.
3 Lower the mixer head. If the
clearance needs to be adjusted,
raise the mixer head and remove
the tool. Ideally the whisk, K-beater
and folding tool should be almost
touching the bottom of the bowl
.
Creaming beater
O
Ideally it should be in contact with
the bowl surface so that it gently
wipes the bowl during mixing
(4
.
4 Using a suitable spanner loosen the
nut sufficiently to allow adjustment
of the shaft
or
(5
. To lower the
tool closer to the bottom of the
bowl, turn the shaft anti-clockwise.
To raise the tool away from the
bottom of the bowl turn the shaft
clockwise.
5 Re-tighten the nut.
6 Fit the tool to the mixer and lower
the mixer head.
(Check its position see points
above).
7 Repeat the above steps as
necessary until the tool is set
correctly. Once this is acheived
tighten the nut securely.
Note: Spanner shown is for illustration
purpose only.
Dough Tool
This tool is set at the factory and should
require no adjustment.
Creaming Beater
O
The creaming beater is designed for
creaming and mixing soft ingredients.
Do not use with heavy recipes such
as dough or hard ingredients, for
example those containing fruit stones,
bones or shells.
Fitting the Wiper Blade
O
The wiper blade is supplied
already fitted and should always
be removed for cleaning
(6
.
1 Carefully fit the flexible wiper
blade onto the tool by locating
the base of the wiper blade
into the slot
(1
then fit one side
into the groove before gently
hooking the end in place
(2
.
Repeat with the other side
(3
.
10

Care and Cleaning
O
Always switch off and unplug before
cleaning.
Power unit and outlet cover
O
Wipe with a damp cloth, then dry.
O
Never use abrasives or immerse in
water.
O
Store excess cord into the cord
storage compartment
(1
at the
back of the machine.
Stainless steel bowl
O
Wash by hand, then dry thoroughly
or wash in the dishwasher.
O
Never use a wire brush, steel wool
or bleach to clean your stainless
steel bowl. Use vinegar to remove
limescale.
O
Keep away from heat (cooker tops,
ovens, microwaves).
Tools and splashguard
O
Wash by hand, then dry thoroughly
or wash in the dishwasher.
Creaming beater
O
Always remove the flexible wiper
blade from the tool before cleaning
(6
.
O
Wash the flexible wiper blade and
tool in hot soapy water, then dry
thoroughly. Alternatively the parts
can be washed in a dishwasher.
Note: Please inspect the condition of
the tool body before and after use and
also regularly inspect the condition of
the wiper blade and replace it if there
are any signs of wear.
Glass bowl
O
Wash the bowl in hot soapy water,
then dry thoroughly.
O
Alternatively the bowl is dishwasher
safe.
O
Note: The collar on the base of
the bowl is removable and can be
washed in the same way. To remove
the collar, upturn the empty bowl
and unscrew the collar in an anti-
clockwise direction.
11

Service and Customer Care
O
If you experience any problems with the operation of your appliance, before
requesting assistance refer to the ‘Troubleshooting Guide’ section in the manual or visit
www.kenwoodworld.com.
O
Please note that your product is covered by a warranty, which complies with all legal
provisions concerning any existing warranty and consumer rights in the country where
the product was purchased.
O
If your Kenwood product malfunctions or you find any defects, please send it or bring it
to an authorised KENWOOD Service Centre. To find up to date details of your nearest
authorised KENWOOD Service centre visit www.kenwoodworld.com or the website
specific to your Country.
O
Designed and engineered by Kenwood in the UK.
O
Made in China.
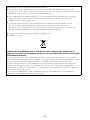
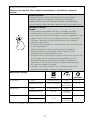
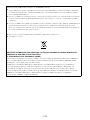
IMPORTANT INFORMATION FOR CORRECT DISPOSAL OF THE PRODUCT IN
ACCORDANCE WITH THE EUROPEAN DIRECTIVE ON WASTE ELECTRICAL AND
ELECTRONIC EQUIPMENT (WEEE)
At the end of its working life, the product must not be disposed of as urban waste. It must
be taken to a special local authority differentiated waste collection centre or to a dealer
providing this service.
Disposing of a household appliance separately avoids possible negative consequences
for the environment and health deriving from inappropriate disposal and enables
the constituent materials to be recovered to obtain significant savings in energy and
resources. As a reminder of the need to dispose of household appliances separately, the
product is marked with a crossed-out wheeled dustbin.
12

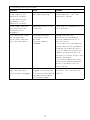
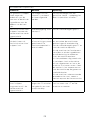
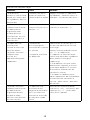
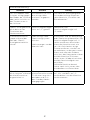
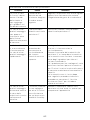
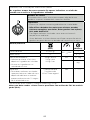
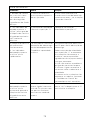
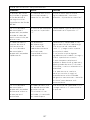
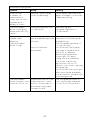
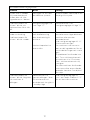
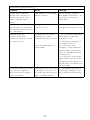
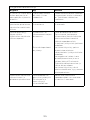
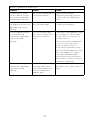
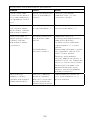
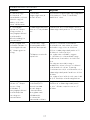
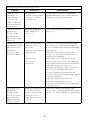
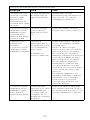
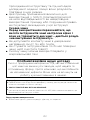
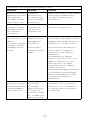
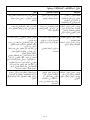
Troubleshooting Guide
Problem Cause Solution
The whisk or K-beater
knocks against the
bottom of the bowl
or not reaching the
ingredients in the
bottom of the bowl.
Tool at the wrong height
and needs adjusting.
Adjust the height using a
suitable spanner – see “Tool
Adjustment” section.
‘Mixer ready indicator
light’ flashing when
Stand mixer first
plugged in.
Speed control not in the
‘O’ position.
Check and turn speed control to
the ‘O’ position.
The Stand mixer stops
during operation.
‘Mixer ready indicator
light’ flashing rapidly.
Overload protection
or overheat system
activated.
Maximum capacity
exceeded.
Unplug and check for
obstruction or overloading.
Turn the speed control to “O”
and then restart.
If the machine will not operate,
remove some of the ingredients
to reduce the load and restart.
If this still does not resolve the
problem, unplug and allow to
stand for 15 minutes. Plug in and
reselect the speed.
If the machine does not restart
following the above procedure
contact “Customer care” for
further advice.
‘Mixer ready indicator
light’ flashing slowly
whilst machine plugged
in.
Stand mixer has been left
plugged in for more than
30 minutes without being
operated and has gone
into Standby mode.
Turn the speed control to ‘min’
then return to ‘O’ to reset the
machine.
13

Veiligheid
O
Lees deze instructies zorgvuldig door en bewaar
ze voor toekomstig gebruik.
O
Verwijder de verpakking en alle labels.
O
Als de stekker of het snoer beschadigd is, moet het
om veiligheidsredenen door Kenwood of een door
Kenwood geautoriseerd reparatiebedrijf vervangen
worden, om gevaar te voorkomen.
O
Schakel het apparaat uit en haal de stekker uit het
stopcontact voordat u instrumenten/hulpstukken
aanbrengt of verwijdert, na ieder gebruik en
alvorens het apparaat te reinigen.
O
Houd uw vingers uit de buurt van bewegende
onderdelen en vaste accessoires.
O
Laat de keukenmachine nooit onbeheerd aan staan.
O
Gebruik de machine niet als hij beschadigd is.
Laat hem nakijken of repareren: zie paragraaf
‘Onderhoud en klantenservice’.
O
Laat het snoer nooit naar beneden hangen waar
een kind erbij kan.
O
Zet de keukenmachine nooit aan als de kop
omhoog staat.
O
De motor, het snoer of de stekker nooit nat laten
worden.
O
Gebruik nooit een ongeautoriseerd hulpstuk of
meer dan één aansluitpunt tegelijkertijd.
O
Overschrijd nooit de vermelde maximale
hoeveelheden en snelheden in de aanbevolen
gebruikstabel.
O
Lees eerst de veiligheidsvoorschriften bij de
accesoires, voordat u ze gebruikt.
O
Wees voorzichtig bij het verwijderen van de
komhulpstukken na langdurig gebruik, omdat ze
heet kunnen zijn.
O
Wees voorzichtig wanneer u dit apparaat optilt,
omdat het zwaar is. Zorg dat de kop vergrendeld
is en dat de kom, hulpstukken, afdekking van het
aansluitpunt en het snoer vastzitten voor u het
apparaat optilt.
Nederlands
14

O
Bij het verplaatsen van het apparaat altijd oppakken
bij de voet en de mengkop. Het apparaat NIET
optillen of dragen aan de komgreep.
O
Verplaats de machine niet en haal de mixerkop niet
omhoog als een hulpstuk aangebracht is, omdat de
keukenmachine dan instabiel kan worden.
O
Gebruik uw apparaat niet in de buurt van de rand of
overhangend werkoppervlak en oefen geen kracht
uit op een vastgemaakte bevestiging, omdat dit
ertoe kan leiden dat het apparaat instabiel wordt en
kantelt, wat kan resulteren in verwondingen.
O
Dit apparaat mag niet door kinderen worden
gebruikt. Houd het apparaat en het snoer buiten
het bereik van kinderen.
O
Op kinderen moet toezicht gehouden worden om
er zeker van te zijn dat ze niet met het apparaat
spelen.
O
Misbruik van dit apparaat kan persoonlijk letsel
veroorzaken.
O
Het snoer is kort om risico op verstrengeling of
struikelen te voorkomen. Een verlengsnoer kan
gebruikt worden, maar wees voorzichtig. Als u
een verlengsnoer gebruikt: 1) zorg ervoor dat
het aangegeven vermogen van het verlengsnoer
minstens gelijk is aan het vermogen van het
apparaat. 2) zorg ervoor dat het snoer niet over
het aanrecht of de tafel hangt waar kinderen
eraan kunnen trekken of over kunnen struikelen. 3)
het verlengsnoer moet geaard zijn en drie aders
hebben. Het vermogen staat onder op het apparaat
vermeld.
O
Dit apparaat kan worden gebruikt door personen
met verminderde lichamelijke, sensorische of
geestelijke capaciteiten of gebrek aan ervaring en
kennis mits ze onder toezicht staan of instructie
hebben gekregen over het veilige gebruik van het
apparaat, en de betrokken risico’s begrijpen.
O
Gebruik het apparaat alleen voor het huishoudelijke
gebruik waarvoor het is bedoeld. Kenwood
kan niet aansprakelijk worden gesteld in als het
apparaat is misbruikt of als deze instructies niet zijn
opgevolgd.
15

Glazen kom
O
Voorafgaand aan het gebruik, zorgt u ervoor
dat de komhulpstukken goed afgesteld zijn en
de bodem van de kom niet raken – raadpleeg de
informatie onder ‘hulpstukken afstellen’.
O
De kom niet in aanraking laten komen met
hittebronnen zoals een oven of fornuis.
O
Nooit hulpstukken op de zijkant van de kom tikken
om ingrediënten te verwijderen.
O
De glazen kom kan in de magnetron worden
gebruikt.
Bijkomende informatie
Glas is gemaakt van natuurlijke materialen. Er is alles aan
gedaan om de kom zo perfect mogelijk af te werken. Er
kunnen echter enkele kleine onvolkomenheden zichtbaar
zijn. Dit is normaal en te verwachten; de prestaties van
de kom worden hierdoor niet beïnvloed.
Voordat u de stekker in het stopcontact steekt
O
Controleer of de elektriciteitsvoorziening dezelfde spanning heeft als op de onderkant van
het apparaat wordt aangegeven.
O
WAARSCHUWING: DIT APPARAAT MOET GEAARD ZIJN.
O
Dit apparaat voldoet aan EG Verordening 1935/2004 inzake materialen en voorwerpen
die bestemd zijn om met levensmiddelen in contact te komen.
Voordat u de machine voor het eerst
gebruikt
O
Lees het deel 'Onderhoud en
reiniging', voordat u de onderdelen
gaat schoonmaken.
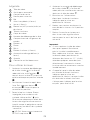
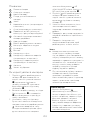
Legenda
1
Mixerkop
2
Aansluitpunt voor hulpstuk
3
Afdekking van aansluitpunt
4
Fitting voor hulpstukken
5
Kom
a Roestvrijstaal (indien meegeleverd)
b Glas (indien meegeleverd)
6
Aan/uit en snelheidsregeling
7
Indicatielampje mixer klaar voor
gebruik
8
Hoofddeel mixer
9
Kopontgrendeling
10
Snoeropslag
11
K-klopper
12
Garde
13
Deeghaak
14
Klopper (indien meegeleverd)
15
Scheplepel (indien meegeleverd)
16
Spatel
17
Spatscherm
16
Sidan laddas...
Sidan laddas...
Sidan laddas...
Sidan laddas...
Sidan laddas...
Sidan laddas...
Sidan laddas...
Sidan laddas...
Sidan laddas...
Sidan laddas...
Sidan laddas...
Sidan laddas...
Sidan laddas...
Sidan laddas...
Sidan laddas...
Sidan laddas...
Sidan laddas...
Sidan laddas...
Sidan laddas...
Sidan laddas...
Sidan laddas...
Sidan laddas...
Sidan laddas...
Sidan laddas...
Sidan laddas...
Sidan laddas...
Sidan laddas...
Sidan laddas...
Sidan laddas...
Sidan laddas...
Sidan laddas...
Sidan laddas...
Sidan laddas...
Sidan laddas...
Sidan laddas...
Sidan laddas...
Sidan laddas...
Sidan laddas...
Sidan laddas...
Sidan laddas...
Sidan laddas...
Sidan laddas...
Sidan laddas...
Sidan laddas...
Sidan laddas...
Sidan laddas...
Sidan laddas...
Sidan laddas...
Sidan laddas...
Sidan laddas...
Sidan laddas...
Sidan laddas...
Sidan laddas...
Sidan laddas...
Sidan laddas...
Sidan laddas...
Sidan laddas...
Sidan laddas...
Sidan laddas...
Sidan laddas...
Sidan laddas...
Sidan laddas...
Sidan laddas...
Sidan laddas...
Sidan laddas...
Sidan laddas...
Sidan laddas...
Sidan laddas...
Sidan laddas...
Sidan laddas...
Sidan laddas...
Sidan laddas...
Sidan laddas...
Sidan laddas...
Sidan laddas...
Sidan laddas...
Sidan laddas...
Sidan laddas...
Sidan laddas...
Sidan laddas...
Sidan laddas...
Sidan laddas...
Sidan laddas...
Sidan laddas...
Sidan laddas...
Sidan laddas...
Sidan laddas...
Sidan laddas...
Sidan laddas...
Sidan laddas...
Sidan laddas...
Sidan laddas...
Sidan laddas...
Sidan laddas...
Sidan laddas...
Sidan laddas...
Sidan laddas...
Sidan laddas...
Sidan laddas...
Sidan laddas...
Sidan laddas...
Sidan laddas...
Sidan laddas...
Sidan laddas...
Sidan laddas...
Sidan laddas...
Sidan laddas...
Sidan laddas...
Sidan laddas...
Sidan laddas...
Sidan laddas...
Sidan laddas...
Sidan laddas...
Sidan laddas...
Sidan laddas...
Sidan laddas...
Sidan laddas...
Sidan laddas...
Sidan laddas...
Sidan laddas...
Sidan laddas...
Sidan laddas...
Sidan laddas...
Sidan laddas...
Sidan laddas...
Sidan laddas...
Sidan laddas...
Sidan laddas...
Sidan laddas...
Sidan laddas...
Sidan laddas...
Sidan laddas...
Sidan laddas...
Sidan laddas...
Sidan laddas...
Sidan laddas...
Sidan laddas...
Sidan laddas...
Sidan laddas...
Sidan laddas...
Sidan laddas...
Sidan laddas...
Sidan laddas...
Sidan laddas...
Sidan laddas...
Sidan laddas...
Sidan laddas...
Sidan laddas...
Sidan laddas...
Sidan laddas...
Sidan laddas...
Sidan laddas...
Sidan laddas...
Sidan laddas...
Sidan laddas...
Sidan laddas...
Sidan laddas...
Sidan laddas...
Sidan laddas...
Sidan laddas...
Sidan laddas...
Sidan laddas...
Sidan laddas...
Sidan laddas...
Sidan laddas...
Sidan laddas...
Sidan laddas...
Sidan laddas...
Sidan laddas...
Sidan laddas...
Sidan laddas...
Sidan laddas...
Sidan laddas...
Sidan laddas...
Sidan laddas...
Sidan laddas...
Sidan laddas...
Sidan laddas...
Sidan laddas...
Sidan laddas...
Sidan laddas...
Sidan laddas...
Sidan laddas...
Sidan laddas...
Sidan laddas...
Sidan laddas...
Sidan laddas...
Sidan laddas...
Sidan laddas...
Sidan laddas...
Sidan laddas...
Sidan laddas...
Sidan laddas...
Sidan laddas...
Sidan laddas...
Sidan laddas...
Sidan laddas...
Sidan laddas...
Sidan laddas...
Sidan laddas...
Sidan laddas...
Sidan laddas...
Sidan laddas...
Sidan laddas...
Sidan laddas...
Sidan laddas...
Sidan laddas...
Sidan laddas...
Sidan laddas...
Sidan laddas...
Sidan laddas...
Sidan laddas...
Sidan laddas...
Sidan laddas...
Sidan laddas...
Sidan laddas...
Sidan laddas...
Sidan laddas...
Sidan laddas...
Sidan laddas...
-
 1
1
-
 2
2
-
 3
3
-
 4
4
-
 5
5
-
 6
6
-
 7
7
-
 8
8
-
 9
9
-
 10
10
-
 11
11
-
 12
12
-
 13
13
-
 14
14
-
 15
15
-
 16
16
-
 17
17
-
 18
18
-
 19
19
-
 20
20
-
 21
21
-
 22
22
-
 23
23
-
 24
24
-
 25
25
-
 26
26
-
 27
27
-
 28
28
-
 29
29
-
 30
30
-
 31
31
-
 32
32
-
 33
33
-
 34
34
-
 35
35
-
 36
36
-
 37
37
-
 38
38
-
 39
39
-
 40
40
-
 41
41
-
 42
42
-
 43
43
-
 44
44
-
 45
45
-
 46
46
-
 47
47
-
 48
48
-
 49
49
-
 50
50
-
 51
51
-
 52
52
-
 53
53
-
 54
54
-
 55
55
-
 56
56
-
 57
57
-
 58
58
-
 59
59
-
 60
60
-
 61
61
-
 62
62
-
 63
63
-
 64
64
-
 65
65
-
 66
66
-
 67
67
-
 68
68
-
 69
69
-
 70
70
-
 71
71
-
 72
72
-
 73
73
-
 74
74
-
 75
75
-
 76
76
-
 77
77
-
 78
78
-
 79
79
-
 80
80
-
 81
81
-
 82
82
-
 83
83
-
 84
84
-
 85
85
-
 86
86
-
 87
87
-
 88
88
-
 89
89
-
 90
90
-
 91
91
-
 92
92
-
 93
93
-
 94
94
-
 95
95
-
 96
96
-
 97
97
-
 98
98
-
 99
99
-
 100
100
-
 101
101
-
 102
102
-
 103
103
-
 104
104
-
 105
105
-
 106
106
-
 107
107
-
 108
108
-
 109
109
-
 110
110
-
 111
111
-
 112
112
-
 113
113
-
 114
114
-
 115
115
-
 116
116
-
 117
117
-
 118
118
-
 119
119
-
 120
120
-
 121
121
-
 122
122
-
 123
123
-
 124
124
-
 125
125
-
 126
126
-
 127
127
-
 128
128
-
 129
129
-
 130
130
-
 131
131
-
 132
132
-
 133
133
-
 134
134
-
 135
135
-
 136
136
-
 137
137
-
 138
138
-
 139
139
-
 140
140
-
 141
141
-
 142
142
-
 143
143
-
 144
144
-
 145
145
-
 146
146
-
 147
147
-
 148
148
-
 149
149
-
 150
150
-
 151
151
-
 152
152
-
 153
153
-
 154
154
-
 155
155
-
 156
156
-
 157
157
-
 158
158
-
 159
159
-
 160
160
-
 161
161
-
 162
162
-
 163
163
-
 164
164
-
 165
165
-
 166
166
-
 167
167
-
 168
168
-
 169
169
-
 170
170
-
 171
171
-
 172
172
-
 173
173
-
 174
174
-
 175
175
-
 176
176
-
 177
177
-
 178
178
-
 179
179
-
 180
180
-
 181
181
-
 182
182
-
 183
183
-
 184
184
-
 185
185
-
 186
186
-
 187
187
-
 188
188
-
 189
189
-
 190
190
-
 191
191
-
 192
192
-
 193
193
-
 194
194
-
 195
195
-
 196
196
-
 197
197
-
 198
198
-
 199
199
-
 200
200
-
 201
201
-
 202
202
-
 203
203
-
 204
204
-
 205
205
-
 206
206
-
 207
207
-
 208
208
-
 209
209
-
 210
210
-
 211
211
-
 212
212
-
 213
213
-
 214
214
-
 215
215
-
 216
216
-
 217
217
-
 218
218
-
 219
219
-
 220
220
-
 221
221
-
 222
222
-
 223
223
-
 224
224
-
 225
225
-
 226
226
-
 227
227
-
 228
228
-
 229
229
-
 230
230
-
 231
231
-
 232
232
-
 233
233
-
 234
234
-
 235
235
-
 236
236
-
 237
237
-
 238
238
-
 239
239
-
 240
240


Kenwood KMX750AB Bruksanvisning
- Kategori
- Mixer / matberedare tillbehör
- Typ
- Bruksanvisning
på andra språk
- italiano: Kenwood KMX750AB Manuale del proprietario
- čeština: Kenwood KMX750AB Návod k obsluze
- slovenčina: Kenwood KMX750AB Návod na obsluhu
- español: Kenwood KMX750AB El manual del propietario
- Deutsch: Kenwood KMX750AB Bedienungsanleitung
- polski: Kenwood KMX750AB Instrukcja obsługi
- português: Kenwood KMX750AB Manual do proprietário
- français: Kenwood KMX750AB Le manuel du propriétaire
- Türkçe: Kenwood KMX750AB El kitabı
- English: Kenwood KMX750AB Owner's manual
- dansk: Kenwood KMX750AB Brugervejledning
- suomi: Kenwood KMX750AB Omistajan opas
- Nederlands: Kenwood KMX750AB de handleiding