
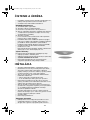
Gebrauchsanweisung
Instructions for use
Mode d’emploi
Gebruiksaanwijzing
Istruzioni per l’uso
Brugsanvisning
Bruksanvisning
Käyttöohje
Manual de utilização
Instrucciones para el uso
Instrukcje użytkowania
Használati utasítás
ИнструкциЯ за употреба
Návod k použití
Návod na použitie
Instruc∑iuni de utilizare
Инструкции по эксплуатации

3
DEUTSCH Gebrauchsanweisung Seite 4
ENGLISH Instructions for use Page 13
FRANÇAIS Mode d’emploi Page 23
NEDERLANDS Gebruiksaanwijzing Pagina 32
ESPAÑOL Instrucciones para el uso Página 41
PORTUGUÊS Manual de utilização Página 50
ITALIANO Istruzioni per l’uso Pagina 59
ΕΛΛΑΣ Οδηγίες χρήοης Σελίδα 68
SVENSKA Bruksanvisning Sidan 77
NORSK Bruksanvisning Side 86
DANSK Brugsanvisning Side 95
SUOMI Käyttöohje Sivu 104
POLSKI Instrukcje użytkowania Strona 113
ČESKY Návod k použití Strana 122
SLOVENSKY Návod na použitie Strana 131
MAGYAR Használati utasítás Oldal 140
РУССКИЙ Инструкции по эксплуатации Страница 149
БЪЛГАРСКИ Инструкция за употреба Страница 158
ROMANA Instrucţiuni de utilizare Pagina 167
63702035_indice.fm Page 3 Friday, February 18, 2011 10:37 AM

4
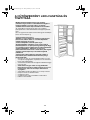
GEBRAUCHSANWEISUNG
VOR DER INBETRIEBNAHME DES GERÄTES
INFORMATIONEN ZUM UMWELTSCHUTZ
ALLGEMEINE HINWEISE UND RATSCHLÄGE
BENUTZUNG DES KÜHLRAUMS
BENUTZUNG DES TIEFKÜHLRAUMS
ABTAUEN UND REINIGEN DES
KÜHLSCHRANKS
REINIGUNG UND PFLEGE
INSTALLATION
ANSCHLAGWECHSELMÖGLICHKEIT DER
TÜREN
STÖRUNG - WAS TUN
TECHNISCHER KUNDENDIENST
63702035D.fm Page 4 Friday, February 18, 2011 10:35 AM

5
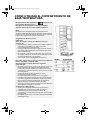
VOR DER INBETRIEBNAHME DES GERÄTES
INFORMATIONEN ZUM UMWELTSCHUTZ
• Das von Ihnen erworbene Gerät ist für den
Einsatz in Privathaushalten und ähnlichen
Anwendungen bestimmt wie:
- Küchenbereiche in Geschäftsräumen, Büros
und anderen Arbeitsplätzen
- landwirtschaftlichen Betrieben
- durch Kunden in Hotels, Motels,
Wohnheimen aller Art sowie Pensionen und
Gästehäusern.
Damit Sie den größtmöglichen Nutzen aus
Ihrem neuen Gerät ziehen, lesen Sie bitte die
Bedienungsanleitung aufmerksam durch. Das
vorliegende Handbuch enthält eine
Beschreibung des Geräts und hilfreiche Tipps.
Heben Sie dieses Handbuch zum späteren
Nachschlagen auf.
1. Stellen Sie nach dem Auspacken sicher, dass das
Gerät unversehrt ist und die Tür richtig schließt.
Mögliche Schäden müssen dem Händler
innerhalb von 24 Stunden nach Anlieferung des
Geräts gemeldet werden.
2. Vor der Inbetriebnahme des Gerätes
mindestens zwei Stunden warten, damit der
Kühlkreislauf seine volle Funktionstüchtigkeit
erreichen kann.
3. Die Installation und der elektrische Anschluss
müssen von einer Fachkraft gemäß den
Herstelleranweisungen und den gültigen örtlichen
Sicherheitsbestimmungen ausgeführt werden.
4. Vor der Inbetriebnahme den Innenraum des
Gerätes reinigen.
1.Verpackung
Das Verpackungsmaterial ist zu 100 % wieder
verwertbar
und durch ein Recyclingsymbol gekennzeichnet.
Für die Entsorgung beachten Sie bitte die örtlichen
Vorschriften.
Bewahren Sie das Verpackungsmaterial
(Plastikbeutel, Styroporteile usw.) außerhalb der
Reichweite von Kindern auf, da es eine mögliche
Gefahrenquelle darstellt.
2.Entsorgung
Das Gerät besteht aus recyclingfähigem Material.
Dieses Gerät ist in Übereinstimmung mit den
Anforderungen der Europäischen Richtlinie
2002/96/EG über Elektro- und Elektronik-
Altgeräte (WEEE) gekennzeichnet. Sie leisten
einen positiven Beitrag zum Umwelt- und
Gesundheitsschutz, wenn Sie dieses Gerät einer
gesonderten Abfallsammlung zuführen.
Das Symbol auf dem Gerät bzw. auf dem
beiliegenden Informationsmaterial weist darauf hin,
dass dieses Gerät kein normaler Haushaltsmüll ist,
sondern in einer Sammelstelle für Elektro- und
Elektronik-Altgeräte entsorgt werden muss.
Schneiden Sie vor der Entsorgung des Gerätes das
Netzkabel durch, um das Gerät
funktionsuntüchtig zu machen, und entfernen Sie
die Türen und Ablageflächen im Gerät, so dass
Kinder nicht ungehindert in das Geräteinnere
klettern und sich dort einsperren können. Das
Gerät muss den örtlichen Bestimmungen
entsprechend entsorgt und bei einer offiziellen
Sammelstelle abgegeben werden. Lassen Sie das
Gerät nicht einmal für wenige Tage
unbeaufsichtigt, da es eine mögliche
Gefahrenquelle für Kinder darstellt. Für weitere
Informationen hinsichtlich Behandlung,
Entsorgung bzw. Recycling dieses Gerätes
wenden Sie sich bitte an die zuständige lokale
Behörde für die Beseitigung von Haushaltsabfällen
oder an den Händler, bei dem Sie das Gerät
gekauft haben.
Hinweis:
Dieses Gerät ist FCKW-frei. Der Kältekreislauf
enthält R134a (HFC) oder R600a (HC), siehe
Typenschild im Innenraum.
Betrifft Geräte mit Isobutan (R600a): Isobutan ist
ein natürliches Gas ohne umweltschädigende
Auswirkungen. Allerdings ist beim Umgang mit
Isobutan Vorsicht geboten, denn es ist leicht
entflammbar. Die Leitungen des Kältekreises
müssen daher unbedingt auf ihre Unversehrtheit
überprüft werden.
Dieses Gerät könnte fluorierte Treibhausgase im
Sinne des Kyoto-Protokolls enthalten; das Kühlmittel
befindet sich in einem hermetisch verschlossenen
System. Kühlmittel: Die Kenngröße für das globale
Erwärmungspotential (GWP) von R134a ist 1300.
Konformitätserklärung
Dieses Gerät darf mit Lebensmitteln in Berührung
kommen und entspricht der EG-Verordnung
1935/2004.
Dieses Gerät wurde gemäß folgender Richtlinien
entworfen, hergestellt und in den Handel
eingeführt:
• Sicherheitsanforderungen der Richtlinie
2006/95/EG zur Niederspannung (welche die
Richtlinie 73/23/EWG und nachfolgende
Änderungen ersetzt),
• den Schutzvorschriften der “EMV”-Richtlinie
2004/108/EG.
Die elektrische Sicherheit des Gerätes ist nur
dann gewährleistet, wenn es korrekt an eine
funktionstüchtige und den gesetzlichen
Bestimmungen entsprechende Erdung
angeschlossen ist.
63702035D.fm Page 5 Friday, February 18, 2011 10:35 AM

6
ALLGEMEINE HINWEISE UND RATSCHLÄGE
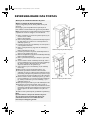
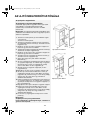
INSTALLATION
• Zum Transport und zur Installation des Geräts
sind zwei oder mehrere Personen erforderlich.
• Achten Sie beim Verschieben des Geräts darauf,
den Fußboden (z. B. Parkettboden) nicht zu
beschädigen.
• Achten Sie bei der Installation darauf, dass das
Gerät nicht auf dem Netzkabel steht.
• Stellen Sie das Gerät nicht neben einer
Wärmequelle auf.
• Zur ausreichenden Belüftung an beiden Seiten
und oberhalb des Gerätes einen Zwischenraum
frei lassen und die Installationsanweisungen
befolgen.
• Die Belüftungsöffnungen des Gerätes nicht
abdecken oder zustellen.
• Die Leitungen des Kühlkreislaufs dürfen nicht
beschädigt werden.
• Das Gerät auf einer tragfähigen Fläche
nivellieren und es in einem seinen
Abmessungen und seinem Verwendungszweck
entsprechenden Raum aufstellen.
• Stellen Sie das Gerät in einem trockenen und
gut belüfteten Raum auf. Das Gerät ist für den
Einsatz in Räumen mit nachstehenden
Temperaturbereichen ausgelegt, die ihrerseits
von der Klimaklasse auf dem Typenschild
abhängig sind. Der Gerätebetrieb könnte
beeinträchtigt werden, wenn das Gerät über
längere Zeit bei höheren oder tieferen
Temperaturwerten als denen des
vorgeschriebenen Bereichs läuft.
• Prüfen Sie, ob die auf dem Typenschild
angegebene Spannung mit der in der Wohnung
übereinstimmt.
• Verwenden Sie weder Einzel- noch
Mehrfachadapter oder Verlängerungskabel.
• Zum Anschließen an die Wasserleitung den im
Lieferumfang des neuen Geräts enthaltenen
Schlauch verwenden. Der Schlauch des
vorherigen Geräts darf nicht wieder verwendet
werden.
• Die Änderung oder der Austausch des
Netzkabels darf ausschließlich durch
qualifizierte Techniker oder den Technischen
Kundendienst erfolgen.
• Die elektrische Abschaltung des Geräts muss
durch Ziehen des Netzsteckers oder durch
einen der Steckdose vorgeschalteten
Zweipolschalter möglich sein.
SICHERHEIT
• Stellen Sie keine Spraydosen oder Behälter mit
Treibgasen oder brennbaren Substanzen in das
Gerät.
• Lagern und verwenden Sie kein Benzin, Gas
oder andere entflammbare Stoffe in der Nähe
des Geräts oder anderer Haushaltsgeräte.
Durch die ausströmenden Dämpfe besteht
Brand- oder Explosionsgefahr.
• Zum Beschleunigen des Abtauvorganges niemals
zu anderen mechanischen, elektrischen oder
chemischen Hilfsmitteln greifen als zu den vom
Hersteller empfohlenen.
• Verwenden Sie keine elektrischen Geräte in
den Geräteräumen, wenn diese nicht den vom
Hersteller genehmigten entsprechen.
• Das Gerät ist nicht für den Gebrauch durch
Kinder oder körperlich oder geistig behinderte
oder auch hör- und sehgeschädigte und
unerfahrene oder im Umgang mit dem Gerät
nicht vertraute Personen bestimmt, es sei denn
unter der Aufsicht oder Anleitung einer für ihre
Sicherheit haftenden Person.
• Kindern das Spielen und Verstecken im Gerät
nicht gestatten, um Erstickungs- und
Einschließgefahr zu vermeiden.
• Die in den (eventuell vorhandenen) Kälteakkus
enthaltene (ungiftige) Flüssigkeit darf nicht
verschluckt werden.
• Eiswürfel oder Wassereis nicht sofort nach der
Entnahme aus dem Gefrierraum verzehren, da sie
Kälteverbrennungen hervorrufen können.
GEBRAUCH
•
Ziehen Sie vor jeder Reinigungs- und
Wartungsarbeit den Netzstecker oder
unterbrechen Sie die Stromversorgung.
• Sämtliche Geräte mit Eisautomat und
Wasserspender müssen an eine Wasserleitung
angeschlossen werden, die ausschließlich
Trinkwasser abgibt (mit Wasserleitungsdruck
zwischen 1,7 und 8,1 bar). Nicht direkt an die
Wasserleitung angeschlossene Eisautomaten
bzw. Wasserspender dürfen nur mit Trinkwasser
gefüllt werden.
• Verwenden Sie den Kühlraum nur zur Lagerung
frischer Lebensmittel und den Gefrierraum nur
zur Lagerung von Tiefkühlware, zum Einfrieren
frischer Lebensmittel und zum Herstellen von
Eiswürfeln.
• Keine Glasbehälter mit flüssigem Inhalt in den
Gefrierraum stellen, da diese platzen können.
Bei Nichtbeachtung der o. g. Empfehlungen
und Vorschriften lehnt der Hersteller jede
Verantwortung ab
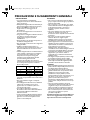
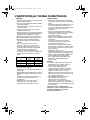
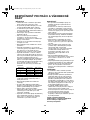
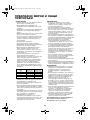
Klimaklasse Raum. temp.
(° C)
Raum. temp.
(° F)
SN 10 bis 32 50 bis 90
N 16 bis 32 61 bis 90
ST 16 bis 38 61 bis 100
T 16 bis 43 61 bis 110
63702035D.fm Page 6 Friday, February 18, 2011 10:35 AM

7
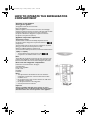
BENUTZUNG DES KÜHLRAUMS
Gerät einschalten
Inbetriebnahme des Geräts
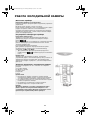
Die Bedienelemente befinden sich im Innenraum des Geräts.
Schließen Sie den Netzstecker an.
Bei angeschlossenem Gerät schaltet sich die Innenbeleuchtung ein,
wenn die Tür geöffnet wird. An dem Thermostat im Kühlraum
können Sie die Temperatur des Kühlraums und des Tiefkühlfachs
(falls vorhanden) einstellen.
Temperatureinstellung:
des Geräts:
Der Thermostat regelt automatisch die Innentemperatur des
Kühlraums und des Tiefkühlfachs.
Durch Drehen des Thermostatknopfs von 1 bis 7 werden
stufenweise niedrigere Kühltemperaturen erzielt.
In der Stellung O kühlt das Gerät nicht.
Für die vorübergehende Aufbewahrung von Lebensmitteln sollte
der Thermostatknopf auf die Positionen zwischen 1 (niedrigste
Kühlleistung) und 3 (mittlere Kühlleistung)gestellt werden.
- Für eine längerfristige Aufbewahrung von Lebensmitteln im
Tiefkühlfach den Thermostatknopf auf 3 oder 4
stellen.
Hinweis:
Die Raumtemperatur, die Häufigkeit der Türöffnungen und der
Aufstellungsort des Geräts können die Innentemperatur des
Kühlgeräts beeinflussen. Bei der Thermostateinstellung müssen
diese Faktoren berücksichtigt werden.
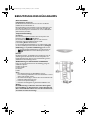
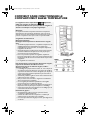
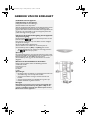
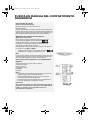
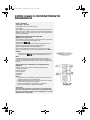
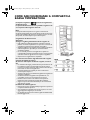
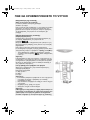
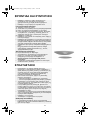
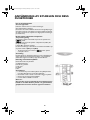
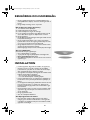
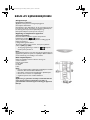
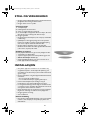
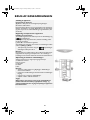
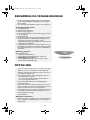
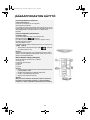
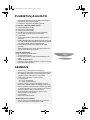
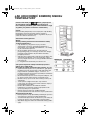
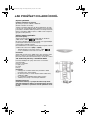
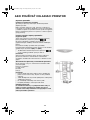
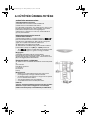
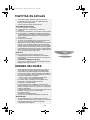
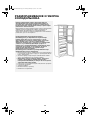
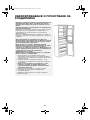
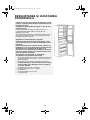
Aufbewahrung von Lebensmitteln im Kühlraum
Lagern Sie die Lebensmittel wie auf der Abbildung gezeigt ein.
A. Gekochte Speisen
B. Obst und Gemüse
C. Fisch, Fleisch
D. Flaschen
E. Käse
Anm.:
• Der Abstand zwischen den Abstellflächen und der
Innenrückwand gewährleistet eine freie Luftzirkulation und darf
daher nicht verstopft werden.
• Die Lebensmittel so lagern, dass sie nicht mit der Rückwand des
Kühlraums in Berührung kommen.
• Keine warmen Speisen einlagern.
• Bewahren Sie Flüssigkeiten in geschlossenen Behältern auf.
Wichtig
Die Aufbewahrung von Gemüse mit hohem Wassergehalt
kann zur Bildung von Kondenswasser auf der Glasplatte des
Obst- und Gemüsefachs führen: der korrekte Gerätebetrieb
wird dadurch nicht beeinträchtigt.
63702035D.fm Page 7 Friday, February 18, 2011 10:35 AM

8
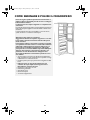
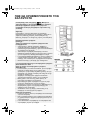
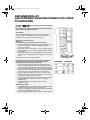
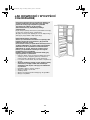
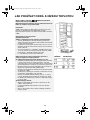
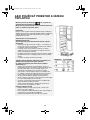
BENUTZUNG DES TIEFKÜHLRAUMS
Der Gefrierraum besitzt . Er kann zum Einfrieren
frischer Lebensmittel genutzt werden.
Die Menge frischer Lebensmittel, die innerhalb von 24
Stunden eingefroren werden kann, ist auf dem Typenschild
angegeben.
Hinweis:
Auch bei Stromausfall behält das Gefrierfach die zur Aufbewahrung
der Lebensmittel erforderliche Temperatur aufrecht. Während
dieser Zeit sollte die Tür des Fachs allerdings nicht geöffnet werden.
Einfrieren frischer Lebensmittel
Wichtig:
Wickeln Sie die einzufrierenden frischen Lebensmittel ein
und verschließen Sie sie in:
• Aluminium- oder Klarsichtfolie, wasserundurchlässige
Kunststoffverpackungen, Polyäthylenbehälter mit Deckel,
lebensmittelgerechte Tiefkühlbehälter.
• Die einzufrierenden Lebensmittel ins obere Fach legen und um
die Päckchen ausreichend Platz für die freie Luftzirkulation lassen.
• Zur Beschleunigung des Gefriervorgangs den Thermostatknopf
vor dem Einführen der Lebensmittel um eine halbe Raststellung
nach unten stellen.
• Nach 24 Stunden ist der Gefriervorgang beendet.
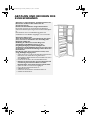
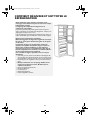
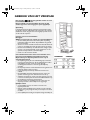
Die Aufbewahrungsdauer in Monaten für eingefrorene
frische Lebensmittel kann der nebenstehenden Tabelle
entnommen werden.
Beim Einkaufen von Tiefkühlware auf Folgendes achten:
• Die Verpackung darf nicht beschädigt sein, da sonst der Inhalt
leicht ungenießbar werden könnte. Wenn die Verpackung
aufgebläht ist oder feuchte Flecken aufweist, wurde das Produkt
nicht optimal gelagert und der Inhalt könnte angetaut sein.
• Legen Sie beim Einkaufen die Tiefkühlware als letzte in den
Einkaufswagen und transportieren Sie sie stets in einer
Kühltasche.
• Legen Sie die Tiefkühlware zu Hause sofort ins Gefrierfach.
• Angetaute Tiefkühlware niemals wieder einfrieren. Innerhalb
von 24 Stunden aufbrauchen.
• Vermeiden Sie Temperaturschwankungen oder reduzieren Sie
sie auf ein Minimum. Beachten Sie das auf der Verpackung
angegebene Verfalldatum.
• Für die Konservierung von Tiefkühlware stets die Anweisungen
auf der Verpackung befolgen.
Herstellen von Eiswürfeln
• Die Eiswürfelschale zu 2/3 mit Wasser füllen und ins Gefrierfach
stellen.
• Falls die Schale auf dem Boden angefroren ist, dürfen zum Lösen
keine spitzen oder scharfen Gegenstände verwendet werden.
• Zur leichteren Entnahme der Eiswürfel aus der Schale kann
diese leicht gebogen werden.
MONATE
LEBENSMITTEL
63702035D.fm Page 8 Friday, February 18, 2011 10:35 AM

9
ABTAUEN UND REINIGEN DES
KÜHLSCHRANKS
Ziehen Sie vor jeder Reinigungs- und Wartungsarbeit den
Netzstecker des Geräts oder schalten Sie die
Stromversorgung ab.
Das Abtauen des Kühlraums erfolgt vollautomatisch.
Die von Zeit zu Zeit an der Innenrückwand des Kühlraums
auftretenden Wassertropfen zeigen die automatische Abtauphase
an.
Das Tauwasser wird in eine Abflussöffnung geleitet und
anschließend in einem Behälter aufgefangen, wo es verdunstet.
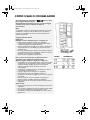
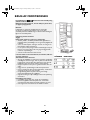
Abtauen des Gefrierraums
Tauen Sie das Gefrierfach 1-2 mal jährlich ab oder immer
dann, wenn sich an den Wänden eine übermäßig dicke
Reifschicht gebildet hat.
Reifbildung ist vollkommen normal. Menge und
Schnelligkeit der Reifbildung hängen von den
Umgebungsbedingungen und der Häufigkeit der
Türöffnungen ab. Die Reifbildung besonders im oberen Teil
des Fachs ist normal und beeinträchtigt in keiner Weise den
Gerätebetrieb.
Das Abtauen sollte dann vorgenommen werden, wenn
wenig Tiefkühlgut eingelagert ist.
• Öffnen Sie die Tür, entnehmen Sie alle Lebensmittel aus dem
Gefrierraum und wickeln Sie sie eng aneinander in
Zeitungspapier. Bewahren Sie sie an einem kühlen Ort oder in
einer Kühltasche auf.
• Lassen Sie die Tür offen, damit der Reif abtauen kann.
• Reinigen Sie den Innenraum mit einem Schwamm und
einer Lösung aus lauwarmem Wasser und/oder
Neutralreiniger. Verwenden Sie keine Scheuermittel.
• Spülen Sie nach und trocknen Sie sorgfältig ab.
• Lagern Sie die Lebensmittel wieder ein.
• Schließen Sie die Tür.
• Stecken Sie den Netzstecker des Geräts wieder ein.
• Schalten Sie das Gerät ein.
63702035D.fm Page 9 Friday, February 18, 2011 10:35 AM

10
REINIGUNG UND PFLEGE
INSTALLATION
• Regelmäßig die Belüftungsöffnungen und den Kondensator hinten
am Gerät mit einem Staubsauger oder einer Bürste reinigen.
• Die Außenwände mit einem weichen Tuch reinigen.
Bei längerer Abwesenheit
1. Entleeren Sie den Kühlschrank vollständig.
2. Das Gerät vom Stromnetz trennen.
3. Tauen Sie die Innenräume ab und reinigen Sie sie.
4. Bei abgeschaltetem Kühlschrank die Tür offen lassen, um
Schimmelbildung, unangenehme Gerüche oder Oxydation zu
vermeiden.
5. Reinigen Sie das Gerät.
• Reinigen Sie während des Abtauvorgangs das Innere des
Gefrierraums (wo vorhanden).
• Reinigen Sie den Kühlraum regelmäßig mit einem Schwamm
und einer Lösung aus lauwarmem Wasser und/oder
Neutralreiniger. Spülen Sie nach und reiben Sie mit einem
weichen Tuch trocken. Verwenden Sie keine Scheuermittel.
• Reinigen Sie das Gerät außen mit einem weichen, mit Wasser
angefeuchteten Tuch.
Benutzen Sie weder Scheuerpaste noch -schwämmchen oder
Fleckenentferner (z. B. Azeton, Trichloräthylen) oder Essig.
Auswechseln der Lampe:
Gehen Sie zum Lampenwechsel folgendermaßen vor:
• Ziehen Sie den Netzstecker aus der Steckdose.
• Auf die Zungen seitlich an der Lampenhalterung drücken und
diese abnehmen.
• Die LED durch eine neue ersetzen.
• Setzen Sie die Lampenhalterung auf und warten Sie 5 Minuten,
bevor Sie das Gerät wieder anschließen.
• Stellen Sie das Gerät nicht neben einer Wärmequelle auf.
Installationen in warmen Räumen, in der Nähe von
Wärmequellen (Heizungen, Öfen) oder die direkte
Sonnenlichteinstrahlung erhöhen den Stromverbrauch und
sollten deshalb vermieden werden.
• Falls dies nicht möglich ist, müssen folgende Mindestabstände
eingehalten werden:
• 30 cm von Kohle- oder Ölöfen;
• 3 cm von Elektro- und/oder Gasherden.
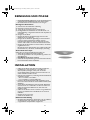
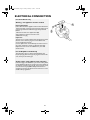
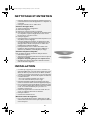
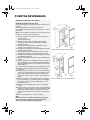
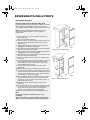
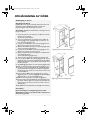
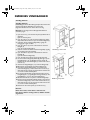
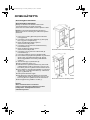
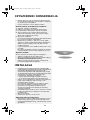
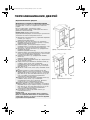
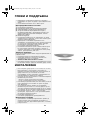
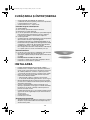
• Montieren Sie die Distanzstücke (falls mitgeliefert) an die
Hinterwand des Kondensators auf der Geräterückseite (siehe
Abbildung.
• Sorgen Sie zur Gewährleistung eines optimalen Betriebs für
einen Freiraum von mindestens 5 cm über dem Gerät und
stellen Sie angrenzende Möbel so auf, dass etwas Luft
zirkulieren kann.
• Stellen Sie das Gerät an einem trockenen und gut belüfteten
Ort auf und nivellieren Sie es bei Bedarf an den vorderen
Stellfüßen.
• Reinigen Sie den Innenraum.
• Setzen Sie das Zubehör ein.
Elektrische Abschaltung
• Die elektrische Abschaltung des Gerätes muss durch Ziehen
des Netzsteckers oder durch einen der Steckdose
vorgeschalteten Zweipolschalter möglich sein.
63702035D.fm Page 10 Friday, February 18, 2011 10:35 AM

11
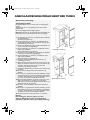
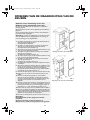
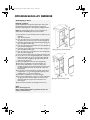
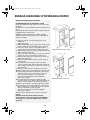
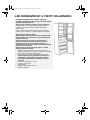
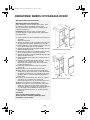
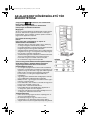
ANSCHLAGWECHSELMÖGLICHKEIT DER TÜREN
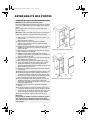
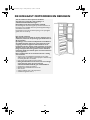
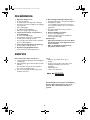
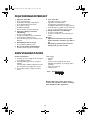
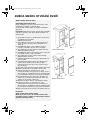
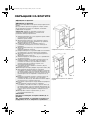
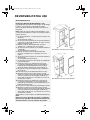
Wechsel des Türanschlags
Türanschlag wechseln
Die Kühlschranktür kann von rechts oder von links geöffnet
werden.
Werkseitig ist die Tür so angeschlagen, dass sie von links
geöffnet wird.
Zum Türanschlagwechsel wie folgt vorgehen.
Hinweis: Ziehen Sie vor dem Wechseln des Türanschlags den
Netzstecker oder unterbrechen Sie die Stromversorgung.
1. Die Schrauben (1) entfernen und dabei die obere Platte (2)
am Gerät abstützen.
Die obere Platte entfernen.
2. Die zwei Schrauben (3) entfernen und dabei das obere
(rechtsseitige) Scharnier (4) an den Rahmen drücken. Das
obere Scharnier (4) entfernen.
3. Die Tür vom Zapfen des mittleren Scharniers abheben und
auf einer weichen Unterlage ablegen.
4. Die zwei Schrauben (5) entfernen und dabei das mittlere
Scharnier (6) festhalten.
Das mittlere Scharnier (6) entfernen.
5. Die untere Tür vom Zapfen des unteren Scharnier abheben
und auf einer weichen Unterlage ablegen.
6. Die zwei Schrauben (7) entfernen und dabei das untere
Scharnier (8) festhalten.
Das untere Scharnier (8) abnehmen.
7. Den linken vorderen Stellfuß (9) herausdrehen und
rechtsseitig montieren.
8. Bevor das untere Scharnier (8) wieder montiert wird, den
Zapfen des Scharniers entfernen (10) und das Scharnier (8)
umdrehen. Das untere Scharnier (6) mit den zwei
Schrauben (7) linksseitig montieren.
9. Den Zapfen des Scharniers (10) auf das untere Scharnier (8)
montieren.
10.Die Tür auf den Zapfen des unteren Scharniers (10)
schieben.
11.Die untere Tür in geschlossener Position festhalten und das
mittlere Scharnier (6) mit den zwei Schrauben (5) linksseitig
montieren. Die Schrauben (5) erst dann festziehen, wenn
die untere Tür korrekt mit dem Rahmen fluchtet.
12.Bevor das obere Scharnier (4) wieder montiert wird, den
Zapfen des Scharniers (11) entfernen und das obere
Scharnier (4) umdrehen. Den Zapfen des Scharniers (11) in
das obere Scharnier (4) einsetzen.
13.Die obere Tür auf den Zapfen des mittleren Scharniers
absenken.
14.Die obere Tür in geschlossener Position festhalten und das
obere Scharnier (4) mit den zwei Schrauben (3) linksseitig
montieren. Die Schrauben (3) erst dann festziehen, wenn
die obere Tür korrekt mit dem Rahmen fluchtet.
15.Die obere Platte (2) mit den Schrauben (1) montieren.
Hinweis:
Der Anschlag der Tür kann geändert werden.
Sollte der Kundendienst den Türanschlagwechsel
durchführen, fällt dies nicht unter die Garantieleistung.
Linksseitige Türöffnung
Rechtsseitige Türöffnung
Abb. 2
Abb. 1
63702035D.fm Page 11 Friday, February 18, 2011 10:35 AM

12
STÖRUNG - WAS TUN
1. Das Gerät funktioniert nicht.
• Liegt ein Stromausfall vor?
• Ist der Netzstecker richtig angeschlossen?
• Ist der Zweipolschalter eingeschaltet?
• Ist die Sicherung durchgebrannt?
• Ist das Netzkabel in Ordnung?
• Steht der Thermostat auf O (Stop)?
2. Die Temperatur in den Geräteräumen ist
nicht kalt genug.
• Wurde die Tür korrekt geschlossen?
• Ist das Gerät in der Nähe einer Wärmequelle
aufgestellt?
• Ist der Thermostat richtig eingestellt?
• Wird die Luftzirkulation behindert?
3. Die Temperatur im Kühlraum ist zu tief.
• Ist der Thermostat richtig eingestellt?
4. Wasser steht auf dem Boden des Kühlraums.
• Ist der Tauwasserabfluss verstopft?
5. Die Innenbeleuchtung funktioniert nicht.
Prüfen Sie zuerst Punkt 1, dann:
• Trennen Sie das Gerät vom Stromnetz.
Für den Austausch der Glühbirne siehe Angaben
und Zeichnung in der beigelegten Tabelle.
• Die Glühbirne kontrollieren und ggf.
auswechseln. Max. 15 W starke Birnen
verwenden.
6. Übermäßige Reifbildung im Gefrierraum
• Wurde die Tür korrekt geschlossen?
• Hemmen eingelagerte Lebensmittel die Tür?
Anm.:
• Die Vorderseite des Geräts kann heiß
werden. Dies verhindert die Bildung von
Kondenswasser und ist kein Defekt.
• Gluckergeräusche und leichtes Zischen des
Kältekreises sind durchaus normal.
TECHNISCHER KUNDENDIENST
Bevor Sie den Kundendienst rufen:
1. Prüfen Sie zuerst, ob Sie die Störung selbst
beheben können (siehe “Störung - was tun”).
2. Das Gerät nochmals einschalten, um zu prüfen,
ob die Störung immer noch vorliegt.
Ist dies der Fall, schalten Sie das Gerät aus und
wiederholen Sie den Versuch nach etwa einer
Stunde.
3. Bleibt das Ergebnis negativ, benachrichtigen Sie
den Kundendienst.
Machen Sie bitte folgende Angaben:
• Art der Störung;
• Gerätemodell;
• Servicenummer (die Ziffer hinter dem Wort
SERVICE auf dem Typenschild im Geräteinnern),
• Ihre vollständige Anschrift;
• Ihre Telefonnummer mit Vorwahl.
Hinweis: Der Anschlag der Tür kann geändert
werden. Sollte der Kundendienst den
Türanschlagwechsel durchführen, fällt dies
nicht unter die Garantieleistung.
63702035D.fm Page 12 Friday, February 18, 2011 10:35 AM

13
INSTRUCTIONS FOR USE
BEFORE USING THE APPLIANCE
SAFEGUARDING THE ENVIRONMENT
PRECAUTIONS AND GENERAL
RECOMMENDATIONS
HOW TO OPERATE THE REFRIGERATOR
COMPARTMENT
HOW TO OPERATE THE LOW TEMPERATURE
COMPARTMENT
HOW TO DEFROST AND CLEAN THE
REFRIGERATOR
CARE AND MAINTENANCE
INSTALLATION
DOORS REVERSIBILITY
TROUBLESHOOTING GUIDE
AFTER-SALES SERVICE
ELECTRICAL CONNECTION
63702035GB.fm Page 13 Friday, February 18, 2011 10:32 AM

14
BEFORE USING THE APPLIANCE
SAFEGUARDING THE ENVIRONMENT
• Your new appliance is designed to be used in the
household and similar applications such as:
- kitchen areas in shops, offices and other
working environments
- farm houses
- by clients in hotels, motels, residences, bed &
breakfasts.
To get the most out of your new appliance, read
the user handbook carefully. It contains a
description of the appliance as well as useful tips.
Keep this handbook for future consultation.
1. After unpacking the appliance, make sure it is
not damaged and that the door closes properly.
Any damage must be reported to the dealer
within 24 hours of delivery of the appliance.
2. Wait at least two hours before switching the
appliance on, to ensure that the refrigerant
circuit is fully efficient.
3. Installation and the electrical connection must be
carried out by a qualified technician, according to
the manufacturer’s instructions and local safety
regulations.
4. Clean the inside of the appliance before using it.
1. Packaging
The packaging material is 100% recyclable
and carries the recycling symbol. Follow local
regulations for scrapping.
Keep the packaging materials (plastic bags,
polystyrene parts, etc.) out of reach of children, as
they are a potential source of danger.
2. Scrapping/Disposal
The appliance is manufactured using recyclable
material.
This appliance is marked according to the
European directive 2002/96/CE on Waste
Electrical and Electronic Equipment (WEEE). By
ensuring that this appliance is disposed of
correctly, you are helping to prevent potentially
damaging consequences for the environment and
for human health.
The symbol on the appliance, or on the
accompanying documents, indicates that this
appliance should not be treated as domestic waste but
must be taken to a special collection centre for the
recycling of electrical and electronic equipment.
When scrapping the appliance, make it unusable
by cutting off the power cable and removing the
doors and shelves so that children cannot easily
climb inside and become trapped. Scrap the
appliance in compliance with local regulations on
waste disposal, taking it to a special collection
centre; do not leave the appliance unattended
even for a few days, since it is a potential source of
danger for children. For further information on
the treatment, scrapping and recycling of this
product, contact your competent local office, the
household waste collection service or the shop
where you purchased the appliance.
Note:
this appliance does not contain CFCs. The
refrigerant circuit contains R134a (HFCs) or
R600a (HCs), see the rating plate inside the
appliance.
Appliances with Isobutane (R600a): Isobutane is a
natural gas with low environmental impact.
Caution is required, however, since isobutane is
flammable. Therefore, ensure that refrigerant
circuit pipelines are not damaged.
This product mat contain fluorinated greenhouse
gases covered by the Kyoto Protocol; the refrigerant
gas is contained in a hermetically sealed system.
Refrigerant gas: R134a has a global warming potential
(GWP) of 1300.
Declaration of conformity
This product has been designed for preserving food
and is manufactured in compliance with Regulation
(CE) No. 1935/2004.
This product has been designed, manufactured
and marketed in compliance with:
• the safety objectives prescribed in the Low
Voltage Directive 2006/95/CE (which replaced
Directive 73/23/CEE as amended);
• the protection requirements of the “EMC”
Directive 2004/108/EC.
The electrical safety of the appliance can only be
guaranteed if the product is connected to an
approved earth connection.
63702035GB.fm Page 14 Friday, February 18, 2011 10:32 AM

15
PRECAUTIONS AND GENERAL
RECOMMENDATIONS
INSTALLATION
• The appliance must be handled and installed by
two or more persons.
• Be careful not to damage the floors when you
move the appliance (e.g. parquet flooring).
• During installation, make sure the appliance
does not damage the power cable.
• Make sure the appliance is not placed near a
heat source.
• To guarantee adequate ventilation, leave a
space on both sides and above the appliance
and follow the installation instructions.
• Keep the appliance ventilation openings free.
• Do not damage the appliance refrigerant circuit
pipes.
• Install and level the appliance on a floor strong
enough to take its weight and in a place suitable
for its size and use.
• Install the appliance in a dry, well-ventilated
place. The appliance has been configured for
operation in places where the temperature falls
within the following ranges, and within the
climatic class given on the rating plate. The
appliance may not work properly if it is left for
a long time at a temperature outside the
specified range.
• Ensure that the voltage indicated on the
appliance data plate corresponds to the
domestic supply voltage.
• Do not use single/multiple adapters or
extension cables.
• For the water connection, use the pipe supplied
with the new appliance; do not reuse the one
from the previous appliance.
• Power cable modification or replacement must
only be carried out by qualified personnel or
After-sales Service.
• It must be possible to disconnect the appliance
from the mains by unplugging it or by means of
a two-pole switch fitted upline of the socket.
SAFETY
• Do not use the appliance to store aerosol cans
or receptacles containing propellants or
flammable substances.
• Do not store or use petrol, flammable liquids or
gas in the vicinity of this or other electrical
appliances. The fumes can create a fire hazard
or explosion.
• Do not use mechanical, electric or chemical means
other than those recommended by the
Manufacturer to speed up the defrost process.
• Do not use or place electrical appliances inside
the product if they are not of the type expressly
authorised by the Manufacturer.
• The appliance is not intended for use by persons
(children included) with restricted physical,
sensory or mental capabilities or without
experience and knowledge of the appliance,
unless they are under the supervision or
instruction of a person responsible for their safety.
• To avoid the risk of children becoming trapped
and suffocating, do not allow them to play or
hide inside the appliance.
• Do not swallow the contents (non-toxic) of the
ice packs (in some models).
• Do not eat ice cubes or ice lollies immediately
after taking them out of the freezer since they
may cause cold burns.
USE
• Before servicing or cleaning the appliance,
unplug it from the mains or disconnect the
electrical power supply.
• All appliances equipped with an ice-maker and
water dispenser must be connected to a water
supply that only delivers drinking water (with
mains water pressure of between 0.17 and 0.81
Mpascals (1.7 and 8.1 bar)). Ice-makers and/or
water dispensers not directly connected to the
water supply must be filled with drinking water
only.
• Use the refrigerator compartment to store
fresh food only and the freezer compartment
to store frozen food, to freeze fresh food, and
to make ice cubes only.
• Do not store glass containers with liquids in the
freezer since they may burst.
The Manufacturer declines any liability if the
above advice and precautions are not
respected
Climatic class Amb. temp.
(°C)
Amb. temp.
(°F)
SN From 10 to 32 From 50 to 90
N From 16 to 32 From 61 to 90
ST From 16 to 38 From 61 to 100
T From 16 to 43 From 61 to 110
63702035GB.fm Page 15 Friday, February 18, 2011 10:32 AM

16
HOW TO OPERATE THE REFRIGERATOR
COMPARTMENT
Switching on the appliance
Starting up the appliance
The appliance features internal controls.
Plug in the appliance.
When the appliance is connected to the mains, the inside light
switches on each time the door is opened. The thermostat, located
inside the refrigerator compartment, is used to adjust the
temperature of both the refrigerator compartment and low
temperature compartment (if fitted).
Appliance temperature adjustment:
Temperature setting:
The thermostat is used to automatically adjust the internal
temperature of the refrigerator compartment and the or
compartment.
The thermostat knob can be turned from position1 to 7 (coldest
setting) to make the internal temperature colder.
When set to O the appliance is switched off.
To store food for a short period of time, set the thermostat between
1 (Min) and 3 (Med).
- To store food for long periods of time in the
compartment, set the thermostat to 3 or 4.
Note:
The ambient air temperature, frequency of door opening and the
position of the appliance can affect internal temperatures. These
factors must be taken into account when setting the thermostat.
How to use the refrigerator compartment
Position the food as illustrated in the figure.
A. Cooked food
B. Fruit and vegetables
C. Fish, meat
D. Bottles
E. Cheese
Notes:
• The space between the shelves and the rear wall of the
refrigerator compartment must be unobstructed to allow
circulation of air.
• Do not place food in direct contact with the rear wall of the
refrigerator compartment.
• Do not place hot food in the refrigerator.
• Store liquids in closed containers.
Important
Storing vegetables with high water content can cause
condensation to form on the glass shelf of the crisper drawer:
this will not affect the correct operation of the appliance.
63702035GB.fm Page 16 Friday, February 18, 2011 10:32 AM

17
HOW TO OPERATE THE LOW TEMPERATURE
COMPARTMENT
The freezer compartment is . It can be used to freeze
fresh food.
The quantity of fresh food that can be frozen in 24 hours is
shown on the rating plate.
Note:
In the event of a power cut, the low temperature compartment will
maintain a sufficiently low temperature for food storage. However,
it is advisable to avoid opening the compartment door during such
periods.
Freezing fresh food
Important:
Before freezing, wrap and seal fresh food in:
• aluminium foil, cling film, air and water-tight plastic bags,
polythene containers with lids or freezer containers suitable for
freezing fresh food.
• Arrange the fresh food in the top compartment, leaving
sufficient space around each pack for the air to circulate.
• For optimum freezing, turn the thermostat down by half a point
when placing fresh foods in the freezer compartment.
• The food will be completely frozen in 24 hours.
The table alongside shows the recommended maximum
storage time for frozen fresh foods.
When purchasing frozen food products:
• Ensure that the packaging is not damaged (frozen food in
damaged packaging may have deteriorated). If the package is
swollen or has damp patches, it may not have been stored under
optimal conditions and defrosting may have already begun.
• When shopping, leave frozen food purchases until last and
transport the products in a thermally insulated cool bag.
• Place the items in the freezer compartment as soon as you get
home.
• If food has defrosted even partially, do not re-freeze it.
Consume within 24 hours.
• Avoid, or reduce temperature variations to the minimum.
Respect the best-before date on the package.
• Always observe the storage information on the package.
Making ice cubes
• Fill the ice cube tray 2/3 full and place it in the low temperature
compartment.
• Do not use sharp or pointed instruments to detach the tray if it
is stuck to the compartment bottom.
• Bend the ice tray slightly to remove the cubes.
MONTHS
FOOD
63702035GB.fm Page 17 Friday, February 18, 2011 10:32 AM

18
HOW TO DEFROST AND CLEAN THE
REFRIGERATOR
Before any cleaning or maintenance operation, unplug the
appliance from the mains or disconnect the electrical power
supply.
Defrosting of the refrigerator compartment is completely
automatic.
Droplets of water on the rear wall of the refrigerator
compartment indicate that the periodic automatic defrost cycle is
in progress.
The defrost water is automatically routed to a drain outlet and into
a container from which it evaporates.
Defrosting the freezer compartment
Defrost the freezer compartment once or twice a year or
when the ice formation is excessive.
It is perfectly normal for ice to form. The amount of ice
which forms and the rate at which it accumulates will
depends on room temperature and humidity, and on the
frequency with which the door is opened. Ice formation is
concentrated at the top of the compartment and does not
affect the efficiency of the appliance.
If possible, defrost the freezer when it is nearly empty.
• Remove the food from the freezer, wrap in newspaper and
group together in a cool place or in a portable cooler.
• Leave the door open to allow the frost to melt.
• Clean the interior with a sponge soaked in warm water
and/or neutral detergent. Do not use abrasive
substances.
• Rinse the interior and dry thoroughly.
• Put the food back into the freezer.
• Close the door.
• Plug in the appliance once again.
• Switch the appliance on.
63702035GB.fm Page 18 Friday, February 18, 2011 10:32 AM

19
CARE AND MAINTENANCE
INSTALLATION
• Periodically clean air vents and the condenser at the rear of
the appliance with a vacuum cleaner or a brush.
• Clean the outside using a soft cloth.
Prolonged disuse
1. Empty the refrigerator.
2. Disconnect the appliance from the power supply.
3. Defrost and clean the interior.
4. In the event of prolonged disuse, leave the door open to
prevent the formation of mould, odours and oxidation.
5. Clean the appliance.
• Clean the inside of the low temperature compartment (where
fitted) when defrosting.
• Periodically clean the inside of the refrigerator compartment
with a sponge dampened in warm water and/or neutral
detergent. Rinse and dry with a soft cloth. Do not use abrasive
products.
• Clean the outside with a soft damp cloth.
Do not use abrasive products, scourers, stain-removers (e.g.
acetone, trichloroethylene) or vinegar.
Replacing bulbs:
When replacing the bulb, proceed as follows:
• Unplug the appliance from the mains
• Squeeze the tabs on the sides of the lamp cover and remove it.
• Replace the LED light with new one.
• Put the lamp cover back on and wait 5 minutes before plugging
the appliance back into the mains.
• Install the appliance away from heat sources. Installation in a
hot environment, direct exposure to the sun or installation
near heat sources (heaters, radiators, cookers) will increase
power consumption and should therefore be avoided.
• If this is not possible, the following minimum distances must
be respected:
• 30 cm from coal or paraffin stoves;
• 3 cm from electric and/or gas stoves.
• Fit the spacers (if supplied) on the rear of the condenser
positioned at the back of the appliance (see figure).
• To optimize appliance efficiency, leave a 5 cm gap above the
appliance and make sure that adjacent kitchen units are
sufficiently distanced to allow air circulation.
• Install the appliance in a dry, well-ventilated place, and ensure
it is level, using the front adjustment feet if necessary.
• Clean the interior.
• Fit the accessories.
Disconnecting the appliance
• It must be possible to disconnect the appliance by unplugging
it or by means of a two-pole switch fitted upline of the socket.
63702035GB.fm Page 19 Friday, February 18, 2011 10:32 AM

20
DOORS REVERSIBILITY
Door Swing Reversal
Reversing the door swing
The refrigerator has the capability of opening the door from
either the left or the right side.
The unit is delivered to you with the door opening from the left
side.
To change the opening direction, please follow these
instructions.
Note: Before reversing the door swing, unplug the appliance
from the mains or disconnect the electrical power supply.
1. Remove the screws (1) holding the top panel (2) to the unit.
Remove the top panel.
2. Remove the two screws (3) holding the top hinge (4) (right
side) to the frame. Remove the top hinge (4).
3. Lift the door off the middle hinge pin and place it on a
nonscratching surface.
4. Remove the two screws (5) holding the middle hinge (6).
Remove the middle hinge (6).
5. Lift the lower door off the bottom hinge pin and place it on
a nonscratching surface.
6. Remove the two screws (7) holding the bottom hinge (8).
Remove the bottom hinge (8).
7. Remove the left front leg (9) and transfer it to the right side.
8. Before replacing the bottom hinge (8), remove the hinge
pin (10) and reverse the direction of the hinge (8).
Reassemble the bottom hinge (6) on the left hand side using
the two screws (7).
9. Refit the hinge pin (10) into the bottom hinge (8).
10.Lower the door onto the bottom hinge pin (10).
11.While holding the lower door in the closed position,
reassemble the middle hinge (6) on the left hand side using
the two screws (5). Do not tighten the screws (5) until the
top of the lower door is level with the counter top.
12.Before replacing the upper hinge (4), remove the hinge pin
(11) and reverse the direction of the hinge (4).Refit the
hinge pin (11) into the upper hinge (4).
13.Lower the upper door onto the middle hinge pin.
14.While holding the upper door in the closed position,
reassemble the upper hinge (4) on the left hand side using
the two screws (3). Do not tighten the screws (3) until the
top of the upper door is level with the counter top.
15.Refit the top panel (2) using the screws (1).
Note:
The direction of door opening can be changed.
If this operation is performed by After-sales Service it is
not covered by the warranty.
Door opening from left side
Door opening from right side
Fig. 2
Fig. 1
63702035GB.fm Page 20 Friday, February 18, 2011 10:32 AM

21
TROUBLESHOOTING GUIDE
1. The appliance is not working.
• Is there a power failure?
• Is the plug properly inserted in the socket?
• Is the double-pole switch on?
• Has the fuse blown?
• Is the power cord in perfect condition?
• Is the thermostat set to O (Stop)?
2. Temperature inside the compartments is
not low enough.
• Is the door shut properly?
• Is the appliance installed near a heat source?
• Is the thermostat setting correct?
• Are the air circulation grilles blocked?
3. Temperature inside the refrigerator
compartment is too low.
• Is the thermostat setting correct?
4. Water collects at the bottom of the
refrigerator compartment.
• Is the defrost water drain blocked?
5. The inside light is not working.
Perform the checks for problem 1, then:
• Disconnect the appliance from the mains power
supply.
To inspect the bulb, refer to the instructions and
illustration on the attached table.
• Check the bulb and if necessary replace it.
Replace using maximum 15W bulb.
6. Excessive frost build-up in the freezer
compartment
• Is the door shut properly?
• Is food obstructing proper door closure?
Notes:
• The front edge of the appliance may be hot.
This prevents the formation of condensation
and is not a defect.
• Gurgling and hissing noises due to expansion
in the refrigerant circuit are normal.
AFTER-SALES SERVICE
Before contacting After-Sales Service:
1. See if you can solve the problem yourself with the
help of the “Troubleshooting guide”).
2. Switch the appliance on again to see if the
problem persists.
If it does, switch off and wait for about an hour
before switching on.
3. If the problem persists after this course of action,
contact After-sales Service.
Specify:
• the nature of the problem,
• the model,
• the Service number (the number after the word
SERVICE on the data plate on the inside of the
appliance),
• your full address,
• your telephone number and area code.
Note: The direction of door opening can be
changed. If this operation is performed by After-
sales Service it is not covered by the warranty.
•
63702035GB.fm Page 21 Friday, February 18, 2011 10:32 AM
Sidan laddas...
Sidan laddas...
Sidan laddas...
Sidan laddas...
Sidan laddas...
Sidan laddas...
Sidan laddas...
Sidan laddas...
Sidan laddas...
Sidan laddas...
Sidan laddas...
Sidan laddas...
Sidan laddas...
Sidan laddas...
Sidan laddas...
Sidan laddas...
Sidan laddas...
Sidan laddas...
Sidan laddas...
Sidan laddas...
Sidan laddas...
Sidan laddas...
Sidan laddas...
Sidan laddas...
Sidan laddas...
Sidan laddas...
Sidan laddas...
Sidan laddas...
Sidan laddas...
Sidan laddas...
Sidan laddas...
Sidan laddas...
Sidan laddas...
Sidan laddas...
Sidan laddas...
Sidan laddas...
Sidan laddas...
Sidan laddas...
Sidan laddas...
Sidan laddas...
Sidan laddas...
Sidan laddas...
Sidan laddas...
Sidan laddas...
Sidan laddas...
Sidan laddas...
Sidan laddas...
Sidan laddas...
Sidan laddas...
Sidan laddas...
Sidan laddas...
Sidan laddas...
Sidan laddas...
Sidan laddas...
Sidan laddas...
Sidan laddas...
Sidan laddas...
Sidan laddas...
Sidan laddas...
Sidan laddas...
Sidan laddas...
Sidan laddas...
Sidan laddas...
Sidan laddas...
Sidan laddas...
Sidan laddas...
Sidan laddas...
Sidan laddas...
Sidan laddas...
Sidan laddas...
Sidan laddas...
Sidan laddas...
Sidan laddas...
Sidan laddas...
Sidan laddas...
Sidan laddas...
Sidan laddas...
Sidan laddas...
Sidan laddas...
Sidan laddas...
Sidan laddas...
Sidan laddas...
Sidan laddas...
Sidan laddas...
Sidan laddas...
Sidan laddas...
Sidan laddas...
Sidan laddas...
Sidan laddas...
Sidan laddas...
Sidan laddas...
Sidan laddas...
Sidan laddas...
Sidan laddas...
Sidan laddas...
Sidan laddas...
Sidan laddas...
Sidan laddas...
Sidan laddas...
Sidan laddas...
Sidan laddas...
Sidan laddas...
Sidan laddas...
Sidan laddas...
Sidan laddas...
Sidan laddas...
Sidan laddas...
Sidan laddas...
Sidan laddas...
Sidan laddas...
Sidan laddas...
Sidan laddas...
Sidan laddas...
Sidan laddas...
Sidan laddas...
Sidan laddas...
Sidan laddas...
Sidan laddas...
Sidan laddas...
Sidan laddas...
Sidan laddas...
Sidan laddas...
Sidan laddas...
Sidan laddas...
Sidan laddas...
Sidan laddas...
Sidan laddas...
Sidan laddas...
Sidan laddas...
Sidan laddas...
Sidan laddas...
Sidan laddas...
Sidan laddas...
Sidan laddas...
Sidan laddas...
Sidan laddas...
Sidan laddas...
Sidan laddas...
Sidan laddas...
Sidan laddas...
Sidan laddas...
Sidan laddas...
Sidan laddas...
Sidan laddas...
Sidan laddas...
Sidan laddas...
Sidan laddas...
Sidan laddas...
Sidan laddas...
Sidan laddas...
Sidan laddas...
Sidan laddas...
Sidan laddas...
Sidan laddas...
Sidan laddas...
-
 1
1
-
 2
2
-
 3
3
-
 4
4
-
 5
5
-
 6
6
-
 7
7
-
 8
8
-
 9
9
-
 10
10
-
 11
11
-
 12
12
-
 13
13
-
 14
14
-
 15
15
-
 16
16
-
 17
17
-
 18
18
-
 19
19
-
 20
20
-
 21
21
-
 22
22
-
 23
23
-
 24
24
-
 25
25
-
 26
26
-
 27
27
-
 28
28
-
 29
29
-
 30
30
-
 31
31
-
 32
32
-
 33
33
-
 34
34
-
 35
35
-
 36
36
-
 37
37
-
 38
38
-
 39
39
-
 40
40
-
 41
41
-
 42
42
-
 43
43
-
 44
44
-
 45
45
-
 46
46
-
 47
47
-
 48
48
-
 49
49
-
 50
50
-
 51
51
-
 52
52
-
 53
53
-
 54
54
-
 55
55
-
 56
56
-
 57
57
-
 58
58
-
 59
59
-
 60
60
-
 61
61
-
 62
62
-
 63
63
-
 64
64
-
 65
65
-
 66
66
-
 67
67
-
 68
68
-
 69
69
-
 70
70
-
 71
71
-
 72
72
-
 73
73
-
 74
74
-
 75
75
-
 76
76
-
 77
77
-
 78
78
-
 79
79
-
 80
80
-
 81
81
-
 82
82
-
 83
83
-
 84
84
-
 85
85
-
 86
86
-
 87
87
-
 88
88
-
 89
89
-
 90
90
-
 91
91
-
 92
92
-
 93
93
-
 94
94
-
 95
95
-
 96
96
-
 97
97
-
 98
98
-
 99
99
-
 100
100
-
 101
101
-
 102
102
-
 103
103
-
 104
104
-
 105
105
-
 106
106
-
 107
107
-
 108
108
-
 109
109
-
 110
110
-
 111
111
-
 112
112
-
 113
113
-
 114
114
-
 115
115
-
 116
116
-
 117
117
-
 118
118
-
 119
119
-
 120
120
-
 121
121
-
 122
122
-
 123
123
-
 124
124
-
 125
125
-
 126
126
-
 127
127
-
 128
128
-
 129
129
-
 130
130
-
 131
131
-
 132
132
-
 133
133
-
 134
134
-
 135
135
-
 136
136
-
 137
137
-
 138
138
-
 139
139
-
 140
140
-
 141
141
-
 142
142
-
 143
143
-
 144
144
-
 145
145
-
 146
146
-
 147
147
-
 148
148
-
 149
149
-
 150
150
-
 151
151
-
 152
152
-
 153
153
-
 154
154
-
 155
155
-
 156
156
-
 157
157
-
 158
158
-
 159
159
-
 160
160
-
 161
161
-
 162
162
-
 163
163
-
 164
164
-
 165
165
-
 166
166
-
 167
167
-
 168
168
-
 169
169
-
 170
170
-
 171
171
-
 172
172
-
 173
173
-
 174
174
-
 175
175


på andra språk
- italiano: Ignis TGA 2300 Guida utente
- slovenčina: Ignis TGA 2300 Užívateľská príručka
- Deutsch: Ignis TGA 2300 Benutzerhandbuch
- português: Ignis TGA 2300 Guia de usuario
- français: Ignis TGA 2300 Mode d'emploi
- dansk: Ignis TGA 2300 Brugervejledning
- română: Ignis TGA 2300 Manualul utilizatorului
Relaterade papper
Andra dokument
-
Whirlpool ACO 053 Användarguide
-
Indesit WTM 1722 V IX Användarguide
-
Whirlpool WV 0800 A+W Användarguide
-
Whirlpool ARC 103 AP Användarguide
-
-
-
Whirlpool WMT502 Användarguide
-
Whirlpool ARC 104/1/A+ Användarguide
-
LADEN WM 1550 A+S Användarguide
-