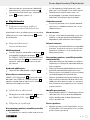
Parkside PABS 10.8 C2 Bruksanvisning
- Kategori
- Kraftövningar
- Typ
- Bruksanvisning
Denna manual är också lämplig för

IAN 102653
CORDLESS DRILL PABS 10.8 C2
AKKUPORAKONE
Käyttö- ja turvaohjeet
Alkuperäisen käyttöohjeen käännös
CORDLESS DRILL
Operation and Safety Notes
Translation of original operation manual
AKKU BORE- OG SKRUEMASKINE
Brugs- og sikkerhedsanvisninger
Oversættelse af den originale driftsvejledning
SLADDLÖS BORRSKRUVDRAG ARE
Bruksanvisning och säkerhetsanvisningar
Översättning av bruksanvisning i original
ACCU-SCHROEFBOORMACHINE
Bedienings- en veiligheidsinstructies
Vertaling van de originele gebruiksaanwijzing
AKKU-BOHRSCHRAUBER
Bedienungs- und Sicherheitshinweise
Originalbetriebsanleitung

Before reading, unfold the page containing the illustrations and familiarise yourself with all functions of the
device.
Käännä ennen lukemista kuvallinen sivu esiin ja tutustu seuraavaksi laitteen kaikkiin toimintoihin.
Vik ut bildsidan och ha den till hands när du läser igenom anvisningarna och gör dig bekant med
apparatens / maskinens funktioner.
Før du læser, vend siden med billeder frem og bliv bekendt med alle apparatets funktioner.
Vouw vóór het lezen de pagina met de afbeeldingen open en maak u vertrouwd met alle functies van het
apparaat.
Klappen Sie vor dem Lesen die Seite mit den Abbildungen aus und machen Sie sich anschließend mit allen
Funktionen des Gerätes vertraut.
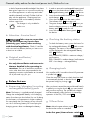
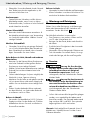
GB / IE Operation and Safety Notes Page 5
FI Käyttö- ja turvaohjeet Sivu 15
SE Bruksanvisning och säkerhetsanvisningar Sidan 25
DK Brugs- og sikkerhedsanvisninger Side 35
NL Bedienings- en veiligheidsinstructies Pagina 45
DE / AT / CH Bedienungs- und Sicherheitshinweise Seite 55

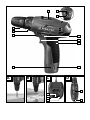
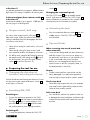
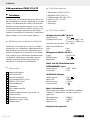
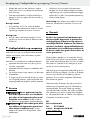
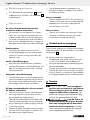
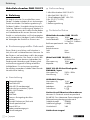
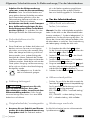
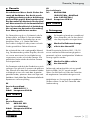
A B C
D
1
2
12
14
1
8
11
9
6
7
4
3
2
10
13
5


5 GB/IE
Table of contents
Introduction
Intended purpose ................................................................................................................................ Page 6
Equipment Components ......................................................................................................................Page 6
Items supplied ......................................................................................................................................Page 6
Technical Data ....................................................................................................................................Page 6
General safety advice for electrical power tools
1. Workplace safety ...........................................................................................................................Page 7
2. Electrical safety ............................................................................................................................... Page 7
3. Personal safety ................................................................................................................................Page 8
4. Careful handling and use of electrical power tools .....................................................................Page 8
5. Use and handling of the cordless electrical power tool ..............................................................Page 9
6. Service .............................................................................................................................................Page 9
Safety advice relating to cordless drill drivers ..................................................................................Page 9
Safety notices for chargers ................................................................................................................. Page 9
Attention - Service lines! ......................................................................................................................Page 10
Original ancillaries / accessories .......................................................................................................Page 10
Before first use
Removing / charging / inserting rechargeable battery pack ............................................................Page 10
Checking the battery status ................................................................................................................Page 10
Changing tools .................................................................................................................................... Page 10
2 Gear Drive .......................................................................................................................................Page 10
Torque control / drill step .................................................................................................................... Page 11
Preparing the tool for use
Changing the direction of rotation / unlocking the device ...............................................................Page 11
Switching On / Off .............................................................................................................................. Page 11
Activating the lock ...............................................................................................................................Page 11
Tips and Tricks ..................................................................................................................................... Page 11
Cleaning and Maintenance ..............................................................................................Page 12
Service ...............................................................................................................................................Page 12
Warranty ......................................................................................................................................... Page 12
Disposal ............................................................................................................................................Page 13
Translation of the original declaration of conformity /
Manufacturer ............................................................................................................................... Page 13

6 GB/IE
Introduction
Cordless drill PABS 10.8 C2
Introduction
We congratulate you on the purchase of your new
device. You have chosen a high quality product. The
instructions for use are part of the product. They
contain important information concerning safety,
use and disposal. Before using the product, please
familiarise yourself with all of the safety information
and instructions for use. Only use the unit as de
scribed
and for the specified applications. If you pass the
product on to anyone else, please ensure that you
also pass on all the documentation with it.
Intended purpose
This appliance is designed for drilling and screwing
into wood, plastic and metal. Use the appliance only
as described and only for the purposes indicated.
Any other uses, and modifications to the appliance,
are deemed to be improper usage and may result
in serious physical injury. The manufacturer accepts
no responsibility for damage(s) resulting from
improper usage. The appliance is not intended for
commercial use.
Equipment Components
1
Gear selector switch
2
Button for rechargeable battery LED
3
Rechargeable battery LED (status indication)
4
Direction of rotation switch/lock
5
ON / OFF switch
6
Soft-grip
7
Battery pack
8
Battery unlocking button
9
Light
10
Torque control / drill step
11
Quick-action drill chuck
12
Status LED red
13
Battery charge status indicator green
14
Fast charger
Items supplied
1 Cordless drill PABS 10.8 C2
1 Rechargeable battery pack PABS 10.8 C2-1
1 Fast charger PABS 10.8 C2-2
2 Bits (S2 PZ1, S2 PZ2)
1 Carry case
1 Directions for use
Technical Data
Cordless Drill PABS 10.8 C2:
Nominal voltage: 10.8 V
Idle-running speed: 1st gear: 0–400 min
-1
2nd gear: 0–1300 min
-1
Drill chuck
clamping range: max. 10 mm
Maximum
drill diameter:
Steel: 8 mm
Wood: 20 mm
Battery pack PABS 10.8 C2-1:
Type: LITHIUM-ION
Nom. voltage: 10.8 V
Capacity: 1300 mAh
PABS 10.8 C2-2 Fast Charger:
INPUT
Nominal voltage: 230 V∼ 50 Hz
Nominal power: 27 W
OUTPUT
Nominal voltage: 12.6 V
Charging current 1500 mA
Charging time: approx. 60 min
Protection class: II /
Noise / vibration data:
Measured values for noise are determined in accord-
ance with EN 60745. The A-weighted noise level
of the electrical power tool are typically:
Sound pressure level: 70 dB(A)
Sound power level: 81 dB(A)
Uncertainty K: 3 dB

7 GB/IE
Introduction / General safety advice for electrical power tools
Wear ear protection!
Total vibration (vector sum of three directions) is
calculated in accordance with EN 60745:
Drilling in metal: Vibration emission value
a
h
< 2.5 m / s
2
,
uncertainty K = 1.5 m / s
2
,
Screwing: Vibration emission value
a
h
< 2.5 m / s
2
,
uncertainty K = 1.5 m / s
2
.
The vibration level specified in
these instructions was measured in accordance with
an EN 60745 standardised measurement process
and can be used to compare equipment. The vibra-
tion emission value specified can also serve as a
preliminary assessment of the exposure.
The vibration level will change according to the ap-
plication of the electrical tool an in some cases may
exceed the value specified in these instructions. Re-
gularly using the electric tool in such a way may
make it easy to underestimate the vibration.
Note: If you wish to make an accurate assessment
of the vibration loads experienced during a particular
period of working, you should also take into account
the intervening periods of time when the device is
switched off or is running but is not actually in use.
This can result in a much lower vibration load over
the whole of the period of working.
General safety advice for
electrical power tools
Read
all the safety advice
and instructions! Failure
to observe the safety advice and instructions may
result in electric shock, fire and / or serious injury.
Keep all the safety advice and instructions
in a safe place for future reference!
The term “electrical tool” used in the safety advice
refers to electrical tools powered by mains electricity
(by means of a mains lead) and electrical tools pow-
ered by rechargeable batteries (without a mains lead).
1. Workplace safety
a) K
eep your working area clean and wel
l
lit. Untidy or poorly lit working areas can lead
to accidents.
b) Do not work with the device in poten-
tially explosive environments in which
there are inflammable liquids, gases o
r
dusts. Electrical power tools create sparks,
which can ignite dusts or fumes.
c) Keep children and other people away
while you are operating the electrical
tool. Distractions can cause you to lose con-
trol of the device.
2. Electrical safety
a) The mains plug on the power tool (or
on the power supply) must fit the
mains
socket. Never modify the plug in any
way. Never use adapter plugs with
earthed power tools. Unmodified plugs
and the correct sockets reduce the risk of elec-
tric shock.
b) Avoid touching earthed surfaces such
as pipes, radiators, ovens and refrig-
erators with any part of your body.
There is an increased risk of electric shock if
your body is earthed.
c) Keep the device away from rain or
moisture. Water entering an electrical device
increases the risk of electric shock.
d) Do not use the mains lead for any pur-
pose for which it was not intended, e.
g.
to carry the device, to hang up the de-
vice or to pull the mains plug out of
the mains socket. Keep the mains lead
away from heat, oil, sharp edges or
moving parts of the device. Damaged or
tangled mains leads increase the risk of elec-
tric shock.
e) When working outdoors with an elec-
trical power tool always use extension

8 GB/IE
cables that are also approved for use
outdoors. The use of an extension cable suit-
able for outdoor use reduces the risk of elec-
tric shock.
f) Use a residual current device (RCD) for
protection if operating the electrical
power tool in a moist environment is
unavoidable. The use of an RCD reduces
the risk of electric shock.
3. Personal safety
a) Remain alert at all times, watch what
you are doing and always proceed
with caution. Do not use the device if
you are tired or under the influence of
drugs, alcohol or medication. One mo
ment
of carelessness when using the device can lead
to serious injury.
b) Wear personal protective equipment
and always wear safety glasses. The
wearing of personal protective equipment such
as dust masks, non-slip safety shoes, safety hel-
mets or ear protectors, appropriate to the type
of electrical power tool used and work under-
taken, reduces the risk of injury.
c) Avoid accidental starting. Verify the po-
wer tool is switched off before connec-
ting it to the mains and / or connecting
the battery, picking it up, or carrying it.
Accidents can happen if you carry the device
with your finger on the ON / OFF switch or with
the device switched on.
d) Remove any setting tools or spanners
before you switch the device on. A tool
or spanner left attached to a rotating part of a
device can lead to injury.
e) Avoid placing your body in an unnat-
ural position. Keep proper footing and
balance at all times. By doing this you will
be in a better position to control the device in
unforeseen circumstances.
f) Wear suitable clothing. Do not wear
loose clothing or jewellery. Keep your
hair, clothing and gloves clear of mov-
ing parts. Loose clothing, jewellery or long
hair can become trapped in moving parts.
g) If vacuum dust extraction and collection
devices are fitted do not forget to
check
that they are properly connected and
correctly used. The use of these devices
reduces the hazard presented by dust.
4. Careful handling and use
of electrical power tools
a) Do not overload the device. Always
use an electrical power tool that is
intended for the task you are under-
taking. By using the right electrical power
tool for the job you will work more safely and
achieve a better result.
b) Do not use an electrical power tool if
its switch is defective. An electrical power
tool that can no longer be switched on and off
is dangerous and must be repaired.
c) Pull the mains plug out of the socket
and / or remove the rechargeable bat-
tery before you make any adjustments
to the device, change accessories or
when the device is put away. This pre-
caution is intended to prevent the device from
unintentionally starting.
d) When not in use always ensure that
electrical power tools are kept out of
reach of children. Do not let anyone
use
the device if he or she is not familiar
with it or has not read the instructions
and advice. Electrical power tools are dan-
gerous when they are used by inexperienced
people.
e) Look after the device carefully. Check
that moving parts are working prop-
erly and move freely. Check for any
parts that are broken or damaged
enough to detrimentally affect the
functioning of the device. Have dam-
aged parts repaired before you use
the device. Many accidents have their origins
in poorly maintained electrical power tools.
f) Keep cutting tools clean and sharp.
Carefully maintained cutting tools with sharp
cutting edges are less likely to jam and are
easier to control.
General safety advice for electrical power tools General safety advice for electrical power tools

9 GB/IE
General safety advice for electrical power tools
g) Use the electrical power tool, accesso-
ries, inserted tools etc. in accordance
with these instructions and advice, and
the stipulations drawn up for this par-
ticular type of device. In doing this, take
into account the working conditions
and the task in hand. The use of electrical
power tools for purposes other than those in-
tended can lead to dangerous situations.
5. Use and handling of the cord-
less electrical power tool
a) Charge a rechargeable battery unit
using only the charger recommended
by the manufacturer. Chargers are often
designed for a particular type of rechargeable
battery unit. There is the danger of fire if other
types of rechargeable battery units are used.
b) Only the rechargeable battery units
supplied are to be used with an elec-
trical power tool. The use of other recharge-
able battery units may lead to the danger of
injury or fire.
c) When they are not being used, store
rechargeable battery units away from
paperclips, coins, keys. nails, screws
or other small metal objects that could
cause the contacts to be bridged. Short-
circuiting the contacts of a rechargeable battery
unit may result in heat damage or fire.
d) Fluids may leak out of rechargeable
battery units if they are misused. If this
happens, avoid contact with the fluid.
If contact occurs, flush the affected area
with water. Seek additional medical
help if any of the fluid gets into your
eyes. Escaping battery fluid may cause skin
irritation or burns.
CAUTION! DANGER OF EXPLOSION!
The batteries must never be recharged!
6. Service
a) Have your device repaired at the ser-
vice centre or by qualified specialist
personnel using original manufacturer
parts only. This will ensure that your device
remains safe to use.
Safety advice relating
to cordless drill drivers
The inserted tool may
strike concealed electricity cables,
therefore when working you must
hold the electrical power tool by the
insulated handle areas only. Contact
with a live wire means that the metal parts of
the electrical power tools may become live and
this can result in an electric shock.
Securely support the workpiece.
A workpiece held in a clamp or vice is kept more
securely in place than one held by your hand.
POISONOUS DUSTS!
Harmful / noxious dusts generated from your
work represent a risk to the health of the person
operating the device and to anyone near the
work area.
Wear safety glasses and a dust mask!
Do not drill any material containing
asbestos. Asbestos is a known carcinogen.
Hold the electrical power tool firmly.
High reaction torques may occur momentarily
during tightening or loosening of screws.
If the inserted tool jams, switch off the
electrical power tool immediately. Be
prepared for high reaction torques as they may
cause kickback. The inserted tool may jam if
the electrical power tool is overloaded or is
held at an angle to the workpiece.
Before you carry out any tasks on the
device, transport or store it, make sure
that the direction of rotation switch is
in the middle position (lock). To prevent
the device from starting up unintentionally.
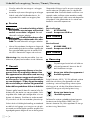
Safety notices for chargers
This appliance can be used by children aged
from 8 years and above and persons with re-
duced physical, sensory or mental capabilities
General safety advice for electrical power tools

10 GB/IE
or lack of experience and knowledge if they have
been given supervision or instruction concerning
use of the appliance in a safe way and under-
stand the hazards involved. Children shall not
play with the appliance. Cleaning and user
maintenance shall not be made by children
without supervision.
The charger is only suitable for
indoor use.
Attention - Service lines!
Take steps to ensure that
you do not hit upon any service lines
(electricity, gas, water) when working
with electrical appliances. Check, if need be
with a service line detector, before you start to cut
or bore into a surface.
Original ancillaries /
accessories
Use only the ancillaries and accessories
that are detailed in the operating in-
structions. The use of ancillaries and acces-
sories other than those recommended in the
operating instructions could lead to an increased
risk of personal injury for you.
Before first use
Removing / charging / inserting
rechargeable battery pack
Note: The battery is supplied partially charged.
Charge the rechargeable battery in the charging
station for at least one hour before first use. By doing
this the battery will operate at its highest capacity.
You can charge the Li-Ion battery at any time with-
out risk of shortening battery life. Interrupting the
charging process does not damage the battery.
1. In order to remove the rechargeable battery pack
7
, press the release buttons
8
and take the
rechargeable battery pack
7
out of the device.
2. Insert the rechargeable battery pack
7
into the
quick-charger
14
.
3. Insert the mains plug into the mains socket.
The indicator LED
12
illuminates red.
4. The green charge indicator LED
13
shows you
that the charging process is complete and the
battery pack
7
is ready for use.
5. Insert the rechargeable battery pack
7
into
the device.
Checking the battery status
To check the battery status, press the button for
the rechargeable battery LED
2
(refer to main
diagram). The status or the remaining power
will be displayed in the rechargeable battery
LED
3
as follows:
RED / ORANGE / GREEN = maximum charge /
performance
RED / ORANGE = medium charge / performance
RED = low charge – recharge battery
Changing tools
Your cordless drill / screwdriver has a fully automat-
ic spindle lock
.
Once the motor has come to a halt, the drive shaft
is automatically locked, so that the chuck
11
can
be opened simply by turning it
.
After you have inserted the required bit and fixed it
in place by turning the chuck
, you can immedi-
ately continue working. The spindle lock releases
itself automatically when the motor is started (by
operation of the ON / OFF switch
5
).
2 Gear Drive
Note: Move the gear selector switch
1
only after
the device has come to a standstill.
In the first gear (Gear selector switch
1
General safety advice for electrical power tools / Before first use Before first use / Preparing the tool for use

11 GB/IE
in Position: 1)
you achieve a speed of up to approx. 400 rpm and a
high torque. This setting is suitable for all screwing tasks.
In the second gear (Gear selector switch
1
in Position: 2)
It achieves a speed of up to approx. 1300 rpm, for
the carrying out of drilling tasks.
Torque control / drill step
You can use the torque control / drill step
10
to
adjust the torque. When the value of the torque
setting is reached, the clutch disengages the drive
connection to the chuck.
Select a low setting for small screws, soft work
material.
Select a high setting for large screws, hard
work materials and for the extraction of screws.
For drilling work, select the drill setting by putting
the torque control / drill setting into the
position.
For drilling tasks, also push the gear selector
switch
1
to the front (Position: 2).
Preparing the tool for use
Changing the direction of
rotation / unlocking the device
Unlock the device and change the direction of rota-
tion by pressing the rotational direction switch
4
to the right or to the left.
Switching ON / OFF
Switching on:
To start the appliance squeeze on the ON /
OFF switch
5
and then keep it pressed down.
The light
9
comes on with a slightly or fully
pressed ON / OFF switch
5
and illuminates
the working area in poor lighting conditions.
Switching off:
To stop the appliance, release the ON / OFF
switch
5
.
Changing the rotational speed:
The ON / OFF switch
5
has a variable speed
control. Light pressure on the ON / OFF switch
5
causes the device to operate at a low speed. In-
creasing the pressure increases the speed.
Activating the lock
Press the rotational direction switch
4
into the
middle position. The ON / OFF switch
5
is
now blocked.
Tips and Tricks
When screwing into wood, metal and
other materials:
Screw bits are designated with their dimensions
and their shape. If you are unsure, always try
the particular screw bit out to see whether it sits
in the screw head without any free play.
Before you use the appliance, check to see
that the screw or drill bit is properly fitted, i.e.
located centrally in the chuck.
Torque:
Smaller screws and bits in particular can be
easily damaged if you adjust the appliance
with too high a torque and/or rotation speed.
Hard screw bed:
Particularly high torques can occur, for example
with metal screws tightened by socket tool bits.
Select a lower rotation speed.
Soft screw bed:
You should also select a low speed in order not
to damage the wood workpiece surface through
contact with the metal screw head. Use a coun-
tersinker.
Before first use / Preparing the tool for use

When drilling into wood, metal and other
materials:
With small diameter drill bits use a high drill
speed. For large diameter drill bits, use a low
drill speed.
For hard materials, select a low drill speed.
For soft materials, select a high drill speed.
Secure or fix down the workpiece (if possible)
in a clamp or vice.
Mark the intended position of the hole with a
centre punch or a nail and select a low drill speed
for drilling.
Take the rotating drill bit out of the hole frequently
so that swarf or drill dust can be re-moved and
the hole and tool is ventilated.
Drilling in metal:
Use a metal drill bit (HSS). For the best results,
you should cool the bit with oil. Metal drill bits
can also be used to drill into plastic.
Drilling in wood:
Normally you should use a wood drill with a
centring point. You can screw small screws into
soft wood without the need for pre-drilling.
Cleaning and Maintenance
Pull the mains plug out of the mains socket and re-
move the rechargeable battery pack
7
every time
before you clean or maintain the device.
The Cordless Drill / Screwdriver is maintenance-free.
Always keep the device clean, dry and free of
oil or grease.
Clean the device immediately after you have
finished using it.
Do not allow any liquids to enter the device.
Use a cloth to clean the housing.
Never use petrol, solvents or cleaning agents
that might attack plastic.
Service
Have your device repaired
at the service centre or by qualified
specialist personnel using original
manufacturer parts only. This will ensure
that your device remains safe to use.
If the plug or lead needs
to be replaced, always have the
replacement carried out by the manu-
facturer or its service centre. This will
ensure that your device remains safe to use.
When storing a lithium-ion battery for extended
periods, regularly check the charge. The optimal
charge is between 50 % and 80 %. The optimal
storage climate is cooling and dry.
Note: Spare parts not listed (e.g. carbon brushes,
switches) can be ordered through our call centre.
Warranty
The warranty for this appliance is for 3
years from the date of purchase. The ap-
pliance has been manufactured with care
and meticulously examined before deliv-
ery. Please retain your receipt as proof
of purchase. In the event of a warranty
claim, please make contact by telephone
with our Service Department. Only in this
way can a post-free despatch for your
goods be assured.
The warranty covers only claims for material and
maufacturing defects, but not for transport damage,
for wearing parts or for damage to fragile compo-
nents, e.g. buttons or batteries. This product is for pri-
vate use only and is not intended for commercial use.
The warranty is void in the case of abusive and im-
proper handling, use of force and internal tampering
not carried out by our authorized service branch. Your
statutory rights are not restricted in any way by this
warranty.
The warranty period will not be extended by repairs
made unter warranty. This applies also to replaced
and repaired parts. Any damage and defects extant
on purchase must be reported immediately after
unpacking the appliance, at the latest, two days after
Preparing the tool for use / Cleaning and Maintenance / Service / Warranty … / Disposal / Translation of the original declaration of conformity / Manufacturer

13 GB/IE
the purchase date. Repairs made after the expiration
of the warranty period are subject to payment.
GB
Service Great Britain
Tel.: 0871 5000 720
(0.10 GBP/Min.)
e-mail: kom[email protected]
IAN 102653
IE
Service Ireland
Tel: 1890 930 034
(0.08 EUR/Min. (peak)
0.06 EUR/Min. (off peak))
e-mail: kom[email protected]
IAN 102653
Disposal
The packaging comprises exclusively en-
vironmentally-friendly material. Dispose
of it in your local recycling containers.
Do not dispose of electrical appli-
ances with your domestic waste!
According to the European Directive 2012 / 19 / EU,
concerning used electrical and electronic appliances
and its implementation in national law, superannuated
electrical appliances must be collected and disposed
of via an environmentally suitable recycling facility.
Li-Ion
Do not dispose of rechargeable
batteries with your household
refuse!
Defective or worn out rechargeable batteries must
be recycled according to Directive 2006 / 66 / EC.
Dispose of batteries and appliances over the existing
collection facilities.
Your local communal or municipal authorities can
provide information on how to dispose of the worn
out appliance.
Translation of the original
declaration of conformity /
Manufacturer
We, KOMPERNASS HANDELS GMBH, the person
responsible for documents: Mr Semi Uguzlu, BURG-
STRASSE 21, 44867 BOCHUM, GERMANY, hereby
declare that this product complies with the following
standards, normative documents and EU directives:
Machinery Directive
(2006 / 42 / EC)
EU Low Voltage Directive
(2006 / 95 / EC)
Electromagnetic Compatibility
(2004 / 108 / EC)
RoHS Directive
(2011 / 65 / EU)
Applicable harmonized standards
EN 60745-1/A11:2010, EN 60745-2-1:2010
EN 60745-2-2:2010
EN 55014-1/A2:2011, EN 55014-2/A2:2008
EN 60335-2-29/A2:2010, EN 60335-1:2012
EN 62233:2008
EN 61000-3-2/A2:2009, EN 61000-3-3:2008
Type / Appliance Designation:
Cordless drill PABS 10.8 C2
Date of manufacture (DOM): 06–2014
Serial number: IAN 102653
Bochum, 30.06.2014
Semi Uguzlu
- Quality Manager -
We reserve the right to make technical modifica-
tions in the course of further development.
Preparing the tool for use / Cleaning and Maintenance / Service / Warranty … / Disposal / Translation of the original declaration of conformity / Manufacturer

14

15 FI
Sisällysluettelo
Johdanto
Määräystenmukainen käyttö ............................................................................................................... Sivu 16
Varustelu ............................................................................................................................................... Sivu 16
Toimituslaajuus ..................................................................................................................................... Sivu 16
Tekniset tiedot ....................................................................................................................................... Sivu 16
Sähkötyökaluja koskevat yleiset turvaohjeet
1. Työpaikkaturvallisuus....................................................................................................................... Sivu 17
2. Sähköturvallisuus ............................................................................................................................. Sivu 17
3. Henkilöiden turvallisuus ................................................................................................................... Sivu 18
4. Sähkötyökalujen huolellinen käsittely ja käyttö ............................................................................. Sivu 18
5. Akkutyökalun käyttö ja käsittely ..................................................................................................... Sivu 19
6. Huolto ............................................................................................................................................... Sivu 19
Akkukäyttöisen porakoneen turvaohjeet ............................................................................................ Sivu 19
Latureita koskevat turvallisuusohjeet ................................................................................................... Sivu 19
Huomio johdot! .................................................................................................................................... Sivu 19
Alkuperäiset tarvikkeet / lisälaitteet ..................................................................................................... Sivu 20
Ennen käyttöönottoa
Akkupaketin poisto / lataus / paikoilleenasetus .................................................................................. Sivu 20
Akun lataustilan tarkistus ..................................................................................................................... Sivu 20
Työkalujen vaihtaminen ....................................................................................................................... Sivu 20
2-vaiheinen voimansiirto ...................................................................................................................... Sivu 20
Esivalinta vääntömomentti / porausporras ......................................................................................... Sivu 20
Käyttöönotto
Pyörimissuunnan vaihto / laitteen avaus lukituksesta ......................................................................... Sivu 21
Käynnistäminen / sammuttaminen ....................................................................................................... Sivu 21
Lukituksen aktivointi .............................................................................................................................. Sivu 21
Ohjeita ja vinkkejä ............................................................................................................................... Sivu 21
Huolto ja puhdistus .................................................................................................................. Sivu 22
Huolto.................................................................................................................................................. Sivu 22
Takuu ................................................................................................................................................... Sivu 22
Hävittäminen ................................................................................................................................ Sivu 22
Käännös alkuperäisestä EY-
vaatimustenmukaisuusvakuutuksesta / Valmistajan ................................ Sivu 23

16 FI
Johdanto
Akkuporakone PABS 10.8 C2
Q
Johdanto
Onnittelemme sinua hyvästä valinnastasi! Valitsit erit-
täin korkealaatuisen tuotteen. Käyttöohje on osa tätä
tuotetta. Se sisältää tärkeitä turvallisuusohjeita sekä
käyttöä ja hävitystä koskevia ohjeita. Tutustu ennen
tuotteen käyttöä huolellisesti kaikkiin käyttöja turval-
lisuusohjeisiin. Käytä tuotetta ainoastaan ohjeen
mukaan ja siinä mainittuihin tarkoituksiin. Anna kaikki
ohjeet mukaan, jos luovutat tuotteen edelleen.
Q
Määräystenmukainen käyttö
Tämä laite on tarkoitettu puun, muovin ja metallin
poraamiseen ja ruuvaamiseen. Käytä laitetta kuva-
tulla tavalla ja vain mainittuihin käyttötarkoituksiin.
Laitteen muu käyttö tai muuntaminen ei ole määrä-
ysten mukaista ja voi aiheuttaa huomattavan tapa-
turmavaaran. Valmistaja ei ota mitään vastuuta
määräystenvastaisesta käytöstä aiheutuneista
vahingoista. Ei tarkoitettu ammattikäyttöön.
Q
Varustelu
1
Vaiheenvalintakytkin
2
Painike Akku-LED
3
Akku-LED (tilanäyttö)
4
Suunnanvaihtokytkin / lukitus
5
PÄÄLLE- / POIS -kytkin
6
Pehmeä kädensija
7
Akkupaketti
8
Akun vapautuspainike
9
Valaistus
10
Esivalinta vääntömomentti / porausporras
11
Pikaporaistukka
12
LED-merkkivalo punainen
13
Varaustason näyttö vihreä
14
Pikalatauslaite
Q
Toimituslaajuus
1 Akkuporakone PABS 10.8 C2
1 Akkupaktti PABS 10.8 C2-1
1 Pikalatauslaite PABS 10.8 C2-2
2 Kärkiä (S2 PZ1, S2 PZ2)
1 Kantolaukku
1 Käyttöohje
Q
Tekniset tiedot
Akkuporakone PABS 10.8 C2:
Nimellisjännite: 10,8 V
Tyhjäkäyntikierrosluku: 1. Porras: 0–400 r / min
2. Porras: 0–1300 r / min
Poraistukan kiinnitysalue: max. 10 mm
Maksimi porahalkaisija:
Teräs: 8 mm
Puu: 20 mm
Akkupaketti PABS 10.8 C2-1:
Tyyppi: LITIUM-IONI
Nimellisjännite: 10,8 V
Kapasiteetti: 1300 mAh
PABS 10.8 C2-2 Pikalatauslaite:
SISÄÄNMENO / Input:
Nimellisjännite: 230 V
~
50 Hz
Nimellisteho: 27 W
ULOSTULO / Output:
Nimellisjännite: 12,6 V
Latausvirta: 1500 mA
Latauksen kesto: n. 60 min
Suojausluokka: II /
Melu- / tärinätiedot:
Melun mittausarvo laskettu EN 60745 standardin
mukaisesti. Sähkötyökalun A-mitattu melutaso on
tyypillisesti:
Äänenpainetaso: 70 dB(A)
Äänitehotaso: 81 dB(A)
Epävarmuus K: 3 dB
Käytä kuulosuojaimia!
Johdanto / Sähkötyökaluja koskevat yleiset turvaohjeet

17 FI
Johdanto / Sähkötyökaluja koskevat yleiset turvaohjeet
Värähtelyn kokonaisarvot (kolmen suunnan vektori-
summa) määritetty normin EN 60745 mukaan:
Metallia poratessa: Värähtelyemissioarvo
a
h
< 2,5 m / s
2
,
epävarmuus
K = 1,5 m / s
2
.
Ruuvatessa: Värähtelyemissioarvo
a
h
< 2,5 m / s
2
,
epävarmuus
K = 1,5 m / s
2
.
Näissä ohjeissa ilmoitettu vä-
rähtelytaso on määritetty EN 60745 -standardissa
normitetulla mittausmenetelmällä ja sitä voidaan käyt-
tää laitevertailussa. Mainittua värähtelyarvoa void-
aan käyttää myös altistumisen alustavaan arviointiin.
Värähtelytaso muuttuu sähkötyökalun käytön mu
kaan
ja se saattaa joissakin tapauksissa ylittää tässä oh-
jeessa mainitun arvon. Värähtelyrasitusta saatetaan
aliarvioida, jos sähkötyökalua käytetään säännölli-
sesti tällä tavalla.
Huomio: Liikekuormituksen arvioimiseksi tietyn
työajan kestäessä on huomioitava myös ajat, jolloin
laite on sammutettuna, tai ajat, jolloin laite on käyn-
nissä, mutta ei työkäytössä. Tämä saattaa vähentää
merkittävästi liikerasitusta kokonaistyöskentelyajan
kestäessä.
Sähkötyökaluja koskevat
yleiset turvaohjeet
Lue
kaikki turva- ja muut
ohjeet! Turva- ja muiden
ohjeiden laiminlyönti voi aiheuttaa sähköiskun, tuli-
palon ja / tai vakavia loukkaantumisia.
Säilytä kaikki turva- ja muut ohjeet tulevaa
tarvetta varten!
T
urvallisuusohjeissa käytetty käsite „sähkötyökalu“ ko
s-
kee verkkokäyttöisiä sähkötyökoneita (verkkojohdol-
la) ja akkukäyttösisiä sähkötyökoneita (ilman johtoa).
1. Työpaikkaturvallisuus
a) Pidä työskentelypaikka puhtaana ja
hyvin valaistuna. Epäjärjestys ja huono
valaistus voivat johtaa tapaturmiin.
b) Älä käytä laitetta räjähdysvaaralli-
sessa ympäristössä, jossa säilytetään
helposti syttyviä nesteitä, kaasuja tai
jossa kehittyy pölyä. Sähkötyökalut kehit-
tävät kipinöintiä, joka voi sytyttää pölyn tai
höyryn.
c) Lapsien ja asiattomien henkilöiden
läsnäolo työpaikalla laitteen ollessa
käynnissä ei ole sallittua. Voit helposti
menettää kontrollin laitteeseen.
2. Sähköturvallisuus
a) Sähkötyökalun pistokkeen (tai verk-
kolaitteen) täytyy sopia pistorasiaan.
Pistoketta ei saa muuttaa millään ta-
valla. Älä käytä adapteria yhdessä
suojamaadoitettujen laitteiden kanssa.
Alkuperäinen pistoke ja sopivat pistorasiat vä-
hentävät sähköiskuvaaraa.
b) Vältä kosketusta maadoitettuihin pin-
toihin, kuten putkiin, lämpöpatterei
hin,
liesiin sekä jääkaappeihin. Vaarana on
saada sähköisku, jos kehosi on maadoitettu.
c)
Älä pidä laitetta sateessa tai muussa
kosteudessa. Veden pääsy laitteeseen lisää
sähköisku vaaraa.
d) Älä kanna laitetta riiputtamalla sitä
kaapelista ja vedä kaapeli irti pistora-
siasta pitämällä kiinni pistokkeesta.
Älä jätä kaapelia kuumaan paikkaan,
älä päästä siihen öljyä, varo teräviä
reunoja sekä laitteen pyöriviä osia. Vi-
alliset tai kietoutuneet kaapelit lisäävät riskiä
saada sähköisku.
e) Jos työskentelet ulkotiloissa, käytä
silloin jatkokaapelia, jonka käyttö on
sallittu myös ulkotilaan. Ulkotilaan sovel-
tuva kaapeli vähentää riskiä saada sähköisku.
f) Jos sähkötyökalua joudutaan käyttä-
mään kosteassa ympäristössä, on

18 FI
Sähkötyökaluja koskevat yleiset turvaohjeet
käytettävä vikavirtakytkintä. Vikavirta-
kytkimen käyttö pienentää sähköiskun vaaraa.
3. Henkilöiden turvallisuus
a) Ole aina tarkkaavainen, tarkista aina,
mitä teet ja toimi järkevästi sähkölait-
teilla työskennellessäsi. Älä käytä
laitetta, jos olet väsynyt, käyttänyt
huumeita, alkoholia tai lääkkeitä.
Epätarkkaavaisuus laitetta käytettäessä voi
aiheuttaa vaikeita loukkaantumisia.
b) Käytä henkilökohtaisia turvavarustei-
ta ja suojalaseja aina. Henkilökohtaisten
turvavarusteiden käyttö, kuten pölynaamari,
turvakengät, kypärä tai kuulosuoja, vähentävät
loukkaantumisriskiä.
c) Vältä laitteen tahatonta käynnistymi-
stä. Varmista, että sähkötyökalu on
kytketty pois päältä, ennen kuin liität
sen sähköverkkoon ja / tai akkuun,
nostat tai siirrät sitä. Tapaturmat ovat
mahdollisia, jos sormesi on laitetta kantaessasi
virtakytkimellä tai laite on kytketty päälle.
d) Poista kaikki työkalut ja ruuviavaimet
paikalta ennen kuin kytket laitteen.
Pyörivässä laiteosassa oleva työkalu tai avain
voi johtaa tapaturmaan.
e) Vältä työskentelemästä epätavalli-
sessa asennossa. Asetu tukevaan
asentoon ja pysyttele koko ajan tasa-
painossa. Pystyt silloin hallitsemaan laitteen
erityisesti yllättävissä tilanteissa.
f) Käytä sopivaa vaatetusta. Älä käytä
löysiä vaatteita äläkä pidä koruja.
Hiukset, vaatteet ja käsineet on pidet-
tävä etäällä liikkuvista osista. Löysät
vaatteet, korut ja avonaiset hiukset voivat jäädä
kiinni liikkuviin osiin.
g) Jos laitteeseen asennetaan pölynimu-
ri- ja lastunkeruulaite, varmistu sitä
ennen, että osat on liitetty ja niitä käy-
tetään oikein. Näiden laitteiden liittäminen
vähentää pölystä aiheutuvia vaaroja.
4. Sähkötyökalujen huolellinen
käsittely ja käyttö
a) Älä ylirasita laitetta. Käytä työssäsi
tätä työtä varten tarkoitettua sähkö-
työkalua. Sopivan sähkötyökalun kanssa
työskentelet paremmin ja varmemmin sen teho-
alueella.
b) Älä käytä mitään sähkötyökalua,
jonka käynnistyskytkin on viallinen.
Sähkötyökalu, jota ei voi enää kytkeä päälle
tai päältä, on vaarallinen ja se on korjattava.
c) Irrota pistoke pistorasiasta ja / tai
poista akku, ennen kuin suoritat säätöjä
laitteeseen, vaihdat varaosia tai otat
laitteen käytöstä. Tämä varotoimenpide es-
tää sähkötyökalun tahattoman käynnistyksen.
d) Säilytä sähkötyökaluja silloin, kun nii-
tä ei käytetä, lasten ulottumattomissa.
Älä anna henkilöiden käyttää laitetta,
jos he eivät tunne sitä tai eivät ole lu-
keneet näitä käyttöohjeita. Sähkötyöka-
lut ovat vaarallisia, jos kokemattomat henkilöt
käyttävät niitä.
e) Hoida laitetta huolellisesti. Tarkasta,
toimivatko sen liikkuvat osat moit-
teettomasti ja että ne eivät jumitu;
tarkasta, onko joku osa katkennut tai
murtunut tai vahingoittunut niin, että
se haittaa laitteen toimintaa. Korjauta
vialliset osat aina ennen kuin käytät
laitetta. Moni tapaturma johtuu huonosti
huolletuista sähkötyökaluista.
f) Pidä terät terävinä ja puhtaina. Huolella
hoidetut leikkuuterät terävine leikkuureunoineen
eivät juutu niin helposti kiinni työkappaleeseen
ja ne toimivat kevyemmin.
g) Käytä sähkötyökaluja, lisätarvikkei-
ta, käyttötarvikkeita jne. tässä esitet-
tyjen määräysten mukaisesti ja aina
erityistä tyyppiä vastaavasti. Ota
huomioon työolosuhteet ja työ. Sähkö-
työkalujen käyttö muuhun kuin sille määrättyyn
tarkoitukseen voi aiheuttaa vaarallisia tilanteita.
Sähkötyökaluja koskevat yleiset turvaohjeet

19 FI
Sähkötyökaluja koskevat yleiset turvaohjeet
5. Akkutyökalun käyttö
ja käsittely
a) Lataa akut ainoastaan valmistajan
suosittelemilla latauslaitteilla. Tietylle
akkutyypille soveltuvaan latauslaitteeseen liittyy
syttymisvaara, jos siinä yritetään ladata muun-
tyyppisiä akkuja.
b) Käytä sähkötyökaluissa vain niille
tarkoitettuja akkuja. Muiden akkujen
käyttö
voi johtaa loukkaantumisiin ja tulipalon vaaraan.
c) Pidä käyttämätön akku loitolla klem-
mareista, kolikoista, avaimista, nau-
loista, ruuveista tai muista pienistä
metalliesineistä, jotka voivat saada
aikaan kosketusten ohituksen. Akku-
kosketusten välinen oikosulku voi johtaa palo-
vammoihin tai tulipaloon.
d) Väärän käytön yhteydessä akusta
saattaa vuotaa ulos nestettä. Vältä
koskettamasta nestettä. Jos kosketat
sitä vahingossa, huuhtele se pois ve-
dellä. Jos nestettä joutuu silmiin, käänny
lisäksi lääkärin puoleen. Vuotava akkunes-
te voi ärsyttää ihoa tai aiheuttaa palovammoja.
VAROITUS! RÄJÄHDYSVAARA!
Älä lataa
ei-ladattavia paristoja koskaan uudestaan!
6. Huolto
a) Anna laitteet huoltoliikkeen tai sähkö-
liikkeen korjattavaksi. Korjauksissa
s
aa käyttää vain alkuperäisiä varaosia
.
Laitteesi säilyy näin turvallisena.
Q
Akkukäyttöisen
porakoneen turvaohjeet
Tartu kiinni ainoastaan
eristetyistä tartuntapinnoista, kun teet
töitä, joissa työkalu saattaa osua piilos-
sa oleviin sähköjohtoihin. Jos sähkötyökalu
osuu jännitteiseen johtoon, työkalun metalliosat
muuttuvat jännitteisiksi, mikä aiheuttaa sähköiskun.
Kiinnitä työstökappale. Kiinnityslaitteilla tai
ruuvipuristimella kiinnitetty työstökappale pysyy
varmemmin paikoillaan kuin käsivoimin pideltynä.
MYRKYLLISIÄ PÖLYJÄ!
Työstön yhteydessä syntyvien haitalliset / myrkyl-
liset pölyt vaarantavat laitetta käyttävän henkilön
tai lähellä olevien henkilöiden turvallisuuden.
Käytä suojalaseja ja hengityssuojainta!
Älä työstä asbestia sisältävää materi-
aalia. Asbesti aiheuttaa syöpää
Pidä kiinni sähkötyökalusta. Ruuvien
kiristämisen ja avaamisen yhteydessä voi esiin-
tyä lyhytaikaisesti korkeita vastamomentteja.
Kytke sähkötyökalu välittömästi pois
päältä, jos työkalu lukittuu. Varaudu
suuriin vastamomentteihin, jotka aiheuttavat
takaiskun. Työkalu lukkiutuu, jos sähkötyökalu
kuormittuu liikaa tai se juuttuu kiinni työstettä-
vään kappaleeseen.
Aseta pyörimissuunnan kytkin kes-
kiasentoon (lukitus) laitteelle suoritet-
tavien töiden, laitteen kuljetuksen tai
säilytyksen ajaksi. Estät näin sähkötyökalun
tahattoman käynnistymisen.
Latureita koskevat
turvallisuusohjeet
Laitetta voivat käyttää 8 vuotta täyttäneet lapset
ja henkilöt, jotka ovat fyysisiltä tai psyykkisiltä
kyvyiltääntai aisteiltaan rajoittuneita tai joilla ei
ole kokemusta tai tietoa laitteen käytöstä, jos
he käyttävät laitettavalvonnan alaisina tai heitä
on opastettu laitteen turvallisessa käytössä ja
he ovat tietoisia laitteeseen liittyvistä vaaroista.
Lapset eivät saa leikkiä laitteella. Lapset eivät saa
puhdistaa tai huoltaa laitetta ilman valvontaa.
Laturi soveltuu vain sisäkäyttöön.
Q
Huomio johdot!
Varmista, ettet osu sähkö-,
kaasu- tai vesijohtoihin sähkötyökalulla

20 FI
Sähkötyökaluja koskevat yleiset turvaohjeet / Ennen käyttöönottoa
työskennellessäsi. Tarkasta tarvittaessa johtoil-
maisimella, ennen kuin poraat tai leikkaat seinää.
Q
Alkuperäiset tarvikkeet /
lisälaitteet
Käytä ainoastaan käyttöohjeessa
ilmoitettuja tarvikkeita ja lisälaitteita.
Muiden kuin käyttöohjeessa suositeltujen käyt-
tötyökalujen tai muiden tarvikkeiden käyttö
saattaa merkitä loukkaantumisvaaraa.
Q
Ennen käyttöönottoa
Q
Akkupaketin poisto / lataus /
paikoilleenasetus
Huomautus: Akku ei ole toimitettaessa ladattu
täyteen. Lataa akkua laturissa, mikäli mahdollista,
vähintään 1 tunti ennen ensimmäistä käyttöönottoa.
Näin takaat akun täyden tehon. Voit milloin tahansa
ladata Li-Ion-akun ilman että sen käyttöikä lyhenisi.
Latauksen keskeytys ei vahingoita akkua.
1. Kun haluat poistaa akkupaketin
7
, paina va-
pautusnappia
8
ja vedä akkupaketti
7
ulos
laitteesta.
2. Pistä akkupaketti
7
pikalaturiin
14
.
3. Kiinnitä verkkopistoke pistorasiaan. LED merkki-
valo
12
palaa punaisena.
4. Vihreä varaustason näyttö-LED
13
ilmoittaa si-
nulle, milloin lataus on päättynyt ja akkuyksikkö
on käyttövalmis
7
.
5. Työnnä akkupaketti
7
laitteeseen.
Q
Akun lataustilan tarkistus
Paina akun lataustilan tarkistamiseksi painiketta
Akku-LED
2
(katso myös suuri kuva). Lataustila
ja jäljellä oleva lataus näytetään Akku-LED
3
näytössä seuraavasti:
PUNAINEN / ORANGE / VIHREÄ = maksimi
lataus / teho
PUNAINEN / ORANGE = keskinkertainen
lataus / teho
PUNAINEN = heikko lataus – lataa akku
Q
Työkalujen vaihtaminen
Akkuporaruuvinvääntimessä on täysautomaattinen
karan lukitus
.
Moottorin seistessä voimansiirto lukitaan automaat-
tisesti niin, että voit avata pikaporanistukan
11
yksinkertaisesti kiertämällä
.
Kun olet asettanut laitteeseen haluamasi työkalun
ja kiristänyt sen poranistukkaa kiertämällä
, voit
heti jatkaa työskentelyä. Tappilukitus aukeaa
automaattisesti, kun moottori käynnistetään
(virtakytkimellä
5
).
Q
2-vaiheinen voimansiirto
Huomio: Käytä nopeudenvalitsinta
1
vain laitteen
ollessa pysähdyksissä.
Ensimmäisellä vaihteella (vaihdekytkin
1
asennossa: 1)
saavutetaan n. 400 min
-1
kierrosluku ja korkea vääntö-
momentti. Tämä säätö soveltuu kaikkiin ruuvaustöi
hin.
Toisessa vaiheessa (vaiheenvalintakytkin
1
asennossa: 2)
saavutetaan n. 1300 min
-1
:n kierrosnopeus poraus-
töiden suorittamiseen.
Q
Esivalinta vääntömomentti /
porausporras
Voit esivalinnalla vääntömomentti / porausporras
10
säätää pyörimisvoiman. Kun säädetty vääntövoima
on saavutettu, kytkin irrottaa käyttömoottorin.
Valitse alhainen taso pienille ruuveille, pehmeille
työstettäville aineille.
Valitse korkea taso suurille ruuveille, koville työs-
tettäville aineille tai ruuvien ulosruuvaamiseen.
Ennen käyttöönottoa / Käyttöönotto
Sidan laddas...
Sidan laddas...
Sidan laddas...
Sidan laddas...
Sidan laddas...
Sidan laddas...
Sidan laddas...
Sidan laddas...
Sidan laddas...
Sidan laddas...
Sidan laddas...
Sidan laddas...
Sidan laddas...
Sidan laddas...
Sidan laddas...
Sidan laddas...
Sidan laddas...
Sidan laddas...
Sidan laddas...
Sidan laddas...
Sidan laddas...
Sidan laddas...
Sidan laddas...
Sidan laddas...
Sidan laddas...
Sidan laddas...
Sidan laddas...
Sidan laddas...
Sidan laddas...
Sidan laddas...
Sidan laddas...
Sidan laddas...
Sidan laddas...
Sidan laddas...
Sidan laddas...
Sidan laddas...
Sidan laddas...
Sidan laddas...
Sidan laddas...
Sidan laddas...
Sidan laddas...
Sidan laddas...
Sidan laddas...
Sidan laddas...
Sidan laddas...
-
 1
1
-
 2
2
-
 3
3
-
 4
4
-
 5
5
-
 6
6
-
 7
7
-
 8
8
-
 9
9
-
 10
10
-
 11
11
-
 12
12
-
 13
13
-
 14
14
-
 15
15
-
 16
16
-
 17
17
-
 18
18
-
 19
19
-
 20
20
-
 21
21
-
 22
22
-
 23
23
-
 24
24
-
 25
25
-
 26
26
-
 27
27
-
 28
28
-
 29
29
-
 30
30
-
 31
31
-
 32
32
-
 33
33
-
 34
34
-
 35
35
-
 36
36
-
 37
37
-
 38
38
-
 39
39
-
 40
40
-
 41
41
-
 42
42
-
 43
43
-
 44
44
-
 45
45
-
 46
46
-
 47
47
-
 48
48
-
 49
49
-
 50
50
-
 51
51
-
 52
52
-
 53
53
-
 54
54
-
 55
55
-
 56
56
-
 57
57
-
 58
58
-
 59
59
-
 60
60
-
 61
61
-
 62
62
-
 63
63
-
 64
64
-
 65
65


Parkside PABS 10.8 C2 Bruksanvisning
- Kategori
- Kraftövningar
- Typ
- Bruksanvisning
- Denna manual är också lämplig för
på andra språk
- Deutsch: Parkside PABS 10.8 C2 Bedienungsanleitung
- English: Parkside PABS 10.8 C2 Owner's manual
- dansk: Parkside PABS 10.8 C2 Brugervejledning
- suomi: Parkside PABS 10.8 C2 Omistajan opas
- Nederlands: Parkside PABS 10.8 C2 de handleiding
Relaterade papper
-
Parkside PABS 10.8 C2 Operation and Safety Notes
-
Parkside PABS 10.8 A2 Operation and Safety Notes
-
Parkside PABS 10.8 B2 Operation and Safety Notes
-
-
-
Parkside PABS 18 A1 Operation and Safety Notes
-
-
-
Parkside PABS 14.4 A1 Operation and Safety Notes
-
Parkside PABS 20-LI B2 Translation Of The Original Instructions