
Contents
The Functions
Tuning
EQ Type
Modulation
Pitch Bend Range
Portamento
Portamento Time
DSP Type
MIDI Select
MIDI Channel
Local Control
Audio Loop Back
Battery Type
Auto power off
How to Use Terminals
[PHONES]
[AUX IN]
[LINE OUT]
[TO HOST]
• Audio data – USB Audio
Interface function
• MIDI data
[MIDI]
Troubleshooting
Voice List
• Drum Kit List
Voice Parameters
Effect List
• DSP Type List
MIDI Implementation Chart
EN
Reference Manual

2
The Functions
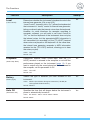
The various “Functions” let you make detailed settings for the instrument. For the Function menu,
see the list on next page.
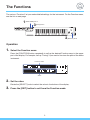
Operation
1. Select the Function menu.
Press the [FUNCTION] button repeatedly to call up the desired Function menu in the upper
part of the display. For example, call up “Tuning” if you want to ne-tune the pitch of the entire
instrument.
2. Set the value.
Rotate the [SELECT] knob to select the value in the bottom of the display.
3. Press the [EXIT] button to exit from the Function mode.
2
[SELECT] knob
3
[EXIT] button
1
[FUNCTION] button
Function name
Value

The Functions
3
Function List
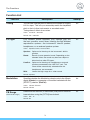
Function Description Backup
Tuning
You can ne-tune the pitch of the entire instrument in roughly
0.2Hz steps. This lets you accurately match the keyboard
pitch to that of other instruments or recorded music.
Tuning doesn’t affect drum voices.
Value: 427.0 Hz – 453.0 Hz
Default: A3 = 440.0 Hz
Yes
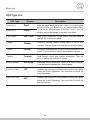
EQ Type
Four different master equalizer (EQ) settings give you
the best possible sound when listening through different
reproduction systems—the instrument’s internal speaker,
headphones, or an external speaker system.
Value: Speaker, Boost, LineOut, Mild
Speaker: Optimum for listening via the instrument’s built-in
speaker.
Boost: Results in more powerful sound. Depending on the
selected Voice, the sound may be more subject to
distortion than other EQ types.
LineOut: Optimum for listening via headphones or external
speakers connected to the LINE OUT jack. This
value will be automatically selected when the
headphones are connected.
Mild: Lowers the high range for a softer sound.
Default: Speaker
Yes
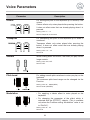
Modulation
Species whether the Modulation wheel controls the Vibrato
depth (Vibrato) or parameter of the effect selected with the
[EFFECT] selector (EfctCtrl).
Value: Vibrato / EfctCtrl
Default: Vibrato
No
PB Range
(Pitch Bend Range)
Determines the amount (in semitones) that pitch is raised or
lowered when using the [PITCH] bend wheel.
Value: 00 – 12
Default: 02
No

The Functions
4
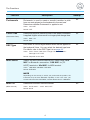
Function Description Backup
Portamento
Portamento is used to create a smooth transition in pitch
from one note played on the keyboard to the next one.
Determines whether Portamento is applied or not.
Value: ON / OFF
Default: OFF
No
Porta Time
(Portamento Time)
Determines the pitch transition time or rate when Portamento
is applied. Higher values result in a longer pitch change time.
Value: 000 – 127
Default: 064
No
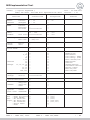
DSP Type
DSP refers to various digital effects which can be applied to
the keyboard Voice. You can select the desired type here.
For details, refer to the DSP Type List on page26.
Value: Dist.1 / Dist.2 / DSP Chrs / Flanger / Phaser / Tremolo /
RotarySp / LPF / HPF
Default: Depends on the Voice
No
MIDI Select
Selects the MIDI transmit/receive port. Select value “BLE
MIDI” for Bluetooth
®
connection, “USB MIDI” for [TO
HOST] terminal or “MiniMIDI” for MIDI terminal.
Value: USB MIDI / MiniMIDI / BLE MIDI
Default: BLE MIDI
NOTE
Depending on the country in which you purchased the product, the
instrument may not have Bluetooth capability. If this is the case, you
cannot select the value “BLE MIDI,” and the default value is “USB MIDI.”
Yes
MIDI CH
(MIDI Channel)
Determines the MIDI transmit channel.
Value: 01CH, 02CH … 15CH, 16CH, OFF
Default: 01CH
Yes

The Functions
5
Function Description Backup
Local
(Local Control)
Determines whether the instrument’s keyboard controls the
internal tone generator (On) or not (Off).
“Local Control” (normally set to “On”) allows the keyboard of
the instrument to “locally” control its internal tone generator,
letting you directly play the internal voices from the keyboard.
However, for some situations (for example, recording to
computer software), you will want to set Local Control to
“Off,” so that the keyboard of the instrument does not play
the internal voices, but the appropriate MIDI information is
still transmitted (for recording) via the [TO HOST] terminal
when notes are played on the keyboard. At the same time,
the internal tone generator responds to MIDI information
received via the [TO HOST] terminal, allowing you to hear
the notes you play.
Value: ON / OFF
Default: OFF
No
LoopBack
(Audio Loop Back)
Determines whether Audio sound input from the [TO
HOST] terminal is returned to the computer or not with the
performance played on the instrument (page 12). If you
want to output only the sound played on this instrument to
the computer, set this parameter to Off.
Value: ON / OFF
Default: ON
Yes
Battery
(Bat ter y Type)
Selects the type of batteries you have installed to this
instrument.
Value: Alkaline (for Alkaline, Manganese batteries) / Ni-MH (for
rechargeable Ni-MH batteries)
Default: Alkaline
Yes
Auto Off
(Auto Power Off)
Species the time that will elapse before the instrument’s
power is automatically turned off.
Value: 0ff / 05min / 10min / 15min / 30min / 60min
Default: 30min
Yes

6
How to Use the Terminals
This keyboard has 5 terminals for connecting to external devices. This section shows you what,
when and how to connect.
CAUTION
Before connecting the instrument to other electronic components, turn off the power of all the components.
Also, before turning any components on or off, make sure to set all volume levels to minimum (0). Otherwise,
damage to the components, electrical shock, or even permanent hearing loss may occur.
1
4 5
3
2
1
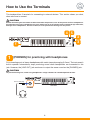
[PHONES] for practicing with headphones
For connecting a pair of stereo headphones with a mini stereo phone plug (3.5mm). The instrument’s
built-in speaker automatically stops producing sound when headphones are connected to this
jack. However, the [LINE OUT] jack continues to output the same sound as the [PHONES] jack.
CAUTION
To prevent hearing loss, avoid using headphones at high volumes for extended periods of time.
SHS-500
PHONES
Headphones
Stereo mini plug

How to Use the Terminals
7
2
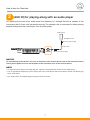
[AUX IN] for playing along with an audio player
For inputting the sound of an audio player and listening to it through the built-in speaker of the
instrument (with 3.5mm, mini stereo phone plug). For example, this is convenient for when playing
keyboard along with the sound input from an audio player.
SHS-500
AUX IN
NOTICE
To avoid damage to the devices, rst turn on the power to the external device, then to the instrument. When
turning off the power, rst turn off the power to the instrument, then to the external device.
NOTE
• To adjust the input volume from [AUX IN] jack, adjust the audio playback volume on the audio device.
• Use an appropriate adaptor plug if the output jack of the audio player does not match the stereo mini phone plug
of the audio cable.
• Use audio cables and adaptor plugs having no (zero) resistance.
Audio player
Headphone jack
Mini stereo phone plug
Audio cable
Mini stereo phone plug

How to Use the Terminals
8
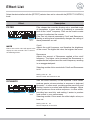
3
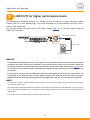
[LINE OUT] for higher performance levels
For connecting a powered speaker or a mixing console for playing in larger venues at higher
volume (with 1/4" mono phone plug). The sound connected to the instrument’s [AUX IN] jack is
output at the same time.
For the best sound, set the Function “EQ Type” setting (page 3) to “LineOut” when using the
[LINE OUT] terminal.
SHS-500
LINE OUT
NOTICE
• To avoid possible damage, rst turn on the power to the instrument, then to the external device. When
turning off the power, rst turn off the power to the external device, then to the instrument. Since this
instrument’s power may automatically be turned off due to the Auto Power Off function (page 5), turn
off the power to the external device, or disable Auto Power Off when you do not intend to operate the
instrument.
• Do not route the output from the [LINE OUT] jack to the [AUX IN] jack. If you make this connection, the
signal input at the [AUX IN] jack is output from the [LINE OUT] jack and then back again, creating a
feedback loop that could make normal performance impossible, and may even damage the equipment.
NOTE
• The instrument’s built-in speaker continue to output the same sound as the [LINE OUT] jack when external devices
are connected to this jack.
• The output volume from the [LINE OUT] jack does not change when adjusting the [VOLUME] dial on the instrument.
• Use an appropriate adaptor plug if the input jack of the powered speaker does not match the phone plug of the
audio cable.
• Use audio cables and adaptor plugs having no (zero) resistance.
Powered speaker
1/4" mono phone plug
Audio cable

How to Use the Terminals
9
4
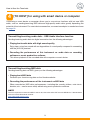
[TO HOST] for using with smart device or computer
Connecting a smart device or computer allows you to use various functions with just one USB
cable, such as sending/receiving MIDI data and high-quality audio data, greatly expanding the
potential of the instrument. For smart device connection, a conversion adaptor is needed as shown
on page10.
Transmitting/receiving audio data – USB Audio Interface function
Sending/receiving audio data via digital connection has the following advantages.
• Playing back audio data with high sound quality
Enjoy clear, noise-free sound with no degradation of sound quality compared to connecting
with the [AUX IN] terminal.
• Recording the performance of this instrument as audio data on recording
software or music production software
This allows playback of the recorded data with computer or smart device.
Transmitting/receiving MIDI data
Sending/receiving data via MIDI, gives you the following advantages.
• Playing back MIDI data
Purchase your favorite song data on the Yamaha website.
• Recording the performance of the instrument as MIDI data
When recorded as MIDI data, performances—including the sounds, pitches, note starts,
duration, etc.—can be more easily edited using music production software.
NOTE
For basic explanations about what MIDI is and can do, refer to the online PDF manual “MIDI Basics” downloadable
from the Yamaha Downloads website:
https://download.yamaha.com/

How to Use the Terminals
10
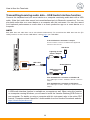
Transmitting/receiving audio data – USB Audio Interface function
Connect this keyboard and your smart device or a computer containing audio data with a USB
cable. (Note that audio data cannot be transmitted/received via Bluetooth connection.) You can
play back audio data on a smart device or a computer with this instrument. You can also record
your keyboard performance as audio data to a music production app on a smart device or a
computer.
NOTE
Both MIDI data and audio data can be transmitted simultaneously. To transmit/receive MIDI data from the [TO
HOST] terminal, set the Function “MIDI Select” setting (page4) to “USB MIDI.”
TO HOST
USB (B) USB (A)
1
2 3
32
SHS-500
A USB audio interface function is available on a computer as well. When using this function
on a computer running Windows, you will need to install the Yamaha Steinberg USB Driver to
your computer. For details on using a computer with this instrument, refer to the online PDF
manual “Computer-related Operations” downloadable from the Yamaha Downloads website:
https://download.yamaha.com/
If the iOS device’s connector is 30-pin:
Use the Camera Connector included in the Apple iPad
Camera Connection Kit.
If the Android device’s connector is USB Micro B:
Use a USB Type A female - USB Micro B male conversion
adaptor
If the Android device’s connector is USB Type C:
Use a USB Type A female - USB Type C male conversion
adaptor
USB conversion
adaptor
Android device
Lightning to USB
Camera Adapter
iOS device
USB cable

How to Use the Terminals
11
NOTE
• This instrument is not compatible with the Yamaha le transfer software “Musicsoft Downloader” and so cannot
transfer any les.
• You don’t need to set the Function “MIDI Select” setting for transmitting/receiving the audio data.
NOTICE
The USB cable connection will not work correctly if you pull out the USB cable without closing the app during
Bluetooth connection. If this happens, turn the power to the instrument on again and then try connect again.
Audio playback
1. Turn off the power of the instrument, then connect your smart device or a
computer to the instrument with the USB cable.
For the proper order, carefully follow the indicated instruction steps as illustrated on page10.
2. Turn on the instrument.
3. Playback song (audio data) on the smart device or the computer.
The sound of the audio data is produced through the built-in speakers of this instrument.
Audio recording
1. Turn off the power of the instrument, then connect your smart device or a
computer to the instrument with the USB cable.
For the proper order, carefully follow the indicated instruction steps as illustrated on page10.
2. Turn on the instrument.
3. Recording the performance of this instrument as audio data on recording
software or music production software on the smart device or computer.
For recording operation, refer to the Owner’s Manual supplied with the software. You can
record audio data to a Yamaha app “Chord Tracker” as well.

How to Use the Terminals
12
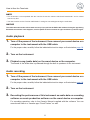
Audio Loop Back
You can set whether Audio sound input from the [TO HOST] terminal is returned to the smart device
or the computer or not with the performance played on the instrument by setting the Function
“Audio Loop Back” (page 5). The default setting is on. If you want to output only the sound
played on this instrument to the smart device or the computer, set this parameter to off.
TO HOST
SHS-500
NOTICE
If you are using a DAW (digital audio workstation) with this instrument, set Audio Loop Back (page 5)
to OFF. Otherwise, a loud sound may occur, depending on the settings of the computer or the application
software.
Precautions when using the [TO HOST] terminal
When connecting the computer to the [TO HOST] terminal, make sure to observe the following
points to avoid freezing the computer and corrupting or losing the data.
NOTICE
• Use an AB type USB cable of less than 3 meters. USB3.0 cables cannot be used.
• Execute the following before turning the power to the instrument on/off or plugging/
unplugging the USB cable to/from the [TO HOST] terminal.
• Quit any open application software on the computer.
• Make sure that data is not being transmitted from the instrument. (Data is transmitted only
by playing notes on the keyboard or playing back a song.)
• While the computer is connected to the instrument, you should wait for six seconds or more
between these operations: (1) when turning the power of the instrument off then on again,
or (2) when alternately connecting/disconnecting the USB cable.
If the computer or the instrument freezes, restart the application software or the computer OS,
or turn the power to the instrument off then on again.
Audio data
Return with the keyboard
performance
Smart
device

How to Use the Terminals
13
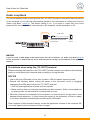
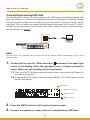
Transmitting/receiving MIDI data
For connecting to a computer or a smart device via the USB cable to transmitting/receiving MIDI
data. This enables you to record your keyboard performance as MIDI data on recording software
or music production software on the computer or the smart device, and then play back it on this
instrument. To do so, make sure to match the MIDI transmit/receive port (in this case, [TO HOST]
terminal) as well as the value of the Function “MIDI Select” setting. For smart device connection,
see the illustration on page10.
TO HOST
SHS-500
NOTE
This instrument is not compatible with the Yamaha le transfer software “Musicsoft Downloader” and so cannot
transfer any les.
1. Conrm that the icon for “USB connection” is shown in the upper right
corner of the display. When the appropriate icon is shown, proceed to
step 2. When not, set according to the steps below.
1-1 Press the [FUNCTION] button repeatedly to call up the Function menu “MIDI Select” in
the upper of the display.
1-2 Rotate the [SELECT] knob to select the value “USB MIDI” ([TO HOST] terminal) in the
bottom of the display.
2. Press the [EXIT] button to exit from the Function mode.
3. Connect a computer or a smart device to transmit/receive MIDI data.
Computer
MIDI connection
USB connection
Bluetooth connection
MIDI Select

How to Use the Terminals
14
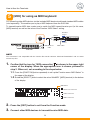
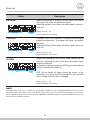
5
[MIDI] for using as MIDI keyboard
For connecting other MIDI devices via the included MIDI breakout cable and standard MIDI cables
(sold separately). This enables you to play a MIDI keyboard from the SHS-500.
To transmit/receive MIDI data, make sure to match the MIDI transmit/receive port (in this case,
[MIDI] terminal) as well as the value of the Function “MIDI Select” setting.
MIDI
SHS-500
MIDI IN
MIDI OUT
NOTE
This instrument is not compatible with the Yamaha le transfer software “Musicsoft Downloader” and so cannot
transfer any les.
1. Conrm that the icon for “MIDI connection” is shown in the upper right
corner of the display. When the appropriate icon is shown, proceed to
step 2. When not, set according to the steps below.
1-1 Press the [FUNCTION] button repeatedly to call up the Function menu “MIDI Select” in
the upper of the display.
1-2 Rotate the [SELECT] knob to select the value “MiniMIDI” ([MIDI] terminal) in the bottom
of the display.
2. Press the [EXIT] button to exit from the Function mode.
3. Connect other MIDI devices to transmit/receive MIDI data.
MIDI device
MIDI OUT
terminal
MIDI IN
terminal
MIDI cablesMIDI breakout
cable
MIDI connection
USB connection
Bluetooth connection
MIDI Select


16
Troubleshooting
Q When the instrument is turned on or off, a popping sound is temporarily
produced.
A
This is normal and indicates that the instrument is receiving electrical power.
Q When using a mobile phone, noise is produced.
A
Using a mobile phone in close proximity to the instrument may produce interference.
To prevent this, turn off the mobile phone or use it further away from the instrument.
Q Noise is heard from the instrument’s speakers or headphones when
using the instrument with your smart device, such as an iPhone/iPad.
A
When you use the instrument along with the application on your smart device,
we recommend that you set that device’s “Airplane Mode” to “ON” and then the
Bluetooth setting to “ON” on your smart device in order to avoid noise caused by
communication.
Q No sound is produced even when the keyboard is played, or a Song is
being played back.
A
Check whether a set of headphones is connected to the [PHONES], or not. When
such a connection is made, no sound is output from the speaker of this instrument.
A Check the on/off status of Local Control (page5). Normally, set this parameter to
ON.
Q Not all of the Voices seem to sound.
Q The sound seems to be cut off when playing the keyboard or Song.
A
You have exceeded 48 simultaneous notes, which is the maximum polyphony (the
maximum amount of notes that can be played simultaneously) of this instrument. If
the Voices are being used along with playback of Song, some notes/sounds may be
omitted (or “stolen”).
Q Sound input via the [TO HOST] jack isn’t produced from the built-in
speaker of the instrument, or it is too low.
A
Check that the volume setting is not too low on your smart device.

Troubleshooting
17
Q The sound of the Voice changes from note to note.
A
This is normal. The tone generation method uses multiple recordings (samples) of an
instrument across the range of the keyboard; thus, the actual sound of the Voice may
be slightly different from note to note.
Q The volume is too soft.
Q The sound quality is poor.
Q The Song stops unexpectedly or will not play.
Q The LCD display suddenly goes dark, and all panel settings are reset.
A
The batteries are low or dead. Replace all six batteries with completely new ones or
completely recharged ones, or use the AC adaptor.
Q The instrument is automatically turned off even if no operation is done.
A
This is normal. This occurs due to the Auto Power Off function (page5). If you
need to disable the Auto Power Off function, select “Off” in the Function settings.
Q When the instrument is turned on, power is turned off suddenly and
unexpectedly.
A
The protection circuit has been activated due to over current. This may occur when
an AC adaptor other than the one specied is used, or an AC adaptor is damaged.
Use the specied adaptor only (refer to the Specications in the Owner’s Manual).
If it should appear to be malfunctioning, discontinue use immediately and have it
inspected by qualied Yamaha service personnel.
Q Sound input via the [AUX IN] jack isn’t produced from the built-in speaker
of the instrument, or it is too low.
A
To control the [AUX IN] volume, adjust the volume of the connected audio equipment.
A Use audio cable having no (zero) resistance.

Troubleshooting
18
Q Cannot connect with Bluetooth.
A
Check that the Bluetooth function of the smart device is activated.
A Check if another smart device is connected to the keyboard via Bluetooth. If this is
the case, disable the Bluetooth function of that smart device, then try connect to the
desired smart device again.
A The keyboard cannot connect to the smart device via Bluetooth if the computer is
connected to the keyboard with a USB cable. When using Bluetooth connection,
make sure not to connect any other device with a USB cable.
A Check that the smart device is compatible with the app “Chord Tracker” on the
Yamaha website:
https://www.yamaha.com/kbdapps/
Q USB cable connection doesn’t work.
A
The USB cable connection will not work correctly if you switch from Bluetooth
connection to USB cable connection without closing the app. If this is the case, turn
the [P] (Standby/On) switch off and turn it on again. Then try the operation again.
Q Cannot transmit/receive the audio data to/from the external audio device.
A
Audio data is not available with Bluetooth connection. Use USB cable connection.
Q “!” is shown in the display.
A
The protection circuit has been activated due to over current. Disconnect the USB
device from the [TO HOST] terminal, then turn on the power of the instrument again.

19
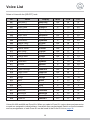
Voice List
Select a Voice with the [SELECT] knob.
No. Voice Display MSB LSB PC1
001 Saw Lead 1 SawLead1 104 20 91
002 Saw Lead 2 SawLead2 0 104 82
003 Quack Lead QuackLd 0 112 85
004 Bright Decay BriteDcy 104 21 85
005 Square Lead SquareLd 0 112 81
006 Under Heim UndrHeim 104 51 88
007 Analogon Analogon 104 52 82
008 Synth Brass SynBrass 0 113 64
009 Electric Piano E.Piano 104 28 5
010 DX Electric Piano DXPiano 0 112 6
011 Electric Guitar E.Guitar 104 3 31
012 Jazz Guitar J.Guitar 104 0 27
013 Acoustic Guitar A.Guitar 0 117 26
014 Electric Bass E.Bass 104 6 34
015 Slap Bass SlapBass 0 112 37
016 Synth Bass SynBass 0 112 39
017 DX Bass DXBass 0 118 40
018 Piano Piano 0 112 2
019 Piano & Strings Pno&Strs 104 39 1
020 Piano & Pad Pno&Pad 104 40 1
021 Air Choir AirChoir 0 112 55
022 Strings Strings 0 116 49
023 Brass Brass 0 117 63
024 Trumpet Trumpet 0 115 57
025 Flute Flute 0 115 74
026 Alto Sax AltoSax 104 2 66
027 Tenor Sax TenorSax 104 3 67
028 Harmonica Harmnica 0 112 23
029 House Kit HouseKit 127 0 65
030 Power Kit PowerKit 127 0 88
Voices No. 029 and 030 are Drum Kits. When you select a Drum Kit, various drum and percussion
sounds are assigned to individual keys, from which they can be played. Details on the instruments
and key assignments of each Drum Kit can be found in the Drum Kit List on page20.

Voice List
20
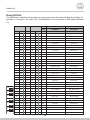
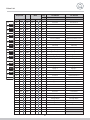
Drum Kit List
The MIDI Note # and Note are actually one octave lower than the keyboard Note # and Note. For
example, in “House Kit,” the “Kick T9 5” (Note #48/Note C2) corresponds to MIDI (Note #36/Note
C1).
Keyboard MIDI
1 org
127-000-65 127-000-88
0 org
127-000-64 127-000-87
Note# Note Note Note# Note Note
House Kit Power Kit
25
C#
0
C#0
13
C#
-1
C#-1
W Kick Surdo Mute
26 D 0 D0 14 D -1 D-1 Surdo Open Surdo Open
27
D#
0
D#0
15
D#
-1
D#-1
Hi Q Hi Q
28 E 0 E0 16 E -1 E-1 Whip Slap Whip Slap
29 F 0 F0 17 F -1 F-1 Scratch H Scratch H
30
F#
0
F#0
18
F#
-1
F#-1
Scratch L Scratch L
31 G 0 G0 19 G -1 G-1 W Noise up Finger Snap
32
G#
0
G#0
20
G#
-1
G#-1
Tom T8 3 Click Noise
33 A 0 A0 21 A -1 A-1 Hi-Hat Open T8 1 Metronome Click
34
A#
0
A#0
22
A#
-1
A#-1
Tom T8 6 Metronome Bell
35 B 0 B0 23 B -1 B-1 Crash T8 Seq Click L
36 C 1 C1 24 C 0 C0 Kick T9 4 Seq Click H
37
C#
1
C#1
25
C#
0
C#0
Snare T8 Rim Brush Tap
38 D 1 D1 26 D 0 D0 Snare T8 5 Brush Swirl
39
D#
1
D#1
27
D#
0
D#0
Clap Analog Sm Brush Slap
40 E 1 E1 28 E 0 E0 Snare Garage L Brush Tap Swirl
41 F 1 F1 29 F 0 F0 Snare Rock Roll Distortion Snare Roll
42
F#
1
F#1
30
F#
0
F#0
Snare T9 3 Castanet
43 G 1 G1 31 G 0 G0 Snare T8 1 Snare Soft Power
44
G#
1
G#1
32
G#
0
G#0
Snare T9 5 Sticks
45 A 1 A1 33 A 0 A0 Kick T9 1 Kick Amb+
46
A#
1
A#1
34
A#
0
A#0
Snare T9 Gate Open Rim Power
47 B 1 B1 35 B 0 B0 Kick T9 2 Kick Power Open
48 C 2 C2 36 C 1 C1 Kick T9 5 Kick Power Closed
49
C#
2
C#2
37
C#
1
C#1
Snare T9 Rim Side Stick Power
50 D 2 D2 38 D 1 D1 Snare T9 1 Snare Power
51
D#
2
D#2
39
D#
1
D#1
Clap T9 Hand Clap Power
52 E 2 E2 40 E 1 E1 Snare T9 2 Snare Rough
53 F 2 F2 41 F 1 F1 Tom T9 1 Tom Power 1
54
F#
2
F#2
42
F#
1
F#1
Hi-Hat Close T8 1 Hi-Hat Closed Power
55 G 2 G2 43 G
1 G1 Tom T9 2 Tom Power 2
56
G#
2
G#2
44
G#
1
G#1
Hi-Hat Pedal T9 Hi-Hat Pedal Power
57 A 2 A2 45 A 1 A1 Tom T9 3 Tom Power 3
58
A#
2
A#2
46
A#
1
A#1
Hi-Hat Open T9 Hi-Hat Open Power
59 B 2 B2 47 B 1 B1 Tom T9 4 Tom Power 4
&ᅊ
'ᅊ
)ᅊ
*ᅊ
$ᅊ
&
'
(
)
*
$
%
&ᅊ
'ᅊ
)ᅊ
*ᅊ
$ᅊ
&
'
(
)
*
$
%
&ᅊ
'ᅊ
)ᅊ
*ᅊ
$ᅊ
&
'
(
)
*
$
%
&
Sidan laddas...
Sidan laddas...
Sidan laddas...
Sidan laddas...
Sidan laddas...
Sidan laddas...
Sidan laddas...
Sidan laddas...
-
 1
1
-
 2
2
-
 3
3
-
 4
4
-
 5
5
-
 6
6
-
 7
7
-
 8
8
-
 9
9
-
 10
10
-
 11
11
-
 12
12
-
 13
13
-
 14
14
-
 15
15
-
 16
16
-
 17
17
-
 18
18
-
 19
19
-
 20
20
-
 21
21
-
 22
22
-
 23
23
-
 24
24
-
 25
25
-
 26
26
-
 27
27
-
 28
28


på andra språk
- italiano: Yamaha SHS-500 Manuale utente
- čeština: Yamaha SHS-500 Uživatelský manuál
- español: Yamaha SHS-500 Manual de usuario
- Deutsch: Yamaha SHS-500 Benutzerhandbuch
- polski: Yamaha SHS-500 Instrukcja obsługi
- português: Yamaha SHS-500 Manual do usuário
- français: Yamaha SHS-500 Manuel utilisateur
- English: Yamaha SHS-500 User manual
- dansk: Yamaha SHS-500 Brugermanual
- русский: Yamaha SHS-500 Руководство пользователя
- suomi: Yamaha SHS-500 Ohjekirja
- Nederlands: Yamaha SHS-500 Handleiding
- română: Yamaha SHS-500 Manual de utilizare
Relaterade papper
-
Yamaha SHS-300 Bruksanvisning
-
Yamaha PSR-I500 Bruksanvisning
-
-
Yamaha P-515 Bruksanvisning
-
Yamaha Clavinova Digital Piano Användarmanual
-
Yamaha CLP-665GP Bruksanvisning
-
-
-
-