LevelOne WBR-6022 Quick Installation Manual
- Kategori
- Säkerhetskameror
- Typ
- Quick Installation Manual

LevelOne
WBR-6022
HomeGuard 22 Residential Router
Quick Installation Guide
English Português
Deutsch Svenska
Français Slovenščina
Español
繁體中文
Nederlands
한국어
Dansk Русский
Italiano Polski
Ελληνικά

2
Table of Contents
English .......................................................................................... 3
Deutsch ....................................................................................... 19
Français ...................................................................................... 35
Español ....................................................................................... 51
Nederlands .................................................................................. 67
Dansk .......................................................................................... 83
Italiano ......................................................................................... 99
Ελληνικά .................................................................................... 115
Português .................................................................................. 131
Svenska .................................................................................... 147
Slovenščina ............................................................................... 163
繁體中文 .................................................................................... 179
한국어........................................................................................ 195
Русский ..................................................................................... 211
Polski ......................................................................................... 227
Default Settings
IP Address 192.168.0.1
Username admin
Password password
Wireless Mode Enable
Wireless SSID LevelOne
Security None
This guide covers only the most common situations. All detailed
information is described in the user manual.

3
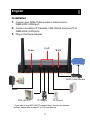
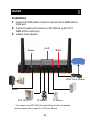
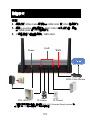
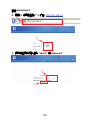
Installation
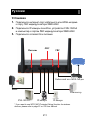
1.
Connect your ADSL/Cable modem’s internet line to
WBR-6022’s WAN port.
2. Connect LevelOne IP Cameras, FNS-1020v2 and your PC to
WBR-6022’s LAN ports.
3. Plug-in the Power Adapter.
English
WAN
LAN
Power
FNS-1020v2 IP Camera IP Camera
PC
ADSL/Cable Modem
* If you want to use WPS (WiFi Protected Setup) function for wireless
devices, please refer to page 57 on CD User Manual.

4
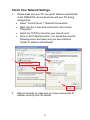
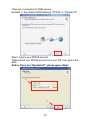
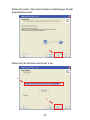
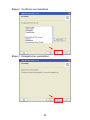
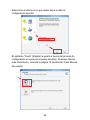
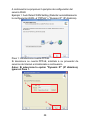
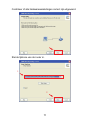
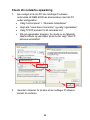
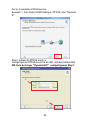
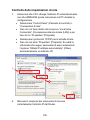
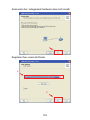
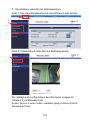
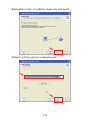
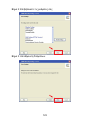
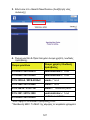
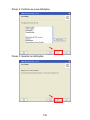
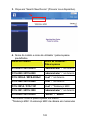
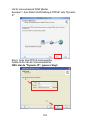
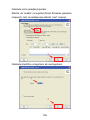
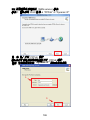
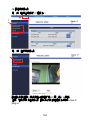
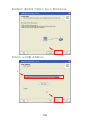
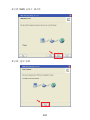
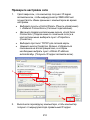
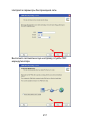
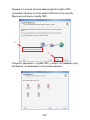
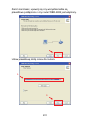
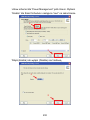
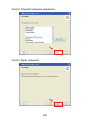
Check Your Network Settings
1. Please make sure your PC can get IP address automatically
so the WBR-6022 can communicate with your PC during
configuration.
Select “Control Panel” > “Network Connections”.
Right click the “Local Area Connection” and choose
“Properties”.
Select the TCP/IP protocol for your network card.
Click on the Properties button. You should then see the
following screen and make sure you have selected
“Obtain IP address automatically”
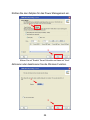
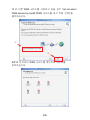
2. Reboot computer to make sure you have received the IP
address correctly form the Router.
1.
2.
3.
4.
5.

5
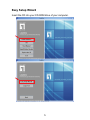
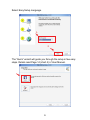
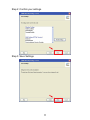
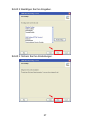
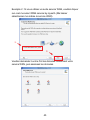
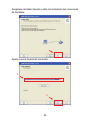
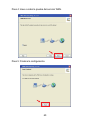
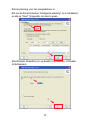
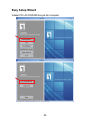
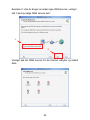
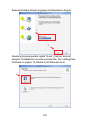
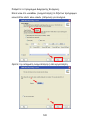
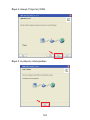
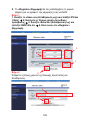
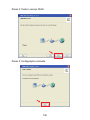
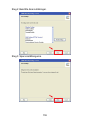
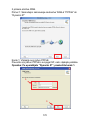
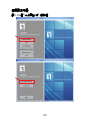
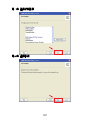
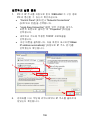
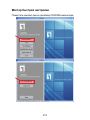
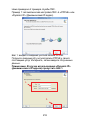
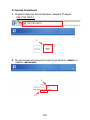
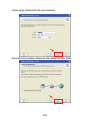
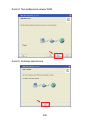
Easy Setup Wizard
Insert the CD into your CD-ROM drive of your computer.

6
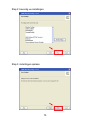
Select Easy Setup Language.
The “Quick” wizard will guide you through the setup in few easy
steps. Details read Page.14 (chart 4) of User Manual.
1.
2.

7
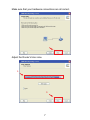
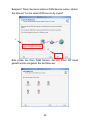
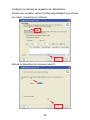
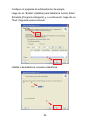
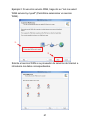
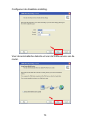
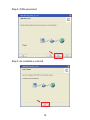
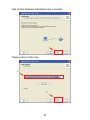
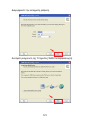
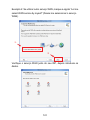
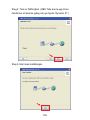
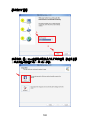
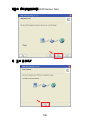
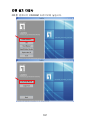
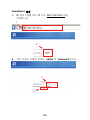
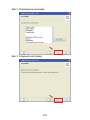
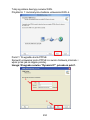
Make sure that your hardware connections are all correct.
Adjust the Router’s time zone.
1.
2.

8
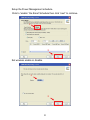
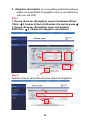
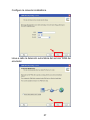
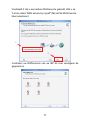
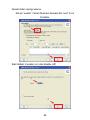
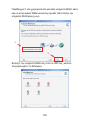
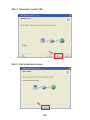
Setup the Power Management schedule.
Click to “enable” the Smart Schedule then click “next” to continue.
Set wireless enable or disable.
1.
2.
2.
1.

9
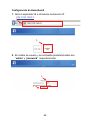
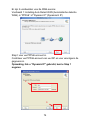
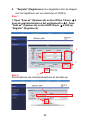
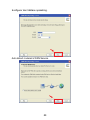
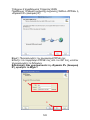
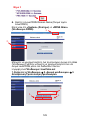
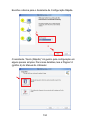
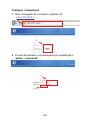
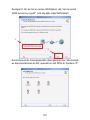
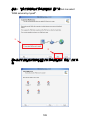
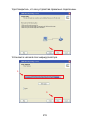
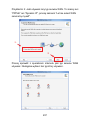
Configure the wireless setting.
Auto detect Router’s WAN Service.

10
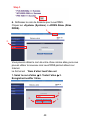
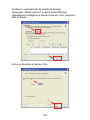
There are 2 examples for WAN service.
Example 1: Auto Detect WAN Setting “PPPoE” or “Dynamic IP”
Step1: Type in your PPPoE account.
Please check your PPPoE account from your ISP, then type in the
data.
Notice: If you use “Dynamic IP”, please ignore Step1.
1.
2.

11
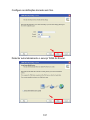
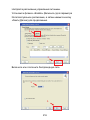
Step 2: Confirm your settings.
Step 3: Save Settings.

12
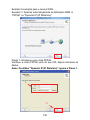
Step 4: WAN Service Test.
Step 5: Setup Completed.

13
Example 2: if you using another WAN service, please click “Let me
select WAN service by myself”.
Please check your WAN service from your ISP, then type in the
data.
1.
2.

14
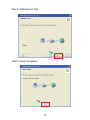
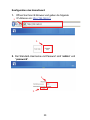
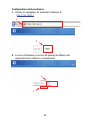
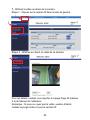
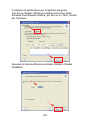
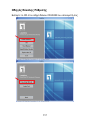
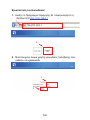
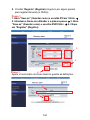
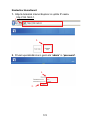
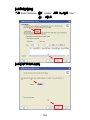
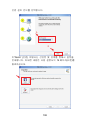
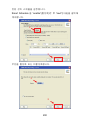
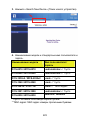
Setup HomeGuard
1. Open IE Browser, type in the IP address http://192.168.0.1
.
2. Default username and password is “admin” and
“password”.
1.
2.
1.
2.

15
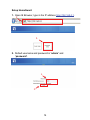
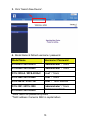
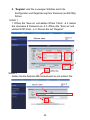
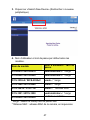
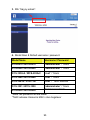
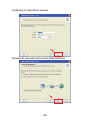
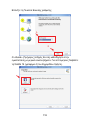
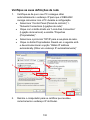
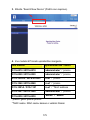
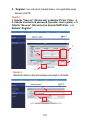
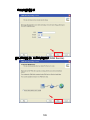
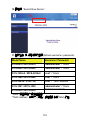
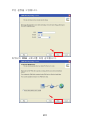
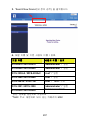
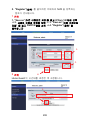
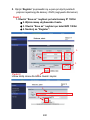
3. Click “Search New Device”.
4. Model Name & Default username / password.
Model Name Username / Password
FCS-0010 / WCS-0010 “administrator” / *blank
FCS-0020 / WCS-0020 “administrator” / *blank
FCS-1030v2 / WCS-2030v2 “root” / *blank
FCS-1060 / WCS-2060 “root” / *blank
FCS-1081A / FCS-1101 “root” / **MAC address
FCS-1091 / WCS-1090 “administrator” / *blank
FCS-0030 / WCS-0030
“admin” / “admin”
*blank: leave the password by blank
**MAC address: Camera’s MAC in capital letters

16
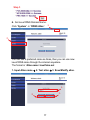
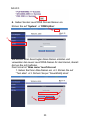
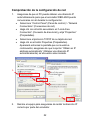
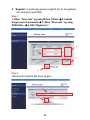
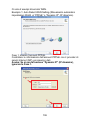
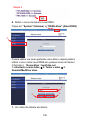
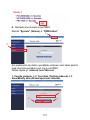
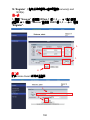
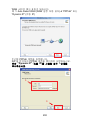
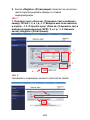
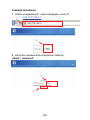
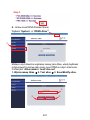
5. “Register” will guide you through few steps to register your
camera(s) and NVR(s).
1. Open “Save as” and choose IPCam 1/2/etc. 2. Insert
Username & password 3. Open “Save as” and choose
NVR1/2/etc. 4. Click “Register”.
Adjust Home Guard’s Time Zone and Save.
1.
4.
3.
2.
2.
1.
Step 2
Step 1

17
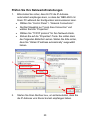
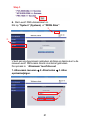
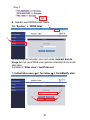
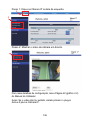
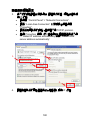
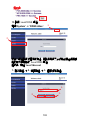
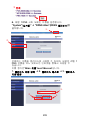
6. Set Level1DNS Domain Name.
Click “System” “DDNS Alias”.
You can use a preferred name as Alias, then you can use new
Level1DNS name through the internet anywhere.
The format is “Alias name“.level1dns.net
1. Input Alias name 2. Test alias 3. Save/Modify alias.
2.
1.
3.
2.
Step 3
1.

18
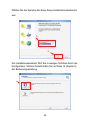
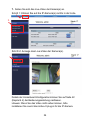
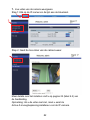
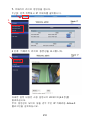
7. View the camera’s live video.
Step 1: Click the IP Camera on the left list.
Step 2: Show the Camera live Video.
Details setup please read Page.22 (chart 4.2) of User Manual.
Notice: if you don’t see the video, please install the Active-X
plug-in for the IP Camera first.
1.
2.

19
Installation
1.
Verbinden Sie das Internetkabel Ihres ADSL/Kabel-Modem
mit dem WAN-Port des WBR-6022.
2. Verbinden Sie die LevelOne IP-Kamera(s), FNS-1020 und
den Computer mit den LAN-Ports des WBR-6022.
3. Schliessen Sie das Netzteil an.
Deutsch
WAN
LAN
Power
FNS-1020v2 IP-Kamera IP-Kamera
PC
ADSL/Kabel Modem
* Wenn Sie die WPS (WiFi Protected Setup) - Funktion für drahtlose Geräte
verwenden möchten, lesen Sie bitte auf Seite 60 des CD-Benutzerhandbuch
nach.

20
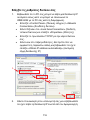
Prüfen Sie Ihre Netzwerk-Einstellungen
1. Bitte stellen Sie sicher, dass Ihr PC die IP-Adresse
automatisch empfangen kann, so dass der WBR-6022 mit
Ihrem PC während der Konfiguration kommunizieren kann.
Wählen Sie “Control Panel” > “Network Connections”.
Rechter Mausklick auf “Local Area Connection” und
wählen Sie bitte “Properties”.
Wählen Sie “TCP/IP protocol” für Ihre Netzwerk-Karte.
Klicken Sie auf die “Properties”-Taste. Sie sollten dann
den folgenden Bildschirm sehen. Stellen Sie bitte sicher,
dass Sie “Obtain IP address automatically” ausgewählt
haben.
2. Starten Sie Ihren Rechner neu, um sicherzustellen, dass Sie
die IP-Adresse vom Router korrekt empfangen haben.
1.
2.
3.
4.
5.
Sidan laddas...
Sidan laddas...
Sidan laddas...
Sidan laddas...
Sidan laddas...
Sidan laddas...
Sidan laddas...
Sidan laddas...
Sidan laddas...
Sidan laddas...
Sidan laddas...
Sidan laddas...
Sidan laddas...
Sidan laddas...
Sidan laddas...
Sidan laddas...
Sidan laddas...
Sidan laddas...
Sidan laddas...
Sidan laddas...
Sidan laddas...
Sidan laddas...
Sidan laddas...
Sidan laddas...
Sidan laddas...
Sidan laddas...
Sidan laddas...
Sidan laddas...
Sidan laddas...
Sidan laddas...
Sidan laddas...
Sidan laddas...
Sidan laddas...
Sidan laddas...
Sidan laddas...
Sidan laddas...
Sidan laddas...
Sidan laddas...
Sidan laddas...
Sidan laddas...
Sidan laddas...
Sidan laddas...
Sidan laddas...
Sidan laddas...
Sidan laddas...
Sidan laddas...
Sidan laddas...
Sidan laddas...
Sidan laddas...
Sidan laddas...
Sidan laddas...
Sidan laddas...
Sidan laddas...
Sidan laddas...
Sidan laddas...
Sidan laddas...
Sidan laddas...
Sidan laddas...
Sidan laddas...
Sidan laddas...
Sidan laddas...
Sidan laddas...
Sidan laddas...
Sidan laddas...
Sidan laddas...
Sidan laddas...
Sidan laddas...
Sidan laddas...
Sidan laddas...
Sidan laddas...
Sidan laddas...
Sidan laddas...
Sidan laddas...
Sidan laddas...
Sidan laddas...
Sidan laddas...
Sidan laddas...
Sidan laddas...
Sidan laddas...
Sidan laddas...
Sidan laddas...
Sidan laddas...
Sidan laddas...
Sidan laddas...
Sidan laddas...
Sidan laddas...
Sidan laddas...
Sidan laddas...
Sidan laddas...
Sidan laddas...
Sidan laddas...
Sidan laddas...
Sidan laddas...
Sidan laddas...
Sidan laddas...
Sidan laddas...
Sidan laddas...
Sidan laddas...
Sidan laddas...
Sidan laddas...
Sidan laddas...
Sidan laddas...
Sidan laddas...
Sidan laddas...
Sidan laddas...
Sidan laddas...
Sidan laddas...
Sidan laddas...
Sidan laddas...
Sidan laddas...
Sidan laddas...
Sidan laddas...
Sidan laddas...
Sidan laddas...
Sidan laddas...
Sidan laddas...
Sidan laddas...
Sidan laddas...
Sidan laddas...
Sidan laddas...
Sidan laddas...
Sidan laddas...
Sidan laddas...
Sidan laddas...
Sidan laddas...
Sidan laddas...
Sidan laddas...
Sidan laddas...
Sidan laddas...
Sidan laddas...
Sidan laddas...
Sidan laddas...
Sidan laddas...
Sidan laddas...
Sidan laddas...
Sidan laddas...
Sidan laddas...
Sidan laddas...
Sidan laddas...
Sidan laddas...
Sidan laddas...
Sidan laddas...
Sidan laddas...
Sidan laddas...
Sidan laddas...
Sidan laddas...
Sidan laddas...
Sidan laddas...
Sidan laddas...
Sidan laddas...
Sidan laddas...
Sidan laddas...
Sidan laddas...
Sidan laddas...
Sidan laddas...
Sidan laddas...
Sidan laddas...
Sidan laddas...
Sidan laddas...
Sidan laddas...
Sidan laddas...
Sidan laddas...
Sidan laddas...
Sidan laddas...
Sidan laddas...
Sidan laddas...
Sidan laddas...
Sidan laddas...
Sidan laddas...
Sidan laddas...
Sidan laddas...
Sidan laddas...
Sidan laddas...
Sidan laddas...
Sidan laddas...
Sidan laddas...
Sidan laddas...
Sidan laddas...
Sidan laddas...
Sidan laddas...
Sidan laddas...
Sidan laddas...
Sidan laddas...
Sidan laddas...
Sidan laddas...
Sidan laddas...
Sidan laddas...
Sidan laddas...
Sidan laddas...
Sidan laddas...
Sidan laddas...
Sidan laddas...
Sidan laddas...
Sidan laddas...
Sidan laddas...
Sidan laddas...
Sidan laddas...
Sidan laddas...
Sidan laddas...
Sidan laddas...
Sidan laddas...
Sidan laddas...
Sidan laddas...
Sidan laddas...
Sidan laddas...
Sidan laddas...
Sidan laddas...
Sidan laddas...
Sidan laddas...
Sidan laddas...
Sidan laddas...
Sidan laddas...
Sidan laddas...
Sidan laddas...
Sidan laddas...
Sidan laddas...
Sidan laddas...
Sidan laddas...
Sidan laddas...
Sidan laddas...
Sidan laddas...
Sidan laddas...
-
 1
1
-
 2
2
-
 3
3
-
 4
4
-
 5
5
-
 6
6
-
 7
7
-
 8
8
-
 9
9
-
 10
10
-
 11
11
-
 12
12
-
 13
13
-
 14
14
-
 15
15
-
 16
16
-
 17
17
-
 18
18
-
 19
19
-
 20
20
-
 21
21
-
 22
22
-
 23
23
-
 24
24
-
 25
25
-
 26
26
-
 27
27
-
 28
28
-
 29
29
-
 30
30
-
 31
31
-
 32
32
-
 33
33
-
 34
34
-
 35
35
-
 36
36
-
 37
37
-
 38
38
-
 39
39
-
 40
40
-
 41
41
-
 42
42
-
 43
43
-
 44
44
-
 45
45
-
 46
46
-
 47
47
-
 48
48
-
 49
49
-
 50
50
-
 51
51
-
 52
52
-
 53
53
-
 54
54
-
 55
55
-
 56
56
-
 57
57
-
 58
58
-
 59
59
-
 60
60
-
 61
61
-
 62
62
-
 63
63
-
 64
64
-
 65
65
-
 66
66
-
 67
67
-
 68
68
-
 69
69
-
 70
70
-
 71
71
-
 72
72
-
 73
73
-
 74
74
-
 75
75
-
 76
76
-
 77
77
-
 78
78
-
 79
79
-
 80
80
-
 81
81
-
 82
82
-
 83
83
-
 84
84
-
 85
85
-
 86
86
-
 87
87
-
 88
88
-
 89
89
-
 90
90
-
 91
91
-
 92
92
-
 93
93
-
 94
94
-
 95
95
-
 96
96
-
 97
97
-
 98
98
-
 99
99
-
 100
100
-
 101
101
-
 102
102
-
 103
103
-
 104
104
-
 105
105
-
 106
106
-
 107
107
-
 108
108
-
 109
109
-
 110
110
-
 111
111
-
 112
112
-
 113
113
-
 114
114
-
 115
115
-
 116
116
-
 117
117
-
 118
118
-
 119
119
-
 120
120
-
 121
121
-
 122
122
-
 123
123
-
 124
124
-
 125
125
-
 126
126
-
 127
127
-
 128
128
-
 129
129
-
 130
130
-
 131
131
-
 132
132
-
 133
133
-
 134
134
-
 135
135
-
 136
136
-
 137
137
-
 138
138
-
 139
139
-
 140
140
-
 141
141
-
 142
142
-
 143
143
-
 144
144
-
 145
145
-
 146
146
-
 147
147
-
 148
148
-
 149
149
-
 150
150
-
 151
151
-
 152
152
-
 153
153
-
 154
154
-
 155
155
-
 156
156
-
 157
157
-
 158
158
-
 159
159
-
 160
160
-
 161
161
-
 162
162
-
 163
163
-
 164
164
-
 165
165
-
 166
166
-
 167
167
-
 168
168
-
 169
169
-
 170
170
-
 171
171
-
 172
172
-
 173
173
-
 174
174
-
 175
175
-
 176
176
-
 177
177
-
 178
178
-
 179
179
-
 180
180
-
 181
181
-
 182
182
-
 183
183
-
 184
184
-
 185
185
-
 186
186
-
 187
187
-
 188
188
-
 189
189
-
 190
190
-
 191
191
-
 192
192
-
 193
193
-
 194
194
-
 195
195
-
 196
196
-
 197
197
-
 198
198
-
 199
199
-
 200
200
-
 201
201
-
 202
202
-
 203
203
-
 204
204
-
 205
205
-
 206
206
-
 207
207
-
 208
208
-
 209
209
-
 210
210
-
 211
211
-
 212
212
-
 213
213
-
 214
214
-
 215
215
-
 216
216
-
 217
217
-
 218
218
-
 219
219
-
 220
220
-
 221
221
-
 222
222
-
 223
223
-
 224
224
-
 225
225
-
 226
226
-
 227
227
-
 228
228
-
 229
229
-
 230
230
-
 231
231
-
 232
232
-
 233
233
-
 234
234
-
 235
235
-
 236
236
-
 237
237
-
 238
238
-
 239
239
-
 240
240
-
 241
241
-
 242
242


LevelOne WBR-6022 Quick Installation Manual
- Kategori
- Säkerhetskameror
- Typ
- Quick Installation Manual
på andra språk
- italiano: LevelOne WBR-6022
- español: LevelOne WBR-6022
- Deutsch: LevelOne WBR-6022
- polski: LevelOne WBR-6022
- português: LevelOne WBR-6022
- français: LevelOne WBR-6022
- English: LevelOne WBR-6022
- dansk: LevelOne WBR-6022
- русский: LevelOne WBR-6022
- Nederlands: LevelOne WBR-6022
Relaterade papper
-
LevelOne NVR-0104 Installationsguide
-
LevelOne NVR-0316 Quick Installation Manual
-
LevelOne WBR-6802 Quick Installation Manual
-
-
-
-
-
-
LevelOne WBR-6801 Quick Installation Manual
-