
PARAFFIN HEATER
PARAFINVARMER
BETJENINGSANVISNINGER
Oversettelse av originalinstruksjonene
PIECYKA NAFTOWEGO
INSTRUKCJA OBSŁUGI
Przekład instrukcji oryginalnej
FOTOGENVÄRMARE
BRUKSANVISNING
Översättning av originalinstruktioner
PARAFFIN HEATER
OPERATING INSTRUCTIONS
Original instructions
418016
NAMING GERMAN
BEDIENUNGSANLEITUNG
Übersetzung der Originalanleitung
NAMING FINNISH
KÄYTTÖOHJEET
Alkuperäisten ohjeiden käännös
NAMING FRENCH
INSTRUCTIONS D’UTILISATION
Traduction des instructions d’origine
NAMING DUTCH
BEDIENINGSINSTRUCTIES
Vertaling van de originele instructies
[Underlag för kundundersökning]

Jula AB reserves the right to make changes to the product. Jula AB claims copyright on this
documentation. It is not allowed to modify or alter this documentation in any way and the
manual shall be printed and used as it is in relation to the product. For the latest version of
operating instructions, refer to the Jula website.
Jula AB behält sich das Recht vor, Änderungen am Produkt vorzunehmen. Jula AB
beansprucht die Urheberrechte an dieser Dokumentation. Es ist nicht zulässig, diese
Dokumentation in irgendeiner Weise zu verändern oder umzugestalten. Die Anleitung muss
gedruckt und so verwendet werden, wie sie in Bezug zum Produkt steht. Die aktuellste
Version der Bedienungsanleitung finden Sie auf der Website von Jula.
Jula AB förbehåller sig rätten att göra ändringar på produkten. Jula AB innehar
upphovsrätten till denna dokumentation. Det är inte tillåtet att modifiera eller ändra
denna dokumentation på något sätt och bruksanvisningen ska skrivas ut och användas
som den är i förhållande till produkten. Se Julas webbplats för den senaste versionen av
bruksanvisningen.
Jula AB pidättää oikeuden tehdä tuotteeseen muutoksia. Jula AB:llä on tämän
dokumentaation tekijänoikeus. Tätä dokumentaatiota ei saa muuttaa millään tavalla ja
käyttöopas on tulostettava ja sitä on käytettävä sellaisena kuin se on tämän tuotteen
kanssa. Käyttöohjeiden uusin versio löytyy Julan verkkosivustolta.
Jula AB forbeholder seg retten til å endre produktet. Jula AB innehar opphavsretten
til denne dokumentasjonen. Det er ikke tillatt å modifisere eller endre denne
dokumentasjonen på noen som helst måte, og håndboken skal trykkes og brukes som den
er i forhold til produktet. For siste versjon av betjeningsanvisningene, se Julas nettsider.
Jula AB se réserve le droit d'apporter des modifications au produit. Jula AB revendique
les droits d'auteur sur cette documentation. Il est interdit de modifier ou d'altérer cette
documentation de quelque manière que ce soit et le manuel doit être imprimé et utilisé
tel quel en relation avec le produit. Pour obtenir la dernière version des instructions
d'utilisation, consultez le site Web de Jula.
Jula AB zastrzega sobie prawo do wprowadzania zmian w produkcie. Jula AB zastrzega
sobie prawa autorskie do niniejszej dokumentacji. Dokumentacji nie wolno w żaden
sposób modyfikować ani zmieniać, a instrukcję należy drukować i używać ją w odniesieniu
do produktu w stanie niezmienionym. Najnowszą wersję instrukcji obsługi można znaleźć
na stronie internetowej Jula.
Jula AB behoudt zich het recht voor om wijzigingen aan het product aan te brengen.
Jula AB claimt het copyright op deze documentatie. Het is niet toegestaan om deze
documentatie op welke manier dan ook te wijzigen of te veranderen. De handleiding moet
worden afgedrukt en gebruikt zoals deze in relatie tot het product staat. Raadpleeg de Jula-
website voor de laatste versie van de bedieningsinstructies.
WWW.JULA.COM
© JULA AB • 2021-09-02
JULA AB
BOX 363, 532 24 SKARA, SWEDEN

3
2022_001
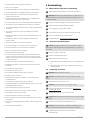
1
2
3
4
56
A
B
A
B
A B
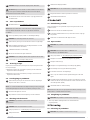
1
2 3
4

42022_001
A
C
B
D
E
F
G
H
56
78

1
2022_001
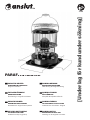
1 Introduction
1.1 Product description
The product is a parain heater.
1.2 Intended use
The product is intended to heat living spaces.
1.3 Product overview
(Figure 1)
1. Handle
2. Safety guard
3. Flue
4. Wick adjustment knob
5. Fuel tank cap
6. Fuel gauge
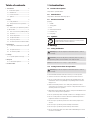
1.4 Symbols
Read the operating instructions carefully and make sure that
you understand the instructions before you use the product.
Save the instructions for future reference.
2 Safety
2.1 Safety definitions
Warning! If you do not obey these instructions, there is a risk of
death or injury.
Caution! If you do not obey these instructions, there is a risk of
damage to the product, other materials or the adjacent area.
Note! Information that is necessary in a given situation.
2.2 Safety instructions for operation
Warning! If you do not obey these instructions, there is a risk of
death or injury.
●Read and understand the instructions before you use the product.
●Save these instructions and safety instructions for future reference.
●Do not use the product for tasks other than its intended purpose. The
manufacturer cannot accept liability for any damage that is a result of
improper use.
●Make sure that the product is on a stable, level, and heat-resistant
surface when you operate it. Some surfaces on the product become hot
when the product is in operation.
●Only fill the product with parain outdoors, away from naked flames and
heat sources. Always remove spilled fuel.
●Do not operate the product in windy conditions or in draughty locations.
●Do not use the product in locations where the ambient temperature is
higher than normal room temperature.
●Do not keep or operate the product in locations where people move
around.
●Do not keep or operate the product in damp environments.
●Do not keep or operate the product in dusty environments.
●Do not operate the product in locations where flammable gases can be
released or accumulate.
Table of contents
1 Introduction 1
1.1 Product description ..............................................1
1.2 Intended use ............................................................. 1
1.3 Product overview ..................................................1
1.4 Symbols ........................................................................1
2 Safety 1
2.1 Safety definitions .................................................1
2.2 Safety instructions for operation .............1
3 Operation 2
3.1 To do before you operate the product
for the first time .................................................................2
3.2 To do a check of the parain quality ...2
3.3 To fill fuel ...................................................................2
3.4 To start the product.......................................... 3
3.5 To adjust the flame ........................................... 3
3.6 To stop the product .......................................... 3
3.7 To remove the fuel from the fuel tank 3
4 Maintenance 3
4.1 To burn o contaminants from the wick
3
4.2 To replace the wick ......................................... 3
4.3 To clean the product .......................................4
5 Storage 4
5.1 To put the product in storage ....................4
6 Disposal 4
6.1 To discard the product .................................... 4
7 Technical data 4

22022_001
●Do not use volatile hydrocarbons, such as thinner, acetone or petrol, in
the same room as the product. Risk of explosion and fire.
●Only operate the product in well-ventilated areas.
●Do not cover the product.
●Do not use the product to dry clothes, fabrics or other materials.
●Do not use the product to cook food or to boil water.
●Keep aerosols and other pressurized containers away from the product
when you operate the product.
●Do not operate the product without the safety guard or if the safety
guard is damaged. Speak to an authorized service center.
●Make sure that the product is at least 1 m away from flammable
materials when it is in operation.
●Do not keep flammable materials in the vicinity of the product.
●Make sure that flammable materials does not touch the product when
the product is in operation.
● Do not touch hot surfaces on the product. Parts of this product become
hot when the product is in operation.
●Do not use the product if parts are missing. Contact the retailer of the
product if parts are missing.
●Do not use the product if it is damaged or defective.
●Do not use the product if you smell strange odors from the product.
●Do not use the product if it produces soot or abnormal flames.
●Do not use parain that has poor quality or is contaminated.
●Do not move the product when it is in operation.
●Only use parain as fuel.
●Do not repair the product. A damaged or defective product must be
repaired at an authorized service center. The manufacturer cannot
accept liability for any damage that is a result of unauthorized repairs.
●Do not operate the product if you are fatigued or easily distracted.
●Do not operate the product if you are under the influence of alcohol or
drugs.
●Do not let children play with the product.
●Do not let children clean the product.
●Do not let children do maintenance on the product without supervision.
●Keep animals away from the product.
●Only use accessories and parts that are approved by the manufacturer
of the product.
●Make sure that air can circulate around all sides of the product.
●Do not operate the product near flammable liquids, gas or dust.
●Do not go away from the product when it is in operation.
●Let the product become cool before you clean it or do maintenance on
it.
●Let the product become cool before you put it in storage.
●Make sure that all fuel is drained from the product before you put the
product in storage.
●Keep the product in a dry and closed storage, away from children, when
the product is not in operation.
●Do not put the product horizontally or at an angle when you put it in
storage. Make sure that the product is vertical.
●Clean the product regularly.
3 Operation
3.1 To do before you operate the product for the
first time
1 Remove all packaging and stickers.
Warning! Risk of fire. Packaging and stickers are flammable. Make
sure that all packaging is removed before you use the product.
2 Hold the handle on the product and remove the burner unit.
3 Remove all protective material from the product.
4 Put the product on a stable and level surface.
5 Turn the wick adjustment knob to do a check of the wick height.
6 Make sure that the flue is correctly installed.
7 Fill the fuel tank. Refer to “3.3 To fill fuel” on page 2.
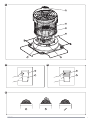
3.2 To do a check of the parain quality
Caution! Do not use contaminated parain or parain that is
degraded. Contaminated or degraded parain can cause damage to the
product and have negative eects on the heat output.
1 Put some clean and clear water into a drinking glass.
2 Put an equal amount of parain into the drinking glass.
3 Hold a sheet of white paper behind the transparent container.
A. If the parain (A) is 100% pure, the parain is as clear as the water
(B). (Figure 2)
B. If the parain (A) is contaminated or degraded it has a darker
color than the water (B). (Figure 3)
3.3 To fill fuel
Warning! Do not fill fuel indoors.
Caution! Do not use contaminated, or poor-quality parain.
1 Make sure that the product is not in operation and that it is cool.
Warning! Do not fill fuel when the product is in operation.
2 Make sure that the parain has the correct quality. Refer to “3.2 To do
a check of the parain quality” on page 2.
3 Turn the fuel tank cap counterclockwise to remove it.
Caution! Keep the fuel tank cap away from unwanted materials,
such as dirt and sand.
4 Fill the fuel tank with parain until the fuel gauge shows “F”.
Caution! Only use prime, 100% pure, parain as fuel in the
product. Do not use gas as fuel in the product.
5 Turn the fuel tank cap clockwise to install it. Tighten the fuel tank cap.
Warning! Remove spilled parain. Risk of fire.

3
2022_001
Caution! The threads can become damaged if the fuel tank cap is
tightened incorrectly. Make sure that you tighten the fuel tank cap
correctly. Always replace a damaged fuel tank cap.
6 Wait at least 10 minutes for the wick to soak in parain before you
operate the product.
3.4 To start the product
1 Fill the fuel tank. Refer to “3.3 To fill fuel” on page 2..
Note! Wait at least 10 minutes for the wick to soak in parain before you
operate the product. A dry wick prevents ignition.
2 Put the product is on a stable, level, and heat-resistant surface.
Warning! Make sure that the location is well-ventilated.
3 Turn the wick adjustment knob clockwise until the wick is at its top
position.
4 Hold the handle on the flue, carefully tilt the flue and ignite the wick
with a match or a lighter.
5 Put the flue back in its vertical position.
6 Wait approximately 15 minutes until the flame becomes stable.
Warning! Do not go away from the product when it is in operation.
7 Adjust the flame. Refer to “3.5 To adjust the flame” on page 3.
3.5 To adjust the flame
The flame is adjusted with the wick adjustment knob. Do the steps that
follow to adjust the flame.
●If the flame is too low (A), turn the wick adjustment knob clockwise until
the flame is correct. (Figure 4)
●If the flame is too high (B), turn the wick adjustment knob
counterclockwise until the flame is correct.
3.6 To stop the product
1 Turn the wick adjustment knob counterclockwise until the wick is in
its bottom position. The flame will stop after 3–5 minutes.
Note! If an emergency occurs, you can push the emergency extinguish
button on the left side of the wick adjustment knob to stop the flame.
2 Make sure that the flame has stopped.
3 Let the product become cool before you move it or do maintenance
on it.
3.7 To remove the fuel from the fuel tank
Warning! Let the product become cool before you remove fuel
from the fuel tank.
Warning! Do not remove fuel from the fuel tank indoors.
1 Stop the product. Refer to “3.6 To stop the product” on page 3.
2 Remove the fuel tank cap.
3 Drain the fuel into an applicable container.
Warning! Make sure that you follow local regulations when you
discard the fuel.
4 If it is necessary, clean the fuel tank with 100% pure parain.
5 Install the fuel tank cap.
4 Maintenance
4.1 To burn o contaminants from the wick
It is necessary to burn o contaminants from the top of the wick regularly.
To burn o contaminants, do the steps that follow.
1 Make sure that the wick is soaked in parain.
2 Make sure that the fuel tank is empty so that the wick cannot absorb
more parain.
3 Ignite the wick and let it burn until the flame stops.
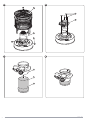
4.2 To replace the wick
Warning! Let the product become cool before you clean it or do
maintenance on it.
Warning! Only use accessories and parts that are approved by the
manufacturer of the product.
1 Stop the product. Refer to “3.6 To stop the product” on page 3.
2 Remove the 3 screws (A) and the safety guard (B). (Figure 5)
3 Remove the flue (C).
4 Remove the 3 wing nuts (D) and the support (E). (Figure 6)
5 Carefully pull out the wick (F) from the wick holder (G). (Figure 7)
6 Make sure that the wick is in the lowest position.
7 Put a new wick in the wick holder. The fiberglass part (H) of the wick
must point upwards.
8 Make sure that the top edge of the fiberglass part is 45–48 mm away
from the top edge of the support. Push the wick outwards from the
inside until it is fixed with the absorber. (Figure 8)
9 Install all parts in the opposite sequence.
Note! Make sure that the wick moves up when you turn the wick
adjustment knob clockwise and that it moves down when you turn the
wick adjustment knob counterclockwise.

42022_001
4.3 To clean the product
Warning! Let the product become cool before you clean it.
●Wipe the external parts of the product with a damp cloth and a mild
detergent.
5 Storage
5.1 To put the product in storage
Warning! Let the product become cool before you put the product
in storage.
●Remove the fuel from the fuel tank. Refer to “3.7 To remove the fuel from
the fuel tank” on page 3.
●Put the product in a vertical position in a clean, dust-free and dry place.
●Always store parain in a cool environment, away from flames, water,
dust, high ambient temperatures and direct sunlight. If parain is not
stored correctly, the color of the parain becomes yellow and the parain
gets an acid odor.
6 Disposal
6.1 To discard the product
Make sure that you follow local regulations when you discard the product. Do not burn
the product.
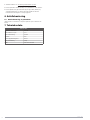
7 Technical data
Technical data
Heat output 2200 W
Tank capacity 5.5 l
Fuel consumption 0.24 l/h
Burn time 20 h
Maximum area that can be heated 100 m²
Weight (without fuel) 7.2 kg
Dimensions 370 x 510 x 370 mm

5
2022_001
1 Inledning
1.1 Beskrivning
Produkten är en paraineldad värmare.
1.2 Avsedd användning
Produkten är avsedd för uppvärmning av bostadsutrymmen.
1.3 Produktöversikt
(Bild 1)
1. Handtag
2. Skyddsgaller
3. Rökkanal
4. Vred för justering av veke
5. Bränsletanklock
6. Bränsleindikator
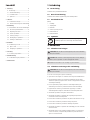
1.4 Symboler
Läs alla anvisningar och säkerhetsanvisningar noga före
användning. Spara dessa anvisningar för framtida behov.
2 Säkerhet
2.1 Säkerhetsanvisningar
VARNING! Om inte dessa anvisningar följs finns risk för dödsfall
och/eller personskada.
VIKTIGT! Om inte dessa anvisningar följs finns risk för skada på
produkten, annan egendom och/eller intilliggande område.
OBS! Markerar information som är viktig i en given situation.
2.2 Säkerhetsanvisningar för användning
VARNING! Om inte dessa anvisningar följs finns risk för dödsfall
och/eller personskada.
●Läs dessa anvisningar noga före användning.
●Spara dessa anvisningar och säkerhetsanvisningar för framtida behov.
●Använd aldrig produkten för något annat ändamål än det avsedda.
Tillverkaren påtar sig inget ansvar för skador som uppkommer till följd
av felaktig användning.
●Placera produkten på plant, stabilt och värmetåligt underlag vid
användning. Vissa delar av produkten blir heta under användning.
●Fyll på bränsle utomhus, på avstånd från öppen låga och andra
antändningskällor. Avlägsna omedelbart eventuellt utspillt bränsle.
●Använd inte produkten i drag eller när det blåser.
●Använd inte produkten i utrymmen där omgivningstemperaturen
överskrider normal rumstemperatur.
●Förvara eller använd inte produkten i utrymmen där människor rör sig.
●Förvara eller använd inte produkten i fuktiga utrymmen.
●Förvara eller använd inte produkten i dammiga utrymmen.
●Använd inte produkten i utrymmen där antändliga gaser kan ansamlas
eller förekomma.
●Använd inte ämnen som innehåller flyktiga kolväten, som förtunning,
aceton eller bensin, i utrymmet där produkten är placerad. Risk för
explosion och/eller brand.
Innehåll
1 Inledning 5
1.1 Beskrivning ...............................................................5
1.2 Avsedd användning .......................................... 5
1.3 Produktöversikt ....................................................5
1.4 Symboler ....................................................................5
2 Säkerhet 5
2.1 Säkerhetsanvisningar .................................... 5
2.2 Säkerhetsanvisningar för användning 5
3 Användning 6
3.1 Förberedelser före första användning 6
3.2 Kontroll av parainkvalitet ..........................6
3.3 Påfyllning av bränsle.......................................6
3.4 Start av produkten .............................................7
3.5 Justering av låga ..................................................7
3.6 Avstängning av produkten ..........................7
3.7 Tömning av bränsletank ................................7
4 Underhåll 7
4.1 Renbränning av veke ........................................7
4.2 Byte av veke ..........................................................7
4.3 Rengöring av produkten ............................... 7
5 Förvaring 7
5.1 Förvaring av produkten ..................................7
6 Avfallshantering 8
6.1 Avfallshantering av produkten ................. 8
7 Tekniska data 8

62022_001
●Använd produkten endast i väl ventilerat utrymme.
●Täck inte över produkten.
●Använd inte produkten för att torka kläder, tyg eller andra material.
●Använd inte produkten för att tillaga livsmedel eller koka vätskor.
●Håll aerosolbehållare och andra trycksatta behållare borta från
produkten när den är tänd.
●Använd inte produkten utan skyddsgaller eller om skyddsgallret är
skadat. Kontakta behörig servicerepresentant.
●Placera produkten minst 1m från antändliga material när den är tänd.
●Se till att det inte finns antändliga material i närheten av produkten.
●Se till att inga antändliga material kommer i kontakt med produkten när
den är tänd.
● Rör inte vid heta delar. Vissa delar av produkten blir heta under
användning.
●Använd inte produkten om delar saknas. Kontakta återförsäljaren om
delar saknas.
●Använd inte produkten om den är skadad eller skadad eller inte
fungerar normalt.
●Använd inte produkten om den avger onormal lukt.
●Använd inte produkten om den avger sot eller onormala lågor.
●Använd inte parain som är förorenat eller av låg kvalitet.
●Flytta inte produkten medan den är igång.
●Använd endast parain som bränsle.
●Försök inte reparera produkten. Om produkten är skadad eller inte
fungerar normalt ska den repareras av behörig servicerepresentant.
Tillverkaren påtar sig inget ansvar för skador som uppkommer till följd
av obehörig reparation.
●Använd inte produkten om du är trött eller distraherad.
●Använd aldrig produkten om du är påverkad av droger, alkohol eller
läkemedel.
●Låt inte barn leka med produkten.
●Låt inte barn rengöra produkten.
●Låt inte barn underhålla produkten utan övervakning.
●Håll djur borta från produkten.
●Använd endast reservdelar och tillbehör som rekommenderas av
produkttillverkaren.
●Se till att luft kan cirkulera på alla sidor av produkten.
●Använd inte produkten i miljö där lättantändliga vätskor eller gaser eller
lättantändligt damm förekommer.
●Lämna aldrig produkten påslagen utan uppsikt.
●Låt produkten svalna helt före rengöring och/eller underhåll.
●Låt produkten svalna helt före förvaring.
●Tappa ut allt bränsle ur produkten före förvaring.
●Förvara produkten torrt i slutet utrymme, oåtkomligt för barn, när den
inte används.
●Förvara inte produkten liggande eller lutande. Se till att produkten står
vertikalt.
●Rengör produkten regelbundet.
3 Användning
3.1 Förberedelser före första användning
1 Avlägsna allt förpackningsmaterial och eventuella klistermärken.
VARNING! Brandrisk. Förpackningsmaterial och klistermärken är
antändliga. Kontrollera att allt förpackningsmaterial avlägsnats innan
produkten används.
2 Fatta tag i produktens handtag och avlägsna brännarenheten.
3 Avlägsna allt förpackningsmaterial från produkten.
4 Placera produkten på plant, stabilt underlag.
5 Vrid vredet för justering av veke för att kontrollera vekens höjd.
6 Kontrollera att rökkanalen är korrekt monterad.
7 Fyll bränsletanken. Se ”3.3 Påfyllning av bränsle” på sid. 6.
3.2 Kontroll av parainkvalitet
VIKTIGT! Använd inte parain som är förorenat eller av åldrat.
Förorenat eller nedbrutet parain kan skada produkten och ge sämre
värmeeekt.
1 Häll lite rent vatten i ett dricksglas.
2 Häll lika stor mängd parain i glaset.
3 Håll ett vitt pappersark bakom glaset.
A. Om parainet (A) är helt rent är det lika klart som vattnet (B). (Bild
2)
B. Om parainet (A) är förorenat eller nedbrutet är det mörkare än
vattnet (B). (Bild 3)
3.3 Påfyllning av bränsle
VARNING! Fyll inte på bränsle inomhus.
VIKTIGT! Använd inte parain som är förorenat eller av låg
kvalitet.
1 Kontrollera produkten är släckt och sval.
VARNING! Fyll inte på bränsle när produkten är tänd.
2 Kontrollera att parainet har korrekt kvalitet. Se ”3.2 Kontroll av
parainkvalitet” på sid. 6.
3 Vrid bränsletanklocket moturs för att avlägsna det.
VIKTIGT! Håll bränsletanklocket borta från smuts, sand och andra
föroreningar.
4 Fyll tanken med parain tills bränsleindikatorn visar F.
VIKTIGT! Använd endast helt rent parain av god kvalitet som
bränsle i produkten. Använd inte bensin som bränsle i produkten.
5 Vrid bränsletanklocket medurs för att montera. Dra åt
bränsletanklocket.

7
2022_001
VARNING! Avlägsna eventuellt utspillt parain. Brandrisk.
VIKTIGT! Gängorna kan skadas om bränsletanklocket inte dras åt
korrekt. Var noga med att dra åt bränsletanklocket korrekt. Byt ut
bränsletanklocket om det är skadat.
6 Vänta minst 10 minuter så att veken hinner suga upp parain innan
produkten tänds.
3.4 Start av produkten
1 Fyll bränsletanken. Se ”3.3 Påfyllning av bränsle” på sid. 6..
OBS! Vänta minst 10 minuter så att veken hinner suga upp parain
innan produkten tänds. Om veken är torr går det inte att tända
produkten.
2 Placera produkten på plant, stabilt och värmetåligt underlag.
VARNING! Se till att utrymmet är väl ventilerat.
3 Vrid vredet för justering av veke medurs tills veken är i högsta läget.
4 Håll i handtaget på rökkanalen, luta försiktigt rökkanalen och tänd
veken med tändsticka eller tändare.
5 Sätt tillbaka rökkanalen i vertikalt läge.
6 Vänta cirka 15 minuter tills lågan stabiliserats.
VARNING! Lämna aldrig produkten utan uppsikt när den är tänd.
7 Justera lågan. Se ”3.5 Justering av låga” på sid. 7.
3.5 Justering av låga
Lågan justeras med vredet för justering av veke. Följ anvisningarna nedan
för att justera lågan.
●Om lågan är för liten (A), vrid vredet för justering av veke medurs tills
lågan har önskad storlek. (Bild 4)
●Om lågan är för stor (N), vrid vredet för justering av veke moturs tills
lågan har önskad storlek.
3.6 Avstängning av produkten
1 Vrid vredet för justering av veke moturs tills veken är i lägsta läget.
Lågan slocknar efter 3–5 minuter.
OBS! I en eventuell nödsituation kan lågan släckas genom tryckning på
nödsläckningsknappen till vänster om vredet för justering av veke.
2 Kontrollera att lågan har slocknat.
3 Låt produkten svalna helt före förflyttning och/eller underhåll.
3.7 Tömning av bränsletank
VARNING! Låt produkten svalna helt före tömning av
bränsletanken.
VARNING! Töm inte bränsletanken inomhus.
1 Stäng av produkten. Se ”3.6 Avstängning av produkten” på sid. 7.
2 Avlägsna tanklocket.
3 Häll bränslet i lämplig behållare.
VARNING! Bränsle ska avfallshanteras i enlighet med gällande
regler.
4 Rengör bränsletanken med rent parain om så behövs.
5 Sätt tillbaka bränsletanklocket.
4 Underhåll
4.1 Renbränning av veke
Veken måste brännas ren regelbundet. Följ anvisningarna nedan för att
renbränna veken.
1 Kontrollera att veken är mättad med parain.
2 Kontrollera att bränsletanken är tom, så att veken inte kan suga upp
mer parain.
3 Tänd veken och låt den brinna tills lågan slocknar.
4.2 Byte av veke
VARNING! Låt produkten svalna helt före rengöring och/eller
underhåll.
VARNING! Använd endast delar och tillbehör som
rekommenderas av produkttillverkaren.
1 Stäng av produkten. Se ”3.6 Avstängning av produkten” på sid. 7.
2 Avlägsna de 3 skruvarna (A) och skyddsgallret (B). (Bild 5)
3 Avlägsna rökkanalen (C).
4 Avlägsna de 3 vingmuttrarna (D) och stödringen (E). (Bild 6)
5 Dra försiktigt ut veken (F) från hållaren (G). (Bild 7)
6 Kontrollera att veken är i det lägsta läget.
7 Sätt i en ny veke i hållaren. Vekens glasfiberdel (H) ska vara vänd
uppåt.
8 Avståndet mellan glasfiberdelens överkant och stödringens överkant
ska bara 45–48 mm. Tryck veken utåt från insidan så att den låses fast
i absorberingsdelen. (Bild 8)
9 Sätt tillbaka delarna i omvänd ordning.
OBS! Kontrollera att veken rör sig uppåt när vredet för justering av veke
vrids medurs och nedåt när det vrids moturs.
4.3 Rengöring av produkten
VARNING! Låt produkten svalna helt före rengöring.
●Torka av produkten utvändigt med en trasa fuktad med milt
rengöringsmedel.
5 Förvaring
5.1 Förvaring av produkten
VARNING! Låt produkten svalna helt före förvaring.

82022_001
●Töm bränsletanken. Se ”3.7 Tömning av bränsletank” på sid. 7.
●Förvara produkten stående vertikalt, i rent, dammfritt och svalt utrymme.
●Förvara parain svalt, på avstånd från öppen låga, vatten, damm, hög
omgivningstemperarur och direkt solljus. Om parain inte förvaras
korrekt kommer det att gulna och avge syrlig lukt.
6 Avfallshantering
6.1 Avfallshantering av produkten
Uttjänt produkt ska avfallshanteras i enlighet med gällande regler. Produkten får inte
brännas.
7 Tekniska data
Tekniska data
Utgående värmeeekt 2200 W
Bränsletankens volym 5,5 l
Bränsleförbrukning 0,24 l/h
Brinntid 20 h
Största uppvärmningsarea 100 m²
Vikt (utan bränsle) 7,2 kg
Mått 370 x 510 x 370 mm

418016 - 001
2022-01-31
www.jula.com
-
 1
1
-
 2
2
-
 3
3
-
 4
4
-
 5
5
-
 6
6
-
 7
7
-
 8
8
-
 9
9
-
 10
10
-
 11
11
-
 12
12
-
 13
13


på andra språk
- English: Anslut 418016 User manual
Relaterade papper
Andra dokument
-
Ansult 418016 Användarmanual
-
Menuett Fakkel Bruksanvisningar
-
-
Meec tools 200070 Användarmanual
-
Dometic RKE400 Användarmanual
-
Qlima - Zibro Piccolo 7831 Användarmanual
-
Menuett 008245 Användarmanual
-
Philips AC3829/10 Användarmanual
-
-
Philips AC2729 Användarmanual