
Frigorifero
Installazionr e uso
Refrigerator
Installation and use
Réfrigérateur
Installation et emploi
Kühlschrank
Installation und Gebrauch
Koelkast
Installatie en gebruik
Frigorífico
Instalación y uso
Køleskab
Instrutione
Jääkaapit
Asennus ja Käyttö
Kylskåp
Installation och användinge
Kjøleskap
Installasjon og bruk

Per garantire l’efficienza e la sicurezza di questo elettrodomestico:
- rivolgetevi esclusivamente a centri di assistenza tecnica autorizzati
- richiedete sempre l’utilizzo di parti di ricambio originali
To maintain the EFFICIENCY and SAFETY of this appliance, we recommend:
- call only the Service Centers authorized by the manufacturer
- always use original Spare Parts
Pour garantir l’efficacité et la sécurité de ce produit:
- adressez-vous exclusivement aux Centres d’assistance technique agréés
- demander toujours l’utilisation de pièces détachées originales
Um die Leistungsfähigkeit und Sicherheit dieses Gerätes zu gewährleisten, bitte folgendes
beachten:
- wenden Sie sich ausschließlich an unsere autorisierten Service-Stellen
- verlangen Sie, daß nur Original-Ersatzteile verwendet werden
Om de doelmatigheid en veiligheid van dit toestel te garanderen raden wij u aan:
- voor reparaties alleen de Service Centers te bellen die door de fabrikant gemachtigd zijn
- altijd gebruik te maken van originele onderdelen
Para garantizar la eficacia y seguridad de este electrodoméstico:
- Diríjase exclusivamente al Servicio Técnico Oficial del Fabricante.
- Solicite siempre la utilización de recambios originales.
For at garantere denne husholdningsmaskinens langvarig funktion og forbrugerens tryghed:
- Man skal henvende sig, ifald maskinen ikke fungerer, kun til en speciel teknisk assistance, som er
autoriseret af fabrikken
- Ved reparationer skal man altid forlange originale reservedele
Jotta tämän kodinkoneen toiminta ja turvallinen käyttö olisi jatkuvasti taattu:
- Vikojen sattuessa on käännyttävä yksinomaan tuottajan valtuuttaman huollon puoleen
- Korjauksissa on vaadittava aina tehtaan omien varaosien käyttöä
För att garantera denna hushållsapparatens långvarig funktion samt förbrukarens trygghet:
- Anlita ändast en av tillverkaren autoriserad kundservice
- Gör alltid anspråk på bruk av originala reservdelar
For å garantere denne husholdsmaskinens langvarig funksjon og forbrukerens trygghet:
- Man må henvende seg, når problemer oppstår, kun til et serviceverksted, som er autoriseret av
konstruktøren
- Ved reparasjoner må man be om bruk av originale reservedel
Frigocongelatore 2 porte 1
Istruzioni per l'installazione e l'uso
Two-doors refrigerator-freezer
8
Instructions for installation and use
Réfrigérateur congélateur 2 portes
15
Instructions pour l'installation et l'emploi
KühlGefrier-Kombination mit 2 T
üren 22
Informationen für Installation und Gebrauch
2 Deurs koel-vriescombinatie
30
Gebruiksaanwijzingen voor de installatie en het gebruik
Refrigerador-congeladora 2 puertas
37
Instrucciones para la instalación y uso
2-døres køle/fryseskab
44
Istrutione
2-Ovinen pakastin/Jääkaappi
50
Koneen asennus ja käyttö
Kyl/frys med separata dörrar 56
Instruktioner för installation och användinge
To døres fryse/kjølekombiskap 62
Instruksjon for installasjon og bruk
GB
D
NL
F
I
E
DK
SF
N
S

1
1
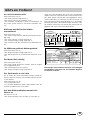
La sicurezza, una buona abitudine
5. Non tirate mai il cavo né il frigorifero per staccare la spina
dalla presa a muro: è molto pericoloso.
6. Non toccate le parti interne raffreddanti soprattutto con
le mani bagnate poiché potreste ustionarvi o ferirvi. Né met-
tere in bocca cubetti di ghiaccio appena estratti dal freezer
poiché rischiate di ustionarvi.
7. Non fate né pulizia né manutenzione senza aver prima
staccato la spina; non basta, infatti, portare la manopola
per la regolazione della temperatura sulla posizione per
eliminare ogni contatto elettrico.
8. Prima di farvi ritirare il vecchio frigorifero, mettete fuori
uso l’eventuale serratura per evitare che i bambini, giocan-
do, possano rimanere chiusi dentro l’apparecchio.
9. In caso di guasto, prima di chiamare il servizio-assistenza,
controllate al capitolo “C’è qualche problema?” per verifi-
care se è possibile eliminare l’eventuale inconveniente. Non
tentate di riparare il guasto, cercando di accedere alle parti
interne.
10. In caso di danneggiamento, il cavo alimentazione di
questo apparecchio deve essere sostituito obbligatoriamen-
te dal nostro Servizio Assistenza Tecnica, essendo necessa-
rio l'uso di utensili specifici.
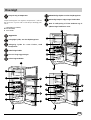
Installazione
Per garantire un buon funzionamento e un consumo
contenuto di elettricità è importante che l’installazio-
ne sia eseguita correttamente.
L’aerazione
Il compressore ed il condensatore emettono calore e richie-
dono perciò una buona aerazione. Sono poco adatti am-
bienti con una non perfetta ventilazione. L’apparecchio va
quindi installato in un ambiente servito da un’apertura (fi-
nestra o portafinestra) che assicuri il necessario ricambio
dell’aria. E che non sia troppo umido.
Fare attenzione, durante l'installazione, a non coprire od
ostruire le griglie che permettono la buona ventilazione del-
l'apparecchio.
Per una buona aerazione dell'apparecchio occorre lasciare:
- una distanza di almeno 10 cm tra la parte superiore ed
eventuali mobili sovrastanti;
- una distanza di almeno 5 cm tra le fiancate ed eventuali
mobili/pareti laterali.
Lontano dal calore
Evitare di posizionare l'apparecchio in un luogo direttamen-
te esposto alla luce solare, accanto alla cucina elettrica o
similari.
In piano
L'apparecchio deve essere ben in piano; se il pavimento non
è livellato, è possibile intervenire con l'apposito piedino
regolabile.
Collegamento elettrico e messa a terra
Prima di procedere al collegamento elettrico, controllate che
il voltaggio indicato sulla targhetta caratteristiche, posta in
basso a sinistra accanto alla verduriera, corrisponda a quella
del vostro impianto di casa, e che la presa sia dotata di una
regolare messa a terra, come prescrive la legge sulla sicurez-
za degli impianti 46/90. Se manca la messa a terra, la Casa
Costruttrice declina ogni responsabilità. Non usate prese mul-
tiple o adattatori.
La potenza è insufficiente?
La presa elettrica deve essere in grado di sopportare il carico
massimo di potenza dell’apparecchio, indicata sulla targhetta
caratteristiche posta in basso a sinistra accanto alla verdu-
riera.
Prima di collegarlo elettricamente
Dopo il trasporto posizionare l’apparecchio verticalmente ed
attendere almeno 3 ore prima di collegarlo alla presa, per
consentire un corretto funzionamento.
ATTENZIONE
Leggete attentamente le avvertenze contenute nel presente
libretto in quanto forniscono importanti indicazioni riguar-
danti la sicurezza di installazione, d’uso e di manutenzione.
Questa apparecchiatura è conforme alle se-
guenti Direttive Comunitarie:
- 73/23/CEE del 19/02/73 (Basse Tensioni) e successive
modificazioni;
- 89/336/CEE del 03/05/89 (Compatibilità Elettromagneti-
ca) e successive modificazioni.
1. Questo apparecchio non va installato all’aperto, nemme-
no se lo spazio è riparato da una tettoia; è molto pericoloso
lasciarlo esposto alla pioggia e ai temporali.
2. Deve essere usato soltanto da adulti ed esclusivamente
per conservare e congelare i cibi, seguendo le istruzioni d’uso
scritte in questo manuale.
3. Non toccate né manovrate mai l’apparecchio a piedi nudi
o con le mani o piedi bagnati.
4. Sconsigliamo di ricorrere a prolunghe e prese multiple. Se
il frigorifero è installato tra i mobili, controllate che il cavo
non subisca piegature o compressioni pericolose.

2
1
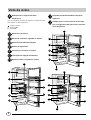
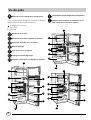
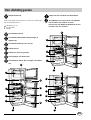
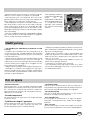
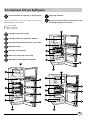
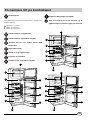
Visto da vicino
Manopola per la regolazione della
temperatura
Questa manopola consente di regolare la temperatura dei
due sreparti su diverse posizioni:
il frigo è spento;
1 meno freddo;
5 più freddo
Balconcino portauova
Balconcini estraibili e regolabili in altezza
Balconcino estraibile per bottiglie
Piedino di regolazione
Cassetto per la frutta e la verdura
Convogliatore acqua di sbrinamento
Ripiani estraibili e regolabili in altezza
Lampada di illuminazione dello scomparto
frigorifero
Scomparto per la conservazione di cibi surge-
lati, la congelazione dei cibi freschi e la produ-
zione del ghiaccio
H
I
E
C
C
A
J
C
D
F
G
H
I
E
C
A
J
D
F
G
C
H
I
E
C
A
J
D
G
F
B

3
1
Come avviare l'apparecchio
ATTENZIONE
Dopo il trasporto, posizionare l’apparecchio verticalmente
ed attendere circa 3 ore prima di collegarlo alla presa di
corrente per favorire un buon funzionamento.
Prima di mettere gli alimenti nel frigorifero o nel freezer
pulite bene l’interno con acqua tiepida e bicarbonato.
Dopo aver collegato la spina alla presa di corrente accertar-
vi che la lampada di illuminazione sia accesa quindi ruotare
la manopola per la regolazione della temperatura “A” sulla
posizione “3” e dopo qualche ora potrete inserire i cibi fre-
schi nel reparto frigo e quelli congelati nel freezer.
Cosa non va in frigorifero
L’aglio (trasmette gli odori), la cipolla e i porri.
Le banane (anneriscono).
Gli agrumi (meglio al fresco, sul balcone).
Patate e tuberi (solo buio e niente umidità).
Come utilizzare al meglio il reparto frigorifero
La temperatura all'interno del reparto frigorifero si regola
automaticamente in base alla posizione della manopola del
termostato.
1 = meno freddo
5 = più freddo
Si consiglia, comunque, una posizione media
Per aumentare lo spazio e disposizione e migliorare l'aspet-
to estetico, questo apparecchio ha la "parte raffreddante"
posizionata all'interno della parete posteriore del reparto
frigo. Tale parete, durante il funzionamento, si presenterà
coperta di brina, oppure di goccioline di acqua a secondo se
il compressore è in funzione o in pausa. Non preoccupatevi
di questo! Il frigorifero sta lavorando in modo normale.
Se si imposta la manopola su numeri alti, con notevoli
quantitativi di cibi e con una temperatura ambiente eleva-
ta, l'apparecchio può funzionare di continuo favorendo la
formazione di brina sulla parete posteriore raffreddante con
conseguente aumento di consumo di energia elettrica.
Per ovviare a questo inconveniente è sufficiente spo-
stare la manopola del termostato verso i numeri più
bassi in modo da permettere all'apparecchio un rego-
lare sbrinamento automatico.
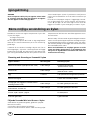
Guida alla sistemazione e conservazione dei cibi nel reparto frigorifero
Cibo
Tempo di
conservazione
Disposizione nel frigo
Carne e pesce pulito
(avvolgere in sacchetti o fogli di plastica)
2 o 3 giorni
Sopra la verduriera
(zona più fredda)
Formaggi freschi 3 o 4 giorni
Sopra la verduriera
(zona più fredda)
Uova 1 mese Nell'apposito contenitore della controporta
Burro e margarine Nel balconcino della controporta
Cibi cotti (chiudere in recipienti ermetici ed
introdurre dopo il raffreddamento)
3 o 4 giorni Su qualsiasi ripiano
Salumi crudi, pane in cassetta, cioccolata,
pasticcini alla crema, pomodori, ecc.
3 o 4 giorni Su qualsiasi ripiano
Bottiglie, latte, bibite, yogurt Negli appositi balconcini della controporta
Frutta e verdura Nella verduriera

4
1
- All’interno del frigorifero l’aria circola in modo naturale e
quella più fredda tende a scendere perché è più pesante.
Ecco perché carne e formaggi devono essere posti sopra la
verduriera.
- Seguite attentamente i nostri consigli sulla durata massi-
ma della conservazione: qualsiasi cibo, anche il più fresco,
non rimane intatto molto a lungo.
- Contrariamente a quanto si crede, i cibi cotti non si man-
tengono più a lungo di quelli crudi.
- Non inserite i liquidi in recipienti scoperti perché provoche-
rebbero l'aumento di umidità all'interno del frigorifero e di
conseguenza la formazione di brina.
- Fate attenzione a non mettere contenitori (plastica, vetro),
cibi ed altro a diretto contatto della parete refrigerante (quella
posteriore). Ciò potrebbe danneggiare i cibi, far aumentare
i consumi di energia e facilitare la formazione di condensa
(sui cibi, contenitori, ecc.).
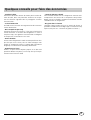
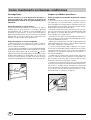
- Il reparto frigorifero è dotato di pratici ripiani estraibili (Fig.
1) e regolabili in altezza grazie alle apposite guide. Per que-
sto è possibile inserire anche grandi contenitori e cibi di no-
tevoli dimensioni.
Fig. 1
- Per la preparazione dei cibi da congelare consultare
un manuale specializzato.
- Un alimento scongelato, anche solo parzialmente, non deve
mai essere ricongelato: lo dovete cuocere per consumarlo
(entro 24 ore) oppure per ricongelarlo.
- Gli alimenti freschi da congelare non devono essere posti a
contatto con quelli già congelati o surgelati ma vanno messi
sopra la griglia del reparto freezer possibilmente a contatto
delle pareti (laterali e posteriore). Non bisogna infatti di-
menticare che la buona conservazione degli alimenti con-
gelati dipende dalla velocità di congelazione.
- Durante la congelazione evitate di aprire la porta del free-
zer.
- La quantità massima giornaliera da congelare è indicata
sulla targhetta caratteristiche posta a sinistra della verdurie-
ra.
- Per ottenere una congelazione e una successiva scongela-
zione ottimali è consigliabile dividere i cibi in piccole porzio-
ni così si congeleranno rapidamente e in modo omogeneo.
Sulle confezioni riportate le indicazioni sul contenuto e sulla
data di congelamento.
- Non aprite la porta del freezer in caso di mancanza di
corrente o di un guasto, ritarderete così l’aumento della
temperatura al suo interno. In questo modo i surgelati e i
congelati si conserveranno senza alterazioni per circa 9-14
ore.
- Non mettete nel freezer bottiglie piene: potrebbero rom-
persi poiché, gelandosi, tutti i liquidi aumentano di volume.
- Riempite le bacinelle dei cubetti di ghiaccio fino a circa 3/
4 della loro altezza.
- Se per lungo tempo permane la temperatura ambiente
più fredda di 14°C, non si raggiungono completamente le
temperature necessarie per una lunga conservazione nel
reparto freezer e il periodo di conservazione risulterà per-
tanto ridotto.
Per congelare bene

5
1
Consigli per risparmiare
- Installatelo bene
E cioè lontano da fonti di calore, dalla luce diretta del sole,
in locale ben aerato e con le distanze indicate nel paragrafo
"Installazione/L'aerazione".
- Il freddo giusto
Il troppo freddo fa aumentare i consumi
- Non riempitelo troppo
Per conservare bene i cibi il freddo deve circolare liberamen-
te all’interno del frigorifero. Riempirlo troppo significa im-
pedire questa circolazione facendo lavorare di continuo il
compressore.
- A porte chiuse
Aprite il vostro frigorifero il meno possibile perché ogni vol-
ta che lo fate va via gran parte dell’aria fredda. Per ristabili-
re la temperatura il motore deve lavorare a lungo consu-
mando molta energia.
- Occhio alle guarnizioni
Mantenetele efficienti e pulite in modo che aderiscano bene
alle porte; solo così non lasceranno uscire nemmeno un po’
di freddo.
- Niente cibi caldi
Una pentola calda messa nel frigorifero alza immediatamente
la temperatura di diversi gradi, lasciatela raffreddare a tem-
peratura ambiente prima di introdurla nel frigorifero.
- Brina nel freezer
Controllate lo spessore della brina sulle pareti del freezer ed
effettuate subito lo sbrinamento se lo strato è diventato
troppo spesso (Vedi più avanti “Come tenerlo in forma”).

6
1
Come tenerlo in forma
Sbrinamento
Fare attenzione a non usare dispositivi meccanici o
altri utensili per accelerare il processo di sbrinamen-
to, oltre a quelli raccomandati dal costruttore.
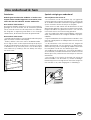
Come sbrinare il reparto frigorifero.
Questo apparecchio ha lo sbrinamento automatico e l’ac-
qua viene convogliata verso la parte posteriore da un appo-
sito scarico (fig. 2) dove il calore prodotto dal compressore
la fa evaporare. L’unico intervento che dovete fare periodi-
camente consiste nel pulire il foro di scarico che si trova
dietro le verduriere affinché l’acqua passi regolarmente.
Come sbrinare il reparto freezer
- Eliminate ogni tanto la brina con l’apposito raschietto in
dotazione (niente coltelli od oggetti metallici).
- Se la brina ha superato i 5 mm bisogna fare lo sbrinamen-
to.
Procedete così: posizionare la manopola per la regolazione
delle temperature A nella posizione
; avvolgete tutti i sur-
gelati e i congelati in carta da giornale mettendoli o in frigo-
rifero o in un luogo fresco. Lasciate aperta la porta in modo
che la brina si sciolga del tutto, aiutandola con dei conteni-
tori pieni di acqua tiepida.
Fig. 2
Pulizia e manutenzioni particolari
Prima di pulire il frigorifero staccate sempre la spina
dalla presa.
- I materiali con i quali è stato fabbricato il vostro apparec-
chio sono igienici e non trasmettono odori ma per mante-
nere queste qualità è necessario che i cibi vengano sempre
protetti e ben chiusi, per evitare macchie difficilmente rimo-
vibili o la creazione di cattivi odori.
- Solo acqua e bicarbonato. Per pulire sia l’interno che l’ester-
no usate una spugnetta con acqua tiepida e bicarbonato di
sodio che, tra l’altro, è anche un buon disinfettante. Se non
l’avete in casa potete impiegare del sapone neutro (quello
di Marsiglia ad esempio).
- Cosa non usare. Mai abrasivi, mai candeggina, mai am-
moniaca. Proibitissimi i solventi e altri prodotti simili.
- Tutto ciò che si può togliere, mettetelo a bagno in acqua
calda con sapone o detersivo per i piatti. E prima di rimet-
terli a posto, risciacquateli e asciugateli bene.
- E per il retro? Qui la polvere si ferma e si concentra provo-
cando qualche problema al buon funzionamento dell’appa-
recchio. Usate la bocchetta lunga del vostro aspirapolvere,
alla potenza media, per eliminarla. E con molta delicatezza!
- Quando sta fermo a lungo. Durante il periodo estivo, se deci-
dete di fermare il frigorifero, bisogna pulire l’interno e lasciare
le porte aperte, altrimenti si formeranno cattivi odori e muffe.
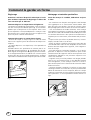
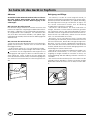
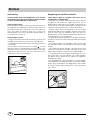
- Come sostituire la lampadina interna. Nella parte posterio-
re della scatola termostato è posta la lampada di illumina-
zione interna. In caso di sostituzione disinserire l’apparec-
chio dalla presa di corrente, svitare la lampada non funzio-
nante e sostituirla con un’altra di potenza non superiore a
15 W. operando come illustrato in figura 3.
Fig. 3

7
1
C'è qualche problema
Il frigorifero non funziona.
Avete controllato se:
••
••
• l’interruttore generale dell’appartamento è disinserito;
••
••
• la spina non è correttamente inserita nella presa di corren-
te;
••
••
• la presa non è efficiente; provate a collegare la spina ad
un’altra presa del locale.
Il frigorifero e il freezer raffreddano poco.
Avete controllato se:
••
••
• le porte non chiudono bene o le guarnizioni sono rovina-
te;
••
••
• le porte rimangono aperte per lungo tempo;
••
••
• la manopola di regolazione della temperatura non è in
posizione corretta;
••
••
• il frigorifero o il freezer sono stati riempiti eccessivamente.
Nel frigorifero gli alimenti si gelano troppo.
Avete controllato se:
••
••
• la manopola di regolazione della temperatura non è in
posizione corretta;
••
••
• gli alimenti sono a contatto con la parte posteriore, la più
fredda.
Il motore funziona in continuo.
Avete controllato se:
••
••
• le porte non sono ben chiuse o sono rimaste aperte per
lungo tempo;
••
••
• la temperatura esterna è molto alta;
••
••
• la manopola di regolazione della temperatura non è in
posizione corretta.
L’apparecchio emette troppo rumore.
Il gas refrigerante interno produce un leggero rumore an-
che quando il compressore è fermo (non è un difetto).
Avete controllato se:
••
••
• Il frigorifero non è posto ben in piano:
••
••
• è stato installato tra mobili o oggetti che vibrano ed emet-
tono rumori;
Sul fondo del frigorifero c’è dell’acqua.
Avete controllato se:
••
••
• il foro dello scarico dell’acqua di sbrinamento è otturato
(vedi fig. 2).
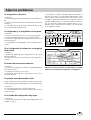
Se, nonostante tutti i controlli, l’apparecchio non funziona
e l’inconveniente da voi rilevato continua ad esserci, chia-
mate il Centro di Assistenza più vicino, comunicando que-
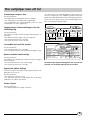
ste informazioni: il tipo di guasto, la sigla del modello (Mod.)
e i relativi numeri (S/N) scritti sulla targhetta delle caratteri-
stiche posta in basso a sinistra, accanto alla verduriera (vedi
esempi nelle figure seguenti).
Non ricorrete mai a tecnici non autorizzati e rifiutate
sempre l’installazione di pezzi di ricambio non origi-
nali.
Mod.
RG 2330
TI
Cod.
93139180000 S/N 704211801
220 - 240 V- 50 Hz 150 W
W
Fuse
A
Max 15 w
Total
Gross
Bruto
Brut
Compr.
Kompr.
Syst.
R 134 a
kg 0,090
Gross
Bruto
Brut
340
Net
Util
Utile
Gross
Bruto
Brut
Freez. Capac
Poder de Cong
75
Made in Italy 13918
Test
P.S-I.
Pressure
HIGH-235
LOW 140
kg/24 h
4,0
Class
Clase
N
Classe
RG 1145 WEU 47133980001
MADE IN ITALY S/N 704045585
VOL. BRUT
GROSS VOL.
VOL. BRUTO
l.
cu. fl.
135
SYSTEME A COMPRESSION
SYSTEM
SISTEMA
K
REFRIGERATEUR
REFRIGERATOR
FRIGORIFICO
l.
cu. fl.
225
REFRIGERATEUR
REFRIGERATOR
FRIGORIFICO
R134 A
kg.
0,080
CONGELATEUR
FREEZER
CONGELADOR
l.
cu. fl.
CONGELATEUR
FREEZER
CONGELADOR
R134 A
kg
HZ W
50 110
CLASSE
CLASS
CLASE
N
220-240
VA
FUSE LINK
POUVOIR DE CONGEL. kg/24h
FREEZING CAPACITY
PODER DE CONGELACION

8
/*
ATTENTION
Read your manual carefully since it contains instructions
which will ensure safe installation, use and maintenance of
your appliance.
Your Refrigerator is built to International safety standards
(EN60) ans has been awarded the European approval mark
(IMQ) for compliance with UK electrical safety requirements.
It also meets the EC standards on the prevention and elimi-
nation of readio interference (EC directive 87/308 -
02.06.89).
1. This appliance is designed to be used indoors and under
no circumstances should it be installed outside even if pro-
tected by a roof. Leaving the appliance exposed to the rain
and whether is exceedingly dangerous.
2. The appliance should be used only by adults and exclu-
sively for storing foodstuffs in compliance with the instruc-
tions provided in this manual. Under no circumstances
should children be allowed to operate, or tamper with, this
product.
3. Do not attempt to operate or handle this appliance when
barefoot, or with wet hands or feet.
4. It is highly recommended that you do not operate this
appliance by connecting it to the power supply with exten-
sions or multiple socket plugs. If the refrigerator has been
installed between two cabinets, make sure that the supply
chord is not dangerously crimped or trapped beneath a heavy
object.
5. Never pull the cable or the appliance to remove the plug
from the socket; this is exceedingly dangerous.
6. Do not touch the internal cooling elements, especially if
your hands are wet, since you could burn or hurt yourself.
7. Before doing any cleaning, disconnect the appliance from
the electricity (by pulling out the plug or turning off the
general switch in your home); it is not sufficient to place the
temperature regulation knob on to cut off the power.
8. Before disposing of your old appliance, remember to break
or remove the lock as a safety measure to protect children
who might lock themselves inside the appliance when play-
ing. In addition, if the appliance is a new one with a lock,
keeo the key out of the reach of small children.
9. If your appliance is not operating properly, read the chap-
ter entitled, “Trouble Shooting”, which might help you re-
solve the problem, before calling an after-sales service cen-
tre. Do not attempt to repair the appliance by tampering
with the internal components.
10. If the power supply cord must be replaced, please con-
tact one of our Customer Service Centers. In some cases, the
connections are made using special terminals and in others a
special tool must be used to access the connections.
Installation
Proper installation of the appliance is essential to en-
sure the best and most efficient performance of your
appliance.
Ventilation
The compressor produces heat and therefore require ad-
equate ventilation; the appliance should therefore be in-
stalled only in a room with doors or windows in order to
ensure proper air circulation. Remember that the room
should not be too humid.
Install the appliance away from heat
sources
The appliance should be installed at least 60 cm away from
cookers, boilers, cookers with ovens, fireplaces and chim-
neys and at least 3 cm away from the wall.
Levelling
The floor should be perfectly level; if not, you can adjust the
feet at the front of the appliance.
Earthing
Before making the electrical connection, check that the volt-
age shown on the data plate, that you will find on the bot-
tom left hand side of the appliance next to the crisper, cor-
responds to that of your home and that the socket is earthed
in compliance with all current electrical regulations. If the
system is not earthed, the manufacturer declines all liability
for consequent damages or losses. Do not use adapters or
multiple sockets.
Check the power load
The electrical socket must support the maximum power load
of the appliance shown on the data plate (on the bottom
left hand side of the appliance next to the crisper).
Before plugging the appliance to the mains
Stand the appliance upright and wait at least 3 hours be-
fore plugging the appliance into the mains to ensure proper
performance.
Safety - a good habit to get into.

9
/*
A closer look
A
Thermostat knob for regulating the tempera-
ture
This knob is used to regulate the temperature in the two
compartments with the following settings:
vailable:
The refrigerator is off;
1 less cold;
5 colder
Shelf with egg compartment
Removable door shelf for food products
Removable door shelf for bottles
Adjustable feet
Fruit and vegetable drawer
Drainage system for defrost water
Removable height adjustable shelves
Light
Compartment for storing frozen foods, freezing
fresh foods and making ice
H
I
E
C
C
A
J
C
D
F
G
H
I
E
C
A
J
D
F
G
C
H
I
E
C
A
J
D
G
F
B

10
/*
How to Start the Appliance
NOTICE
After the appliance has been delivered, stand it in the
upright position and wait approximately 3 hours be-
fore connecting it to the electrical outlet to guaran-
tee that it operates properly.
Before placing foodstuffs in the refrigerator or freezer, clean
the interior well with warm water and baking soda.
After putting the plug in the socket, make sure that the
light is on inside the appliance and then turn the thermo-
stat knob (A) to the “3” setting. After a few hours have
passed, you can place fresh food in the refrigerator com-
partment and frozen foods into the freezer.
The thermostat automatically regulates the temperature in-
side the appliance
1 = less cold
5 = colder
It is recommended that a medium setting be used.
To increase the amount of space, optimize arrangement and
improve appearance, this appliance has a “cooling area”
located within the back panel of the refrigerator compart-
ment. When the appliance is operating, this panel may be
covered with frost or droplets of water depending on
whether the compressor is operating or not at a given time.
Do not be concerned about this! The refrigerator is operat-
ing normally.
If the thermostat knob is positioned on higher settings while
the refrigerator is heavily filled and the ambient tempera-
ture high, the appliance may run continuously, resulting in
the formation of frost on the back cooling area. This will
lead to an increase in energy consumption.
To avoid this situation, just turn the thermostat knob
to a lower setting so that the appliance defrosts au-
tomatically.
Storing Food in the Refrigerator Compartment
Food Storage Time Location in the Refrigerator
Wrapped meat and cleaned fish
(use plastic wrap or pack in plastic bags)
2 or 3 days
On the shelf above the vegetable crisper
(which is the coldest area).
Fresh cheese 3 or 4 days
On the shelf above the vegetable crisper
(which is the coldest area).
Eggs 1 month In special egg rack on door.
Butter, margarine On any shelf.
Cooked or precooked food
(placer in air-tight containers and when cool store
in refrigerator)
3 or 4 days On any shelf.
Sausages, salami, sandwich meats in general, fresh
pasta, custards,puddings, chocolates, cream
pastries, bread, dry pastries, red tomatoes
3 or 4 days On any shelf.
Bottled products, milk, drinks, yoghurt On special door shelves.
Fruits and legumes In vegetable crisper.
What Not to Store in the Refrigerator
Garlic (transmits odour), onions and leeks.
Bananas (they will turn black).
Citrus fruits.
Potatoes and root vegetables (store in dark, dry places).
How to use the refrigerator compartment...

11
/*
- Within the refrigerator compartment, the air circulates natu-
rally, with the colder air falling because it is heavier. This is
the reason why meat and cheeses should be placed above
the vegetable crisper.
- Please follow our instructions carefully on maximum stor-
age time: any food, even the freshest, will not remain ed-
ible for any extended amount of time.
- Contrary to popular belief, cooked foods do not store any
longer than raw food.
- Do not place liquids in containers without covering them
because this will lead to an increase in the level of moisture
within the refrigerator, causing the formation of frost.
- Be careful not to place containers (plastic or glass), food or
other objects in direct contact with the cooling area of the
back wall of the refrigerator. This could harm the food, in-
crease energy consumption and facilitate the formation of
condensate (on food, containers, etc.).
- The refrigerator compartment is equipped with conven-
ient, removable shelves (Fig. 1) which can be adjusted for
height using the shelf guides. This allows you to place even
large containers and foodstuffs in the refrigerator.
Fig. 1
- For the preparation of food to be frozen, please con-
sult a specialized manual.
- Food that has be thawed, even partially, must not be re-
frozen: you must cook it in order to consume it (within 24
hours) or to freeze it once again.
- Fresh foods that you intend to freeze must not be placed
in contact with those that are already frozen or those that
have been fast-frozen. Rather, they must placed atop the
grate in the freezer compartment, in contact with the walls
of the compartment (back or side) if possible. Please keep
in mind that proper conservation of frozen foods depends
on the speed with which they are frozen.
- During the freezing process, avoid opening the door of
the freezer.
- The maximum daily quantity of food that can be frozen is
indicated on the rating plate located to the left of the veg-
etable crisper.
- In order to freeze and then thaw foods optimally, it is
recommended that you divide food into small portions so
that they freeze quickly and uniformly. The packages should
be clearly marked with the content and the date they were
frozen.
- Do not open the freezer door in the event of a power
failure or malfunction. This precaution will slow the rise in
temperature within the compartment. If the door is not
opened, frozen and fast-frozen foods will remain in their
current state for approximately 9-14 hours.
- Do not place full bottles in the freezer: they could easily
burst because all liquids increase in volume when they freeze.
- Fill the ice cube trays about 3/4 full.
- If the ambient temperature remains below 14°C for an
extended period of time, the temperature needed for ex-
tended storage of food in the freezer will not be reached,
resulting in reduced storage life of the food.
Freezing Foods Properly

12
/*
Tips on Saving Energy
- Install the Appliance Properly
In other words, away from sources of heat and direct sun-
light, in a well ventilated room complying with the mini-
mum distances indicated in the paragraph entitled, “ Instal-
lation/Ventilation.”
- Use the Right Temperature Setting
A setting which is too cold increases energy consumption.
- Do not Overfill
To conserve food properly, the cold air must circulate freely
within the refrigerator. If it is overfilled, this will prevent
proper air circulation, forcing the compressor to work con-
tinuously.
- Close the Doors
Open your refrigerator as little as possible because each time
you do so you loose much of the cold air. To raise the tem-
perature to the proper level again, the motor must work for
a long time, consuming energy.
- Keep an Eye on the Seals
Keep the seals clean and make sure that they adhere well
to the door. This alone will ensure that no cold air escapes.
- No Hot Foods
A hot pot or pan placed in the refrigerator immediately raises
the temperature several degrees. Let hot cookware and food
cool to ambient temperature before placing them in the
refrigerator.
- Defrost the Freezer
Check the thickness of the frost on the walls of the freezer
and immediately defrost it if the layer of frost is too thick.
(see the section entitled, “Keeping your Appliance in
Shape”).

13
/*
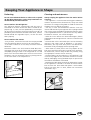
Keeping Your Appliance in Shape
Fig. 2
Cleaning and maintenance
Always unplug the appliance from the mains before
cleaning.
- Your appliance is manufactured with hygienic odourless
materials. To preserve these characteristics, always use sealed
containers for strong smelling foods to avoid the formation
of odours that are difficult to remove.
- Use only a water and bicarbonate solution: Clean the
internal and exterior of your appliance with a sponge soaked
with a warm water and sodium bicarbonate solution, which
is also a good disinfectant. If you do not have any sodium
bicarbonate at home, use neutral detergent.
- What not to use: Do not use abrasive detergents, bleach
or detergents containing ammonia. Never use solvent based
products.
- Dishwashable: All the removable parts can be cleaned by
soaking in hot soapy water or detergent. If you own a
dishwasher, you may wash these parts in the dishwasher.
Remember to dry thoroughly before replacing them.
- What about the back panel? Dust may deposit on the
back panel and affect the proper running of the appliance.
To remove dust, vacuum away the dust very carefully using
the appropriate vacuum cleaner accessory.
- Discontinued use of the appliance: If the appliance is not
in use for any length of time, remember to clean the interior
and dry thoroughly, leaving the doors open to prevent the
formation of bad odours and mould.
- Replacing the light bulb. The bulb for lighting the interior
of the appliance is located at the back of the thermostat
box. Unscrew the burnt bulb and replace it with another
bulb of no more than 15 Watt, follow the instructions
illustrated in fig. 3.
Defrosting
Do not use mechanical devices or other tools to speed
up the defrosting process, unless they have been rec-
ommended by the manufacturer.
How to Defrost the Refrigerator
This appliance defrosts automatically and the water is
channeled to the back toward the drain installed for this
purpose (fig. 2). Here, the heat produced by the compres-
sor will make it evaporate. The only thing you must do is to
periodically check and clean the hole of the drain, which is
located behind the vegetable crispers, so that the water
drains properly.
How to Defrost the Freezer
- Every so often, remove the frost with the scraper provided
with the appliance (do not use knives or metal objects).
- If the frost is more than 15 mm thick, the freezer must be
defrosted.
Proceed as follows: turn the thermostat knob (A) to the ·
setting . Then wrap all the frozen and fast-frozen food in
newspaper, placing it either in the refrigerator or in a cool
place. Leave the freezer door open so that the frost thaws
completely. You can speed this process by placing contain-
ers of warm water in the compartment.
Fig. 3

14
/*
Is There a Problem?
The refrigerator does not function.
Have you checked whether:
• The main switch for the electricity to the apartment or
home has been turned off;
• The plug is properly inserted in the outlet;
• The outlet is adequate; try inserting the plug into another
outlet in the room.
The refrigerator and the freezer do not cool
properly.
Have you checked whether:
• The doors do not close well or the seals are faulty;
• The doors are left open too long;
• The thermostat knob is not on the proper setting;
• The refrigerator or freezer is overfilled.
The food in the refrigerator becomes too cold.
Have you checked whether:
• The thermostat knob is on the proper setting;
• The food is in contact with the back wall - which is the
coldest part.
The motor runs continuously.
Have you checked whether
• The doors are not closed well or have remained open too
long;
• The ambient temperature is too high;
• The thermostat knob is not on the proper setting.
The appliance makes too much noise.
The gas refrigerant produces a slight noise even when the
compressor is not running (this is not a defect).
Have you checked whether:
• The refrigerator is level.
• The appliance was installed between cabinets or objects
that vibrate and make noise.
There is water on the bottom of the
refrigerator.
Have you checked whether:
• The hole for draining the water from the frost is clogged
(see fig. 2).
Never call on unauthorized technicians and always
refuse spare parts which are not originals.
If after all the checks, the appliance still does not operate or
the problem persists, call the nearest Service Centre and
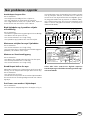
inform them of: the type of problem, the abbreviation of
the model name (Mod.) and the relative numbers (S/N)
written on the rating plate located at the bottom left next
to the vegetable crisper (see examples in the figures be-
low).
Mod.
RG 2330
TI
Cod.
93139180000 S/N 704211801
220 - 240 V- 50 Hz 150 W
W
Fuse
A
Max 15 w
Total
Gross
Bruto
Brut
Compr.
Kompr.
Syst.
R 134 a
kg 0,090
Gross
Bruto
Brut
340
Net
Util
Utile
Gross
Bruto
Brut
Freez. Capac
Poder de Cong
75
Made in Italy 13918
Test
P.S-I.
Pressure
HIGH-235
LOW 140
kg/24 h
4,0
Class
Clase
N
Classe
RG 1145 WEU 47133980001
MADE IN ITALY S/N 704045585
VOL. BRUT
GROSS VOL.
VOL. BRUTO
l.
cu. fl.
135
SYSTEME A COMPRESSION
SYSTEM
SISTEMA
K
REFRIGERATEUR
REFRIGERATOR
FRIGORIFICO
l.
cu. fl.
225
REFRIGERATEUR
REFRIGERATOR
FRIGORIFICO
R134 A
kg.
0,080
CONGELATEUR
FREEZER
CONGELADOR
l.
cu. fl.
CONGELATEUR
FREEZER
CONGELADOR
R134 A
kg
HZ W
50 110
CLASSE
CLASS
CLASE
N
220-240
VA
FUSE LINK
POUVOIR DE CONGEL. kg/24h
FREEZING CAPACITY
PODER DE CONGELACION

15
.
Installation
Pour garantir le bon fonctionnement de votre appa-
reil tout en réduisant sa consommation d’électricité,
il faut qu’il soit installé correctement.
L’aération
Le compresseur et le condenseur produisent de la chaleur
et exigent par conséquent une bonne aération. Les pièces
mal ventilées sont par conséquent déconseillées. L’appareil
doit donc être installé dans une pièce munie d’une ouver-
ture (fenêtre ou porte-fenêtre) qui permette de renouveler
l’air et qui ne soit pas trop humide.
Attention, lors de son installation, à ne pas boucher les grilles
d’aération de l’appareil.
Pour une bonne aération de l’appareil, il faut prévoir:
- une distance de 10 cm au moins entre le haut de l’appareil
et les meubles situés au-dessus;
- une distance de 5 cm au moins entre les côtés de l’appa-
reil et des meubles ou des murs latéraux.
Loin de toute source de chaleur
Evitez d’installer votre appareil dans un endroit exposé à la
lumière directe du soleil ou près d’une cuisinière électrique
ou autre.
ATTENTION
Lire attentivement les avertissements contenus dans ce li-
vret car ils fournissent des indications importantes pour la
sécurité de l’installation, de l’utilisation et de l’entretien.
Ce réfrigérateur a été construit conformément aux normes
internationales de sécurité qui ont pour but de protéger le
consommateur. Cet appareil a en effet obtenu le label IMQ
que les techniciens de l’Institut Italien de Qualité n’accor-
dent qu’aux appareils conformes aux normes du CEI: Co-
mité Electrotechnique Italien.
1. Cet appareil ne doit pas être installé à l’extérieur, même
à l’abri d’un appentis, il est extrêmement dangereux de le
laisser exposé à la pluie et aux orages.
2. Il ne doit être utilisé que par des adultes et uniquement
pour conserver et congeler des aliments, conformément à
ce mode d’emploi.
3. Ne touchez jamais ni ne manoeuvrez l’appareil pieds nus
ou avec les mains ou les pieds mouillés.
4. Nous déconseillons d’utiliser des rallonges ou des prises
multiples. Si le réfrigérateur est installé entre des meubles,
veillez par soucis de sécurité à ce que le cordon d’alimenta-
tion ne soit ni plié ni comprimé.
A plat
L’appareil doit être installé bien à plat; si le sol n’est pas
nivelé, servez-vous des pied réglable situé à l’avant de l’ap-
pareil pour le mettre à niveau.
Raccordement électrique et mise à la terre
Avant de procéder à tout raccordement électrique, contrô-
lez si le voltage indiqué sur la plaquette des caractéristi-
ques, placée en bas à gauche à côté du bac à légumes,
correspond bien à celui de votre installation et contrôlez si
la prise est dotée d’une mise à la terre conforme, comme
prescrit par la loi 46/90 sur la sécurité des installations. S’il
n’y a pas de mise à la terre, le Fabricant décline toute res-
ponsabilité. N’utilisez ni prises multiples ni adaptateurs.
La puissance est insuffisante?
La prise électrique doit être en mesure de supporter la charge
maximum de puissance de l’appareil, indiquée sur la pla-
quette des caractéristiques placée en bas à gauche à côté
du bac à légumes.
Avant de le raccorder électriquement
Après le transport, pour que votre appareil fonctionne bien,
placez-le à la verticale et attendez au moins 3 heures avant
de le brancher à la prise.
La sécurité, une bonne habitude
5. Ne tirez jamais sur le cordon ou le réfrigérateur pour
débrancher la fiche de la prise murale: c’est extrêmement
dangereux.
6. Ne touchez pas aux parties intérieures réfrigérantes sur-
tout avec les mains mouillées, vous pourriez vous brûler ou
vous blesser. Ne portez jamais à la bouche des glaçons à
peine sortis du freezer, vous risqueriez de vous brûler.
7. Ne procédez à aucune opération de nettoyage ou d’en-
tretien sans avoir auparavant débranché la fiche de l’appa-
reil; il ne suffit pas, en effet, d’amener la manette de ré-
glage de la température sur la position pour éliminer
tout contact électrique.
8. Avant d’envoyer votre ancien réfrigérateur à la déchetterie,
rendez sa serrure inutilisable. Vous éviterez ainsi que des
enfants en jouant, ne restent enfermés à l’intérieur.
9. En cas de panne et avant de faire appel au service après-
vente, consultez le chapitre «Quelque chose ne va pas?»
pour vérifier si vous pouvez vous-même résoudre le pro-
blème. Ne tentez pas de réparer la panne en essayant d’ac-
céder aux parties internes.
10. Si le câble d’alimentation de cet appareil est abîmé, seul
notre Service Après Vente peut le changer à l’aide d’outils
spéciaux.

16
.
Vu de près
Manette pour le réglage de la température
Cette manette permet de régler la température des deux
compartiments sur des positions différentes
le réfrigérateur est éteint;
1 moins froid;
5 plus froid.
Balconnet pour oeufs
Balconnets amovibles réglables en hauteur
Balconnet amovible pour bouteilles
Pied de réglasge
Tiroir pour fruits et légumes
Convoyeur eau de dégivrage
Clayettes coulissantes et réglables en hauteur
Lampe d'éclairage du compartiment réfrigérateur
Chambre pour congeler les aliments frais et
pour conserver les aliments surgelés
H
I
E
C
C
A
J
C
D
F
G
H
I
E
C
A
J
D
F
G
C
H
I
E
C
A
J
D
G
F
B

17
.
Comment mettre en marche l'appareil
ATTENTION
Après le transport, pour que votre appareil fonctionne
bien, placez-le à la verticale et attendez au moins 3
heures avant de le brancher à la prise de courant.
Avant d’introduire les aliments dans le réfrigérateur ou dans
le freezer, nettoyez bien l’intérieur de l’appareil avec de l’eau
tiède et du bicarbonate.
Après avoir branché la fiche à la prise de courant, contrôlez
si la lumière à l’intérieur est bien allumée puis tournez la
manette pour le réglage de la température “A” jusqu’à la
position “3” , au bout de quelques heures vous pouvez com-
mencer à introduire les aliments frais dans le compartiment
réfrigérateur et les aliments congelés dans le freezer..
Ce qu'il ne faut pas mettre dans le réfrigérateur
L’ail (il transmet les odeurs), les oignons et les poireaux
Les bananes (elles noircissent)
Les agrumes (il vaut mieux les conserver au frais sur le balcon)
Les pommes de terre et les tubercules (un endroit sec et obscur est préférable)
Comment utiliser au mieux le compartiment réfrigérateur
Le thermostat règle automatiquement la temperature ù
l’interne de l’appareil.
1 = moins froid
5 = plus froid
Une position intermédiaire est de toute manière conseillée.
Pour augmenter la place disponible et améliorer l’aspect
esthétique, la «partie réfrigérante» de cet appareil est si-
tuée à l’intérieur de la paroi arrière du compartiment réfri-
gérateur. En cours de fonctionnement, cette paroi sera par
conséquent recouverte de givre ou de gouttelettes d’eau
suivant que le compresseur est en marche ou pas. Ne vous
en faites pas! Votre réfrigérateur fonctionne tout à fait nor-
malement.
Si vous réglez la manette sur des chiffres plus élevés, en
emmagasinant des quantités importantes de nourriture et
avec une température ambiante élevée, votre appareil ris-
que de fonctionner sans interruption favorisant ainsi la for-
mation de givre sur la paroi arrière réfrigérante tout en con-
sommant beaucoup plus d’électricité.
Pour résoudre cet inconvénient il suffit de déplacer la
manette du thermostat vers des chiffres plus bas per-
mettant ainsi un dégivrage automatique de l’appareil.
Guide au rangement et à la conservation des aliments dans le réfrigérateur
Aliments
Durée de
conservation
Rangement à l'intérieur de
réfrigérateur
Viande et poisson vidé (mettre sous sachets ou
envelopper dans des feuilles plastique
2 ou 3 jours
Au-dessus du bac à légumes
(zone la plus froide du réfrigérateur)
Fromages frais 3 ou 4 jours
Au-dessus du bac à légumes
(zone la plus froide du réfrigérateur)
Oeufs 1 mois
Dans le casier correspondant de la
contre-porte
Beurre et margarine Dans le balconnet de la contre-porte
Aliments cuits ou précuisinés (enfermer dans des
récipient étanches et introduire après refroidissement)
3 ou 4 jours Sur une clayette quelconque
Charcuterie crue, pain de mie, pâtes fraîches, crème,
flans, chocolats, gâteaux à la crème, lard, gâteaux secs,
tomates
3 ou 4 jours Sur une clayette quelconque
Bouteilles, lait, boisson, yaourt
Dans le balconnet correspondant de la
contre-porte
Fruits et légumes Dans le bac à légumes

18
.
- A l’intérieur du réfrigérateur, l’air circule normalement et
l’air plus froid, qui est plus lourd, a tendance à descendre.
C’est pourquoi, les viandes et les fromages doivent être pla-
cés au-dessus du bac à légumes.
- Suivez attentivement nos conseils quant à la durée maxi-
mum de conservation: tout aliment, pour frais qu’il soit, ne
reste pas intact très longtemps..
- Contrairement à ce que l’on pense, les aliments cuits ne se
conservent pas plus longtemps que les aliments crus.
- N’introduisez pas de liquides dans des récipients ouverts,
ils entraîneraient une augmentation de l’humidité à l’inté-
rieur du réfrigérateur et donc la formation de givre.
- Attention à ne pas placer de récipients (plastique, verre),
aliments et autres contre la paroi réfrigérante (paroi arrière).
Les aliments pourraient s’abîmer, la consommation d’éner-
gie augmenter et de la buée pourraient se former (sur les
aliments, les récipients, etc.).
- Le compartiment réfrigérateur est équipé de clayettes amo-
vibles extrêmement pratiques (Fig. 1) et réglables en hau-
teur grâce à des glissières spéciales. Vous pouvez ainsi intro-
duire de grands récipients et des aliments particulièrement
volumineux.
Fig. 1
- Lors de la préparation des aliments à congeler, con-
sultez un manuel spécialisé.
- Un aliment décongelé, ne serait ce que partiellement, ne
doit jamais être remis à congeler : il faut le faire cuire pour
le consommer (dans les 24 heures) ou bien pour le congeler
à nouveau.
- Les aliments frais à congeler ne doivent pas être rangés
tout contre des aliments déjà congelés ou surgelés, ils doi-
vent être posés sur la clayette du compartiment freezer et,
si possible, contre les parois (latérales et arrière). N’oubliez
pas, en effet, que la bonne conservation des aliments con-
gelés dépend de leur vitesse de congélation.
- En cours de congélation, évitez d’ouvrir la porte du free-
zer.
- La quantité maximum pouvant être congelée, par jour, est
indiquée sur la plaquette des caractéristiques située à gau-
che du bac à légumes.
- Pour obtenir une congélation et une décongélation parfai-
tes, il vaut mieux congeler de petites portions d’aliments,
leur congélation n’en sera que plus rapide et homogène.
Indiquez sur vos sachets ou barquettes leur contenu et la
date de congélation.
- N’ouvrez pas la porte du freezer en cas de coupure de
courant ou de panne, vous éviterez ainsi d’accélérer la mon-
tée de la température à l’intérieur du freezer. Les produits
surgelés et congelés se conserveront ainsi inaltérés pendant
environ 9-14 heures.
- Ne mettez jamais de bouteilles pleines dans votre freezer:
elle pourraient se briser car tous les liquides augmentent
de volume en gelant.
- Ne remplissez les bacs à glaçons qu’aux 3/4 de leur hau-
teur.
- Si l’on a pendant longtemps une température ambiante
plus froide que 14°C, les températures indispensables à une
longue conservation ne pourront être atteintes à l’intérieur
du freezer et la durée de conservation sera par conséquent
réduite.
Pour bien congeler
Sidan laddas...
Sidan laddas...
Sidan laddas...
Sidan laddas...
Sidan laddas...
Sidan laddas...
Sidan laddas...
Sidan laddas...
Sidan laddas...
Sidan laddas...
Sidan laddas...
Sidan laddas...
Sidan laddas...
Sidan laddas...
Sidan laddas...
Sidan laddas...
Sidan laddas...
Sidan laddas...
Sidan laddas...
Sidan laddas...
Sidan laddas...
Sidan laddas...
Sidan laddas...
Sidan laddas...
Sidan laddas...
Sidan laddas...
Sidan laddas...
Sidan laddas...
Sidan laddas...
Sidan laddas...
Sidan laddas...
Sidan laddas...
Sidan laddas...
Sidan laddas...
Sidan laddas...
Sidan laddas...
Sidan laddas...
Sidan laddas...
Sidan laddas...
Sidan laddas...
Sidan laddas...
Sidan laddas...
Sidan laddas...
Sidan laddas...
Sidan laddas...
Sidan laddas...
Sidan laddas...
Sidan laddas...
Sidan laddas...
Sidan laddas...
Sidan laddas...
Sidan laddas...
-
 1
1
-
 2
2
-
 3
3
-
 4
4
-
 5
5
-
 6
6
-
 7
7
-
 8
8
-
 9
9
-
 10
10
-
 11
11
-
 12
12
-
 13
13
-
 14
14
-
 15
15
-
 16
16
-
 17
17
-
 18
18
-
 19
19
-
 20
20
-
 21
21
-
 22
22
-
 23
23
-
 24
24
-
 25
25
-
 26
26
-
 27
27
-
 28
28
-
 29
29
-
 30
30
-
 31
31
-
 32
32
-
 33
33
-
 34
34
-
 35
35
-
 36
36
-
 37
37
-
 38
38
-
 39
39
-
 40
40
-
 41
41
-
 42
42
-
 43
43
-
 44
44
-
 45
45
-
 46
46
-
 47
47
-
 48
48
-
 49
49
-
 50
50
-
 51
51
-
 52
52
-
 53
53
-
 54
54
-
 55
55
-
 56
56
-
 57
57
-
 58
58
-
 59
59
-
 60
60
-
 61
61
-
 62
62
-
 63
63
-
 64
64
-
 65
65
-
 66
66
-
 67
67
-
 68
68
-
 69
69
-
 70
70
-
 71
71
-
 72
72


Indesit rg 2190weu Bruksanvisning
- Typ
- Bruksanvisning
- Denna manual är också lämplig för
på andra språk
- italiano: Indesit rg 2190weu Manuale del proprietario
- eesti: Indesit rg 2190weu Omaniku manuaal
- español: Indesit rg 2190weu El manual del propietario
- Deutsch: Indesit rg 2190weu Bedienungsanleitung
- français: Indesit rg 2190weu Le manuel du propriétaire
- English: Indesit rg 2190weu Owner's manual
- dansk: Indesit rg 2190weu Brugervejledning
- Nederlands: Indesit rg 2190weu de handleiding
Relaterade papper
Andra dokument
-
Whirlpool FR 300 A Användarguide
-
-
-
-
-
V-ZUG Komfort 60i Bruksanvisningar
-
Fagor BFD2302BW Bruksanvisning
-
-
-