Tunturi Platinum Rower PRO Manual Concise
- Typ
- Manual Concise

www.tunturi.com
Attention, Achtung, Attention, Attentie, Attenzione, Atención, Giv akt, Huomio
- Bitte lesen Sie dieses Handbuch durch, bevor Sie mit er Montage dieses Produkts beginnen.
- Veuillez lire ce manuel avant de commencer le montage de ce produit.
- Leest u deze handleiding voordat u dit apparaat installeert.
- Leggere questo manuale prima di assemblare questo prodotto.
- Lea este manual antes de montar este producto
- Läs bruksanvisningen innan du monterar denna produkt
- Lue tämä käsikirja ennen kokoamista tuotetta
Rower
GB User manual 18 - 20
DE Benutzerhandbuch 21 - 23
FR Manuel de l’utilisateur 24 - 26
NL Gebruikershandleiding 27 - 29
IT Manuale d‘uso 30 - 32
ES Manual del usuario 33 - 35
SV Bruksanvisning 36 - 38
SU Käyttöohje 39 - 41


3
Rower
A

Frame X1
Aluminum Rail X1
Rear Bracket For
Aluminum Rail X1
Rear Cover For
Aluminum Rail X1
Seat Assembly X1
Frame bracket set X1
Rall bracket set X1
Cover set for
main shrouds X1
Pedal set X1
Front stabilizer X1
4
Rower
B

Tool
M5X113L
Tool
M8X180L
Tool
NO. 58 (4 pcs)
Screw
M5X12L
NO. 57 (2 pcs)
Screw
M4X20L
NO. 50 (8 pcs)
Screw
M6*10L
NO. 51 (1pcs)
Screw
M6X20L
NO. 54 (1 pcs)
Screw
M10X50L
NO. 53 (1 pcs)
Screw
M10X40L
NO. 52 (12 pcs)
Screw
M10X20L
NO. 61 (2 pcs)
Rubber Pad
NO. 55 (8 pcs)
Flat washer
M6X16X1.5T
NO. 56 (16 pcs)
Flat Washer
M10X21X2.0T
NO. 59 (2 pcs)
Ring
NO. 60 (2 pcs)
Spacer ring
NO. 62 (2 pcs)
Screw
M10X60L
5
Rower
C

100 cm
100 cm
100 cm
100 cm
6
Rower
D-0
D-1
# 56 2x
# 62 2x

7
Rower
D-2
D-3
# 52 6x
# 56 6x
# 57 2x
# 58 4x

8
Rower
D-4
D-5
# 56 2x
# 62 2x

TURN&LOCK
TURN&LOCK
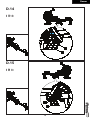
9
Rower
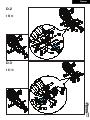
D-6
D-7
# 53 1x
# 54 1x
# 56 2x

10
Rower
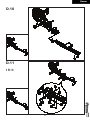
D-8
D-9
# 51 1x

11
Rower
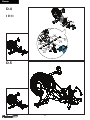
D-10
D-11
# 52 4x
# 56 2x

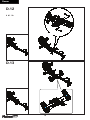
12
Rower
D-12
D-13
# 61 2x

13
Rower
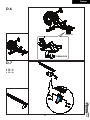
D-14
D-15
# 50 4x
# 55 4x
# 50 4x
# 55 4x

3 mm
X
14
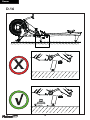
Rower
D-16

15
Rower
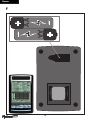
E

+
_
+
_
AA
AA
16
Rower
F

CLICK !
17
Rower
G

18
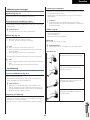
English
To reduce the impact on the environment, we have kept this user manual as concise as possible by only providing the
most essential information.
Visit http://manuals.tunturi.com for a complete version and www.tunturi.com for all
product related information.
Please retain the product model name and SKU code for a quick match when searching
the database.
The SKU and product model name can be found on your serial number label.
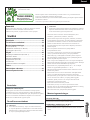
THINK GREEN
We are proud to be
ecologically responsible
Index
Rower..................................................................18
Safety warnings ................................................. 18
Assembly instructions ...................................... 19
Description (g. A) ....................................................... 19
Package contents (g. B & C) ......................................19
Assembly (g. D) .........................................................19
Use ...................................................................... 19
Adjusting the support feet (g. E-1) ............................ 19
Adjusting resistance .................................................... 19
Adjusting the footplates .............................................. 19
Folding (Fig. G) ............................................................ 19
How to row ..................................................................19
Additional information ................................................ 20
Declaration of the manufacturer ...................... 20
Disclaimer .......................................................... 20
Rower
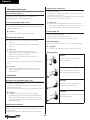
Important Safety Instructions
This Owner’s Manual is an essential part of your training equipment:
reading all instructions in this manual before you start using this
appliance. The following precautions must always be followed:
Safety warnings
⚠ WARNING
• Read the safety warnings and the instructions. Failure to follow
the safety warnings and the instructions can cause personal
injury or damage to the equipment. Keep the safety warnings
and the instructions for future reference.
⚠ WARNING
• Heart rate monitoring systems may be inaccurate.
• Over exercise may result in serious injury or death. If you feel
faint stop exercising immediately.
- The equipment is suitable for domestic and professional use only
(e.g. hospitals, fire stations, hotels, schools etc.).
- The use of this equipment by children or persons with a physical,
sensory, mental or motorial disability, or lack of experience and
knowledge can give cause to hazards. Persons responsible for their
safety must give explicit instructions or supervise the use of the
equipment.
- Before starting your workout, consult a physician to check your
health.
- If you experience nausea, dizziness or other abnormal symptoms,
immediately stop your workout and consult a physician.
- To avoid muscular pain and strain, start each workout by warming
up and finish each workout by cooling down. Remember to stretch
at the end of the workout.
- The equipment is suitable for indoor use only. The equipment is
not suitable for outdoor use.
- Only use the equipment in environments with adequate ventilation.
Do not use the equipment in draughty environments in order not
to catch a cold.
- Only use the equipment in environments with ambient
temperatures between 10 °C and 35 °C. Only store the equipment
in environments with ambient temperatures between 5 °C and 45
°C.
- Do not use or store the equipment in humid surroundings. The air
humidity must never be more than 80%.
- Only use the equipment for its intended purpose. Do not use the
equipment for other purposes than described in the manual.
- Do not use the equipment if any part is damaged or defective. If a
part is damaged or defective, contact your dealer.
- Keep your hands, feet and other body parts away from the moving
parts.
- Keep your hair away from the moving parts.
- Wear appropriate clothing and shoes.
- Keep clothing, jewellery and other objects away from the moving
parts.
- Make sure that only one person uses the equipment at a time. The
equipment must not be used by persons weighing more than 165
kg (363 lbs).
- Do not open equipment without consulting your dealer.

19
English
Assembly instructions
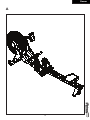
Description (fig. A)
Your rower is a piece of stationary fitness equipment used to simulate
rowing without causing excessive pressure to the joints.
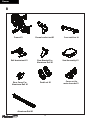
Package contents (fig. B & C)
- The package contains the parts as shown in
fig. B.
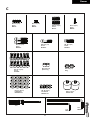
- The package contains the fasteners as shown in fig. C. Refer to the
section “Description”
‼ NOTE
• If a part is missing, contact your dealer.
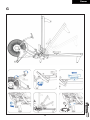
Assembly (fig. D)
⚠ WARNING
• Assemble the equipment in the given order.
• Carry and move the equipment with at least two persons.
⚠ CAUTION
• Place the equipment on a firm, level surface.
• Place the equipment on a protective base to prevent damage to
the floor surface.
• Allow at least 100 cm of clearance around the equipment.
• Refer to the illustrations for the correct assembly of the
equipment.
‼ NOTE
• Save the tools provided with this product, after you completed
the product assembly,
for future service purposes.
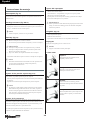
Use
Adjusting the support feet (fig. E-1)
The equipment is equipped with 2 support feet. If the equipment is
not stable, the support feet can be adjusted.
- Turn the support feet as required to put the equipment in a stable
position.
- Tighten the locknuts to lock the support feet.
‼ NOTE
• The machine is the most stable when all support feet are turned
fully in. Therefore start to level the machine by turning all
support feet fully in, before turning out the required support
feet to stable the machine.
Adjusting resistance
To increase or decrease resistance, turn the adjustment knob at front
of the rowing frame cover.
- Clockwise (+ direction) to increase resistance
- Counterclockwise (- direction) to decrease resistance.
The scale above the knob (1-12) helps you find and reset a suitable
resistance.
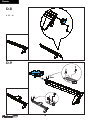
Adjusting the footplates
- Lift the top of the sliding portion of the footplate and slide up or
down.
The symbols A ~ F represent a guideline from which the proper
length can be determined.
- Secure the plate onto the mounting pegs and push down firmly to
lock into position.
⚠ WARNING
• Never operate this rower without feet properly secured in Foot
straps, or without the sliding portion of the Slider Footplate
locked into position.
Folding (Fig. G)
- Pull out the lock pin from the joint.
- Loosen the fixation knob.
- Fold the aluminium rail.
- Securing aluminium rail with the lock pin.
Unfolding
same as in folding, but in reverse following order.
‼
NOTE
• Support the slide rail when lowering all the way down.
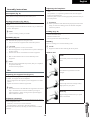
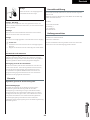
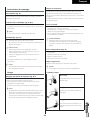
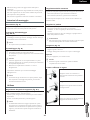
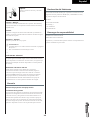
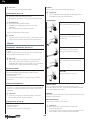
How to row
Catch
Comfortably forward with straight back and
arms.
Drive
Push with the legs while arms remain
straight.
Finish
Pull through with arms and legs rocking
slightly back on your pelvis.
Recovery
Upper body tips forward over your pelvis
and move forward.

20
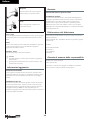
English
Catch
Back to the starting position and begin
again.
Catch - Drive
Begin the stroke comfortably in forward position and push strongly
back with your legs while keeping your arms and back straight.
Finish
Begin to pull your arms back as they pass over your knees and
continue the stroke through to completion rocking slightly back over
your pelvis.
Recovery - Catch
Return to the starting position and repeat.
⚠ WARNING
• Always consult a doctor before beginning an exercise program.
• Stop immediately if you feel faint or dizzy.
Additional information
Packaging disposal
Government guidelines ask that we reduce the amount of waste
material disposed of in land fill sites. We therefore ask that you
dispose of all packaging waste responsibly at public recycling centres.
End of life disposal
We at Tunturi hope you enjoy many years of enjoyable use from your
fitness trainer. However, a time will come when your fitness trainer will
come to the end of its useful life. Under ‘European WEEE Legislation
you are responsible for the appropriate disposal of your fitness trainer
to a recognised public collection facility.
Warranty
Warranty terms
The consumer is entitled to the applicable legal rights stated in the
national legislation concerning the commerce of consumer goods.
This warranty does not restrict these rights. The Purchaser’s Warranty
is only valid if the item is used in an environment approved by Tunturi
New Fitness BV for that particular equipment. The product-specific
approved environment is stated in the Owner’s Manual provided with
your equipment.
Declaration of the manufacturer
Tunturi New Fitness BV declares that the product is in conformity with
the following standards and directives: EN 957 (SA), 2014/30/EU.
The product therefore carries the CE label.
04-2020
Tunturi New Fitness BV
Purmerweg 1
1311 XE Almere
The Netherlands
Disclaimer
© 2020 Tunturi New Fitness BV
All rights reserved.
The product and the manual are subject to change. Specifications can
be changed without further notice.
Sidan laddas...
Sidan laddas...
Sidan laddas...
Sidan laddas...
Sidan laddas...
Sidan laddas...
Sidan laddas...
Sidan laddas...
Sidan laddas...
Sidan laddas...
Sidan laddas...
Sidan laddas...
Sidan laddas...
Sidan laddas...
Sidan laddas...
Sidan laddas...
Sidan laddas...
Sidan laddas...
Sidan laddas...
Sidan laddas...
Sidan laddas...
Sidan laddas...
Sidan laddas...
Sidan laddas...
-
 1
1
-
 2
2
-
 3
3
-
 4
4
-
 5
5
-
 6
6
-
 7
7
-
 8
8
-
 9
9
-
 10
10
-
 11
11
-
 12
12
-
 13
13
-
 14
14
-
 15
15
-
 16
16
-
 17
17
-
 18
18
-
 19
19
-
 20
20
-
 21
21
-
 22
22
-
 23
23
-
 24
24
-
 25
25
-
 26
26
-
 27
27
-
 28
28
-
 29
29
-
 30
30
-
 31
31
-
 32
32
-
 33
33
-
 34
34
-
 35
35
-
 36
36
-
 37
37
-
 38
38
-
 39
39
-
 40
40
-
 41
41
-
 42
42
-
 43
43
-
 44
44


Tunturi Platinum Rower PRO Manual Concise
- Typ
- Manual Concise
på andra språk
- italiano: Tunturi Platinum Rower PRO
- español: Tunturi Platinum Rower PRO
- Deutsch: Tunturi Platinum Rower PRO
- français: Tunturi Platinum Rower PRO
- English: Tunturi Platinum Rower PRO
- suomi: Tunturi Platinum Rower PRO
- Nederlands: Tunturi Platinum Rower PRO