Electrolux PA91-404DG Användarmanual
- Kategori
- Luftrenare
- Typ
- Användarmanual
Denna manual är också lämplig för


www.electrolux.com2
TABLE OF CONTENT
English ..............................................10
Český .................................................14
Dansk ................................................18
Suomalainen ..................................22
Français ............................................26
Deutsch ............................................31
Magyar .............................................36
Italiano .............................................40
Norsk .................................................46
Polski .................................................49
Română ............................................53
русский ............................................57
Slovenský.........................................61
Slovenščina .....................................65
Svenska ............................................69
Türk ....................................................73

www.electrolux.com 3
E
G
F
ABC
D
H
I
LM
NOP
K
R
Q
TSJ
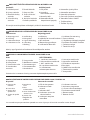
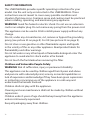
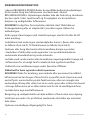
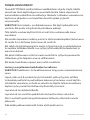
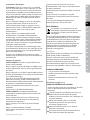
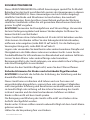
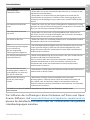
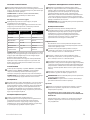
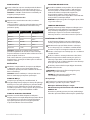
Appliance:
A. Control panel
B. Air outlet
C. Air quality light
D. Air quality sensor
E. Fabric handle
F. Multi-layer lter
G. Air intake door
H. Air intake
I. Product handles
Control panel:
J. Loading LED
K. Manual mode indicator
L. WiFi indicator
M. Child lock indicator
N. Filter change indicator
O. Ionizer indicator
P. Schedule indicator
Q. Fan speed slider
R. SMART mode indicator
S. Mode button
T. On/O button
DESCRIPTION OF YOUR AIR PURIFIER PURE A9-40/PURE A9-60
Features might be added or updated with new App releases.
EN

www.electrolux.com4
Luftrenseren:
A. Betjeningspanel
B. Luftudtag
C. Luftkvalitetslampe
D. Luftkvalitetssensor
E. Stofhåndtag
F. Flerlagslter
G. Låge til luftindtag
H. Luftindtag
I. Håndtag
J. Infolampe
K. Indikator for manuel funktion
L. WiFi-indikator
M. Børnesikringsindikator
N. Indikator for lterskift
O. Indikator for ionisering
P. Timer-indikator
Q.
Skydeknap til blæserhastighed
R. Indikator for SMART funktion
S. Funktionsvælger
T. Tænd/Sluk-knap
BESKRIVELSE AF LUFTRENSER PURE A940/PURE A960
DA
Betjeningspanel:
Med ny app frigivelse kan funktioner blive tilføjet eller ændret
Ominaisuuksia saatetaan lisätä ja parantaa ohjelmistopäivitysten avulla.
Osat:
A. Käyttöpaneeli
B. Ilmanpoisto
C. Ilmanlaadun valo
D. Ilmanlaadun
tunnistin
E. Kangasvedin
F. Monikerrossuodatin
G. Ilmanottosuojus
H. Ilmanottoaukko
I. Kantokahvat
J. Latauksen merkkivalo
K. Manuaalitilan merkkivalo
L. WiFi -merkkivalo
M. Lapsilukon merkkivalo
N. Suodattimen
vaihtotarpeen ilmaisin
O. Ionisoijan-merkkivalo
P. Ajastimen merkkivalo
Q. Puhaltimen nopeuden
liukusäädin
R. SMART-tilan merkkivalo
S. Toimintatilan painike
T. Virtapainike
KUVAUS: ILMANPUHDISTIN PURE A940/PURE A960
FI
KÄYTTÖPANEELI:
Spotřebič:
A. Ovládací panel
B. Výstup vzduchu
C. Kontrolka kvality
vzduchu
D. Snímač kvality
vzduchu
E. Textilní držadlo
F. Vícevrstvý ltr
G. Dvířka nasávání
vzduchu
H. Nasávání vzduchu
I. Držadla spotřebiče
Ovládací panel:
J. LED plnění
K. Kontrolka
manuálníhorežimu
L. Kontrolka WiFi
M. Kontrolka dětské
bezpečnostní pojistky
N. Kontrolka výměny ltru
O. Kontrolka ionizátoru
P. Kontrolka plánování
Q. Posuvník rychlosti ventilátoru
R. Kontrolka režimu SMART
S. Tlačítko režimu
T. Tlačítko Zap./Vyp.
POPIS VAŠÍ ČISTIČKY VZDUCHU PURE A9-40/PURE A9-60
Při nových verzích aplikace může dojít k přidání či aktualizaci funkcí.
CZ
Dispositif:
A. Panneau de
contrôle
B. Sortie d’air
C. Voyant de la
qualité d’air
D. Sonde de qualité
d’air
E. Poignée en
tissu
F. Filtre
multicouches
G. Porte d’admission
d’entrée d’air
H. Entrée d’air
I. Poignées du
produit
J. LED de chargement
K. Indicateur mode
manuel
L. Indicateur WiFi
M. Indicateur verrou de
sécurité enfant
N. Indicateur remplace
ment ltre
DESCRIPTION DE VOTRE PURIFICATEUR D’AIR PURE A940 / PURE A960
FR
Panneau de contrôle:
Les caractéristiques peuvent être ajoutées ou mises à jour par le biais de nouvelles sorties d’appli.
O. Indicateur ioniseur
P. Indicateur programme
Q.
Curseur vitesse ventilateur
R. Indicateur mode SMART
S. Bouton mode
T. Bouton On/O

www.electrolux.com 5
Egenskaper kan legges til eller endres ved oppdatering av appen.
Apparatet:
A. Betjeningspanel
B. Luftuttak
C. Luftkvalitetsindikator
D. Luftkvalitetssensor
E. Stohåndtak
F. Flerlagslter
G. Luftinntakdeksel
H. Lunntak
I. Bærehåndtak
J. Avlesningsindikator
K. Indikator for MANUELL
modus
L. Wi-indikator
M. Indikator for barnesikring
N. Indikator for lterbytte
O. Indikator for ionisering
P. Indikator for tidsplanlegger
Q. Glidebryter for viftehastighet
R. Indikator for SMART modus
S. Modusknapp
T. Av/på knapp
BESKRIVELSE AV LUFTRENSER PURE A940/PURE A960
NO
Betjeningspanel:
Készülék:
A. Kezelőpanel
B. Levegő kimenet
C. Levegőminőség
lámpa
D. Levegőminőség
érzékelő
E. Textilfogantyú
F. Többrétegű szűrő
G. Levegőbemeneti
ajtó
H. Levegőbemenet
I. A termék fogantyúi
Kezelőpanel:
J. Betöltés LED
K. Manuális üzemmód
jelzőfénye
L. WiFi jelzés
M. Gyerekzár jelzőfénye
N. Szűrőcsere jelzőfénye
O. Ionizáló jelzőfény
P. Ütemezés jelzés
Q. Ventilátor-sebesség beállító
R. INTELLIGENS üzemmód jelzés
S. Üzemmód kapcsoló
M. Be/Ki kapcsoló
A PURE A9-40/PURE A9-60 LÉGTISZTÍTÓ BEMUTATÁSA
Az alkalmazás újabb verzióinak megjelenésével a funkciók bővülhetnek vagy módosulhatnak.
HU
Gerätebeschreibung:
A. Steuereinheit
B. Luftauslass
C. Kontrollleuchte
der Luftqualität
D. Sensor zur
Messung der
Luftqualität
E. Stoasche
F. Mehrlagiger
Filter
G. Tür des Zuluft-
gehäuses
H. Zuluftgehäuse
I. Tragegrie
J. LED-Ladeanzeige
K. Anzeige «Manuell»-
Modus
L. Anzeige WLAN
M. Anzeige Kinder-
sicherung
N. Anzeige Filterwechsel
O. Anzeige Ionisator
P. Anzeige Planbetrieb
Q.
Regler Gebläsegeschwindigkeit
R. Anzeige «Smart»-Modus
S. Modus-Taste
T. Ein-/Aus-Taste
BESCHREIBUNG IHRES LUFTREINIGERS PURE A940/PURE A960
DE
Steuereinheit:
Weitere Funktionen können mit der App hinzugefügt oder aktualisiert werden.
Apparecchio:
A. Pannello di
controllo
B. Apertura per
sfogo dell’aria
C. Indicatore della
qualità dell’aria
D. Sensore della
qualità dell’aria
E. Maniglia in
stoa
F. Filtro multistrato
G. Sportello della
valvola di
aspirazione
dell’aria
H. Valvola di
aspirazione dell’aria
I. Maniglie del
prodotto
J. Indicatore di
caricamento in corso
LED
K. Indicatore della
modalità manuale
L. Indicatore WiFi
M. Indicatore blocco
bambini
N. Indicatore di cambio
ltro
DESCRIZIONE DEL PURIFICATORE D’ARIA PURE A940/PURE A960
IT
Pannello di controllo:
Con le versioni recenti dell’app, possono essere aggiunte o aggiornate delle funzioni.
O. Indicatore dello ionizzatore
P. Indicatore del programma
Q.
Binario per velocità ventola
R. Indicatore modalità SMART
S. Pulsante modalità
T. Pulsante on/o

www.electrolux.com6
Urządzenie:
A. Panel sterowania
B. Wylot powietrza
C. Wskaźnik jakości
powietrza
D. Czujnik jakości
powietrza
E. Uchwyt z tkaniny
F. Filtr
wielowarstwowy
G. Klapka wlotu
powietrza
H. Wlot powietrza
I. Uchwyty urządzenia
Panel sterowania:
J. Wskaźnik obciążenia
K. Wskaźnik trybu ręcznego
L. Wskaźnik Wi-Fi
M. Wskaźnik blokady
uruchomienia
N. Wskaźnik wymiany ltra
O. Wskaźnik jonizatora
P. Wskaźnik harmonogramu
Q. Suwak regulacji prędkości
wentylatora
R. Wskaźnik trybu SMART
S. Przycisk trybu pracy
T. Przycisk Wł./Wył.
OPIS OCZYSZCZACZA POWIETRZA PURE A9-40/PURE A9-60
Nowe wersje aplikacji mogą zawierać nowe funkcje lub aktualizacje dotychczasowych funkcji.
PL
Panoul de comandă:
J. LED Încărcare
K. Indicator mod manual
L. Indicator WiFi
M. Indicator blocare
accescopii
N. Indicator de schimbare
altrului
O. Indicator ionizator
P. Indicator program
Q. Selector viteză ventilator
R. Indicator mod SMART
S. Buton Mod
T. Buton Pornit/Oprit
Aparat:
A. Panou de comandă
B. Evacuare aer
C. Indicator luminos
pentru calitatea
aerului
D. Senzor calitate aer
E. Mâner textil
F. Filtru multistrat
G. Ușă admisie aer
H. Admisie aer
I. Mânere produs
DESCRIEREA PURIFICATORULUI DVS. DE AER PURE A9-40/PURE A9-60
Funcțiile pot adăugate sau actualizate cu noi versiuni de Aplicație.
RO
Прибор:
А. Панель
управления
B. Отверстие для
выпуска воздуха
C. Индикатор
качества воздуха
D. Датчик качества
воздуха
E. Рукоятка с
тканевой обивкой
F. Многослойный
фильтр
G. Дверца
воздухозаборника
H. Воздухозаборник
I. Рукоятки изделия
Панель управления:
J. Светодиодный
индикатор загрузки
K. Индикатор ручного
режима
L. Индикатор Wi-Fi
M. Индикатор функции
защиты от детей
N. Индикатор
необходимости
заменыфильтра
O. Индикатор ионизатора
P. Индикатор работы по
расписанию
Q. Ползунок регулировки
скорости вентилятора
R. Индикатор
ИНТЕЛЛЕКТУАЛЬНОГО режима
S. Кнопка режимов
T. Кнопка включения/
выключения
PURE A9-40/PURE A9-60
В новых версиях приложения могут быть добавлены новые функции или обновлены имеющиеся функции.
RU
Spotrebič:
A. Ovládací panel
B. Výstup vzduchu
C. Ukazovateľ kvality
vzduchu
D. Snímač kvality
vzduchu
E. Textilná rukoväť
F. Viacvrstvový lter
G. Dvierka prívodu
vzduchu
H. Prívod vzduchu
I. Rukoväte
spotrebiča
Ovládací panel:
J. LED načítavania
K. Ukazovateľ manuálneho
režimu
L. Indikátor wi
M. Indikátor detskej poistky
N. Indikátor výmeny ltra
O. Indikátor ionizátora
P. Indikátor plánovača
Q. Ovládač rýchlosti ventilátora
R. Indikátor INTELIGENTNÉHO
režimu
S. Tlačidlo režimu
T. Tlačidlo zap./vyp.
POPIS ČISTIČKY VZDUCHU PURE A9-40/PURE A9-60
Pri novej verzii aplikácie môže dôjsť k pridaniu alebo aktualizácii funkcií.
SK

www.electrolux.com 7
Naprava:
A. Upravljalna plošča
B. Izstop zraka
C. Lučka za kakovost
zraka
C. Senzor kakovosti
zraka
E. Ročaj za perilo
F. Večplastni lter
G. Vrata za dovod
zraka
H. Dovod zraka
I. Ročaji za izdelek
Upravljalna plošča:
J. LED lučka za nalaganje
K. Indikator ročnega načina
L. Indikator za WiFi
M. Indikator varovala za
otroke
N. Indikator menjave ltra
O. Indikator ionizatorja
P. Indikator urnika
Q. Drsnik za hitrost ventilatorja
R. Indikator za PAMETNI način
S. Tipka za izbiro načina
T. Tipka za vklop/izklop
OPIS VAŠEGA PREČIŠČEVALCA ZRAKA PURE A9-40/PURE A9-60
Funkcije se lahko dodajajo ali posodabljajo z novimi različicami aplikacije.
SL
Enheten:
A. Kontrollpanel
B. Luftutblås
C. Luftkvalitetsindikator
D. Luftkvalitetssensor
E. Tygrem
F. Flerskiktslter
G. Luftintag med lucka
H. Luftintag
I. Handtag
Kontrollpanelen:
J. Laddningsindikator
K. Indikator för Manuellt
läge
L. WiFi- indikator
M. Barnlåsindikator
N. Indikator för lterbyte
O. Joniserings indikator
P. Indikator för schemaläggning
Q. Reglage för äkthastighet
R. Indikator för SMART läge
S. Lägesväljare
T. Strömbrytare På/Av
BESKRIVNING SV AV LUFTRENARE PURE A940/PURE A960
SV
Funktioner kan läggas till och justeras vid uppdateringar av appen.
Cihaz:
A. Kontrol paneli
B. Hava çıkışı
C. Hava kalitesi ışığı
D. Hava kalitesi
sensörü
E. Kumaş tutamak
F. Çok katmanlı ltre
G. Hava giriş kapağı
H. Hava girişi
I. Ürün tutamakları
Kontrol paneli:
J. Yükleme LED’i
K. Manuel mod göstergesi
L. WiFi göstergesi
M. Çocuk kilidi göstergesi
N. Filtre değiştirme
göstergesi
O. İyonlaştırıcı göstergesi
P. Program göstergesi
Q. Fan hızı kaydırıcı
R. AKILLI mod göstergesi
S. Mod düğmesi
T. Açma/Kapatma düğmesi
PURE A9-40/PURE A9-60 HAVA TEMİZLEYİCİNİZ İÇİN AÇIKLAMA
Yeni Uygulama sürümleriyle birlikte özellikler eklenebilir veya güncellenebilir.
TR

www.electrolux.com8
1
2
0°
3
Min. 30 cm
4
5
6
7
8
11
9
10
12

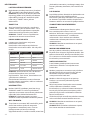
www.electrolux.com 9
14
15
16
17
19
20
21
22
23
24
25
13

www.electrolux.com10
SAFETY INFORMATION
This USER MANUAL provides specic operating instructions for your
model. Use the unit only as instructed in this USER MANUAL. These
instructions are not meant to cover every possible condition and
situation that may occur. Common sense and caution must be practiced
when installing, operating, and maintaining any appliance.
WARNING! Avoid re hazard or electric shock. Do not use an extension
cord or an adaptor plug. Do not remove any prong from the power cord.
This appliance can be used in 50Hz or 60Hz power supply without any
change.
Do not, under any circumstances, cut, remove or bypass the grounding
prong (see picture 23 on page 9). For UK (see picture 24 on page 9).
Do not store or use gasoline or other ammable vapors and liquids
in the vicinity of this or any other appliance. Read product labels for
ammability and other warnings.
Do not let water or any other liquid or ammable detergent enter the
appliance to avoid electric shock and/or a re hazard.
Do not touch the fan blade when removing the lter.
Children and Vulnerable People Safety
WARNING! Risk of suocation, injury or permanent disability.
This appliance can be used by children aged from 8 years and above
and persons with reduced physical, sensory or mental capabilities or
lack of experience and knowledge if they have been given supervision
or instruction concerning use of the appliance in a safe way and
understand the hazards involved.
Children shall not play with the appliance.
Cleaning and user maintenance shall not be made by children without
supervision.
Children under 3 years of age should be kept away from the appliance
unless continuously supervised.
Keep all packaging away from children.

www.electrolux.com 11
Electrical Information
WARNING! Avoid re hazard or electric shock.
If you are not sure the outlet is adequately grounded
or protected by a time delay fuse or circuit breaker,
have a qualied electrician install the proper outlet
according to the National Electrical Code and
applicable local codes and ordinances.
Do not use an extension cord or an adapter plug.
Never unplug the unit by pulling on the power cord.
Always grip the plug rmly and pull straight out from
the receptacle.
Do not pinch, bend, or knot the power cord.
Do not cut or damage the power cord. If the power
cord is damaged, it should only be replaced by an
authorized Electrolux servicer. This unit contains no
user- serviceable parts. Always call an authorized
Electrolux servicer for repairs.
If the supply cord is damaged, it must be replaced
by the manufacturer, its service agent or similarly
qualied persons in order to avoid a hazard.
Be sure to unplug the unit before cleaning to prevent
shock or re hazards.
ENGLISH
Thank you for choosing the Electrolux air purier
PURE A9-40/PURE A9-60.
Always use original accessories and spare parts to
get the best results. This product is designed with the
environment in mind. All plastic parts are marked for
recycling purposes.
BEFORE STARTING
• Read this manual carefully.
• Check that all parts described are included.
• Pay special attention to the safety precautions!
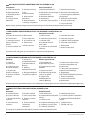
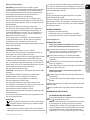
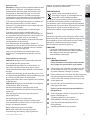
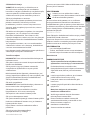
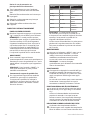
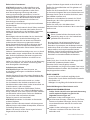
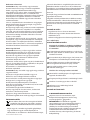
Picture pages 8-9
Place the product according to the instructions
below for optimal operation and results:
BEFORE FIRST USE
Safety Precautions
CAUTION! Avoid Serious Injury or Death.
Do not insert or place ngers or objects into the air
discharge area or front grille of the unit.
Do not start or stop the unit by unplugging the power
cord or turning o the power at the electrical box.
In the event of a malfunction (sparks, burning smell,
etc.), immediately stop the operation, disconnect the
power cord, and call an authorized Electrolux servicer.
Do not operate the unit with wet hands.
Do not pull on the power cord.
CAUTION! Avoid Injury or damage to the unit or other
property.
Do not direct airow at replaces or other heat
related sources as this could cause are ups.
Do not climb on or place objects on the unit.
Do not hang objects o the unit.
Do not place containers with liquids on the unit.
Turn o the unit at the power source when it will not
be used for an extended period of time.
Operate the unit with air lter in place.
Do not block or cover the intake grille, discharge area
and outlet ports.
Ensure that any electrical/electronic equipment is 30
cm away from the unit.
This symbol on the product or on its packaging
indicates that the product may not be treated
as household waste.
To recycle your product, please take it to an ocial
collection point or to an Electrolux service center that
Operate the air cleaner in an enclosed area.
Close all doors, windows, and other openings
connecting to the outside of the room.
Place the air cleaner in a location that does
not restrict the airow through the top of the
appliance.
The appliance must be placed on a leveled oor
that can support it.
There should be a minimum of 30 cm of clearance
around the appliance.
Remove the plastic protective bag from the
multi-layer lter:
DISPOSAL
1
2
3
4
can remove and recycle the battery and electric parts
in a safe and professional way. Follow your country’s
rules for the separate collection of electrical products
and rechargeable batteries.
OPERATION INSTRUCTIONS
TO TURN ON THE APPLIANCE
Pull the Fabric handle outward to remove the air
intake door.
Take out the multi-layer lter pulling it out by the
handle.
Remove the plastic protective bag from the multi-
layer lter.
Reinstall the multi-layer lter into the appliance.
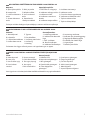
Plug in the appliance and tap (touch and release)
the " " button to turn it on.
NOTE: It will take about 10 seconds for the sensor
to analyze the air quality, during this time the
Loading LED and the Air quality light will pulsate
slowly in white. Each time the appliance is turned
on the SMART mode is activated automatically
and the fan runs in low speed until the air quality
5
6
7
8
9
GB
FI
DA
DE
FR
HU
IT
NO
PL
RO
RU
SK
SL
SV
TR
CS

www.electrolux.com12
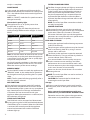
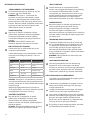
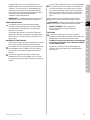
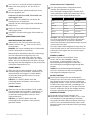
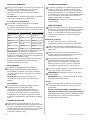
SMART MODE
About the Air quality light
CHILD LOCK FUNCTION
FILTER CHANGE INDICATOR
IONIZER FUNCTION
CARE AND CLEANING
MANUAL MODE
WIFI FUNCTION
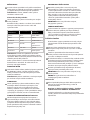
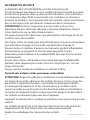
The appliance has an air quality sensor that
analyzes the air quality.
The air quality light will show the real-time air
quality through dierent colors of light. As shown
below:
NOTE: It will take about 10 seconds for the sensor
to analyze the air quality each time the appliance
is turned on. During this time, the air quality light
will pulsate slowly in white.
Very high humidity conditions in the room might
produce condensation in the sensors. This could
aect the accuracy of the sensor readings.
In this mode, the appliance will choose the fan
speed automatically, based on the air quality level.
This is the default mode each time the appliance
is turned on.
NOTE: In "SMART" mode the fan speed cannot be
changed manually.
The Child lock can be activated and deactivated
by long pressing the On/O and the Mode button
simultaneously for 4 seconds. When the Child lock
is activated, the control panel of the appliance
cannot be interacted with and the Child lock
indicator light up.
The lter change indicator will light up to remind
you to change the lter. Refer to the instructions
in the Pure A9 app or the Electrolux website on
where to purchase replacement lters. Ensure
the plastic protective bag is removed from the
replacement lter before use. After the lter is
replaced, the lter change indicator will turn o
automatically.
NOTE: The multi-layer lter cannot be washed, it
can only be replaced.
The ionizer function can only be activated and
deactivated by using the Pure A9 app (smartphone
application). When this function is activated,
the ionizer indicator lights up and the appliance
generates ions to improve the unit's performance
and with it the room’s air quality.
The plastic parts of the appliance may be cleaned
with an oil-free dry cloth or by using a vacuum
cleaner with a soft brush.
The fabric on the appliance cannot be removed.
Clean the fabric by using an oil-free dry cloth or a
vacuum cleaner with a soft brush.
Dust accumulated in the Air quality sensor can
result in incorrect sensor readings and aect
performance. Use a vacuum cleaner with a soft
brush to remove any dust that might accumulate
in this area. Vacuum at least monthly.
Never use abrasive, harsh cleaners or wax when
cleaning the unit.
Unplug the appliance before cleaning to prevent
shock or re hazards.
Tap the “MODE” button to switch the appliance to
“MANUAL” mode. In this mode, the fan speed can
be changed manually by touching the Fan speed
slider.
NOTE: The fan speed will change gradually after a
new fan speed is selected.
This appliance is equipped with a WiFi module,
which enables remote control and access to the
full functionality of the system via our smartphone
app. Download our Pure A9 app and follow the
instructions for how to connect it with your
appliance. When the connection is stablished, the
WiFi indicator will light up.
10
11
14
15
16
17
19
18
20
12
13
LIGHT'S COLOR
Green
Yellow
Orange
Red
Purple
Maroon
PM 2.5 (μg/m
3
) AIR QUALITY
0-12 Very Good
13-35 Good
36-55 Poor
56-150 Very Poor
151-250 Bad
>250 Very Bad
analysis is complete.
21
NOTE: The multi-layer lter can not be washed, it
can only be replaced.
CAUTION! Do not touch the fan blade when
removing the multi-layer lter.
Storage
Enjoy a great cleaning experience with your
Electrolux air purier PURE A9-40/PURE A9-60!
If you are not planning to use the appliance for
a long time, cover it with plastic or return it to its
carton.
Electrolux reserves the right to change products,
information and specications without notice.
22

www.electrolux.com 13
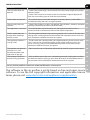
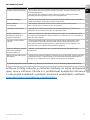
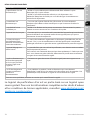
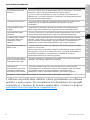
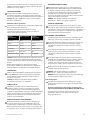
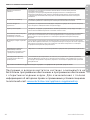
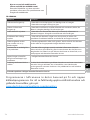
TROUBLESHOOTING
PROBLEM
The air purier does not
operate.
The fan does not operate.
The air quality does not
improve.
The appliance is very loud.
The fan speed does not
change after selecting a
new fan speed.
The appliance produces a
strange smell.
The app does not operate
properly or it is not
possible to onboard the
appliance on the app.
The Loading LED ashes
quickly during operation.
For any further problems, contact an authorized Electrolux service centre.
• Check if the power plug is disconnected. Push the power plug rmly into the
electrical outlet.
• Check if the house fuse is blown or the circuit breaker tripped. Replace the
fuse with a time delay type or reset the circuit breaker.
• Ensure that the air intake door (image 8) is closed properly, and the lter is
installed correctly, then retry using the purier.
• Check if the windows or doors are opened. Close all doors, windows and other
openings connecting to the outside of the room.
• Ensure that there are no obstacles near the appliance and that it has a
minimum of 30 cm of clearance around it for optimal operation.
• The fan speed will decrease or increase gradually, this is normal. If it does not
change after a prolonged period of time after the input then please reach out
to an Electrolux authorized servicer for support.
• The rst time you use the purier, you might perceive a plastic or paint smell.
This is normal, but it should disappear quickly. If the smell persist or if you
sense a burning smell, please disconnect the purier and reach out to an
Electrolux authorized servicer for support.
• Please reach out to an Electrolux authorized servicer for support on the topic.
• If this problem occurs the unit is not working normally. Unplug the unit from
the electrical outlet and plug it again after 30 seconds. If the problem remains
please reach out to an Electrolux authorized servicer for support.
SOLUTION
GB
FI
SV
NO
DA
The software in the air purifier is partly based on free and open source
software. To see the full copyright information and applicable license
terms, please visit: www.electrolux.com/appliance-supplementary
GB
FI
SV
NO
DA
DE
FR
IT
GB
FI
DA
DE
FR
HU
IT
NO
PL
RO
RU
SK
SL
SV
TR
CS

www.electrolux.com14
BEZPEČNOSTNÍ INFORMACE
Tento NÁVOD K POUŽITÍ obsahuje specické provozní pokyny pro váš
model. Spotřebič používejte pouze v souladu s pokyny v tomto NÁVODU
K POUŽITÍ. Tyto pokyny nemají pokrývat všechny možné podmínky
asituace, které mohou nastat. Při instalaci, provozu a údržbě jakéhokoliv
spotřebiče je nutné se řídit zdravým rozumem a opatrností.
VAROVÁNÍ! Vyvarujte se rizika požáru nebo zásahu elektrickým
proudem. Nepoužívejte prodlužovací šňůru ani rozdvojku.
Znapájecíšňůry neodstraňujte jakýkoliv kolík.
Tento spotřebič lze používat s napájením 50 Hz nebo 60 Hz bez jakékoliv
úpravy.
Za žádných okolností neřežte, neodstraňujte nebo nepřemosťujte zemnicí
kolík (viz obrázek 23 na straně 9). Pro VB (viz obrázek 24 na straně 9).
V blízkosti tohoto spotřebiče nebo jiných spotřebičů neskladujte
činepoužívejte benzín nebo jiné hořlavé výpary či kapaliny. Přečtěte
siproduktové štítky ohledně hořlavosti a ostatních výstrah.
Nedovolte, aby do spotřebiče vnikla voda nebo jakákoliv jiná kapalina
nebo hořlavý prostředek, abyste zabránili zásahu elektrickým proudem
nebo nebezpečí požáru.
Při vyjímání ltru se nedotýkejte lopatek ventilátoru.
Bezpečnost dětí a postižených osob
VAROVÁNÍ! Hrozí nebezpečí udušení, úrazu nebo jiných trvalých následků.
Tento spotřebič smějí používat děti starší osmi let, osoby se sníženými
fyzickými, smyslovými nebo duševními schopnostmi nebo osoby
bezpatřičných zkušeností a znalostí, pouze pokud tak činí pod dozorem
nebo vedením, které zohledňuje bezpečný provoz spotřebiče, a pokud
rozumí rizikům spojeným s provozem spotřebiče.
Zabraňte, aby si děti hrály se spotřebičem.
Čištění a uživatelskou údržbu spotřebiče by neměly provádět děti bez
dozoru.
Děti mladší tří let bez stálého dozoru držte z dosahu spotřebiče.
Všechny obaly uschovejte z dosahu dětí.

www.electrolux.com 15
Elektrické informace
VAROVÁNÍ! Vyvarujte se rizika požáru nebo zásahu
elektrickým proudem.
Pokud si nejste jistí, zda je zásuvka řádně uzemněna
nebo chráněna pojistkou nebo jističem, obraťte se na
kvalikovaného elektrikáře a požádejte ho o instalování
zásuvky v souladu s národní elektrickou normou
amístními elektrickými předpisy a nařízeními.
Nepoužívejte prodlužovací šňůru ani rozdvojku.
Nikdy neodpojujte zástrčku spotřebiče od sítě zatažením
za napájecí kabel. Vždy pevně uchopte zástrčku
avytáhněte ji přímo ze zásuvky.
Napájecí kabel nesmí být skřípnutý, ohnutý nebo zauzlený.
Neřežte nebo nepoškozujte napájecí kabel. Pokud
je napájecí kabel poškozený, měl by jej vyměnit
pouze autorizovaný servis společnosti Electrolux.
Tento spotřebič neobsahuje žádné součásti, které by
mohl opravit uživatel. Kvůli opravám vždy zavolejte
autorizovaný servis společnosti Electrolux.
Jestliže je poškozený přívodní kabel, smí ho vyměnit
pouze výrobce, servisní technik nebo osoba s podobnou
příslušnou kvalikací, jinak by mohlo dojít k úrazu.
Ujistěte se, že před čištěním zařízení odpojíte od napájení,
abyste zabránili úrazu elektrickým proudem nebo riziku
požáru.
ČEŠTINA
Děkujeme vám, že jste zvolili čističku vzduchu
Electrolux PURE A9-40/PURE A9-60.
Vždy používejte originální příslušenství a náhradní
díly pro zajištění nejlepších výsledků. Tento spotřebič
je navržen s ohledem na životní prostředí. Všechny
plastové součásti jsou označeny pro účely recyklace.
NEŽ ZAČNETE
• Pozorně si tento návod přečtěte.
• Zkontrolujte, zda výrobek obsahuje všechny
popsané součásti.
• Věnujte zvláštní pozornost bezpečnostním opatřením!
Obrázek na stranách 8-9
Spotřebič umístěte podle níže uvedených pokynů,
abyste dosáhli optimálního chodu a výsledků:
PŘED PRVNÍM POUŽITÍM
Bezpečnostní opatření
POZOR! Vyvarujte se vážného zranění nebo smrti.
Nestrkejte nebo nedávejte prsty či předměty do oblasti
výpusti vzduchu nebo do přední mřížky spotřebiče.
Nespouštějte nebo nezastavujte spotřebič vypojením
jeho napájecího kabelu nebo vypnutím proudu na
elektrické skříňce.
V případě poruchy (jiskry, pach spáleniny, apod.)
okamžitě zastavte chod, odpojte napájecí kabel a
zavolejte autorizovaný servis společnosti Electrolux.
Nepoužívejte jednotku, máte-li vlhké ruce.
Netahejte za napájecí kabel.
POZOR! Vyvarujte se zranění nebo poškození spotřebiče
nebo jiného majetku.
Nesměrujte proud vzduchu na krby nebo jiné zdroje
tepla, jelikož by to mohlo působit náhlá vzplanutí.
Na spotřebič nešplhejte nebo na něj nepokládejte předměty.
Nevěšte na spotřebič jiné předměty.
Na spotřebič nepokládejte nádoby s kapalinami.
Spotřebič odpojte ze zdroje napájení, když jej nebudete
po delší dobu používat.
Spotřebič provozujte se vzduchovým ltrem na svém místě.
Neblokujte nebo nezakrývejte mřížku přívodu vzduchu,
oblast výpusti vzduchu nebo otvory výpustí.
Ujistěte se, že se jakékoliv elektrické/elektronické
vybavení nachází 30 cm od spotřebiče.
Tento symbol na spotřebiči nebo na jeho obalu
znamená, že tento spotřebič nepatří do domovního
odpadu.
Chcete-li spotřebič recyklovat, odevzdejte ho
vociálním sběrném místě nebo v servisním
Čističku vzduchu provozujte v uzavřeném prostoru.
Zavřete všechny dveře, okna a ostatní otvory vedoucí
zvenku do místnosti.
Umístěte čističku vzduchu tam, kde není omezen
průtok vzduchu přes vrchní část spotřebiče.
Spotřebič je nutné umístit na rovnou podlahu,
která jej unese.
Kolem spotřebiče by měl být volný prostor
minimálně 30 cm.
Odstraňte plastový ochranný sáček
zvícevrstvého ltru:
LIKVIDACE
1
2
3
4
středisku Electrolux, kde mohou baterii i elektrické
součásti vyjmout a recyklovat bezpečně a odborně.
Při samostatném sběru elektrických spotřebičů a
dobíjecíchbaterií se řiďte pravidly platnými ve vaší zemi.
POKYNY K POUŽITÍ
ZAPNUTÍ SPOTŘEBIČE
Vytáhněte textilní držadlo směrem ven, abyste
sejmuli dvířka nasávání vzduchu.
Zatažením na držadlo vyjměte vícevrstvý ltr ven.
Odstraňte plastový ochranný sáček z vícevrstvého
ltru.
Vraťte vícevrstvý ltr zpět do spotřebiče.
Zapojte spotřebič do zásuvky a stisknutím (dotkněte
se a uvolněte) tlačítka „ “ jej spusťte.
POZNÁMKA: Snímači trvá přibližně 10 sekund,
než analyzuje kvalitu vzduchu. Během této doby
budou kontrolky plnění a kvality vzduchu pomalu
bíle pulzovat. Při každém zapnutí spotřebiče se
automaticky aktivuje režim SMART a ventilátor
poběžív nízkých otáčkách, dokud se nedokončí
analýza kvality vzduchu.
5
6
7
8
9
GB
FI
DA
DE
FR
HU
IT
NO
PL
RO
RU
SK
SL
SV
TR
CS

www.electrolux.com16
REŽIM SMART
O kontrolce kvality vzduchu
FUNKCE DĚTSKÉ BEZPEČNOSTNÍ POJISTKY
KONTROLKA VÝMĚNY FILTRU
FUNKCE IONIZÁTORU
ČIŠTĚNÍ A ÚDRŽBA
MANUÁLNÍ REŽIM
FUNKCE WIFI
Tento spotřebič je vybaven snímačem pro analýzu
kvality vzduchu.
Kontrolka kvality vzduchu v reálném čase vizuálně
ukazuje kvalitu různými barvami světla. Dle
vyobrazení níže:
POZNÁMKA: Snímači trvá přibližně 10 sekund,
než analyzuje kvalitu vzduchu po každém zapnutí
spotřebiče. Během této doby bude kontrolka kvality
vzduchu pomalu bíle pulzovat.
Velmi vysoká vlhkost v místnosti může způsobovat
kondenzaci na snímačích. To může mít vliv na
přesnost snímaných hodnot.
V tomto režimu spotřebič zvolí rychlost ventilátoru
automaticky na základě úrovně kvality vzduchu. Toto
je výchozí režim při každém zapnutí spotřebiče.
POZNÁMKA: V režimu „SMART“ nelze rychlost
ventilátoru měnit ručně.
Dětskou bezpečnostní pojistku lze zapnout a
vypnout dlouhým současným stisknutím tlačítka
Zap/Vyp a tlačítka režimu na čtyři sekundy. Když
je zapnutá dětská bezpečnostní pojistka, ovládací
panel spotřebiče nelze používat a kontrolka dětské
bezpečnostní pojistky svítí.
Kontrolka výměny ltru se rozsvítí, aby vám
připomněla, že je třeba vyměnit ltr. Viz pokyny
vrámci aplikace Pure A9 nebo na webové stránce
společnosti Electrolux, kde lze zakoupit náhradní
ltry. Ujistěte se, zda jste před výměnou ltru
a jeho použitím odstranili ochranný plastový
sáček. Po výměně ltru kontrolka výměny ltru
automatickyzhasne.
POZNÁMKA: Vícevrstvý ltr nelze omývat,
lzejejpouze vyměnit.
Funkci ionizéru lze zapnout a vypnout pouze pomocí
aplikace Pure A9 (aplikace pro chytré telefony).
Kdyžje tato funkce zapnutá, kontrolka ionizéru
svítí aspotřebič vytváří ionty pro zlepšení výkonu
jednotky a tím i kvality vzduchu v místnosti.
Plastové části spotřebiče lze čistit pomocí suché
tkaniny bez oleje nebo pomocí vysavače s měkkým
kartáčem.
Textilii na spotřebiči nelze demontovat. Textilii
čistěte pomocí suché tkaniny bez oleje nebo pomocí
vysavače s měkkým kartáčem.
Prach nahromaděný ve snímači kvality vzduchu může
způsobit nesprávné snímání hodnot a ovlivnit výkon.
K odstranění jakéhokoliv prachu, který se mohl v
daném místě nahromadit, použijte vysavač s měkkým
kartáčem. Vysávejte alespoň jednou měsíčně.
K čištění spotřebiče nikdy nepoužívejte abrazivní,
agresivní čisticí prostředky nebo vosk.
Před čištěním vypojte spotřebič ze zásuvky, abyste
zabránili riziku zásahu elektrickým proudem nebo
požáru.
Stisknutím tlačítka režimu „MODE“ přepnete spotřebič
do „MANUAL“ režimu. V tomto režimu lze měnit
otáčky ventilátoru manuálně dotykem posuvníku
rychlosti ventilátoru.
POZNÁMKA: Rychlost ventilátoru se mění postupně
po navolení nových otáček ventilátoru.
Tento spotřebič je vybaven WiFi modulem, který
umožňuje dálkové ovládání a přístup ke všem
funkcím systému přes naši aplikaci pro chytré
telefony. Stáhněte si naši aplikaci Pure A9 a řiďte
sepokyny, jak ji propojit s vaším spotřebičem. Když
jepropojení navázané, rozsvítí se kontrolka WiFi.
BARVA
KONTROLKY
Zelená
Žlutá
Oranžová
Červená
Nachová
Kaštanová
PM 2,5 (μg/m
3
) KVALITA
VZDUCHU
0-12 Velmi dobrá
13-35 Dobrá
36-55 Nedostatečná
56-150 Silně
nedostatečná
151-250 Špatná
>250 Velmi špatná
POZNÁMKA: Vícevrstvý ltr nelze omývat, lze jej
pouze vyměnit.
POZOR! Při vyjímání vícevrstvého ltru se
nedotýkejte lopatek ventilátoru.
Uchovávání
Dopřejte si skvěle vyčištěný vzduch s čističkou
vzduchu Electrolux PURE A9-40/PURE A9-60!
Pokud spotřebič plánujete delší dobu nepoužívat,
zakryjte jej plastovou fólií nebo jej vraťte do
kartónové krabice.
Společnost Electrolux si vyhrazuje právo měnit
výrobky, informace i technické údaje bez předchozího
upozornění.
10
11
12
13
14
15
16
17
18
19
20
21
22

www.electrolux.com 17
ODSTRAŇOVÁNÍ ZÁVAD
PROBLÉM
Čistička vzduchu nefunguje.
Ventilátor nefunguje..
Kvalita vzduchu
senezlepšuje.
Spotřebič je velmi hlučný.
Otáčky ventilátoru se
nezmění po volbě nové
rychlosti ventilátoru.
Spotřebič vydává zvláštní
zápach.
Aplikace nefunguje správně
nebo nelze spotřebič
vaplikaci aktivovat.
Během provozu bliká rychle
LED plnění.
V případě jakýchkoliv dalších problémů se obraťte na autorizované servisní středisko společnosti Electrolux.
• Zkontrolujte, zda není vypojená zástrčka ze zásuvky. Zasuňte zástrčku pevně
doelektrické zásuvky.
• Zkontrolujte, zda nedošlo ke spálení domovní pojistky nebo vypnutí jističe.
Vyměňte pojistku za zpožďovaný typ nebo přepněte jistič.
• Ujistěte se, že jsou dvířka nasávání vzduchu (obrázek 8) řádně zavřená a že je ltr
řádně nainstalován, a poté zkuste čističku opět použít.
• Zkontrolujte, zda nejsou otevřená okna či dveře. Zavřete všechny dveře,
okna a ostatní otvory vedoucí zvenku do místnosti.
• Ujistěte se, že v blízkosti spotřebiče nejsou žádné překážky a že je kolem něj
minimálně 30 cm volného místa pro jeho optimální chod.
• Otáčky ventilátoru se sníží nebo zvýší postupně. Jedná se o normální jev. Pokud
se nezmění po delší době po zadání, obraťte se na autorizovaný servis společnosti
Electrolux pro podporu.
• Při prvním použití čističky můžete vnímat zápach plastu nebo nátěru. Jedná
se o normální jev, který by však měl rychle vymizet. Pokud zápach přetrvává
nebo pokud vnímáte zápach spáleniny, vypojte čističku ze sítě a obraťte se na
autorizovaný servis společnosti Electrolux pro podporu.
• Obraťte se na autorizovaný servis společnosti Electrolux ohledně podpory
natototéma.
• Pokud dojde k tomuto problému, jednotka nepracuje normálně. Vypojte jednotku
z elektrické zásuvky a zapojte ji zpět po 30 sekundách. Pokud problém přetrvává,
obraťte se na autorizovaný servis společnosti Electrolux pro podporu.
ŘEŠENÍ
Software čističky vzduchu je částečně založený na volně dostupném
open source software. Chcete-li si prohlédnout kompletní informace
o ochranných známkách a platných licenčních podmínkách, navštivte:
www.electrolux.com/appliance-supplementary
GB
FI
DA
DE
FR
HU
IT
NO
PL
RO
RU
SK
SL
SV
TR
CS

www.electrolux.com18
SIKKERHEDSINFORMATION
I denne BRUGERVEJLEDNING nder du specikke betjeningsvejledninger
til din model. Brug kun luftrenseren som beskrevet i denne
BRUGERVEJLEDNING. Vejledningen dækker ikke alle forhold og situationer,
der kan opstå. Udvis sund fornuft og forsigtighed, når du installerer,
betjener og vedligeholder luftrenseren.
ADVARSEL! Undgå fare for brand eller elektrisk stød. Tilslut ikke en
forlængerledning eller et adapterstik. Fjern ikke nogen stikben fra
netledningen.
Dette apparat kan bruges med strømforsyninger med 50 Hz eller 60 HZ
uden ændring.
Jordstikbenet må under ingen omstændigheder skæres i, ernes eller omgås
(se billede 23 på side 9). Til Storbritannien (se billede 24 på side 9).
Opbevar, eller brug ikke benzin eller brændbare dampe og væsker
i nærheden af dette eller andre apparater. Læs produktmærkaterne
vedrørende brændbarhed og andre advarsler.
Lad ikke vand, andre væsker eller brændbare rengøringsmidler trænge ind
iluftrenseren for at undgå fare for elektrisk stød og/eller brandfare.
Undlad at røre ved blæservingen under ernelse af lteret.
Sikkerhed for børn og andre udsatte personer
ADVARSEL! Risiko for kvælning, personskade eller permanent invaliditet.
luftrenseren kan kun bruges af børn fra 8 år og opefter samt af personer med
nedsat fysisk, sensorisk eller psykisk funktionsevne, eller som mangler den
nødvendige erfaring eller viden, hvis de er under opsyn eller er blevet instrueret
i at bruge luftrenseren på en sikker måde samt forstår de medfølgende farer.
Lad ikke børn lege med luftrenseren.
Rengøring og vedligeholdelse må ikke udføres af børn uden overvågning.
Hold børn på under 3 år på afstand, medmindre du holder øje med dem
hele tiden.
Opbevar al emballage utilgængeligt for børn.

www.electrolux.com 19
Sørg for, at eventuelt elektrisk/elektronisk udstyr
bender sig 30 cm fra luftrenseren.
BORTSKAFFELSE
Dette symbol på produktet eller på
emballagen angiver, at produktet ikke må
behandles som husholdningsaald.
For at genbruge dit produkt skal du bringe det til
et ocielt indsamlingssted eller til et Electrolux
servicecenter, som kan erne og genbruge batteriet
og elektriske dele på en sikker og professionel måde.
Følg dit lands regler for separat indsamling af
elektriske produkter og genopladelige batterier.
Elektriske data
ADVARSEL! Undgå fare for brand eller elektrisk stød.
Hvis du ikke er sikker på, at kontakten er korrekt
jordforbundet eller beskyttet af en tidsforsinket
sikring eller en fejlstrømsafbryder, skal du få en
kvaliceret elektriker til at installere en korrekt
stikkontakt iht. de nationale forskrifter for elektricitet
og gældende lokale forskrifter og bestemmelser.
Tilslut ikke en forlængerledning eller et adapterstik.
Kobl aldrig luftrenseren fra ved at trække i
ledningen. Tag altid godt fat i selve stikket, og træk
det lige ud af kontakten.
Klem, bøj eller slå ikke knuder på netledningen.
Skær ikke i, eller beskadig netledningen. Hvis
netledningen beskadiges, må den kun udskiftes af
en autoriseret Electrolux-tekniker. Denne luftrenser
indeholder ingen dele, der kan serviceres af
brugeren selv. Tilkald altid en autoriseret Electrolux
servicetekniker til reparationer.
Hvis netledningen er beskadiget, skal den af
sikkerhedsgrunde udskiftes af producenten, dennes
serviceværksted eller en tekniker med tilsvarende
kvalikationer for at undgå fare.
Sørg for at tage stikket ud af stikkontakten inden
rengøring for at undgå elektrisk stød eller risiko for
brand.
Sikkerhedsforanstaltninger
FORSIGTIG! Undgå alvorlig ulykke eller dødsfald.
Kom ikke ngre eller genstande i
luftudledningsområdet eller i luftrenserens rist.
Start, eller stop ikke luftrenseren ved at trække
stikket ud af kontakten eller slukke for strømmen på
el tavlen.
I tilfælde af funktionsfejl (gnister, brændt lugt, osv.) skal
du stoppe driften øjeblikkeligt, trække stikket ud og ringe
til en autoriseret Electrolux-serviceteknikker.
Betjen ikke luftrenseren med våde hænder Træk ikke
i netledningen.
FORSIGTIG! Undgå personskade eller beskadigelse
af luftrenseren eller andre ting.
Ret ikke luftstrømmen mod pejse eller andre
varmerelaterede kilder, da det kan skabe pludselig
opblussen.
Klatr ikke op på luftrenseren, og anbring ikke
genstande på det.
Hæng ikke ting ned fra luftrenseren.
Stil ikke beholdere med væsker på luftrenseren.
Sluk strømkilden til luftrenseren, hvis den ikke skal
bruges i en længere periode.
Betjen luftrenseren med isat luftlter.
Blokér, eller tildæk ikke indsugningsristen,
luftudledningsområdet og udgangsportene.
DANSK
Tak for dit valg af Electrolux luftrenser PURE A9-40/
PURE A9-60. Brug altid originalt tilbehør og originale
reservedele for at opnå det bedste resultat. Dette
produkt er udviklet med tanke på miljøet.
Alle plastdele er mærket til genbrug.
FØR START
• Læs brugervejledningen grundigt igennem.
• Kontrollér, at alle de beskrevne dele medfølger.
• Vær særlig opmærksom på kapitlet om
sikkerhedsforanstaltninger!
Billede side 8-9
FØR IBRUGTAGNING
Placér produktet i henhold til nedenstående
anvisninger for optimal drift og resultater:
Luftrenseren skal anvendes i et lukket område
for det bedste resultat. Luk alle døre, vinduer
og andre udendørs åbninger i rummet.
Placér luftrenseren på et sted, der ikke begrænser
luftstrømmen gennem toppen af luftrenseren.
Luftrenseren skal placeres på et plant gulv, der
understøtter det.
Der skal være et frit område på mindst 30 cm
omkring luftrenseren.
DA
Fjernelse af den beskyttende plastiklm fra
erlagslteret
Træk håndtaget udad for at tage den bageste
låge til luftindtaget ud.
Tag erlagslteret ud ved tage fat i
erlagslterets håndtag og træk udad.
Fjern den beskyttende plastiklm fra
erlagslteret.
Sæt erlagslteret tilbage på plads.
GB
FI
DA
DE
FR
HU
IT
NO
PL
RO
RU
SK
SL
SV
TR
CS
1
2
3
4
5
6
7
8

www.electrolux.com20
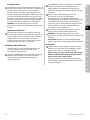
BETJENINGSVEJLEDNING
SÅDAN TÆNDES LUFTRENSEREN
Tilslut luftrenseren og tryk (berør og slip) på
knappen “ “ for at tænde den.
BEMÆRK: Det tager ca. 10 sekunder for
sensoren at analysere luftkvaliteten. I dette
tidsrum vil infolampe og luftkvalitetslampen
pulse langsomt i hvidt. Hver gang luftrenseren
tændes, aktiveres SMART funktionen automatisk,
og blæseren kører ved lav hastighed, indtil
luftkvalitetsanalysen er afsluttet.
SMART FUNKTION
Ved brug af “SMART“ funktionen, vælger
luftrenseren automatisk blæserhastigheden,
baseret på luftkvalitetsniveauet. Dette er
standardindstillingen hver gang luftrenseren
tændes.
BEMÆRK: Ved “SMART“ funktion kan
blæserhastigheden ikke ændres manuelt.
OM LUFTKVALITETSLAMPEN
Luftrenseren har en luftkvalitetssensor, der
analyserer luftkvaliteten.
Luftkvalitetslampen viser luftkvaliteten i realtid
ved hjælp af forskelligt farvede lys. Som vist
nedenfor:
LYSETS FARVE
PM 2,5
(μg/m
3
)
LUFTKVALITET
Grøn 0-12 Meget god
Gul 13-35 God
Orange 36-55 Ringe
Rød 56-150 Meget ringe
Lilla 151-250 Dårlig
Rødbrun >250 Meget dårlig
BEMÆRK: Det tager ca. 10 sekunder for sensoren
at analysere luftkvaliteten hver gang luftrenseren
tændes. I dette tidsrum blinker luftkvalitetslampen
langsomt hvidt.
Meget høje fugtighedsforhold i rummet kan
forårsage kondens i sensorerne. Dette kan påvirke
nøjagtigheden af sensorens læsning.
MANUEL FUNKTION
Rør ved “MODE”-knappen for at ændre
luftrenseren til “MANUAL” funktion. Ved
denne funktion kan blæserhastigheden
ændres manuelt ved at ytte skydeknappen til
blæserhastighed.
BEMÆRK: Blæserhastigheden ændres gradvist,
efter du har valgt en ny blæserhastighed.
WIFIFUNKTION
Denne luftrenser er udstyret med et WiFi-
modul, som muliggør ernbetjening og adgang
til systemets fulde funktionalitet via vores
smartphone app. Download vores Pure A9 app
og følg vejledningen for hvordan luftrenseren
forbindes til internettet. Når luftrenseren er
forbundet til internettet, lyser WiFi- indikatoren.
BØRNESIKRING
Børnesikringen kan aktiveres og deaktiveres
ved at trykke langsomt på tænd/sluk og
funktionsknappen samtidigt i 4 sekunder.
Når børnesikringen er aktiveret, lyser
børnesikringslampen, og luftrenserens indstilling
kan ikke ændres ved hjælp af betjeningspanelet
på luftrenseren.
INDIKATOR FOR FILTERSKIFT
Indikatoren for lterskift lyser for at minde dig
om at udskifte lteret. Se instruktionerne i Pure
A9 appen eller på Electrolux webstedet, hvor
du kan købe nye ltre. Sørg for at erne den
beskyttende plastiklm fra det nye lter inden
brug. Når lteret er udskiftet, slukkes indikatoren
for lterskift automatisk.
BEMÆRK: Flerlagslteret kan ikke vaskes, det
kan kun udskiftes.
IONISERINGSFUNKTION
Ioniseringsfunktionen kan kun aktiveres og
deaktiveres via Pure A9 appen. Når denne
funktion er aktiveret, lyser ioniseringsindikatoren
og luftrenseren genererer ioner for at forbedre
luftrenserens ydeevne og rummets luftkvalitet.
VEDLIGEHOLDELSE OG RENGØRING
Tag stikket ud af stikkontakten før rengøring for at
forhindre stød eller brandfare.
Luftrenserens plastikdele kan rengøres med en
oliefri, tør klud eller ved brug af en støvsuger
med en blød børste.
Stoet på kabinettet kan ikke tages ud. Rengør
stoet med en støvsuger med blød børste.
Støv samlet i luftkvalitetssensoren kan resultere i
forkerte sensoraæsninger og påvirke ydeevnen.
Brug en støvsuger med en blød børste til at
erne støv, der har ophobet sig i dette område.
Støvsug mindst én gang om måneden
Brug aldrig skrappe rengøringsmidler, voks eller
pudsemiddel på kabinettets forside.
9
18
19
20
10
11
12
13
14
15
16
17
Sidan laddas...
Sidan laddas...
Sidan laddas...
Sidan laddas...
Sidan laddas...
Sidan laddas...
Sidan laddas...
Sidan laddas...
Sidan laddas...
Sidan laddas...
Sidan laddas...
Sidan laddas...
Sidan laddas...
Sidan laddas...
Sidan laddas...
Sidan laddas...
Sidan laddas...
Sidan laddas...
Sidan laddas...
Sidan laddas...
Sidan laddas...
Sidan laddas...
Sidan laddas...
Sidan laddas...
Sidan laddas...
Sidan laddas...
Sidan laddas...
Sidan laddas...
Sidan laddas...
Sidan laddas...
Sidan laddas...
Sidan laddas...
Sidan laddas...
Sidan laddas...
Sidan laddas...
Sidan laddas...
Sidan laddas...
Sidan laddas...
Sidan laddas...
Sidan laddas...
Sidan laddas...
Sidan laddas...
Sidan laddas...
Sidan laddas...
Sidan laddas...
Sidan laddas...
Sidan laddas...
Sidan laddas...
Sidan laddas...
Sidan laddas...
Sidan laddas...
Sidan laddas...
Sidan laddas...
Sidan laddas...
Sidan laddas...
Sidan laddas...
Sidan laddas...
-
 1
1
-
 2
2
-
 3
3
-
 4
4
-
 5
5
-
 6
6
-
 7
7
-
 8
8
-
 9
9
-
 10
10
-
 11
11
-
 12
12
-
 13
13
-
 14
14
-
 15
15
-
 16
16
-
 17
17
-
 18
18
-
 19
19
-
 20
20
-
 21
21
-
 22
22
-
 23
23
-
 24
24
-
 25
25
-
 26
26
-
 27
27
-
 28
28
-
 29
29
-
 30
30
-
 31
31
-
 32
32
-
 33
33
-
 34
34
-
 35
35
-
 36
36
-
 37
37
-
 38
38
-
 39
39
-
 40
40
-
 41
41
-
 42
42
-
 43
43
-
 44
44
-
 45
45
-
 46
46
-
 47
47
-
 48
48
-
 49
49
-
 50
50
-
 51
51
-
 52
52
-
 53
53
-
 54
54
-
 55
55
-
 56
56
-
 57
57
-
 58
58
-
 59
59
-
 60
60
-
 61
61
-
 62
62
-
 63
63
-
 64
64
-
 65
65
-
 66
66
-
 67
67
-
 68
68
-
 69
69
-
 70
70
-
 71
71
-
 72
72
-
 73
73
-
 74
74
-
 75
75
-
 76
76
-
 77
77


Electrolux PA91-404DG Användarmanual
- Kategori
- Luftrenare
- Typ
- Användarmanual
- Denna manual är också lämplig för
på andra språk
- italiano: Electrolux PA91-404DG Manuale utente
- čeština: Electrolux PA91-404DG Uživatelský manuál
- slovenčina: Electrolux PA91-404DG Používateľská príručka
- Deutsch: Electrolux PA91-404DG Benutzerhandbuch
- polski: Electrolux PA91-404DG Instrukcja obsługi
- français: Electrolux PA91-404DG Manuel utilisateur
- Türkçe: Electrolux PA91-404DG Kullanım kılavuzu
- dansk: Electrolux PA91-404DG Brugermanual
- română: Electrolux PA91-404DG Manual de utilizare