Cardo FRC4P101 FREECOM 4 Plus Motocyclette 2 Voies Bluetooth Communication System Casque Användarmanual
- Kategori
- Mikrofoner
- Typ
- Användarmanual

EN |
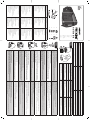
INSTALLING THE SPEAKERS
DE |
MONTAGE DER LAUTSPRECHER
FR |
INSTALLATION DES ECOUTEURS
IT |
INSTALLAZIONE DEGLI AURICOLARI
ES |
INSTALACIÓN DE ALTAVOCES
PT |
INSTALAÇÃO DOS ALTOFALANTES
NL |
DE LUIDSPREKERS INSTALLEREN
RU |
SV |
INSTALLATION AV HÖGTALARNA
For best sound clarity, place the speakers directly
opposite and as close as possible to your ears.
Note: If using two speakers in a helmet is
prohibited in your jurisdiction, position both
speakers on one side of the helmet.
1
In the helmet, remove the liners and pads to
gain access to speaker locations.
2
Clean the speaker locations with the
alcohol pad.
3
If the speaker recesses are deep, attach both
Velcro speaker booster pads to the helmet.
4
Attach both square Velcro pads.
5
On the same side as the cradle, attach the
speaker with the shorter wire to the Velcro
pad, and attach the speaker with the longer
wire to the Velcro pad on the other side.
6
Route the speaker wires toward the cradle
and connect to the cradle speaker connector.
Für beste Klangschärfe platzieren Sie die
Lautsprecher direkt gegenüber und so nah wie
möglich an Ihren Ohren.
Hinweis: Ist die Verwendung zweier Lautsprecher in
einem Helm in Ihrer Gerichtsbarkeit verboten, positionie-
ren Sie beide Lautsprecher auf einer Helmseite.
1
Entfernen Sie das Futter und die Polster im
Helm, um Zugri auf die Plätze der Lautspre-
cher zu erhalten.
2
Reinigen Sie die Plätze der Lautsprecher mit
dem Alkoholtupfer.
3
Sind die Aussparungen für die Lautsprecher tief,
bringen Sie beide Lautsprecherverstärkerkissen
per Klettverschluss am Helm an.
4
Bringen Sie beide quadratischen Klettkissen an.
5
Bringen Sie den Lautsprecher mit dem kür-
zeren Kabel an das Klettkissen auf der selben
Seite wie die Halterung und den Lautsprecher
mit dem längeren Kabel an das Klettkissen
auf der anderen Seite an.
6
Führen Sie die Lautsprecherkabel zur
Halterung und schließen Sie sie an den
Lautsprecheranschluss der Halterung an.
Pour une meilleure clarté de son, placer les
écouteurs juste en face et aussi près que
possible de vos oreilles.
Remarque : Si l’usage de deux écouteurs dans un
casque est interdit dans votre pays, positionner les
deux écouteurs d’un seul côté du casque.
1
Dans le casque, retirer les liners et pads pour
avoir accès à l’emplacement des écouteurs.
2
Essuyer l’emplacement de l’écouteur avec un
pad alcoolisé.
3
Si l’enfoncement de l’écouteur est profond,
xer les deux pads Velcro de l’amplicateur
d’écouteur au casque.
4
Fixer les deux pads Velcro carrés.
5
De même côté du combiné, xer l’écouteur avec
le câble court au pad Velcro, et xer l’écouteur
au câble long au pad Velcro de l’autre côté.
6
Acheminer les câbles d’écouteur vers le com-
biné et connecter au connecteur d’écouteur
de combiné.
Per il suono più chiaro, mettere gli auricolari diretta-
mente di fronte e più vicini possibile alle orecchie.
Nota: Se l’uso di due auricolari in un casco è proi-
bito nella giurisdizione di appartenenza, mettere
i due auricolari sullo stesso lato del casco.
1
Nel casco, rimuovere i rivestimenti e i
cuscinetti per potere accedere alla posizione
dell’auricolare.
2
Pulire la posizione per l’auricolare con la
salvietta imbevuta di alcool.
3
Se gli incavi per l’auricolare sono profondi,
attaccare entrambi i cuscinetti di rinforzo
dell’auricolare di Velcro al casco.
4
Attaccare entrambi i cuscinetti quadrati
di Velcro
5
Dallo stesso lato dell’intelaiatura di sostegno,
attaccare l’auricolare con il cavo più corto al
cuscinetto di Velcro, e attaccare l’auricolare
con il cavo più lungo al cuscinetto di Velcro
sull’altro lato.
6
Dirigere i cavi dell’auricolare verso l’intelaiatura
di sostegno e collegare al connettore dell’auri-
colare sull’intelaiatura di sostegno .
Para obtener el sonido más claro, coloque
los altavoces directamente opuestos y lo más
cercano posible a sus orejas.
Nota: Si el uso de dos altavoces en un casco está
prohibido dentro de su jurisdicción, coloque a
ambos altavoces en el mismo lado del casco.
1
En el casco, retire los forros y rellenos para tener
acceso al lugar de ubicación de los altavoces.
2
Limpie los lugares de ubicación de los
altavoces con el pañito con alcohol.
3
Si los espacios para altavoces son profundos,
adhiera al casco las dos almohadillas de
velcro para elevar altavoces.
4
Fije las dos almohadillas cuadradas de velcro
en su sitio.
5
Sujete el altavoz de alambre corto jándolo
en la almohadilla de velcro que está en el
lado del soporte y el altavoz de alambre
largo en la almohadilla de velcro en el lado
opuesto.
6
Encamine a los alambres de los altavoces
hacia el soporte y conéctelos allí al conector
de altavoces .
Posicione os alto-falantes o mais próximo
possível de seus ouvidos para obter uma
melhor clareza de som.
Nota: Caso sua jurisdição não permita o uso de dois
alto-falantes em um capacete posicione ambos os
alto-falantes em um dos lados do capacete.
1
Remova a forração e almofadas do capacete
para acessar os locais dos alto-falantes.
2
Limpe os locais dos alto-falantes usando as
almofadas com álcool.
3
Se os locais para os alto-falantes forem profun-
dos, prenda ambas as espumas amplicadoras
dos alto-falantes com Velcro no capacete.
4
Prenda os dois adesivos quadrados com Velcro.
5
Prenda o alto falante com o o mais curto
no adesivo com Velcro no mesmo lado do
suporte, e prenda o alto-falante com o o
mais longo no outro lado com o adesivo
com Velcro.
6
Posicione os os do alto falante em direção
ao suporte e conecte ao conector dos alto-
-falantes no suporte.
Voor de beste helderheid van het geluid,
plaatst u de luidsprekers direct tegenover
elkaar en zo dicht mogelijk bij uw oren.
Opmerking: indien het verboden is in uw
rechtsgebied twee luidsprekers in een helm te
gebruiken, plaats beide luidsprekers dan aan
één kant van de helm.
1
Verwijder in de helm de bekleding en kus-
sentjes om bij de plaats van de luidsprekers
te kunnen.
2
Reinig de plaatsen van de luidsprekers met
het alcoholschije.
3
Wanneer de inkepingen van de luidspreker
diep zijn, bevestig dan beide klittenband
luidspreker boosterkussentjes aan de helm.
4
Bevestig beide vierkante stukjes klittenband.
5
Monteer aan dezelfde kant van de bevesti-
ging de luidspreker met de kortere draad
aan het stukje klittenband, en bevestig de
luidspreker met de langere draad aan het
stukje klittenband aan de andere kant.
6
Leid de snoertjes van de luidsprekers naar de
basis en verbind ze met de luidspreker-
ingang op de basis.
,
.
Примечание: Если использование в шлеме
двух наушников запрещено местным
законодательством, разместите оба
наушника на одной стороне шлема.
1
,
.
2
.
3
,
-
.
4
-
.
5
,
,
,
-
.
6
.
Placera högtalarna direkt motsatt varandra
och så nära dina ögon som möjligt för bästa
ljudkvalitet.
Obs: Om det är förbjudet att använda två högta-
lare i ditt land skall båda högtalarna placeras på
ena sidan av hjälmen.
1
Ta bort stoppning och dynor i hjälmen för
att få tillgång till platserna där högtalarna
ska placeras.
2
Rengör platserna för högtalarna med
våtservetterna.
3
Om skrymslena där högtalarna ska placeras
är djupa fäster du båda de kardborreför-
sedda högtalardynorna vid hjälmen.
4
Fäst de båda fyrkantiga kardborredynorna.
5
Fäst högtalaren med den kortare kabeln på
kardborredynan på samma sida som hål-
laren och fäst högtalaren med den längre
kabeln på den andra sidan.
6
Led högtalarkablarna mot hållaren och an-
slut dem till hållarens högtalaranslutningar.
EN |
FINAL STEPS
DE |
LETZTE SCHRITTE
FR |
ETAPES FINALES
1
Return the liner and pads to their position in the helmet, taking care to secure all
wires under the liner and pads.
2
Attach the CARDO FREECOM headset to the cradle.
3
Switch the headset on, as described in the Pocket Guide or User Guide.
1
Setzen Sie das Futter und die Kissen an ihren Ort im Helm zurück. Achten Sie darauf, alle
Kabel unter dem Futter und den Kissen zu sichern.
2
Schließen Sie das CARDO FREECOM Headset an die Halterung an.
3
Schalten Sie das Headset ein, wie in der Kurzanleitung oder der Bedienungsanleitung
beschrieben.
1
Remettre le liner et les pads en position dans le casque en prenant soin de bien sécuriser tous
les câbles sous le liner et les pads.
2
Fixer l’écouteur CARDO FREECOM au combiné.
3
Mettre l’écouteur en marche, comme décrit dans le Guide de poche ou de Mode d’emploi.
IT |
OPERAZIONI FINALI
ES |
ÚLTIMOS PASOS
PT |
PASSOS FINAIS
1
Rimettere il rivestimento e i cuscinetti nella loro posizione nel casco, accertandosi di
assicurare bene tutti i cavi sotto il rivestimento e i cuscinetti.
2
Attaccare l’unità CARDO FREECOM all’intelaiatura di sostegno.
3
Accendere il dispositivo, come descritto nella Guida Tascabile o la Guida per l’Utente.
1
Devuelva el forro y relleno del casco a su lugar, cuidando de que todos los cables estén bien
colocados debajo del forro y el relleno.
2
Sujete los auriculares CARDO FREECOM al soporte.
3
Encienda los auriculares como se describe en la Guía de Bolsillo o en la Guía de Usuario.
1
Recoloque a forração e as almofadas na sua posição original no capacete, para prender todos
os os sob a forração.
2
Prenda o fone de ouvido CARDO FREECOM no suporte.
3
Ligue o fone de ouvido como indicado no Guia de Bolso ou Guia do Usuário.
NL |
TOT SLOT
RU |
SV |
SISTA STEGEN
1
Plaats de bekleding en kussentjes terug in de helm en zorg daarbij dat alle snoertjes
zich veilig onder de bekleding en kussentjes bevinden.
2
Bevestig de CARDO FREECOM koptelefoon op de basis.
3
Schakel de koptelefoon in, zoals beschreven in de Pocketgids of Gebruikershand-
leiding.
1
,
.
2
CARDO FREECOM .
3
.
1
Sätt tillbaka stoppning och dynor på plats i hjälmen och se till att säkra alla kablar under dem.
2
Fäst CARDO FREECOM-headsetet i hållaren.
3
Slå på headsetet i enlighet med ckguiden eller användarmanualen.
EN |
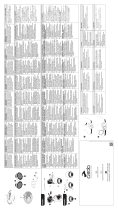
INSTALLING THE MICROPHONE
DE |
MONTAGE DES MIKROFONS
FR |
INSTALLATION DU MICROPHONE
IT |
INSTALLAZIONE DEL MICROFONO
ES |
INSTALACIÓN DE MICRÓFONO
PT |
INSTALAÇÃO DO MICROFONE
NL |
DE MICROFOON INSTALLEREN
RU |
SV |
INSTALLATION AV MIKROFONEN
OPTION A HYBRID MICROPHONE FOR
OPENFACE AND MODULAR HELMETS
1
In the helmet, on the same side as the
cradle, remove any pads at the helmet front.
2
Position the hybrid microphone so that the
microphone itself is opposite your mouth,
and note the position of the boom relative
to the helmet.
3
Clean the hybrid microphone location with
the alcohol pad.
4
Attach both rectangular Velcro pads, adja-
cent to each other, near the helmet rim.
5
Attach the hybrid microphone and clip to
the Velcro pads, with the yellow arrow
facing your mouth.
6
Route the microphone wire toward the
cradle and connect to the cradle micro-
phone connector.
OPTION B CORDED MICROPHONE FOR
FULLFACE HELMETS
1
In the helmet, on the same side as the
cradle, remove any pads at the helmet front.
2
Clean the corded microphone location with
the alcohol pad.
3
Attach the rectangular Velcro pad near the
helmet rim, opposite your mouth.
4
Attach the microphone to the Velcro pad.
5
Route the microphone wire toward the
cradle and connect to the cradle micro-
phone connector.
OPTION A HYBRIDMIKROFON FÜR
JETHELME UND KLAPPHELME
1
Entfernen Sie auf der Seite der Halterung
jegliche Kissen im vorderen Helmbereich.
2
Position Sie das Hybridmikrofon so, dass
das Mikrofon selbst vor Ihrem Mund sitzt.
Beachten Sie die Position des Auslegers im
Bezug zum Helm.
3
Reinigen Sie den Platz des Hybridmikrofons
mit dem Alkoholtupfer.
4
Bringen Sie beide rechteckigen Klettkissen
nebeneinander in die Nähe der Helmkante an.
5
Bringen Sie Hybridmikrofon und Klemme an
die Klettkissen an, wobei der gelbe Pfeil auf
Ihren Mund zeigt.
6
Führen Sie das Mikrofonkabel zur Halterung
und schließen Sie es an den Mikrofonan-
schluss der Halterung an.
OPTION B KABELMIKROFON FÜR
INTEGRALHELME
1
Entfernen Sie auf der Seite der Halterung
jegliche Kissen im vorderen Helmbereich.
2
Reinigen Sie den Platz des Kabelmikrofons mit
dem Alkoholtupfer.
3
Bringen Sie das rechteckige Klettkissen in der
Nähe der Helmkante vor Ihrem Mund an.
4
Bringen Sie das Mikrofon auf das Klettkissen
an.
5
Führen Sie das Mikrofonkabel zur Halterung
und schließen Sie es an den Mikrofonan-
schluss der Halterung an.
OPTION A MICROPHONE HYBRIDE POUR
CASQUES A VISAGE LIBRE ET CASQUES
MODULAIRES
1
Dans le casque, du même côté que le combiné,
retirer tous pads de l’avant du casque.
2
Positionner le microphone hybride de manière
à ce que le micro soit lui-même en face de
votre bouche, et noter la position de la perche
par rapport au casque.
3
Essuyer l’emplacement du micro hybride avec
un pad alcoolisé.
4
Fixer les deux pads Velcro rectangulaires, l’un
près de l’autre, près de la monture de casque.
5
Fixer le micro hybride et enclencher dans
les pads Velcro, la èche jaune étant devant
votre bouche.
6
Acheminer les câbles de micro vers le combiné
et connecter au connecteur du micro de
combiné.
OPTION B MICROPHONE CABLE POUR
CASQUES PLEIN VISAGE
1
Dans le casque, du même côté que le combiné,
retirer tous pads de l’avant du casque.
2
Essuyer l’emplacement du micro câblé avec un
pad alcoolisé.
3
Fixer le pad Velcro rectangulaire près de la
monture de casque, face à vore bouche.
4
Fixer le micro au pad Velcro.
5
Acheminer les câbles de micro vers le combiné
et connecter au connecteur du micro de
combiné.
OPZIONE AMICROFONO IBRIDO PER
CASCHI MODULARI E APERTI
1
Nel casco, sul lato dell’intelaiatura di sostegno,
rimuovere qualsiasi cuscinetto nella parte
anteriore del casco.
2
Posizionare il microfono ibrido in modo che il
microfono stesso sia di fronte alla bocca, e no-
tare la posizione del braccio rispetto al casco.
3
Pulire la posizione del microfono ibrido con la
salvietta imbevuta di alcool.
4
Attaccare entrambi i cuscinetti rettangolari
di Velcro, uno vicino all’altro, vicino al bordo
del casco.
5
Attaccare il microfono ibrido e ssarlo ai
cuscinetti di Velcro, con la freccia gialla di
fronte alla bocca.
6
Dirigere il cavo del microfono verso
l’intelaiatura di sostegno e collegare il connet-
tore del microfono sull’intelaiatura di sostegno.
OPZIONE BMICROFONO CABLATO PER
CASCHI INTEGRALI
1
Nel casco, sul lato dell’intelaiatura di sostegno,
rimuovere qualsiasi cuscinetto dalla parte
anteriore del casco.
2
Pulire la posizione del microfono cablato con
la salvietta imbevuta di alcool.
3
Attaccare il cuscinetto rettangolare di Velcro
vicino al bordo del casco, di fronte alla bocca.
4
Attaccare il microfono al cuscinetto di Velcro.
5
Dirigere il cavo del microfono verso l’intelaiatura
di sostegno e collegare il connettore
dell’intelaiatura di sostegno del microfono.
OPCIÓN AMICRÓFONO HÍBRIDO PARA
CASCOS DE CARA ABIERTA Y MODULARES
1
Retire todo el relleno de la parte anterior del
casco en al mismo lado donde está el soporte.
2
Coloque el micrófono híbrido de tal manera
que el micrófono mismo quede al frente de
su boca, y tome nota de la posición del brazo
respecto al casco.
3
Limpie el lugar de ubicación del micrófono
híbrido usando el pañito con alcohol.
4
Fije ambas almohadillas rectangulares de
velcro en su sitio cerca del borde del caso, una
al lado de la otra.
5
Sujete el micrófono híbrido jándolo en las
almohadillas de velcro con la echa amarilla
frente a su boca.
6
Encamine al alambre del micrófono hacia
el soporte y conéctelo allí al conector para
micrófono.
OPCIÓN BMICRÓFONO CON CABLE PARA
CASCOS INTEGRALES
1
Retire todo el relleno de la parte anterior del
casco en al mismo lado donde está el soporte.
2
Limpie el lugar de ubicación del micrófono con
cable usando el pañito con alcohol.
3
Fije la almohadilla de velcro rectangular en su
sitio cerca del borde del caso, al frente de su boca.
4
Sujete el micrófono jándolo a la almohadilla
de velcro.
5
Encamine al alambre del micrófono hacia
el soporte y conéctelo allí al conector para
micrófono.
OPÇÃO AMICROFONE HÍBRIDO PARA
CAPACETES DE FACE ABERTA E CAPACETES
MODULARES
1
No capacete, no mesmo lado do suporte,
remova quaisquer almofadas na parte diantei-
ra do capacete.
2
Posicione o microfone híbrido de forma que o
mesmo que em posição oposta à sua boca, e
note a posição do arco com relação ao capacete.
3
Limpe o local do microfone híbrido com a
almofada com álcool.
4
Prenda ambos os adesivos retangulares com
Velcro, um adjacente ao outro, próximo à
moldura do capacete.
5
Prenda o microfone híbrido e o gancho nos
adesivos com Velcro, com a echa amarela
voltada para a sua boca.
6
Leve o o do microfone em direção ao suporte e
conecte ao conector do microfone no suporte.
OPÇÃO BMICROFONE COM FIO PARA
CAPACETES FECHADOS
1
No capacete, no mesmo lado do suporte,
remova quaisquer almofadas na parte diantei-
ra do capacete.
2
Limpe o local do microfone híbrido com a
almofada com álcool.
3
Prenda o adesivo retangular com Velcro próximo
à moldura do capacete, oposto à sua boca.
4
Prenda o microfone no adesivo com Velcro.
5
Leve o o do microfone em direção ao suporte e
conecte ao conector do microfone no suporte.
OPTIE AHYBRIDE MICROFOON VOOR OPEN
EN MODULAIRE HELMEN
1
Verwijder in de helm aan dezelfde kant als
de basis alle kussentjes aan de voorkant van
de helm.
2
Plaats de hybride microfoon zo dat de micro-
foon zelf tegenover uw mond zit en let op de
plaats van de steel ten opzichte van de helm.
3
Reinig de plaats van de hybride microfoon met
het alcoholschije.
4
Bevestig beide vierkante stukjes klittenband,
naast elkaar, dicht bij de rand van de helm.
5
Bevestig de hybride microfoon en klem op de
stukjes klittenband, met de gele pijl richting
uw mond.
6
Leid het snoertje van de microfoon naar de
basis en verbind met de microfooningang
op de basis.
OPTIE BMICROFOON MET SNOER VOOR
GESLOTEN HELMEN
1
Verwijder alle bekleding aan de voorkant van
de helm, aan dezelfde kant als de basis.
2
Reinig de plaats van de microfoon met snoer
met het alcoholschije.
3
Bevestig het vierkante stukje klittenband
dicht bij de rand van de helm, tegenover
uw mond.
4
Bevestig de microfoon aan het stukje
klittenband.
5
Leid het snoertje van de microfoon naar de
basis en verbind met de microfooningang
op de basis.
1
, .
2
,
,
.
3
.
4
-
,
.
5
,
.
6
.
1
, .
2
.
3
-
,
.
4
.
5
.
ALTERNATIV A HYBRIDMIKROFON FÖR
HJÄLMAR UTAN VISIR SAMT MODULÄRA
HJÄLMAR
1
Ta bort all stoppning framtill på hjälmen på
samma sida som hållaren.
2
Placera hybridmikrofonen så att mikrofonen
själv är framför din mun och observera bom-
mens position i förhållande till hjälmen.
3
Rengör platsen för hybridmikrofonen med
våtservetterna.
4
Fäst de båda rektangulära kardborrdynorna
mitt emot varandra och nära hjälmens kant.
5
Fäst hybridmikrofonen och klämman vid
karborrdynorna med den gula pilen riktad
mot din mun.
6
Led mikrofonkabeln mot hållaren och anslut
dem till hållarens mikrofonanslutning.
ALTERNATIV B SLADDMIKROFON FÖR
INTEGRALHJÄLM
1
Ta bort all stoppning framtill på hjälmen på
samma sida som hållaren.
2
Rengör platsen för sladdmikrofonen med
våtservetterna.
3
Fäst den rektangulära kardborrdynan nära
hjälmens kant, framför munnen.
4
Fäst mikrofonen vid kardborrdynan.
5
Led mikrofonkabeln mot hållaren och anslut
den till hållarens mikrofonanslutning.
EN |
PREPARING THE HELMET FOR
INSTALLATION
DE |
DEN HELM FÜR DIE MONTAGE
VORBEREITEN
FR |
PREPARATION DU CASQUE POUR
INSTALLATION
IT |
PREPARAZIONE DEL CASCO PER
L’INSTALLAZIONE
ES |
PREPARACIÓN DEL CASCO PARA LA
INSTALACIÓN
PT |
PREPARAÇÃO O CAPACETE PARA A
INSTALAÇÃO
NL |
DE HELM VOORBEREIDEN VOOR
INSTALLATIE
RU |
SV |
FÖRBEREDELSE AV HJÄLMEN FÖR
INSTALLATION
Note: These instructions are for helmets with
removable liners and pads. If, in your helmet,
they cannot be removed, push them gently
aside while cleaning and installing speakers,
microphones and wires.
Hinweis: Diese Anweisungen gelten für Helme
mit entfernbarem Innenfutter und Polster.
Können diese bei Ihrem Helm nicht entfernt
werden, drücken Sie sie während der Reinigung
und der Montage der Lautsprecher, Mikrofone
und Kabel leicht zur Seite.
Remarque : Ces instructions sont destinées
aux casques à liners amovibles et pads. S’ils ne
peuvent être retirés de votre casque, les pousser
doucement de côté en nettoyant et en installant
les écouteurs, les micros et les câbles.
Nota: Queste istruzioni sono per caschi con
rivestimenti e cuscinetti asportabili. Se non
possono essere rimossi dal casco, spingerli
delicatamente di lato mentre si pulisce e si
installano gli auricolari, i microfoni e i cavi.
Nota: Estas instrucciones son para cascos con
forro y relleno extraíbles. Si los de su casco no
son extraíbles, empújelos suavemente a un lado
durante la limpieza e instalación de los altavoces,
microfónos y cables.
Nota: Estas instruções são destinadas a
capacetes com forração e almofadas removíveis.
Caso seu capacete não permita a remoção,
afaste gentilmente a forração para a limpeza e
instalação dos alto-falantes, microfones e os.
Opmerking: deze instructies zijn voor helmen
met verwijderbare bekleding en kussentjes.
Wanneer ze in uw helm niet kunnen worden
verwijderd, duw ze dan voorzichtig opzij terwijl
u de luidsprekers, microfoons en bedrading
schoonmaakt en installeert.
Примечание: Эти инструкции предназначе-
ны для шлемов с удаляемыми покрытиями
и накладками. Если в вашем шлеме они
не удаляются, аккуратно сдвиньте их в
сторону при очистке и установке наушников,
микрофонов и проводов.
Obs: Dessa instruktioner är för hjälmar med
löstagbar stoppning och dynor. Om de inte kan
tas loss i din hjälm yttas de försiktigt åt sidan
under rengöring och installation av högtalare,
mikrofoner och kablar.
5
6
b
5
6
5
1
MAN14012 Freecom Installation Guide _003
www.cardosystems.com
USA & Canada: 1-800-488-0363
International: +49 89 450 36819
communication in motion
®

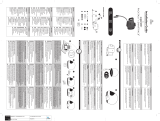
EN |
OPTION B USING THE CRADLE ADHESIVE PLATE
When the clamp cannot be used, attach the cradle to your helmet with the adhesive plate.
While we have no reason to believe that this option might negatively aect any helmet, Cardo does not assume any responsibility, irrespective
of its nature and circumstances. The adhesive plate is oered as an option that you may use at your own risk and subject to renouncement of any
future claims.
Note: Using this option can only be performed once!
1
Remove the pre-installed clamp from the cradle by pushing the release tab on the inside of the cradle and sliding the clamp out.
2
With the alcohol pad, clean the left side of the helmet where you will place the adhesive plate.
3
On the adhesive plate, remove the release liner from the adhesive tape and carefully put the plate in position, then press the adhesive plate rmly to form a good
bond along the plate.
4
Slide the cradle onto the plate until it clicks.
DE |
OPTION B EINSATZ DER KLEBEPLATTE DER HALTERUNG
WENN DIE ZWINGE NICHT BENUTZT WERDEN KANN, BRINGEN SIE DIE HALTERUNG MIT DER KLEBEPLATTE AN IHREN HELM AN.
Obwohl wir keinen Grund zur Annahme haben, dass diese Option eine negative Auswirkung auf Helme haben könnte, so übernimmt Cardo
doch keine Verantwortung, unabhängig von Art und Umstände. Die Klebeplatte wird als Option angeboten, die Sie auf eigenes Risiko und
vorbehaltlich des Verzichts auf zukünftige Ansprüche verwenden können.
Hinweis: Diese Option kann nur einmal ausgeführt werden!
1
Die vorinstallierte Zwinge durch Drücken der Freigabelasche an der Innenseite der Halterung und Herausgleiten der Zwinge entfernen.
2
Reinigen Sie die linke Helmseite, an der die Klebeplatte angebracht wird, mit dem Alkoholtupfer.
3
Entfernen Sie an der Klebeplatte die Schutzfolie vom Klebestreifen und bringen Sie die Platte vorsichtig in Position. Drücken Sie dann die Klebeplatte fest an, um eine
gute Verbindung der gesamten Platte zu gewährleisten.
4
Schieben Sie die Halterung in die Platte, bis sie einrastet.
FR |
OPTION B UTILISATION DE LA PLAQUE ADHESIVE DU COMBINE
Lorsque le crampon ne peut être utilisé, xer le combiné à votre casque à l’aide de la plaque adhésive.
Bien que nous n’ayons aucune raison de croire que cette option puisse négativement aecter votre casque, Cardo n’assume aucune responsabilité,
peut importe sa nature et ses circonstances. La plaque adhésive est proposée en option que vous pourrez utiliser à vos risques et périls et sous
réserve de renoncer à toutes futures réclamations.
Remarque : Cette option ne peut être utilisée qu’une seule fois !
1
Retirer le crampon pré installé du combiné en poussant l’onglet de libération à l’intérieur du combiné et en faisant glisser le crampon vers l’extérieur.
2
Avec le pad d’alcool, essuyer le côté gauche du casque où vous placerez la plaque adhésive.
3
Sur la plaque adhésive, retirer le liner de la plaque adhésive, et, avec précaution, mettre la plaque en position, puis appuyer fermement sur la plaque adhésive pour
bien coller la plaque.
4
Faire glisser le combiné sur la plaque jusqu’à ce qu’il s’enclenche.
ES |
OPCIÓN B USO DE LA PLACA ADHESIVA DEL SOPORTE
Cuando no sea posible usar la pinza, sujete el soporte a su casco usando la placa adhesiva.
Aunque no tenemos motivo para creer que esta opción pueda afectar a su casco en forma negativa, Cardo no asume responsabilidad alguna,
independientemente de su naturaleza y circunstancias. La placa adhesiva se ofrece como una opción que usted puede usar bajo su propio riesgo y
con sujeción a la renuncia de cualquier reclamación futura.
Nota: ¡Esta opción sólo puede ser utilizada una vez!
1
Retire el sujetador preinstalado del soporte presionando la pestaña de liberación en la parte interior del soporte y deslizando el sujetador hacia afuera.
2
Usando los pañitos con alcohol, limpie el lado izquierdo del casco donde colocará la placa adhesiva.
3
En la placa adhesiva, retire la lámina antiadherente de la cinta adhesiva y con cuidado coloque la placa en la posición deseada y luego presiónela rmemente para que
se pegue bien por todos lados.
4
Deslice el soporte sobre la placa hasta que encaje en su sitio
PT |
OPÇÃO B USANDO A PLACA ADESIVA DO SUPORTE
Prenda o suporte em seu capacete com a placa adesiva quando não puder utilizar o grampo.
Mesmo não conhecendo algum fato que leve a acreditar que esta opção possa vir a afetar negativamente qualquer capacete, a Cardo não assume
nenhuma responsabilidade, independentemente de sua natureza ou circunstância. A placa adesiva é oferecida como opção que você pode usar sob
seu próprio risco e sujeito à renúncia de quaisquer reclamações futuras.
Nota: Esta opção pode ser utilizada somente uma vez!
1
Remova o grampo pré-instalado do suporte empurrando a presilha na parte interna do suporte até que o grampo seja liberado.
2
Utilize a almofada com álcool para limpar o lado esquerdo do capacete onde você irá posicionar a placa adesiva.
3
Remova a proteção da ta adesiva da placa e posicione-a cuidadosamente na posição e pressione a placa com rmeza para assegurar uma boa adesão ao capacete.
4
Deslize o suporte por sobre a placa até ouvir um clique.
NL |
OPTIE B GEBRUIK HET KLEEFPLAATJE VOOR DE BEVESTIGING
Wanneer de klem niet kan worden gebruikt, monteer de basis dan met het kleefplaatje op de helm.
Hoewel we geen reden hebben om aan te nemen dat deze optie de helm nadelig beïnvloedt, aanvaardt Cardo geen enkele aansprakelijkheid,
ongeacht de aard en omstandigheden. Het kleefplaatje wordt als optie geleverd die u op eigen risico kunt gebruiken en waarvoor geen enkele
claim zal worden geaccepteerd.
Opmerking: deze optie kan slechts één keer worden aangebracht!
1
Verwijder de vooraf geïnstalleerde klem van de basis door het palletje binnen in de bevestiging in te drukken en de klem eruit te schuiven.
2
Maak met het alcoholschije de linkerkant van de helm schoon waar u het kleefplaatje zult aanbrengen.
3
Verwijder het beschermlaagje van het kleefplaatje en plaats het plaatje voorzichtig op de goede plek, druk vervolgens stevig op het kleefplaatje om te zorgen dat het
plaatje overal goed hecht.
4
Schuif de basis op het plaatje tot het klikt.
IT |
OPZIONE B USO DEL PANNELLO ADESIVO DELL’INTELAIATURA DI SOSTEGNO
Quando non è possibile usare il morsetto, attaccare l’intelaiatura di sostegno al casco con il pannello adesivo.
Nonostante non abbiamo nessun motivo di pensare che questa opzione possa inuire negativamente su un casco, Cardo non si assume nessuna
responsibilità, indipendentemente dalla sua natura e dalle circostanze. Il pannello adesivo viene oerto come un’opzione che si può usare a
proprio rischio ed è soggetta alla rinuncia a qualsiasi reclamo futuro.
Nota: questa opzione può essere usata una sola volta!
1
Rimuovere il morsetto pre-installato dall’intelaiatura di sostegno spingendo la linguetta di rilascio nella parte interna dell’intelaiatura di sostegno e facendo scivolare
fuori il morsetto.
2
Con la salvietta imbevuta di alcool, pulire il lato sinistro del casco nel punto in cui si posizionerà il pannello adesivo.
3
Sul pannello adesivo, rimuovere la pellicola dal nastro adesivo e mettere il pannello con attenzione nella posizione giusta, poi premere il pannello adesivo con forza per
attaccare bene il pannello.
4
Fare scivolare l’intelaiatura di sostegno sul pannello nchè scatta.
SV |
ALTERNATIV B ANVÄND HÅLLARENS FÄSTPLATTA
När klämman inte kan användas fäster du hållaren på hjälmen med fästplattan.
Emedan vi inte har anledning att tro att detta alternativ negativt påverkar någon hjälm tar inte Cardo något ansvar oberoende av dess natur och
omständigheter. Fästplattan erbjuds som ett alternativ att användas på egen risk och vi tar avstånd från eventuella framtida fordringar.
Obs: Detta alternativ kan endast utföras en gång!
1
Ta bort den förinstallerade klämman från hållaren genom att trycka på frigöringsiken på hållarens insida och skjuta ut klämman.
2
Rengör hjälmens vänstra sida med våtservetten där du kommer att placera fästplattan.
3
Ta bort skyddslmen från tejpen på fästplattan och sätt försiktigt plattan på plats, tryck sedan ordentligt på fästplattan för att få en god sammanbindning längs plattan.
4
Skjut hållaren på plats på plattan tills det klickar.
RU |
, .
Поскольку у нас нет оснований предполагать, что этот вариант может каким-либо образом повредить какому-либо шлему, Cardo
не берет на себя никакой ответственности, независимо от ее природы и обстоятельств. Вы используете клеящую полоску на свой
собственный риск, что является основанием для отклонения любых возможных в будущем претензий.
: 1 !
1
, .
2
,
.
3
, ,
.
4
.
5 ➒
6 ➓
➐ ⓫
➑ ⓬
Installation Guide
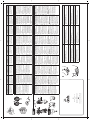
EN |
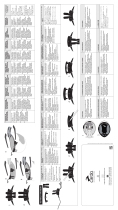
CONTENTS OF BOX
DE |
INHALT LIEFERKARTON
FR |
CONTENU DU COFFRET
1
Cradle with mic and speaker jacks
2
Speakers
3
Hybrid mic
4
Corded mic (FREECOM 2/4 only)
5
Adhesive plate
6
Speaker booster pads
➐
Square Velcro pads for speakers (x2)
➑
Rectangular Velcro pads for hybrid mic (x2)
➒
Hybrid mic clip
➓
Alcohol pads (x2)
⓫
Hybrid mic replacement sponge
⓬
Corded mic replacement sponge
⓭
Freecom Headset (not shown)
1
Halterung mit Mikrofon- und Lautsprecheranschlüssen
2
Lautsprecher
3
Hybridmikrofon
4
Kabelmikrofon (nur FREECOM 2/4)
5
Klebeplatte
6
Lautsprecherverstärkerkissen
➐
Quadratische Klettkissen für Lautsprecher (x2)
➑
Rechteckige Klettkissen für Hybridmikrofon (x2)
➒
Hybridmikrofon-Clip
➓
Alkoholtupfer (x2)
⓫
Hybridmikrofon Ersatzschwamm
⓬
Kabelmikrofon Ersatzschwamm
⓭
Freecom Sprechgarnitur (nicht abgebildet)
1
Combiné avec prises de mic et écouteur
2
Écouteurs
3
Mic hybride
4
Mic à câble (FREECOM 2/4 seulement)
5
Plaque adhésive
6
Pads d’ampli d’écouteur
➐
Pads Velcro carrés pour écouteurs (x2)
➑
Pads Velcro rectangulaires pour mic hybride (x2)
➒
Agrafe de mic hybride
➓
Pads d’alcool (x2)
⓫
Éponge de rechange pour mic hybride
⓬
Éponge de rechange pour mic câblé
⓭
Combiné Freecom (non présenté)
IT |
CONTENUTO DELLA CONFEZIONE
ES |
CONTENIDO DE LA CAJA
PT |
CONTEÚDO DA EMBALAGEM
1
Intelaiatura di sostegno con attacchi per il microfono e l’auricolare
2
Auricolari
3
Microfono ibrido
4
Microfono cablato (solo FREECOM 2/4)
5
Piastra adesiva
6
Cuscinetti di rinforzo per l’auricolare
➐
Cuscinetti di Velcro quadrati per gli auricolari (x2)
➑
Cuscinetti di Velcro rettangolari per microfono ibrido (x2)
➒
Clip del microfono ibrido
➓
Salviette imbevute di alcool (x2)
⓫
Spugnetta di ricambio per il microfono ibrido
⓬
Spugnetta di ricambio per il microfono cablato
⓭
Unità Freecom (non visualizzata)
1
Soporte con tomas para micro y altavoces
2
Altavoces
3
Micro híbrido
4
Micro con cable (sólo en FREECOM 2/4)
5
Placa adhesiva
6
Almohadillas para elevar los altavoces
➐
Almohadillas cuadradas de velcro para altavoces (2)
➑
Almohadillas rectangulares de velcro para micro híbrido
➒
Pinza de micro híbrido
➓
Pañitos con alcohol (2)
⓫
Esponja de remplazo de micro híbrido
⓬
Esponja de remplazo de micro con cable
⓭
Auriculares Freecom (no se muestran)
1
Suporte com tomadas para microfone e alto-falante
2
Alto-falantes
3
Microfone híbrido
4
Microfone com o (somente FREECOM 2/4)
5
Placa adesiva
6
Espumas amplicadoras dos alto-falantes
➐
Adesivos quadrados com Velcro para os alto-falantes (x2)
➑
Adesivos retangulares com Velcro para o microfone híbrido (x2)
➒
Clipe do microfone híbrido
➓
Almofadas com álcool (x2)
⓫
Espuma sobressalente do microfone híbrido
⓬
Espuma sobressalente do microfone com o
⓭
Fone de ouvido Freecom (não mostrado)
NL |
INHOUD VAN DE DOOS
RU |
SV |
INNEHÅLL I VARULÅDAN
1
Basisplaatje met microfoon en luidsprekeringangen
2
Luidsprekers
3
Hybride microfoon
4
Microfoon met snoer
5
Kleefplaatje
6
Luidspreker boosterkussentjes
➐
Vierkante stukjes klittenband voor luidsprekers (2x)
➑
Rechthoekige stukjes klittenband voor hybride microfoon (2x)
➒
Hybride microfoon-clip
➓
Alcoholschijes (2x)
⓫
Vervangend kussentje hybride microfoon
⓬
Vervangend kussentje microfoon met snoer
⓭
Freecom koptelefoon (niet getoond)
1
2
3
4
( FREECOM 2/4)
5
6
➐
- (2 .)
➑
-
(2 .)
➒
➓
(2 .)
⓫
⓬
⓭
Freecom ( )
1
Hållare med mikrofon och högtalaruttag
2
Högtalare
3
Hybridmikrofon
4
Sladdmikrofon (endast FREECOM 2/4)
5
Fästplatta
6
Förhöjningskuddar för högtalare
➐
Fyrkantiga kardborredynor för högtalare (x2)
➑
Rektangulära kardborredynor för hybridmikrofon (x2)
➒
Hybridmikrofonklämma
➓
Våtservetter (x2)
⓫
Ersättningspuskydd för hybridmikrofon
⓬
Ersättningspuskydd för sladdmikrofon
⓭
Freecom-headset (visas inte)
EN |
OPTION A USING THE PREINSTALLED CRADLE CLAMP
IT |
OPZIONE A – USO DEL MORSETTO DELL’INTELAIATURA DI SOSTEGNO
PREINSTALLATO
PT |
OPÇÃO A – USANDO O GRAMPO PRÉINSTALADO DO SUPORTE
1
Position the cradle on the left side of the helmet.
2
Insert the cradle clamp between the helmet shell and padding and push all the
way in.
1
Posizionare l’intelaiatura di sostegno sul lato sinistro del casco.
2
Inserire il morsetto dell’intelaiatura di sostegno fra la calotta e l’imbottitura del
casco e premere no in fondo.
1
Posicione o suporte no lado esquerdo do capacete.
2
Encaixe o gancho do suporte entre a casca do capacete e a forração e empurre até o nal.
DE |
OPTION A EINSATZ DER VORINSTALLIERTEN HALTERUNGSZWINGE
NL |
OPTIE A – DE VOORAF GEMONTEERDE BEVESTIGINGSKLEM GEBRUIKEN
RU |
1
Halterung an der linken Helmseite positionieren.
2
Die Halterungszwinge zwischen Helmschale und Polsterung einfügen und
komplett hineindrücken.
1
Plaats de basis links op de helm
2
Plaats de basisklem tussen de schaal van de helm en de bekleding en druk
helemaal naar binnen.
1
.
2
.
FR |
OPTION A – UTILISATION DE CRAMPON DE COMBINE PRE INSTALLE
ES |
OPCIÓN A – USO DEL SUJETADOR DE SOPORTE PREINSTALADO
SV |
ALTERNATIV A ANVÄND HÅLLARENS FÖRINSTALLERADE KLÄMMA
1
Positionner le combiné du côté gauche du casque.
2
Introduire le crampon de combiné entre la coque et le rembourrage du casque et
poussez à fond vers l’intérieur.
1
Coloque el soporte en el lado izquierdo del casco
2
Introduzca el sujetador de soporte entre la carcasa del casco y el relleno y empújelo
hasta que esté totalmente adentro.
1
Placera hållaren på hjälmens vänstra sida.
2
För in hållarens klämma mellan hjälmens skal och stoppning och tryck den hela vägen in.
English
Deutsch
Français
Italiano
Español
Português
Nederlands
Русский
Svenska
3
4
2
1
✔
EN |
INTRODUCTION
IT |
INTRODUZIONE
PT |
INTRODUÇÃO
This installation guide will guide you in attaching the FREECOM headset and cradle to your motorcycle helmet. Questa guida di installazione guida all’attacco del dispositivo FREECOM e del supporto al casco per motocicletta. Este guia de instalação irá orientá-lo na xação do fone de ouvido e do suporte do FREECOM em seu capacete.
DE |
EINFÜHRUNG
NL |
TER INTRODUCTIE
RU |
Diese Montageanleitung zeigt Ihnen, wie Sie die FREECOM Sprechgarnitur anbringen und an Ihren Motorradhelm befestigen
.
Deze installatiehandleiding helpt u om de FREECOM koptelefoon en het montageplaatje aan uw motorhelm te bevestigen. FREECOM .
FR |
INTRODUCTION
ES |
SPANISH
SV |
INTRODUKTION
Ce guide d’installation vous aide à xer l’écouteur et combiné FREECOM à votre casque de motocyclette. Esta guía de instalación le ayudará a sujetar los auriculares FREECOM y su soporte en su casco de motocicleta. Denna installationsguide kommer att vägleda dig vid fästandet av FREECOMs headset och hållare på din motorcykelhjälm.
-
 1
1
-
 2
2


Cardo FRC4P101 FREECOM 4 Plus Motocyclette 2 Voies Bluetooth Communication System Casque Användarmanual
- Kategori
- Mikrofoner
- Typ
- Användarmanual
på andra språk
- italiano: Cardo FRC4P101 FREECOM 4 Plus Motocyclette 2 Voies Bluetooth Communication System Casque Manuale utente
- español: Cardo FRC4P101 FREECOM 4 Plus Motocyclette 2 Voies Bluetooth Communication System Casque Manual de usuario
- Deutsch: Cardo FRC4P101 FREECOM 4 Plus Motocyclette 2 Voies Bluetooth Communication System Casque Benutzerhandbuch
- português: Cardo FRC4P101 FREECOM 4 Plus Motocyclette 2 Voies Bluetooth Communication System Casque Manual do usuário
- français: Cardo FRC4P101 FREECOM 4 Plus Motocyclette 2 Voies Bluetooth Communication System Casque Manuel utilisateur
- English: Cardo FRC4P101 FREECOM 4 Plus Motocyclette 2 Voies Bluetooth Communication System Casque User manual
- русский: Cardo FRC4P101 FREECOM 4 Plus Motocyclette 2 Voies Bluetooth Communication System Casque Руководство пользователя
- Nederlands: Cardo FRC4P101 FREECOM 4 Plus Motocyclette 2 Voies Bluetooth Communication System Casque Handleiding
Andra dokument
-
Cardo Systems SmartH Installationsguide
-
 Cardo Systems Freecom 4+ Installationsguide
-
Cardo Systems PACKTALK BOLD Installationsguide
-
 Cardo Systems PACKTALK Installationsguide
-
Yamaha DM-105 Bruksanvisning
-
 Cardo Systems Packtalk Slim Installationsguide
-
Cellular Line INTERPHONEF3EU Användarmanual
-
Cellular Line INTERPHONEF4TPPLEU Användarmanual
-
Freecom Hard Drive mDock Pro Användarmanual
-


