Auriol Z30237B Bruksanvisning
- Kategori
- Väckarklockor
- Typ
- Bruksanvisning
Denna manual är också lämplig för

RADIO-CONTROLLED LCD CLOCK
Operation and Safety Notes
RADIOSTYRD LCD-KLOCKA
Bruksanvisning och säkerhetsanvisningar
RADIO-OHJATTU LCD-KELLO
Käyttö- ja turvallisuusohjeet
LCD-RADIOUR
Betjenings- og sikkerhetshenvisninger
LCD-FUNKUHR
Bedienungs- und Sicherheitshinweise
3
Z30237B
Z30237C

GB / IE Operation and Safety Notes Page 5
FI Käyttö- ja turvaohjeet Sivu 12
SE Bruksanvisning och säkerhetsanvisningar Sidan 19
DK Brugs- og sikkerhedsanvisninger Side 26
DE / AT / CH Bedienungs- und Sicherheitshinweise Seite 33

3
1 3
4
6
7
91011
12
26
13
18
19
17
Z30237B
8
15
5
16
202122232425
2
14

4
Z30237C
1 3
7
4
1011
26
26
13
12
18
19
17
15
16
202122232425
2
5
14

5 GB/IE
Table of Contents
Introduction
Proper Use ........................................................................................................................................Page 6
Description of Parts ..........................................................................................................................Page 6
Technical data ..................................................................................................................................Page 6
Safety
General Safety Information .............................................................................................................Page 6
Safety Instructions for Batteries .......................................................................................................Page 7
Before Initial Use
Setting up Devices ............................................................................................................................Page 7
Installing the LCD radio-controlled clock ........................................................................................Page 8
Inserting or replacing batteries........................................................................................................Page 8
Operation
Reception of DCF radio signal ........................................................................................................Page 8
Setting the year / month / date / time / day of the week ................................................................Page 9
Setting the day of the week display ................................................................................................Page 9
Using the 12 / 24-hour display .......................................................................................................Page 9
Setting the alarm ..............................................................................................................................Page 9
Activating / deactivating the alarm .................................................................................................Page 9
Switching off the alarm signal .........................................................................................................Page 10
Displaying the temperature in °C / °F ............................................................................................Page 10
Moon phase (Model B only) ..........................................................................................................Page 10
Displaying summertime ....................................................................................................................Page 10
Setting the time zone .......................................................................................................................Page 10
Troubleshooting .....................................................................................................................Page 10
Cleaning and Maintenance ...........................................................................................Page 10
Service ............................................................................................................................................Page 11
Disposal .........................................................................................................................................Page 11
Declaration of Conformity .............................................................................................Page 11

6 GB/IE
Introduction / Safety
Radio-Controlled LCD Clock
Introduction
Use the product only as described and
for the indicated purpose.
Proper Use
The clock is only suitable for operation in enclosed
spaces at normal room temperature. The device is
not intended for commercial use.
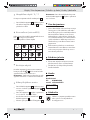
Description of Parts
1
Time display
2
Radio symbol
3
Battery symbol
4
Summer time symbol
5
Time zone symbol
6
Calender week (Model B only)
7
Indoor air temperature
8
Moon phase (Model B only)
9
Year display (Model B only)
10
Month display
11
Date display
12
Day of the week display
13
PM symbol (afternoon)
14
AM symbol (morning)
15
Alarm 1 symbol
16
Alarm 2 symbol
17
Hanger
18
Battery compartment cover
19
Battery compartment
20
SNOOZE button
21
WAVE button
22
DOWN button
23
UP button
24
ALARM button
25
SET button
26
Folding stand
Technical data
Battery type: 2 x 1.5 V , AAA (supplied)
Safety
WARNING!
Please read all safety information
and instructions. Failure to comply with the safety
information and instructions may result in, fire and / or
severe injuries.
KEEP ALL THE SAFETY ADVICE AND INSTRUC-
TIONS IN A SAFE PLACE FOR FUTURE REFERENCE!
General Safety
Information
WARNING!
DANGER TO
LIFE AND ACCIDENT HAZARD
FOR TODDLERS AND
SMALL
CHILDREN! Never allow children
to play un-
supervised with the packaging material. There
is a danger of suffocation from the packaging
material. Children frequently underestimate the
dangers. Children should be kept away from
the product at all times. This is not a toy.
Children or persons who lack the knowledge
or experience to use the device or whose
physical, sensory or intellectual capacities are
limited must never be allowed to use the device
without supervision or instruction by a person
responsible for their safety. Children must never
be allowed to play with the device.
Do not use the device if it is damaged. Damaged
devices represent a danger of death!
WARNING!
Do not use the device in hospitals
or medical facilities, as otherwise this may result
in malfunctions of life-support systems.
Please prevent the housing of the device from
rubbing to strongly against textiles. This may
result in static charges and affect the results of
the measurements.
Please note that the guarantee does not cover
damage caused by incorrect handling, non-com-

7 GB/IE
pliance with the operating instructions or interfer-
ence with the device by unauthorised individuals.
Under no circumstances should you take the
device apart. Improper repairs may place the
user in considerable danger. Repairs should
only be carried out by specialist personnel.
Safety Instructions
for Batteries
WARNING!
DANGER TO LIFE! Batteries
can be swallowed, which may represent a
danger to life. If a battery has been swallowed,
medical help is required immediately.
Remove the batteries from the device if they
have not been used for a long period.
CAUTION! DANGER OF EXPLO-
SION! The batteries must never be
recharged!
CAUTION! RISK OF EXPLO-
SION! Use batteries of the indicated
type only. Otherwise there is a risk
of an explosion.
When inserting the batteries, ensure the correct
polarity!
If necessary clean the contacts on the batteries
and on the device itself before inserting them.
Remove exhausted batteries from the device
immediately. Otherwise the batteries are more
likely to leak.
If you disregard the above instructions and
advice, your batteries may discharge beyond
their minimum voltage, thus increasing the
chance of leakage. If the batteries in your
device leak, remove them immediately to
prevent the device from being damaged.
Keep batteries away from children; do not
throw batteries in the fire, short-circuit batteries
or take them apart.
Avoid contact with the skin, eyes and mucous
membranes. Any parts of the body coming into
contact with battery acid should be rinsed off
with copious amounts of water and / or a doctor
contacted if necessary!
Dispose of batteries in accordance with the
disposal instructions.
Before Initial Use
Unscrew the transport securing device on the
back of the box in order to remove the device.
Remove the protective foil before first use.
Setting up Devices
CAUTION! When selecting a location to set
up the device, please ensure that it is not exposed
to any direct sunlight, vibrations, dust, heat, cold or
moisture. Do not place the device close to sources of
heat, e.g. radiators. Otherwise it may be damaged.
Make sure that the device is standing safely on
a stable surface.
Make sure that the device is mounted properly
if installed on a wall. A falling clock could injure
people
or cause damage to the device itself or
to other objects.
Stand the radio-controlled clock on its base
26
or mount it on the wall.
Place the clock on a level, horizontal surface.
Do not stand the device on valuable or sensitive
surfaces without suitable protection. The surface
may otherwise be damaged.
Do not place the device anywhere near to sources
of interference such as televisions, computers,
thick walls, etc. These may hinder reception of
the radio signal.
Do not use the clock in reinforced concrete
buildings, e. g. airports, high-rises, factories or
basements. This can seriously disrupt reception
of the radio signal.
Do not start radio reception in a moving vehicle,
e. g. car or train. Reception of the radio signal
by the device can disrupt the vehicle electronics.
Do not expose the clock to temperatures below
--10°C for any length of time. This can seriously
affect the reception range of the device.
Safety / Before Initial Use

8 GB/IE
Installing the LCD
radio-controlled clock
Note: You will need a drill, suitable assembly
material and a screwdriver for installation.
CAUTION! DANGER TO LIFE AND RISK
OF INJURY; RISK OF DAMAGE TO PROP-
ERTY! Please read the operating and safety instruc-
tions for your drill carefully.
WARNING!
DANGER TO LIFE! Please
ensure that you do not drill into any electrical wiring,
gas or water pipes in the wall. If necessary, carry out
checks with a wire, pipe and stud detector before
you drill into a wall.
Find a suitable place to install the radio-controlled
clock.
Mark the drill hole on the wall.
CAUTION! DANGER OF INJURY! Refer to
the operating instructions for your electric drill.
Drill the hole with a drill.
Insert a suitable dowel into the drill hole.
Use a screwdriver to insert a suitable screw.
Hang the radio-controlled clock on the screw
using the mount
17
.
Inserting or replacing batteries
The battery symbol
3
appears in the LC dis-
play if the batteries are too weak. Make sure you
replace the batteries at the earliest opportunity.
The radio-controlled LCD wall clock starts to receive
the radio time signal as soon as the batteries are
inserted.
Note: Do not alter the position of the radio-controlled
clock during reception of the signal. This may disrupt
reception.
Radio time signal (DCF):
The DCF signal (time signal transmission) consists
of time pulses broadcast from one of the most accu-
rate clocks in the world. It is situated near Frankfurt /
Main, Germany.
Your radio-controlled clock receives these signals
under ideal conditions up to a distance of approx.
1,500 km around Frankfurt / Main. Reception of the
radio signal generally takes approx. 3–10 minutes.
If it does not work properly, restart the radio-
controlled clock. To do this, keep the WAVE
button
21
pressed for approx. 3 seconds.
Reception can be considerably impaired by obstacles
(e.g. concrete walls) or sources of interference (e.g.
other electrical devices). If necessary, change the
location of the radio clock (e.g. by putting it near a
window) if you have problems with reception.
Operation
Reception of DCF radio signal
The radio-controlled clock automatically starts to
search for the DCF radio signal. The radio icon
2
on the LCD indicates that the clock is searching for the
radio signal.
Note: Reception of the radio signal may be seriously
disrupted in reinforced concrete buildings (see “Set-
ting up Devices”).
It is also possible to start reception of the DCF radio
signal manually on the clock.
Press and keep pressed the WAVE button
21
for longer than 3 seconds. The LCD radio-con-
trolled wall clock attempts to receive the DCF
radio time signal. This process takes several
minutes and is indicated in the LC display by a
flashing radio symbol
2
.
Note: If the radio-controlled clock cannot pick up
the DCF radio signal on account of an error or the
distance from the transmitter, etc., it is also possible
to set the time manually. As soon as reception of
the DCF signal is successful, the manual settings
are overwritten.
Before Initial Use / Operation

9 GB/IE
Setting the year / month /
date / time / day of the week
1. Press and keep pressed the WAVE button
21
for
approx. 3 seconds. The radio symbol
2
flashes.
2. Press and keep pressed the WAVE button
21
again for approx. 3seconds to stop the recep-
tion of the radio time signal.
3. Press and keep pressed the SET button
25
for
approx. 2 seconds. The year display flashes.
Set the desired value by pressing the UP
23
or
DOWN button
22
.
Tip: By keeping the UP
23
or DOWN button
22
pressed you can accelerate the setting process
and reach the desired value more quickly. This
quicker method can also be used for making
the other settings. If during a period of 15sec-
onds no buttons are pressed, the LC display
returns automatically to the default display.
4. Confirm your settings by pressing the SET but-
ton
25
. The month display flashes.
5. Repeat steps 3 and 4 to set the values for day,
hour, minute and day of the week.
Setting the day of the week
display
The day of the week
12
can be displayed in various
languages.
Press the DOWN button
22
and keep it pressed.
In the day of the week display
12
, the abbrevi-
ation for the current language appears. Release
the DOWN button
22
when the abbreviation
for your chosen language appears.
The following languages are available:
GER = German
FRE = French
SPA = Spanish
ITA = Italian
DAN = Danish
DUT = Dutch
ENG = English
Using the 12 / 24-hour display
While time display
1
is indicated press the
UP button
23
to switch between 12- hour and
24-hour format.
Note: The AM icon
14
on the LCD stands for
mornings in 12-hour format. The PM icon
13
on the LCD stands for afternoons in 12-hour
format.
Setting the alarm
Press the SET button
25
once or twice to select
alarm 1
15
or alarm 2
16
.
Press and keep pressed the SET button
25
for
about 2seconds. The hour display flashes.
Press the UP
23
or DOWN button
22
to set
the desired value.
Press the SET button
25
to confirm your setting.
The minute display flashes.
Press the UP
23
or DOWN button
22
to set
the desired minute value.
Press the SET button
25
to confirm your setting.
Press the SNOOZE button
20
as soon as the
alarm signal sounds. The alarm signal stops
sounding. The alarm will sound again 5minutes
after the set waking time or alarm time.
Press any button except the SNOOZE button
20
to stop the alarm signal sounding.
Activating / deactivating the
alarm
Press the ALARM button
24
briefly. The appro-
priate alarm symbol
15
or
16
is dis-
played to indicate that the alarm is activated.
Pressing the ALARM button
24
again causes
the appropriate alarm symbol
15
or
16
to cease to be displayed. The alarm is deacti-
vated.
Operation

10 GB/IE
Switching off the alarm signal
Press any button except the SNOOZE button
20
to stop the alarm signal sounding. You do not
have to reactivate the alarm. It reactivates itself
automatically according to the weekly rhythm.
Note: The alarm signal switches itself off after
2minutes.
Displaying the temperature
in °C / °F
The current inside temperature
7
is indicated on
the LCD.
Press the DOWN button
22
to switch between
the Celsius and Fahrenheit temperature scales
7
.
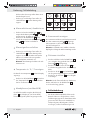
Moon phase (Model B only)
The LCD radio-controlled wall clock shows the current
moon phase
8
in the LC display (Model B only).
It uses the following symbols:
Full moon Waning
gibbous
Last quarter Waning
crescent
New moon Waxing
crescent
First quarter Waxing
gibbous
Displaying summertime
Summertime is automatically indicated on the LCD
by the summertime icon
4
. The clock receives
the information as to whether it is summertime or not
from the DCF radio signal.
Note: Reception of the radio signal may be seriously
disrupted in reinforced concrete buildings.
Setting the time zone
Press and keep pressed the DOWN button
22
for
about 2seconds. The time zone symbol
5
is displayed.
Press and keep pressed the SET button
25
for
about 3seconds. The hour display flashes.
Press the UP
23
or DOWN button
22
to set
the desired hour value.
Press the SET button
25
to confirm your setting.
Note: Press and keep pressed the DOWN button
22
for about 2seconds to deactivate the time zone
function.
Troubleshooting
This appliance has delicate electronic compo-
nents. This means that if it is placed near an
object that transmits radio signals, it could cause
interference. This could be, for example, mobile
telephones, walkie talkies, CB radios, remote
controls and microwaves. If the display indicates
a problem, move such objects away from it.
Electrostatic discharges may cause malfunctions.
In the event of such malfunctions, remove the
batteries briefly and reinsert them.
Cleaning and Maintenance
Under no circumstances should you use liquids
or detergents, as these will damage the device.
The device should only be cleaned on the out-
side with a soft dry cloth.
Operation / Troubleshooting / Cleaning and Maintenance

11 GB/IE
Service
GB
Service Great Britain
Tel.: 0871 5000 720
(0,10 GBP / Min.)
e-mail: milome[email protected]
IAN 66773
IE
Service Ireland
Tel: 1890 930 034
(0,08 EUR / Min. (peak)
0,06 EUR / Min. (off peak))
e-mail: milome[email protected]
IAN 66773
Disposal
The packaging is made entirely of recy-
clable materials, which you may dispose
of at local recycling facilities.
Contact your local refuse disposal authority for more
details of how to dispose of your worn-out product.
To help protect the environment, please
dispose of the product properly when it
has reached the end of its useful life and
not in the household waste. Information
on collection points and their opening
hours can be obtained from your local
authority.
Faulty or used batteries must be recycled in accord-
ance with Directive 2006 / 66 / EC. Please return
the batteries and / or the device to the available
collection points.
Pb Hg
Environmental damage through
incorrect disposal of the batteries!
Batteries may not be disposed of with the usual do-
mestic waste. They may contain toxic heavy metals
and are subject to hazardous waste treatment rules
and regulations. The chemical symbols for heavy
metals are as follows: Cd = cadmium, Hg = mercury,
Pb = lead. That is why you should dispose of used
batteries at a local collection point.
Declaration of Conformity
We, Milomex Ltd., c / o Milomex Services, Hilltop
Cottage, Barton Road, Pulloxhill, Bedfordshire,
MK45 5HP, UK, hereby declare under our sole
responsibility that the product: Radio-Controlled
LCD Clock, Model No.: Z30237B / Z30237C,
Version: 07 / 2011, to which this declaration refers,
complies with the standards / normative documents
of 1999 / 05 / EC.
The complete declaration of conformity can be
viewed at: www.milomex.com
EMC
Product description:
Radio-Controlled LCD Clock
Model No.: Z30237B / Z30237C
Version: 07 / 2011
Service / Disposal / Declaration of Conformity

12 FI
Sisällysluettelo
Johdanto
Määräystenmukainen käyttö ............................................................................................................Sivu 13
Osien kuvaus .....................................................................................................................................Sivu 13
Tekniset tiedot ....................................................................................................................................Sivu 13
Turvallisuus
Yleiset turvaohjeet .............................................................................................................................Sivu 13
Paristoja koskevia turvallisuusohjeita ...............................................................................................Sivu 14
Ennen käyttöönottoa
Laitteen sijoittaminen .........................................................................................................................Sivu 14
Radio-ohjatun LCD-kellon asennus ...................................................................................................Sivu 15
Pariston paikoilleenasetus ja vaihto .................................................................................................Sivu 15
Käyttö
DCF radiosignaalin vastaanotto ......................................................................................................Sivu 15
Vuoden / kuukauden / päiväyksen / ajan / viikonpäivän asetus .................................................... Sivu 15
Viikonpäivänäytön asetus .................................................................................................................Sivu 16
12 / 24-tuntinäytön käyttö ................................................................................................................ Sivu 16
Hälytyksen asetus ..............................................................................................................................Sivu 16
Hälytystoimintojen käynnistys / päättäminen ................................................................................... Sivu 16
Hälytyssignaalin poiskytkentä ..........................................................................................................Sivu 16
Lämpötilan näyttö °C / °F ................................................................................................................ Sivu 17
Kuunvaiheet (vain malli B) ................................................................................................................Sivu 17
Kesäajan näyttö ................................................................................................................................Sivu 17
Aikavyöhykkeen asetus ....................................................................................................................Sivu 17
Vian korjaaminen ..................................................................................................................Sivu 17
Puhdistus ja hoito ...................................................................................................................Sivu 17
Huolto
...............................................................................................................................................Sivu 17
Jätehuolto .....................................................................................................................................Sivu 17
Vaatimustenmukaisuusvakuutus .............................................................................Sivu 18

13 FI
Johdanto / Turvallisuus
Radio-ohjattu LCD-kello
Johdanto
Käytä laitetta vain kuvatulla tavalla ja
ainoastaan ilmoitettuihin käyttötarkoituk-
siin.
Määräystenmukainen käyttö
Laite on tarkoitettu käytettäväksi ainoastaan sulje-
tuissa tiloissa ja normaalissa huoneenlämpötilassa.
Laite ei ole tarkoitettu ammattimaiseen käyttöön.
Osien kuvaus
1
Ajannäyttö
2
Radiosymboli
3
Paristosymboli
4
Symboli kesäaika
5
Symboli aikavyöhyke
6
Kalenteriviikko (vain malli B)
7
Sisälämpötila
8
Kuunvaihe (vain malli B)
9
Vuosinäyttö (vain malli B)
10
Kuukausinäyttö
11
Päivämäärän näyttö
12
Viikonpäivänäyttö
13
PM-symboli (iltapäivä)
14
AM-symboli (aamupäivä)
15
Hälytys 1-symboli
16
Hälytys 2-symboli
17
Ripustuslaite
18
Paristotilan kansi
19
Paristotila
20
SNOOZE-näppäin („torkku“)
21
WAVE-näppäin („aalto“)
22
DOWN-näppäin („alaspäin“)
23
UP-näppäin („ylöspäin“)
24
HERÄTYS-näppäin („herätyskellon asetus“)
25
SET-näppäin
26
Käännettävä jalka
Tekniset tiedot
Paristotyyppi: 2 x 1,5 V , AAA
(kuuluu toimitukseen)
Turvallisuus
VAROLTUS!
Lue kaikki turva- ja muut ohjeet!
Turva- ja muiden ohjeiden laiminlyönti voi aiheuttaa
sähköiskun, tulipalon ja / tai vakavia loukkaantumisia.
SÄILYTÄ KAIKKI TURVA- JA MUUT OHJEET
TULEVAA TARVETTA VARTEN!
Yleiset turvaohjeet
VAROLTUS!
HENGEN- JA
TAPATURMANVAARA PIKKU-
LAPSILLE JA LAPSILLE! Älä
koskaan jätä lapsia pakkausmateriaalien lähei-
syyteen ilman valvontaa. Pakkausmateriaaleihin
liittyy tukehtumisvaara. Lapset aliarvioivat usein
vaarat. Pidä lapset aina loitolla tuotteesta. Tuote
ei ole lasten leikkikalu.
Tämä laite ei ole tarkoitettu sellaisten henkilöiden
(lapset mukaan luettuina) käyttöön, joiden fyy-
sinen, aistimuksellinen tai henkinen kunto on
rajoittunut tai joilla ei ole kokemusta / tietoja
laitteen käytöstä. He saavat käyttää laitetta
ainoastaan turvallisuudesta vastuussa olevan
henkilön valvonnassa tai jos heille on annettu
opastusta laitteen käytössä. Lapsia on valvottava
ja pidettävä huoli siitä, etteivät he pääse leikki-
mään laitteen kanssa.
Älä ota laitetta käyttöön, jos se on viallinen.
Vioittuneet laitteet merkitsevät sähköiskun aihe-
uttamaa hengenvaaraa.
VAROLTUS!
Älä käytä laitetta sairaaloissa
tai muissa lääketieteellisissä laitoksissa. Tämä
voi johtaa elintoimintoja ylläpitävien laitteiden
toimintahäiriöihin.
Älä anna laitteen kotelon hankautua voimak-
kaasti kankaita vasten. Se voi johtaa staattiseen
latautumiseen ja vaikuttaa mittaustulokseen.

14 FI
Huomaa, että takuu ei korvaa väärästä käsittelystä,
käyttöohjeen tietojen noudattamatta jättämisestä
tai valtuuttamattomien henkilöiden toimenpiteistä
aiheutuvia vikoja.
Älä koskaan pura laitetta osiin. Asiantuntematto-
masti tehdyt korjaukset voivat aiheuttaa käyttäjälle
huomattavia vaaratilanteita. Anna korjaukset vain
ammattiliikkeen tehtäväksi.
Paristoja koskevia
turvallisuusohjeita
VAROLTUS!
HENGENVAARA! Paristojen
nieleminen voi olla hengenvaarallista. Pariston
nielleen henkilön on välittömästi mentävä lää-
kärille.
Poista paristot laitteesta, jos niitä ei ole käytetty
pitkään aikaan.
VARO! RÄJÄHDYSVAARA! Älä
missään tapauksessa lataa paristoja
uudelleen!
VARO! RÄJÄHDYSVAARA!
Käytä vain ilmoitetun tyyppisiä paris-
toja. Muuten uhkaa räjähdysvaara.
Tarkista paristoja paikoilleen asettaessasi, että
napaisuus on oikea!
Puhdista paristo- ja laitekontaktit tarvittaessa
ennen niiden paikoilleen asetusta.
Tyhjentyneet paristot on poistettava laitteesta
välittömästi. Ne voivat vuotaa paristotilaan!
Ellei näitä edellä mainittuja ohjeita noudateta,
paristot voivat tyhjentyä yli loppujännitteensä.
Silloin on olemassa vuotamisvaara. Jos paristot
ovat päässeet vuotamaan laitteessasi, poista
ne heti, muuten laite voi vaurioitua.
Pidä paristot lasten ulottumattomissa, älä heitä
niitä tuleen, älä oikosulje niitä äläkä pura niitä.
Vältä kosketusta ihoon, silmiin ja limakalvoihin.
Jos pariston happoa joutuu iholle, huuhtele
kyseinen kohta runsaalla määrällä vettä ja / tai
mene lääkäriin!
Hävitä paristot hävitysohjeiden mukaisesti.
Ennen käyttöönottoa
Ruuvaa kuljetustuki pois kartongin takapuolelta,
jotta voit ottaa laitteen ulos.
Poista suojakalvo ennen ensimmäistä käyttöön-
ottoa.
Laitteen sijoittaminen
VARO! Varmista laitteiden sijoituspaikkaa vali-
tessasi, että laitteet eivät altistu suoralle auringonsä-
teilylle, tärinälle, pölylle, kuumuudelle, kylmyydelle
ja kosteudelle. Älä sijoita laitteita lämmönlähteiden
(esim. lämpöpatteri) lähelle. Laitteet voivat vioittua.
Varmistaudu, että laite seisoo tukevasti vankalla
alustalla.
Tarkista, että ripustus seinäasennuksessa on
suoritettu moitteettomasti. Jos kello putoaa,
henkilöt voivat loukkaantua, laite rikkoutua ja
siitä voi seurata muita aineellisia vahinkoja.
Aseta radio-ohjattu kello jalalle
26
tai asenna
se seinään.
Aseta laite tasaiselle, vaakasuoralle alustalle.
Älä sijoita laitetta ilman sopivaa suojusta arvok-
kaille tai aroille pinnoille. Nämä voivat vaurioitua.
Älä sijoita laitetta häiriölähteiden läheisyyteen,
kuten televisio, tietokone, vahvat muurit jne.
Tämä voi alentaa radiosignaalin vastaanotto-
kykyä.
Älä käytä kelloa teräsbetonirakennuksissa, esim.
lentoasemilla, korkeissa kerrostaloissa, tehtaissa,
kellareissa. Tämä voi vaikuttaa voimakkaasti
radiosignaalin vastaanottoon.
Älä käynnistä vastaanottoa liikkuvassa ajoneu-
vossa, esimerkiksi autossa tai junassa. Radio-
signaalin vastaanotto voi häiritä ajoneuvon
elektroniikkaa.
Älä altista laitetta pitemmäksi ajaksi alle --10°C
lämpötiloille.
Turvallisuus / Ennen käyttöönottoa

15 FI
Ennen käyttöönottoa / Käyttö
Radio-ohjatun LCD-kellon
asennus
Huomautus: Tarvitset asennukseen porakoneen-
sekä sopivaa asennusmateriaalia ja ruuviavaimen.
VARO! HENGENVAARA JA LOUK-
KAANTUMISVAARA SEKÄ AINEELLISTEN
VAHINKOJEN VAARA! Lue porakoneesi käyt-
töohje ja turvallisuusohjeet huolellisesti läpi.
VAROLTUS!
HENGENVAARA! Varo, ettet
seinää poratessasi osu sähkö-, kaasu tai vesijohtoihin.
Tarkista seinä tarvittaessa johtojen etsintälaitteella,
ennen kuin ryhdyt poraamaan sitä.
Etsi sopiva sijoituspaikka radio-ohjatulle kellollesi.
Merkitse porausreikä seinään.
VARO! LOUKKAANTUMISVAARA! Ota
töissäsi avuksi porakoneen käyttöohje.
Poraa reikä porakoneella.
Kiinnitä sopiva tulppa porausreikään.
Ruuvaa ruuvinvääntimellä siihen sopiva ruuvi.
Ripusta radio-ohjattu kello ripustuslaitteella
17
ruuviin.
Pariston paikoilleenasetus
ja vaihto
Paristosymbli
3
tulee LC-näyttöön, kun paristot
ovat heikkoja. Huolehdi siitä, että vaihdat paristot
ajoissa.
Heti kun paristo on asetettu paristotilaan, LCD-radio-
ohjattu seinäkello käynnistää radiosignaalin vas-
taanoton.
Huomautus: Älä vaihda LCD-radio-ohjattun
seinäkellon sijaintipaikkaa vastaanoton aikana.
Se voi aiheuttaa häiriöitä vastaanotossa.
Radiosignaali (DCF):
DCF-77 signaalin (aikasignaalin lähetin) muodostavat
aikapulssit, jotka antaa eräs maailman tarkimmista
kelloista. Frankfurt / Main kaupungin lähellä Saksassa.
Radio-ohjattu kello vastaanottaa optimaalisissa olo-
suhteissa nämä signaalit n. 1.500 km:n etäisyydeltä
Frankfurt / Mainista. Radiosignaalin vastaanotto
kestää normaalisti noin 3–10 minuuttia.
Ellei kello toimi kunnolla, käynnistä se tarvittaessa
uudelleen. Pidä tällöin WAVE -näppäintä
21
painettuna noin 3 sekunnin ajan.
Esteet (esim. betoniseinät) tai häiriölähteet (esim.
muut sähkölaitteet) voivat heikentää signaalin vas-
taanottamista huomattavasti. Vaihda tarvittaessa
radiokellon paikkaa (esim. ikkunan lähelle), jos
vastaanotossa on häiriöitä.
Käyttö
DCF radiosignaalin vastaanotto
Radio-ohjattu kello alkaa automaattisesti etsiä
DCF-radiosignaalia. Etsintä näytetään LC-näytössä
radiosymbolin vilkunnalla
2
.
Huomautus: Teräsbetonisissa rakennuksissa
radiosignaalin vastaanotto voi vaikeutua huomatta-
vasti (katso ”Laitteen sijoittaminen”).
DCF-radiosignaalin vastaanotto voidaan radio-oh-
jatussa kellossa käynnistää myös manuaalisesti.
Paina WAVE-näppäintä
21
ja pidä sitä painet-
tuna 3 sekunnin ajan. LCD-radio-ohjattu seinä-
kello yrittää vastaanottaa DCF-radiosignaalin.
Tämä kestää muutaman minuutin ja se näytetään
LC-näytössä radiosymbolin
2
vilkunnalla.
Huomautus: Ellei LCD-radio-ohjattu seinäkello
virheiden, liian suuren etäisyyden lähettimestä tms.
vuoksi voi vastaanottaa DCF-radiosignaalia, voit
asettaa ajan manuaalisesti. Heti kun DCF-radiosig-
naalin vastaanotto onnistuu manuaalisesti, asetetut
arvot pyyhitään pois.
Vuoden / kuukauden /
päiväyksen / ajan /
viikonpäivän asetus
1. Pidä WAVE -näppäintä
21
painettuna noin 3
sekuntia. Radio-symboli
2
vilkkuu.

16 FI
Käyttö
2. Pidä WAVE -näppäintä
21
uudelleen painettuna
noin 3 sekuntia niin radiosignaalin vastaanotto
keskeytyy.
3. Pidä WAVE -näppäintä
25
painettuna noin
2 sekuntia. Vuosinäyttö vilkkuu. Aseta haluttu
arvo UP-
23
tai DOWN-näppäintä
22
paina-
malla.
Tipp: Pidä UP-
23
tai DOWN-näppäintä
22
painettuna. Näin nopeutat arvojen asetusta.
Tätä pika-asetusta voit käyttää hyväksi myös
seuraavissa asetuksissa. Ellet 15 sekuntiin paina
mitään painiketta, LC-näyttö palaa automaatti-
sesti takaisin vakionäyttöön.
4. Vahvista syöttö painamalla SET-painiketta
25
.
Kuukausinäyttö vilkkuu.
5. Toista vaiheet 3. ja 4., kun haluat asettaa päivä-,
tunti, minuutti- ja viikonpäiväarvot.
Viikonpäivänäytön asetus
Viikonpäivänäyttö
12
voidaan saada näyttöön eri
kielillä.
Paina DOWN-näppäintä
22
ja pidä se
painettuna.
Viikonpäivänäyttöön
12
tulee lyhennys aktuel-
lista asetetusta kielestä. Päästä DOWN-näp-
päin
22
irti vasta, kun näyttöön tulee haluamasi
kielen lyhennys.
Käytettävissä ovat seuraavat kielet:
GER = saksa
FRE = ranska
SPA = espanja
ITA = italia
DAN = tanska
DUT = hollanti
ENG = englanti
12 / 24-tuntinäytön käyttö
Paina UP-näppäintä
23
, kun näytössä on ajan-
näyttö
1
voidaksesi kytkeä edestakaisin
12-tunnin- ja 24-tunnin näyttömuodon välillä.
Huomautus: AM-symboli
14
LC-näytössä
näyttää 12-tunnin näyttömuodon aamupäivälle.
PM-symboli
13
LC-näytössä näyttää 12-tunnin
näyttömuodon iltapäivälle.
Hälytyksen asetus
Paina kerran tai kaksi SET-näppäintä
25
valitak-
sesi hälytyksen 1
15
tai hälytyksen 2
16
.
Paina SET-näppäintä
25
ja pidä se painettuna
noin 2 sekuntia. Tuntinäyttö vilkkuu.
Aseta haluttu arvo painamalla UP-
23
tai
DOWN-näppäintä
22
.
Vahvista syöttö painamalla SET-näppäintä
25
.
Minuuttinäyttö vilkkuu.
Aseta haluttu arvo painamalla UP-
23
tai
DOWN-näppäintä
22
.
Vahvista syöttö painamalla SET-näppäintä
25
.
Paina SNOOZE-näppäintä
20
heti kun kuulet
herätysäänen. Herätysääni sammuu. 5 minuut-
tia asetetun herätysajan tai asetetun hälytyksen
jälkeen herätysääni kuuluu uudelleen.
Paina jotain näppäintä paitsi SNOOZE-näp-
päintä
20
, kun haluat pysäyttää hälytyssignaalin.
Hälytystoimintojen käynnistys /
päättäminen
Paina hetken ALARM-näppäintä
24
. Vastaava
hälytyssymboli
15
tai
16
tulee näyttöön
ja hälytys käynnistyy.
Paina ALARM-näppäintä
24
uudelleen, vastaa-
vaa hälytyssymboli
15
tai
16
sammuu.
Hälytys on poistettu.
Hälytyssignaalin poiskytkentä
Paina jotain näppäintä paitsi SNOOZE-näp-
päintä
20
, kun haluat pysäyttää hälytyssignaa-
lin. Hälytystä ei tarvitse aktivoida uudelleen. Se
kytkeytyy päälle automaattisesti säädetyssä
viikkorytmissä.
Huomautus: Herätyssignaali kytkeytyy
2 minuutin kuluttua pois.

17 FI
Käyttö / Vian korjaaminen / Puhdistus ja hoito / Huolto / Jätehuolto
Lämpötilan näyttö °C / °F
LC-näytössä näytetään aktuelli sisälämpötila
7
.
Paina DOWN-näppäintä
22
voidaksesi kytkeä
edestakaisin lämpötila-asteikkojen
7
Celsius
ja Fahrenheit välillä.
Kuunvaiheet (vain malli B)
Radio-ohjattu LCD-seinäkello näyttää kaikki kuunvai-
heet
8
LC-näytössä (vain malli B).
Seuraavat symbolit voidaan näyttää:
Täysikuu Vähenevä kuu Vähenevä
puolikuu
Vähenevä
kuun sirppi
Uusikuu Kasvava kuun
sirppi
Kasvava
puolikuu
Kasvava kuu
Kesäajan näyttö
Kesäaika näytetään LC-näytössä automaattisesti
kesäajan symbolilla
4
. Kello toteaa DC-radio-
signaalin avulla onko kesäaika vai ei.
Huomautus: Teräsbetonisissa rakennuksissa radio-
signaalin vastaanotto voi vaikeutua huomattavasti.
Aikavyöhykkeen asetus
Paina DOWN-näppäintä
22
ja pidä se painet-
tuna noin 2 sekuntia. Symboli aikavyöhyke
5
on näytössä.
Paina SET-näppäintä
25
ja pidä se painettuna
noin 3 sekuntia. Tuntinäyttö vilkkuu.
Aseta haluttu tuntiarvo painamalla UP-
23
tai
DOWN-näppäintä
22
.
Vahvista syöttö painamalla SET-näppäintä
25
.
Huomautus: Paina aikavyöhykkeiden käynnistä-
miseksi DOWN-näppäintä
22
ja pidä se painettuna
noin 2 sekuntia.
Vian korjaaminen
Laite sisältää herkkiä elektronisia komponentteja.
Tästä syystä voi olla mahdollista, että välittö-
mässä läheisyydessä olevat radiolähetinlaitteet
häiritsevät laitetta. Tällaisia voivat olla esim.
matkapuhelimet, radiopuhelimet, CB-radiolait-
teet, radiokaukosäätimet / muut kaukosäätimet
ja mikroaaltolaitteet. Mikäli näytössä ilmenee
vikailmoituksia, poista tällaiset laitteet laitteen
ympäristöstä.
Elektrostaattiset purkaukset voivat aiheuttaa
toimintahäiriöitä. Poista tällaisten toimintohäiri-
öiden esiintyessä paristo hetkeksi ja aseta se
sitten takaisin paikoilleen.
Puhdistus ja hoito
Älä missään tapauksessa käytä nesteitä tai
puhdistusaineita, sillä ne vioittavat laitetta.
Puhdista laite vain ulkopuolelta pehmeällä,
kuivalla kankaalla.
Huolto
FI
Huolto Suomi
Tel.: 010309 3582
e-mail: milome[email protected]i
IAN 66773
Jätehuolto
Pakkaus on ympäristöystävällista materi-
aalia, jonka voit viedä paikalliseen
kierrätyspisteeseen.

18 FI
Jätehuolto / Vaatimustenmukaisuusvakuutus
Saat lisätietoa käytettyjen tuotteiden jätehuoltomah-
dollisuuksista kunnan- tai kaupungintoimistosta.
Älä heitä käytettyä tuotetta talousjättei-
siin. Toimi ympäristöystäväl-lisesti toimit-
tamalla se asianmukaiseen jätehuoltoon.
Paikallisesta kunnan- tai kaupungintoi-
mistosta saat lisätietoa kierrätyspisteistä
ja aukioloajoista.
Vialliset ja käytetyt paristot on toimitettava kierrä-
tykseen direktiivin 2006 / 66 / EC mukaisesti.
Palauta paristot ja / tai laite tarjolla olevaan keräys-
laitokseen.
Pb Hg
Akkujen väärä hävittäminen
aiheuttaa ympäristövahinkoja!
Paristoja ei saa hävittää talousjätteenä. Ne voivat
sisältää myrkyllisiä raskasmetalleja ja ne kuuluvat
ongelmajätekäsittelyyn. Raskasmetallien kemialliset
merkit ovat seuraavat: Cd = kadmium, Hg = eloho-
pea, Pb = lyijy. Toimita tästä syystä vanhat paristot
kunnalliseen keräyspisteeseen.
Vaatimustenmukaisuusvakuutus
Me, Milomex Ltd., c / o Milomex Services, Hilltop
Cottage, Barton Road, Pulloxhill, Bedfordshire,
MK45 5HP, UK, vakuutamme yksin vastuullisina,
että tuote: Radio-ohjattu LCD-kello, Malli nro.:
Z30237B / Z30237C, Versio: 07 / 2011, jota
tämä vakuutus koskee, on yhtäpitävä standardien /
normatiivisten dokumenttien 1999 / 05 / EC kanssa.
Nämä dokumentit voit tarvittaessa ladata osoitteesta
www.milomex.com.
EMC
Tuotenimike:
Radio-ohjattu LCD-kello
Malli nro.: Z30237B / Z30237C
Versio: 07 / 2011

19 SE
Innehållsförteckning
Inledning
Avsedd användning ......................................................................................................................Sidan 20
De olika delarna ........................................................................................................................... Sidan 20
Tekniska data ................................................................................................................................ Sidan 20
Säkerhet
Allmänna säkerhetsanvisningar.................................................................................................... Sidan 20
Säkerhetsanvisningar för batterier ............................................................................................... Sidan 21
Före användning
Ställa upp produkten .................................................................................................................... Sidan 21
Montera radiostyrd klocka ........................................................................................................... Sidan 21
Lägga in och byta batteri ............................................................................................................. Sidan 22
Användning
Ta emot DCF radiosignal .............................................................................................................. Sidan 22
Ställa in år / månad / datum / tid / veckodag ............................................................................. Sidan 22
Ställa in veckodag ........................................................................................................................ Sidan 23
Använda 12 / 24-timmarsindikering ............................................................................................ Sidan 23
Ställa in larm ................................................................................................................................. Sidan 23
Aktivera / inaktivera larm .............................................................................................................. Sidan 23
Stänga av larmsignal .................................................................................................................... Sidan 23
Visa temperatur i °C / °F ............................................................................................................. Sidan 23
Månfaser (endast modell B) ......................................................................................................... Sidan 23
Visa sommartid .............................................................................................................................. Sidan 24
Ställa in tidszon ............................................................................................................................. Sidan 24
Felsökning ................................................................................................................................ Sidan 24
Rengöring och skötsel .................................................................................................... Sidan 24
Service
......................................................................................................................................... Sidan 24
Avfallshantering ................................................................................................................. Sidan 24
Konformitetsdeklaration ............................................................................................. Sidan 25

20 SE
Inledning / Säkerhet
Radiostyrd LCD-klocka
Inledning
Använd endast produkten i enlighet med
beskrivningen och för angivna ändamål.
Avsedd användning
Produkten är endast avsedd för användning i slutna
rum med normal rumstemperatur. Produkten är endast
avsedd för privat bruk.
De olika delarna
1
Tid
2
Radiosymbol
3
Batterisymbol
4
Symbol sommartid
5
Symbol tidszon
6
Kalendervecka (endast modell B)
7
Inomhustemperatur
8
Månfas (endast modell B)
9
År (endast modell B)
10
Månad
11
Datum
12
Veckodag
13
PM-symbol (eftermiddag)
14
AM-symbol (förmiddag)
15
Alarm 1-symbol
16
Alarm 2-symbol
17
Upphängningsanordning
18
Batterifackslucka
19
Batterifack
20
SNOOZE-knapp (”slummer“)
21
WAVE-Taste (”frekvens“)
22
DOWN-Taste (”nedåt“)
23
UP-knapp (”uppåt“)
24
ALARM-knapp (”ställa in väckarklocka“)
25
SET-knapp
26
Utfällbar uppställningsfot
Tekniska data
Batterityp: 2 x 1,5 V , AAA
(ingår i leveransen)
Säkerhet
VARNING!
Läs alla säkerhetsinstruktioner och
anvisningar! Felhantering vid tillämpning av nedan
angivna säkerhetsinstruktioner och anvisningar kan
medföra elstötar, brand och / eller allvarliga skador.
FÖRVARA ALLA SÄKERHETSINSTRUKTIONER
OCH ANVISNINGAR FÖR FRAMTIDA BEHOV!
Allmänna
säkerhetsanvisningar
VARNING!
RISK FÖR
LIVSFARLIGA SKADOR FÖR
SPÄDBARN OCH BARN! Låt
inte barn leka med förpackningsmaterialet.
Kvävningsrisk föreligger vid hantering av för-
packningsmaterialet. Mindre barn förstår inte
farorna som lurar. Håll alltid mindre barn på
avstånd. Produkten är ingen leksak.
Barn och personer med bristande kunskaper
och eller erfarenhet samt personer med nedsatta
fysiska, motoriska hinder, handikappade perso-
ner eller barn skall om möjligt inte använda
produkten utan uppsikt eller handledning av
säkerhetsansvarig person. Barn skall hållas
under uppsikt och får absolut inte använda
produkten som leksak.
Använd aldrig en produkt som är skadad. Ska-
dad produkt kan medföra elstötar och livsfara.
VARNING!
Använd inte produkten på sjuk-
hus eller i närheten av medicinsk utrustning. Detta
kan medföra funktionsstörningar i livsuppehål-
lande utrustning.
Se till att apparathuset inte gnids för häftigt mot
textil. Detta kan medföra statisk uppladdning
och påverka mätresultatet.
Garantin omfattar inte skador vilka kan härledas
till osakkunnig hantering, icke beaktande av
Sidan laddas ...
Sidan laddas ...
Sidan laddas ...
Sidan laddas ...
Sidan laddas ...
Sidan laddas ...
Sidan laddas ...
Sidan laddas ...
Sidan laddas ...
Sidan laddas ...
Sidan laddas ...
Sidan laddas ...
Sidan laddas ...
Sidan laddas ...
Sidan laddas ...
Sidan laddas ...
Sidan laddas ...
Sidan laddas ...
Sidan laddas ...
Sidan laddas ...
Sidan laddas ...
Sidan laddas ...
-
 1
1
-
 2
2
-
 3
3
-
 4
4
-
 5
5
-
 6
6
-
 7
7
-
 8
8
-
 9
9
-
 10
10
-
 11
11
-
 12
12
-
 13
13
-
 14
14
-
 15
15
-
 16
16
-
 17
17
-
 18
18
-
 19
19
-
 20
20
-
 21
21
-
 22
22
-
 23
23
-
 24
24
-
 25
25
-
 26
26
-
 27
27
-
 28
28
-
 29
29
-
 30
30
-
 31
31
-
 32
32
-
 33
33
-
 34
34
-
 35
35
-
 36
36
-
 37
37
-
 38
38
-
 39
39
-
 40
40
-
 41
41
-
 42
42


Auriol Z30237B Bruksanvisning
- Kategori
- Väckarklockor
- Typ
- Bruksanvisning
- Denna manual är också lämplig för
på andra språk
- Deutsch: Auriol Z30237B Bedienungsanleitung
- English: Auriol Z30237B Owner's manual
- dansk: Auriol Z30237B Brugervejledning
- suomi: Auriol Z30237B Omistajan opas
Relaterade papper
-
Auriol Z29962A Bruksanvisning
-
Auriol Z29962C - IAN 70340 Bruksanvisning
-
Auriol Z30398 Bruksanvisning
-
-
-
-
-
-
-