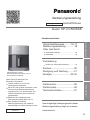
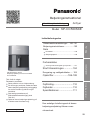
Panasonic NFCC500SXE Bruksanvisningar
- Kategori
- Drick kylare
- Typ
- Bruksanvisningar

Household use Air Fryer
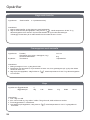
Trouble shooting....................12
Error codes.............................12
Specification..........................13
The final interpretation right of this instruction
manual belongs to our company
Preparation
Cooking time and temperature adjustment ...5
Start cooking ...........................6
Cleaning and maintenance .....7
Recipes ..............................8-11
Safety Precautions ...............2-3
Operation Instructions ............4
Parts
Main body ......................................................4
Control panel .................................................5
Table of contents
NF-CC500SXE
Model
Operating Instruction
Thank you very much for purchasing
Panasonic products
All pictures in this instruction manual are
in reference to the model NF-CC500SXE.
This product is for home use only.
Before using the product, please read
this instruction manual carefully to ensure
correct and safe use of the product.
Pay special attention to
[Safety Precautions] (page 2-3).
Please keep this instruction manual in a
safe place for future reference.
Preserve for future reference
Instructions When in doubt
Before use

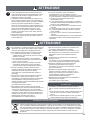
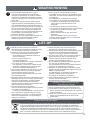
Safety Precautions Please comply!
To prevent personal injury and property damage, please be sure to observe the following safety
precautions:
The following icons indicate the degree of damage that can be caused by incorrect handling.
WARNING: Indicates a potentially hazardous situation which, if not avoided, could result in
death or serious injury.
CAUTION: Indicates a potentially hazardous situation which, if not avoided, could result in
minor or moderate injury.
The symbols are classified and explained as follows.
This symbol indicates what cannot be done, i.e. "prohibited".
This symbol indicates what must be implemented, i.e. "the mandatory" requirements.
WARNING
● Do not use the product if the power cord or plug is
damaged or if the connection between the power
outlet and the power plug is loose.
(To avoid causing electric shock or fire due to short
circuit.)
→ If the power cord is damaged, it must be replaced
by the manufacturer, its service department or
similarly qualified persons to avoid a hazard.
● Do not damage the power cord or power plug.
The following is strictly prohibited:
Damaging it, altering it, exposing it to or near high
heat, forcibly bending it, twisting it, pulling on it,
hanging it on a corner, placing a heavy object on it,
bundling it, pinching it, or dragging the power cord.
(To avoid electric shock due to damage to the power
cord and power plug, or fire due to short circuit.)
● Do not insert or unplug the power plug with wet
hands.
Always make sure your hands are dry before
handling the power plug or product.
(To avoid causing electric shock or injury.)
● Do not let anyone lick the power plug.
(To avoid causing electric shock or injury.)
Pay special attention to infants and young children.
● Do not fill the water tank with liquids other than
purified or filtered water.
(To avoid clogging the internal water outlets.)
● Do not pour water over the product, wash it directly
with water, or immerse it in water (not applicable to
the frying basket, baking tray, water tank, and water
tank cap).
(To avoid causing electric shock or fire due to short
circuit.)
→ If water gets inside the product, please contact a
Panasonic Authorised Repair Centre.
● Do not alter, disassemble or repair the product by
yourself. (To avoid causing fire, electric shock, or
injury.)
→ For repairs, please contact a Panasonic
Authorised Repair Centre.
● During use or just after use, do not put your face or
hands near the exhaust port, and pay extra attention
to children.
(To avoid causing burns.)
● Do not use the product for any purposes other than
those described in the instruction manual.
(Otherwise it may cause fire, burns, injury or electric
shock.)
→ Panasonic will not be held responsible for
conditions resulting from improper use or failure to
follow the instruction manual .
● Do not move the main body while cooking.
(To avoid burns.)
● Do not splash water or other liquids on the power plug
(to avoid electric shock or fire due to short circuit.)
● Be sure to use an AC power socket with a
specification of 220 V-240 V / 10 A on its own.
(To avoid sharing power supply with other electrical
appliances and causing a fire due to overheating.)
● Be sure to use a terminal strip of at least 10 A .
● Be sure to insert the power plug firmly all the way.
(To avoid causing smoke, fire or electric shock.)
● Single-phase bipolar grounded power outlet should
be used for this appliance to ensure reliable
grounding. If grounding device is not installed, it may
cause electrostatic induction of other metal parts
such as housing.(So as not to cause the risk of
electric shock due to failure or electric leakage.)

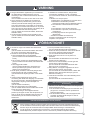
WARNING
CAUTION
● Clean the power plug regularly. (To prevent the
power plug from being poorly insulated due to the
accumulation of moisture and foreign objects, which
may cause a fire.)
Unplug the power plug and wipe it with a dry cloth.
● This product is not suitable for use by the following
persons (including children): persons with reduced
physical or mental abilities, or persons lacking
experience and knowledge of use, unless they are
supervised or instructed by a person responsible for
their safety. Please be careful not to let children play
with this product.
(To avoid causing burns, injury or electric shock.)
● Be sure to keep the product out of the reach of
children.
(To avoid causing burns, injury or electric shock.)
● In case of abnormality or failure, please stop using it
immediately and unplug the power plug.
(To avoid causing smoke, fire or electric shock.)
Abnormalities and examples of failure
● The power plug and power cord are abnormally hot.
● The power cord is damaged or intermittent power
loss occurs after the power cord is touched.
● The main body is deformed or abnormally heated
● The main body emits smoke or burnt smell.
● The main body is cracked, loosened, or making
abnormal noises.
● When cooking, there is no air coming from the
exhaust port.
→ Please contact a Panasonic Authorised Repair Centre
immediately to inquire about inspection and repair.
● Do not use any non-exclusive or deformed frying
basket.
(To avoid causing burns or injuries due to
overheating or malfunction.)
● Do not use this product in the following places.
● Near heat sources or in high humidity.
(To avoid causing electric shock or fire.)
● On an uneven surface or non-heat-resistant mat.
(To avoid causing injury, burns or fire.)
● Near any walls or furniture.
(To avoid causing discolouration, deformation, and
damage to the furniture due to the heat discharged
from the exhaust port.)
● When moving the product, make sure that the frying
basket is firmly in place. Do not carry the product at
an angle.
(To prevent the frying basket from falling out and
damaging it)
● Do not touch where the temperature is high during
use or immediately after cooking. The main body has
a high temperature. Especially the metal parts such
as the exhaust port, frying basket, bottom heating
plate, and protective grid.
(To avoid causing burns.)
● Do not aim the exhaust port at the power plug.
(To avoid deforming the plug or causing a fire due to
a short circuit.)
→ When using this machine, it should be placed in
an open area. If it is placed in a cabinet, please
ensure that there is enough space for heat
dissipation to avoid overheating and malfunctioning.
When a power outage occurs during use
Including when unplugging the power plug during
cooking, the circuit breaker tripping, etc.:
● If it occurs during cooking and the power is on again
within 10 minutes, the product will resume cooking.
● If it occurs in standby or menu mode, the product will
return to being switched off after the power comes
back on.
Before use
Correct Disposal of this product
● When unplugging the power plug, be sure to do it
by pulling on the plug itself.
(To avoid causing electric shock, or fire due to short
circuit.)
● Always turn off and unplug the appliance when
removing the basket or when not in use.
(To avoid causing burns, injuries, or electric shock,
leakage, or fire due to insulation aging.)
● Please wait until the main body has cooled down
sufficiently before cleaning it.
(To avoid causing burns.)
● Do not connect this product to an external timer or
run it with an independent remote control system.
(To avoid malfunctioning or injuries.)
● Please ensure that there is more than 8 cm of
space around the product.
(To prevent the power cord from being too close to
other objects which might damage it.)
● Do not run the product with an empty basket.
(To avoid malfunctioning or burns.)
This marking indicates that this product should not be disposed with other household wastes throughout
the EU/UK.To prevent possible harm to the environment or human health from uncontrolled waste disposal,
recycle it responsibly to promote the sustainable reuse of material resources. To return your used
device, please use the return and collection systems or contact the retailer where the product was
purchased.They can take this product for environmentally safe recycling.

Operation Instructions
About the main body
Do not use the air fryer where its bottom (suction
port) may be blocked.
For example: on top of a carpet, plastic bag,
aluminium foil, or cloth, etc.
(To avoid damaging the product.)
Do not cover the exhaust port with cloths or other
objects during use.
(In case the hot air cannot be released, resulting in
poor heat dissipation, deformation of the casing, or
malfunction.)
Please clean the food residues and other foreign
objects stuck to the frying basket (the walls of the
basket or the baking tray) in time.
(To avoid corrosion and damage to the coating of the
metal parts.)
After the "+Water" function was in use, press and
hold the "+ Water" button to perform max draining to
ensure that the water in the pipe is completely
drained. Then, open the water tank cap and take out
the water tank.
(To prevent water in the water tank outlet from
leaking onto the product and the counter top.)
Regularly check the suction port and exhaust port on
the bottom of the empty frying basket and remove
dust.
(C P7 Cleaning and maintenance)
Do not use on sliding surfaces such as pull-out tables.
(To avoid dropping the product.)
Do not use the product on an induction hob.
(To avoid damaging the induction hob or causing the
product to operate abnormally.)
Do not use the product outdoors.
(An unstable power supply may cause the product to
malfunction.)
Do not use in direct sunlight.
(To avoid causing discolouration.)
Do not fill the frying basket with water.
(To prevent the frying basket from leaking.)
To ensure the best result, the "+ Water" mode is not
set up for the Toast, Pizza, Tarts/Pies, and Dried Fruits
menus. When using these menus, please be assured
that it is normal that the "+ Water" button cannot be
selected.
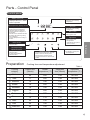
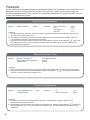
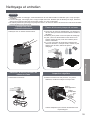
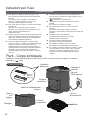
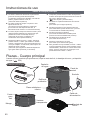
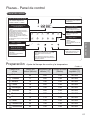
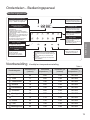
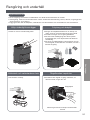
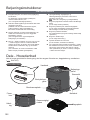
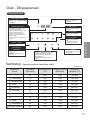
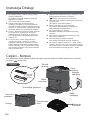
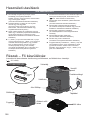
Parts - Main Body
When using the product for the first time, please clean the frying basket, baking tray and water tank.
( P7)
Water tank
Water tank cap Power plug
Control panel
Power cord
Baking tray
See-through
window
Handle
Frying
basket
Bottom heating plate
Protective grid
Main body
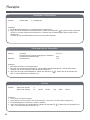
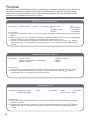
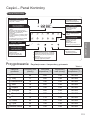
Chicken Toast Seafood Steaks Meatballs Veggies
Potatoes Pizza Cake Fries Dried fruit Light
Temperature
Water

1-60 80-200
1-60 80-200
1-60 80-200
1-60 80-200
1-60 80-200
1-60 80-200
1-60 80-200
200
200
180
200
200
170
180
1-60 80-200
1-60 80-200
1-60 80-200
1-60 80-200
180
200
150
100
22
5
10
10
10
15
20
10
30
20
60
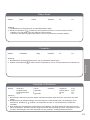
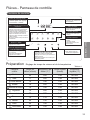
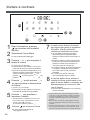
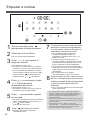
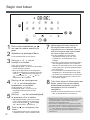
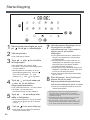
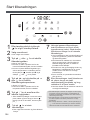
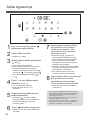
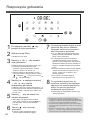
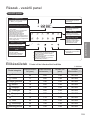
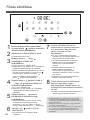
Parts - Control Panel
Water refill icon
● Displayed after the "+ Water"
button is pressed.
Time/temperature display window
● In standby mode, "15:00" is displayed.
● Press the time and temperature
adjustment button to display the
currently selected cooking time or
temperature.
● After the menu is selected and Start
is pressed, the remaining cooking
time is displayed.
● "End" is displayed when cooking is
finished.
"+Water button"
● To increase moisture,
press this button.
Time/temperature
adjustment button
● To adjust the time,
press this button.
● To adjust the temperature,
press this button.
Temperature icon
● Displayed when indicating
temperature.
Time icon
● Displayed when indicating
cooking time
Menu button
● Select Light to use it.
+/- Buttons
● For adjusting cooking time
and temperature.
Start/Pause button
● If the product is switched off, press this
button to enter the standby mode.
● Press this button to start or pause.
● Long press this button to switch off the
product.
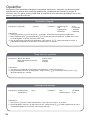
Preparation Cooking time and temperature adjustment
Table 1
Cooking
category Default time
(Minute) Default
temperature (°C) Adjustable
time (Minute) Adjustable
temperature (°C)
Before use
Control panel
Chicken Toast Seafood Steaks Meatballs Veggies
Potatoes Pizza Cake Fries Dried fruit Light
Time
Temperature
Water
Light button
● Select Light to use it.
● The light will be
automatically extinguished
after one minute.
Chicken
Toast
Seafood
Steaks
Meatballs
Veggies
Potatoes
Pizza
Cake
Fries
Dried fruit

2
3
4
1
5
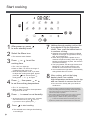
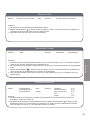
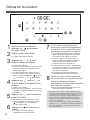
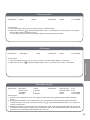
Start cooking
After power on, press
to enter standby mode.
Select the Menu icon.
● The selected menu flashes.
Press or to set the
cooking time.
● The “min” icon lights up.
● Refer to Table 1 on P5 for the range of
cooking time that can be set.
● After the temperature is set, if you want
to adjust the cooking time again, please
press the first, second press
finally press or to adjust.
Press , then press or
to set the cooking temperature.
● The “
°C”
icon lights up.
● Refer to Table 1 on P5 for the temperature
range that can be set.
7Halfway through cooking, pull out the
frying basket to flip the ingredients
inside. Then, push the basket back in
to continue cooking.
● Whether the ingredients need to be flipped
depends on the type of ingredients, serving
size, and cooking time.
● When the frying basket is pulled out, the
machine will pause heating. When the frying
basket is pushed back in place, the machine
will continue working.
● The frying basket, see-through window, and
baking tray in the working mode are hot.
Please do not touch them to avoid burns.
● It is normal that the light will be automatically
extinguished after one minute.
8After cooking, pull out the frying
basket, place it on a stable
high-temperature resistant counter top,
and use utensils to remove the food.
● Do not touch it directly with your hands to
avoid burns.
● After the cooking is finished, the display window will display
"End", the heating tube will stop heating, and the cooling fan
will continue to work for 40 seconds to cool down the
machine as quickly as possible.
● After cooking, the temperature of the fryer is high, so please
do not place it directly on the table to avoid scalding it.
● When using the "+Water" function, please long press
to drain the residual moisture in the water pipe. Then,
replace the purified water or filtered water in the water tank.
Press to cancel or set humidity.
● By default (except in the Toast, Pizza, Tarts/Pies,
and Dried Fruits menus), the “
”
icon is on.
If you want to cancel, please press
Chicken Toast Seafood Steaks Meatballs Veggies
Potatoes Pizza Cake Fries Dried fruit Light
Time
Temperature
Water
Time
Temperature
Water
Time
Temperature
Water
6Press to start cooking.
● The selected menu changes from flashing
to a solid light.
Water

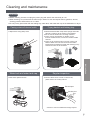
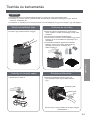
Cleaning and maintenance
Casing exterior/Internal walls Frying basket and baking tray
● Before cleaning, be sure to unplug the power plug and wait for the main body to cool.
● When cleaning, do not immerse the main body in water. Do not use lacquer thinner, gasoline, alcohol,
cleaning powder, stiff brushes, etc. to clean.
● Do not put any parts other than the baking tray, water tank, and water tank cap in the dishwasher or dryer.
● Wipe with a wrung damp cloth.
● Take them apart and rinse. ● Check it about once a month, if there is dirt,
please clean it in a timely manner.
Exhaust port
Suction port
● Wash with diluted dish soap and a sponge and water.
Wipe any moisture off the exterior of the basket.
● Do not use the basket as a cleaning container.
● There may be discoloration or streaks on the
fluorine-coated surface, but it does not affect health
and use.
● There are air channel holes in the top of the frying
basket. Water must not enter these air channels.
Please drain the basket promptly after cleaning if any
water does enter the air channels.
Vacuum to remove rubbish and foreign objects.
Attention
Instructions
Water tank and water tank cap Regular inspection

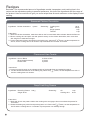
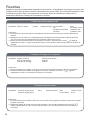
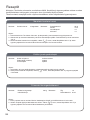
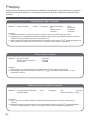
Recipes
Reminder: The recommended amount of ingredients needed, temperature, and cooking time in the
recipes can be adjusted according to personal preference, the size of the ingredients and the usage of
the product. Here we would like to give you some recipe ideas for each automenu on the display to start
cooking.
Seasoned Chicken Drumsticks
Instructions:
1 Wash the chicken drumsticks, make three slits on the front and back sides to better absorb the flavours.
2 Mix the cooking wine and spice mix and spread it evenly on the chicken drumsticks, then cover them
with cling film to marinate overnight.
3 Put the marinated chicken drumsticks on the baking tray, select themenu, set the temperature to
200°C, set the cooking time to 25 minutes. Flip the drumsticks over after 15 minutes.
Ingredients: Chicken drumsticks 4 piece Seasoning: Cooking wine 20 ml
Salt 1/2 tsp
Ginger powder 1 tsp
Turmeric 1 tsp
Deep Fried King Prawns
Instructions:
1 Wash and de-vein the prawns. Add to the cooking wine and ginger slices to marinate the prawns for
10 minutes.
2 Grease the baking tray with oil and put the prawns on it. Select the menu, set the temperature to
180°C and the cooking time to 10 minutes. Flip the prawns over halfway through.
Ingredients: Raw King Prawns 200 g
Ginger slices
Seasoning: Oil 1 tsp
Cooking wine 20 ml
Cheese and Ham Toastie
Ingredients: Ham or Bacon 2 slices of ham
Sliced bread (buttered) 3 pieces
Cheese slice 2 pieces
Instructions:
1. Put the ham and cheese on the unbuttered side of the bread slices and sandwich together.
2Put the stacked sandwiches on the baking tray, select the menu, set the temperature to 200 °C
and the cooking time to 5 minutes.

Meatballs
Instructions:
1Brush the baking tray with a little oil and place the meatballs on the baking tray .
2Select the menu, set the temperature to 180°C and the cooking time to 15 minutes.
Ingredients: Meatballs 200g Seasoning: Oil 1 tsp
Instructions
Ribeye Steak
Instructions:
1 Brush a layer of oil on the baking tray, add the steak in.
2 Select the menu, set the temperature to 200°C and the cooking time to 6 to 10 minutes.
Flip the steak over halfway through.
You can choose the doneness of the steak according to your personal preference.
Ingredients: Steak
1 piece
Seasoning: Oil 1 tsp
Aubergine with Garlic
Instructions:
1Wash and pat dry the aubergine. In a small bowl, add all the seasoning sauce ingredients except the oil
2Put tin foil on the baking tray and place the aubergine on the tin foil. Brush the aubergine with oil, select
the menu, set the temperature to 200°C and the cooking time to 20 minutes.
3After 20 minutes, take out the aubergine and cut it in half. Brush the sauce on the flesh sides of the
aubergine. Roast for another 5 minutes according to the menu setting and temperature in Step 2.
Sprinkle the aubergine with the chopped spring onion after cooking.
Ingredients: Aubergine 1 piece
Garlic clove 1 (minced)
Spring onions 4
Chilli 1 (chopped)
Seasoning Soy sauce 15 ml
Oyster sauce 15 ml
Sugar 1 tsp
Oil 1 tsp

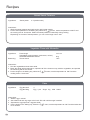
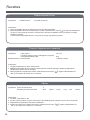
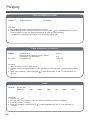
Recipes
Vegetable Pizza with Mozarella
Instructions:
1Dice the vegetables and set them aside.
2Brush the dough with tomato sauce, sprinkle half of the cheese on top, add the vegetables, and sprinkle
the remaining half of the cheese.
3Put the dough on the baking tray, select the function, set the temperature to 180°C and the
cooking time to 12 minutes.
Ingredients: Pizza dough 1x15 cm
Vegetables (green peppers, mushrooms, onions)
Shredded Mozzarella Cheese 50 g
Seasoning: Tomato sauce 1 tbs
Baked Sweet Potatoes
Instructions:
1Wash the sweet potatoes and pat them dry with kitchen towels.
2Put the sweet potatoes on the baking tray, select the menu, set the temperature to 200°C and
the cooking time to 30 minutes. Shake the sweet potatoes occasionally during cooking.
*Depending on the size of sweet potatoes, you can cut the large ones in half.
Ingredients: Sweet potato 3-4 (medium size)
酸奶蛋糕
Cake
Instructions:
1Whisk 1 egg in a bowl.
2Add 100ml milk and 10g sugar to the bowl. Stir well until the sugar is melted.
3Seperate the egg liquid into 4 egg tart shells.
4Put the shells on the baking tray, select the menu, set the temperature to 180°C and the bake time
to 12 minutes.
Ingredients: Egg tart shell 4
Egg tart filling Egg 1 pcs Sugar 10g Milk 100mL

Seasoning: Salt water (to cover)
Dried fruit
Instructions:
1Wash the apple (remove the core but not the skin) and slice it into 2-mm pieces. Soak them in salt water
for about 10 minutes.
2Absorb the excess moisture with kitchen towels and place the apple slices on the baking tray.
3Select the menu, set the temperature to 130°C and the cooking time to 33 minutes. After 15
minutes, spread the apple slices around and continue cooking.
4If the apple slices are still wet and soft, set the temperature to 140°C and cook for 10-15 minutes.
Ingredients: Apple 1
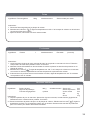
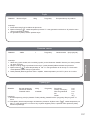
Instructions
Delicious Barbecue
Instructions:
1 Cut the pork belly into slices. Add the spring onions, ginger slices and seasoning. Marinate for
10 minutes.
2Place the pork belly slices on the baking tray. Select the menu, set the temperature to
200°C and the cooking time to 12 minutes. Flip the pork belly slices over halfway through for the best
results.
Ingredients: Pork belly 300g
Spring Onions
Ginger slices 4 pieces
Seasoning: Soy sauce 5 ml
Dark soy sauce 5 ml
Cooking wine 5 ml
Salt 2 g
Sugar 10 g
French Fries
Instructions:
1Place the frozen french fries in the baking tray.
2Select the function, set the temperature to 200°C and the cooking time to 20 minutes.
Give the fries a shake halfway through.
3After cooking, serve them with tomato sauce
Ingredients: Frozen French fries 250 g Seasoning: Tomato sauce to serve

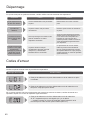
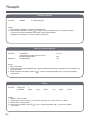
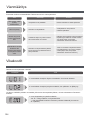
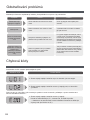
The see-through
window is fogging or a
small amount of water is
leaking from the frying
basket below the
see-through window.
The frying basket is not fully
drained after being cleaned and
there is residual moisture in the
air duct
This is normal. Please use the product as
usual. (If a large amount of water leaks
from the bottom of the main body, please
contact a Panasonic Authorised Repair
Centre.)
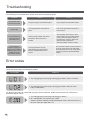
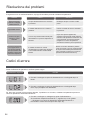
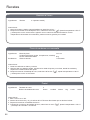
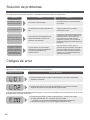
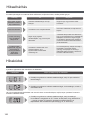
Troubleshooting
The following is not a malfunction, please check before requesting repairs.
Check the below before commissioning repairs.
If it still does not return to normal after trying the above measures, please request repair from a Panasonic
Authorised Repair Centre.
Symptom Cause Solution
No response when
connected to power The power plug is not inserted in place Plug it in again or find another outlet.
Cannot start
The motor does not
turn or there is an
abnormal sound
The frying basket is not inserted in
place.
Pull out the frying basket and push it
back in place.
There is foreign matter stuck to the
fan blade or the suction port is
blocked
After switching off the power, check
whether there are any foreign objects
in the suction port and the inside of
the main body. If there is still a fault,
please contact a Panasonic
Authorised Repair Centre for repair.
● Try unplugging the power plug and plugging it back in after 10 minutes.
● Try unplugging the power plug and plugging it back in after the main
body is cooled down.
● Try unplugging the power plug and plugging it back in.
If “E**” still appears, it means there is a fault.
→ Please consult a Panasonic Authorised Repair Centre and inform them of
the error code (two digits after “E”).
Error codes
Error display Please try

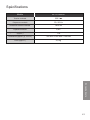
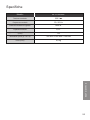
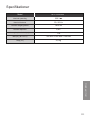
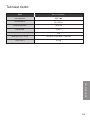
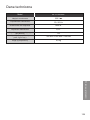
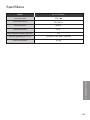
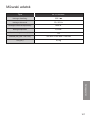
NF-CC500SXE
265 mm × 360 mm × 328 mm
4.8 kg
50 / 60 Hz
1450 W
220 V
1 m
5.0 L
Specification
Model
Rated voltage
Rated frequency
Rated input power
Rated capacity
Power cord length (approx.)
Dimensions (approx.) (W x D x H)
Weight (approx.)
When in doubt

Made in China
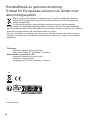
Disposal of Old Equipment and Batteries
Only for European Union and countries with
recycling systems
These symbols on the products, packaging, and/or accompanying documents mean
that used electrical and electronic products must not be mixed with general house
hold waste.
For proper treatment, recovery and recycling of old products, please take them to
applicable collection points in accordance with your national legislation.
By disposing of them correctly, you will help to save valuable resources and prevent any
potential negative effects on human health and the environment.
For more information about collection and recycling, please contact your local authority.
Penalties may be applicable for incorrect disposal of this waste, in accordance with national
legislation.
Manufacturer:
Panasonic Marketing Europe GmbH,
Hagenauer Straße 43, Wiesbaden, Germany
Authorised Representative in the EU:
Panasonic Testing Centre,
Winsbergring 15, 22525 Hamburg, Germany
EU
14

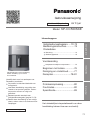
Hausgebrauch Heißluftfritteuse
Fehlersuche............................26
Fehlercodes...........................26
Technische Daten...................27
Das endgültige Auslegungsrecht dieser
Bedienungsanleitung liegt bei unserem
Unternehmen.
Vorbereitung
Garzeit und Temperatureinstellung...............19
Kochen...................................20
Reinigung und Wartung.........21
Rezepte.............................22-25
Sicherheitshinweise..........16-17
Bedienungsanleitung.............18
Über das Gerät
Gerät & Bestandteile.....................................18
Bedienfeld.....................................................19
Inhaltsverzeichnis
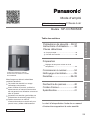
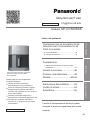
NF-CC500SXE
Modell
Vielen Dank für den Kauf von
Panasonic-Produkten.
Alle Abbildungen in dieser
Bedienungsanleitung beziehen sich auf
das Modell NF-CC500SXE.
Dieses Produkt ist nur für den
Hausgebrauch bestimmt.
Bevor Sie das Produkt verwenden, lesen
Sie bitte diese Bedienungsanleitung
sorgfältig durch, um eine korrekte und
sichere Verwendung des Produkts zu
gewährleisten.
Beachten Sie insbesondere die
[Sicherheitshinweise] (Seite 16-17).
Bitte bewahren Sie diese
Bedienungsanleitung zum späteren
Nachschlagen an einem sicheren Ort auf.
Anleitung Im Zweifelsfall
Vor dem Gebrauch
Bedienungsanleitung
Zum späteren Nachschlagen
aufbewahren
15

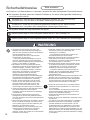
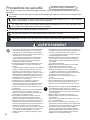
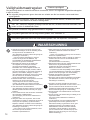
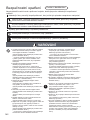
Sicherheitshinweise Bitte einhalten!
Um Personen- und Sachschäden zu vermeiden, beachten Sie bitte die folgenden Sicherheitshinweise:
Die folgenden Symbole geben den Grad der Schäden an, die durch unsachgemäße Handhabung
verursacht werden können.
WARNUNG: Weist auf eine potenziell gefährliche Situation hin, die, wenn sie nicht
vermieden wird, zum Tod oder zu schweren Verletzungen führen kann.
VORSICHT: Weist auf eine potenziell gefährliche Situation hin, die, wenn sie nicht
vermieden wird, zu leichten oder mittelschweren Verletzungen führen kann.
Die Symbole werden wie folgt klassifiziert und erklärt.
Dieses Symbol zeigt an, was nicht getan werden darf, d.h. was „untersagt“ ist.
Dieses Symbol zeigt an, was umgesetzt werden muss, d.h. „die verbindlichen“ Anforderungen.
WARNUNG
● Verwenden Sie das Produkt nicht, wenn das
Netzkabel oder der Netzstecker beschädigt sind
oder wenn die Verbindung zwischen der Steckdose
und dem Netzstecker locker ist.
(Um Stromschlag oder Feuer aufgrund eines
Kurzschlusses zu vermeiden.)
→ Wenn das Netzkabel beschädigt ist, muss es
durch den Hersteller oder seinen Kundendienst
oder eine ähnlich qualifizierte Person ausgetauscht
werden, um eine Gefahr zu vermeiden.
● Beschädigen Sie nicht das Netzkabel oder den
Netzstecker. Folgendes ist strengstens untersagt:
Diese beschädigen, verändern, starker Hitze
aussetzen, sie gewaltsam verbiegen, verdrehen,
daran ziehen, sie aufhängen, einen schweren
Gegenstand darauf stellen, sie bündeln,
einklemmen oder das Netzkabel dehnen.
(Um Stromschläge aufgrund von Beschädigungen
am Netzkabel und Netzstecker oder einen Brand
aufgrund eines Kurzschlusses zu vermeiden.)
● Stecken Sie den Netzstecker nicht mit nassen
Händen ein oder aus. Stellen Sie immer sicher,
dass Ihre Hände trocken sind, bevor Sie den
Netzstecker oder das Produkt anfassen. (Um
Stromschläge oder Verletzungen zu vermeiden.)
● Lassen Sie niemanden an dem Netzstecker lecken.
(Um Stromschläge oder Verletzungen zu
vermeiden.) Achten Sie besonders auf Säuglinge
und Kleinkinder.
● Füllen Sie den Wassertank nicht mit anderen
Flüssigkeiten als reinem oder gefiltertem Wasser.
(Um eine Verstopfung der internen Wasserauslässe
zu vermeiden).
● Gießen Sie kein Wasser über das Produkt, waschen
Sie es nicht direkt mit Wasser und tauchen Sie es
nicht in Wasser (gilt nicht für den Frittierkorb, das
Backblech, den Wassertank und den
Wassertankdeckel). (Um Stromschlag oder Feuer
aufgrund eines Kurzschlusses zu vermeiden.)
→ Sollte Wasser in das Innere des Geräts
gelangen, wenden Sie sich bitte an ein autorisiertes
Panasonic Service Center.
● Verändern, zerlegen oder reparieren Sie das Produkt
nicht selbst. (Um Feuer, Stromschlag oder
Verletzungen zu vermeiden).
→ Für Reparaturen wenden Sie sich bitte an ein
autorisiertes Panasonic Service Center.
● Halten Sie während oder kurz nach dem Gebrauch
weder Gesicht noch Hände in die Nähe der
Abluftöffnung, und achten Sie besonders auf Kinder.
(Um Verbrennungen zu vermeiden.)
● Verwenden Sie das Produkt nicht für andere als die
in der Bedienungsanleitung beschriebenen Zwecke.
(Andernfalls kann es zu Feuer, Verbrennungen,
Verletzungen oder Stromschlägen kommen.)
→ Panasonic übernimmt keine Verantwortung für
Schäden, die auf unsachgemäßen Gebrauch oder
Nichtbeachtung der Bedienungsanleitung
zurückzuführen sind.
● Bewegen Sie den Grundkörper/das Gerät während des
Kochens nicht. (Um Verbrennungen zu vermeiden.)
● Spritzen Sie kein Wasser oder andere Flüssigkeiten
auf den Netzstecker. (Um Stromschlag oder Feuer
aufgrund eines Kurzschlusses zu vermeiden).
● Achten Sie darauf, dass Sie nur eine Wechselstrom-
steckdose mit einer Spezifikation von 220 V-240 V /
10 A verwenden.
(Um zu vermeiden, dass die Stromversorgung mit
anderen Elektrogeräten geteilt wird und ein Feuer
aufgrund von Überhitzung entsteht).
● Verwenden Sie unbedingt eine Klemmenleiste von
mindestens 10 A.
● Achten Sie darauf, den Netzstecker vollständig und fest
einzustecken.
(Um Rauch, Feuer oder Stromschläge zu vermeiden.)
● Für dieses Gerät sollte eine einphasige, zweipolige,
geerdete Steckdose verwendet werden, um eine
zuverlässige Erdung zu gewährleisten. Wenn keine
Erdungsvorrichtung installiert ist, kann dies zu einer
elektrostatischen Induktion anderer Metallteile, z.B. des
Gehäuses, führen. (Um das Risiko eines Stromschlags
aufgrund einer Störung oder einer elektrischen Leckage
zu vermeiden.)
16

WARNUNG
VORSICHT
● Reinigen Sie den Netzstecker regelmäßig. (Um zu
verhindern, dass der Netzstecker durch die
Ansammlung von Feuchtigkeit und Fremdkörpern
schlecht isoliert ist, was zu einem Brand führen kann.)
Ziehen Sie den Netzstecker und wischen Sie ihn mit
einem trockenen Tuch ab.
● Dieses Produkt ist nicht für die Verwendung durch
folgende Personen (einschließlich Kinder) geeignet:
Personen mit eingeschränkten körperlichen oder
geistigen Fähigkeiten oder Personen, denen es an
Erfahrung und Kenntnis der Anwendung mangelt, es
sei denn, sie werden von einer für ihre Sicherheit
verantwortlichen Person beaufsichtigt oder
angewiesen. Bitte achten Sie darauf, dass Kinder nicht
mit diesem Produkt spielen. (Um Verbrennungen,
Verletzungen oder Stromschläge zu vermeiden.)
● Bewahren Sie das Produkt außerhalb der Reichweite
von Kindern auf. (Um Verbrennungen, Verletzungen
oder Stromschläge zu vermeiden.)
● Im Falle einer Anomalie oder einer Störung beenden
Sie bitte sofort den Gebrauch und ziehen Sie den
Netzstecker. (Um Rauch, Feuer oder Stromschläge
zu vermeiden.) Anomalien und Beispiele für
Störungen.
● Der Netzstecker und das Netzkabel sind
ungewöhnlich heiß.
● Das Netzkabel ist beschädigt oder es kommt zu
einem zeitweiligen Stromausfall, wenn das
Netzkabel berührt wird.
● Das Gerät ist verformt oder ungewöhnlich heiß.
● Das Gerät gibt Rauch oder Brandgeruch ab.
● Das Gerät ist gerissen, locker oder macht
ungewöhnliche Geräusche.
● Beim Kochen kommt keine Luft aus der
Abluftöffnung.
→ Wenden Sie sich bitte umgehend an ein
autorisiertes Panasonic Service Center, um sich über
die Überprüfung und Reparatur zu informieren.
● Verwenden Sie keine nicht zugelassenen oder
verformten Frittierkörbe.
(Um Verbrennungen oder Verletzungen aufgrund von
Überhitzung oder Fehlfunktion zu vermeiden.)
● Verwenden Sie dieses Produkt nicht an den folgenden
Orten:
● In der Nähe von Wärmequellen oder bei hoher
Luftfeuchtigkeit.
(Um Stromschläge oder Feuer zu vermeiden.)
● Auf einer unebenen Oberfläche oder einer nicht
hitzebeständigen Matte. (Um Verletzungen,
Verbrennungen oder Feuer zu vermeiden.)
● In der Nähe von Wänden oder Möbeln.
(Um Verfärbungen, Verformungen und
Beschädigungen der Möbel durch die Wärme-
ableitung aus der Abluftöffnung zu vermeiden.)
● Achten Sie beim Bewegen des Produkts darauf, dass
der Frittierkorb fest sitzt. Tragen Sie das Produkt nicht
schräg. (Um zu verhindern, dass der Frittierkorb
herausfällt und beschädigt wird.)
● Berühren Sie nicht die Stellen, an denen die
Temperatur während des Gebrauchs oder unmittelbar
nach dem Kochen hoch ist. Das Gerät hat eine hohe
Temperatur. Insbesondere die Metallteile wie die
Abluftöffnung, der Frittierkorb, die untere Heizplatte
und das Schutzgitter.
(Um Verbrennungen zu vermeiden.)
● Richten Sie die Abluftöffnung nicht auf den
Netzstecker.
(Um zu vermeiden, dass der Stecker verformt wird
oder durch einen Kurzschluss ein Feuer entsteht).
→ Wenn Sie dieses Gerät benutzen, sollten Sie es in
einem offenen Bereich aufstellen. Wenn es in einem
Schrank aufgestellt wird, achten Sie bitte darauf, dass
genügend Platz für die Wärmeabfuhr vorhanden ist,
um Überhitzung und Fehlfunktionen zu vermeiden.
Wenn während des Betriebs ein
Stromausfall auftritt
Einschließlich beim Ziehen des Netzsteckers während des
Kochens, beim Auslösen des Schutzschalters usw.:
● Wenn die Störung während des Kochens auftritt und
das Gerät innerhalb von 10 Minuten wieder
eingeschaltet wird, setzt es den Kochvorgang fort.
● Wenn die Störung im Standby- oder Menümodus
auftritt, wird das Gerät nach dem Wiederherstellen der
Stromzufuhr ausgeschaltet.
Vor dem Gebrauch
Korrekte Entsorgung dieses Produkts
● Betreiben Sie das Produkt nicht mit einem leeren
Korb. (Um Fehlfunktionen oder Verbrennungen zu
vermeiden.)
● Schließen Sie dieses Produkt nicht an eine externe
Zeitschaltuhr an und betreiben Sie es nicht mit einem
unabhängigen Fernbedienungssystem. (Um
Fehlfunktionen oder Verletzungen zu vermeiden.)
● Bitte stellen Sie sicher, dass um das Produkt herum
mehr als 8 cm Platz ist. (Um zu verhindern, dass sich
das Netzkabel zu nahe an anderen Objekten befindet,
die es beschädigen könnten.)
● Achten Sie beim Ziehen des Netzsteckers darauf,
dass Sie am Stecker selbst ziehen. (Um Stromschlag
oder Feuer aufgrund eines Kurzschlusses zu
vermeiden.)
● Schalten Sie das Gerät immer aus und ziehen Sie den
Netzstecker, wenn Sie den Korb herausnehmen oder
wenn Sie es nicht benutzen. (Um Verbrennungen,
Verletzungen, Stromschläge, Leckagen oder Feuer
aufgrund der Alterung der Isolierung zu vermeiden.)
● Bitte warten Sie, bis das Gerät ausreichend abgekühlt
ist, bevor Sie es reinigen.
(Um Verbrennungen zu vermeiden.)
Diese Kennzeichnung weist darauf hin, dass dieses Produkt in der EU nicht mit anderen
Haushaltsabfällen entsorgt werden darf. Um mögliche Schäden für die Umwelt oder die menschliche
Gesundheit durch unkontrollierte Abfallentsorgung zu vermeiden, sollten Sie den Abfall
verantwortungsvoll recyceln, um die nachhaltige Wiederverwendung von Materialressourcen zu fördern.
Um Ihr gebrauchtes Gerät zurückzugeben, nutzen Sie bitte die Rückgabe- und Abholsysteme oder
wenden Sie sich an den Händler, bei dem das Produkt gekauft wurde. Sie können dieses Produkt einem
umweltgerechten Recycling zuführen.
17

Bedienungsanleitung
Über das Gerät
Verwenden Sie die Heißluftfritteuse nicht an Stellen,
an denen der Boden (Ansaugöffnung) verstopft werden
könnte. Zum Beispiel: auf einem Teppich, einer
Plastiktüte, einer Aluminiumfolie oder einem Tuch usw.
(Um eine Beschädigung des Produkts zu
vermeiden.)
Decken Sie die Auslassöffnung während des Gebrauchs
nicht mit Tüchern oder anderen Gegenständen ab.
(Falls die heiße Luft nicht abgelassen werden kann, führt
dies zu schlechter Wärmeableitung, Verformung des
Gehäuses oder Fehlfunktion).
Reinigen Sie den Frittierkorb (die Wände des Korbs oder
das Backblech) immer von Speiseresten und anderen
Fremdkörpern, die daran haften.
(Um Korrosion und Schäden an der Beschichtung der
Metallteile zu vermeiden).
Nachdem die Funktion „+ Water“ verwendet wurde,
drücken und halten Sie die Taste „+ Water“ gedrückt,
um die maximale Entleerung durchzuführen und
sicherzustellen, dass das Wasser in der Leitung
vollständig abgelassen wird. Öffnen Sie dann den
Wassertankdeckel und nehmen Sie den Wassertank
heraus. (Um zu verhindern, dass Wasser aus dem
Wassertankauslass auf das Produkt und die Arbeitsplatte
gelangt.)
Kontrollieren Sie regelmäßig die Ansaug- und
Abluftöffnung am Boden des leeren
Frittierkorbraumes und entfernen Sie Staub.
( Seite 21 Reinigung und Wartung)
Nicht auf gleitenden Flächen, wie z. B.
Ausziehtischen verwenden.
(Um zu vermeiden, dass das Produkt herunterfällt.)
Verwenden Sie das Produkt nicht auf einem
Induktionskochfeld.
(Um zu vermeiden, dass das Induktionskochfeld
beschädigt wird oder das Produkt nicht
ordnungsgemäß funktioniert.)
Verwenden Sie das Produkt nicht im Freien.
(Eine instabile Stromversorgung kann zu
Fehlfunktionen des Produkts führen.)
Nicht in direktem Sonnenlicht verwenden.
(Um Verfärbungen zu vermeiden.)
Füllen Sie den Frittierkorb nicht mit Wasser.
(Um zu vermeiden, dass der Frittierkorb leckt.)
Um ein optimales Ergebnis zu erzielen, ist der Modus
„+ Water“ für die Menüs Toast, Pizza,
Kuchen/Pasteten und Trockenfrüchte nicht
eingerichtet. Wenn Sie diese Menüs verwenden, ist
es normal, dass die Taste „+ Water“ nicht ausgewählt
werden kann.
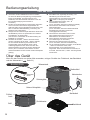
Über das Gerät
Wenn Sie das Produkt zum ersten Mal verwenden, reinigen Sie bitte den Frittierkorb, das Backblech
und den Wassertank. ( Seite 21)
Wassertank
Wassertank-
deckel Netzstecker
Bedienfeld
Netzkabel
Backblech
Sichtfenster
Griff
Frittier-
korb
Untere Heizplatte
Schutzgitter
Bestandteile
18
Chicken Toast Seafood Steaks Meatballs Veggies
Potatoes Pizza Cake Fries Dried fruit Light
Time
Temperature
Water

1-60 80-200
1-60 80-200
1-60 80-200
1-60 80-200
1-60 80-200
1-60 80-200
1-60 80-200
200
200
180
200
200
170
180
1-60 80-200
1-60 80-200
1-60 80-200
1-60 80-200
180
200
150
100
22
5
10
10
10
15
20
10
30
20
60
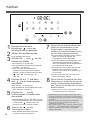
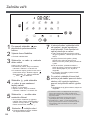
Über das Gerät - Bedienfeld
Symbol für Wassernachfüllung
● Wird angezeigt, nachdem die
Taste „+ Water“ gedrückt wurde.
Zeit-/Temperatur Display
● Im Standby-Modus wird „15:00“
angezeigt.
● Drücken Sie die Taste zur Einstellung
von Zeit/Temperatur, um die aktuell
gewählte Garzeit oder Temperatur
anzuzeigen.
● Nachdem das Menü ausgewählt und
Start gedrückt wurde, wird die
verbleibende Garzeit angezeigt.
● „End“ (Ende) wird angezeigt, wenn der
Garvorgang beendet ist.
„+ Water“ Taste
● Um die Feuchtigkeit zu erhöhen,
drücken Sie diese Taste.
Taste zur Einstellung von
Zeit/Temperatur
● Um die Uhrzeit einzustellen,
drücken Sie diese Taste.
● Um die Temperatur einzustellen,
drücken Sie diese Taste.
Temperatur-Symbol
● Wird bei der Anzeige der
Temperatur angezeigt.
Zeit-Symbol
● Wird bei der Anzeige der
Garzeit angezeigt.
Menü-Taste
● Wählen Sie Licht, um es zu
verwenden.
+/- Tasten
● Zum Einstellen von Garzeit
und Temperatur.
Start-/Pause-Taste
● Wenn das Produkt ausgeschaltet ist,
drücken Sie diese Taste, um in den
Standby-Modus zu wechseln.
● Drücken Sie diese Taste zum Starten
oder Pausieren.
● Drücken Sie diese Taste lange, um das
Produkt auszuschalten.
Vorbereitung Garzeit und Temperatureinstellung
Tabelle 1
Koch
Kategorie Standardzeit
(Minute) Standard-
temperatur (°C) Einstellbare Zeit
(Minute) Einstellbare
Temperatur (°C)
Vor dem Gebrauch
Bedienfeld
Licht-Taste
● Wählen Sie Licht, um es zu
verwenden.
● Das Licht wird nach einer
Minute automatisch
ausgeschaltet.
Hühnchen
Toast
Meeresfrüchte
Steaks
Frikadellen
Gemüse
Kartoffeln
Pizza
Kuchen
Pommes frites
Getrocknete Früchte
Chicken Toast Seafood Steaks Meatballs Veggies
Potatoes Pizza Cake Fries Dried fruit Light
Time
Temperature
Water
19

2
3
4
1
5
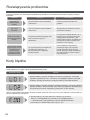
Kochen
Drücken Sie nach dem
Einschalten , um in den
Standby-Modus zu gelangen.
Wählen Sie das Menüsymbol.
● Das gewählte Menü blinkt.
Drücken Sie oder , um die
Garzeit einzustellen.
● Das Symbol „min“ leuchtet auf.
● Den einstellbaren Garzeitbereich finden Sie
in Tabelle 1 auf Seite 19.
● Wenn Sie nach dem Einstellen der
Temperatur die Garzeit erneut einstellen
möchten, drücken Sie bitte zuerst die Taste
, dann und schließlich
oder .
Drücken Sie auf und dann
oder , um die Gartemperatur
einzustellen.
● Das Symbol „°C“ leuchtet auf.
● Den einstellbaren Temperaturbereich finden
Sie in Tabelle 1 auf Seite 19.
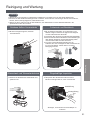
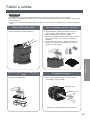
7Ziehen Sie den Frittierkorb nach der
Hälfte der Garzeit heraus, um die
Zutaten darin zu wenden. Dann
schieben Sie den Korb wieder hinein,
um den Garvorgang fortzusetzen.
● Ob die Zutaten umgedreht werden müssen,
hängt von der Art der Zutaten, der
Portionsgröße und der Garzeit ab.
● Wenn der Frittierkorb herausgezogen wird,
unterbricht das Gerät den Heizvorgang.
Wenn der Frittierkorb wieder eingeschoben
wird, arbeitet das Gerät weiter.
● Der Frittierkorb, das Sichtfenster und das
Backblech sind im Betrieb heiß. Bitte
berühren Sie sie nicht, um Verbrennungen
zu vermeiden.
● Es ist normal, dass das Licht nach einer
Minute automatisch erlischt.
8Ziehen Sie den Frittierkorb nach dem
Garen heraus, stellen Sie ihn auf eine
stabile, hitzebeständige Arbeitsfläche
und nehmen Sie die Speisen mit einem
Besteck heraus.
● Berühren Sie es nicht direkt mit den Händen,
um Verbrennungen zu vermeiden.
● Nach Beendigung des Garvorgangs zeigt das Display „End“
(Ende) an, die Heizung hört auf zu heizen und der Lüfter läuft
40 Sekunden lang weiter, um das Gerät so schnell wie möglich
abzukühlen.
● Nach dem Garen hat die Fritteuse eine hohe Temperatur,
stellen Sie sie daher bitte nicht direkt auf den Tisch, um
Verbrühungen zu vermeiden.
● Wenn Sie die Funktion „+ Water“ verwenden, drücken Sie bitte
lange auf , um die Restfeuchtigkeit in der Wasserleitung
abzulassen. Ersetzen Sie dann das reine oder gefilterte
Wasser im Wassertank.
Drücken Sie , um die
Luftfeuchtigkeit zu löschen oder
einzustellen.
● Standardmäßig (außer in den Menüs Toast,
Pizza, Kuchen/Pasteten und Trockenfrüchte)
ist das Symbol „ “ aktiviert. Wenn Sie
stornieren möchten, drücken Sie bitte .
Time
Temperature
Water
Time
Temperature
Water
6Drücken Sie , um den
Garvorgang zu starten.
● Das gewählte Menü blinkt nicht mehr,
sondern leuchtet durchgehend.
Water
Chicken Toast Seafood Steaks Meatballs Veggies
Potatoes Pizza Cake Fries Dried fruit Light
Time
Temperature
Water
20
Sidan laddas...
Sidan laddas...
Sidan laddas...
Sidan laddas...
Sidan laddas...
Sidan laddas...
Sidan laddas...
Sidan laddas...
Sidan laddas...
Sidan laddas...
Sidan laddas...
Sidan laddas...
Sidan laddas...
Sidan laddas...
Sidan laddas...
Sidan laddas...
Sidan laddas...
Sidan laddas...
Sidan laddas...
Sidan laddas...
Sidan laddas...
Sidan laddas...
Sidan laddas...
Sidan laddas...
Sidan laddas...
Sidan laddas...
Sidan laddas...
Sidan laddas...
Sidan laddas...
Sidan laddas...
Sidan laddas...
Sidan laddas...
Sidan laddas...
Sidan laddas...
Sidan laddas...
Sidan laddas...
Sidan laddas...
Sidan laddas...
Sidan laddas...
Sidan laddas...
Sidan laddas...
Sidan laddas...
Sidan laddas...
Sidan laddas...
Sidan laddas...
Sidan laddas...
Sidan laddas...
Sidan laddas...
Sidan laddas...
Sidan laddas...
Sidan laddas...
Sidan laddas...
Sidan laddas...
Sidan laddas...
Sidan laddas...
Sidan laddas...
Sidan laddas...
Sidan laddas...
Sidan laddas...
Sidan laddas...
Sidan laddas...
Sidan laddas...
Sidan laddas...
Sidan laddas...
Sidan laddas...
Sidan laddas...
Sidan laddas...
Sidan laddas...
Sidan laddas...
Sidan laddas...
Sidan laddas...
Sidan laddas...
Sidan laddas...
Sidan laddas...
Sidan laddas...
Sidan laddas...
Sidan laddas...
Sidan laddas...
Sidan laddas...
Sidan laddas...
Sidan laddas...
Sidan laddas...
Sidan laddas...
Sidan laddas...
Sidan laddas...
Sidan laddas...
Sidan laddas...
Sidan laddas...
Sidan laddas...
Sidan laddas...
Sidan laddas...
Sidan laddas...
Sidan laddas...
Sidan laddas...
Sidan laddas...
Sidan laddas...
Sidan laddas...
Sidan laddas...
Sidan laddas...
Sidan laddas...
Sidan laddas...
Sidan laddas...
Sidan laddas...
Sidan laddas...
Sidan laddas...
Sidan laddas...
Sidan laddas...
Sidan laddas...
Sidan laddas...
Sidan laddas...
Sidan laddas...
Sidan laddas...
Sidan laddas...
Sidan laddas...
Sidan laddas...
Sidan laddas...
Sidan laddas...
Sidan laddas...
Sidan laddas...
Sidan laddas...
Sidan laddas...
Sidan laddas...
Sidan laddas...
Sidan laddas...
Sidan laddas...
Sidan laddas...
Sidan laddas...
Sidan laddas...
Sidan laddas...
Sidan laddas...
Sidan laddas...
Sidan laddas...
Sidan laddas...
Sidan laddas...
Sidan laddas...
Sidan laddas...
Sidan laddas...
Sidan laddas...
Sidan laddas...
Sidan laddas...
Sidan laddas...
Sidan laddas...
Sidan laddas...
Sidan laddas...
Sidan laddas...
Sidan laddas...
Sidan laddas...
Sidan laddas...
Sidan laddas...
Sidan laddas...
-
 1
1
-
 2
2
-
 3
3
-
 4
4
-
 5
5
-
 6
6
-
 7
7
-
 8
8
-
 9
9
-
 10
10
-
 11
11
-
 12
12
-
 13
13
-
 14
14
-
 15
15
-
 16
16
-
 17
17
-
 18
18
-
 19
19
-
 20
20
-
 21
21
-
 22
22
-
 23
23
-
 24
24
-
 25
25
-
 26
26
-
 27
27
-
 28
28
-
 29
29
-
 30
30
-
 31
31
-
 32
32
-
 33
33
-
 34
34
-
 35
35
-
 36
36
-
 37
37
-
 38
38
-
 39
39
-
 40
40
-
 41
41
-
 42
42
-
 43
43
-
 44
44
-
 45
45
-
 46
46
-
 47
47
-
 48
48
-
 49
49
-
 50
50
-
 51
51
-
 52
52
-
 53
53
-
 54
54
-
 55
55
-
 56
56
-
 57
57
-
 58
58
-
 59
59
-
 60
60
-
 61
61
-
 62
62
-
 63
63
-
 64
64
-
 65
65
-
 66
66
-
 67
67
-
 68
68
-
 69
69
-
 70
70
-
 71
71
-
 72
72
-
 73
73
-
 74
74
-
 75
75
-
 76
76
-
 77
77
-
 78
78
-
 79
79
-
 80
80
-
 81
81
-
 82
82
-
 83
83
-
 84
84
-
 85
85
-
 86
86
-
 87
87
-
 88
88
-
 89
89
-
 90
90
-
 91
91
-
 92
92
-
 93
93
-
 94
94
-
 95
95
-
 96
96
-
 97
97
-
 98
98
-
 99
99
-
 100
100
-
 101
101
-
 102
102
-
 103
103
-
 104
104
-
 105
105
-
 106
106
-
 107
107
-
 108
108
-
 109
109
-
 110
110
-
 111
111
-
 112
112
-
 113
113
-
 114
114
-
 115
115
-
 116
116
-
 117
117
-
 118
118
-
 119
119
-
 120
120
-
 121
121
-
 122
122
-
 123
123
-
 124
124
-
 125
125
-
 126
126
-
 127
127
-
 128
128
-
 129
129
-
 130
130
-
 131
131
-
 132
132
-
 133
133
-
 134
134
-
 135
135
-
 136
136
-
 137
137
-
 138
138
-
 139
139
-
 140
140
-
 141
141
-
 142
142
-
 143
143
-
 144
144
-
 145
145
-
 146
146
-
 147
147
-
 148
148
-
 149
149
-
 150
150
-
 151
151
-
 152
152
-
 153
153
-
 154
154
-
 155
155
-
 156
156
-
 157
157
-
 158
158
-
 159
159
-
 160
160
-
 161
161
-
 162
162
-
 163
163
-
 164
164
-
 165
165
-
 166
166
-
 167
167
-
 168
168
-
 169
169
-
 170
170


Panasonic NFCC500SXE Bruksanvisningar
- Kategori
- Drick kylare
- Typ
- Bruksanvisningar
på andra språk
- italiano: Panasonic NFCC500SXE Istruzioni per l'uso
- slovenčina: Panasonic NFCC500SXE Návod na používanie
- español: Panasonic NFCC500SXE Instrucciones de operación
- Deutsch: Panasonic NFCC500SXE Bedienungsanleitung
- polski: Panasonic NFCC500SXE Instrukcja obsługi
- français: Panasonic NFCC500SXE Mode d'emploi
- dansk: Panasonic NFCC500SXE Betjeningsvejledning
- Nederlands: Panasonic NFCC500SXE Handleiding
Relaterade papper
Andra dokument
-
Philips HD9220/41 Recipe book
-
Silvercrest SMUK 1500 A1 Bruksanvisning
-
Samsung MC35J8085LT Bruksanvisning
-
bluMill GLA-1006A Användarmanual
-
-
Emerio AF-128121 Användarmanual
-
Philips HD9621/90 Användarmanual
-
Emerio AF-126672 Smart Fryer Användarmanual
-
Emerio AF-126668 Användarmanual