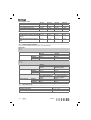
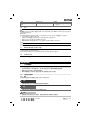
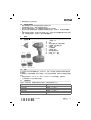
Hilti SID 14A Cordless Drills and Impact Wrenches Användarmanual
- Typ
- Användarmanual


1

2
3
4
5

6
7
8
9

10

SID 14A
SID 22A
SIW 14A
SIW 22A
en Originaloperatinginstructions....................................... 1
fr Moded'emploioriginal........................................... 13
da Originalbrugsanvisning .......................................... 26
sv Originalbruksanvisning........................................... 38
no Originalbruksanvisning .......................................... 51
fi Alkuperäisetohjeet ............................................. 63
ru Перевод оригинального руководства по эксплуатации . . . . . . . . . . . . . . . . . . . . 75
tr Orijinalkullanımkılavuzu ......................................... 89
ar ﺩﻟﻴﻞﺍﻻﺳﺘﻌﻤﺎﻝﺍﻷﺻﻠﻲ .......................................... 103
lv Oriģinālā lietošanas instrukcija . . . . . . . . . . . . . . . . . . . . . . . . . . . . . . . . . . . . . 117
lt Originalinaudojimoinstrukcija...................................... 130
et Originaalkasutusjuhend .......................................... 143
uk Оригінальна інструкція з експлуатації . . . . . . . . . . . . . . . . . . . . . . . . . . . . . . . . 155
kk Түпнұсқа пайдалану бойынша нұсқаулық . . . . . . . . . . . . . . . . . . . . . . . . . . . . . 169
ja オリジナル取扱説明書 ............................................ 183
ko 오리지널사용설명서............................................. 195
zh 原始操作說明.................................................. 207
cn 原版操作说明.................................................. 218

*2072653* 2072653 English 1
Original operating instructions
1 Information about the documentation
1.1 About this documentation
• Read this documentation before initial operation or use. This is a prerequisite for safe, trouble-free
handling and use of the product.
• Observe the safety instructions and warnings in this documentation and on the product.
• Always keep the operating instructions with the product and make sure that the operating instructions
are with the product when it is given to other persons.
1.2 Explanation of symbols used
1.2.1 Warnings
Warnings alert persons to hazards that occur when handling or using the product. The following signal words
are used:
DANGER
DANGER !
▶Draws attention to imminent danger that will lead to serious personal injury or fatality.
WARNING
WARNING !
▶Draws attention to a potential threat of danger that can lead to serious injury or fatality.
CAUTION
CAUTION !
▶Draws attention to a potentially dangerous situation that could lead to slight personal injury or damage
to the equipment or other property.
1.2.2 Symbols in the documentation
The following symbols are used in this document:
Read the operating instructions before use.
Instructions for use and other useful information
Dealing with recyclable materials
Do not dispose of electric equipment and batteries as household waste
1.2.3 Symbols in the illustrations
The following symbols are used in illustrations:
These numbers refer to the corresponding illustrations found at the beginning of these operating
instructions
The numbering reflects the sequence of operations shown in the illustrations and may deviate
from the steps described in the text
Item reference numbers are used in the overview illustrations and refer to the numbers used in
the product overview section
This symbol is intended to draw special attention to certain points when handling the product.

2 English 2072653 *2072653*
1.3 Product-dependent symbols
1.3.1 Symbols on the product
The following symbols can be used on the product:
Drilling without hammer action
Hammer drilling
Revolutions per minute
Rated speed under no load
Direct current (DC)
Li-ion battery
Hilti Li-ion battery type series used. Observe the information given in the section headed In-
tended use.
The power tool supports near-field communication (NFC) technology, which is compatible with
iOS and Android platforms.
Never use the battery as a striking tool.
Do not drop the battery. Never use a battery that has suffered an impact or is damaged in any
other way.
1.4 Product information
products are designed for professional users and only trained, authorized personnel are
permitted to operate, service and maintain the products. This personnel must be specifically informed about
the possible hazards. The product and its ancillary equipment can present hazards if used incorrectly by
untrained personnel or if used not in accordance with the intended use.
The type designation and serial number are printed on the rating plate.
▶Write down the serial number in the table below. You will be required to state the product details when
contacting Hilti Service or your local Hilti organization to inquire about the product.
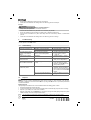
Product information
Cordless screwdriver
Cordless impact wrench SID 14-A, SID 22-A
SIW 14-A, SIW 22-A
Generation: 01
Serial no.:
1.5 Declaration of conformity
We declare, on our sole responsibility, that the product described here complies with the applicable directives
and standards. A copy of the declaration of conformity can be found at the end of this documentation.
The technical documentation is filed here:
Hilti Entwicklungsgesellschaft mbH | Tool Certification | Hiltistrasse 6 | 86916 Kaufering, Germany
2 Safety
2.1 General power tool safety warnings
WARNING Read all safety warnings, instructions, illustrations and specifications provided with this
power tool. Failure to follow all instructions listed below may result in electric shock, fire and/or serious injury.
Save all warnings and instructions for future reference.
The term "power tool" in the warnings refers to your mains-operated (corded) power tool or battery-operated
(cordless) power tool.
Work area safety
▶Keep work area clean and well lit. Cluttered or dark areas invite accidents.

*2072653* 2072653 English 3
▶Do not operate power tools in explosive atmospheres, such as in the presence of flammable
liquids, gases or dust. Power tools create sparks which may ignite the dust or fumes.
▶Keep children and bystanders away while operating a power tool. Distractions can cause you to lose
control.
Electrical safety
▶Power tool plugs must match the outlet. Never modify the plug in any way. Do not use any adapter
plugs with earthed (grounded) power tools. Unmodified plugs and matching outlets will reduce risk of
electric shock.
▶Avoid body contact with earthed or grounded surfaces, such as pipes, radiators, ranges and
refrigerators. There is an increased risk of electric shock if your body is earthed or grounded.
▶Do not expose power tools to rain or wet conditions. Water entering a power tool will increase the
risk of electric shock.
▶Do not abuse the cord. Never use the cord for carrying, pulling or unplugging the power tool. Keep
cord away from heat, oil, sharp edges or moving parts. Damaged or entangled cords increase the
risk of electric shock.
▶When operating a power tool outdoors, use an extension cord suitable for outdoor use. Use of a
cord suitable for outdoor use reduces the risk of electric shock.
▶If operating a power tool in a damp location is unavoidable, use a residual current device (RCD)
protected supply. Use of an RCD reduces the risk of electric shock.
Personal safety
▶Stay alert, watch what you are doing and use common sense when operating a power tool. Do
not use a power tool while you are tired or under the influence of drugs, alcohol or medication. A
moment of inattention while operating power tools may result in serious personal injury.
▶Use personal protective equipment. Always wear eye protection. Protective equipment such as a
dust mask, non-skid safety shoes, hard hat or hearing protection used for appropriate conditions will
reduce personal injuries.
▶Prevent unintentional starting. Ensure the switch is in the off-position before connecting to power
source and/or battery pack, picking up or carrying the tool. Carrying power tools with your finger on
the switch or energising power tools that have the switch on invites accidents.
▶Remove any adjusting key or wrench before turning the power tool on. A wrench or a key left
attached to a rotating part of the power tool may result in personal injury.
▶Do not overreach. Keep proper footing and balance at all times. This enables better control of the
power tool in unexpected situations.
▶Dress properly. Do not wear loose clothing or jewellery. Keep your hair and clothing away from
moving parts. Loose clothes, jewellery or long hair can be caught in moving parts.
▶If devices are provided for the connection of dust extraction and collection facilities, ensure these
are connected and properly used. Use of dust collection can reduce dust-related hazards.
▶Do not let familiarity gained from frequent use of tools allow you to become complacent and ignore
tool safety principles. A careless action can cause severe injury within a fraction of a second.
Power tool use and care
▶Do not force the power tool. Use the correct power tool for your application. The correct power tool
will do the job better and safer at the rate for which it was designed.
▶Do not use the power tool if the switch does not turn it on and off. Any power tool that cannot be
controlled with the switch is dangerous and must be repaired.
▶Disconnect the plug from the power source and/or remove the battery pack, if detachable, from
the power tool before making any adjustments, changing accessories, or storing power tools.
Such preventive safety measures reduce the risk of starting the power tool accidentally.
▶Store idle power tools out of the reach of children and do not allow persons unfamiliar with the
power tool or these instructions to operate the power tool. Power tools are dangerous in the hands
of untrained users.
▶Maintain power tools and accessories. Check for misalignment or binding of moving parts,
breakage of parts and any other condition that may affect the power tool’s operation. If damaged,
have the power tool repaired before use. Many accidents are caused by poorly maintained power
tools.
▶Keep cutting tools sharp and clean. Properly maintained cutting tools with sharp cutting edges are
less likely to bind and are easier to control.
▶Use the power tool, accessories and tool bits etc. in accordance with these instructions, taking
into account the working conditions and the work to be performed. Use of the power tool for
operations different from those intended could result in a hazardous situation.

4 English 2072653 *2072653*
▶Keep handles and grasping surfaces dry, clean and free from oil and grease. Slippery handles and
grasping surfaces do not allow for safe handling and control of the tool in unexpected situations.
Battery tool use and care
▶Recharge only with the charger specified by the manufacturer. A charger that is suitable for one type
of battery pack may create a risk of fire when used with another battery pack.
▶Use power tools only with specifically designated battery packs. Use of any other battery packs may
create a risk of injury and fire.
▶When battery pack is not in use, keep it away from other metal objects, like paper clips, coins,
keys, nails, screws or other small metal objects, that can make a connection from one terminal to
another. Shorting the battery terminals together may cause burns or a fire.
▶Under abusive conditions, liquid may be ejected from the battery; avoid contact. If contact
accidentally occurs, flush with water. If liquid contacts eyes, additionally seek medical help. Liquid
ejected from the battery may cause irritation or burns.
▶Do not use a battery pack or tool that is damaged or modified. Damaged or modified batteries may
exhibit unpredictable behaviour resulting in fire, explosion or risk of injury.
▶Do not expose a battery pack or tool to fire or excessive temperature. Exposure to fire or temperature
above 130° C (265 °F) may cause explosion.
▶Follow all charging instructions and do not charge the battery pack or tool outside the temperature
range specified in the instructions. Charging improperly or at temperatures outside the specified range
may damage the battery and increase the risk of fire.
Service
▶Have your power tool serviced by a qualified repair person using only identical replacement parts.
This will ensure that the safety of the power tool is maintained.
▶Never service damaged battery packs. Service of battery packs should only be performed by the
manufacturer or authorized service providers.
2.2 Safety warnings for screwdrivers and impact wrenches
▶Hold the power tool by insulated gripping surfaces, when performing an operation where the
fastener may contact hidden wiring. Fasteners contacting a "live" wire may make exposed metal parts
of the power tool "live" and could give the operator an electric shock.
2.3 Additional safety precautions for screwdrivers
Personal safety
▶Use the product only when it is in perfect working order.
▶Never tamper with or modify the tool in any way.
▶Use the auxiliary grips supplied with the power tool. Loss of control can cause personal injury.
▶Always hold the tool firmly with both hands on the grips provided. Keep the grips clean and dry.
▶Do not touch rotating parts – risk of injury!
▶Wear suitable protective glasses, a hard hat, ear protection, protective gloves and light respiratory
protection while using the power tool.
▶Wear protective gloves also when changing the tool. Touching the accessory tool can result in cuts and
burns.
▶Wear eye protection. Flying fragments can injure the body and eyes.
▶Before starting work, check the hazard class of the dust that will be produced when working. Use
an industrial vacuum cleaner with an officially approved protection class in compliance with the locally
applicable dust protection regulations. Dust from materials such as lead-based paint, certain types of
wood and concrete/masonry/stone containing quartz, minerals or metal can be harmful to health.
▶Make sure that the workplace is well ventilated and, where necessary, wear a respirator appropriate for
the type of dust generated. Contact with or inhalation of the dust may cause allergic reactions and/or
respiratory or other diseases among operators or bystanders. Certain kinds of dust are classified as
carcinogenic such as oak and beech dust, especially in conjunction with additives for wood conditioning
(chromate, wood preservative). Only specialists are permitted to handle material containing asbestos.
▶Take breaks and do physical exercises to improve the blood circulation in your fingers. Exposure to
vibration during long periods of work can lead to disorders of the blood vessels and nervous system in
the fingers, hands and wrists.

*2072653* 2072653 English 5
Electrical safety
▶Before beginning work, check the working area for concealed electric cables or gas and water pipes.
External metal parts of the power tool may give you an electric shock if you damage an electric cable
accidentally.
Power tool use and care
▶Immediately switch off the power tool if the accessory tool jams. The power tool might twist off-line.
▶Wait until the power tool stops completely before you lay it down.
2.4 Battery use and care
▶Observe the special regulations and instructions applicable to the transport, storage and use of Li-ion
batteries.
▶Do not expose batteries to high temperatures, direct sunlight or fire.
▶Do not disassemble, crush or incinerate batteries and do not subject them to temperatures over 80 °C.
▶Do not use or charge batteries that have suffered mechanical impact, have been dropped from a height
or show signs of damage. In this case, always contact your Hilti Service.
▶If the battery is too hot to touch it may be defective. In this case, place the product in a non-flammable
location, well away from flammable materials, where it can be kept under observation and allowed to
cool down. In this case, always contact your Hilti Service.
3 Description
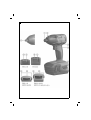
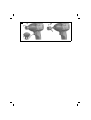
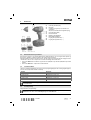
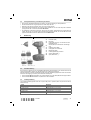
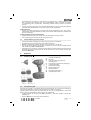
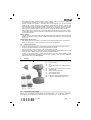
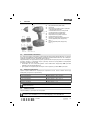
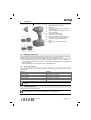
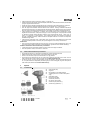
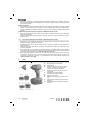
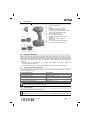
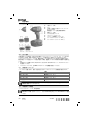
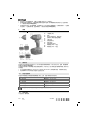
3.1 Overview of the product 1
@Hex. socket (SID)
;Illumination
=Forward/reverse selector switch with safety
lock
%Control switch (with electronic speed control)
&Square drive (SIW)
(Torque selector button
)Belt hook (optional)
+Battery state-of-charge display
§Release buttons (B22/… battery)
/Release button (B14/… battery)
3.2 Intended use
The product described is a hand-held cordless impact wrench. It is designed for driving and removing
screws and for tightening and releasing nuts and bolts in wood, metal, masonry and concrete.
The impact wrench may be used only for applications that do not require a precise/specified torque. Failure
to observe this point presents a risk of over-tightening and damage to the bolt, screw or workpiece.
▶For this product use only Hilti Liion batteries of the B14 (SID/SIW 14A) or B22 (SID/SIW 22A) series,
as applicable.
▶Use only the Hilti battery chargers of the C4/36 series for these batteries.
3.3 Charge status display
The charge status of the Liion battery is displayed after pressing one of the release buttons lightly (press
only until slight resistance is felt).

6 English 2072653 *2072653*
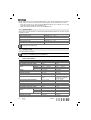
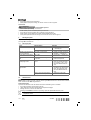
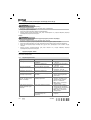
Status Meaning
4 LEDs light. Charge status: 75 % to 100 %
3 LEDs light. Charge status: 50 % to 75 %
2 LEDs light. Charge status: 25 % to 50 %
1 LED lights. Charge status: 10 % to 25 %
1 LED blinks. Charge status: < 10 %
Battery charge status cannot be displayed while the control switch is pressed and for up to 5 seconds
after releasing the control switch.
3.4 Items supplied
Impact wrench, operating instructions.
Spare parts, consumables and accessories approved by Hilti for use with the product can be found at
your local Hilti Store or online at: www.hilti.group | USA: www.hilti.com
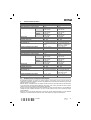
4 Impact wrench
SID 14A SIW 14A
Rated voltage 14.4 V 14.4 V
Weight in accordance with EPTA
Procedure-01 1.6 kg 1.6 kg
Rated speed under no
load Setting I 0 /min … 1,000 /min 0 /min … 1,000 /min
Setting II 0 /min … 1,500 /min 0 /min … 1,500 /min
Setting III 0 /min … 2,500 /min 0 /min … 2,300 /min
Impact speed ≤ 3,100 bpm ≤ 3,400 bpm
Torque adjustment 3 settings 3 settings
Large standard bolts M8 to M16 M8 to M16
Large high-strength bolts M6 to M12 M6 to M12
Socket/bit drive 1/4″ hex. socket with lock-
ing ring
1/2″ square drive with
ball-notch retention
or 3/8″ square drive with
locking ring
Ambient temperature for operation −17 ℃ … 60 ℃ −17 ℃ … 60 ℃
Storage temperature −20 ℃ … 70 ℃ −20 ℃ … 70 ℃
SID 22A SIW 22A
Rated voltage 21.6 V 21.6 V
Weight in accordance with EPTA
Procedure-01 2.1 kg 2.1 kg
Rated speed under no
load Setting I 0 /min … 1,000 /min 0 /min … 1,000 /min
Setting II 0 /min … 1,500 /min 0 /min … 1,500 /min
Setting III 0 /min … 2,500 /min 0 /min … 2,300 /min
Impact speed ≤ 3,450 bpm ≤ 3,500 bpm
Torque adjustment 3 settings 3 settings
Large standard bolts M8 to M16 M8 to M16
Large high-strength bolts M6 to M12 M6 to M12
Socket/bit drive 1/4″ hex. socket with lock-
ing ring
1/2″ square drive with
ball-notch retention
or 3/8″ square drive with
locking ring

*2072653* 2072653 English 7
SID 22A SIW 22A
Ambient temperature for operation −17 ℃ … 60 ℃ −17 ℃ … 60 ℃
Storage temperature −20 ℃ … 70 ℃ −20 ℃ … 70 ℃
4.1 Noise information and vibration values in accordance with EN 62841
The sound pressure and vibration values given in these instructions were measured in accordance with a
standardized test and can be used to compare one power tool with another. They can also be used for a
preliminary assessment of exposure.
The data given represent the main applications of the power tool. However, if the power tool is used for
different applications, with different accessory tools, or is poorly maintained, the data can vary. This can
significantly increase exposure over the total working period.
An accurate estimation of exposure should also take into account the times when the tool is switched off, or
when it is running but not actually being used for a job. This can significantly reduce exposure over the total
working period.
Identify additional safety measures to protect the operator from the effects of noise and/or vibration, for
example: maintaining the power tool and accessory tools, keeping the hands warm, organization of work
patterns.
Noise information
SID 14A SIW 14A SID 22A SIW 22A
Sound (power) level (LWA)94 dB(A) 94 dB(A) 97 dB(A) 97 dB(A)
Uncertainty for the sound power level
(KWA)3 dB(A) 3 dB(A) 3 dB(A) 3 dB(A)
Emission sound pressure level (LpA)83 dB(A) 83 dB(A) 86 dB(A) 86 dB(A)
Uncertainty for the sound pressure
level (KpA)3 dB(A) 3 dB(A) 3 dB(A) 3 dB(A)
Total vibration
SID 14A SIW 14A SID 22A SIW 22A
Vibration emission value when tighten-
ing screws/bolts and nuts of the maxi-
mum permitted size (ah)
7.5 m/s² 7.5 m/s² 11 m/s² 11 m/s²
Uncertainty for tightening
screws/bolts and nuts of the maximum
permitted size
1.5 m/s² 1.5 m/s² 1.5 m/s² 1.5 m/s²
4.2 Setting the torque
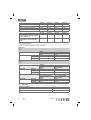
The torque is selected by way of the torque selector button.
Model SID …
SID 14A
SID 22A
Model
SID 14A SID 22A
Torque Setting I 50 Nm 60 Nm
Setting II 100 Nm 110 Nm
Setting III 150 Nm 165 Nm

8 English 2072653 *2072653*
Model SIW …
SIW 14A
SIW 22A
SIW 14A
1/2″ square drive with
ball-notch retention 3/8″ square drive with
locking ring
Torque Setting I 80 Nm 65 Nm
Setting II 120 Nm 115 Nm
Setting III 185 Nm 160 Nm
SIW 22A
1/2″ square drive with
ball-notch retention 3/8″ square drive with
locking ring
Torque Setting I 90 Nm 75 Nm
Setting II 135 Nm 120 Nm
Setting III 200 Nm 175 Nm
4.3 Battery, 14.4 V
Battery operating voltage 14.4 V
Ambient temperature −10 ℃ … 60 ℃
Storage temperature −20 ℃ … 40 ℃
4.4 Battery, 21.6 V
Battery operating voltage 21.6 V
Ambient temperature −17 ℃ … 60 ℃
Storage temperature −20 ℃ … 40 ℃
5 Preparations at the workplace
CAUTION
Risk of injury by inadvertent starting!
▶Before inserting the battery, make sure that the product is switched off.
▶Remove the battery before making any adjustments to the power tool or before changing accessories.
Observe the safety instructions and warnings in this documentation and on the product.
5.1 Charging the battery
1. Before charging the battery, read the operating instructions for the charger.
2. Make sure that the contacts on the battery and the contacts on the charger are clean and dry.
3. Use an approved charger to charge the battery.
5.2 Inserting the battery
CAUTION
Risk of injury by short circuit or falling battery!
▶Before inserting the battery, make sure that the contacts on the battery and the contacts on the product
are free of foreign matter.
▶Make sure that the battery always engages correctly.
1. Charge the battery fully before using it for the first time.
2. Push the battery into the battery holder until it engages with an audible click.
3. Check that the battery is seated securely.

*2072653* 2072653 English 9
5.3 Removing the battery
1. Press the battery release buttons.
2. Remove the battery from the tool.
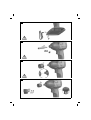
5.4 Fitting the belt hook (optional) 2
WARNING
Risk of injury! Hazard presented by a falling power tool.
▶A falling power tool may present a risk of injury to yourself and others. Check that the belt hook is fitted
securely before beginning work.
The belt hook allows the power tool to be attached to a belt worn by the operator. The belt hook can
be fitted to allow attachment on the left or right side of the body.
1. Remove the battery. → page 9
2. Insert the belt hook in the opening provided at the base of the screwdriver’s grip.
3. Secure the belt hook with the 2 screws.
5.5 Installing an accessory tool 3
SID 14A
SID 22A
1. Check that the connection end of the accessory tool is clean.
▶If necessary, clean the connection end.
2. Set the forward/reverse switch to the middle position or remove the battery from the power tool.
3. Push the accessory tool into the chuck as far as it will go (until it engages).
4. Before using the power tool, check that the accessory tool is correctly seated and secure.
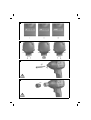
5.6 Installing an accessory tool 4
SIW 14A
SIW 22A
1. Check that the connection end of the accessory tool is clean.
▶If necessary, clean the connection end.
2. Set the forward/reverse switch to the middle position or remove the battery from the power tool.
3. Bring the notch in the accessory tool into alignment with the ball on the square drive.
4. Push the accessory tool onto the square drive until it engages.
5. Before using the power tool, check that the accessory tool is correctly seated and secure.
5.7 Installing an accessory tool 5
SIW 22A
CAUTION
Risk of injury through use of the wrong type of accessory tool!
▶Use only accessory tools of the locking type.
▶Do not use worn or damaged accessory tools.
1. Set the forward/reverse switch to the middle position or remove the battery from the power tool.
2. Remove the O-ring from the groove in the socket.
3. Pull out the locking pin.
4. Place the socket on the square drive spindle of the tool.
Take care to ensure that the holes in the square drive spindle and socket, into which the locking
ring fits, are in alignment with each other.
5. Insert the locking pin in the socket.

10 English 2072653 *2072653*
6. Fit the O-ring on the socket.
7. Before using the power tool, check that the accessory tool is correctly seated and secure.
6 Operation
Observe the safety instructions and warnings in this documentation and on the product.
6.1 Setting the torque 6
▶Repeatedly press the torque selector switch until the desired torque setting is indicated by the indicator
on the left beside the switch.
SID 14A
SID 22A
Model SID … → page 7
SIW 14A
SIW 22A
Model SIW … → page 8
6.2 Setting forward or reverse rotation 7
An interlock prevents switching while the motor is running.
The control switch is locked when the forward/reverse switch is in the middle position (safety lock).
▶Set the forward/reverse switch to the desired direction of rotation.
6.3 Switching on
▶Press the control switch.
▶Speed of rotation is regulated by the distance the control switch is pressed in.
6.4 Screwdriving
CAUTION
Risk of injury by damaged workpieces! Screws or workpiece can be damaged if torque is too high. This
presents a risk of injury.
▶Make sure that screws and workpiece are suitable for the torque produced by the tool.
1. Set the forward/reverse switch to the middle position or remove the battery from the power tool.
2. Use the torque selector switch to set the desired torque. → page 10
6.5 Switching off
▶Release the control switch.
6.6 Removing the accessory tool 8
SID 14A
SID 22A
CAUTION
Risk of injury by the accessory tool! The accessory tool might be hot or have sharp edges.
▶Wear protective gloves when using the power tool and when changing accessory tools.
1. Set the forward/reverse switch to the middle position or remove the battery from the power tool.
2. Pull the chuck ring forward and hold it in this position.
3. Pull the accessory tool out of the chuck.
4. Release the chuck ring.

*2072653* 2072653 English 11
6.7 Removing the accessory tool 9
SIW 14A
SIW 22A
CAUTION
Risk of injury by the accessory tool! The accessory tool might be hot or have sharp edges.
▶Wear protective gloves when using the power tool and when changing accessory tools.
1. Set the forward/reverse switch to the middle position or remove the battery from the power tool.
2. Pull the accessory tool off the square drive.
6.8 Removing the accessory tool 10
SIW 22A
1. Set the forward/reverse switch to the middle position or remove the battery from the power tool.
2. Remove the O-ring from the groove in the socket.
3. Pull out the locking pin.
4. Remove the socket from the square drive spindle of the tool.
5. Fit the locking pin.
6. Fit the securing O-ring to the socket.
7 Care and maintenance
WARNING
Risk of injury with battery inserted !
▶Always remove the battery before carrying out care and maintenance tasks!
Care and maintenance of the tool
• Carefully remove stubborn dirt.
• Clean the air vents carefully with a dry brush.
• Use only a slightly damp cloth to clean the casing. Do not use cleaning agents containing silicone as
these can attack the plastic parts.
Care of the Liion batteries
• Keep the battery free from oil and grease.
• Use only a slightly damp cloth to clean the casing. Do not use cleaning agents containing silicone as
these may attack the plastic parts.
• Avoid ingress of moisture.
Maintenance
• Check all visible parts and controls for signs of damage at regular intervals and make sure that they all
function correctly.
• Do not operate the product if signs of damage are found or if parts malfunction. Have it repaired
immediately by Hilti Service.
• After cleaning and maintenance, fit all guards or protective devices and check that they function correctly.
To help ensure safe and reliable operation, use only genuine Hilti spare parts and consumables. Spare
parts, consumables and accessories approved by Hilti for use with the product can be found at your
local Hilti Store or online at: www.hilti.group.
8 Transport and storage of cordless tools
Transport
CAUTION
Accidental starting during transport !
▶Always transport your products with the batteries removed!
▶Remove the battery.

12 English 2072653 *2072653*
▶Never transport batteries in bulk form (loose, unprotected).
▶Check the tool and batteries for damage before use after long periods of transport.
Storage
CAUTION
Accidental damage caused by defective or leaking batteries !
▶Always store your products with the batteries removed!
▶Store the tool and batteries in a place that is as cool and dry as possible.
▶Never store batteries in direct sunlight, on heating units or behind a window pane.
▶Store the tool and batteries in a place where they cannot be accessed by children or unauthorized
persons.
▶Check the tool and batteries for damage before use after long periods of storage.
9 Troubleshooting
If the trouble you are experiencing is not listed in this table or you are unable to remedy the problem by
yourself, please contact Hilti Service.
9.1 Troubleshooting
Trouble or fault Possible cause Action to be taken
The power tool doesn’t run. The battery is not fully inserted. ▶Insert the battery. → page 8
Low battery. ▶Charge the battery. → page 8
The control switch can’t be
pressed, i.e. the switch is
locked.
The forward/reverse selector
switch is in the middle position.
▶Set the forward/reverse switch
to the desired position.
→ page 10
Running speed suddenly
drops considerably. Low battery. ▶Charge the battery. → page 8
The battery runs down more
quickly than usual. Very low ambient temperature. ▶Allow the battery to warm up
slowly to room temperature.
The battery doesn’t engage
with an audible double click. The retaining lugs on the battery
are dirty.
▶Clean the retaining lugs and
push the battery in until it
engages. Contact Hilti Service
if the problem persists.
The power tool or the battery
becomes very warm. Electrical fault. ▶Switch the power tool off im-
mediately, remove the battery,
keep it under observation, allow
it to cool down and contact Hilti
Service.
The tool is overloaded (application
limits exceeded).
▶Select a suitable power tool for
the application.
10 Disposal
Most of the materials from which Hilti tools and appliances are manufactured can be recycled. The
materials must be correctly separated before they can be recycled. In many countries, your old tools,
machines or appliances can be returned to Hilti for recycling. Ask Hilti Service or your Hilti representative
for further information.
Battery disposal
Improper disposal of batteries can result in health hazards from leaking gases or fluids.
▶DO NOT send batteries through the mail!
▶Cover the terminals with a non-conductive material (such as electrical tape) to prevent short circuiting.
▶Dispose of your battery out of the reach of children.
▶Dispose of the battery at your Hilti Store, or consult your local governmental garbage disposal or public
health and safety resources for disposal instructions.
▶Do not dispose of power tools, electronic equipment or batteries as household waste!

*2072653* 2072653 Français 13
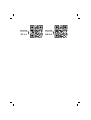
11 RoHS (Restriction of Hazardous Substances)
Click on the links to go to the table of hazardous substances: qr.hilti.com/r4923, qr.hilti.com/r4922,
qr.hilti.com/r4927 and qr.hilti.com/r4926 .
You will find a link to the RoHS table, in the form of a QR code, at the end of this document.
12 Manufacturer’s warranty
▶Please contact your local Hilti representative if you have questions about the warranty conditions.
Mode d'emploi original
1 Indications relatives à la documentation
1.1 À propos de cette documentation
• Lire intégralement la présente documentation avant la mise en service. C'est la condition préalablement
requise pour assurer la sécurité du travail et un maniement sans perturbations.
• Bien respecter les consignes de sécurité et les avertissements de la présente documentation ainsi que
celles figurant sur le produit.
• Toujours conserver le mode d'emploi à proximité du produit et uniquement le transmettre à des tiers
avec ce mode d'emploi.
1.2 Explication des symboles
1.2.1 Avertissements
Les avertissements attirent l'attention sur des dangers liés à l'utilisation du produit. Les termes de
signalisation suivants sont utilisés :
DANGER
DANGER !
▶Pour un danger imminent qui peut entraîner de graves blessures corporelles ou la mort.
AVERTISSEMENT
AVERTISSEMENT !
▶Pour un danger potentiel qui peut entraîner de graves blessures corporelles ou la mort.
ATTENTION
ATTENTION !
▶Pour attirer l'attention sur une situation pouvant présenter des dangers entraînant des blessures
corporelles légères ou des dégâts matériels.
1.2.2 Symboles dans la documentation
Les symboles suivants sont utilisés dans la présente documentation :
Lire le mode d'emploi avant d'utiliser l'appareil
Pour des conseils d'utilisation et autres informations utiles
Maniement des matériaux recyclables
Ne pas jeter les appareils électriques et les accus dans les ordures ménagères
1.2.3 Symboles dans les illustrations
Les symboles suivants sont utilisés dans les illustrations :

14 Français 2072653 *2072653*
Ces chiffres renvoient à l'illustration correspondante au début du présent mode d'emploi
La numérotation détermine la séquence des étapes de travail dans l'image et peut se différencier
de celles des étapes de travail dans le texte
Les numéros de position sont utilisés dans l'illustration Vue d’ensemble et renvoient aux numé-
ros des légendes dans la section Vue d'ensemble du produit
Ce signe doit inviter à manier le produit en faisant particulièrement attention.
1.3 Symboles spécifiques au produit
1.3.1 Symboles sur le produit
Les symboles suivants peuvent être utilisés sur le produit :
Perçage sans percussion
Perçage à percussion
Tours par minute
Vitesse nominale à vide
Courant continu
Accu lithium-ions
Série de type d'accu Li-Ion Hilti utilisée. Observer les instructions au chapitre Utilisation
conforme à l'usage prévu.
L'appareil prend en charge la technologie NFC qui est compatible avec les plates-formes iOS et
Android.
Ne jamais utiliser l'accu comme outil de percussion.
Ne pas laisser tomber l'accu. Ne pas utiliser d'accu ayant subi un choc ou d'autres dommages.
1.4 Informations produit
Les produits sont destinés aux professionnels et ne doivent être utilisés, entretenus et réparés
que par un personnel autorisé et formé. Ce personnel doit être spécialement instruit quant aux dangers
inhérents à l'utilisation de l'appareil. Le produit et ses accessoires peuvent s'avérer dangereux s'ils sont
utilisés de manière incorrecte par un personnel non qualifié ou de manière non conforme à l'usage prévu.
La désignation du modèle et le numéro de série figurent sur sa plaque signalétique.
▶Inscrivez le numéro de série dans le tableau suivant. Les informations produit vous seront demandées
lorsque vous contactez nos revendeurs ou services après-vente.
Caractéristiques produit
Visseuse sans fil
Boulonneuse à choc sans fil SID 14-A, SID 22-A
SIW 14-A, SIW 22-A
Génération : 01
N° de série :
1.5 Déclaration de conformité
Nous déclarons sous notre seule et unique responsabilité que le produit décrit ici est conforme aux
directives et normes en vigueur. Une copie de la Déclaration de conformité se trouve en fin de la présente
documentation.
Pour obtenir les documentations techniques, s'adresser à :
Hilti Entwicklungsgesellschaft mbH | Zulassung Geräte | Hiltistraße 6 | 86916 Kaufering, DE
Sidan laddas...
Sidan laddas...
Sidan laddas...
Sidan laddas...
Sidan laddas...
Sidan laddas...
Sidan laddas...
Sidan laddas...
Sidan laddas...
Sidan laddas...
Sidan laddas...
Sidan laddas...
Sidan laddas...
Sidan laddas...
Sidan laddas...
Sidan laddas...
Sidan laddas...
Sidan laddas...
Sidan laddas...
Sidan laddas...
Sidan laddas...
Sidan laddas...
Sidan laddas...
Sidan laddas...
Sidan laddas...
Sidan laddas...
Sidan laddas...
Sidan laddas...
Sidan laddas...
Sidan laddas...
Sidan laddas...
Sidan laddas...
Sidan laddas...
Sidan laddas...
Sidan laddas...
Sidan laddas...
Sidan laddas...
Sidan laddas...
Sidan laddas...
Sidan laddas...
Sidan laddas...
Sidan laddas...
Sidan laddas...
Sidan laddas...
Sidan laddas...
Sidan laddas...
Sidan laddas...
Sidan laddas...
Sidan laddas...
Sidan laddas...
Sidan laddas...
Sidan laddas...
Sidan laddas...
Sidan laddas...
Sidan laddas...
Sidan laddas...
Sidan laddas...
Sidan laddas...
Sidan laddas...
Sidan laddas...
Sidan laddas...
Sidan laddas...
Sidan laddas...
Sidan laddas...
Sidan laddas...
Sidan laddas...
Sidan laddas...
Sidan laddas...
Sidan laddas...
Sidan laddas...
Sidan laddas...
Sidan laddas...
Sidan laddas...
Sidan laddas...
Sidan laddas...
Sidan laddas...
Sidan laddas...
Sidan laddas...
Sidan laddas...
Sidan laddas...
Sidan laddas...
Sidan laddas...
Sidan laddas...
Sidan laddas...
Sidan laddas...
Sidan laddas...
Sidan laddas...
Sidan laddas...
Sidan laddas...
Sidan laddas...
Sidan laddas...
Sidan laddas...
Sidan laddas...
Sidan laddas...
Sidan laddas...
Sidan laddas...
Sidan laddas...
Sidan laddas...
Sidan laddas...
Sidan laddas...
Sidan laddas...
Sidan laddas...
Sidan laddas...
Sidan laddas...
Sidan laddas...
Sidan laddas...
Sidan laddas...
Sidan laddas...
Sidan laddas...
Sidan laddas...
Sidan laddas...
Sidan laddas...
Sidan laddas...
Sidan laddas...
Sidan laddas...
Sidan laddas...
Sidan laddas...
Sidan laddas...
Sidan laddas...
Sidan laddas...
Sidan laddas...
Sidan laddas...
Sidan laddas...
Sidan laddas...
Sidan laddas...
Sidan laddas...
Sidan laddas...
Sidan laddas...
Sidan laddas...
Sidan laddas...
Sidan laddas...
Sidan laddas...
Sidan laddas...
Sidan laddas...
Sidan laddas...
Sidan laddas...
Sidan laddas...
Sidan laddas...
Sidan laddas...
Sidan laddas...
Sidan laddas...
Sidan laddas...
Sidan laddas...
Sidan laddas...
Sidan laddas...
Sidan laddas...
Sidan laddas...
Sidan laddas...
Sidan laddas...
Sidan laddas...
Sidan laddas...
Sidan laddas...
Sidan laddas...
Sidan laddas...
Sidan laddas...
Sidan laddas...
Sidan laddas...
Sidan laddas...
Sidan laddas...
Sidan laddas...
Sidan laddas...
Sidan laddas...
Sidan laddas...
Sidan laddas...
Sidan laddas...
Sidan laddas...
Sidan laddas...
Sidan laddas...
Sidan laddas...
Sidan laddas...
Sidan laddas...
Sidan laddas...
Sidan laddas...
Sidan laddas...
Sidan laddas...
Sidan laddas...
Sidan laddas...
Sidan laddas...
Sidan laddas...
Sidan laddas...
Sidan laddas...
Sidan laddas...
Sidan laddas...
Sidan laddas...
Sidan laddas...
Sidan laddas...
Sidan laddas...
Sidan laddas...
Sidan laddas...
Sidan laddas...
Sidan laddas...
Sidan laddas...
Sidan laddas...
Sidan laddas...
Sidan laddas...
Sidan laddas...
Sidan laddas...
Sidan laddas...
Sidan laddas...
Sidan laddas...
Sidan laddas...
Sidan laddas...
Sidan laddas...
Sidan laddas...
Sidan laddas...
Sidan laddas...
Sidan laddas...
Sidan laddas...
Sidan laddas...
Sidan laddas...
Sidan laddas...
Sidan laddas...
Sidan laddas...
Sidan laddas...
Sidan laddas...
Sidan laddas...
Sidan laddas...
Sidan laddas...
Sidan laddas...
Sidan laddas...
-
 1
1
-
 2
2
-
 3
3
-
 4
4
-
 5
5
-
 6
6
-
 7
7
-
 8
8
-
 9
9
-
 10
10
-
 11
11
-
 12
12
-
 13
13
-
 14
14
-
 15
15
-
 16
16
-
 17
17
-
 18
18
-
 19
19
-
 20
20
-
 21
21
-
 22
22
-
 23
23
-
 24
24
-
 25
25
-
 26
26
-
 27
27
-
 28
28
-
 29
29
-
 30
30
-
 31
31
-
 32
32
-
 33
33
-
 34
34
-
 35
35
-
 36
36
-
 37
37
-
 38
38
-
 39
39
-
 40
40
-
 41
41
-
 42
42
-
 43
43
-
 44
44
-
 45
45
-
 46
46
-
 47
47
-
 48
48
-
 49
49
-
 50
50
-
 51
51
-
 52
52
-
 53
53
-
 54
54
-
 55
55
-
 56
56
-
 57
57
-
 58
58
-
 59
59
-
 60
60
-
 61
61
-
 62
62
-
 63
63
-
 64
64
-
 65
65
-
 66
66
-
 67
67
-
 68
68
-
 69
69
-
 70
70
-
 71
71
-
 72
72
-
 73
73
-
 74
74
-
 75
75
-
 76
76
-
 77
77
-
 78
78
-
 79
79
-
 80
80
-
 81
81
-
 82
82
-
 83
83
-
 84
84
-
 85
85
-
 86
86
-
 87
87
-
 88
88
-
 89
89
-
 90
90
-
 91
91
-
 92
92
-
 93
93
-
 94
94
-
 95
95
-
 96
96
-
 97
97
-
 98
98
-
 99
99
-
 100
100
-
 101
101
-
 102
102
-
 103
103
-
 104
104
-
 105
105
-
 106
106
-
 107
107
-
 108
108
-
 109
109
-
 110
110
-
 111
111
-
 112
112
-
 113
113
-
 114
114
-
 115
115
-
 116
116
-
 117
117
-
 118
118
-
 119
119
-
 120
120
-
 121
121
-
 122
122
-
 123
123
-
 124
124
-
 125
125
-
 126
126
-
 127
127
-
 128
128
-
 129
129
-
 130
130
-
 131
131
-
 132
132
-
 133
133
-
 134
134
-
 135
135
-
 136
136
-
 137
137
-
 138
138
-
 139
139
-
 140
140
-
 141
141
-
 142
142
-
 143
143
-
 144
144
-
 145
145
-
 146
146
-
 147
147
-
 148
148
-
 149
149
-
 150
150
-
 151
151
-
 152
152
-
 153
153
-
 154
154
-
 155
155
-
 156
156
-
 157
157
-
 158
158
-
 159
159
-
 160
160
-
 161
161
-
 162
162
-
 163
163
-
 164
164
-
 165
165
-
 166
166
-
 167
167
-
 168
168
-
 169
169
-
 170
170
-
 171
171
-
 172
172
-
 173
173
-
 174
174
-
 175
175
-
 176
176
-
 177
177
-
 178
178
-
 179
179
-
 180
180
-
 181
181
-
 182
182
-
 183
183
-
 184
184
-
 185
185
-
 186
186
-
 187
187
-
 188
188
-
 189
189
-
 190
190
-
 191
191
-
 192
192
-
 193
193
-
 194
194
-
 195
195
-
 196
196
-
 197
197
-
 198
198
-
 199
199
-
 200
200
-
 201
201
-
 202
202
-
 203
203
-
 204
204
-
 205
205
-
 206
206
-
 207
207
-
 208
208
-
 209
209
-
 210
210
-
 211
211
-
 212
212
-
 213
213
-
 214
214
-
 215
215
-
 216
216
-
 217
217
-
 218
218
-
 219
219
-
 220
220
-
 221
221
-
 222
222
-
 223
223
-
 224
224
-
 225
225
-
 226
226
-
 227
227
-
 228
228
-
 229
229
-
 230
230
-
 231
231
-
 232
232
-
 233
233
-
 234
234
-
 235
235
-
 236
236
-
 237
237
-
 238
238
-
 239
239
-
 240
240


