
user manual
käyttöohje
bruksanvisning
Freezer
Pakastin
Frysskåp
EUC29320W

Electrolux. Thinking of you.
Share more of our thinking at www.electrolux.com
CONTENTS
Safety information 2
Control panel 4
First use 5
Daily use 5
Helpful hints and tips 6
Care and cleaning 6
What to do if… 8
Technical data 9
Installation 10
Environmental concerns 12
Subject to change without notice
SAFETY INFORMATION
In the interest of your safety and to ensure
the correct use, before installing and first
using the appliance, read this user manual
carefully, including its hints and warnings.
To avoid unnecessary mistakes and acci-
dents, it is important to ensure that all peo-
ple using the appliance are thoroughly fa-
miliar with its operation and safety features.
Save these instructions and make sure that
they remain with the appliance if it is moved
or sold, so that everyone using it through its
life will be properly informed on appliance
use and safety.
For the safety of life and property keep the
precautions of these user's instructions as
the manufacturer is not responsible for
damages caused by omission.
Children and vulnerable people safety
• This appliance is not intended for use by
persons (including children) with reduced
physical, sensory or mental capabilities,
or lack of experience and knowledge, un-
less they have been given supervision or
instruction concerning use of the appli-
ance by a person responsible for their
safety.
Children should be supervised to ensure
that they do not play with the appliance.
• Keep all packaging well away from chil-
dren. There is risk of suffocation.
• If you are discarding the appliance pull
the plug out of the socket, cut the con-
nection cable (as close to the appliance
as you can) and remove the door to pre-
vent playing children to suffer electric
shock or to close themselves into it.
• If this appliance featuring magnetic door
seals is to replace an older appliance
having a spring lock (latch) on the door or
lid, be sure to make that spring lock un-
usable before you discard the old appli-
ance. This will prevent it from becoming a
death trap for a child.
General safety
Warning!
Keep ventilation openings, in the appliance
enclosure or in the built-in structure, clear of
obstruction.
• The appliance is intended for keeping
foodstuff and/or beverages in a normal
household as explained in this instruction
booklet.
• Do not use a mechanical device or any
artificial means to speed up the thawing
process.
• Do not use other electrical appliances
(such as ice cream makers) inside of re-
frigerating appliances, unless they are ap-
proved for this purpose by the manufac-
turer.
• Do not damage the refrigerant circuit.
• The refrigerant isobutane (R600a) is con-
tained within the refrigerant circuit of the
appliance, a natural gas with a high level
of environmental compatibility, which is
nevertheless flammable.
During transportation and installation of
the appliance, be certain that none of the
components of the refrigerant circuit be-
come damaged.
If the refrigerant circuit should become
damaged:
– avoid open flames and sources of igni-
tion
– thoroughly ventilate the room in which
the appliance is situated
2 electrolux

• It is dangerous to alter the specifications
or modify this product in any way. Any
damage to the cord may cause a short-
circuit, fire and/or electric shock.
Warning! Any electrical component
(power cord, plug, compressor) must
be replaced by a certified service agent
or qualified service personnel to avoid
hazard.
1. Power cord must not be lengthened.
2. Make sure that the power plug is not
squashed or damaged by the back
of the appliance. A squashed or
damaged power plug may overheat
and cause a fire.
3. Make sure that you can come to the
mains plug of the appliance.
4. Do not pull the mains cable.
5. If the power plug socket is loose, do
not insert the power plug. There is a
risk of electric shock or fire.
6. You must not operate the appliance
without the lamp cover
1)
of interior
lighting.
• This appliance is heavy. Care should be
taken when moving it.
• Do not remove nor touch items from the
freezer compartment if your hands are
damp/wet, as this could cause skin abra-
sions or frost/freezer burns.
• Avoid prolonged exposure of the appli-
ance to direct sunlight.
•
Bulb lamps
2)
used in this appliance are
special purpose lamps selected for
household appliances use only. They are
not suitable for household room illumina-
tion.
Daily Use
• Do not put hot pot on the plastic parts in
the appliance.
• Do not store flammable gas and liquid in
the appliance, because they may ex-
plode.
• Do not place food products directly
against the air outlet on the rear wall.
3)
• Frozen food must not be re-frozen once
it has been thawed out.
• Store pre-packed frozen food in accord-
ance with the frozen food manufacturer's
instructions.
• Appliance's manufacturers storage rec-
ommendations should be strictly adhered
to. Refer to relevant instructions.
• Do not place carbonated or fizzy drinks in
the freezer compartment as it creates
pressure on the container, which may
cause it to explode, resulting in damage
to the appliance.
• Ice lollies can cause frost burns if con-
sumed straight from the appliance.
Care and cleaning
• Before maintenance, switch off the appli-
ance and disconnect the mains plug from
the mains socket.
• Do not clean the appliance with metal
objects.
• Do not use sharp objects to remove frost
from the appliance. Use a plastic scraper.
• Never use a hair drier or other heating
appliances to speed up defrosting. Ex-
cessive heat may damage the plastic in-
terior, and humidity could enter the elec-
tric system making it live.
Installation
Important! For electrical connection
carefully follow the instructions given in
specific paragraphs.
• Unpack the appliance and check if there
are damages on it. Do not connect the
appliance if it is damaged. Report possi-
ble damages immediately to the place
you bought it. In that case retain packing.
• It is advisable to wait at least four hours
before connecting the appliance to allow
the oil to flow back in the compressor.
• Adequate air circulation should be
around the appliance, lacking this leads
to overheating. To achieve sufficient ven-
tilation follow the instructions relevant to
installation.
• Wherever possible the back of the prod-
uct should be against a wall to avoid
touching or catching warm parts (com-
pressor, condenser) to prevent possible
burn.
1) If the lamp cover is foreseen.
2) If the lamp is foreseen.
3) If the appliance is Frost Free.
electrolux 3

• The appliance must not be located close
to radiators or cookers.
• Make sure that the mains plug is accessi-
ble after the installation of the appliance.
•
Connect to potable water supply only.
4)
Service
• Any electrical work required to do the
servicing of the appliance should be car-
ried out by a qualified electrician or com-
petent person.
• This product must be serviced by an au-
thorized Service Centre, and only genu-
ine spare parts must be used.
Environment Protection
This appliance does not contain gasses
which could damage the ozone layer,
in either its refrigerant circuit or insula-
tion materials. The appliance shall not
be discarded together with the urban
refuse and rubbish. The insulation foam
contains flammable gases: the appli-
ance shall be disposed according to
the applicable regulations to obtain
from your local authorities. Avoid dam-
aging the cooling unit, especially at the
rear near the heat exchanger. The ma-
terials used on this appliance marked
by the symbol
are recyclable.
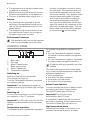
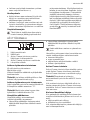
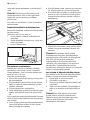
CONTROL PANEL
1. Alarm light
2. Pilot light
3. Action Freeze button
Alarm reset button
4. Action Freeze light
5. Temperature regulator
Switching on
Insert the plug into the wall socket.
The pilot light will light up.
Turn the Temperature regulator clockwise
to a medium setting.
Important! If the temperature inside the
appliance is too high the Alarm light will light
up.
Switching off
To turn off the appliance, turn the Tempera-
ture regulator to the "O" position.
Important! The Pilot light stay ON until the
appliance is disconnected from the power
socket.
Temperature regulation
The temperature is automatically regulated.
1 2 3 4 5
1
2
34
5
6
0
1
2
34
5
6
0
To operate the appliance, proceed as fol-
lows:
• turn the Temperature regulator counter
clockwise to obtain warmer storage tem-
perature.
• turn the Temperature regulator clockwise
to obtain colder storage temperature.
A medium setting is generally the most
suitable.
The exact setting should be chosen keep-
ing in mind that the temperature inside the
appliance depends on:
• room temperature
• how often the door is opened
• the quantity of food stored
• the location of the appliance.
Action Freeze function
You can activate the Action Freeze function
by pressing the Action Freeze button.
The Action Freeze light will light up.
Important! This function stops
automatically after 52 hours.
It is possible to deactivate the function at
any time by pressing Action Freeze button.
The Action Freeze light will switch off.
High temperature alarm
Temperature increase in the freezer com-
partment (for example due to an earlier
4) If a water connection is foreseen.
4 electrolux

power failure or door is open) is indicated
by:
•Alarm light flashing.
• sounding of buzzer.
The buzzer can be switched off by pressing
the Alarm reset button.
When normal conditions are restored the
Alarm light will stop flashing and the buzzer
turn off automatically.
FIRST USE
Cleaning the interior
Before using the appliance for the first time,
wash the interior and all internal accesso-
ries with lukewarm water and some neutral
soap so as to remove the typical smell of a
brand-new product, then dry thoroughly.
Important! Do not use detergents or abra-
sive powders, as these will damage the fin-
ish.
DAILY USE
Freezing fresh food
The freezer compartment is suitable for
freezing fresh food and storing frozen and
deep-frozen food for a long time.
To freeze small amount of fresh foods it is
not necessary to change the present set-
ting.
To freeze fresh food activate the Action
Freeze function 24 hours before placing the
food to be frozen in the freezer compart-
ment.
Place the fresh food to be frozen in the two
top compartments.
The maximum amount of food that can be
frozen in 24 hours is specified on the rating
plate, a label located on the inside of the
appliance.
The freezing process lasts 24 hours: during
this period do not add other food to be fro-
zen.
Storage of frozen food
When first starting-up or after a period out
of use, before putting the products in the
compartment let the appliance run at least
2 hours.
Important! In the event of accidental
defrosting, for example due to a power
failure, if the power has been off for longer
than the value shown in the technical
characteristics chart under "rising time", the
defrosted food must be consumed quickly
or cooked immediately and then re-frozen
(after cooling).
Thawing
Deep-frozen or frozen food, prior to being
used, can be thawed in the refrigerator
compartment or at room temperature, de-
pending on the time available for this opera-
tion.
Small pieces may even be cooked still fro-
zen, directly from the freezer: in this case,
cooking will take longer.
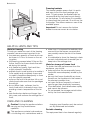
Removal of freezing baskets from the
freezer
The freezing baskets have a limit stop to
prevent their accidental removal or falling
out. At the time of its removal from the
freezer, pull the basket towards yourself
and, upon reaching the end point, remove
the basket by tilting its front upwards.
At the time of putting it back, slightly lift the
front of the basket to insert it into the freez-
er. Once you are over the end points, push
the baskets back in their position.
electrolux 5

Freezing baskets
The freezer baskets ensure that it is quick
and easy to find the food package you
want. To gain space, the baskets can be
removed and the food can be put directly
on the shelves. On all shelves it is possible
to place food that protrude 15 mm from the
front edge. This allows maximum use of the
available space.
Important! Do not remove the bottom
basket to ensure correct air circulation.
HELPFUL HINTS AND TIPS
Hints for freezing
To help you make the most of the freezing
process, here are some important hints:
• the maximum quantity of food which can
be frozen in 24 hrs. is shown on the rat-
ing plate;
• the freezing process takes 24 hours. No
further food to be frozen should be add-
ed during this period;
• only freeze top quality, fresh and thor-
oughly cleaned, foodstuffs;
• prepare food in small portions to enable it
to be rapidly and completely frozen and
to make it possible subsequently to thaw
only the quantity required;
• wrap up the food in aluminium foil or pol-
ythene and make sure that the packages
are airtight;
• do not allow fresh, unfrozen food to
touch food which is already frozen, thus
avoiding a rise in temperature of the lat-
ter;
• lean foods store better and longer than
fatty ones; salt reduces the storage life of
food;
• water ices, if consumed immediately after
removal from the freezer compartment,
can possibly cause the skin to be freeze
burnt;
• it is advisable to show the freezing in date
on each individual pack to enable you to
keep tab of the storage time.
Hints for storage of frozen food
To obtain the best performance from this
appliance, you should:
• make sure that the commercially frozen
foodstuffs were adequately stored by the
retailer;
• be sure that frozen foodstuffs are trans-
ferred from the foodstore to the freezer in
the shortest possible time;
• not open the door frequently or leave it
open longer than absolutely necessary.
• Once defrosted, food deteriorates rapidly
and cannot be refrozen.
• Do not exceed the storage period indica-
ted by the food manufacturer.
CARE AND CLEANING
Caution! Unplug the appliance before
carrying out any maintenance
operation.
This appliance contains hydrocarbons
in its cooling unit; maintenance and re-
charging must therefore only be carried
out by authorized technicians.
Periodic cleaning
The equipment has to be cleaned regularly:
6 electrolux

• clean the inside and accessories with
lukewarm water and some neutral soap.
• regularly check the door seals and wipe
clean to ensure they are clean and free
from debris.
• rinse and dry thoroughly.
Important! Do not pull, move or damage
any pipes and/or cables inside the cabinet.
Never use detergents, abrasive powders,
highly perfumed cleaning products or wax
polishes to clean the interior as this will
damage the surface and leave a strong
odour.
Clean the condenser (black grill) and the
compressor at the back of the appliance
with a brush. This operation will improve the
performance of the appliance and save en-
ergy consumption.
Important! Take care of not to damage the
cooling system.
Important! When moving the cabinet, lift it
by the front edge to avoid scratching the
floor.
Many proprietary kitchen surface cleaners
contain chemicals that can attack/damage
the plastics used in this appliance. For this
reason use a soft cloth rinsed in warm wa-
ter and neutral soap emulsion for cleaning
external surfaces.
Important! Do not use detergents or
abrasive paste as these will damage the
paint, or stainless steel anti finger print
coating.
After cleaning, reconnect the equipment to
the mains supply.
Cleaning the ventilation grille
The ventilation grille can be removed for
washing.
Make sure the door is open and then:
1. Loosen the upper edge of the grille by
pulling outward/downward.
2. Pull the grille straight out to completely
remove it.
3. Vacuum clean under the cabinet.
Defrosting the freezer
A certain amount of frost will always form
on the freezer shelves and around the top
compartment.
Defrost the freezer when the frost layer rea-
ches a thickness of about 3-5 mm.
To remove the frost, follow the instructions
below:
• switch off the appliance and pull out the
plug from the wall socket
• remove any stored food, wrap it in sever-
al layers of newspaper and put it in a cool
place
• remove the freezer drawers
• put insulating material around the draw-
ers, e.g. blankets or newspapers.
Defrosting can be accelerated by placing
bowls with hot water (not boiling) inside the
freezer.
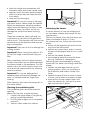
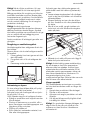
• Loosen the drainage channel from its
resting position, push it in according to
the illustration and collect a water con-
tainer.
• carefully scrape off the ice when it starts
to thaw. Use a wood or a plastic scraper
• when all the ice has melted, clean and
wipe the cabinet dry, then put the drain-
age channel back in place.
electrolux 7

• switch on the cabinet, insert the plug into
the wall socket and replace the frozen
foodstuff.
Important! Never use sharp metal tools to
scrape off frost from the evaporator as you
could damage it. Do not use a mechanical
device or any artificial means to speed up
the thawing process other than those
recommended by the manufacturer. A
temperature rise of the frozen food packs,
during defrosting, may shorten their safe
storage life.
Periods of non-operation
When the appliance is not in use for long
periods, take the following precautions:
1. disconnect the appliance from electrici-
ty supply
2. remove all food
3. defrost and clean the appliance and all
accessories
4. leave the door/doors open to prevent
unpleasant smells.
Important! If the cabinet will be kept on,
ask somebody to check it once in a while to
prevent the food inside from spoiling in
case of a power failure.
WHAT TO DO IF…
During operation of the appliance some
smaller but annoying trouble can often oc-
cur, which does not require calling a techni-
cian out. In the following chart information is
given about them to avoid unnecessary
charges on service.
Important! The operation of the appliance
goes with certain sounds (compressor and
circulating sound). This not means a
trouble, but a normal operation.
Important! The appliance operates
discontinuously, so the stopping of
compressor does not mean being no
current. That is why you must not touch the
electrical parts of the appliance before
breaking the circuit.
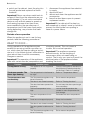
Problem Possible cause Solution
The appliance is noisy.
The appliance is not supported
properly.
Check if the appliance stands sta-
ble (all feet and wheels should be
on the floor). Refer to "Levelling".
The buzzer sounds. The
Alarm light flashing.
The temperature in the freezer is
too high.
Refer to "Temperature Alarm"
The compressor runs
continuously.
The Temperature regulator may
be set incorrectly.
Set a warmer temperature.
The door is not closed correctly. Refer to "Closing the door".
The door has been opened too
frequently.
Do not keep the door open longer
than necessary.
The food temperature is too
high.
Let the food temperature de-
crease to room temperature be-
fore storage.
The room temperature is too
warm.
Decrease the room temperature.
There is too much frost
and ice.
Food are not wrapped properly. Wrap the food better.
The door is not closed correctly. Refer to "Closing the door".
The door gasket is deformed or
dirty.
Refer to "Closing the door".
The Temperature regulator may
be set incorrectly.
Set a warmer temperature.
8 electrolux

Problem Possible cause Solution
The temperature in the
appliance is too cold.
The Temperature regulator may
be set incorrectly.
Set a warmer temperature.
The temperature in the
appliance is too warm.
The Temperature regulator may
be set incorrectly.
Set a lower temperature.
The door is not closed correctly. Refer to "Closing the door".
The food temperature is too
high.
Let the food temperature de-
crease to room temperature be-
fore storage.
The temperature in the
freezer is too warm.
Food is too near to each other. Store food so that there is cold air
circulation.
Large quantities of food to be
frozen were put in at the same
time.
Insert smaller quantities of food to
be frozen at the same time.
The appliance does not
operate.
The appliance is switched off. Switch on the appliance.
The mains plug is not connected
to the mains socket correctly.
Connect the mains plug to the
mains socket correctly.
The appliance has no power.
There is no voltage in the mains
socket.
Connect another electrical appli-
ance to the mains socket. Check
fuse. Contact a qualified electri-
cian.
Door interferes with ven-
tilation grill.
The appliance is not levelled. Refer to "Levelling".
Misaligned door The appliance is not levelled. Refer to "Levelling".
As much as the advice does not lead to result, call the nearest brand-mark service.
Closing the door
1. Clean the door gaskets.
2. If necessary, adjust the door. Refer to
"Installation".
3. If necessary, replace the defective door
gaskets. Contact the Service Center.
TECHNICAL DATA
Dimension
Height 1800 mm
Width 595 mm
Depth 623 mm
Rising Time 18 h
Voltage 230 V
Frequency 50 Hz
The technical information are situated in the
rating plate on the internal left side of the
appliance and in the energy label.
electrolux 9

INSTALLATION
Read the "Safety Information" carefully
for your safety and correct operation of
the appliance before installing the
appliance.
Positioning
Install this appliance at a location where the
ambient temperature corresponds to the
climate class indicated on the rating plate of
the appliance:
Climate
class
Ambient temperature
SN +10°C to + 32°C
N +16°C to + 32°C
ST +16°C to + 38°C
T +16°C to + 43°C
Location
To ensure best performance, if the appli-
ance is positioned below an overhanging
wall unit, the minimum distance between
the top of the cabinet and the wall unit
must be at least 40 mm . Ideally, however,
the appliance should not be positioned be-
low overhanging wall units.
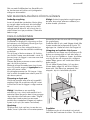
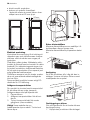
The ventilation space can be:
• directly above the appliance
• behind and above the top cupboard.
In this case, the space behind the top
cupboard must be at least 50 mm deep.
50mm
Electrical connection
Before plugging in, ensure that the voltage
and frequency shown on the rating plate
correspond to your domestic power supply.
The appliance must be earthed. The power
supply cable plug is provided with a contact
for this purpose. If the domestic power sup-
ply socket is not earthed, connect the appli-
ance to a separate earth in compliance with
current regulations, consulting a qualified
electrician.
The manufacturer declines all responsibility
if the above safety precautions are not ob-
served.
This appliance complies with the E.E.C. Di-
rectives.
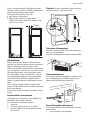
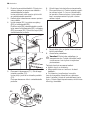
Removing the transport support
Your appliance is equipped with transport
support to secure the door during transpor-
tation.
To remove them do these steps:
1. Open the door.
2. Remove the transport support from the
door sides.
3. Remove the transport support from the
lower hinge (some models).
Important! Some models are fitted with a
silencing pad under the cabinet. Do not
remove this pad.
3
2
Rear spacers
Install the spacers provided within the ac-
cessory bag as shown in the figure.
10 electrolux

Install the spacers on the back side of the
panel.
Levelling
When placing the appliance ensure that it
stands level. If necessary adjust the feet us-
ing the adjustment spanner supplied.
Door reversibility
To change the opening direction of the
door, do these steps:
1. Remove the plug from the power.
2. Remove the ventilation grille. Remove
the upper filling and install it on the op-
posite side of the grille.
Remove the pedal hole cover and in-
stall it on the opposite side.
3. Lay down the appliance back side
down on a wooden support.
4. Unscrew the hinge (B1) and remove the
cover plate (B2) and the support (B3).
Remove the cover (B4) on the opposite
side and install the support (B3) the
cover plate (B2) and the hinge (B1). In-
stall the cover (B4) on the opposite
side.
5. Unscrew the lower hinge (C1). Move
the pin to the opposite side (C2).
Unscrew and move the pedal to the
opposite side (C3).
Screw on the lower hinge on the oppo-
site side.
6. Tighten the pin with the adjustment
spanner supplied.
B1
B3 B4
B2
C2
C3
C1
electrolux 11

7. Unscrew the handle. On the opposite
side remove the hole covers by driving
a 3–4 mm drift or drill into them. Install
the handle. Install the hole covers provi-
ded within the accessory bag.
8. Raise the appliance and install the ven-
tilation grille.
9. Put the appliance in position.
Warning! Reposition, level the
appliance, wait for at least four hours
and then connect it to the power
socket.
Do a final check to make sure that:
• All screws are tightened.
• The magnetic seal adheres to the cabi-
net.
• The door opens and closes correctly.
If the ambient temperature is cold (i.e. in
Winter), the gasket may not fit perfectly to
the cabinet. In that case, wait for the natural
fitting of the gasket.
ENVIRONMENTAL CONCERNS
The symbol on the product or on its
packaging indicates that this product may
not be treated as household waste. Instead
it should be taken to the appropriate
collection point for the recycling of electrical
and electronic equipment. By ensuring this
product is disposed of correctly, you will
help prevent potential negative
consequences for the environment and
human health, which could otherwise be
caused by inappropriate waste handling of
this product. For more detailed information
about recycling of this product, please
contact your local council, your household
waste disposal service or the shop where
you purchased the product.
12 electrolux

Electrolux. Thinking of you.
Lue lisää osoitteessa www.electrolux.com
SISÄLLYS
Turvallisuusohjeet 13
Käyttöpaneeli 15
Ensimmäinen käyttökerta 16
Päivittäinen käyttö 16
Hyödyllisiä neuvoja ja vinkkejä 17
Hoito ja puhdistus 17
Käyttöhäiriöt 19
Tekniset tiedot 20
Asennus 20
Ympäristönsuojelu 23
Oikeus muutoksiin pidätetään
TURVALLISUUSOHJEET
Lue tämä käyttöohje ja sen sisältämät neu-
vot sekä varoitukset huolellisesti ennen lait-
teen asentamista ja ensimmäistä käyttöä,
jotta osaisit käyttää laitetta turvallisesti ja oi-
kealla tavalla. Turhien virheiden ja onnetto-
muuksien välttämiseksi on tärkeää, että
kaikki laitteen käyttäjät perehtyvät huolelli-
sesti sen toimintaan ja turvallisuusominai-
suuksiin. Pidä tämä ohje tallessa ja varmis-
ta, että se kulkee aina laitteen mukana esi-
merkiksi asunnon vaihdon yhteydessä tai
luovutetaan mahdolliselle uudelle omistajal-
le. Näin kaikilla laitteen käyttäjillä on asian-
mukaiset ohjeet turvallista käyttöä varten.
Huomioi tarkasti käyttöohjeen sisältämät
varoitukset käyttäjien turvallisuuden varmis-
tamiseksi ja omaisuusvahinkojen välttämi-
seksi. Valmistaja ei vastaa vahingoista, jotka
ovat aiheutuneet varoitusten ja turvallisuus-
ohjeiden vastaisesta toiminnasta.
Lasten ja taitamattomien henkilöiden
turvallisuus
• Tämä laite ei ole tarkoitettu fyysisesti,
motorisesti tai henkisesti rajoitteisten tai
kokemattomien tai taitamattomien henki-
löiden (eikä lasten) käyttöön, ellei heidän
turvallisuudestaan vastuussa oleva henki-
lö valvo ja opasta heitä laitteen käytössä.
Pikkulapsia on valvottava eikä heidän pi-
dä antaa leikkiä laitteella.
• Pidä kaikki pakkausmateriaalit poissa las-
ten ulottuvilta. Ne voisivat aiheuttaa tu-
kehtumisvaaran.
• Kun poistat laitteen käytöstä lopullisesti,
irrota pistoke pistorasiasta, leikkaa virta-
johto irti (mahdollisimman läheltä laitteen
liitäntäkohtaa) ja irrota laitteen ovi. Tällä
tavoin voidaan välttää leikkiville lapsille ai-
heutuva sähköiskun tai loukkuunjäämisen
vaara.
• Tässä laitteessa on magneettiset oven tii-
visteet. Jos entisen laitteesi ovessa on
jousilukitus (salpa), riko jousilukitus, en-
nen kuin poistat vanhan laitteen käytöstä
estääksesi lasten loukkuunjäämisen vaa-
ran.
Yleiset turvallisuusohjeet
Varoitus!
Pidä kalusteen sisään asennetun laitteen
syvennyksen tai kalustekaapin ilmanvaihto-
aukot vapaina.
• Laite on tarkoitettu elintarvikkeiden ja/tai
juomien säilyttämiseen kotitalouskäytössä
tämän käyttöohjeen kuvauksen mukai-
sesti.
• Älä yritä nopeuttaa sulatusta mekaanisten
laitteiden tai muun keinotekoisen sulatus-
välineen avulla.
• Älä käytä muita sähkölaitteita (esim. jää-
telökonetta) jäähdytyslaitteiden sisällä, el-
leivät ne ole valmistajan hyväksymiä tä-
hän tarkoitukseen.
• Varo vahingoittamasta jäähdytysputkis-
toa.
• Laitteen jäähdytysputkisto sisältää isobu-
taania (R600a), joka on hyvin ympäristö-
ystävällinen luonnonkaasu, mutta kuiten-
kin tulenarka.
Varmista, etteivät jäähdytyspiirin kompo-
nentit pääse vaurioitumaan laitteen kulje-
tuksen ja asennuksen aikana.
Jos jäähdytysputkisto vaurioituu:
– vältä avotulta ja muita syttymislähteitä
electrolux 13

– tuuleta huolellisesti huone, johon laite
on sijoitettu
• Laitteen teknisten ominaisuuksien muut-
taminen tai muiden muutosten tekeminen
laitteeseen on vaarallista. Vahingoittunut
virtajohto voi aiheuttaa oikosulun, tulipa-
lon ja/tai sähköiskun.
Varoitus! Sähköosien (virtajohto, pisto-
ke, kompressori) vaihdon saa suorittaa
vain valtuutettu huoltoliike vaaratilantei-
den välttämiseksi.
1. Virtajohtoa ei saa jatkaa.
2. Varmista, että virtajohto ei joudu pu-
ristuksiin tai pääse vahingoittumaan
laitteen takana. Litistynyt tai vahin-
goittunut virtajohto voi ylikuumentua
ja aiheuttaa tulipalon.
3. Laitteen verkkovirtakytkennän on ol-
tava hyvin ulottuvilla siten, että pisto-
ke on helppo irrottaa pistorasiasta.
4. Älä vedä virtajohdosta pistoketta ir-
rottaessasi.
5. Jos pistoke on löysästi kiinni virtajoh-
dossa, älä kiinnitä sitä pistorasiaan.
Tämä aiheuttaa sähköiskun tai tulipa-
lon vaaran.
6. Laitetta ei saa käyttää, jos sisävalon
lampun suojus
5)
puuttuu.
• Laite on painava. Sen siirtämisessä on
noudatettava varovaisuutta.
• Älä koske pakastimessa oleviin tuotteisiin
kostein tai märin käsin. Koskettaminen
voi aiheuttaa ihon hankautumista tai kyl-
mävammoja.
• Laite ei saa olla pitkään suorassa aurin-
gonvalossa.
•
Tämän laitteen hehkulamput
6)
ovat erityi-
siä lamppua, joita saa käyttää vain kodin-
koneissa. Ne eivät sovi huoneiden valais-
tukseen.
Päivittäinen käyttö
• Älä laita kuumia kattiloita laitteen muovio-
sien päälle.
• Älä säilytä tulenarkoja kaasuja tai nesteitä
jääkaapissa, sillä ne voivat räjähtää.
• Älä laita elintarvikkeita suoraan takasei-
nän ilmanvaihtoaukkoa vasten.
7)
• Pakasteita ei saa pakastaa uudelleen sen
jälkeen, kun ne on kerran sulatettu.
• Säilytä valmispakasteet pakkauksen oh-
jeita noudattaen.
• Noudata tarkasti laitteen valmistajan säi-
lytysohjeita. Lue ohjeet.
• Älä laita pakastimeen hiilihappopitoisia tai
poreilevia juomia, sillä jäätyessä pakkauk-
seen muodostuu painetta, jolloin se voi
räjähtää ja vahingoittaa laitetta.
• Mehujäät voivat aiheuttaa kylmävammoja,
jos ne nautitaan suoraan pakastimesta
otettuina.
Huolto ja puhdistus
• Ennen kuin aloitat huoltoa tai puhdistus-
ta, kytke laite pois toiminnasta ja irrota
pistoke pistorasiasta.
• Älä käytä laitteen puhdistuksessa metalli-
esineitä.
• Älä käytä huurteen poistamisessa teräviä
esineitä. Käytä muovista kaavinta.
• Älä koskaan käytä hiustenkuivaajaa tai
muuta lämmityslaitetta sulatuksen no-
peuttamiseen. Liiallinen kuumuus voi va-
hingoittaa muovisia sisäpintoja ja kosteut-
ta voi päästä sähköjärjestelmään.
Asennus
Tärkeää Noudata tarkasti sähköliitäntää
käsittelevissä kappaleissa annettuja ohjeita.
• Pura laite pakkauksestaan ja tarkista
mahdolliset kuljetusvauriot. Vaurioitunutta
laitetta ei saa kytkeä verkkovirtaan. Ilmoi-
ta mahdollisista vahingoista välittömästi
jälleenmyyjälle. Säilytä tässä tapauksessa
pakkausmateriaalit.
• Odota vähintään kaksi tuntia, ennen kuin
kytket laitteen verkkovirtaan, jotta öljy eh-
tii virrata kompressoriin.
• Laitteen ympärillä on oltava hyvä ilman-
kierto, jotta ylikuumenemisen vaaraa ei
ole. Noudata asennusohjeissa esitettyjä
ilmanvaihtomääräyksiä.
• Laite on mahdollisuuksien mukaan sijoi-
tettava selkä seinää vasten, jotta palo-
vammoja aiheuttaviin kuumiin osiin (kom-
pressori, lauhdutin) ei voida koskea.
• Laitetta ei saa sijoittaa lämpöpatterin tai
lieden viereen.
• Varmista, että laitteen verkkovirtakytkentä
on hyvin ulottuvilla laitteen asennuksen
jälkeen.
5) Mikäli lampussa on suojus.
6) Mikäli laitteessa on lamppu.
7) Mikäli kyseessä on huurtumaton Frost Free-malli.
14 electrolux

• Laitteen saa kytkeä ainoastaan puhtaa-
seen vesijohtoverkkoon.
8)
Huoltopalvelu
• Kaikki laitteen asennukseen liittyvät säh-
kötyöt on annettava ammattitaitoisen
sähköasentajan tehtäväksi.
• Laitteen huoltotyöt saa suorittaa vain val-
tuutettu huoltoliike, ja ainoastaan alkupe-
räisten varaosien käyttäminen on sallittua.
Ympäristönsuojelu
Tämä laite ei sisällä otsonikerrosta tu-
hoavia kaasuja jäähdytyspiirissä eikä
eristemateriaaleissa. Käytöstäpoistettua
laitetta ei saa toimittaa tavallisen yhdys-
kuntajätteen keräykseen. Eristevaahto
sisältää tulenarkoja kaasuja: laitteen
käytöstäpoistossa ja hävittämisessä tu-
lee noudattaa paikallisia jätehuoltomää-
räyksiä. Vältä vahingoittamasta jäähdy-
tysyksikköä, erityisesti lämmönvaihti-
men läheltä. Tässä laitteessa käytetyt,
symbolilla
merkityt materiaalit ovat
kierrätettäviä.
KÄYTTÖPANEELI
1. Hälytysmerkkivalo
2. Merkkivalo
3. Action Freeze-toiminnon painike
Hälytyksen kuittauspainike
4. Action Freeze-toiminnon merkkivalo
5. Lämpötilan säädin
Laitteen kytkeminen toimintaan
Kiinnitä pistoke pistorasiaan.
Merkkivalo syttyy.
Käännä lämpötilan säädintä myötäpäivään
keskiasentoon.
Tärkeää Jos laitteen sisälämpötila on liian
korkea, hälytysmerkkivalo syttyy.
Laitteen kytkeminen pois toiminnasta
Laite kytketään pois toiminnasta kääntämäl-
lä lämpötilan säädin asentoon "O".
Tärkeää Merkkivalo palaa kunnes laite
kytketään irti sähköverkosta ON.
Lämpötilan säätäminen
Lämpötila säätyy automaattisesti.
Laitetta käytetään seuraavasti:
• Lämpötilaa säädetään korkeammaksi
kääntämällä lämpötilan säädintä vasta-
päivään.
1 2 3 4 5
1
2
34
5
6
0
1
2
34
5
6
0
• Lämpötilaa säädetään kylmemmäksi
kääntämällä lämpötilan säädintä myötä-
päivään.
Keskimääräinen asetus on yleensä so-
pivin.
Lämpötilan valinnassa tulee huomioida seu-
raavat sisälämpötilaan vaikuttavat asiat:
• huoneen lämpötila
• oven avaamistiheys
• säilytettävien elintarvikkeiden määrä
• laitteen sijaintipaikka.
Action Freeze-toiminto
Action Freeze-toiminto käynnistetään paina-
malla Action Freeze-toiminnon painiketta.
Action Freeze-toiminnon merkkivalo syttyy.
Tärkeää Pikapakastus kytkeytyy
automaattisesti pois toiminnasta 52 tunnin
kuluttua.
Voit poistaa toiminnon käytöstä milloin ta-
hansa painamalla Action Freeze-toiminnon
painiketta. Action Freeze-toiminnon merkki-
valo sammuu.
Korkean lämpötilan hälytys
Kun pakastimen sisälämpötila kohoaa (esi-
merkiksi sähkökatkon jälkeen tai kun ovi on
auki):
• hälytysmerkkivalo vilkkuu,
• laitteesta kuuluu merkkiääni.
Voit vaientaa äänimerkin painamalla hälytyk-
sen kuittauspainiketta.
8) Mikäli laitteessa on vesiliitäntä.
electrolux 15

Kun lämpötila on palautunut normaaliksi,
hälytysmerkkivalo lakkaa vilkkumasta ja
merkkiääni sammuu automaattisesti.
ENSIMMÄINEN KÄYTTÖKERTA
Sisätilan puhdistaminen
Ennen kuin otat laitteen käyttöön, pese si-
säosat ja kaikki kaapin sisään sijoitettavat
varusteet haalealla vedellä ja käsitiskiaineel-
la poistaaksesi näin uudelle laitteelle tyypilli-
sen hajun. Kuivaa pinnat ja varusteet lopuk-
si huolellisesti.
Tärkeää Älä käytä puhdistusaineita tai han-
kaavia jauheita, sillä ne vahingoittavat pinto-
ja.
PÄIVITTÄINEN KÄYTTÖ
Ruokien pakastaminen
Pakastinosasto soveltuu tuoreiden elintar-
vikkeiden pakastamiseen sekä valmispa-
kasteiden pitkäaikaiseen säilyttämiseen.
Kun pakastat pieniä määriä tuoreita elintar-
vikkeita, asetusta ei tarvitse muuttaa.
Kun haluat pakastaa tuoreita elintarvikkeita,
aktivoi Action Freeze-toiminto vähintään 24
tuntia ennen pakastettavien elintarvikkeiden
asettamista pakastinosastoon.
Laita pakastettavat elintarvikkeet kahteen
yläosastoon.
24 tunnin aikana pakastettavien elintarvik-
keiden enimmäismäärä on merkitty arvokil-
peen, joka sijaitsee laitteen sisäpuolella.
Ruokien pakastuminen kestää 24 tuntia: tä-
nä aikana pakastimeen ei saa lisätä uusia
pakastettavia ruokia.
Pakasteiden säilyttäminen
Kun käytät pakastinta ensimmäistä kertaa
tai pitkän käyttämättömän jakson jälkeen,
anna laitteen toimia vähintään 2 tunnin ajan
ennen kuin laitat siihen elintarvikkeita.
Tärkeää Jos pakastin sulaa vahingossa
esimerkiksi sähkökatkon vuoksi, kun sähkö
on ollut poikki pitempään kuin teknisissä
ominaisuuksissa (kohdassa
Käyttöönottoaika) mainitun ajan, sulaneet
elintarvikkeet on käytettävä nopeasti tai
valmistettava ruoaksi, jonka jälkeen ne
voidaan pakastaa uudelleen (kun ne ovat
jäähtyneet).
Sulatus
Pakasteet voidaan sulattaa ennen käyttöä
jääkaapissa tai huoneen lämpötilassa riip-
puen siitä, kuinka nopeasti niitä tarvitaan.
Pienempiä paloja voidaan kypsentää myös
jäisinä suoraan pakastimesta otettuna: Kyp-
sennys kestää tässä tapauksessa pitem-
pään.
Pakastuskorien poistaminen
pakastimesta
Pakastuskoreissa oleva rajoitin estää niiden
tahattoman poistamisen tai putoamisen.
Kun haluat poistaa korin pakastimesta, ve-
dä sitä itseesi päin ja irrota se lopuksi nos-
tamalla sen etuosaa ylöspäin.
Kori asetetaan takaisin paikalleen nostamal-
la sen etuosaa hieman ja työntämällä se pa-
kastimeen. Kun kori on rajoittimien kohdalla,
työnnä se paikalleen.
Pakastuskorit
Pakastuskorien ansiosta löydät haluamasi
pakkauksen helposti ja nopeasti. Jos tarvit-
set lisätilaa, voit poistaa korit ja laittaa elin-
tarvikkeet suoraan hyllyille. Kaikille hyllyille
16 electrolux

on mahdollista sijoittaa elintarvikkeita, jotka
tulevat 15 mm hyllyn etureunan yli. Näin on
mahdollista parhaiten hyödyntää käytettä-
vissä olevaa tilaa.
Tärkeää Oikean ilmanvaihdon takaamiseksi
älä poista alakoria.
HYÖDYLLISIÄ NEUVOJA JA VINKKEJÄ
Pakastusohjeita
Seuraavassa on muutamia tärkeitä ohjeita
tehokkaan pakastamisen varmistamiseksi:
• 24 tunnin aikana pakastettavien elintar-
vikkeiden maksimimäärä on mainittu lait-
teen arvokilvessä.
• Ruokien pakastuminen kestää 24 tuntia.
Tänä aikana pakastimeen ei saa lisätä
uusia pakastettavia ruokia.
• Pakasta vain korkealaatuisia, tuoreita ja
puhdistettuja elintarvikkeita.
• Jaa ruoka pieniin annoksiin, jotta se pa-
kastuu nopeasti ja täydellisesti. Tällöin
voit myöhemmin sulattaa vain tarvitsema-
si määrän.
• Kääri elintarvikkeet alumiinifolioon tai pak-
kaa muovipusseihin mahdollisimman il-
matiiviisti.
• Älä anna tuoreiden pakastamattomien
ruokien koskea jo pakastuneita tuotteita,
jotta niiden lämpötila ei nouse.
• Vähärasvaiset ruoat säilyvät paremmin
kuin rasvaiset. Suola lyhentää elintarvik-
keiden säilytysaikaa.
• Jos jääpaloja nautitaan suoraan pakasti-
mesta otettuina, ne voivat aiheuttaa kyl-
mävammoja.
• Merkitse pakastuspäivämäärä kaikkiin
pakkauksiin, jotta voit helposti seurata
säilytysaikoja.
Pakasteiden säilytysohjeita
Noudata seuraavia ohjeita varmistaaksesi
laitteen parhaan suorituskyvyn:
• Tarkista, että kaupasta ostamasi pakas-
teet on säilytetty oikein.
• Laita pakasteet pakastimeen mahdolli-
simman nopeasti ostoksilla käynnin jäl-
keen.
• Älä avaa ovea usein äläkä pidä ovea auki
pitempään kuin on tarpeen.
• Sulatettu pakaste pilaantuu nopeasti eikä
sitä saa pakastaa uudelleen.
• Älä käytä tuotetta pakkaukseen merkityn
viimeisen käyttöpäivän jälkeen.
HOITO JA PUHDISTUS
Huomio Kytke laite irti verkkovirrasta
ennen puhdistus- ja huoltotöiden
aloittamista.
Laitteen jäähdytysyksikkö sisältää hiili-
vetyä; Jäähdytysyksikön huollon ja täy-
tön saa suorittaa ainoastaan valtuutettu
huoltoliike.
Säännöllinen puhdistus
Laite on puhdistettava säännöllisesti.
• Puhdista sisäosa ja varusteet lämpimällä
vedellä ja käsitiskiaineella.
• Tarkista oven tiivisteet säännöllisesti ja
pyyhi puhtaaksi.
• Huuhtele ja kuivaa huolellisesti.
Tärkeää Älä vedä, siirrä tai vahingoita
kaapin sisällä olevia putkia ja/tai kaapeleita.
Älä käytä puhdistusaineita, hankausjauhet-
ta, voimakastuoksuisia puhdistustuotteita
tai kiillotusvahaa sisätilojen puhdistamises-
sa, sillä tällaiset tuotteet vahingoittavat pin-
toja ja jättävät voimakkaan tuoksun.
Puhdista laitteen takapuolella sijaitsevat
lauhdutin (musta ritilä) ja kompressori harjal-
la. Tämä toimenpide parantaa laitteen suori-
tuskykyä ja säästää energiaa
Tärkeää Varo vahingoittamasta
jäähdytysjärjestelmää.
Tärkeää Kun siirrät laitetta, nosta sitä
etureunasta, jottet naarmuta lattiaa.
Monet keittiön pintojen puhdistusaineet si-
sältävät kemikaaleja, jotka voivat vahingoit-
taa laitteen muoviosia. Puhdista siis ulko-
pinnat pehmeällä lämpimään veteen ja
electrolux 17

neutraaliin pesunesteeseen kostutetulla lii-
nalla.
Tärkeää Älä käytä puhdistusaineita tai
hankausjauhetta, sillä ne vahingoittavat
maalia tai ruostumattoman teräksen
pinnoitusta.
Kun laite on puhdistettu, kytke se takaisin
verkkovirtaan.
Ilmanvaihtosäleikön puhdistaminen
Ilmanvaihtosäleikkö voidaan irrottaa puhdis-
tamista varten.
Varmista, että ovi on auki ja:
1. Irrota säleikön yläosa vetämällä sitä
ulos/alas.
2. Vedä säleikköä suoraan ulos, jotta se ir-
toaa kokonaan.
3. Imuroi laitteen alus.
Pakastimen sulattaminen
Pakastimen hyllyihin ja laitteen yläosaan
muodostuu aina jonkin verran huurretta.
Sulata pakastin, kun huurrekerroksen pak-
suus on noin 3-5 mm.
Huurteen poistaminen:
• Kytke laite pois toiminnasta ja irrota pisto-
ke pistorasiasta
• Poista pakastimesta kaikki elintarvikkeet,
kääri ne paksulti sanomalehteen ja laita
viileään paikkaan
• Poista pakastimen vetolaatikot
• Laita laatikoiden ympärille eristävää mate-
riaalia, esimerkiksi huopa tai sanomaleh-
tiä.
Voit nopeuttaa sulatusta laittamalla kuumaa
vettä (ei kiehuvaa) sisältäviä astioita pakasti-
men sisään.
• Irrota tyhjennyskanava säilytysasennosta,
työnnä se laitteen sisään kuvan mukai-
sesti ja kerää vesi astiaan.
• Kun jää alkaa sulaa, raaputa se varovasti
irti. Käytä puista tai muovista kaavinta
• Kun kaikki jää on sulanut, puhdista sisä-
pinnat ja pyyhi ne kuiviksi ja laita tyhjen-
nyskanava sen jälkeen takaisin säilytys-
paikkaansa.
• Kytke laite toimintaan, laita pistoke pisto-
rasiaan ja sijoita pakasteet takaisin lait-
teeseen.
Tärkeää Älä koskaan käytä teräviä
metalliesineitä huurteen poistamisessa
haihduttimesta, sillä tämä voi vahingoittaa
sitä. Älä yritä nopeuttaa sulatusta
mekaanisilla tai muilla keinotekoisilla
välineillä, joita valmistaja ei ole neuvonut
käyttämään. Pakasteiden lämpötilan
nouseminen sulatuksen aikana voi lyhentää
niiden turvallista säilytysaikaa.
Jos laitetta ei käytetä pitkään aikaan
Jos laitetta ei ole tarkoitus käyttää pitkään
aikaan, suorita seuraavat toimenpiteet:
1. Kytke laite irti verkkovirrasta.
2. Ota kaikki ruoat pois.
3. Sulata ja puhdista laite sekä kaikki sen
varusteet.
4. Jätä ovi/ovet raolleen, jotta laitteen si-
sälle ei muodostu epämiellyttävää ha-
jua.
Tärkeää Jos jätät laitteen toimintaan,
pyydä jotakin henkilöä tarkistamaan
kaappiin jätetyt elintarvikkeet aika ajoin,
jotta ne eivät pilaannu esimerkiksi
sähkökatkon sattuessa.
18 electrolux

KÄYTTÖHÄIRIÖT
Käytön aikana voi usein esiintyä pieniä mut-
ta harmittavia ongelmia, jotka eivät vaadi
huoltohenkilöstön kutsumista. Seuraavassa
taulukossa annetaan ohjeet, joita noudatta-
malla voidaan välttää huoltokustannuksia.
Tärkeää Laitteen toimintaan kuuluu tiettyjä
ääniä (kompressorin ja ilman kierrätyksen
ääni). Tämä ei merkitse vikaa, vaan se
kuuluu normaaliin toimintaan.
Tärkeää Laite toimii jaksoittain, joten
kompressorin pysähtyminen ei tarkoita
virran katkeamista. Sen vuoksi laitteen
sähköosiin ei saa koskea ennen virran
katkaisemista.
Ongelma Mahdollinen syy Korjaustoimenpide
Laitteen käyntiääni on
kova.
Laitetta ei ole tuettu kunnolla
paikalleen.
Tarkista, että laite on tukevasti
paikallaan (kaikki jalat koskevat
lattiaan). Katso kohta "Tasapai-
nottaminen".
Äänimerkki kuuluu. Häly-
tysmerkkivalo vilkkuu.
Pakastimen lämpötila on liian
korkea.
Katso kohta "Lämpötilahälytys".
Kompressori toimii jatku-
vasti.
Lämpötilan säädin ei ehkä ole oi-
keassa asennossa.
Säädä lämpötila korkeammaksi.
Ovi ei ole kunnolla kiinni. Lue ohjeet kohdasta "Oven sulke-
minen".
Ovea on avattu liian usein. Älä pidä ovea auki pitempään kuin
on tarpeen.
Ruoat ovat liian lämpimiä. Anna lämpötilan laskea huoneen
lämpötilaan ennen kuin laitat ruoat
laitteeseen.
Huoneen lämpötila on liian kor-
kea.
Laske huoneen lämpötilaa.
Laitteessa on liikaa huur-
retta ja jäätä.
Elintarvikkeita ei ole pakattu kun-
nolla.
Pakkaa ruoat oikein.
Ovi ei ole kunnolla kiinni. Lue ohjeet kohdasta "Oven sulke-
minen".
Oven tiiviste on vioittunut tai li-
kainen.
Lue ohjeet kohdasta "Oven sulke-
minen".
Lämpötilan säädin ei ehkä ole oi-
keassa asennossa.
Säädä lämpötila korkeammaksi.
Laitteen lämpötila on
liian alhainen.
Lämpötilan säädin ei ehkä ole oi-
keassa asennossa.
Säädä lämpötila korkeammaksi.
Laitteen lämpötila on
liian korkea.
Lämpötilan säädin ei ehkä ole oi-
keassa asennossa.
Säädä lämpötila alhaisemmaksi.
Ovi ei ole kunnolla kiinni. Lue ohjeet kohdasta "Oven sulke-
minen".
Ruoat ovat liian lämpimiä. Anna lämpötilan laskea huoneen
lämpötilaan ennen kuin laitat ruoat
laitteeseen.
Pakastimen lämpötila on
liian korkea.
Tuotteet ovat liian lähellä toisi-
aan.
Järjestä tuotteet siten, että kylmä
ilma pääsee kiertämään niiden vä-
lissä.
electrolux 19

Ongelma Mahdollinen syy Korjaustoimenpide
Pakastimeen on pantu suuria
määriä elintarvikkeita samanai-
kaisesti.
Sijoita pakastimeen pienempiä
ruokamääriä yhdellä kertaa.
Laite ei toimi lainkaan.
Virta on katkaistu laitteesta. Kytke laitteeseen virta.
Pistoke ei ole kunnolla kiinni pis-
torasiassa.
Kiinnitä pistoke oikein pistorasi-
aan.
Laitteeseen ei tule virtaa. Pisto-
rasiaan ei tule jännitettä.
Kokeile kytkemällä pistorasiaan
jokin toinen sähkölaite. Tarkista
sulake. Ota yhteys sähköasenta-
jaan.
Ovi osuu ilmanvaihtosä-
leikköön.
Laite ei ole oikein tasapainotettu. Katso kohta "Tasapainottaminen".
Ovi ei ole kohdallaan.
Laite ei ole oikein tasapainotettu. Katso kohta "Tasapainottaminen".
Jos nämä ohjeet eivät ratkaise ongelmaa, ota yhteys lähimpään valtuutettuun huoltoliik-
keeseen.
Oven sulkeminen
1. Puhdista oven tiivisteet.
2. Säädä ovea tarvittaessa. Lue ohjeet
kohdasta Asennus.
3. Vaihda tarvittaessa vaurioituneet oven
tiivisteet. Ota yhteys valtuutettuun huol-
toliikkeeseen.
TEKNISET TIEDOT
Mitat
Korkeus 1800 mm
Leveys 595 mm
Syvyys 623 mm
Lämmönnousuaika 18 h
Jännite 230 V
Taajuus 50 Hz
Tekniset tiedot löytyvät arvokilvestä, joka on
sijoitettu laitteen sisälle vasemmalle puolelle,
sekä energiamerkinnästä.
ASENNUS
Lue huolellisesti turvallisuusohjeet
oman turvallisuutesi ja laitteen
asianmukaisen toiminnan
varmistamiseksi, ennen kuin aloitat
laitteen asennuksen.
Sijoittaminen
Asenna laite paikkaan, jossa ympäristön
lämpötila vastaa laitteen arvokilvessä mai-
nittua ilmastoluokkaa:
Ilmasto-
luokka
Ympäristön lämpötila
SN +10 °C - 32 °C
N +16 °C - 32 °C
ST +16 °C - 38 °C
T +16 °C - 43 °C
Sijainti
Jos laite sijoitetaan keittiökaapin alapuolelle,
laitteen yläreunan ja keittiökaapin välillä tu-
lee olla vähintään 40 mm parhaan suoritus-
20 electrolux
Sidan laddas...
Sidan laddas...
Sidan laddas...
Sidan laddas...
Sidan laddas...
Sidan laddas...
Sidan laddas...
Sidan laddas...
Sidan laddas...
Sidan laddas...
Sidan laddas...
Sidan laddas...
Sidan laddas...
Sidan laddas...
Sidan laddas...
Sidan laddas...
-
 1
1
-
 2
2
-
 3
3
-
 4
4
-
 5
5
-
 6
6
-
 7
7
-
 8
8
-
 9
9
-
 10
10
-
 11
11
-
 12
12
-
 13
13
-
 14
14
-
 15
15
-
 16
16
-
 17
17
-
 18
18
-
 19
19
-
 20
20
-
 21
21
-
 22
22
-
 23
23
-
 24
24
-
 25
25
-
 26
26
-
 27
27
-
 28
28
-
 29
29
-
 30
30
-
 31
31
-
 32
32
-
 33
33
-
 34
34
-
 35
35
-
 36
36


Electrolux EUC29320W Användarmanual
- Typ
- Användarmanual
- Denna manual är också lämplig för
på andra språk
- eesti: Electrolux EUC29320W Kasutusjuhend
- English: Electrolux EUC29320W User manual