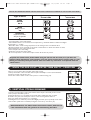
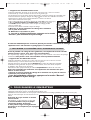
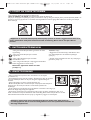
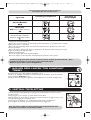
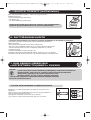
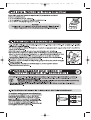
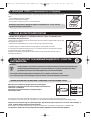
Tefal GV8110D0 Användarmanual
- Kategori
- Ångstrykningsstationer
- Typ
- Användarmanual

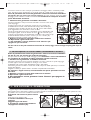
M o d .
P
R O EX P R ES S
M o d .
P R O E X P R E S S
T U R B O
1800111787 - 45/08
INSTRUCTIONS FOR USE - STEAM GENERATOR
NOTICE D’EMPLOI - GENERATEUR DE VAPEUR
GEBRUIKSAANWIJZING - STOOMGENERATOR
GEBRAUCHSANWEISUNG - DAMPFGENERATOR
BRUGSANVISNING - DAMPGENERATOR
BRUKSANVISNING - ÅNGSTATION
KÄYTTÖOHJE - SILITYSKESKUS
ISTRUZIONI PER L’USO - GENERATORE DI VAPORE
Nнcтpyкция пo зкcплyaтaции - ПАРОГЕНЕРАТОРЕ
1800111787 GTA2 GV81XX.qxd:1800111787 GTA2 GV81XX 19/11/08 14:52 Page 1

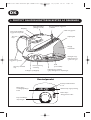
GB
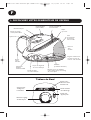
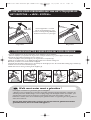
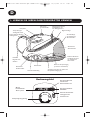
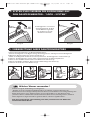
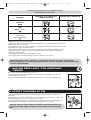
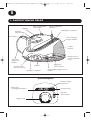
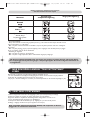
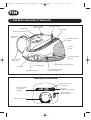
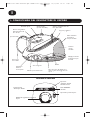
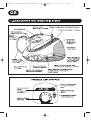
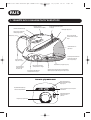
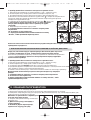
1- UNDERSTANDING YOUR STEAM GENERATOR
Control panel
Steam control button
Turbo steam button
(depending on the model)
Temperature control
slide for the iron
Removable
water tank
Removable
water
tank filler cover
Iron rest
Iron retaining hoop
Boiler rinse plug and steam
cord fastener clip
Iron-base
steam cord
Power cord storage space
Steam output
control dial
Orange “boiler
rinse” light
Red “removable
water tank empty”
light
“Restart” button
Thermostat
light
Steam generator boiler
(in the base unit)
Handles for removing
and replacing
the water tank
Power cord reel button
Illuminated
on / off switch
Green “steam ready” light
1800111787 GTA2 GV81XX.qxd:1800111787 GTA2 GV81XX 19/11/08 14:52 Page 2

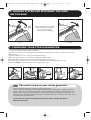
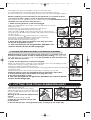
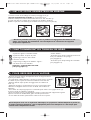
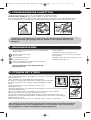
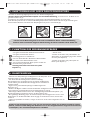
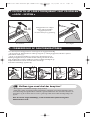
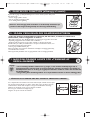
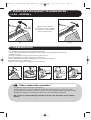
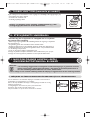
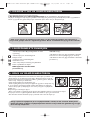
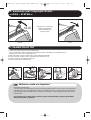
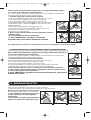
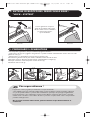
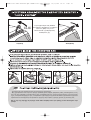
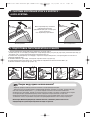
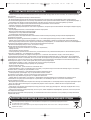
2- LOCKING SYSTEM FOR RETAINING THE IRON
ON THE BASE
CLICK
1 2 3 4 5
Your iron has been designed to operate using untreated tap water.
• Heat concentrates the elements contained in water during evaporation. The types of water listed below
contain organic waste or mineral elements that can cause spitting, brown staining or premature wear of the
appliance: water from clothes dryers, scented or softened water, water from refrigerators, batteries or air
conditioners, pure distilledor demineralised water or rain water should not be used in your iron. Also do not
use boiled, filtered or bottled water.
If your water is very hard mix 50% untreated tap water and 50% distilled or
demineralised water.
3- PREPARING YOUR STEAM GENERATOR
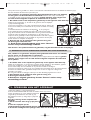
1. To carry your steam generator by the iron handle :
- place the iron on the iron rest of the generator and raise the retaining hoop over the iron until it locks into place
(audible click) (1).
- grasp the handle of the iron to carry your steam generator (2).
2. Place your steam generator on a stable, horizontal heat-resistant surface.
3. Grasp the handles of the removable tank and pull horizontally to remove it (3).
4. Fill up the water tank taking care not to exceed the maximum level just below the filler cover (4).
5. Replace it firmly in its housing, making sure it is fully into place (5).
The water to use in your steam generator :
CLIC
Your steam generator is equipped
with a retaining clip which locks
the iron on its casing for
easier transport and storage
UnlockLock
1800111787 GTA2 GV81XX.qxd:1800111787 GTA2 GV81XX 19/11/08 14:52 Page 3

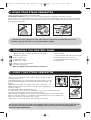
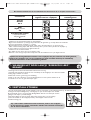
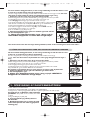
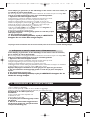
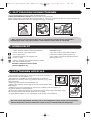
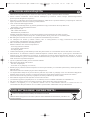
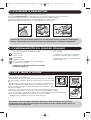
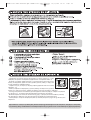
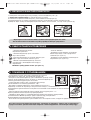
4- USING YOUR STEAM GENERATOR
1. Push the retaining clip forward to release the iron(6).
2. Completely unwind the power cord from its storage space before connecting to an earthed socket (7).
3. Press on the on / off switch (located on the side of the base unit) (a): the green light (located on the control panel) flashes
and the boiler heats up (b).It will take around 2 minutes for steam to be produced which is indicated when the green “steam
ready” light stops flashing (8).
• The first time the appliance is used, there may be some fumes and smell but this is not
harmful. They will not affect use and will disappear rapidly.
(a)
(b)
6 7 8
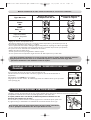
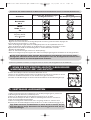
• Place the iron's temperature control slide according to the type of fabri
c to
be ironed (see table + 9).
• The thermostat light comes on. Be careful ! The steam generator is ready
when the thermostat light goes out and when the green “steam ready” light
stays on.
• Adjust the steam output control dial (located on the control panel - 10).
• While ironing, the light on top of the iron and the steam ready light turn on
and off, according to
the heating needs without any disturbing the use.
• To obtain steam, press on the steam control button on top of the iron handle and keep it
pressed (11). The steam will stop when you release the button.
• When starting, and regularly while it is being used, your steam generator's electric pump injects
water into the boiler. It makes a noise but this is quite normal. You may also hear a clicking noise
which is the steam valve opening. Again this is normal.
• Always spray starch onto the reverse side of the fabric to be ironed.
Do not place the iron on a metal support.When taking a break from ironing, always place the iron
on the iron rest plate of the unit. It is equipped with non-slip pads and has been designed to
withstand high temperatures.
6- USING YOUR STEAM GENERATOR
5- OPERATING THE CONTROL PANEL
• “Restart” button:
- to be pressed after each refill of the water tank
to start ironing again (see paragraph 7),
- to be held pressed after rinsing the boiler
(see paragraph 11).
• Flashing green light : the water is heating up in the boiler.
• Continuous green light :
steam is ready for use.
• Continuous red light :
the water tank is empty.
• Orange “boiler rinse” light flashes :
your boiler needs rinsing.
Note: the appliance must be cold (see section 11).
linen
cotton
lin
coton
laine
soie
synth.
wool
silk
synthetic
9 10
11
1800111787 GTA2 GV81XX.qxd:1800111787 GTA2 GV81XX 19/11/08 14:52 Page 4

8- VERTICAL STEAM IRONING
1. Set the iron temperature control slide and the steam output control dia
l (located on the
control panel) to the MAX position.
2. Hang the garment on a coat hanger and hold the fabric slightly taut with one hand.
As steam is very hot, never attempt to remove creases from a garment while it is
being worn, always hang garment on a coat hanger.
3. Holding the iron in a vertical position, tilted slightly forwards, press repeatedly on the steam
control button (under the iron handle) moving the iron from top to bottom (13).
Recommendations : for fabrics other than linen or cotton, hold the iron
a few centimetres from the garment to avoid burning the fabric.
7-
WHEN THE RED LIGHT “WATER TANK EMPTY” COMES ON
There is no more steam. The removable water tank is empty.
1. Grasp the handles of the removable tank and pull horizontally to remove it; fill with water.
2. Replace and push it firmly into place.
3. Press the “restart” button on the control panel to continue ironing (12).
To prime the steam circuit, either before using the iron for the first time, or if you have not
used the steam function for a few minutes, press the steam control button several times in a row,
holding the iron away from your clothes. This will enable any cold water to be ejected from the
steam circuit.
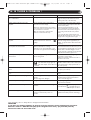
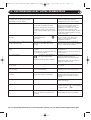
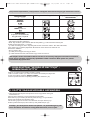
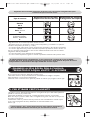
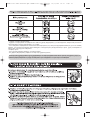
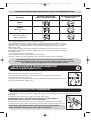
Type of fabric
Linen
Cotton
● ● ●
Wool
Silk, Viscose
● ●
Synthetic,
Polyester, Acetate,
Acrylic, Polyamide
●
Setting the temperature
control slide
Setting the steam output
control dial
• Iron temperature control slide setting:
- Start with the fabrics to be ironed at a low temperature (•) and finish with those which need higher
temperatures (••• or Max).
- Mixed fibre fabric: set the ironing temperature to the setting for the most delicate fabric.
- Woollen garments: press repeatedly on the steam control button to obtain short bursts of steam,
without placing the iron on the garment itself.
• Steam output control dial setting:
- Thick fabric: increase the steam setting.
- At a low temperature : set the steam output control dial to the low position.
SETTING THE TEMPERATURE CONTROL SLIDE AND STEAM OUTPUT CONTROL DIAL ACCORDING TO TYPE OF FABRIC TO BE IRONED :
linen
cotton
lin
coton
laine
soie
synth.
wool
silk
synthetic
linen
cotton
lin
coton
l
a
i
ne
soie
sy
nt
h
.
wool
silk
synthetic
linen
cotton
lin
coton
laine
soie
synth
.
wool
silk
synthetic
13
12
1800111787 GTA2 GV81XX.qxd:1800111787 GTA2 GV81XX 19/11/08 14:52 Page 5

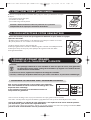
11. THE ORANGE “BOILER RINSE”
LIGHT FLASHES
1. TO RINSE THE BOILER USING RINSING ACCESSORY
Note:
• To extend the efficient operating life of your boiler and avoid scale particles on your
linen, your generator is equipped with an orange “boiler rinse” warning light that
flashes on the control panel after about 10 uses.
• If your water is hard, increase the frequency.
• Do not use descaling agents for rinsing out the boiler, as they could damage it.
For greater effectiveness and for ease of operation, you are
advised to use the rinsing accessory provided in the box.
It will make it easier to rinse the boiler as the generator will
need less handling.
9- TURBO STEAM FUNCTION (depending on the model)
Press 2 or 3 times on the turbo steam button to obtain a more powerful burs
t of steam (14):
• for ironing thicker fabrics,
• to eliminate creases,
• for powerful vertical steaming.
Be careful : use the turbo steam function very carefully because of the
exceptional power of steam that may cause burns.
NOTE : continuous use of the turbo steam function will begin to cool
the iron and may cause water to drip from the iron. If this occcurs,
stop using the turbo steam function and allow the iron thermostat to
reach temperature again (thermostat light will come on and go off)
before using this function again.
10- MAINTAINING YOUR STEAM GENERATOR
• Before cleaning, ensure that your steam generator is unplugged and that the soleplate and
the iron rest have cooled down.
• Do not use detergent or descaling products for cleaning the soleplate or the base-unit.
• Never hold the iron or the base unit under the tap.
• Do not place the iron on a metal rest as this could damage it.
Place it on the iron-rest on the base unit : it has non-slip pads and has been designed
to withstand high temperatures.
1. Empty and rinse the removable water tank (15).
2. Regularly clean the soleplate with a damp, non-metallic washing up pad.
3. Clean the plastic parts of the appliance occasionally with a soft cloth.
15
14
(a)
(b)
1
2
1800111787 GTA2 GV81XX.qxd:1800111787 GTA2 GV81XX 19/11/08 14:52 Page 6

12- PUTTING YOUR STEAM GENERATOR AWAY
1. Place the iron on the rest.
2. Turn off at the main O/I switch and unplug.
3. Raise the retaining hoop over the iron until it locks
into place (audible click) (21). Your iron is then safely
retained on its base.
Warning: do not touch the soleplate while
still hot.
4. Retract the electric supply cord (22).
5. Allow the iron (and iron rest) to cool
for 30 minutes.
6. You can then put your steam generator away, carrying it by the handle (23).
Your rinsing accessory has been designed to work on a wide range o
f taps.
It is supplied with 2 types of membrane (a) (b). Choose the one best suited to your tap.
If you do not wish to, or cannot use the rinsing accessory, refer to the advice in paragraph II (below).
Before attempting to rinse the boiler of your generator, it is essential to leave
it to cool for at least 2 hours in order to avoid any risk of scalding.
If the orange “boiler rinse” light flashes, you can continue ironing normally but remember to rinse
the boiler first, the next time that you use it.
1. Check that the generator is cold and unplugged.
2. Place your steam generator on the edge of your sink, with the iron to one side,
standing on its heel.
3. Unscrew the cord clip by turning a quarter turn to the left (16).
4. Using a coin, gently unscrew the boiler rinse plug (17).
5. Place the plastic nozzle of the rinsing pipe into the hole of the boiler and
turn gently to the right until it locks. The outlet of this nozzle must be positioned
over the sink (18).
6. Connect the rubber end of the rinsing pipe to a cold tap (19).
7. Turn the tap on gently and gradually and let cold water run through
the rinsing pipe into the sink for about 1 minute (20).
8. Switch off the tap and remove the rinsing pipe.
9. Screw back and tighten up the boiler rinse plug with a coin.
10. Put the cord clip back in place.
11. The next time you use the generator, hold down the
“restart” button to turn off the orange light.
1
2
1I. TO RINSE THE BOILER WITHOUT THE RINSING ACCESSORY
Before attempting to rinse the boiler of your generator, it is essential to leave it
to cool for at least 2 hours in order to avoid any risk of scalding. If the orange “boiler
rinse” light flashes, you can continue ironing normally but remember to rinse the boiler first,
the next time that you use it.
1. Check that the generator is cold and unplugged.
2. Place your steam generator on the edge of your sink, with the iron to one side, standing on its heel.
3. Unscrew the cord clip by turning a quarter turn to the left.
4. Using a coin, gently unscrew the boiler rinse plug.
5. Holding your steam generator in a tilted position, and using a jug, fill the boiler (in the base unit) with
1/4 litre of tap water.
6. Shake the base unit for a few moments and then empty it completely over your sink.
To obtain the best result, we recommend that this operation is done twice.
7. Screw back and tighten up the boiler rinse plug with a coin.
8. Put the cord clip back in place.
9. The next time you use the generator, hold down the “restart” button
to turn off the orange light.
16
18
17
19 20
CLIC
21 22 23
1800111787 GTA2 GV81XX.qxd:1800111787 GTA2 GV81XX 19/11/08 14:52 Page 7

13- SAFETY RECOMMENDATIONS
• Please read these instructions carefully before first use. This prod
uct has been designed for domestic use only. Any commercial
use, inappropriate use or failure to comply with the instructions, the manufacturer accepts no responsibility and the guarantee
will not apply.
• For your safety, this appliance conforms to the applicable standards and regulations (Low Voltage, Electomagnetic
Compatibility, Environmental Directives, as applicable...).
• Your steam generator is an electrical appliance. It should be used under normal conditions. It is intended for domestic use
only.
• Your generator is fitted with 2 safety systems :
- a pressure release valve which, in the event of a malfunction, releases any excess steam ;
- a thermal fuse to prevent the appliance from overheating.
• Always plug your steam generator into:
- an electrical installation with voltage between 220V and 240V.
- an earthed socket.
Connecting to the wrong voltage may cause irreparable damage to the appliance and will invalidate your guarantee.
If you are using a mains extension lead, ensure that it is correctly rated (10A) with an earth, and is fully extended.
• Completely unwind the power cord from its storage space before connecting to an earthed socket.
• If the electric power cord, the iron-unit or the brush-unit is damaged, it must be replaced by an Approved Service Centre in
order to prevent any danger.
• Do not unplug the appliance by pulling on the cord.
Always unplug your appliance :
- before rinsing out the boiler or before filling the reservoir or rinsing the boiler,
- before cleaning your generator,
- after each use.
• The appliance must be used and placed on a stable, heat-resistant surface. When you place the iron on the iron rest, make
sure that the surface on which you place it is stable.
• This appliance is not intended for use by persons (including children) with reduced physical, sensory or mental capabilities, or
lack of experience and knowledge, unless they have been given supervision or instruction concerning use of the appliance by a
person responsible for their safety.
• Children should be supervised to ensure that they do not play with the appliance.
• Never leave the appliance unattended :
- when it is connected to the mains,
- until it has cooled down (around 1 hour).
• The soleplate and generator iron-rest can become very hot and cause burns : never touch these parts.
Never touch the electric cords with the soleplate of the iron.
• Your appliance gives off steam which can cause burns. Handle your iron carefully, particularly when using the vertical steam
function. Never direct the steam towards persons or animals.
• Before unscrewing the boiler rinse cap, wait until the generator is cold (unplugged for more than 2 hours).
• While rinsing out the boiler, never fill it directly under the tap.
• If you lose or damage the boiler rinse cap, have it replaced by an approved Service Centre.
• Never immerse your steam generator in water or any other liquid. Never hold it under the water tap.
• The appliance must not be used if it has fallen to the floor, shows evidence of damage, leaks or fails to function correctly.
Never dismantle your appliance. To avoid any danger, have it inspected in an approved service centre.
ENVIRONMENT PROTECTION FIRST !
Your appliance contains valuable materials which can be recovered or recycled.
Leave it at a waste disposal centre.
1800111787 GTA2 GV81XX.qxd:1800111787 GTA2 GV81XX 19/11/08 14:52 Page 8

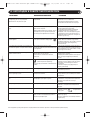
14- IS THERE A PROBLEM ?
PROBLEMS POSSIBLE CAUSES SOLUTIONS
Never dismantle your iron : always take it to an Approved Service Centre
HELPLINE
If you have any product problems or queries with your product, please telephone our Customer
Relations team on : 0845 6021454 (UK) (Calls charged at local rate) - (01) 4751947 (Ireland)
Consult our web site: www.tefal.co.uk
• The thermostat light and the on/off switch
are not illuminated.
• The appliance is not switched on. • Check that your appliance is correctly
plugged in and press the illuminated on/off
switch (on the side of the base-unit).
• Water runs through the holes in the
soleplate.
• You are using the steam control button
before the iron is hot enough.
• Water has condensed in the pipes because
you are using steam for the first time or you
have not used it for some time.
• Over use of the turbo steam function
(which has cooled down the iron).
• Decrease the steam output while ironing at
low temperature (steam output control dial
on the control panel).
• Wait for the thermostat light to go out
before activating the steam control button.
• Press the steam control button away from
your ironing board until the iron produces
steam.
• Stop using the turbo steam function and
allow the thermostat light to come on and go
off again before using this function again.
• White streaks come through the holes in the
soleplate.
• Your boiler has a build-up of scale
because it has not been rinsed out
regularly.
• Rinse out the boiler after every 10 uses,
when the orange indicator light flashes (see
chapter 11). If your water is hard, increase the
frequency.
• Brown streaks come through the holes in
the soleplate and stain the linen.
• You are using chemical descaling agents or
additives in the water for ironing.
• Your linen is not rinsed sufficiently or you
have ironed a new garment before washing it.
• Never add this type of product in the
removable water tank or in the boiler (see our
recommendations regarding water to be used).
• Ensure linen is rinsed thoroughly to remove
any soap deposits or chemicals on new garments
which have been sucked up by the iron.
• The soleplate is dirty or brown and may
stain the linen.
• You are ironing at too high a temperature.
• You are using starch.
• See our recommendations regarding
temperature control setting.
• Always spray starch on the reverse side of
the fabric to be ironed.
• There is little or no steam. • The removable water tank is empty
(red “water tank empty” light on).
• The steam output control dial is set
at minimum.
• Fill the removable water tank and press the
“Restart” button located on the control panel.
• Increase the steam output (control dial on
the control panel).
• You have filled the tank but there is no
steam.
• The tank is not properly in place. • Check that the water tank is pushed firmly
into place (see section 3).
• The red “removable water tank empty” light
is on.
• You have not pressed the “Restart” button. • Press the “Restart” button on the control
panel.
• Steam escapes from the rinse plug. • The rinse plug has not been tightened
correctly.
• The rinse plug seal is damaged.
• Tighten the rinse plug correctly.
• Contact an Approved Service Centre to
order a new rinse plug seal.
• Steam escapes under the appliance. • The generator is faulty. • Stop using the generator and contact an
Approved Service Centre.
• The power cord does not fully retract. • The power cord has lost tension during
retraction.
• Pull the power cord out completely.
Press the button and guide the cord
with your free hand.
• Water streaks appear on the linen. • Your ironing table is saturated with water
because it is suited for the power of a
generator.
• Check that your ironing table is suitable
(gridded board which prevents condensing).
1800111787 GTA2 GV81XX.qxd:1800111787 GTA2 GV81XX 19/11/08 14:52 Page 9

1- DECOUVREZ VOTRE GENERATEUR DE VAPEUR
F
Tableau de Bord
Commande vapeur
Commande Turbo
(selon modèle)
Curseur de réglage
de température du fer
Réservoir
d’eau
amovible
Volet
de remplissage
du réservoir
d’eau amovible
Plaque
repose-fer
Arceau de maintien du
fer sur le boîtier
Bouchon d’accès à la chaudière
pour la vidange et clip d’accrochage
du cordon vapeur
Cordon
vapeur
fer-boîtier
Espace de rangement
du cordon électrique
Bouton de réglage
du débit vapeur
Voyant orange :
“Vidange de
la chaudière”
Voyant rouge :
“Réservoir d’eau
amovible vide”
Touche “Restart”
de redémarrage
Voyant du fer
Chaudière
(à l’intérieur du boîtier)
Poignées d’extraction et
de remise en place du
réservoir d’eau amovible
Touche enrouleur
de cordon électrique
Interrupteur
lumineux
marche/arrêt O/I
Voyant vert :
“appareil prêt”
1800111787 GTA2 GV81XX.qxd:1800111787 GTA2 GV81XX 19/11/08 14:52 Page 10

2- SYSTEME DE VERROUILLAGE DU FER SUR LE SOCLE -
« LOCK – SYSTEM »
• Votre appareil a été conçu pour fonctionner avec l’eau du robinet.
• N’utilisez jamais d’eau contenant des additifs (amidon, parfum, substances aromatiques, adoucissant, etc.), ni
de l’eau de batterie ou de condensation (par exemple l’eau des séchoirs à linge, l’eau des réfrigérateurs, l’eau
des climatiseurs, l’eau de pluie). Elles contiennent des déchets organiques ou des éléments minéraux qui se
concentrent sous l’effet de la chaleur et provoquent des crachements, des coulures brunes ou un
vieillissement prématuré de votre appareil.
Si votre eau est très calcaire, mélangez 50 % d’eau du robinet et 50 % d’eau
déminéralisée du commerce.
3- PREPAREZ VOTRE GENERATEUR
1. Pour transporter votre générateur de vapeur par la poignée du fer :
- posez le fer sur la plaque repose-fer du générateur et rabattez l’arceau de maintien sur le fer
jusqu’à l’enclenchement du verrouillage (identifié par un « clic » sonore) (1),
- saisissez le fer par la poignée pour transporter votre générateur (2).
2. Placez le générateur sur un emplacement stable et horizontal ne craignant pas la chaleur.
3. Retirez le réservoir d’eau amovible à l’aide des poignées en le tirant horizontalement (3).
4. Remplissez le réservoir d’eau sans dépasser le niveau Max. (4)
5. Remettez le bien à fond dans son logement. (5)
Quelle eau utiliser ?
CLIC
1 2 3 4 5
CLIC
Votre générateur de vapeur
est équipé d’un arceau
de verrouillage
du fer sur son boîtier
pour faciliter
le transport et
le rangement.
DéverrouillerVerrouiller
1800111787 GTA2 GV81XX.qxd:1800111787 GTA2 GV81XX 19/11/08 14:52 Page 11

4- METTEZ VOTRE GENERATEUR EN MARCHE
1. Pousser l’arceau de verrouillage vers l’avant pour dégager le fer
(6).
2. Sortez complètement le cordon (7) et branchez la prise.
3. Allumez l’interrupteur lumineux marche/arrêt situé sur le côté du boîtier (a):
le voyant vert situé sur le tableau de bord clignote et la chaudière chauffe (b).
Quand le voyant vert reste allumé (après 2 minutes environ), la vapeur est prête (8).
• Durant la première utilisation, il peut se produire un dégagement de fumée et une
odeur sans nocivité. Ce phénomène sans conséquence sur l’utilisation de l’appareil
disparaîtra rapidement.
(a)
(b)
6 7 8
• Placez le curseur de réglage de température du fer sur le type de tissu à
repasser (voir tableau + 9).
• Le voyant du fer s’allume. Attention : l’appareil est prêt lorsque le voyant du
fer s’éteint et que le voyant vert situé sur le tableau de bord reste fixe.
• Réglez le débit de vapeur (bouton de réglage situé sur le tableau de
bord - 10).
• Pendant le repassage, le voyant situé sur le fer et le voyant vapeur prête
s’allument et s’éteignent selon les besoins de chauffe, sans incidence sur
l’utilisation.
• Pour obtenir de la vapeur, appuyez sur la commande vapeur située sous la poignée du fer (11).
La vapeur s’arrête en relâchant la commande.
• Après une minute environ, et régulièrement à l’usage, la pompe électrique équipant votre appareil
injecte de l’eau dans la chaudière. Cela génère un bruit qui est normal.
• Si vous utilisez de l’amidon, pulvérisez-le à l’envers de la face à repasser.
Evitez de poser le fer sur un repose-fer métallique, ce qui pourrait l’abîmer. Reposez le plutôt sur
la plaque repose-fer du boîtier : elle est équipée de patins anti-dérapants et a été conçue pour
résister à des températures élevées.
6- POUR REPASSER A LA VAPEUR
5- FONCTIONNEMENT DU TABLEAU DE BORD
• Voyant vert clignote : la chaudière chauffe.
• Voyant vert allumé : la vapeur est prête.
• Voyant rouge “réservoir d’eau” allumé :
le réservoir est vide.
• Voyant orange “vidange de la chaudière” clignote :
vous devez rincer votre chaudière.
Attention : l’appareil doit être froid
(voir paragraphe 11).
• Touche “Restart” :
- A actionner après chaque remplissage du réservoir
d’eau pour redémarrer le repassage
(voir paragraphe 7)
- A actionner après chaque vidange de la chaudière
(voir paragraphe 11).
linen
cotton
l
in
coton
laine
soie
synth.
wool
silk
synthetic
9 10
11
1800111787 GTA2 GV81XX.qxd:1800111787 GTA2 GV81XX 19/11/08 14:52 Page 12

8- POUR DEFROISSER VERTICALEMENT
1. Réglez le curseur de température du fer et le bouton de débit vapeur situé sur le tabl
eau de bord sur la position maxi.
2. Suspendez le vêtement sur un cintre et tendez légèrement le tissu d’une main.
La vapeur produite étant très chaude, ne défroissez jamais un vêtement sur une
personne, mais toujours sur un cintre.
3. Le fer étant en position verticale et inclinée, appuyez sur la commande vapeur (située sous
la poignée du fer) par intermittence en effectuant un mouvement de haut en bas (13).
Nos conseils : Pour les tissus autres que le lin ou le coton, maintenez
le fer à quelques centimètres afin de ne pas brûler le tissu.
Lors de la première utilisation ou si vous n’avez pas
utilisé la vapeur depuis quelques minutes :
appuyez plusieurs fois de suite sur la commande vapeur en dehors de votre linge. Cela
permettra d’éliminer l’eau froide du circuit de vapeur.
Type de tissu
Lin
Coton
●●●
Laine
Soie, Viscose
●●
Synthétique,
Polyester, Acetate,
Acrylique, Polyamide
●
Réglage du curseur
de température du fer
Réglage du bouton de
débit de vapeur
• Réglage du curseur de température du fer :
- Commencez d’abord par les tissus qui se repassent à basse température (•) et terminez par ceux qui
supportent une température plus élevée (••• ou Max).
- Si vous repassez des tissus en fibres mélangées, réglez la température de repassage sur la fibre la plus fragile.
- Si vous repassez des vêtements en laine, appuyez juste sur la commande vapeur du fer par impulsions,
sans poser le fer sur le vêtement. Vous éviterez ainsi de le lustrer.
• Réglage du bouton de débit vapeur :
- Si vous repassez un tissu épais, augmentez le débit de vapeur.
- Si vous repassez à basse température, réglez le bouton de débit vapeur sur la position mini.
R
ÉGLAGE TEMPÉRATURE ET DÉBIT VAPEUR EN FONCTION DU TYPE DE TISSU À REPASSER :
12
7-
QUAND LE VOYANT ROUGE “RESERVOIR D’EAU VIDE”
S’ALLUME
Vous n’avez plus de vapeur. Le réservoir d’eau amovible est vide.
1. Retirez le réservoir d’eau amovible à l’aide des poignées en le tirant horizontalement et
remplissez-le.
2. Remettez-le bien à fond dans son logement.
3. Appuyez sur la touche “restart” de redémarrage, située sur le tableau de bord, pour poursuivre
votre repassage (12).
linen
cotton
lin
coton
laine
soie
synth.
wool
silk
synthetic
linen
cotton
lin
coton
laine
soie
synth.
wool
silk
synthetic
linen
cotton
lin
coton
laine
soie
synth.
wool
silk
synthetic
13
1800111787 GTA2 GV81XX.qxd:1800111787 GTA2 GV81XX 19/11/08 14:52 Page 13

11. QUAND LE VOYANT ORANGE
“VIDANGE DE LA CHAUDIERE” CLIGNOTE
1. POUR RINCER LA CHAUDIERE AVEC L’ACCESSOIRE DE VIDANGE
Attention :
Pour prolonger l’efficacité de votre chaudière et éviter les rejets de tartre, votre générateur
est équipé d’un voyant orange “vidange de la chaudière” qui clignote sur le tableau de bord
au bout d’environ 10 utilisations.
• Si votre eau est calcaire, augmentez les fréquences de vidange de la chaudière.
• Surtout, n’utilisez pas de produits détartrants pour rincer la chaudière : ils pourraient l’endommager.
Pour une plus grande efficacité et pour faciliter c
ette opération,
nous vous conseillons d’utiliser l’accessoire de vidange mis à votre
disposition dans l’emballage.
Il vous facilitera le rinçage de la chaudière en limitant les
manipulations du générateur.
Votre accessoire de vidange a été conçu pour fonctionner sur le plus grand nombre de robinets.
Vous avez à votre disposition 2 types de membranes (a) (b). Choisissez celle qui est la mieux adaptée à votre robinet.
Avant de procéder à la vidange de votre générateur, il est impératif de le laisser refroidir pendant
plus de 2 heures, pour éviter tout risque de brûlure.
Si le voyant orange “vidange de la chaudière” clignote, vous pouvez continuer votre séance de repassage normalement, mais
pensez à rincer votre chaudière avant la prochaine utilisation.
9- FONCTION TURBO (selon modèle)
Donnez 2 ou 3 impulsions sur la commande turbo (14) pour obtenir ponctu
ellement un surplus
de vapeur :
• pour repasser les tissus plus épais,
• pour éliminer les faux plis,
• pour un défroissage vertical puissant.
Attention : Utilisez la fonction turbo avec précaution car la puissance
exceptionnelle de la vapeur peut occasionner des brûlures.
10- POUR ENTRETENIR VOTRE GENERATEUR
•
Avant tout entretien, assurez-vous que l’appareil est débranché et que la semelle et la plaque
repose-fer sont froides.
• N’utilisez aucun produit d’entretien ou de détartrage pour nettoyer la semelle ou le boîtier.
• Ne passez jamais le fer ou son boîtier sous l’eau du robinet.
1. Videz et rincez le réservoir d’eau amovible (15).
2. Nettoyez régulièrement la semelle en utilisant un grattoir à vaisselle non-métallique humide.
3. Nettoyez de temps en temps les parties plastiques de l’appareil à l’aide d’un chiffon
doux légèrement humide.
15
14
(a)
(b)
1
2
1800111787 GTA2 GV81XX.qxd:1800111787 GTA2 GV81XX 19/11/08 14:52 Page 14

1. Posez le fer sur la plaque repose-fer du générateur.
2. Eteignez l’interrupteur marche / arrêt O/I et débranchez la prise.
3. Rabattez l’arceau de maintien sur le fer jusqu’à l’enclenchement du verrouillage (identifié par un « clic » sonore). (21).
Votre fer sera ainsi bloqué en toute sécurité sur son
boîtier.
Attention de ne pas toucher la semelle
encore chaude.
4. Remettez le cordon électrique en place (22).
5. Laissez refroidir le fer (et la plaque
repose-fer) pendant 30 minutes.
6. Vous pouvez ranger votre générateur
de vapeur en le transportant par la poignée
du fer (23).
12- POUR RANGER LE GENERATEUR
Si vous ne souhaitez pas ou si vous ne pouvez pas ut
iliser l’accessoire de vidange,
reportez-vous à nos conseils en paragraphe 11 ci-dessous
1I. POUR RINCER LA CHAUDIÈRE SANS L’ACCESSOIRE DE VIDANGE
Avant de procéder à la vidange de votre générateur, il est impératif de le laisser refroidir
pendant plus de 2 heures, pour éviter tout risque de brûlure.
Si le voyant orange “vidange de la chaudière” clignote, vous pouvez continuer votre séance de repassage
normalement,
mais pensez à rincer votre chaudière avant la prochaine utilisation.
1.
L’appareil doit être débranché et froid.
2. Placez le générateur de vapeur sur le rebord de votre évier, et le fer à côté sur son talon.
3. Dévissez le clip cordon en faisant 1/4 de tour vers la gauche.
4. A l’aide d’une pièce de monnaie, dévissez
doucement
le bouchon de vidange de la chaudière.
5. Maintenez votre générateur de vapeur en position inclinée, et avec une carafe, remplissez
la chaudière d’1/4 de litre d’eau du robinet.
6. Remuez le boîtier quelques instants puis videz le complètement au-dessus de votre évier.
Nous vous conseillons de renouveler cette opération une deuxième fois pour
obtenir un bon résultat.
7.
Revissez et serrez le bouchon de vidange de la chaudière avec la pièce de monnaie.
8.
Remettez le clip cordon en place.
9.
Lors de la prochaine utilisation, appuyez sur la touche “Restart”
pour éteindre le voyant orange.
1. L’appareil doit être débranché et froid.
2. Placez le générateur de vapeur sur le rebord de votre évier, le fer à côté sur son talon.
3. Dévissez le clip cordon en faisant 1/4 de tour vers la gauche (16).
4. A l’aide d’une pièce de monnaie, dévissez doucement le bouchon de vidange de la chaudière (17).
5. Placez l’embout en plastique du tuyau de vidange dans l’orifice de la chaudière et tournez
légèrement sur la droite jusqu’à l’enclenchement. La sortie de cet embout
doit se situer au-dessus de l’évier (18).
6. Raccordez l’embout en caoutchouc du tuyau de vidange à votre robinet (19).
7. Ouvrez progressivement et modérément votre robinet et laissez
l’eau froide s’écouler dans l’évier à travers le tuyau de vidange pendant
environ 1 minute (20).
8. Fermez votre robinet et enlevez le tuyau de vidange.
9. Revissez et serrez le bouchon de vidange de la chaudière
avec la pièce de monnaie.
10. Remettez le clip cordon en place.
11. Lors de la prochaine utilisation, appuyez sur la touche
“Restart” pour éteindre le voyant orange.
1
2
16
18
17
19 20
CLIC
21 22 23
1800111787 GTA2 GV81XX.qxd:1800111787 GTA2 GV81XX 19/11/08 14:52 Page 15

PARTICIPONS À LA PROTECTION DE L’ENVIRONNEMENT !
Votre appareil contient de nombreux matériaux valorisables ou recycl
ables.
Confiez celui-ci dans un point de collecte ou à défaut dans un centre service agrée pour que son traitement soit
effectué.
13- CONSEILS POUR VOTRE SECURITE
• Lisez attentivement le mode d’emploi avant la première utilisation de votre appareil : une utilisation non conforme au mode
d’emploi dégagerait la marque de toute responsabilité.
• Pour votre sécurité, cet appareil est conforme aux normes et réglementations applicables (Directives Basse Tension,
Compatibilité Electromagnétique, Environnement …).
• Votre générateur est un appareil électrique : il doit être utilisé dans des conditions normales d’utilisation. Il est prévu pour un
usage domestique uniquement.
• Il est équipé de 2 systèmes de sécurité :
- une soupape évitant toute surpression, qui en cas de dysfonctionnement, laisse échapper le surplus de vapeur,
- un fusible thermique pour éviter toute surchauffe.
• Branchez toujours votre générateur :
- sur une installation électrique dont la tension est comprise entre 220 et 240 V.
- sur une prise électrique de type «terre».
Toute erreur de branchement peut causer un dommage irréversible et annule la garantie.
Si vous utilisez une rallonge, vérifiez que la prise est bien de type bipolaire I0A avec conducteur de terre.
• Déroulez complètement le cordon électrique avant de le brancher sur une prise électrique de type terre.
• Si le cordon d’alimentation électrique ou le cordon vapeur est endommagé, il doit être impérativement remplacé par un
Centre Service Agréé afin d’éviter un danger.
• Ne débranchez pas l’appareil en tirant sur le cordon.
Débranchez toujours votre appareil :
- avant de remplir le réservoir ou de rincer la chaudière,
- avant de le nettoyer,
- après chaque utilisation.
• L’appareil doit être utilisé et posé sur une surface stable. Lorsque vous posez le fer sur le repose-fer, assurez-vous que la
surface sur laquelle vous le reposez est stable.
• Cet appareil n’est pas prévu pour être utilisé par des personnes (y compris les enfants) dont les capacités physiques,
sensorielles ou mentales sont réduites, ou des personnes dénuées d’expérience ou de connaissance, sauf si elles ont pu
bénéficier, par l’intermédiaire d’une personne responsable de leur sécurité, d’une surveillance ou d’instructions préalables
concernant l’utilisation de l’appareil. Il convient de surveiller les enfants pour s’assurer qu’ils ne jouent pas avec l’appareil
• Il convient de surveiller les enfants pour s’assurer qu’ils ne jouent pas avec l’appareil.
• Ne laissez jamais l’appareil sans surveillance :
- lorsqu’il est raccordé à l’alimentation électrique,
- tant qu’il n’a pas refroidi environ 1 heure.
• La semelle de votre fer et la plaque repose-fer du boîtier peuvent atteindre des températures très élevées, et peuvent
occasionner des brûlures : ne les touchez pas.
Ne touchez jamais les cordons électriques avec la semelle du fer à repasser.
• Votre appareil émet de la vapeur qui peut occasionner des brûlures.
Manipulez le fer avec précaution, surtout en repassage vertical.
Ne dirigez jamais la vapeur sur des personnes ou des animaux.
• Avant de vidanger la chaudière, attendez toujours que le générateur soit froid et débranché depuis plus de 2 heures pour
dévisser le bouchon de vidange.
• Lors du rinçage de la chaudière, ne la remplissez jamais directement sous le robinet.
• Si vous perdez ou abîmez le bouchon de vidange, faites-le remplacer dans un Centre Service Agréé.
• Ne plongez jamais votre générateur dans l’eau ou tout autre liquide. Ne le passez jamais sous l’eau du robinet.
• L’appareil ne doit pas être utilisé s’il a chuté, s’il présente des dommages apparents, s’il fuit ou présente des anomalies de
fonctionnement.
Ne démontez jamais votre appareil : faites-le examiner dans un Centre Service Agréé, afin d’éviter un danger.
1800111787 GTA2 GV81XX.qxd:1800111787 GTA2 GV81XX 19/11/08 14:52 Page 16

14- UN PROBLEME AVEC VOTRE GENERATEUR
PROBLÈMES CAUSES POSSIBLES SOLUTIONS
S’il n’est pas possible de déterminer la cause d’une panne, adressez-vous à un Centre de Service Après-Vente agréé.
• Le générateur ne s’allume pas.
• Le voyant du fer et l’interrupteur lumineux
marche/arrêt ne sont pas allumés.
. L’appareil n’est pas sous tension. • Vérifiez que l’appareil est bien branché et
appuyez sur l’interrupteur lumineux
marche/arrêt (situé sur le côté du boîtier).
• L’eau coule par les trous de la semelle. • Vous utilisez la commande vapeur alors que
votre fer n’est pas suffisamment chaud.
• L’eau s’est condensée dans les tuyaux car
vous utilisez la vapeur pour la première fois
ou vous ne l’avez pas utilisée depuis quelques
temps.
• Diminuez le débit de vapeur lorsque vous
repassez à basse température (bouton de
réglage situé sur le tableau de bord).
• Attendez que le voyant du fer soit éteint
avant d’actionner la commande vapeur.
• Appuyez sur la commande vapeur en dehors
de votre table à repasser, jusqu’à ce que le fer
émette de la vapeur.
• Des coulures blanches sortent des trous de
la semelle.
• Votre chaudière rejette du tartre
car elle n’est pas rincée
régulièrement.
• Rincez la chaudière toutes les 10 utilisations
lorsque le voyant orange clignote. (Voir
chapitre 11). Si votre eau est calcaire,
augmentez les fréquences.
• Des coulures brunes sortent des trous de la
semelle et tachent le linge.
• Vous utilisez des produits chimiques
détartrants ou des additifs dans l’eau de
repassage.
• N’ajoutez jamais aucun produit dans le
réservoir d’eau amovible ou dans la chaudière
(voir nos conseils sur l’eau à utiliser).
• La semelle est sale ou brune et peut tacher
le linge.
• Vous utilisez une température trop
importante.
• Votre linge n’est pas suffisamment bien rincé
ou vous utilisez de l’amidon.
• Reportez-vous à nos conseils sur le réglage
des températures.
• Pulvérisez toujours l’amidon sur l’envers de
la face à repasser.
• Il y a peu de vapeur. • Le réservoir d’eau amovible est
vide. (voyant rouge allumé).
• Le débit de vapeur est réglé au minimum.
• Remplissez le réservoir d’eau amovible et
appuyez sur la touche “restart” de
redémarrage située sur le tableau de bord.
• Augmentez le débit de vapeur (bouton de
réglage sur le tableau de bord).
• Vous avez rempli votre réservoir et il n’y a
plus de vapeur.
• Le réservoir est mal emboîté. • Vérifiez que le réservoir d’eau amovible est
bien emboîté.
• Le voyant rouge “réservoir d’eau amovible
vide” est allumé.
• Vous n’avez pas appuyé sur la touche
“Restart” de redémarrage.
• Appuyez sur la touche « Restart » de
redémarrage située sur le tableau de bord.
• De la vapeur sort autour du bouchon
de vidange.
• Le bouchon de vidange est mal vissé.
• Le joint du bouchon est endommagé.
• Resserrez le bouchon de vidange.
• Contactez un Centre de Service Après-
Vente Agréé pour commander un joint de
rechange.
• De la vapeur sort en dessous de l’appareil. • L’appareil est défectueux. • N’utilisez plus le générateur et contactez un
Centre Service Agréé.
• Le cordon ne s’enroule pas totalement. • Le cordon est ralenti lors de sa rentrée. • Ressortez entièrement le cordon.
Appuyez sur la touche et accompagnez
le cordon à la main.
• Des traces d’eau apparaissent sur le linge. • Votre housse de table est saturée en eau car
elle n’est pas adaptée à la puissance d’un
générateur.
• Assurez-vous d’avoir une table adaptée
(plateau grillagé qui évite la condensation)
1800111787 GTA2 GV81XX.qxd:1800111787 GTA2 GV81XX 19/11/08 14:52 Page 17

NL
1-
DE BELANGRIJKSTE ONDERDELEN VAN UW STOOMGENERATOR
Bedieningspaneel
Stoomknop
Turbo-knop (extra stoom)
(afhankelijk van model)
Temperatuurregelaar
van het strijkijzer
Uitneembaar
waterreservoir
Vulklep om
waterreservoir
af te sluiten
Strijkijzerplateau
Systeem om het strijkijzer op de
basis te vergrendelen
Dop voor toegang tot de stoomtank,
voor het spoelen ervan en snoerklem van
het stoomsnoer
Stoomsnoer
strijkijzer-stoomtank
Opbergruimte netsnoer
Knop voor het
regelen van de
stoomhoeveelheid
Oranje lampje:
“Stoomtank
spoelen”
Rood lampje : “het afneembare
waterreservoir is leeg”
Toets “Restart”
voor opnieuw starten
Controlelampje
van het strijkijzer
Stoomtank (boiler)
Handgrepen voor
verwijdering en plaatsing
van het afneembare
waterreservoir
Knop voor opwikkeling
van het netsnoer
Aan/uit-schakelaar met
controlelampje
Groen lampje : “stoom klaar”
1800111787 GTA2 GV81XX.qxd:1800111787 GTA2 GV81XX 19/11/08 14:52 Page 18

2- SYSTEEM VOOR VERGRENDELING VAN HET STRIJKIJZER OP
HET VOETSTUK - « LOCK – SYSTEM »
CLIC
1 2 3 4 5
Uw strijkijzer is bedoeld voor gebruik met gewoon leidingwater.
• Gebruik nooit de onderstaande soorten water, zij bevatten namelijk organische afvalstoffen of mineralen die
waterdruppels, bruine vlekken, lekkage of een voortijdige slijtage van uw strijkijzer kunnen veroorzaken : puur
gedemineraliseerd water, water uit wasdrogers, geparfumeerd water, water dat verzacht is, water uit
koelkasten, accuwater, water uit airconditioners, puur gedistilleerd water en regenwater, gekookt en gefiltreerd
water, water uit flessen...
Als het water echter heel hard is, mengt u het voor de helft met gedemineraliseerd of
gedistilleerd water, dat in de handel verkrijgbaar is.
3- STOOMGENERATOR GEREEDMAKEN VOOR GEBRUIK
Welk soort water moet u gebruiken ?
1. Voor het verplaatsen van uw stoomgenerator aan de handgreep van het strijkijzer :
- plaats het strijkijzer op het plateau van de generator en klap de metalen boog op het strijkijzer tot het systeem
automatisch vergrendelt (te herkennen aan een « klik ») (1).
- neem het strijkijzer vast bij de handgreep om uw generator te verplaatsen (2).
2. Plaats de stoomgenerator op een hittebestendige, stabiele en horizontale ondergrond.
Gebruik bij voorkeur een stoomdoorlatende strijkplank.
3. Verwijder het afneembare waterreservoir met behulp van de handgrepen door dit in horizontale richting weg te trekken (3).
4. Vul het reservoir tot aan het maximumpeil (4).
5. Plaats het reservoir weer goed terug in het strijkijzer (5).
CLIC
Uw stoomgenerator is voorzien
van een vergrendelingsboog op de
houder om het apparaat gemakkelijker
te kunnen vervoeren en op te bergen.
OntgrendelenVergrendelen
1800111787 GTA2 GV81XX.qxd:1800111787 GTA2 GV81XX 19/11/08 14:53 Page 19

4- STOOMGENERATOR AANZETTEN
1. Duw de vergrendelingsboog naar voren om het strijkijzer uit te kunnen nemen (6).
2. Rol het snoer volledig uit (7) en steek de stekker in een geaard stopcontact.
3. Zet de aan/uit-schakelaar op de zijkant van het apparaat (a) aan: het groene lampje op het bedieningspaneel knippert
en de stoomtank warmt op (b). Zodra het groene lampje blijft branden (na ongeveer 2 min.) is de stoom klaar (8).
•
Tijdens het eerste gebruik kan er rook en een geur ontstaan die niet schadelijk zijn.
Dit verschijnsel, dat geen gevolgen voor het gebruik van het apparaat heeft, zal snel
verdwijnen.
(a)
(b)
6 7 8
• Stel de temperatuurregelaar van het strijkijzer in op het type stof dat u gaat
strijken (zie tabel + 9).
• Het controlelampje van het strijkijzer gaat branden. Attentie !
Het apparaat is op temperatuur wanneer het controlelampje van het strijkijzer
is gedoofd en wanneer het groene lampje op het bedieningspaneel continu
brandt.
• Regel de hoeveelheid stoom door middel van de knop op het
bedieningspaneel (10).
• Tijdens het strijken gaan de controlelampjes van het strijkijzer en van de stoom aan en uit, afhankelijk
van de verwarmingsbehoeften.
• Om stoom te krijgen, houdt u de stoomknop bovenop de handgreep van het strijkijzer
ingedrukt (11). Zodra u deze stoomknop loslaat, stopt de stoom.
• Na ongeveer één minuut, en regelmatig tijdens het gebruik, spuit de elektrische pomp van uw
apparaat water in de stoomtank (boiler). Dit veroorzaakt een geluid dat normaal is en het strijkijzer
geeft tijdelijk minder stoom.
• Indien u stijfsel gebruikt, dient u dit aan de achterzijde van de te strijken stof te verstuiven.
Het strijkijzer niet op een metalen plateau plaatsen omdat de zool zou kunnen beschadigen.
Zet het strijkijzer liever op het strijkijzerplateau van de stoomtank : deze is voorzien van
anti-slipprofiel en is speciaal ontwikkeld voor hoge temperaturen.
6- STRIJKEN MET STOOM
5- BEDIENINGSPANEEL
• Toets « Restart » :
- Inschakelen na iedere keer vullen van het
reservoir met water om opnieuw te gaan strijken
(zie paragraaf 7)
- Inschakelen iedere keer na het omspoelen van de
stoom-tank (zie paragraaf 11).
• Groen lampje knippert : het water in de stoomtank (boiler)
wordt verwarmd.
• Groen lampje brandt continu :
de stoom is klaar.
• Rood lampje brandt continu :
het waterreservoir is leeg.
• Oranje controlelampje « stoomtank spoelen » knippert :
u moet de stoomtank omspoelen.
Let op: het apparaat moet hierbij koud zijn
(zie paragraaf 11).
linen
cotton
lin
coton
laine
so
ie
synth.
wool
silk
synthetic
9 10
11
1800111787 GTA2 GV81XX.qxd:1800111787 GTA2 GV81XX 19/11/08 14:53 Page 20
Sidan laddas ...
Sidan laddas ...
Sidan laddas ...
Sidan laddas ...
Sidan laddas ...
Sidan laddas ...
Sidan laddas ...
Sidan laddas ...
Sidan laddas ...
Sidan laddas ...
Sidan laddas ...
Sidan laddas ...
Sidan laddas ...
Sidan laddas ...
Sidan laddas ...
Sidan laddas ...
Sidan laddas ...
Sidan laddas ...
Sidan laddas ...
Sidan laddas ...
Sidan laddas ...
Sidan laddas ...
Sidan laddas ...
Sidan laddas ...
Sidan laddas ...
Sidan laddas ...
Sidan laddas ...
Sidan laddas ...
Sidan laddas ...
Sidan laddas ...
Sidan laddas ...
Sidan laddas ...
Sidan laddas ...
Sidan laddas ...
Sidan laddas ...
Sidan laddas ...
Sidan laddas ...
Sidan laddas ...
Sidan laddas ...
Sidan laddas ...
Sidan laddas ...
Sidan laddas ...
Sidan laddas ...
Sidan laddas ...
Sidan laddas ...
Sidan laddas ...
Sidan laddas ...
Sidan laddas ...
Sidan laddas ...
Sidan laddas ...
Sidan laddas ...
Sidan laddas ...
Sidan laddas ...
Sidan laddas ...
Sidan laddas ...
Sidan laddas ...
Sidan laddas ...
Sidan laddas ...
Sidan laddas ...
Sidan laddas ...
Sidan laddas ...
Sidan laddas ...
Sidan laddas ...
Sidan laddas ...
Sidan laddas ...
Sidan laddas ...
Sidan laddas ...
Sidan laddas ...
Sidan laddas ...
Sidan laddas ...
-
 1
1
-
 2
2
-
 3
3
-
 4
4
-
 5
5
-
 6
6
-
 7
7
-
 8
8
-
 9
9
-
 10
10
-
 11
11
-
 12
12
-
 13
13
-
 14
14
-
 15
15
-
 16
16
-
 17
17
-
 18
18
-
 19
19
-
 20
20
-
 21
21
-
 22
22
-
 23
23
-
 24
24
-
 25
25
-
 26
26
-
 27
27
-
 28
28
-
 29
29
-
 30
30
-
 31
31
-
 32
32
-
 33
33
-
 34
34
-
 35
35
-
 36
36
-
 37
37
-
 38
38
-
 39
39
-
 40
40
-
 41
41
-
 42
42
-
 43
43
-
 44
44
-
 45
45
-
 46
46
-
 47
47
-
 48
48
-
 49
49
-
 50
50
-
 51
51
-
 52
52
-
 53
53
-
 54
54
-
 55
55
-
 56
56
-
 57
57
-
 58
58
-
 59
59
-
 60
60
-
 61
61
-
 62
62
-
 63
63
-
 64
64
-
 65
65
-
 66
66
-
 67
67
-
 68
68
-
 69
69
-
 70
70
-
 71
71
-
 72
72
-
 73
73
-
 74
74
-
 75
75
-
 76
76
-
 77
77
-
 78
78
-
 79
79
-
 80
80
-
 81
81
-
 82
82
-
 83
83
-
 84
84
-
 85
85
-
 86
86
-
 87
87
-
 88
88
-
 89
89
-
 90
90


Tefal GV8110D0 Användarmanual
- Kategori
- Ångstrykningsstationer
- Typ
- Användarmanual
på andra språk
- italiano: Tefal GV8110D0 Manuale utente
- Deutsch: Tefal GV8110D0 Benutzerhandbuch
- français: Tefal GV8110D0 Manuel utilisateur
- English: Tefal GV8110D0 User manual
- dansk: Tefal GV8110D0 Brugermanual
- русский: Tefal GV8110D0 Руководство пользователя
- suomi: Tefal GV8110D0 Ohjekirja
- Nederlands: Tefal GV8110D0 Handleiding