Silvercrest SFR 1200 A1 Operation and Safety Notes
- Kategori
- Rakapparater för kvinnor
- Typ
- Operation and Safety Notes

Men‘s Electric Shaver SFR 1200 A1
PerSOnaL Care
Herren-Rasierer (Akku / Netz)
Bedienungs- und Sicherheitshinweise
Men‘s Electric Shaver
Operation and Safety Notes
Miesten akku- ja verkkokäyttöinen
partakone
Käyttö- ja turvaohjeet
Rakapparat, herr (sladdlös / nät)
Bruksanvisning och säkerhetsanvisningar
Barbermaskine (batteri / el)
Brugs- og sikkerhedsanvisninger
3

GB/IE Operation and Safety Notes Page 5
FI Käyttö- ja turvaohjeet Sivu 13
SE Bruksanvisning och säkerhetsanvisningar Sidan 21
DK Brugs- og sikkerhedsanvisninger Side 29
DE / AT / CH Bedienungs- und Sicherheitshinweise Seite 37
Before reading, unfold the page containing the illustrations and familiarise yourself with all functions of
the device.
Käännä ennen lukemista kuvallinen sivu esiin ja tutustu seuraavaksi laitteen kaikkiin toimintoihin.
Vik ut bildsidan och ha den till hands när du läser igenom anvisningarna och gör dig bekant med produktens
funktioner.
Klap siden med illustrationerne ud inden De læser og gør Dem frotroligt med alle apparatets funktioner.
Klappen Sie vor dem Lesen die Seite mit den Abbildungen aus und machen Sie sich anschließend mit allen
Funktionen des Gerätes vertraut.

1 2 3 4 5
8
10
7
6
5
11
12
9

A
B C
D E

5 GB/IE
Introduction
Intended use .......................................................................................................................................................... Page 6
Scope of delivery ................................................................................................................................................. Page 6
Description of parts ............................................................................................................................................. Page 6
Technical data ...................................................................................................................................................... Page 7
Safety
General safety instructions ................................................................................................................................ Page 7
In order to avoid experiencing a life-threatening electric shock, the following must be observed .........Page 7
In order to ensure that your shaver works perfectly, please observe the following ........................... Page 8
Before first use
Operating the shaver using the AC adaptor plug ...................................................................................... Page 8
Charging the rechargeable batteries ............................................................................................................. Page 8
Using the safety lock-out .................................................................................................................................... Page 9
Use
Foil shave (dry shave) ......................................................................................................................................... Page 9
Wet shave .............................................................................................................................................................. Page 10
Trimmer ................................................................................................................................................................... Page 10
3-day beard attachment .................................................................................................................................... Page 10
Cleaning and maintenance
Cleaning ................................................................................................................................................................. Page 10
Maintenance ......................................................................................................................................................... Page 11
Disposal
Removal of rechargeable batteries ................................................................................................................. Page 11
Warranty and service ......................................................................................................................... Page 12
Conformity ....................................................................................................................................................... Page 12
Table of Contents

6 GB/IE
Introduction
Men’s Electric Shaver
Introduction
Dear Customer,
We would like to thank you for your purchase and
hope you will enjoy using your new Wet & Dry
Men‘s Electric Shaver.
This shaver has a three-way shaving system with
two spring-mounted, counter-oscillating cutters with
an integrated trimmer, a combination which ensures
the best shaving performance for all hair types.
The protective cap can also be used as a 3-day
beard attachment. The device can be used for dry
or wet shaving (Wet & Dry function). The wide input
voltage range (100–240 V
~
) of the plug-in mains
adapter makes the shaver ideal for use when
travelling.
These instructions will help you familiarise yourself
with your shaver and make it easier for you to use it.
Please read the directions for use through carefully
before you start using your shaver and keep them
in a safe place for future reference.
You must follow the safety instructions to avoid
causing any accidents, injuries or damage.
Intended use
The razor is intended for private use only and its use
has not been approved for commercial purposes. It
is only designed for shaving facial hair. The guarantee
expires if it is used for purposes other than intended.
Scope of delivery
1 Shaver
1 Protective cap
1 AC adaptor plug with flex
1 Travel pouch with zip
1 Cleaning brush
1 Directions for use
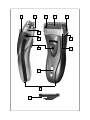
Description of parts
1
Long hair trimmer
2
Protective cap = 3-day beard attachment
3
Shaving foil frame
4
Shaving foil
5
Release button for foil frame
6
Release button for shaving head
7
ON / OFF switch
8
Spring-loaded pop-up hinge for shaver head
9
Shaver head
10
Charge monitor with power indicator
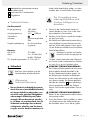
The following pictograms are used in these operating instructions / on the device:
Read instruction manual!
V
Direct current
(Type of current and voltage)
Observe caution and safety notes!
Keep children and other unauthorised
personnel at a safe distance when using
electrical tools.
Caution – electric shock! Dangerous
electric current – Danger to life!
Suitable for cleaning under running water.
V
~
Volt (AC)
Dispose packaging and appliance in an
environmentally-friendly way!

7 GB/IE
Introduction / Safety
11
Input socket for plug-in mains adapter
12
Cutter set
Technical data
Plug-in mains adapter:
Input voltage: 100–240 V
~
, 50 / 60 Hz
Output voltage: 4.5 V
, 1000 mA
Protection class:
Protection type: Splash water protected, IP44
Ambient conditions: For indoor use only
Shaver:
L&P Art. No.: 9113058
Rechargeable
batteries: 2 x 1.2 V HR6 (AA) Ni-MH,
1200 mAh
Permissible ambient
temperature range: 0 °C to +40 °C
Safety
Please read these instructions carefully
before using this shaver.
General safety
instructions
This device is not designed to be used
by people (including children) with
limited physical, sensory or mental
abilities or by those who lack the ex-
perience and / or knowledge to use it,
unless they are supervised by a per-
son responsible for ensuring safety or
receive instructions from such person
regarding how to use the device. Chil-
dren should be supervised in order to ensure
that they do not play with the device.
In order to avoid
experiencing a life-
threatening electric
shock, the following
must be observed
Never take hold of the AC adaptor plug with wet
hands when you are inserting it or removing it
from the socket.
Only use the device in line with the specifications
on the type plate.
The installation of a residual-current-operated
protective device (RCD) with a design tripping
current of not more than 30 mA offers more
protection. Installation of such a device should
only be carried out by a certified electrician.
Please keep the shaver and AC
adaptor plug out of the reach of
children.
Switch the device off immediately after using it.
Take hold of the AC adaptor plug when pulling
it out of the socket.
CAUTION! RISK OF ELECTRIC SHOCK!
The device and AC adaptor plug are not water-
proof and may not be operated under the
shower or in the bath. Before cleaning the cutting
parts under running water, the shaver must be
disconnected from the flex. When cleaning the
shaving foil
4
, the shaver must not be fully im-
mersed into water. You can clean the casing
with a damp cloth.
CAUTION! RISK OF ELECTRIC SHOCK!
Keep the AC adaptor plug and the flex dry at
all times.
If the device has fallen into water, you must pull
the AC adaptor plug out of the socket before
putting your hand into the water.

8 GB/IE
Safety / Before first use
In order to ensure that
your shaver works
perfectly, please observe
the following
Never expose your shaver to temperatures below
0 °C or above +40 °C. Do not place the shaver
down on radiators or fan heaters.
Always make sure that the flex does not get
jammed in cupboard doors or is pulled over
hot surfaces.
Do not use a screwdriver or pliers to change
the cutter set
12
. This will damage the shaving
foil
4
.
Please use only the original AC adaptor plug
supplied with your shaver for mains operation.
Insert the plug only into a socket within easy
reach. In order to avoid inadmissible overheating,
do not cover the AC adaptor plug.
Please check the AC adaptor plug and shaver
for any mechanical faults at regular intervals.
Replace faulty parts with an original part if
possible (see your specialist dealer). Never try
to repair a faulty appliance yourself! Repairs
should only be carried out by a specialist
dealer or by our service centre (see section
“Warranty and service”).
Used or defective rechargeable bat-
teries must not be disposed of with
the usual domestic waste! Always
take your used rechargeable batteries to the
designated collection point (see section on
“Disposal”).
Before first use
CAUTION! Oil residue on the shaving foil.
Due to the manufacturing process, you may find
some oil residue still on the shaving foil when
you unpack the razor. Remove the oil with an
absorbent, lint-free cloth before starting the
device for the first time.
The shaver can be used as a battery-operated or
mains-operated device.
Operating the shaver using the
AC adaptor plug
CAUTION! RISK OF ELECTRIC SHOCK!
Never touch the device with wet hands when it
is connected to the mains supply.
First insert the connection lead of the plug-in
mains adapter into the input socket for the
plug-in mains adapter
11
on the underside of
the device and insert the plug-in mains adapter
into the mains socket. The device is ready for
immediate use.
Charging the rechargeable
batteries
The shaver has two high-capacity Ni-MH recharge-
able batteries with overcharge protection. The
batteries can be recharged without undergoing
a reduction in performance. There is no risk of over-
charging them.
Note: Allowing the rechargeable batteries to be
completely discharged before recharging them will
increase their overall service life. To completely
discharge the batteries, run the device until the
charge reduces to 20 % and the LED starts to flash
red (indicating that a recharge is necessary).
The rechargeable battery in the shaver should be
charged for at least 120 minutes before the shaver
is used for the first time. For subsequent recharging
processes, a charging time of about 90 minutes is
adequate. Proceed as follows to charge the batteries:
Switch off the device. Slide the ON / OFF
switch
7
downwards.
Connect the connection lead of the plug-in mains
adapter to the input socket for the plug-in mains
adapter
11
on the shaver. The device begins
the charging process.

9 GB/IE
Before first use / Use
Note: The green light-emitting diodes (LEDs)
of the charge indicator
10
on the front of the
shaver show the present charge state in percent.
A quick-charge process is completed in 5 minutes.
This method of charging is adequate for one shave.
Fully charged batteries provide enough charge for
cordless operation for about 90 minutes.
If your shaver stops during shaving because a bat-
tery has run of out charge then you can continue
by connecting the shaver to the plug-in mains
adapter.
After the shaver is switched off, the indicators show
the present charge state of the batteries for a few
seconds. The LEDs flash green, starting with the
20 % charge state LED then following one after the
other, up to the present charge state. Then the
charge indicator ceases to illuminate.
Advice on battery care: Bear in mind that,
for technical reasons, the capacity of a rechargeable
battery reduces over a long period of non-use.
Therefore you should avoid long periods of non-use
and the associated interruption of the series of
charging and discharging cycles.
Using the safety lock-out
This function prevents the shaver from inadvertently
switching on during transport.
To release the safety lock-out, press the small
button on the ON / OFF switch
7
at the same
time as you switch on the device.
Use
Note:
This device can be used for dry or wet shaving
(Wet & Dry function). The best shaving performance
is obtained on dry skin. For a thorough shave, we
recommend that you first carefully wash and dry
your face and neck first.
Foil shave (dry shave)
Do not use the shaver if you have:
– skin lesions
– inflamed skin
– sunburn
– spots and blisters.
Familiarisation:
After using your shaver, you may have red or irritated
skin for a while. This is a normal reaction because
your skin has to first get used to this kind of shave.
This generally takes 2–3 weeks. Consult a doctor if
the redness or irritation continues for longer than
this period.
CAUTION! THE SHAVER IS NOT WATER-
PROOF!
Do not use under the shower or in
the bath as this could damage the appliance.
Remove the protective cap
2
from the shaver
head
9
.
Slide the ON / OFF switch
7
upwards. When
doing this press the small black button on the
ON / OFF switch
7
(safety lock-out).
Now hold the shaver upright and, using slight
pressure, guide it over the surface of the skin
against the direction of hair growth. Use your
free hand to stretch the skin on your face so
that your facial hairs stand up better. A gentle,
circular motion of the shaver head
9
helps to
shave off individual facial hairs.
The integrated long hair trimmer
1
helps to
trim long facial hair.
CAUTION! Avoid pressing too hard down on
the foil to avoid breaking it. Pressing down too
hard on the skin will also have an adverse effect
on the shaving results and can lead to skin irri-
tation.
Switching off: Push the ON / OFF button
7
downwards.
Replace the protective cap
2
to protect the
shaving foil
4
!

10 GB/IE
Use / Cleaning and maintenance
Wet shave
Use a fine-bubbled shaving foam.
CAUTION! We advise against the use of
shaving gel, as it can stick the foil
4
and the
cutter set
12
together.
Apply a thin layer of shaving foam to your
face. Shaving foam is the most suitable choice
from the wide range of available cosmetic
shaving products. Do not use a thick layer of
shaving foam, as this can detrimentally affect
the performance of the shaver.
Proceed with the shave in all other respects as
described in the section “Foil shave”.
If the shaving head
9
becomes blocked, rinse
the shaver under running water (refer to the
section “Wet cleaning”).
Trimmer
The trimmer
1
on the back of the device can be
switched on by pushing it out into the locked position.
Slide the trimmer towards the shaving head
9
as
far as it will go.
It can be used for shortening longer beard hair,
trimming contours, sideburns and walrus moustaches.
After use, slide the trimmer
1
back into its initial
position.
3-day beard attachment
The supplied protective cap
2
can be used as a
3-day beard attachment. Regular use of this attach-
ment allows you to create the effect of a three day
beard.
Note: Please note that using the 3-day beard at-
tachment produces a shave corresponding to anything
between a 3-day and a 7-day beard, depending
on the rate of growth of your beard.
Place the protective cap
2
on to the shaving
head
9
and ensure it engages. The trimmer
1
is now blocked by the protective cap
2
.
To switch on the device, slide the ON / OFF
switch
7
upwards. You can now trim your beard.
To switch off the device, slide the ON / OFF
switch
7
downwards.
Note: When you are using the protective
cap
2
as a 3-day beard attachment, the direct
contact of the foil with your skin is lost. The nat-
ural lubrication of the cutting system by the secre-
tions from your skin no longer takes place. After
each use of the 3-day beard attachment, spread
a drop of cutter or sewing machine oil on the
foil after cleaning. This will preserve the excellent
shaving performance of your shaver.
Take off the protective cap
2
if you wish to
have a “1-day shave” without using the 3-day
beard attachment, or if you wish to use the
trimmer
1
. Detach the protective cap
2
from
the shaving head
9
to do this.
Cleaning and maintenance
Cleaning
CAUTION! RISK OF ELECTRIC SHOCK!
Always disconnect the shaver from the mains
supply and the flex before cleaning it. Do not
immerse into water or other fluids!
Always clean the razor after each use in order
to ensure it works well.
When cleaning the appliance regularly with warm
water, occasionally moisten the long hair trim-
mer
1
and cutter set
12
with sewing machine
oil.
Dry cleaning:
CAUTION! Do not clean the foil with the brush
as this could damage it. Do not remove the foil!
Press the release buttons
5
on the side and
pull the shaving foil frame
3
out or blow it out.
Knock the shaving foil frame
3
out on an even
surface.
Brush the cutter set
12
with the cleaning brush.

11 GB/IE
Cleaning and maintenance / Disposal
Wet cleaning:
CAUTION! Above a temperature of about
45 °C there is the risk of scolding injury. Set your
mixer tap to a lower temperature or ensure that no
hot water can come into contact with your hands
or arms.
The shaving head
9
and cutter set
12
can be
washed under lukewarm to hot running water
(max. 70 °C):
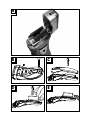
Press the release button
6
: The shaving head
9
flips up (see Fig. A).
If necessary add some liquid soap.
Switch on the device during washing to achieve
a more intensive cleaning action (cordless op-
eration only).
Wipe the housing with a soft, slightly moistened
cloth.
Allow the shaver and cutting parts to dry.
CAUTION! In order to avoid accidents, do not
use force when attaching the shaver head
9
and do not press down on the shaving foil
4
!
Hold the sides of the shaver head
9
and press
it down until it clips into place.
Replace the protective cap
2
.
Maintenance
Check cutting parts and replace
if necessary
The quality of the shave is largely affected by the
condition of the cutting parts. As they are subject to
natural wear and tear, you must replace them in
due time.
As both cutting parts adapt themselves to each other
over time, we recommend that you replace the shav-
ing foil
4
(as a unit with the shaving foil frame
3
)
and the cutter set
12
at the same time. You can
easily order these replacement parts through our
Service Centre (see Service Hotline on the accom-
panying guarantee sheet).
RISK OF INJURY FROM
SHARP CUTTING EDGES!
CAUTION! In order to avoid injuries, do not
press down on the shaving foil
4
when fitting
it! Replace bent or damaged foils!
Press the release buttons
5
on the sides and
pull the shaving foil frame
3
off upwards.
Take hold of the cutter set
12
at both ends and
pull off upwards.
Insert the new parts in reverse order.
CAUTION! In order to avoid injuries, you
must allow the cutter sets
12
click into place!
Holding only the sides of the shaving foil
frame
3
, push down until it clips into place.
Disposal
You are not permitted to throw away
single-use or rechargeable batteries with
household refuse. Please dispose of single-
use or rechargeable batteries through a
battery return system or a battery collection
point run by your dealer or local council.
When you decide to discard the device,
please do not place it (even without bat-
teries) into the household refuse bin.
Contact your local council to find out about
environmentally friendly and proper dis-
posal of the device as electrical scrap.
The packaging consists of environmentally-
friendly materials which you can dispose
of at your local recycling points.
Removal of rechargeable
batteries
In order to avoid injuries, do
not operate a disassembled appliance! Do not
short-circuit any rechargeable batteries you remove
from the appliance; they could become very hot if
they are still charged!

12 GB/IE
Disposal / Warranty and service / Conformity
This is how you can disassemble your
appliance to ensure environmentally
friendly disposal of it:
First disconnect the shaver from the AC adaptor
plug.
Remove the decorative strips on the side; lever
the upper cover plate off with a screwdriver or
similar.
Unscrew the 4 screws with a Phillips screwdriver
(see Fig. B).
Disassemble the two halves of the casing with
a screwdriver or similar (see Fig. C).
Separate the batteries and the trimmer or similar
components from the printed circuit board and
the motor (see Figs. D, E). Dispose of the parts
separately.
Warranty and service
The Service Hotline for your country is
shown on the enclosed warranty docu-
mentation.
Extreme care was used in the manufacture of our
product. Therefore we are able to provide a warranty
for the defect-free condition and functioning of the
product within the provisions of our warranty terms
and conditions. However, should a fault develop,
we will rectify all defects that are attributable to
faults in materials or manufacture.
The period of warranty is 36 months and begins on
the day of purchase. The performance of a service
under the warranty does not extend or renew the
warranty period. Please retain the sales voucher as
proof of the purchase date. Your warranty rights
under law are not limited by this warranty.
The following types of damage and items are not
covered by the warranty:
– wear parts such as foils
4
and cutter set
12
,
– parts that undergo wear naturally or as a conse-
quence of use,
– damage to fragile components,
– damage caused by unauthorised interference.
– damage caused by the use of non-original replace-
ment parts,
– damage caused by improper handling,
– damage caused by force majeure,
– damage caused by non-observance of the main-
tenance advice,
– single-use and rechargeable batteries.
Similarly we cannot accept liability for the conse-
quences of improper use of the device.
Conformity /
In accordance with the following European directives,
the CE marking has been affixed to the product:
Low-voltage directive (2006 / 95 / EC)
EMC Directive (2004 / 108 / EC)
The attendant declaration of conformity is lodged
at the distributor‘s premises.
LUTTER & PARTNER GmbH
Schleissheimer Str. 93a
D-85748 Garching bei München
Note: As part of ongoing product improvements,
we retain the right to make technical and visual
changes to the shaver and its accessories.

13 FI
Johdanto
Määräyksenmukainen käyttö .............................................................................................................................Sivu 14
Toimituksen sisältö .................................................................................................................................................Sivu 14
Osien kuvaus ...........................................................................................................................................................Sivu 14
Tekniset tiedot .........................................................................................................................................................Sivu 15
Turvallisuus
Yleiset turvaohjeet ..................................................................................................................................................Sivu 15
Hengenvaarallisen sähköiskun välttämiseksi ..................................................................................................Sivu 15
Moitteettoman käytön takia on huomioitava ..................................................................................................Sivu 15
Ennen käyttöönottoa
Verkkolaitteen käyttö .............................................................................................................................................Sivu 16
Akkujen lataaminen ...............................................................................................................................................Sivu 16
Käynnistyslukituksen käyttö .................................................................................................................................Sivu 16
Käyttö
Teräverkkoajo (kuiva parranajo) .......................................................................................................................Sivu 17
Märkäajo .................................................................................................................................................................Sivu 17
Rajain ........................................................................................................................................................................Sivu 17
3-päivän parran leikkuuterä ................................................................................................................................Sivu 18
Puhdistus ja huolto
Puhdistus ...................................................................................................................................................................Sivu 18
Huolto .......................................................................................................................................................................Sivu 18
Hävittäminen
Akun poisto ..............................................................................................................................................................Sivu 19
Takuu ja palvelu .........................................................................................................................................Sivu 19
Standardinmukaisuus ..........................................................................................................................Sivu 20
Sisällysluettelo

14 FI
Miesten akku-
ja verkkokäyttöinen partakone
Johdanto
Hyvä asiakas,
kiitämme ostostasi ja toivomme sinulla paljon iloa
uuden Wet & Dry–parranajokoneen kanssa.
Tässä parranajokoneessa on kolmekehäjärjestelmä
kahdella jousilaakeroidulla, vastakkain pyörivällä
leikkuuterällä ja integroidulla rajaimella, yhdis-
telmä, joka takaa mitä parhaaan tuloksen kaikissa
hiustyypeissä. Suojuskappaa voidaan samalla käyt-
tää 3-päivän parran leikkuuteränä. Laitetta voidaan
käyttää sekä kuiva- että märkäajoon (Wet & Dry-
toiminto). Verkkolähteen laajan 100– 240 voltin
~
tulojännitealueen ansiosta parranajokonetta voidaan
ihanteellisesti käyttää matkoilla.
Tämän ohjeen lukeminen auttaa sinua tutustumaan
laitteeseen paremmin ja helpottaa sen käyttöä.
Lue käyttöohje ennen käyttöönottoa huolellisesti
läpi ja säilytä se hyvin myöhempää käyttöä varten.
Kiinnitä huomiota turvaohjeisiin välttyäksesi tapatur-
milta, loukkaantumisilta ja vahingoilta.
Määräyksenmukainen käyttö
Laite on tarkoitettu vain yksityiseen käyttöön, ei
kaupallisiin tarkoituksiin. Laite on suunniteltu par-
ranajoon. Epätarkoituksenmukainen käyttö ei ole
takuun piirissä.
Toimituksen sisältö:
1 Parranajokone
1 Suojus
1 Verkkolaite verkkojohdon kanssa
1 Vetoketjullinen suojakotelo
1 Puhdistusharja
1 Käyttöohje
Osien kuvaus
1
Trimmeri
2
Suojuskappa = 3 päivän parran leikkuuterä
3
Teräsäleikkö
4
Terät
5
Verkkoteräkehysten avauspainikkeet
6
Leikkuupään avauspainike
7
PÄÄLLE- /POISKYTKIN-kytkin
8
Jousitettu sarananivel ajopäälle
9
Ajopää
10
Latausilmaisin, jossa lataustilan prosentuaalinen
näyttö
Johdanto
Tässä käyttöohjeessa / laitteessa käytetään seuraavia kuvakkeita:
Lue käyttöohje!
V
Tasavirta (Virta- ja jännitelaji)
Huomioi varoitus- ja turvaohjeet!
Pidä lapset ja muut henkilöt loitolla sähkö-
työkalun käytön aikana.
Varo sähköiskua! Vaarallisia
sähköjännitteitä – Hengenvaara!
Sopii puhdistettavaksi juoksevan veden
alla.
V
~
Voltti (Vaihtojännite)
Hävitä pakkaus ja laite
ympäristöystävällisesti!

15 FI
Johdanto / Turvallisuus
11
Pistorasia verkkolähteen liitäntään
12
Teräverkko
Tekniset tiedot
Pistokeverkkolähde:
Tulojännite: 100–240 V
~
, 50 / 60 Hz
Lähtöjännite: 4,5 V
, 1,000 mA
Suojausluokka:
Kotelointiluokka: roiskevesisuojattu, IP44
Ympäristöolosuhteet: käyttö on sallittu vain sisäti-
loissa
Parranajokone:
L&P tuote-nro: 9113058
Akut: 2 x 1,2 V HR6 (AA)
Ni-MH, 1200 mAh
Sallittu ympäristön
lämpötila: 0 °C – +40 °C
Turvallisuus
Lue ohje ennen käyttöä huolellisesti läpi.
Yleiset
turvaohjeet
Tätä laitetta ei ole tarkoitettu sellais-
ten henkilöiden käytettäväksi (mukaan
lukien lapset), joiden fyysinen, senso-
rinen tai henkinen toimintakyky on
rajoittunut tai joilla ei ole tietoa tai
kokemusta laitteen käytöstä, muuten
kuin heidän turvallisuudestaan vas-
taavan henkilön valvonnassa ja ohja-
uksessa. Lapsia on valvottava, jotta voidaan
olla varmoja, etteivät he ala leikkiä laitteella.
Hengenvaarallisen
sähköiskun välttämiseksi
Älä koske verkkolaitteeseen koskaan märin käsin,
kun kiinnität sen pistorasiaan tai vedät sen irti
pistorasiasta.
Käytä laitetta vain tyyppimerkinnän antamien
ohjeiden mukaan.
Vikavirtasuojalaitteen rakentaminen ei enemmälle
kuin 30 mA laukaisuvirralle tarjoaa lisäsuojan.
Anna vikavirtasuojalaitteen rakentaminen säh-
köalan ammattilaisen tehtäväksi.
Pidä parranajokone ja verkkolaite
poissa lasten ulottuvilta.
Kytke laite käytön jälkeen pois päältä! Tartu
verkkolaitteen koteloon, kun vedät laitetta pisto-
rasiasta. Älä irrota vetämällä johdosta.
VARO! SÄHKÖISKUVAARA! Laite ja verk-
kolaite eivät ole vesitiiviitä eikä niitä saa käyttää
missään nimessä suihkussa / kylvyssä. Parran-
ajokone täytyy irrottaa verkkojohdosta ennen
leikkuuterien puhdistamista vedellä. Parranajo-
konetta ei saa upottaa kokonaan veteen teriä
4
puhdistettaessa; kotelon voit puhdistaa kostealla
pyyhkeellä.
VARO! SÄHKÖISKUVAARA! Pidä verkko-
laite ja verkkojohto aina kuivina.
Jos laite on pudonnut veteen, vedä ensin eh-
dottomasti verkkolaite pistorasiasta, ennenkuin
kosket veteen.
Moitteettoman käytön
takia on huomioitava
Älä jätä parranajokonetta alle 0 °C tai yli +40 °C
lämpötiloihin. Älä sijoita parranajokonetta läm-
pöpattereiden äläkä ilmankuumennustuulettimien
päälle.
Verkkojohto ei saa takertua kaapinoviin eikä sitä
saa vetää kuumien pintojen yli.
Älä käytä teräverkon vaihtamiseen
12
ruuvi-
meisseliä äläkä pihtejä. Muuten terä
4
vioittuu.

16 FI
Turvallisuus / Ennen käyttöönottoa
Käytä verkkokäyttöön vain mukana toimitettua
alkuperäistä verkkolaitetta. Kytke verkkolaite
hyvin tavoitettavaan pistorasiaan. Älä peitä
verkkolaitetta lämpenemisen välttämiseksi.
Tarkista verkkolaite ja parranajokone säännölli-
sesti mahdollisilta mekaanisilta vioilta.
Vaihda vialliset osa alkuperäisiin osiin (erikois-
liike). Älä yritä koskaan itse korjata rikkinäistä
laitetta! Anna alan ammattilaisten tai asiakas-
palvelumme tehdä korjaukset (katso kohta ”takuu
ja palvelu“).
Käytettyjä ja viallisia akkuja ei saa
hävittää laittamalla niitä talousjätteisiin.
Vie käytetyt akut niille varattuihin ke-
räyspisteisiin (katso kohta ”hävittäminen“).
Ennen käyttöönottoa
VARO! Öljyjäämiä terällä. Terästä voi löytyä
avaamisen jälkeen valmistuksessa käytettyjä
öljyjäämiä. Poista ennen käyttöönottoa öljy
hyvin imevällä, nukkaamattomalla pyyhkeellä.
Parranajokone on akku- ja verkkokäyttöinen
Verkkolaitteen käyttö
VARO! SÄHKÖISKUVAARA! Laitteeseen
ei saa koskea märin käsin, kun se on kytkettynä
sähköverkkoon.
Liitä ensin pistokeverkkolähteen liitäntäjohto
pistokeverkkolähteen
11
liitäntään laitteen ala-
puolella ja pistokeverkkolähteen pistorasiaan.
Laite on heti käyttövalmis.
Akkujen lataaminen
Parranajokone on varustettu kahdella Ni-MH kor-
keatehoisella akulla ja ylilataussuojalla. Akkuja voi-
daan jälkiladata ilman että se rajoittaisi tehoa.
Ylilatauksen vaaraa ei ole.
Huomautus: Jotta akkujen käyttöikä olisi pitempi,
on suositeltavaa antaa akkujen purkautua tyhjäksi
ennen uutta latausta. Käytä laitetta, jotta se purkau-
tuisi täysin, kunnes LED alkaa lataustason ollessa
20 % vilkkua punaisena (kehoitus ladata akku).
Parranajokoneen akkua on ennen ensimmäistä
käyttöä ladattava vähintään 120 minuuttia. Seu-
raavina laitauskertoina akun lataukseen riittää noin
90 minuuttia. Lataa akut seuraavalla tavalla:
Sammuta laite. Työnnä tätä varten PÄÄLLE- /
POISKYTKIN-kytkin
7
alas.
Yhdistä pistokevirtalähteen pistorasia pistoke-
virtalähteen
11
liitäntään parranajokoneella.
Laite aloittaa nyt latauksen.
Huomautus: Parranajokoneen latauskontrol-
livalon
10
vihreät valodiodit (LEDit) näyttävät
lataustilan prosentteina parranajokoneen etu-
puolella.
Pikalataus kestää 5 minuuttia. Lataus riittää yhteen
parranajoon.
Täyteen ladatut akut mahdollistavat noin 90 minuutin
käytön ilman virtalähdettä.
Mikäli parranajokone pysähtyy tyhjien akkujen
vuoksi parranajon aikana, voit jatkaa parranajoa
liittämällä laitteen sähkövirtaan.
Ajankohtainen lataustila näytetään poiskytkennän
jälkeen muutaman sekunnin ajan. Tällöin LEDit vilk-
kuvat 20 % lataustilasta alkaen perätysten sen het-
kiseen lataustilaan asti. Sitten näyttö sammuu.
Huomautus “Akkujen hoito”: Huomaa,
että akkujen kapasiteetti alenee teknisistä syistä
huomattavasti pitempiaikaisen varastoinnin aikana.
Vältä tästä syystä pitempiä varastointiaikoja ja siihen
liittyviä lataus- ja tyhjennysvaiheiden keskeyttämistä.
Käynnistyslukituksen käyttö
Tämä toiminto estää parranajokoneen tahattoman
käynnistämisen kuljetuksen aikana.

17 FI
Ennen käyttöönottoa / Käyttö
Avaa käynnistyslukitus painamalla pientä mustaa
painiketta PÄÄLLE- / POIS -kytkimellä
7
, kun
haluat käynnistää laitteen.
Käyttö
Huomautus:
Laitetta voidaan käyttää sekä kuiva- että märkäajoon
(Wet & Dry-toiminto). Parhaan tuloksen saavutat
kuivalla iholla. Perusteellista parranajoa varten on
suositeltavaa pestä ja kuivata kasvot ja iho huolelli-
sesti ennen parranajoa.
Teräverkkoajo
(kuiva parranajo)
Laitetta ei saa käyttää:
– Jos ihossa on haavoja
– Jos iho on tulehtunut
– Auringon polttamissa
– Jos iholla on näppyjä ja rakkoja
Tottuminen:
Käytön jälkeen iho voi olla tilapäisesti punainen ja
ärsyyntynyt. Tämä on normaali ilmiö, sillä ihosi täy-
tyy ensin tottua tällaiseen parranajomenetelmään.
Tämä vaihe kestää yleensä 2–3 viikkoa. Käänny
lääkärin puoleen, jos ihon punoitus tai ärsyynnys
jatkuu pitemmän aikaa.
VARO! PARRANAJOKONE EI OLE VESI-
TIIVIS! Älä käytä suihkussa tai kylvyssä, koska
laite voi mennä rikki.
Irrota suojus
2
ajopäästä
9
.
Työnnä PÄÄLLE- /POISKYTKIN-kytkin
7
ylös.
Paina pientä mustaa painiketta PÄÄLLE- / POIS
-kytkimellä
7
(käynnistyslukitus).
Pidä parranajokonetta pystysuorassa ja paina
sitä kevyesti ihoa vastaan parrankasvusuuntaa
vastaan. Jännitä vapaana olevalla kädellä kas-
vojen ihoa, jotta parta kohoaa. Kevyt pyörivä
ajopään
9
liike tukee parransängen kohotta-
mista. Integroitu trimmeri
1
palvelee samanai-
kaisesti pitempien partakarvojen lyhentämistä.
VARO! Vältä voimakasta terän painamista,
jottei se murru. Lisäksi voimakas ihon painami-
nen vähentää leikkuutehoa ja voi johtaa ihon
ärsyyntymiseen.
Kytke laite pois päältä PÄÄLLE- / POIS-
painikkeesta
7
painamalla sitä alas.
Kiinnitä suojus
2
terän
4
suojaksi.
Märkäajo
Käytä hienohuokoista parranajovaahtoa.
VARO! Emme suosittele parranajogeelin käyt-
töä, koska teräverkko
4
ja terälohko
12
voivat
liimaantua toisiinsa.
Sivele ohut kerros parranajovaahtoa kasvoihisi.
Parranajovaahto soveltuu parhaiten kaikista
parranajon kosmetiikkatuotteista. Älä käytä
paksua kerrosta parranajovaahtoa, koska se
voi vaikuttaa parranajokoneen tehoon.
Suorita parranajo muilta kohdin kuten kappa-
leessa teräverkkoajo on kuvattu.
Huuhtele parranajokone juoksevan veden alla,
mikäli ajopää
9
on tukkeutunut parranajo-
vaahdosta (katso myös kappale ”Märkäpuh-
distus”).
Rajain
Rajain
1
laitteen takapuolella voidaan kytkeä
päälle lukitusasentoon työntämällä. Se on tätä varten
työnnettävä vasteeseen asti ajopään
9
suuntaan.
Sen tehtävänä on partakarvojen lyhentäminen,
ääriviivojen, pulisonkien ja viiksien leikkaaminen.
Työnnä käytön jälkeen rajain
1
takaisin alku-
asentoonsa.

18 FI
Käyttö / Puhdistus ja huolto
3-päivän parran leikkuuterä
Suojuskappaa
2
voidaan samalla käyttää 3 päivän
parran leikkuuteränä. Tällä terällä saavutat säännöl-
lisellä lyhentämisellä noin 3-päivän parran pituuden.
Huomautus: Huomaa, että parranajon tulos
3-päivän parran leikkuuterällä voi vaihdella parran-
kasvusta riippuen 3-päivän parran ja 1-viikon parran
välillä.
Aseta suojuskappa
2
ajopäälle
9
niin, että
se lukittuu paikoilleen. Rajain
1
on nyt suojus-
kapan
2
lukitsema.
Työnnä laitteen PÄÄLLE- / POIS -kytkin
7
ylös,
kun haluat käynnistää laitteen. Voit nyt leikata
parran.
Työnnä laitteen PÄÄLLE-/POIS -kytkin
7
taas
alas, kun haluat taas sammuttaa laitteen.
Huomautus: Käytettäessä suojuskappaa
2
3 päivän parran leikkuuteränä teräverkon välitön
kontakti ihoon katoaa. Ajojärjestelmän luonnol-
linen, talin aiheuttama, rasvautuminen ei ole
mahdollista. Tiputa jokaisen 3 päivän parran
leikkuuterän käytön jälkeen ja puhdistuksen
jälkeen, muutama tippa leikkuu- tai ompeluko-
neöljyä verkoille. Näin taataan pitkäaikainen
hyvä leikkuuteho.
Poista suojuskappa
2
, mikäli haluat suorittaa
”1-päivän parran ajon“ ilman 3 päivän parran
leikkuuterää tai jos haluat käyttää rajainta
1
.
Poista suojuskappa
2
ajopäältä
9
.
Puhdistus ja huolto
Puhdistus
VARO! SÄHKÖISKUVAARA! Irrota parra-
najokone sähköverkosta ja verkkojohdosta puh-
distuksen ajaksi. Älä upota laitetta veteen tai
muihin nesteisiin!
Puhdista laite jokaisen käytön jälkeen huolellisesti,
jotta se pysyy hyväkuntoisena.
Lämpimällä vedellä puhdistamisen lisäksi voidaan
trimmeri
1
ja teräverkot
12
kostuttaa aika
ajoin ompelukoneöljyllä.
Kuivapuhdistus:
VARO! Terää ei saa puhdistaa harjalla, koska
se menee muuten rikki. Älä irrota terää!
Paina sivusuuntaisia irrotuspainikkeita
5
ja
vedä teräsäleiköt
3
vetämällä tai puhaltamalla
ne ylös.
Kopista teräsäleikkö
3
tasaiselle alustalle.
Harjaa teräverkot
12
puhdistusharjalla.
Märkäpuhdistus:
VARO! 45 °C lämpötilasta lähtien palovam-
mavaara. Aseta sekoitinhana alempaan lämpötilaan
tai varmistaudu, ettei käsille ja käsivarsille pääse
roiskumaan kuumaa vettä.
Ajopää
9
ja terälohko
12
voidaan pestä juoksevan
veden alla, lämpötila haalea – kuuma (max 70 °C):
Paina avauspainiketta
6
: Ajopää
9
kääntyy
ylös (katso kuva A).
Käytä tarvittaessa juoksevaa saippuaa.
Käynnistä laite pesuun tehokasta puhdistusta
varten (vain akkukäytössä).
Pyyhi kotelo pehmeällä, hieman kostutetulla lii-
nalla.
Anna parranajokoneen ja leikkuuosien kuivua.
VARO! Välttyäksesi vahingoilta älä käytä vä-
kivaltaa ajopään
9
kiinnittämisessä äläkä
paina terää
4
!
Tartu ajopäähän
9
sivulta ja paina alas, kunnes
kiinnityskiskot napsahtavat paikoilleen.
Aseta suojus
2
jälleen paikoilleen.
Huolto
Tarkasta leikkuuterät ja vaihda ne
tarvittaessa
Parranajon laatu määräytyy suurimmaksi osaksi leik-
kuuterien kunnosta. Koska ne luonnollisesti kuluvat,
on oikea-aikainen vaihto välttämätön.

19 FI
Puhdistus ja huolto / Hävittäminen / Takuu ja palvelu
Koska molemmat leikkuuosat sopeutuvat toisiinsa
ajan kuluessa, on suositeltavaa vaihtaa samanai-
kaisesti terä
4
(yksikkö teräsäleikön kanssa
3
) ja
teräverkko
12
. Voit ostaa molemmat osat muka-
vasti asiakaspalvelustamme (katso asiakastuessa
takuulehtistä).
LOUKKAANTUMISVAARA
TERÄVIEN LEIKKAUSREUNOJEN TAKIA!
VARO! Loukkaantumisten välttämiseksi älä
paina asennuksessa uutta terää
4
! Vaihda tai-
puneet ja rikkinäiset terät!
Paina sivusuuntaisia
irrotuspainikkeita
5
ja vedä teräsäleikkö
3
ylös.
Pidä teräverkon
12
molemmista päistä kiinni ja
vedä ylös.
Laita uudet osat päinvastaisessa järjestyksessä.
VARO! Välttyäksesi vahingoilta napsauta terä-
verkot
12
ehdottomasti pidikkeeseen!
Koske teräsäleikköön
3
sivulta ja työnnä sitä
alaspäin, kunnes se kiinnittyy napsahtaen.
Hävittäminen
Lain mukaan on kiellettyä hävittää akut
ja paristot talousjätteenä. Toimita akut /
paristot hävitettäviksi palautusjärjestelmään
tai niille varattuihin kaupan keruuastioihin.
Älä heitä laitetta (ilman paristoja / akkuja)
jätekontiin sen käyttöiän päätyttyä. Tie-
dustele kaupunkisi tai kuntasi vastaavasta
virastosta mahdollisuuksista, miten voit
hävittää elektroniikkaromun ympäristöys-
tävällisesti ja määräysten mukaisesti.
Koko pakkaus ja pakkausmateriaali
koostuu vain ympäristöystävällisistä
materiaaleista ja se voidaan hävittää
paikalliseen kierrätyspisteeseen.
Akun poisto
Loukkaantumisilta välttyäksesi
älä ota osina olevaa laitetta käyttöön. Älä yhdistä
purettuja akkuja, ne voivat kuumentua, jos niissä on
vielä latausta!
Näin hajotat laitteen asianmukaisesti ympä-
ristöystävällistä hävittämistä varten:
Irrota ensin parranajokone verkkolaitteesta.
Poista sivuilla olevat koristeviivat, irrota ylempi
peitelevy yms. ruuvimeisselillä.
Irrota 4 ruuvia ristipäämeisselillä (katso kuva B).
Erota molemmat kotelon puolet toisistaan ruuvi-
meisselillä tms (katso kuva C).
Irrota akut sivuleikkuupäällä tms. piirikortilta ja
moottorilta (katso kuvat D, E). Hävitä osat erik-
seen.
Takuu ja palvelu
Maasi vastaavan servicehotlinen löydät
oheisesta takuutodistuksesta.
Tämä laite on valmistettu mitä suurimmalla huolelli-
suudella. Jos laite tästä huolimatta kuitenkin lakkaisi
toimimasta, myönnämme luonnollisesti takuun tuotteen
moitteettomasta kokoonpanosta ja toimivuudesta
takuuehtojemme puitteissa. Mikäli laite lakkaa toimi-
masta, korjaamme kaikki puutteet, jotka johtuvat
materiaali- tai valmistusvirheistä.
Takuuaika on 36 kuukautta ja se alkaa laitteen
ostopäivästä. Takuuaikaa ei pidennetä eikä uusita
myönnetyllä takuukorvauksella. Säilytä ostokuitti
todistukseksi ostopäivästä. Tämä takuu ei rajoita
laillista takuusuoritusvelvollisuutta.
Takuun piiriin eivät kuulu:
– kuluvat osat, esim.teräverkko
4
ja terälohko
12
,
– osat, joiden kuluminen johtuu käytöstä tai luon-
nollisesta kulumisesta,
– vauriot rikkoutuvilla osilla,

20 FI
Takuu ja palvelu / Standardinmukaisuus
– asiantuntemattomasta puuttumisesta laitteeseen
johtuvat viat,
– vauriot, jotka ovat aiheutuneet muiden kuin alku-
peräisten varaosien käytöstä,
– asiantuntemattomasta käsittelystä johtuvat vauriot,
– force majeur tilanteesta syntyneet vauriot,
– vauriot, jotka ovat aiheutuneet hoito-ohjeiden
noudattamatta jättämisestä,
– paristot, akut.
Samoin emme voi myöntää takuuta laitteen asian-
tuntemattomasta käytöstä aiheutuneista vaurioista.
Standardinmukaisuus /
Yhtäpitävästi seuraavien eurooppalaisten direktiivien
kanssa annettiin tuotteelle CE-merkintä:
Pienjännitedirektiivi (2006 / 95 / EC)
EMV-direktiivi (2004 / 108 / EC)
Siihen kuuluvan standardinmukaisuustodistuksen on
tallettanut liikkeesen laskija:
LUTTER & PARTNER GmbH
Schleissheimer Str. 93 a
D-85748 Garching bei München
Huomautus: Tuoteparantelun piirissä pidätämme
itsellämme tekniset ja optiset parranajokoneen ja
sen lisävarusteiden muutokset.
Sidan laddas...
Sidan laddas...
Sidan laddas...
Sidan laddas...
Sidan laddas...
Sidan laddas...
Sidan laddas...
Sidan laddas...
Sidan laddas...
Sidan laddas...
Sidan laddas...
Sidan laddas...
Sidan laddas...
Sidan laddas...
Sidan laddas...
Sidan laddas...
Sidan laddas...
Sidan laddas...
Sidan laddas...
Sidan laddas...
Sidan laddas...
Sidan laddas...
Sidan laddas...
Sidan laddas...
Sidan laddas...
-
 1
1
-
 2
2
-
 3
3
-
 4
4
-
 5
5
-
 6
6
-
 7
7
-
 8
8
-
 9
9
-
 10
10
-
 11
11
-
 12
12
-
 13
13
-
 14
14
-
 15
15
-
 16
16
-
 17
17
-
 18
18
-
 19
19
-
 20
20
-
 21
21
-
 22
22
-
 23
23
-
 24
24
-
 25
25
-
 26
26
-
 27
27
-
 28
28
-
 29
29
-
 30
30
-
 31
31
-
 32
32
-
 33
33
-
 34
34
-
 35
35
-
 36
36
-
 37
37
-
 38
38
-
 39
39
-
 40
40
-
 41
41
-
 42
42
-
 43
43
-
 44
44
-
 45
45


Silvercrest SFR 1200 A1 Operation and Safety Notes
- Kategori
- Rakapparater för kvinnor
- Typ
- Operation and Safety Notes
på andra språk
- Deutsch: Silvercrest SFR 1200 A1
- English: Silvercrest SFR 1200 A1
- dansk: Silvercrest SFR 1200 A1
- suomi: Silvercrest SFR 1200 A1
Relaterade papper
-
Silvercrest SFR 37 B1 Operating Instructions Manual
-
Silvercrest SHBS 1000 A1 Operating Instructions Manual
-
-
-
-
Silvercrest SRR 3.7 C4 - IAN 115785 Bruksanvisning
Andra dokument
-
Braun CRUZER 6 CLEAN SHAVE W&D Bruksanvisning
-
-
-
-
Philips S9511/63 Användarmanual
-
-
Braun MG 5010 Användarmanual
-
-
LIVARNO 282512 Bruksanvisning
-