Yamaha VL-1 Bruksanvisning
- Kategori
- Digitala pianon
- Typ
- Bruksanvisning
Denna manual är också lämplig för


Owner’s Manual 2
Feature Reference

2
Feature Reference
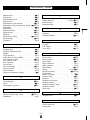
Contents
■ 3: Feedback Delay . . . . . . . . . . . . . . . . . . . . . . 53
• Mono Delay . . . . . . . . . . . . . . . . . . . . . . . 53
• L,R Delay . . . . . . . . . . . . . . . . . . . . . . . . 55
• L,C,R Delay . . . . . . . . . . . . . . . . . . . . . . 57
■ 4:Reverberation . . . . . . . . . . . . . . . . . . . . . . . . 60
• Hall1, Hall2, Room1, Room2, Studio,
Plate, Space, Reverse . . . . . . . . . . . . . . . 61
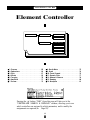
Element Controller . . . . . . . . . . . . . . . . . . . . . 64
■ 1: Pressure . . . . . . . . . . . . . . . . . . . . . . . . . . . . 65
■ 2: Embouchure . . . . . . . . . . . . . . . . . . . . . . . . 66
■ 3: Pitch . . . . . . . . . . . . . . . . . . . . . . . . . . . . . . . 67
■ 4: Vibrato . . . . . . . . . . . . . . . . . . . . . . . . . . . . . 69
■ 5: Tonguing . . . . . . . . . . . . . . . . . . . . . . . . . . . 70
■ 6: Amplitude . . . . . . . . . . . . . . . . . . . . . . . . . . 71
■ 7: Scream . . . . . . . . . . . . . . . . . . . . . . . . . . . . . 72
■ 8: Breath Noise . . . . . . . . . . . . . . . . . . . . . . . . 73
■ 9: Growl . . . . . . . . . . . . . . . . . . . . . . . . . . . . . . 74
■ 10: Throat Formant . . . . . . . . . . . . . . . . . . . . . 75
■ 11: Dynamic Filter . . . . . . . . . . . . . . . . . . . . . 77
■ 12; Harmonic Enhancer . . . . . . . . . . . . . . . . . 78
■ 13: Damping . . . . . . . . . . . . . . . . . . . . . . . . . . 80
■ 14: Absorption . . . . . . . . . . . . . . . . . . . . . . . . . 81
Element Miscellaneous . . . . . . . . . . . . . . . . . 84
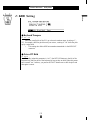
■ 1: Setting . . . . . . . . . . . . . . . . . . . . . . . . . . . . . 85
■ 2: Breath Noise . . . . . . . . . . . . . . . . . . . . . . . . 86
• 2-1: Breath Noise Level Key Scaling . . 88
• 2-2: Breath Noise HPF Key Scaling . . . 89
• 2-3: Breath Noise LPF Key Scaling . . . . 90
■ 3: Throat Formant . . . . . . . . . . . . . . . . . . . . . . 91
• 3-1: Throat Formant Pitch Key Scaling . 93
• 3-2: Throat Formant Amount Key
Scaling . . . . . . . . . . . . . . . . . . . . . . . 94
• 3-3: Throat Formant Intensity Key
Scaling . . . . . . . . . . . . . . . . . . . . . . . 95
• 3-4: Throat Formant HPF Key Scaling . 96
• 3-5: Throat Formant LPF Key Scaling . 97
■ 4: Mixing . . . . . . . . . . . . . . . . . . . . . . . . . . . . . 98
• 4-1: Mixing Driver Output Key Scaling 100
• 4-2: Mixing Pipe/String Output Key
Scaling . . . . . . . . . . . . . . . . . . . . . . 101
• 4-3: Mixing Tap Output Key Scaling . 102
• 4-4: Mixing Tap Location Key Scaling 103
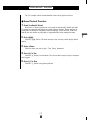
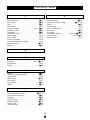
About the Manuals . . . . . . . . . . . . . . . . . . . . . . 4
■ The Getting Started Manual . . . . . . . . . . . . . . 4
■ The Feature Reference Manual (this manual) . 5
■ Conventions . . . . . . . . . . . . . . . . . . . . . . . . . . . . 5
General Operation
■ The Three Main Modes . . . . . . . . . . . . . . . . . . . 8
■ Finding Functions & Parameters . . . . . . . . . . . 9
■ Other Navigation Aids . . . . . . . . . . . . . . . . . . 11
■ Selecting & Editing Parameters . . . . . . . . . . . 12
Play Mode
■ The Main Play Mode Display . . . . . . . . . . . . . 14
■ Voice Selection . . . . . . . . . . . . . . . . . . . . . . . . 15
■ Controller Views . . . . . . . . . . . . . . . . . . . . . . . 17
■ Quick Editing In the Play Mode . . . . . . . . . . . 19
Edit Mode
■ The Voice Number Buttons In the Edit Mode 22
■ The Edit Compare Function . . . . . . . . . . . . . . 24
■ The Copy Function . . . . . . . . . . . . . . . . . . . . . 25
■ Storing Edited Data . . . . . . . . . . . . . . . . . . . . . 28
Initial Edit Page . . . . . . . . . . . . . . . . . . . . . . . . 30
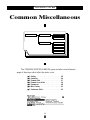
Common Miscellanous . . . . . . . . . . . . . . . . . 34
■ 1: Setting . . . . . . . . . . . . . . . . . . . . . . . . . . . . . 35
■ 2: Controller . . . . . . . . . . . . . . . . . . . . . . . . . . 36
■ 3: Element Pitch . . . . . . . . . . . . . . . . . . . . . . . 37
■ 4: Element Level & Pan . . . . . . . . . . . . . . . . . 38
■ 5: Portamento . . . . . . . . . . . . . . . . . . . . . . . . . 40
■ 6: Micro Tuning . . . . . . . . . . . . . . . . . . . . . . . 42
■ 7: Continuous Slider . . . . . . . . . . . . . . . . . . . . 43
Common Effect . . . . . . . . . . . . . . . . . . . . . . . . 44
■ 1: Setting . . . . . . . . . . . . . . . . . . . . . . . . . . . . . 45
■ 2: Modulation Effect . . . . . . . . . . . . . . . . . . . . 46
• Flanger . . . . . . . . . . . . . . . . . . . . . . . . . . . 47
• Pitch Change . . . . . . . . . . . . . . . . . . . . . . 49
• Distortion . . . . . . . . . . . . . . . . . . . . . . . . . 51

3
Feature Reference
■ 5: Amplitude . . . . . . . . . . . . . . . . . . . . . . . . . 104
• 5-1: Total Amplitude Level Key Scaling104
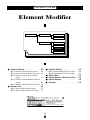
Element Modifier . . . . . . . . . . . . . . . . . . . . . 106
■ 1: Harmonic Enhancer . . . . . . . . . . . . . . . . . 107
•1-1: Harmonic Enhancer HPF Key
Scaling . . . . . . . . . . . . . . . . . . . . . . 110
•1-2: Harmonic Enhancer Overdrive Key
Scaling . . . . . . . . . . . . . . . . . . . . . . 111
• 1-3: Harmonic Enhancer Carrier Level
Key Scaling . . . . . . . . . . . . . . . . . . 112
• 1-4: Harmonic Enhancer Modulator
Index Key Scaling . . . . . . . . . . . . . 113
• 1-5: Harmonic Enhancer Balance Key
Scaling . . . . . . . . . . . . . . . . . . . . . . 114
■ 2: Dynamic Filter . . . . . . . . . . . . . . . . . . . . . 115
• 2-1: Dynamic Filter Cutoff Key Scaling 117
• 2-2: Dynamic Filter Resonance Key
Scaling . . . . . . . . . . . . . . . . . . . . . . 118
■ 3: Equalizer Auxiliary . . . . . . . . . . . . . . . . . . 119
• 3-1: Equalizer Auxiliary HPF Key
Scaling . . . . . . . . . . . . . . . . . . . . . . 120
• 3-2: Equalizer Auxiliary LPF Key
Scaling . . . . . . . . . . . . . . . . . . . . . . 121
■ 4: Equlizer Band . . . . . . . . . . . . . . . . . . . . . . 122
■ 5: Impulse Expander & Resonator Setting . . 123
■ 6: Impulse Expander . . . . . . . . . . . . . . . . . . . 125
■ 7: Resonator . . . . . . . . . . . . . . . . . . . . . . . . . . 126
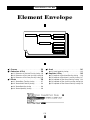
Element Envelope . . . . . . . . . . . . . . . . . . . . . 128
■ 1: Pressure . . . . . . . . . . . . . . . . . . . . . . . . . . . 129
■ 2: Embouchure & Pitch . . . . . . . . . . . . . . . . . 130
• 2-1: Embouchure & Pitch Hold Time
Key Scaling . . . . . . . . . . . . . . . . . . 132
• 2-2: Embouchure & Pitch Initial Level
Key Scaling . . . . . . . . . . . . . . . . . . 133
• 2-3: Embouchure & Pitch Decay Rate
Key Scaling . . . . . . . . . . . . . . . . . . 134
■ 3: Vibrato . . . . . . . . . . . . . . . . . . . . . . . . . . . . 135
• 3-1: Vibrato Delay Time Key Scaling . 137
• 3-2: Vibrato Attack Rate Key Scaling . 138
• 3-3: Vibrato Depth Key Scaling . . . . . . 139
• 3-4: Vibrato Speed Key Scaling . . . . . . 140
■ 4: Growl . . . . . . . . . . . . . . . . . . . . . . . . . . . . . 141
• 4-1: Growl Speed Key Scaling . . . . . . . 142
■ 5: Amplitude & Filter . . . . . . . . . . . . . . . . . . 143
• 5-1: Amplitude & Filter Attack Rate
Key Scaling . . . . . . . . . . . . . . . . . . 146
• 5-2: Amplitude & Filter Attack 1 Level
Key Scaling . . . . . . . . . . . . . . . . . . 147
• 5-3: Amplitude & Filter Decay Rate
Key Scaling . . . . . . . . . . . . . . . . . . 148
• 5-4: Amplitude & Filter Sustain Level
Key Scaling . . . . . . . . . . . . . . . . . . 149
• 5-5: Amplitude & Filter Release Rate
Key Scaling . . . . . . . . . . . . . . . . . . 150
Utility Mode
System . . . . . . . . . . . . . . . . . . . . . . . . . . . . . . 152
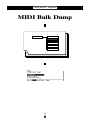
MIDI Bulk Dump . . . . . . . . . . . . . . . . . . . . . . 160
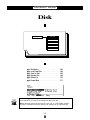
Disk . . . . . . . . . . . . . . . . . . . . . . . . . . . . . . . . . 162
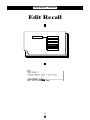
Edit Recall . . . . . . . . . . . . . . . . . . . . . . . . . . . 172
Demo . . . . . . . . . . . . . . . . . . . . . . . . . . . . . . . 174
Appendix
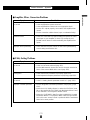
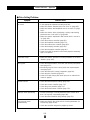
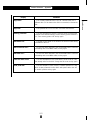
Troubleshooting . . . . . . . . . . . . . . . . . . . . . . 178
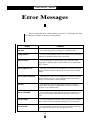
Error Messages . . . . . . . . . . . . . . . . . . . . . . . 180
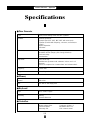
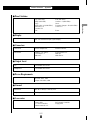
Specifications . . . . . . . . . . . . . . . . . . . . . . . . 184
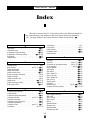
Index . . . . . . . . . . . . . . . . . . . . . . . . . . . . . . . . 186

4
Feature Reference
About the Manuals
The VL1 comes with two manuals — Getting Started and Feature
Reference. If you’re just starting out with the VL1 we urge you to begin
with the Getting Started manual since it describes basic concepts and
procedures that are essential to proper operation of the VL1.
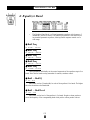
The Getting Started Manual
The Getting Started manual contains seven chapters that take you through
essential information and procedures you will need to know to become familiar
with your VL1:
1. VL1 Basics [≥ Page 8]
Basic concepts you’ll need to understand in order to get the
most out of the VL1.
2. The Controls & Connectors [≥ Page 16]
Brief descriptions of the VL1 controls and connectors, and their
functions.
3. Setting Up [≥ Page 22]
System connections, powering up, playing the demo, calibrating
the Breath Controller, and loading the pre-programmed voices.
4. Voice Selection [≥ Page 34]
Several ways to select and play the VL1’s 128 voices.
5. The Controllers [≥ Page 38]
The VL1 controllers and how they can be assigned and edited
for optimum control.
6. Mixing & The Modifiers [≥ Page 48]
Customizing the sound to suit your own personal needs.
7. Effects [≥ Page 58]
An overview of the built-in digital effects that you can use to
add depth and ambience to the VL1 sound.
We recommend that you go through the chapters in sequence and actually
try out the various operations described. Once you’ve gone through the entire
Getting Started manual in this way, you should be familiar enough with the VL1
to need only the VL1 Feature Reference manual in future.

5
Feature Reference
The Feature Reference Manual (this manual)
The Feature Reference manual is the “nuts and bolts” reference for
the VL1, individually describing its many functions in detail. The Feature
Reference manual is divided into five main sections, each describing the
various functions within a particular VL1 edit or utility mode.
1. General Operation [≥ Page 7]
2. Play Mode [≥ Page 13]
3. Edit Mode [≥ Page 21]
4. Utility Mode [≥ Page 151]
5. Appendix [≥ Page 177]
Once you have become familiar with the way the VL1 works by
going through the Getting Started manual, you should only need to refer
to the Feature Reference manual from time to time to get details on func-
tions you’ve never used before, or refresh your memory about functions
that you don’t use very often.
Each section of the Feature Reference manual has its own table of
contents, so you should be able to locate any particular function quickly
and easily. Functions and references can also be located by referring to the
index at the back of the manual.
Conventions
The following conventions are used through the VL1 manuals to
avoid confusion and make the text easier to read.
Buttons & Controls
Button and control names used on the VL1 panel appear in the text
in capital letters within a border: “the [ button”, for example.
Parameter Names
Parameter names and other labels which appear on the VL1 display
are printed in the courier typeface for easier identification: for
example, “adjust the “Balance” parameter as required”.
Parameter Ranges
An ellipsis is used to indicate a range of parameter values: e.g. “0
… 127”. This minimizes the confusion sometimes caused by the use
of a hyphen or dash for this purpose.


General Operation
The VL1 makes operation as easy as possible
by providing a consistent, logical control interface via
which its many functions and parameters can be
accessed and edited. Once you become familiar with
the system, operation should be smooth, efficient, and
easy.
● The Three Main Modes . . . . . . . . . . . . . 8
● Finding Functions & Parameters . . . . . 9
● Other Navigation Aids . . . . . . . . . . . . . 11
● Selecting & Editing Parameters . . . . . 12

8
Feature Reference
●
General Operation
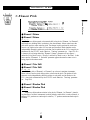
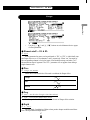
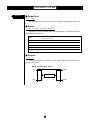
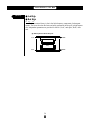
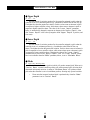
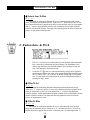
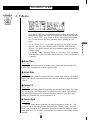
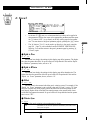
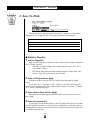
The Three Main Modes
The VL1 has three main modes: PLAY, EDIT, and UTILITY. Each of these modes
can be directly accessed by pressing the P, E, or U button, respectively.
The PLAY mode is the one you use to select and play the VL1 voices.
The PLAY mode also includes several “Controller Views” that allow you
to check controller assignments, the status of several important
performance parameters, and the continuous slider assignments.
≥
Pages 13 through 19.
All voice editing functions are accessed via the EDIT mode: controller
assignments, mixing, modifiers, effects, and more.
≥
Pages 21 through 150.
The UTILITY mode includes a range of functions that affect overall
operation of the VL1 rather than individual voices. For example: master
tuning, MIDI settings, disk operations, etc.
≥
Pages 151 through 175.
PLAY
EDIT
UTILITY

9
Feature Reference
●
General Operation
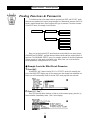
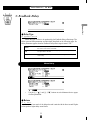
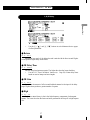
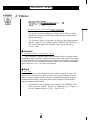
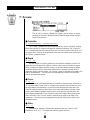
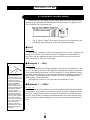
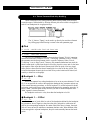
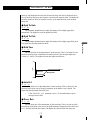
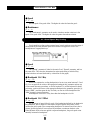
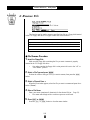
Finding Functions & Parameters
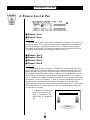
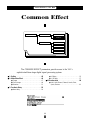
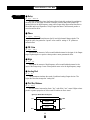
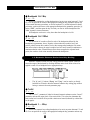
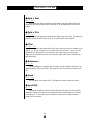
To facilitate access to the many functions provided, the EDIT and UTILITY mode
functions are organized into logical groups arranged in a hierarchical structure (the PLAY
mode is simple enough that it doesn’t require this type of structure). The basic structure
of the EDIT mode, for example, looks like this:
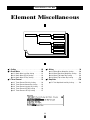
EDIT MODE
ELEMENT
EFFECT
CONTROLLER
MODIFIER
ENVELOPE
COMMON
MISCELLANEOUS
MISCELLANEOUS
Here you can see that the EDIT mode functions are divided into two main groups:
COMMON and ELEMENT, and that these are further sub-divided into related groups of
functions. The COMMON EFFECT group, for example, includes all the effect parameters
(flange, reverb, etc.) that apply to the entire voice. Here’s how you would access the
reverb parameters, starting from the PLAY mode:
●
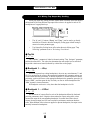
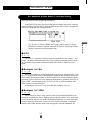
Example: Locate the Effect Reverb Parameters
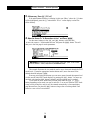
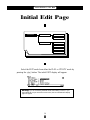
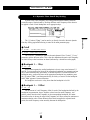
1. Press E
Pressing the E button from the PLAY or UTILITY mode will normally take
you to the initial EDIT display page (if the current voice has already been edited but not
stored, you will automatically return to the last EDIT mode page that was selected).
2. Press ¡ (“Com”)
Since you want the effect functions, which are in the common group, press the ¡
function button (immediately below “Com” on the display).

10
Feature Reference
●
General Operation
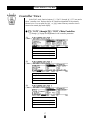
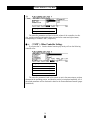
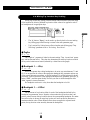
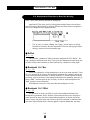
3. If Necessary, Press ™ (“Efct”)
If the miscellaneous directory is showing (in this case “Misc” above the ¡ button
will be highlighted), press the ™ button below “Efct” on the display to select the
effect directory.
4. Move the Cursor To “4:Reverberation” and Press [
Use the cursor buttons (or the - and = buttons, or the data dial)
to move the cursor to “4:Reverberation” and press the [ button. This will
take you to the first page of reverb parameters.
NOTES ■ Notice that the top line of the display shows the “path” to the current
level or function: “
EDIT/COM/EFFECT/REVERBERATION
”.
This example illustrates the two methods used to move downward through the EDIT
mode levels: 1) press the appropriate function button and 2) move the cursor to the
desired selection and press [.
From any point within the structure you can move upward toward the topmost level
(in this case the initial EDIT mode display) by pressing the ] button. You move up
one level each time the ] button is pressed, until the topmost level is reached.
To exit from the EDIT mode itself you must press either the P or U
button, depending on the mode you want to switch to. You can exit from the EDIT mode
at any level by doing this, and you will be returned automatically to the same display
page the next time you press the E button as long as the voice being edited is not
stored or a new voices is not selected.

11
Feature Reference
●
General Operation
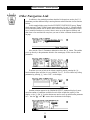
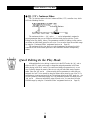
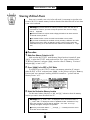
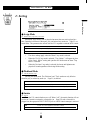
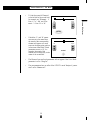
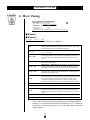
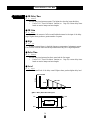
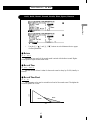
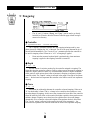
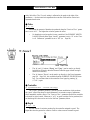
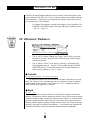
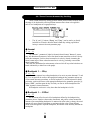
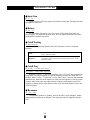
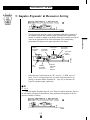
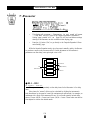
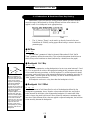
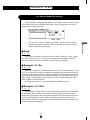
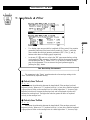
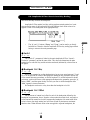
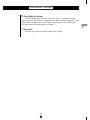
Other Navigation Aids
In addition to the standard procedures described in the previous section, the VL1
sometimes provides additional help in moving between related functions via the function
buttons.
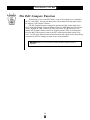
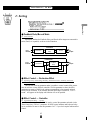
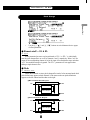
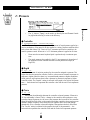
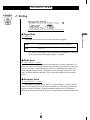
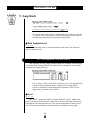
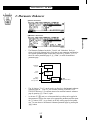
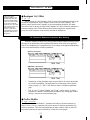
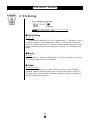
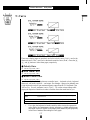
In this example display page from the ELEMENT CONTROLLER group, “Bpag”
(back page) and “Fpag” (forward page) appear above the § and ¶ function buttons.
In this case these buttons can be used to move forward and backward through the entire
list of controller functions so you don’t have to move up to the function directory and
then down to the next function every time you want to select a different element control-
ler page.
Also note the “Para” (Parameter) abbreviation above the • button. This enables
you to go directly to the parameters related to the current page: in this case the vibrato
parameters.
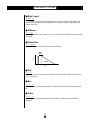
From here you can go back to the vibrato controller page by pressing the •
function button again (note that it is now labelled “Ctrl”), or to the vibrato key scaling
parameters by pressing ¶, below “KSC” on the display.
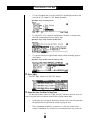
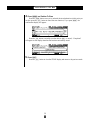
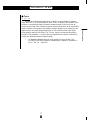
Another variation appears in the COMMON EFFECT parameter displays. In most
cases the number of parameters available for each effect exceeds the capacity of the
display, so the ¡ and ™ function buttons are used to scroll up and down the parameter
list — note the “>” and “<” arrows above the buttons in the display.

12
Feature Reference
●
General Operation
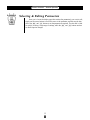
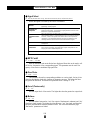
Selecting & Editing Parameters
Once you’ve locate the display page that contains the parameter(s) you want to edit,
simply use the cursor buttons to move the cursor to the parameter, and then use the data
dial or the = and - buttons to set the parameter as required. The data dial is ideal
for quickly covering a large range of settings, while the = and - buttons are best
for small stepwise changes.

Play Mode
The primary function of the PLAY mode is to
allow you to select and play voices. The VL1 play
mode additionally offers a range of controller views
that let you check controller assignments, and simple
“quick edit” capability. Select the PLAY mode from
either the EDIT or UTILITY mode by pressing the
P button.
● The Main Play Mode Display . . . . . . . 14
● Voice Selection . . . . . . . . . . . . . . . . . . 15
● Controller Views . . . . . . . . . . . . . . . . . 17
● Quick Editing In the Play Mode . . . . . 19

14
Feature Reference
●
Play Mode
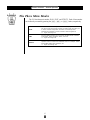
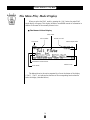
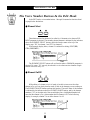
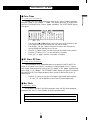
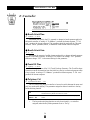
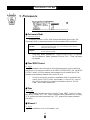
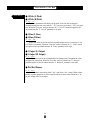
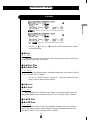
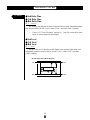
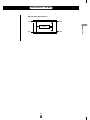
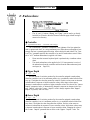
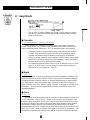
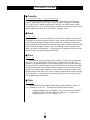
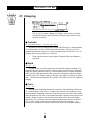
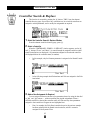
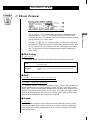
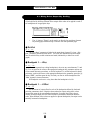
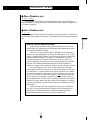
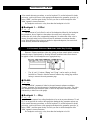
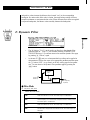
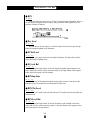
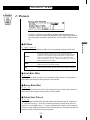
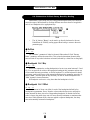
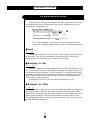
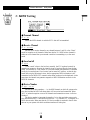
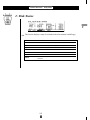
The Main Play Mode Display
When you select the PLAY mode by pressing the P button, the main PLAY
mode display will appear. This display includes a considerable amount of information in
addition to the name of the currently selected voice.
The abbreviations in the section separated by a line at the bottom of the display
(“Cnt1”, “Cnt2”, etc) indicate the functions of the corresponding function buttons
below the display (described below).
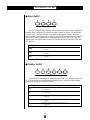
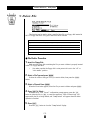
■ The Normal Voice Display
Play mode.
Voice number.
Voice name.
Reverb on or off.
Stereo output mode.
Element E1 and E2 names.
Voice mode.
Effects in use.

15
Feature Reference
●
Play Mode
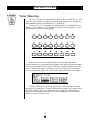
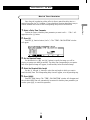
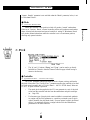
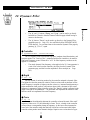
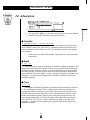
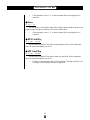
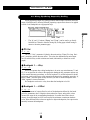
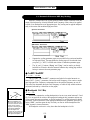
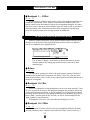
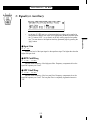
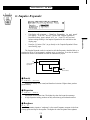
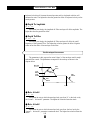
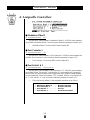
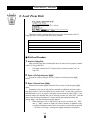
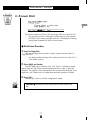
Voice Selection
The VL1’s 128 voices are organized into 8 banks of 16 voices each (8 x 16 = 128).
Any voice can be selected by specifying its bank using the bank keys (a through h),
and its number using the voice number keys (1 through ^).
To select voice “A7”, for example, first press the bank a key and then the voice
number 7 key. The bank a key indicator will flash until the voice number 7 key is
pressed and the D7 voice is actually engaged.
A
1
E1
9
ALL
B
2
E2
10
HE
C
3
E1
11
DF
D
4
E2
12
EQ
E
5
ALL
13
IE
F
6
MOD
14
RSN
G
7
FBD
15
H
8
REV
16
EFFECT ON / OFF
ELEMENT ON / OFFELEMENT SELECT
MODIFIER ON / OFF
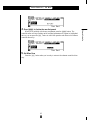
Note that when you select a different bank (or press the same bank button)
the voice directory for the selected bank will appear on the display, showing the names
of all voices in that bank with the cursor located at the currently selected voice number.
The VL1 returns to the normal voice display as soon as you specify the voice number.
You can also press the [ button if you want to stay with the same voice number.
To select a different voice within the same bank it is only necessary to press the
appropriate voice number key. To select a different bank, however, you’ll always have to
press both a bank key and a voice number key (or the [ key). This prevents un-
wanted voices from being selected until you’ve actually specified both the bank and
number of the voice you want to use.

16
Feature Reference
●
Play Mode
DEC INC
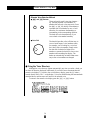
Alternate Voice Selection Methods
● = and - Buttons
These are best for small, step-wise changes —
e.g. selecting adjacent voice numbers, or
numbers that are only a few steps away. Press
the = or - key briefly to decrement or
increment the voice number by one, or hold
either key for continuous decrementing or
incrementing in the corresponding direction.
The bank will switch automatically if you
cross a bank voice-number boundary.
● Data Dial
The data dial provides a fast, efficient way to
cover a broad range of voice numbers when,
for example, you’re looking for a voice but
don’t know the voice number. Simply rotate
the data dial clockwise for higher voice
numbers or counter-clockwise for lower voice
numbers while watching the display. The
banks are automatically switched when neces-
sary as the voice numbers are changed.
●
Using the Voice Directory
Although the voice directory appears automatically any time you select a bank, you
can have the directory displayed continuously if you find it more convenient than the
normal voice display. To switch to the voice directory display, press the • button —
located directly below “Dir” on the display. Voices are selected using the same methods
described above, and the cursor will move to the selected voice.
To return to the normal voice display press the ] or P button.
Sidan laddas ...
Sidan laddas ...
Sidan laddas ...
Sidan laddas ...
Sidan laddas ...
Sidan laddas ...
Sidan laddas ...
Sidan laddas ...
Sidan laddas ...
Sidan laddas ...
Sidan laddas ...
Sidan laddas ...
Sidan laddas ...
Sidan laddas ...
Sidan laddas ...
Sidan laddas ...
Sidan laddas ...
Sidan laddas ...
Sidan laddas ...
Sidan laddas ...
Sidan laddas ...
Sidan laddas ...
Sidan laddas ...
Sidan laddas ...
Sidan laddas ...
Sidan laddas ...
Sidan laddas ...
Sidan laddas ...
Sidan laddas ...
Sidan laddas ...
Sidan laddas ...
Sidan laddas ...
Sidan laddas ...
Sidan laddas ...
Sidan laddas ...
Sidan laddas ...
Sidan laddas ...
Sidan laddas ...
Sidan laddas ...
Sidan laddas ...
Sidan laddas ...
Sidan laddas ...
Sidan laddas ...
Sidan laddas ...
Sidan laddas ...
Sidan laddas ...
Sidan laddas ...
Sidan laddas ...
Sidan laddas ...
Sidan laddas ...
Sidan laddas ...
Sidan laddas ...
Sidan laddas ...
Sidan laddas ...
Sidan laddas ...
Sidan laddas ...
Sidan laddas ...
Sidan laddas ...
Sidan laddas ...
Sidan laddas ...
Sidan laddas ...
Sidan laddas ...
Sidan laddas ...
Sidan laddas ...
Sidan laddas ...
Sidan laddas ...
Sidan laddas ...
Sidan laddas ...
Sidan laddas ...
Sidan laddas ...
Sidan laddas ...
Sidan laddas ...
Sidan laddas ...
Sidan laddas ...
Sidan laddas ...
Sidan laddas ...
Sidan laddas ...
Sidan laddas ...
Sidan laddas ...
Sidan laddas ...
Sidan laddas ...
Sidan laddas ...
Sidan laddas ...
Sidan laddas ...
Sidan laddas ...
Sidan laddas ...
Sidan laddas ...
Sidan laddas ...
Sidan laddas ...
Sidan laddas ...
Sidan laddas ...
Sidan laddas ...
Sidan laddas ...
Sidan laddas ...
Sidan laddas ...
Sidan laddas ...
Sidan laddas ...
Sidan laddas ...
Sidan laddas ...
Sidan laddas ...
Sidan laddas ...
Sidan laddas ...
Sidan laddas ...
Sidan laddas ...
Sidan laddas ...
Sidan laddas ...
Sidan laddas ...
Sidan laddas ...
Sidan laddas ...
Sidan laddas ...
Sidan laddas ...
Sidan laddas ...
Sidan laddas ...
Sidan laddas ...
Sidan laddas ...
Sidan laddas ...
Sidan laddas ...
Sidan laddas ...
Sidan laddas ...
Sidan laddas ...
Sidan laddas ...
Sidan laddas ...
Sidan laddas ...
Sidan laddas ...
Sidan laddas ...
Sidan laddas ...
Sidan laddas ...
Sidan laddas ...
Sidan laddas ...
Sidan laddas ...
Sidan laddas ...
Sidan laddas ...
Sidan laddas ...
Sidan laddas ...
Sidan laddas ...
Sidan laddas ...
Sidan laddas ...
Sidan laddas ...
Sidan laddas ...
Sidan laddas ...
Sidan laddas ...
Sidan laddas ...
Sidan laddas ...
Sidan laddas ...
Sidan laddas ...
Sidan laddas ...
Sidan laddas ...
Sidan laddas ...
Sidan laddas ...
Sidan laddas ...
Sidan laddas ...
Sidan laddas ...
Sidan laddas ...
Sidan laddas ...
Sidan laddas ...
Sidan laddas ...
Sidan laddas ...
Sidan laddas ...
Sidan laddas ...
Sidan laddas ...
Sidan laddas ...
Sidan laddas ...
Sidan laddas ...
Sidan laddas ...
Sidan laddas ...
Sidan laddas ...
Sidan laddas ...
Sidan laddas ...
Sidan laddas ...
Sidan laddas ...
Sidan laddas ...
Sidan laddas ...
Sidan laddas ...
Sidan laddas ...
Sidan laddas ...
-
 1
1
-
 2
2
-
 3
3
-
 4
4
-
 5
5
-
 6
6
-
 7
7
-
 8
8
-
 9
9
-
 10
10
-
 11
11
-
 12
12
-
 13
13
-
 14
14
-
 15
15
-
 16
16
-
 17
17
-
 18
18
-
 19
19
-
 20
20
-
 21
21
-
 22
22
-
 23
23
-
 24
24
-
 25
25
-
 26
26
-
 27
27
-
 28
28
-
 29
29
-
 30
30
-
 31
31
-
 32
32
-
 33
33
-
 34
34
-
 35
35
-
 36
36
-
 37
37
-
 38
38
-
 39
39
-
 40
40
-
 41
41
-
 42
42
-
 43
43
-
 44
44
-
 45
45
-
 46
46
-
 47
47
-
 48
48
-
 49
49
-
 50
50
-
 51
51
-
 52
52
-
 53
53
-
 54
54
-
 55
55
-
 56
56
-
 57
57
-
 58
58
-
 59
59
-
 60
60
-
 61
61
-
 62
62
-
 63
63
-
 64
64
-
 65
65
-
 66
66
-
 67
67
-
 68
68
-
 69
69
-
 70
70
-
 71
71
-
 72
72
-
 73
73
-
 74
74
-
 75
75
-
 76
76
-
 77
77
-
 78
78
-
 79
79
-
 80
80
-
 81
81
-
 82
82
-
 83
83
-
 84
84
-
 85
85
-
 86
86
-
 87
87
-
 88
88
-
 89
89
-
 90
90
-
 91
91
-
 92
92
-
 93
93
-
 94
94
-
 95
95
-
 96
96
-
 97
97
-
 98
98
-
 99
99
-
 100
100
-
 101
101
-
 102
102
-
 103
103
-
 104
104
-
 105
105
-
 106
106
-
 107
107
-
 108
108
-
 109
109
-
 110
110
-
 111
111
-
 112
112
-
 113
113
-
 114
114
-
 115
115
-
 116
116
-
 117
117
-
 118
118
-
 119
119
-
 120
120
-
 121
121
-
 122
122
-
 123
123
-
 124
124
-
 125
125
-
 126
126
-
 127
127
-
 128
128
-
 129
129
-
 130
130
-
 131
131
-
 132
132
-
 133
133
-
 134
134
-
 135
135
-
 136
136
-
 137
137
-
 138
138
-
 139
139
-
 140
140
-
 141
141
-
 142
142
-
 143
143
-
 144
144
-
 145
145
-
 146
146
-
 147
147
-
 148
148
-
 149
149
-
 150
150
-
 151
151
-
 152
152
-
 153
153
-
 154
154
-
 155
155
-
 156
156
-
 157
157
-
 158
158
-
 159
159
-
 160
160
-
 161
161
-
 162
162
-
 163
163
-
 164
164
-
 165
165
-
 166
166
-
 167
167
-
 168
168
-
 169
169
-
 170
170
-
 171
171
-
 172
172
-
 173
173
-
 174
174
-
 175
175
-
 176
176
-
 177
177
-
 178
178
-
 179
179
-
 180
180
-
 181
181
-
 182
182
-
 183
183
-
 184
184
-
 185
185
-
 186
186
-
 187
187
-
 188
188
-
 189
189
-
 190
190
-
 191
191
-
 192
192
-
 193
193
-
 194
194
-
 195
195


Yamaha VL-1 Bruksanvisning
- Kategori
- Digitala pianon
- Typ
- Bruksanvisning
- Denna manual är också lämplig för
på andra språk
- italiano: Yamaha VL-1 Manuale del proprietario
- čeština: Yamaha VL-1 Návod k obsluze
- español: Yamaha VL-1 El manual del propietario
- Deutsch: Yamaha VL-1 Bedienungsanleitung
- polski: Yamaha VL-1 Instrukcja obsługi
- português: Yamaha VL-1 Manual do proprietário
- français: Yamaha VL-1 Le manuel du propriétaire
- Türkçe: Yamaha VL-1 El kitabı
- English: Yamaha VL-1 Owner's manual
- dansk: Yamaha VL-1 Brugervejledning
- русский: Yamaha VL-1 Инструкция по применению
- suomi: Yamaha VL-1 Omistajan opas
- Nederlands: Yamaha VL-1 de handleiding
- română: Yamaha VL-1 Manualul proprietarului