
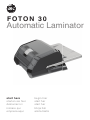
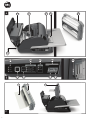
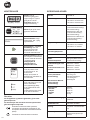
Automatic Laminator
FOTON 30
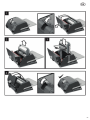
start here
starten sie hier
démarrez ici
iniziare qui
empieza aquí
begin hier
start her
start her
börja här
aloita tästä

English 3
Deutsche 15
Français 27
Italiano 39
Español 51
Nederlands 63
Svenska 75
Dansk 87
Norsk 99
Suomalainen 111

3
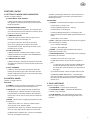
Quick Start Guide 4
Controls 5
Installation 6
Feature Guide 7
Operation 9
Troubleshooting 11
Safety 13
GB

4
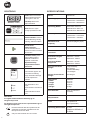
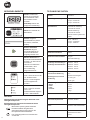
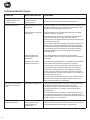
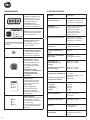
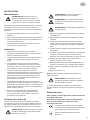
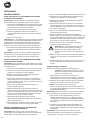
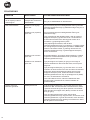
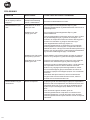
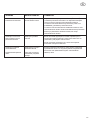
A3/A4
≤120gsm A3/A4
≥120gsm
A3/A4
≤120gsm
A3/A4
≥120gsm
A3/A4
≤120gsm A3/A4
≥120gsm

5
Service
To register and activate the warranty go to
ww.gbceurope.com
For details of your local service representative go to
www.gbceurope.com
Products marked with this symbol meet all
applicable Community regulations for the
European Economic Area.
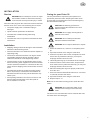
Only use the laminator in indoor areas.
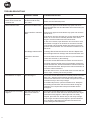
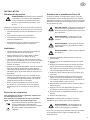
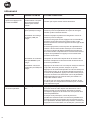
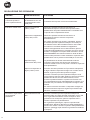
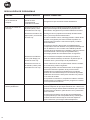
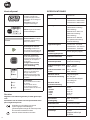
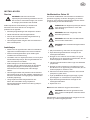
CONTROLS SPECIFICATIONS
Power: turns on unit and
begins warming process,
press again to turn o.
Run/Stop: Starts and
stops lamination
Mode: Press to cycle
through operation modes.
Status indicator: used to
indicate Warming, Ready,
Running, and Error states.
Manual Feed
Ready indicator:
used to indicate when to
insert document in manual
feed modes
Activates Cutter: press
while in Manual Feed
/ Manual Cut Mode to
separate documents.
Important! Verify
completed document
before use
Film Status:
Low indicates approx. 30
documents remaining.
Empty indicates cartridge
must be replaced to
continue
Error States:
Door indicates a door
is ajar.
Jam indicates a document
jam.
Cutter indicates a cutter
error
Model FOTON 30
Operating Speed 75 microns: 700mm/min
100 microns: 670mm/min
125 microns: 650mm/min
Operating Modes Auto Feed / Auto Cut
Manual Feed / Auto Cut
Manual Feed / Manual Cut
Warm-Up Time 75 microns: 3 minutes
100 microns: 3.5 minutes
125 microns: 4 minutes
Maximum Feed
Capacity
30 sheets (80gsm paper)
Maximum Film Width 306mm
Maximum Document
Thickness
250gsm (Manually Fed)
Document Lengths
Supported
Document Widths
Supported
Minimum: 152mm
Maximum: 432mm
Minimum: 127mm
Maximum: 297mm
Auto Feeder Media
Weight
Manual Feeder Media
Weight
High Reliability:
64-120gsm
Variable Reliability:
121-220gsm
64-250gsm
Dimensions
• Width
• Height
• Depth
• Weight
Machine
57.7cm
24.5cm
47.8cm
9.5kgs
After 15 minutes of
inactivity
Electrical
Requirements
220-240V, 50/60Hz
Fuse Yes (internal &
non-replaceable)
Operating Environment 5-35C
Maximum Altitude of
2,000m

6
GB
INSTALLATION
Service
WARNING: Do not attempt to service or repair
the laminator. Failure to observe this warning
could result in severe personal injury or death.
Disconnect the plug from the socket and contact Customer
Service when one or more of the following has occurred.
• The power supply cord or attachment plug is
damaged.
• Liquid has been spilled into the laminator.
• The laminator is malfunctioning after being
mishandled.
• The laminator does not operate as described in these
instructions.
Installation
• Shipping damage should be brought to the immediate
attention of the delivering carrier.
• Place the laminator on a stable at surface capable of
supporting 23kg.
• The surface should be at least 0.75m high to assure
comfortable positioning during operation. All four
rubber feet should be on the supporting surface.
• Connect power cord to an appropriate power source.
Avoid connecting other equipment to the same branch
circuit to which the laminator is connected as this may
cause nuisance tripping of the circuit breaker or blown
fuses.
• The laminator should be positioned to allow exiting
lm to drop freely to a at surface. Accumulation of
laminated documents as they exit the laminator may
cause a jam.
• Avoid placing laminator near sources of heat or cold.
Avoid locating the laminator in the direct path of
forced, heated or cooled air.
Caring for your Foton 30
The only maintenance required by the operator is to
periodically clean the rollers. Keeping the rollers clean
ensures that your nished items will not be damaged by
dirt and adhesive build-ups.
CAUTION: the following procedure is
performed while the laminator is hot. Use
extreme caution.
WARNING: Do not apply cleaning uids or
solvents to the rollers.
WARNING: Do not attempt to laminate
adhesives marked ‘Flammable’.
WARNING: Do not expose laminator to liquids.
1. Power the machine on, wait for it to completely warm
up.
2. Open the laminator door using the silver latch.
3. Clean the top rollers with a clean, damp lint-free cloth.
If there are any adhesive build-ups, you may use
isopropyl alcohol instead of water.
4. Lift leading lm edge up to the handle of the cartridge.
5. Clean the bottom rollers with a clean, damp lint-free
cloth. If there are any adhesive build-ups, you may use
isopropyl alcohol instead of water.
6. Place the leading lm edge into proper position and
close the door.
7. Press and hold the RUN/STOP button for 5-7 seconds
to manually advance the rollers.
8. Open the laminator door using the silver latch.
9. Repeat steps 3 – 6.
Note: Do not use metal scouring pads to clean the heat
rollers!
WARNING: Do not laminate glitter and/or
metallic items. Damage to the rollers may
result.
The side covers, and feed table can be cleaned with a lint-
free cloth and a mild detergent.

7
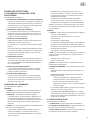
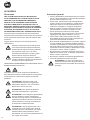
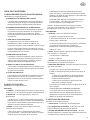
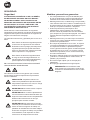
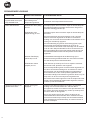
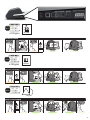
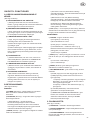
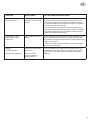
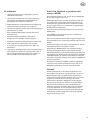
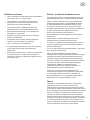
C
a
b
c
d
ac
a
i
e
f
g
h
b
bcd
e
f

8
GB
A. GETTING TO KNOW YOUR LAMINATOR:
(Shown in image A above)
a) FEED TRAY & SIDE GUIDES:
i) Place document(s) to be laminated and use the
side guides to minimise skew. Flip out extension for
larger documents.
b) FEEDER/FEEDER DOOR:
i) Feeds document into laminator. A red light on the
door will indicate that a mis-feed has occurred. Open
the door to clear any mis-feeds.
c) LAMINATOR DOOR:
i) Door that gives access to the inner parts of the
laminator: rollers, lm cartridge, etc.
ii) To Open: pull on the silver latch, and lift up
iii) To Close: gently lower using the silver latch,
and push latch closed. DO NOT push down on the
laminator door to close.
d) FILM CARTRIDGE:
i) Replace the lm cartridge when empty or when
a dierent thickness is required. See CARTRIDGE
FILM LOADING for details.
e) LAMINATORS ROLLERS:
i) Rollers heat-up to activate the adhesive on the lm
and apply the pressure to ensure the lm sticks to the
document.
f) AUTO TRIMMER:
i) When in Auto Cut modes, the trimmer nds the
leading and trailing edge of the document and cuts
the lm. In Manual Cut mode, it will cut the lm when
the CUT button is pressed.
B. CONTROL PANEL:
(Shown in image B above)
BUTTONS
a) POWER – turns the machine on/o. After 15 minutes
of no use, the machine will automatically turn o.
b) RUN/STOP – used to start and stop the laminator.
i) Dual Function – Manual Advance: Continuously
hold the button to manually advance the laminator
rollers. This can be used to clear jams and debris for
cleaning.
c) MODE – allows users to toggle through three modes
of operation.
i) Auto Feed / Auto Cut – best for standard paper
sizes printed on 80-120gsm paper.
ii) Manual Feed / Auto Cut – best for standard paper
sizes on heavy paper stocks that won’t Auto Feed.
iii) Manual Feed / Manual Cut – best for odd shaped
and non- rectangular documents.
d) CUT – pressing this button will cycle the trimmer to
cut the lm one time. This button is primarily used in
Manual Cut mode.
INDICATORS
e) STATUS – communicates the status of the machine:
i) Solid Green = ready to use
ii) Green Blinking Sequence = running
iii) Solid Amber = warming up
iv) Amber Blinking Sequence = warming up and
RUN command accepted. Will begin laminating once
ready.
v) Solid Red = error status
f) FILM – LED light will indicate when lm is low (approx.
30% remaining) or is empty.
i) Low = Amber LED light
ii) Empty = Red LED light
g) MODE – green LED light identies what mode of
operation the machine is in.
h) ERROR MESSAGE – communicates error messages
that need to be resolved.
i) DOOR: one or both doors are open
ii) JAM: the machine may encounter two types of
jams:
1. Laminator jam: push and hold the RUN button
to manually advance the rollers to clear itself.
2. Feeder jam: open the feeder door and remove
the paper.
iii) CUTTER: trimmer cannot complete full cut cycle
iv) MANUAL FEED INDICATOR – communicates
when the machine is ready by illuminating GREEN to
feed the next manually fed document. Located on the
Feeder Door.
C. FILM CARTRIDGE:
(Shown in image C above)
a) CARTRIDGE – inserts into the laminator.
b) CARTRIDGE LABEL – indicates lm thickness.
Located on top of handle.
c) FILM LEADER – the sealed leading edge of the
lm. This edge must be placed facing the exit of the
machine.
FEATURE GUIDE

9
OPERATION
OPERATION MODES:
AUTO FEED / AUTO CUT
Note: Best for standard paper sizes printed on 80-120
gsm paper.
1. Press the POWER button to turn the machine ON.
The machine will automatically start in Auto Feed /
Auto Cut mode.
2. Place your document(s) in the FEED TRAY.
3. Slide the Side Guides to t your document(s) to
minimise skew during lamination.
4. Press the RUN button:
Note: If RUN is pressed before the machine has
completely warmed up, the status bar will be AMBER
blinking in a sequence. The laminator has accepted the
command and will start automatically when machine
reaches proper temperature.
5. Document(s) will be automatically laminated and
automatically trimmed as they exit the machine.
Note: If you hit stop while the document is still feeding
through the laminator, the machine will nish laminating
the document before stopping.
MANUAL FEED / AUTO CUT
Note: Best for standard rectangular paper sizes on heavy
paper stocks that won’t Auto Feed.
1. Press the POWER button to turn the machine ON.
2. Select the Manual Feed / Auto Cut mode by pressing
the Mode button.
3. Wait for the machine to reach proper temperature:
solid green STATUS light.
4. Place only the rst document in the FEED TRAY.
The document must be placed in the centre of the
Feed Tray and far enough into the feeder to grab your
document.
5. Press the RUN button. The document will begin to
feed into the laminator.
6. After your rst document begins laminating, wait for
the MANUAL FEED indicator to illuminate green.
Once illuminated, the machine can be manually fed
the next document. Repeat this process one sheet at
a time until the job is complete.
7. Documents will be manually laminated and
automatically trimmed as they exit the machine.
8. After the nal document has been cut and exits the
machine will automatically stop.
MANUAL FEED / MANUAL CUT
Note: This mode is best used for odd-shaped or non-
rectangular documents that won’t Auto Feed.
1. Press the POWER button to turn the machine ON.
2. Select the Manual Feed / Manual Cut mode by
pressing the Mode button.
3. Wait for the machine to reach proper temperature:
solid green STATUS light.
4. Place only the rst document in the FEED TRAY.
The document must be placed in the centre of the
Feed Tray and far enough into the feeder to grab your
document.
5. Press the RUN button. The document will begin to
feed into the laminator.
6. After your rst document begins laminating, wait for
the MANUAL FEED indicator to illuminate green.
Once illuminated, the machine can be manually fed
the next document. Repeat this process one sheet at
a time until the job is complete.
7. Press the CUT button to cycle the trimmer anytime
you want to cut the lm.
Note: It is recommended to press the CUT
button after you see the entire document exit
the machine to avoid cutting the document.
8. After the nal document has exited the machine,
press the STOP button to stop the lamination
process.
9. Once lamination has stopped, press CUT to cut the
remaining lm that has exited the machine.
CARTRIDGE FILM LOADING
(Reference Images 1-4 to demonstrate process)
CAUTION: the following procedure might
be performed while the laminator is hot. Use
extreme caution.
1. Open Laminator Door: Open the laminator door by
fully raising the silver latch on the top of the machine
and pull up until door fully opens.
2. Remove Cartridge: Lift upward on the cartridge
handle to remove the installed cartridge.
CAUTION: full cartridges tend to be heavy
3. Insert Cartridge: Insert replacement cartridge by
aligning edges of cartridge over grey channel guide in
laminator and lowering.
Note: Film leader should be inserted away from the feeder,
facing towards the exit of the machine.
4. Close Laminator Door: Close the laminator door by
gently lowering the door and fully close the silver latch
on top. DO NOT push down on the laminator door to
close; use the latch.
5. Ensure Cartridge is Fully Inserted: Film Empty
indicator will be illuminated when no cartridge is
installed or if the cartridge is not fully seated on the
bottom.
Note: When the laminator reaches proper temperature,
the machine will feed approximately 23cm of lm to
eliminate potential wrinkles in the lm.

10
GB

11
SYMPTOM POSSIBLE CAUSE CORRECTIVE ACTION
Pressing the Power
button does not turn the
machine ON
The power cord may not
be inserted all the way
into outlet
Fully Insert plug into outlet.
Make sure the outlet has power.
Status Indicator Red: Door Error Indicator Red: Remove any paper from the feeder tray. Open and Close
both the laminator door and the feeder door. Ensure they are
fully closed
Paper Jam Error Indicator
Red:
Remove any paper from the feeder tray. Open and close the
feeder door.
If the above does not clear the error, press and hold the RUN
button for 10 seconds to manually feed lm. Film should
begin to exit the machine and Jam should clear.
If Jam error remains, open laminator door and look to see if
lm leader is caught on an obstacle or the rollers. DO NOT
CUT the lm. Lift-up the lm leader and replace it in proper
position. Shut Laminator door and hold the run button for 10
Seconds.
Film Empty Indicator Red: Cartridge End of Roll label has been detected. Replace the
lm cartridge with new cartridge and shut the laminator door.
Cutter Error Indicator
Red:
Press the manual cut button one time to try and activate the
cutter. Not resolved, try the following:
Press and hold the RUN button for about 10-20 seconds to
manually advance the lm. If there is laminated media in the
exit of the laminator, hold the RUN button until the media has
fully exited the laminator. Now press the manual cut button to
see if the cutter is activated.
If the lm does not run, or if the cutter does not work after the
above steps, contact your service provider.
TROUBLESHOOTING
Film Wrinkles on output Film Misaligned Press and hold the RUN button to manually advance the lm.
After 125 – 500mm of lm has been advanced the wrinkle
should work themselves out. If wrinkle clear press the manual
cut button and you are ready to begin.
If wrinkles still present, open the laminator door. Grasp the
lm exiting the laminator and hold it taut while closing the
laminator door. Repeat above step and wrinkles should
disappear.
Film Edges are not evenly
aligned.
Top and bottom rolls of
lm are not matched
properly.
Press and hold the RUN button to manually advance the
lm. After 125 mm of lm has been advanced the lm edges
should be evenly aligned. If lm edges are now evenly
aligned, press the CUT button and you are ready to begin.
If lm edges are still not evenly aligned, open the laminator
door. Grasp the lm exiting the laminator and hold it taut
while closing the laminator door.

12
GB
SYMPTOM POSSIBLE CAUSE CORRECTIVE ACTION
Documents are skewed in
the lm when exiting
Documents fed in skewed Before loading paper, try tapping the leading edge of the
paper on a at surface and then repeat with the bottom or top
edge to get your paper properly squared.
Insert your media in the auto feeder and slide the edge guide
up to edge of your media.
Experiencing frequent
double feeds
Paper has heavy static Try fanning the media or placing in a paper jogger prior to
feeding it. If issues persist use the Manual Feed / Auto Cut
mode.
Experiencing frequent
mis-feeds
Rollers are slipping on
media and do not feed
sheets

13
General Safeguards
• Use this laminator only for its intended purposes
as according to the specications outlined in the
operating instructions.
• Keep hands, long hair, loose clothing and articles
such as necklaces or ties away from the front of the
feed rollers to avoid entanglement and entrapment.
• When opening the top door of the laminator, avoid
contact with the internal rollers when laminator is
powered on or shortly after the laminator has been
turned o. The rollers can reach temperatures in
excess of 260º F / 126.7° C.
• Keep hands and ngers away from the path of the
sharp lm cutter blade located at the lm exit.
• Do not place the laminator on an unstable cart, stand
or table. An unstable surface may cause the laminator
to fall resulting in serious bodily injury. Avoid quick
stops, excessive force and uneven oor surfaces
when moving the laminator on a cart or stand.
• Do not defeat or remove electrical and mechanical
safety equipment such as interlocks, shields and
guards.
• Do not insert objects unsuitable for lamination.
• Do not expose laminator to liquids.
CAUTION: The receptacle must be located
near the equipment and easily accessible. Do
not use an extension cord.
Safety
YOUR SAFETY, AS WELL AS THE SAFETY OF OTHERS
IS IMPORTANT TO GBC. IN THIS INSTRUCTION
MANUAL AND ON THE PRODUCT ARE IMPORTANT
SAFETY MESSAGES. BEFORE YOU INSTALL OR
USE THE MACHINE, READ AND FOLLOW ALL THE
SAFETY NOTICES CAREFULLY IN THIS CHAPTER.
Observe all the safety information provided. Observe all
safety warnings. Never remove safety warnings or other
information from the equipment.
Read all of the instructions and save these instructions for
further use.
The safety alert symbol precedes each safety
notice in this manual. The symbol indicates a
potential personal safety hazard to you or
others, as well as cause product damage or
property damage.
Observe all the safety information provided.
Observe all safety warnings. Never remove
safety warnings or other information from
the equipment.
THE FOLLOWING WARNINGS ARE FOUND ON THE
FOTON 30 LAMINATOR
Do not open. No user serviceable parts insides. Refer
servicing to qualied service personal.
CAUTION Hot Surface: Laminator rollers can
be in excess of 260° F/ 126.7° C. Please use
caution and do not touch the rollers.
WARNING: Do not attempt to service or repair
the laminator.
WARNING: Do not connect the laminator to
an electrical supply or attempt to operate
the laminator until you have completely
read these instructions. Maintain these
instructions in a convenient location for
future reference.
WARNING: This device is not intended for use
in the direct eld of view at visual display
workplaces. To avoid incoming reections
at visual display workplaces this device must
not be placed in the direct eld of view.
SAFETY

14
GB
Electrical Safeguards
• The equipment should be connected to an easily
accessible and grounded (3-pin) receptacle (socket
outlet) near the equipment.
• This laminator must be connected to a supply voltage
corresponding to the electrical rating as indicated on
the serial plate located on the rear of the machine.
• Unplug the laminator before moving it, or when it is
not in use for an extended period of time.
• Do not operate the laminator with a damaged power
supply cord or plug.
• Do not overload electrical outlets as this can result in
re or shock.
• Do not alter the attachment plug. This plug is
congured for the appropriate electrical supply.
• The unit is intended for indoor use only.
• Disconnect the attachment plug from the receptacle to
which it is connected and keep the power supply cord
in your possession while moving the laminator.
• Do not operate the laminator with a damaged power
supply cord or attachment plug, upon occurrence of
a malfunction, or after laminator has been damaged.
Contact an authorized GBC service representative for
assistance.
Waste Electrical and Electronic
Equipment (WEEE)
At the end of its useful life, your product is considered
to be WEEE. As such, it is important to note that: WEEE is
not to be disposed of as unsorted municipal waste. It is to
be collected separately such that it can be disassembled
so its components and materials can be recycled, re-
used, and recovered (burned for energy content in the
production of electricity).
Public collection points have been set up by municipalities
for the collection of WEEE, free of charge to you.
Please return your WEEE to the collection facility nearest
your home or oce.
If you have diculty locating a collection facility, the retailer
that sold you the product should accept your WEEE.
If you are no longer in contact with your retailer, please
contact ACCO for assistance with this matter.
Recycling of WEEE is geared toward protecting the
environment, protecting human health, preserving raw
materials, improving sustainable development, and
ensuring a better supply of commodities in the European
Union. This will be achieved by retrieving valuable
secondary raw materials and reducing the disposal of
waste. You can contribute to the success of these goals by
returning your WEEE to a collection facility.
Your product is marked with the WEEE symbol (wheelie
bin with an X through it). This symbol is to inform you that
the WEEE is not to be disposed of as unsorted municipal
waste.
Guarantee
Operation of this machine is guaranteed for two years
from date of purchase, subject to normal use. Within the
guarantee period, ACCO will at its own discretion either
repair or replace the defective machine free of charge.
Defects due to misuse or use for inappropriate purposes
are not covered under the guarantee. Proof of date of
purchase will be required. Repairs or alterations made
by persons not authorised by ACCO will invalidate the
guarantee. It is our aim to ensure that our products perform
to the specications stated. This guarantee does not aect
the legal rights which consumers have under applicable
national legislation governing the sale of goods.

15
Schnellstartanleitung 16
Bedienelemente
17
Technische Daten 17
Installation 18
Gerätekomponenten 20
Betrieb 21
Störungsbeseitigung 23
Sicherheit
25
DE

16
A3/A4
≤120gsm A3/A4
≥120gsm
A3/A4
≤120gsm
A3/A4
≥120gsm
A3/A4
≤120gsm A3/A4
≥120gsm

17
TECHNISCHE DATEN
Modell FOTON 30
Laminiergeschwindigkeit 75 µm: 700mm/min
100 µm: 670mm/min
125 µm: 650mm/min
Betriebsarten Automatische Zuführung/
Automatischer Schnitt
Manuelle Zuführung/
Automatischer Schnitt
Manuelle Zuführung/Manueller
Schnitt
Aufwärmzeit 75 µm: 3 Minuten
100 µm: 3,5 Minuten
125 µm: 4 Minuten
Maximale Zufuhrkapazität 30 Blatt (80 g/m²)
Maximale Folienbreite 306mm
Maximale Dokumentstärke 250 g/m²
(manuelle Zuführung)
Zulässige Dokumentlängen
Zulässige Dokumentbreiten
Minimum: 152mm
Maximum: 432mm
Minimum: 127mm
Maximum: 297mm
Mediengewicht,
automatische Zuführung
Mediengewicht, manuelle
Zuführung
Hohe Zuverlässigkeit: 64–120
g/m²
Variable Zuverlässigkeit:
121–220 g/m²
64-250 g/m²
Abmessungen
• Breite
• Höhe
• Tiefe
• Gewicht
Gerät
57,7cm
24,5cm
47,8cm
9.5kgs
nach 15 Minuten Inaktivität
Electrical Requirements 220-240V, 50/60Hz
Fuse Ja (intern, nicht austauschbar)
Operating Environment 5-35C
Maximale Standorthöhe:
2000m
Service
Registrierung und Aktivierung der Garantie unter
www.gbceurope.com
Einzelheiten zum örtlichen Kundendienst siehe
www.gbceurope.com.
Mit diesem Symbol gekennzeichnete
Produkte erfüllen alle geltenden
Gemeinschaftsverordnungen für den
Europäischen Wirtschaftsraum.
Das Laminiergerät nur im Innenbereich
verwenden.
BEDIENELEMENTE
Power: schaltet das
Gerät ein und beginnt
das Aufwärmen. Zum
Ausschalten erneut
drücken.
Run/Stop: startet und
stoppt die Laminierung.
Mode: zur Auswahl der
Betriebsart.
Status: zeigt den
Gerätestatus an (wärmt
auf, bereit, in Betrieb,
Fehler).
Bereit, manuelles
Zuführen: zeigt im
manuellen Betrieb an,
wann das Dokument
eingelegt werden soll.
Messer aktivieren: im
manuellen Schneidbetrieb
drücken, um Dokumente
zu trennen.
Hinweis: Vor Gebrauch
sicherstellen, dass
die Laminierung
abgeschlossen ist.
Folienstatus:
Low = Folie reicht noch für
ca. 30 Dokumente.
Empty = Folienmagazin
muss ausgetauscht
werden.
Fehlerzustände:
Door = eine Tür ist oen.
Jam = ein
Dokumentenstau liegt vor.
Cutter = Messerfehler.

18
DE
INSTALLATION
Wartung
WARNUNG: Nicht versuchen, das
Laminiergerät selbst zu warten oder instand
zu setzen. Bei Nichtbeachten dieser Warnung
besteht die Gefahr schwerer Verletzungen und
Todesgefahr.
In folgenden Fällen den Netzstecker ziehen und den
Kundendienst verständigen:
• Das Netzkabel oder der Netzstecker ist beschädigt.
• Flüssigkeit ist in das Laminiergerät eingedrungen.
• Nach unsachgemäßem Einsatz ist eine
Betriebsstörung aufgetreten.
• Das Laminiergerät funktioniert nicht so wie in der
vorliegenden Anleitung beschrieben.
Installation
• Transportschäden sind unverzüglich dem
Lieferunternehmen zu melden.
• Das Laminiergerät auf eine stabile, ache Unterlage
mit einer Tragkraft von 23 kg aufstellen.
• Zur Gewährleistung einer bequemen Bedienung des
Geräts sollte die Aufstellungsäche mindestens 0,75
m hoch sein. Alle vier Gummifüße müssen vollständig
auf der Aufstellungsäche stehen.
• Das Netzkabel an eine geeignete Stromquelle
anschließen. An den Stromkreis des Laminiergeräts
sollten keine weiteren Geräte angeschlossen werden,
da es ansonsten zu einer überhäuften Auslösung des
Schutzschalters bzw. der Sicherung kommen kann.
• Das Laminiergerät muss so aufgestellt werden, dass
die ausgegebene Folie ungehindert auf eine ache
Fläche gleiten kann. Ein Auaufen von Laminat am
Geräteausgang kann zu einem Stau führen.
• Das Gerät nicht in der Nähe von Wärme- oder
Kältequellen aufstellen. Das Gerät nicht direkt in
einem von einem Kühl- oder Heizgebläse erzeugten
Luftstrahl aufstellen.
Die einzige erforderliche Pegemaßnahme besteht in einer
regelmäßigen Reinigung der Walzen. Durch die Reinigung
der Walzen wird eine Kontaminierung des Laminats mit
Schmutz und Klebsto vermieden.
ACHTUNG: Der nachfolgende Arbeitsgang
erfolgt bei heißem Gerät. Extreme Vorsicht
walten lassen.
WARNUNG: Keine Reinigungs- oder
Lösungsmittel auf die Walzen aufbringen.
WARNUNG: Folien mit einem als entzündlich
gekennzeichneten Klebsto dürfen nicht
verwendet werden.
WARNUNG: Keinerlei Flüssigkeiten auf oder
in das Gerät schütten.
1. Gerät einschalten und warten, bis die Aufwärmphase
abgeschlossen ist.
2. Gerätetür mithilfe des silberfarbenen Riegels önen.
3. Obere Walzen mit einem sauberen und fusselfreien,
feuchten Tuch reinigen. Klebstorückstände können
mit Isopropanol entfernt werden.
4. Vorderkante der Folie anheben.
5. Untere Walzen mit einem sauberen und fusselfreien,
feuchten Tuch reinigen. Klebstorückstände können
mit Isopropanol entfernt werden.
6. Vorderkante der Folie in die richtige Position legen
und Tür schließen.
7. RUN/STOP-Taste 5–7 Sekunden lang gedrückt halten,
um die Walzen zu drehen.
8. Gerätetür mithilfe des silberfarbenen Riegels önen.
9. Schritte 3–6 wiederholen.
Hinweis: Zum Reinigen der Walzen keine Stahlwolle oder
Ähnliches verwenden!
WARNUNG: Keine Objekte mit Glitzer- und/
oder Metallpartikeln laminieren. Diese können
die Walzen beschädigen.
Zur Reinigung der seitlichen Abdeckungen und des
Zufuhrfachs ein fusselfreies Tuch und ein mildes
Reinigungsmittel verwenden.

19
C
a
b
c
d
ac
a
i
e
f
g
h
b
bcd
e
f

20
DE
A. ÜBERBLICK:
(Siehe Abbildung A oben)
a) ZUFUHRFACH UND SEITENFÜHRUNGEN:
i) Zu laminierende Dokumente einlegen und mithilfe
der Seitenführungen gerade ausrichten. Für größere
Dokumente die Fachverlängerung ausklappen.
b) ZUFUHR/ZUFUHRTÜR:
i) Zieht Dokumente in das Gerät ein. Im Fall eines
Fehleinzugs leuchtet eine rote Anzeige an der Tür auf.
Zum Beseitigen von Fehleinzügen die Tür önen.
c) GERÄTETÜR:
i) Legt das Geräteinnere mit Walzen, Folienmagazin
und weiteren Komponenten frei.
ii) Tür önen: Die Tür am silberfarbenen Riegel
anheben.
iii) Tür schließen: Silberfarbenen Riegel vorsichtig nach
unten drücken bis er einrastet. Zum Schließen NICHT
auf die Gerätetür drücken.
d) FOLIENMAGAZIN:
i) Folienmagazin austauschen, wenn es leer ist
oder eine andere Folienstärke benötigt wird. Siehe
„EINSETZEN DES FOLIENMAGAZINS“.
e) LAMINIERWALZEN:
i) Die heißen Walzen aktivieren den Klebsto auf der
Folie und sorgen durch Druck dafür, dass die Folie auf
dem Dokument haftet.
f) AUTOMATISCHES MESSER:
i) In der Betriebsart Automatischer Schnitt erkennt das
Messer die Vorder- und Hinterkante der Dokumente
und schneidet die Folie durch. In der Betriebsart
Manueller Schnitt muss zum Schneiden der Folie die
Taste CUT gedrückt werden.
B. BEDIENFELD:
(Siehe Abbildung B oben)
TASTEN
a) POWER – schaltet das Gerät ein und aus. Nach 15
Minuten Inaktivität schaltet sich das Gerät automatisch
aus.
b) RUN/STOP – dient zum Starten und Stoppen des
Betriebs.
i) Doppelfunktion, manueller Vorschub – Die Taste
gedrückt halten, um die Laminierwalzen zu drehen.
Diese Funktion dient der Staubeseitigung und zum
Entfernen von Schmutz beim Reinigen.
c) MODE – dient zur Auswahl einer von drei Betriebsarten.
i) Auto Feed / Auto Cut – (automatische Zuführung/
automatischer Schnitt) eignet sich ideal für
Standardformate und Grammaturen von 80 bis
120 g/m².
ii) Manual Feed / Auto Cut – (manuelle Zuführung/
automatischer Schnitt) eignet sich am besten für
Standardformate und schweres Papier, das nicht
automatisch eingezogen wird.
iii) Manual Feed / Manual Cut – manuelle Zuführung/
manueller Schnitt) eignet sich für Dokumente einer
anderen als rechteckiger Form.
d) CUT – (Schneiden) durch Drücken dieser Taste wird
das Messer zum einmaligen Schneiden der Folie aktiviert.
Die Taste wird hauptsächlich in der Betriebsart Manueller
Schnitt verwendet.
ANZEIGEN
e) STATUS – zeigt den Status des Geräts an:
i) Grünes Leuchten = betriebsbereit
ii) Grüne Blinkfolge = in Betrieb
iii) Gelbes Leuchten = in Aufwärmphase
iv) Gelbe Blinkfolge = in Aufwärmphase, der Befehl
RUN zum Auslösen des Laminiervorgangs ist
eingegangen. Der Laminiervorgang beginnt, sobald
das Gerät betriebsbereit ist
v) Rotes Leuchten = Fehler
f) FILM – Die LED zeigt an, wenn nur noch ca. 30 % der
Folie verbleiben, bzw. wenn das Folienmagazin leer ist.
i) Folie knapp = LED leuchtet gel.
ii) Magazin leer = LED leichtet rot
g) MODE – Die grüne LED zeigt an, welche Betriebsart
aktiviert wurde.
h) FEHLERANZEIGE – weist auf einen Fehler hin, der
behoben werden muss.
i) DOOR: Eine oder beide Türen sind oen.
ii) JAM: Es ist einer von zwei möglichen Staus
aufgetreten:
1. Stau im Gerät: Die RUN-Taste gedrückt halten,
um die Walzen zu drehen und den Stau so zu
beseitigen.
2. Stau in der Zufuhr: Die Zufuhrtür önen und das
Papier entfernen.
iii) CUTTER: Das Messer kann keinen vollständigen
Schneidzyklus ausführen.
iv) ANZEIGE FÜR MANUELLE ZUFUHR: Leuchtet
grün auf, wenn das Gerät bereit ist und das nächste
Dokument manuell zugeführt werden kann. Diese
Anzeige bendet sich auf der Zufuhrtür.
C. FOLIENMAGAZIN:
(Siehe Abbildung C oben)
a) MAGAZIN – wird in das Gerät eingesetzt.
b) MAGAZINBESCHRIFTUNG – gibt die Folienstärke an.
Bendet sich an der Grioberseite.
c) FOLIENVORDERKANTE – die miteinander verklebten
Vorderkanten der Folienrollen. Die Kante muss der
Geräteausgabe zugewandt sein.
GERÄTEKOMPONENTEN
Sidan laddas...
Sidan laddas...
Sidan laddas...
Sidan laddas...
Sidan laddas...
Sidan laddas...
Sidan laddas...
Sidan laddas...
Sidan laddas...
Sidan laddas...
Sidan laddas...
Sidan laddas...
Sidan laddas...
Sidan laddas...
Sidan laddas...
Sidan laddas...
Sidan laddas...
Sidan laddas...
Sidan laddas...
Sidan laddas...
Sidan laddas...
Sidan laddas...
Sidan laddas...
Sidan laddas...
Sidan laddas...
Sidan laddas...
Sidan laddas...
Sidan laddas...
Sidan laddas...
Sidan laddas...
Sidan laddas...
Sidan laddas...
Sidan laddas...
Sidan laddas...
Sidan laddas...
Sidan laddas...
Sidan laddas...
Sidan laddas...
Sidan laddas...
Sidan laddas...
Sidan laddas...
Sidan laddas...
Sidan laddas...
Sidan laddas...
Sidan laddas...
Sidan laddas...
Sidan laddas...
Sidan laddas...
Sidan laddas...
Sidan laddas...
Sidan laddas...
Sidan laddas...
Sidan laddas...
Sidan laddas...
Sidan laddas...
Sidan laddas...
Sidan laddas...
Sidan laddas...
Sidan laddas...
Sidan laddas...
Sidan laddas...
Sidan laddas...
Sidan laddas...
Sidan laddas...
Sidan laddas...
Sidan laddas...
Sidan laddas...
Sidan laddas...
Sidan laddas...
Sidan laddas...
Sidan laddas...
Sidan laddas...
Sidan laddas...
Sidan laddas...
Sidan laddas...
Sidan laddas...
Sidan laddas...
Sidan laddas...
Sidan laddas...
Sidan laddas...
Sidan laddas...
Sidan laddas...
Sidan laddas...
Sidan laddas...
Sidan laddas...
Sidan laddas...
Sidan laddas...
Sidan laddas...
Sidan laddas...
Sidan laddas...
Sidan laddas...
Sidan laddas...
Sidan laddas...
Sidan laddas...
Sidan laddas...
Sidan laddas...
Sidan laddas...
Sidan laddas...
Sidan laddas...
Sidan laddas...
Sidan laddas...
Sidan laddas...
Sidan laddas...
-
 1
1
-
 2
2
-
 3
3
-
 4
4
-
 5
5
-
 6
6
-
 7
7
-
 8
8
-
 9
9
-
 10
10
-
 11
11
-
 12
12
-
 13
13
-
 14
14
-
 15
15
-
 16
16
-
 17
17
-
 18
18
-
 19
19
-
 20
20
-
 21
21
-
 22
22
-
 23
23
-
 24
24
-
 25
25
-
 26
26
-
 27
27
-
 28
28
-
 29
29
-
 30
30
-
 31
31
-
 32
32
-
 33
33
-
 34
34
-
 35
35
-
 36
36
-
 37
37
-
 38
38
-
 39
39
-
 40
40
-
 41
41
-
 42
42
-
 43
43
-
 44
44
-
 45
45
-
 46
46
-
 47
47
-
 48
48
-
 49
49
-
 50
50
-
 51
51
-
 52
52
-
 53
53
-
 54
54
-
 55
55
-
 56
56
-
 57
57
-
 58
58
-
 59
59
-
 60
60
-
 61
61
-
 62
62
-
 63
63
-
 64
64
-
 65
65
-
 66
66
-
 67
67
-
 68
68
-
 69
69
-
 70
70
-
 71
71
-
 72
72
-
 73
73
-
 74
74
-
 75
75
-
 76
76
-
 77
77
-
 78
78
-
 79
79
-
 80
80
-
 81
81
-
 82
82
-
 83
83
-
 84
84
-
 85
85
-
 86
86
-
 87
87
-
 88
88
-
 89
89
-
 90
90
-
 91
91
-
 92
92
-
 93
93
-
 94
94
-
 95
95
-
 96
96
-
 97
97
-
 98
98
-
 99
99
-
 100
100
-
 101
101
-
 102
102
-
 103
103
-
 104
104
-
 105
105
-
 106
106
-
 107
107
-
 108
108
-
 109
109
-
 110
110
-
 111
111
-
 112
112
-
 113
113
-
 114
114
-
 115
115
-
 116
116
-
 117
117
-
 118
118
-
 119
119
-
 120
120
-
 121
121
-
 122
122
-
 123
123


på andra språk
- italiano: GBC 4410011 Manuale utente
- eesti: GBC 4410011 Kasutusjuhend
- español: GBC 4410011 Manual de usuario
- Deutsch: GBC 4410011 Benutzerhandbuch
- français: GBC 4410011 Manuel utilisateur
- dansk: GBC 4410011 Brugermanual
- Nederlands: GBC 4410011 Handleiding