Thermex GLASGOW Installationsguide
- Kategori
- Mixer / matberedare tillbehör
- Typ
- Installationsguide

Glasgow 60 cm sort
Glasgow 80 cm sort
English • Svenska

1
CONTENT
CONTENT .................................................................................................................................. 1
SAFETY INSTRUCTIONS ............................................................................................................. 2
INSTALLATION (VENT OUTSIDE) ............................................................................................... 4
TROUBLESHOOTING ................................................................................................................. 8
MAINTENANCE AND CLEANING ............................................................................................... 8
ENVIRONMENTAL PROTECTION: ............................................................................................ 11

2
SAFETY INSTRUCTIONS
This manual explains the proper installation and use of your cooker hood,
please read it carefully before using even if you are familiar with the product.
The manual should be kept in a safe place for future reference.
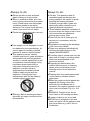
Never to do:
● Do not try to use the cooker hood
without the grease filters or if the filters
are excessively greasy!
●Do not install above a cooker with a
high level grill.
●Do not leave frying pans unattended
during use because overheated fats or
oils might catch fire.
●Never leave naked flames under the
cooker hood.
●If the cooker hood is damaged, do not
attempt to use.
●Do not flambé under the cooker hood.
●CAUTION: Accessible parts may
become hot when used with cooking
appliances.
●The minimum distance between the
supporting surface for the cooking
vessels on the hob and the lowest part
of the cooker hood. (When the cooker
hood is located above a gas appliance,
this distance shall be at least 65 cm)
●The air must not be discharged into a
flue that is used for exhausting fumes
from appliances burning gas or other
fuels.
Always to do:
● Important! Always switch off the
electricity supply at the mains during
installation and maintenance such as
light bulb replacement.
●The cooker hood must be installed in
accordance with the installation
instructions and all measurements
followed.
●All installation work must be carried
out by a competent person or qualified
electrician.
●Please dispose of the packing material
carefully. Children are vulnerable to it.
● Pay attention to the sharp edges
inside the cooker hood especially
during installation and cleaning.
●Make sure the ducting has no bends
sharper than 90 degrees as this will
reduce the efficiency of the cooker
hood.
●Warning: Failure to install the screws
or fixing device in accordance with
these instructions may result in
electrical hazards
●Warning: Before obtaining access to
terminals, all supply circuits must be
disconnected.

3
Always to do:
●Always put lids on pots and pans
when cooking on a gas cooker.
●When in extraction mode, air in the
room is being removed by the cooker
hood. Please make sure that proper
ventilation measures are being
observed. The cooker hood removes
odours from room but not steam.
●Cooker hood is for domestic use only.
●If the supply cord is damaged, it must
be replaced by the manufacturer, its
service agent or similarly qualified
persons in order to avoid a hazard.
●This appliance can be used by
children aged from 8 years and above
and persons with reduced physical,
sensory or mental capabilities or lack
of experience and knowledge if they
have been given supervision or
instruction concerning use of the
appliance in a safe way and
understand the hazards involved.
Children shall not play with the
appliance. Cleaning and user
maintenance shall not be made by
children without supervision.
●Warning: Before obtaining access to
terminals, all supply circuits must be
disconnected.
Always to do:
● Caution: The appliance and its
accessible parts can become hot
during operation. Be careful to avoid
touching the heating elements.
Children younger than 8 years old
should stay away unless they are
under permanent supervision.
● There shall be adequate ventilation of
the room when the range hood is used
at the same time as appliances
burning gas or other fuels.
●There is a fire risk if cleaning is not
carried out in accordance with the
instructions
●Regulations concerning the discharge
of air have to be fulfilled.
●Clean your appliance periodically by
following the method given in the
chapter MAINTENANCE.
●For safety reason, please use only the
same size of fixing or mounting screw
which are recommended in this
instruction manual.
●Regarding the details about the
method and frequency of cleaning,
please refer to maintenance and
cleaning section in the instruction
manual.
●Cleaning and user maintenance shall
not be made by children without
supervision.
●When the range hood and appliances
supplied with energy other than
electricity are simultaneously in
operation, the negative pressure in the
room must not exceed 4 Pa (4 x 10⁻⁵
bar).
●WARNING: Danger of fire: do not
store items on the cooking surfaces.
●A steam cleaner is not to be used.
●NEVER try to extinguish a fire with
water, but switch off the appliance and
then cover flame e.g. with a lid or a
fire blanket.

4
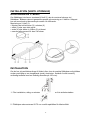
INSTALLATION (VENT OUTSIDE)
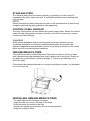
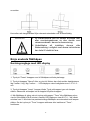
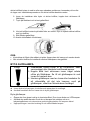
MOUNTING OF THE V-FLAP
If the cooker hood does not have an assembled V-flap 1, you should mount the half-
parts to its body.The images only show an example of how to mount the V-flap,the
outlet may be various according to different models and configuration.
To mount the V-flap 1 you should:
• Mount two half-parts 2 into the body 6
• a pin 3 should be top oriented;
• the axis 4 should be inserted in the holes 5 on body;
• repeat all the operations for the 2nd half-part
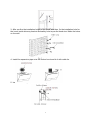
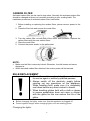
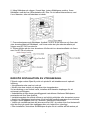
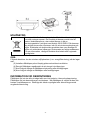
INSTALLATION
If you have an outlet to the outside, your cooker hood can be connected as below
picture by means of an extraction duct (enamel, aluminum, flexible pipe or non-
flammable material with an interior diameter of 150mm)
1. Before installation, turn the unit off and unplug it from the outlet.
2. The cooker hood should be placed at a distance of 65~75cm above the cooking
surface for best effect.

5
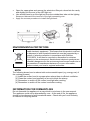
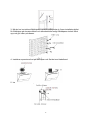
3. After confirm the installation height of the hood, and then, fix the installation hole for
the hood, inside chimney bracket and safety hole as per the hood size. Make the holes
on the wall.
4. Install the expansion pipe onto the cooker hood and tie it with cable tie.
5. Install the chimney bracket on the chimney.

6
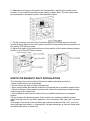
6. Make the hood hang on the wall in the fixed position, adjusting the cooker hood
position, fix the cooker hood with screws (safety screws). Note: The two safety vents
are positioned on the back housing, with diameter of 6mm.
7. Fix the chimneys onto the cooker hood:Use 2pcs of ST4*8mm screws to fix the
outside chimney bracket onto the cooker hood,then fix the outside chimney bracket on
the wall by ST4*40mm screws.
8. Adjust the height of the inside chimney to the position of the inside chimney bracket
and fix on it by 2pcs ST4*8mm screws.
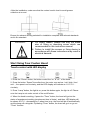
HINTS FOR EXHAUST DUCT INSTALLATION
The following rules must be strictly followed to obtain optimal air extraction:
• Keep exhaust duct short and straight
• Do not reduce the size or restrict exhaust duct
• When using flexible duct always install the duct pulled taut to minimize pressure loss
• Failure to observe these basic instructions will reduce the performance and increase
noise levels of the range hood.
• Any installation work must be carried out by a qualified electrician or competent
person.
•Do not connect the ducting system of the hood to any existing ventilation system
which is being used for any other appliance ,such as warmer tube, gas tube , hot wind
tube.
•The angle of the bend of the ventilation pipe should not be less than 120º; you must
direct the pipe horizontally, or, alternatively, the pipe should go up from the initial point
and should be led to an outer wall.

7
•After the installation ,make sure that the cooker hood is level to avoid grease
collection at on end.
Ensure the exhaust ducting selected for installation complies with relevant standards
and is fire retardant.
WARNING:
For safety reason, please use only the same
size of fixing or mounting screw which are
recommended in this instruction manual.
Failure to install the screws or fixing device in
accordance with these instructions may result in
electrical hazards.
Start Using Your Cooker Hood
Touch control with LED display
1. Press the “Power” button, the button control the “on” & “off ” of the hood.
2. Press the button “Speed” time after time, the motor runs as low / mid / high / low /
mid…, the speed runs circularly; and the LED display will indicate as 1-2-3-1-2…
circularly.
3. Press “Lamp” button, the light is on, press this button again, the light is off. Please
note the Lamp is not under control of the on/off button.
4. When the hood is working, if press the “Timer” button, the hood will go into the
status of acquiescent working (acquiescent time is 9mins), and then, LED display will
be shown 9.8.7.6 ...decreasing by 1,when time is up, the hood will be off automatically
and the lamp will extinguish. If pressing “Timer” button, the hood will go in or go out
“Timer” function.

8
TROUBLESHOOTING
Fault Possible Cause Solution
Light on, but motor
does not work
Fan switch turned off
Select a fan switch position.
Fan switch failed
Contact service center.
Motor failed
Contact service center.
Light does not
work, motor does
not work
House fuses blown
Reset/Replace fuses.
Power cord loose or
disconnected
Refit cord to power outlet.
Switch power outlet on.
Oil leakage
One way valve and the outlet
are not tightly sealed
Take down the one way valve
and seal with sealant.
Leakage from the connection of
chimney and cover
Take chimney down and seal.
Lights not working
Broken/Faulty globes
Replace globes as per this
instruction.
Insufficient suction
The distance between the
range hood and the gas top is
too far
Refit the range hood to the
correct distance.
The Range hood
inclines
The fixing screw not tight
enough
Tighten the hanging screw and
make it horizontal.
NOTE:
Any electrical repairs to this appliance must conform to your local, state and
federal laws.Please contact the service centre if in any doubt before
undertaking any of the above.Always disconnect the unit from the power source when
opening the unit.
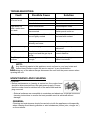
MAINTENANCE AND CLEANING
Caution:
• Before maintenance or cleaning is carried out, the cooker hood
should be disconnected from the main power supply. Ensure
that the cooker hood is switched off at the wall socket and the
plug removed.
• External surfaces are susceptible to scratches and abrasions, so please follow the
cleaning instructions to ensure the best possible result is achieved without
damage.
GENERAL
Cleaning and maintenance should be carried out with the appliance cold especially
when cleaning.Avoid leaving alkaline or acid substances (lemon juice, vinegar etc.)
on the surfaces.

9
STAINLESS STEEL
The stainless steel must be cleaned regularly (e.g.weekly) to ensure long life
expectancy.Dry with a clean soft cloth. A specialized stainless steel cleaning fluid
may be used.
NOTE:
Ensure that wiping is done along with the grain of the stainless steel to prevent any
unsightly crisscross scratching patterns from appearing.
CONTROL PANEL SURFACE
The inlay control panel can be cleaned using warm soapy water. Ensure the cloth is
clean and well wrung before cleaning. Use a dry soft cloth to remove any excess
moisture left after cleaning.
Important
Using neutral detergents and avoid using harsh cleaning chemicals, strong
household detergents or products containing abrasives,as this will affect the
appliance appearance and potentially remove any printing of artwork on the control
panel and will void manufactures warrantee.
GREASE MESH FILTERS
The mesh filters can be cleaned by hand. Soak them for about 3 minute in water
with a grease-loosening detergent then brush it gently with a soft brush. Please do
not apply too much pressure, avoid to damage it . (Leave to dry naturally out of
direct sun light)
Filters should be washed separately to crockery and kitchen utensils. it is advisable
not to use rinse aid.
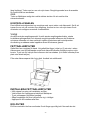
INSTALLING GREASE MESH FILTERS
• To install filters for the following four steps .
- Angle the filter into slots at the back of the hood.
- Push the button on handle of the filter.
- Release the handle once the filter fits into a resting position.
- Repeat to install all filters.

10
CARBON FILTER
Activated carbon filter can be used to trap odors. Normally the activated carbon filter
should be changed at three or six months according to your cooking habit. The
installation procedure of activated carbon filter is as below.
1. Before installing or replacing the carbon filters, please remove power to the
unit.
2. Press the filter lock and remove the mesh filter.
3. Turn the carbon filter on both side of the motor anti-clockwise. Replace the
carbon filters with the new carbon filters.
4. Place the mesh filter.
5. Connect the power supply to the wall socket.
NOTE:
• Make sure the filter is securely locked. Otherwise, it would loosen and cause
dangerous.
• When activated carbon filter attached, the suction power will be lowered.
BULB REPLACEMENT
Important :
The bulb must be replaced by the manufacturer,
its service agent or similarly qualified persons.
Always switch off the electricity supply before
carrying out any operations on the appliance.
When handling bulb, make sure it is completely
cool down before any direct contact to hands.
When handling globes hold with a cloth or gloves
to ensure perspirat
ion does not come in contact
with the globe as this can reduce t
he life of the
globe.
Note:
Before changing the lights, make sure that the appliance is plugged off.
Protect against danger when changing lights, such as wearing gloves.
Changing the lights:

11
• Open the upper glass and remove the aluminium filter,put a hand into the cavity
and slightly pull one end of the LED light out.
• Use another hand to pull the light out from the outside,then take out the lighting
fixture and dismantle the terminal of the light connecting wire.
• Apply the reverse procedure to install the light back.
ENVIRONMENTAL PROTECTION:
This product is marked with the symbol on the selective sorting of
waste electronic equipment. This means that this product must not
be disposed of with household waste but must be supported by a
system of selective collection in accordance with Directive
2012/19/EU. It will then be recycled or dismantled to minimize
impacts on the environment, electrical and electronic products are
potentially dangerous for the environment and human health due to
the presence of hazardous substances.For more information,
please contact your local or regional authorities.
NOTE:
The following shows how to reduce total environmental impact (e.g. energy use) of
the cooking process).
(1) Install the cooker hood in a proper place where there is efficient ventilation.
(2) Clean the cooker hood regularly so as not to block the airway.
(3) Remember to switch off the cooker hood light after cooking.
(4) Remember to switch off the cooker hood after cooking.
INFORMATION FOR DISMANTLING
Do not dismantle the appliance in a way which is not shown in the user manual.
The appliance could not be dismantled by user. At the end of life, the appliance
should not be disposed of with household waste. Check with you Local Authority
or retainer for recycling advice.

12
INNEHÅLL
INNEHÅLL ................................................................................................................................ 12
SÄKERHETSFÖRESKRIFTER ...................................................................................................... 13
INSTALLATION (VENTIL UTOMHUS) ....................................................................................... 15
FELSÖKNING ........................................................................................................................... 19
UNDERHÅLL OCH RENGÖRING ............................................................................................... 19
MILJÖSKYDD: .......................................................................................................................... 22

13
SÄKERHETSFÖRESKRIFTER
Denna bruksanvisning beskriver korrekt installation och användning av din
fläktkåpa. Läs noga igenom bruksanvisningen före användning av fläktkåpan,
även om du känner till produkten sedan tidigare. Spara bruksanvisningen på en
säker plats för framtida referens.
Gör aldrig detta:
● Använd inte fläktkåpan utan fettfilter
eller med mycket nedsmutsade filter!
●Installera inte fläktkåpan ovanför en
spis med en högeffektiv grill.
●Lämna inte kastruller och stekpannor
utan uppsikt under matlagningen
eftersom överhettat fett eller olja kan
fatta eld.
●Låt inga öppna lågor befinna sig under
fläktkåpan.
●Om fläktkåpan är trasig, försök inte
använda den.
●Flambera inte något under fläktkåpan.
●FÖRSIKTIGHET: De åtkomliga
detaljerna kan bli heta när de används
tillsammans med matlagningskärl.
●Respektera minimiavståndet mellan
spishällen och undersidan av
fläktkåpan. (Om fläktkåpan är
installerad ovanför en gasspis, ska
detta avstånd vara minst 65 cm.)
●Luften får inte blåsas ut i en rökgång
som används för att leda ut rök från
apparater som förbränner gas eller
andra bränslen.
Gör alltid detta:
● Viktigt! Stäng alltid av
strömförsörjningen under installation
och underhåll såsom lampbyte.
●Fläktkåpan måste installeras i enlighet
med installationsinstruktionerna och
alla mått måste respekteras.
●Allt installationsarbete måste utföras av
en kompetent person eller en behörig
elektriker.
●Sopsortera förpackningsmaterialet på
ett miljövänligt sätt. Små barn kan
skadas av förpackningsmaterialet.
● Tänk på att det finns vassa kanter
inuti fläktkåpan under installation och
rengöring.
●Se till att luftkanalen inte har några
vinklar som överstiger 90 grader,
eftersom det försämrar fläktkåpans
effektivitet.
●Varning: Underlåtelse att installera
skruvar eller fästanordning i enlighet
med dessa instruktioner kan leda till
elektrisk fara.
●Varning: All strömförsörjning måste
vara bortkopplad innan arbete med
kontakter utförs

14
Gör alltid detta:
●Använd alltid lock på kastruller och
stekpannor när du lagar mat på en
gasspis.
●I utsugsläget sugs luften i rummet ut av
fläktkåpan. Säkerställ att rummet har
god ventilation. Fläktkåpan avlägsnar
lukt från rummet, men inte ånga.
●Fläktkåpan är endast avsedd för
hemmabruk.
●Om strömkabeln har skadats måste
den bytas ut av tillverkaren eller
tillverkarens servicerepresentant eller
en lämpligt kvalificerad person för att
undvika risker.
●Den här apparaten får användas av
barn från åtta (8) år och uppåt och av
personer med nedsatt fysisk,
sensorisk eller mental förmåga, eller
bristfällig erfarenhet och kunskap, om
de övervakas eller har instruerats i hur
man använder apparaten på ett säkert
sätt och så att de förstår riskerna.
Barn ska inte leka med apparaten.
Barn får inte utföra rengöring och
underhåll utan tillsyn.
●Varning: All strömförsörjning måste
vara bortkopplad innan arbete med
kontakter utförs
Gör alltid detta:
●Försiktighet: Den här apparaten och
dess åtkomliga delar kan bli varma vid
användning. Undvik att röra vid
uppvärmningselement. Barn som är
yngre än åtta (8) år bör inte använda
apparaten såvida de inte övervakas
konstant.
● Se till så att det finns tillräckligt med
ventilation i rummet när fläktkåpan
används samtidigt med apparater som
drivs med gas eller andra bränslen.
●Det finns risk för brand om inte
rengöring görs i enlighet med dessa
instruktioner
●Regler angående luftutsläpp måste
följas.
●Rengör fläktkåpan regelbundet enligt
beskrivningen i kapitlet UNDERHÅLL.
●Av säkerhetsskäl, använd enbart den
storlek på fäst- eller
monteringsskruvar som
rekommenderas i denna
bruksanvisning.
●Gällande detaljer om tillvägagångssätt
och frekvens för rengöring, se kapitlet
om underhåll och rengöring i denna
bruksanvisning.
●Barn får inte utföra rengöring och
underhåll utan tillsyn.
●Om fläktkåpan används samtidigt som
apparater som drivs med något annat
än elektricitet, får det negativa trycket i
rummet inte överskrida 4 Pa (4 x 10⁻⁵
bar).
●VARNING: Brandfara: förvara inga
föremål på kokytorna.
●Använd inte en ångtvätt.
●Försök ALDRIG släcka eld med vatten,
utan stäng av apparaten och kväv
sedan flammorna med t.ex. ett lock
eller en brandfilt.

15
INSTALLATION (VENTIL UTOMHUS)
MONTERING AV V-KLAFF
Om fläktkåpan inte har en monterad V-klaff (1) ska du montera halvorna vid
fläktkåpan. Bilderna visar ett generellt exempel på montering av V-klaffen. Utloppet
kan se annorlunda ut beroende på modell och utförande.
Montering av V-klaff (1):
• Montera de två halvorna (2) i enheten (6)
• stiftet (3) ska vara vänt uppåt
• axeln (4) ska sättas in i hålen (5) på huset
• upprepa alla moment för den 2:a halvan
INSTALLATION
Om du har ett ventilationsutlopp till friska luften, kan du ansluta fläktkåpan enligt bilden
nedan med hjälp av en utsugskanal (emalj, aluminium, flexibelt rör eller annat ej
antändligt material med en invändig diameter på 150 mm).
1. Före installation, stäng av enheten och koppla bort den från strömkontakten.
2. Fläktkåpan ska monteras 65-75 cm ovanför spishällen för bästa effekt.

16
3. När du har kontrollerat fläktkåpans installationshöjd ska du fixera installationshålet
för fläktkåpan på skorstensfästet och säkerhetshålet enligt fläktkåpans storlek. Märk
upp och gör hålen på väggen.
4. Installera expansionsröret på fläktkåpan och fäst det med kabelband.
5. Installera skorstensfästet på skorstenen.

17
6. Häng fläktkåpan på väggen i fixerat läge, justera fläktkåpans position, fixera
fläktkåpan med skruvar (säkerhetsskruvar). Obs: De två säkerhetsventilerna, med
6 mm diameter, sitter på baksidan av kåpan.
7. Fixera skorstenarna på fläktkåpan: Använd 2 st ST4*8 mm skruvar och fixera det
yttre skorstensfästet på fläktkåpan, och fixera sedan det yttre skorstensfästet på
väggen med ST4*40 mm skruvar.
8. Justera höjden på den inre skorstenen till efter det inre skorstensfästet och fixera
med 2 st ST4*8 mm skruvar.
RÅD FÖR INSTALLATION AV UTSUGSKANAL
Följande regler måste följas till punkt och pricka för att åstadkomma ett optimalt
luftutsug:
• Utsugskanalen ska vara kort och rak
• Minska inte dess storlek och begränsa inte utsugskanalen
Vid användning av en flexibel kanal, installera alltid kanalen hopdragen för att
minimera tryckförlusten.
• Underlåtelse att följa dessa grundläggande instruktioner försämrar fläktkåpans
prestanda och ökar dess ljudnivå.
• Installationsarbete får endast utföras av en behörig elektriker eller kompetent person.
• Anslut inte fläktkåpans kanalsystem till ett befintligt ventilationssystem som används
till någon annan apparat som t.ex. värmerör, gasrör eller varmluftsrör.
• Vinkeln på ventilationsrörets böj ska vara minst 120º; du måste rikta röret horisontellt
eller låta röret gå uppåt från utgångspunkten och ledas till en yttervägg.
• Efter installation, kontrollera att fläktkåpan är plan för att undvika att fett samlas på

18
ena sidan.
Kontrollera att utsugskanalen följer relevanta standarder och är brandhärdig.
VARNING:
Av säkerhetsskäl ska du endast använda fäst-
eller monteringsskruvar av den storlek som
rekommenderas i denna bruksanvisning.
Underlåt
else att installera skruvar eller
fästanordning i enlighet med dessa instruktioner
kan leda till elektrisk fara.
Börja använda fläktkåpan
Beröringsreglage med LED-display
1. Tryck på ”Power”-knappen som är fläktkåpans strömbrytarknapp.
2. Tryck på knappen ”Speed” efter en viss tid. Motorn kan växla mellan hastigheterna
låg / mellan / hög / låg / mellan ..... LED-displayen visar hastigheten som 1-2-3-1-2...
osv.
3. Tryck på knappen ”Lamp”. Lampan tänds. Tryck på knappen igen och lampan
släcks. Observera att lampan inte är kopplad till på/av-knappen.
4. När fläktkåpan är igång och du trycker på knappen ”Timer” körs fläktkåpan på en
viss tid (förinställd tid är 9 minuter) varefter LED-displayen visar 9.8.7.6... där värdet
minskas med 1. När tiden har passerat stängs fläktkåpan av automatiskt och lampan
släcks. Om du trycker på ”Timer”-knappen aktiveras eller inaktiveras ”Timer”-
funktionen.

19
FELSÖKNING
Fel Möjlig orsak Lösning
Lampan lyser men
motorn fungerar
inte.
Fläktbrytaren är frånslagen.
Välj ett driftsläge för
fläktbrytaren.
Fläktbrytaren är trasig.
Kontakta ett servicecenter.
Motorfel.
Kontakta ett servicecenter.
Lampan fungerar
inte, motorn
fungerar inte.
Säkringarna är trasiga.
Återställ/byt ut säkringarna.
Strömkabeln sitter löst eller har
blivit bortkopplad.
Återanslut strömkabeln till
eluttaget.
Strömanslut eluttaget.
Oljeläckage.
Envägsventil och utlopp är inte
ordentligt tätade.
Ta bort envägsventilen och täta
den med ett tätningsmedel.
Läckage från anslutningen
mellan skorsten och fläktkåpa.
Ta ner skorstenen och täta den.
Belysningen
fungerar inte.
Trasiga glödlampor.
Byt ut glödlamporna enligt denna
instruktion.
Otillräckligt utsug.
Avståndet mellan fläktkåpan
och spishällen är för stort.
Sänk fläktkåpan till rätt avstånd.
Fläktkåpan lutar.
Fästskruven är inte tillräckligt
åtdragen.
Dra åt upphängningsskruven och
se till att den är horisontell.
OBS:
Eventuell elektrisk reparation av fläktkåpan måste efterleva befintliga regelverk.
Kontakta ditt servicecenter om du är osäker på hur du utför något av det
ovanstående. Koppla alltid bort fläktkåpan från nätströmmen om du ska öppna den.
UNDERHÅLL OCH RENGÖRING
Försiktighet:
• Innan underhåll eller rengöring ska fläktkåpan kopplas bort
från nätströmmen. Kontrollera att fläktkåpan är avstängd vid
eluttaget och att strömkabeln är bortkopplad.
• Externa ytor kan repas och bli slitna, så följ dessa
rengöringsinstruktioner för att uppnå bästa resultat utan att skada fläktkåpan.
ALLMÄNT
Rengöring och underhåll ska utföras när fläktkåpan är sval. Lämna inte kvar några
alkaliska eller sura substanser (citronsaft, ättika osv.) på fläktkåpan.
ROSTFRITT STÅL
Den rostfria stålytan måste rengöras regelbundet (t.ex. varje vecka) för att säkra en
Sidan laddas...
Sidan laddas...
Sidan laddas...
Sidan laddas...
-
 1
1
-
 2
2
-
 3
3
-
 4
4
-
 5
5
-
 6
6
-
 7
7
-
 8
8
-
 9
9
-
 10
10
-
 11
11
-
 12
12
-
 13
13
-
 14
14
-
 15
15
-
 16
16
-
 17
17
-
 18
18
-
 19
19
-
 20
20
-
 21
21
-
 22
22
-
 23
23
-
 24
24


Thermex GLASGOW Installationsguide
- Kategori
- Mixer / matberedare tillbehör
- Typ
- Installationsguide
på andra språk
- English: Thermex GLASGOW Installation guide
Andra dokument
-
Grundig GDKP5460B KJØKKENVENTILATOR Bruksanvisning
-
Falcon SE1000 Bruksanvisning
-
-
Falcon FHDSE 900 Bruksanvisning
-
AGA Aga TC Super Extract cooker hood manual Bruksanvisning
-
-
Whirlpool AKR 994 IX Användarguide
-
Whirlpool AKR 039 G BL Användarguide
-
-
 POINT 5-SERIES POHO5052INTW KJØKKENVENTILATOR Användarmanual
