
AF-129369
(EN)
(DE)
(FR)
(SE)
(NL)
(PL)
(ES)

- 1 -
Content – Inhalt – Teneur – Innehåll – Inhoud – Treść – Contenido
Instruction manual – English ...................................................................................... - 2 -
Bedienungsanleitung – German ............................................................................... - 10 -
Mode d’emploi – French .......................................................................................... - 19 -
Bruksanvisning – Swedish ........................................................................................ - 29 -
Gebruiksaanwijzing – Dutch ..................................................................................... - 37 -
Instrukcja obsługi – Polish ........................................................................................ - 46 -
Manual de Instrucciones – Spanish .......................................................................... - 55 -

- 2 -
Instruction manual – English
SAFETY INSTRUCTIONS
Before use make sure to read all of the below instructions in
order to avoid injury or damage, and to get the best results
from the appliance. Make sure to keep this manual in a safe
place. If you give or transfer this appliance to someone else
make sure to also include this manual.
In case of damage caused by user failing to follow the
instructions in this manual the warranty will be void. The
manufacturer/importer accepts no liability for damages
caused by failure to follow the manual, a negligent use or
use not in accordance with the requirements of this manual.
1. This appliance can be used by children aged from 8 years
and above and persons with reduced physical, sensory or
mental capabilities or lack of experience and knowledge if
they have been given supervision or instruction
concerning use of the appliance in a safe way and
understand the hazards involved.
2. Children shall not play with the appliance.
3. Cleaning and user maintenance shall not be made by
children unless they are older than 8 and supervised.
4. Keep the appliance and its cord out of reach of children
less than 8 years.
5. If the supply cord is damaged, it must be replaced by the
manufacturer, its service agent or similarly qualified
persons in order to avoid a hazard.
6. Regarding the instructions for cleaning the surfaces which
come in contact with food or oil, please refer to the
paragraph “CLEANING AND MAINTENANCE” of the
manual.
7. This appliance is intended to be used in household and
similar applications such as: staff kitchen areas in shops,
offices and other working environments; farm houses; by
clients in hotels, motels and other residential type
environments; bed and breakfast type environments.

- 3 -
8. This appliance is not intended to be operated by means of
an external timer or separate remote-control system.
9. Before inserting the plug into the mains socket, please
check that the voltage and frequency comply with the
specifications on the rating label.
10. Disconnect the mains plug from the socket when the
appliance is not in use and before cleaning.
11. If an extension cord is used it must be suited to the power
consumption of the appliance, otherwise overheating of
the extension cord and/or plug may occur. There is a
potential risk of injuries from tripping over the extension
cord. Be careful to avoid dangerous situations.
12. Ensure that the mains cable is not hung over sharp edges
and keep it away from hot objects and open flames.
13. Do not immerse the appliance or the mains plug in water
or other liquids. There is danger to life due to electric
shock!
14. To remove the plug from the plug socket, pull the plug. Do
not pull the power cord.
15. Do not touch the appliance if it falls into water. Remove
the plug from its socket, turn off the appliance and send it
to an authorized service center for repair.
16. Do not plug or unplug the appliance from the electrical
outlet with a wet hand.
17. Never attempt to open the housing of the appliance, or to
repair the appliance yourself. This could cause electric
shock.
18. Never leave the appliance unattended during use.
19. This appliance is not designed for commercial use.
20. Do not use the appliance for other than intended use.
21. Do not wind the cord around the appliance and do not
bend it.
22. Place the appliance on a stable, level surface from which
it cannot fall off.
23. Please prevent the product to be exposed to excessive
dirt and humidity.

- 4 -
24. Clean the product itself with a slightly damp cloth.
25. Do not operate the machine without supervision, if you
should leave the workplace, always switch the machine
off or remove the plug from socket (pull the plug itself,
not the lead).
26. Do not place the appliance against a wall or against other
appliance. Leave at least 10cm free space on the back and
sides and above the appliance.
27. During hot air frying, hot steam is released through the air
outlet openings. Keep your hands and face at a safe
distance from the steam and from the air outlet openings.
Also be careful of hot steam and air when you remove the
pan from the appliance.
28. Immediately unplug the appliance if you see dark smoke
coming out of the appliance. Wait for the smoke emission
to stop before you remove the pan from the appliance.
29. Make sure before each use of the appliance that the
heating element and surroundings are clean and clear
from any food remainders in order to ensure a flawless
function.
30.
Caution, hot surface.
WARNING!! Please do not touch surface while in use. The
temperature of accessible surfaces may be high when the
appliance is operating.
31. Hot air comes out of the air vent at the back side of the
appliance. Be sure to keep sufficient distance to materials,
like glass, that are sensitive to heat.
32. If you use products with non-stick surfaces, please make
sure no birds are in the same room and that the room can
be completely closed off and well-ventilated.

- 5 -
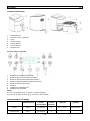
AF-129369 EN
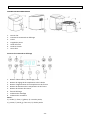
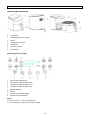
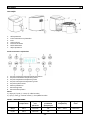
PARTS DESCRIPTION
1. Air inlet
2. Control panel and display
3. Basket
4. Basket handle
5. Frying grill
6. Silicone feet
7. Air outlet
Control panel and display
1. Power/start/stop button
2. Temperature/time setting button
3. Temperature/time increase button
4. Temperature/time decrease button
5. Menu selection button
6. Display screen
7. Heating indicator
8. Fan indicator
Menu:
a). meat, b). chips, c). cake, d). chicken leg,
e). fish, f). Steak, g). dry fruit, h). chicken wing

- 6 -
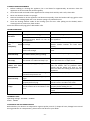
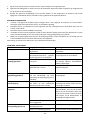
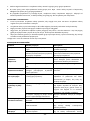
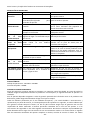
MENU INTRODUCTION
Ingredient
Default
temperature
Suggested
cooking time
Food
flipping
Adjustable
temperature
Adjustable time
Meat
220 ℃
15 minutes
Yes
80 ℃ – 220 ℃
1-60 minutes
Chips
220 ℃
16 minutes
Yes
80 ℃ – 220 ℃
1-60 minutes
Cake
160 ℃
15 minutes
80 ℃ – 220 ℃
1-60 minutes
Chicken leg
220 ℃
20 minutes
Yes
80 ℃ – 220 ℃
1-60 minutes
Fish
180 ℃
20 minutes
Yes
80 ℃ – 220 ℃
1-60 minutes
Steak
200 ℃
10 minutes
Yes
80 ℃ – 220 ℃
1-60 minutes
Dry fruit
40 ℃
4 hours
40 ℃ – 80 ℃
2-9 hours
Chicken wing
220 ℃
13 minutes
Yes
80 ℃ – 220 ℃
1-60 minutes
Note: If the instructions on the product pack should deviate from the values shown in this table, the
instructions on the pack should be followed.
BEFORE USE
First read all instructions before use and retain the manual for later reference. Only plug this appliance into an
earthed socket. Before first use, remove the packing materials. Clean the basket and frying grill. (See
“CLEANING AND MAINTENANCE”) Wipe inside and outside of the appliance with a soft cloth. Make sure that
the electrical parts remain dry. This appliance heats food at all directions and most of the ingredients do not
need any oil.
Operate the appliance before first use for approximately 10 minutes in order to burn off production residues.
Make sure there is good ventilation. The appliance may emit some smoke and a characteristic smell when you
switch it on for the first time. This is normal and will stop soon.
Note: Always use the frying grill with the silicone feet attached. They will help to stabilize the frying grill in the
basket during cooking.
USE
1. Place the appliance on a dry, stable and heat-resistant surface.
2. Since the appliance becomes hot during use, make sure that it is not too close to other objects.
3. Pull out the basket from the appliance by the basket handle. Put the frying grill into the basket.
4. Place the ingredients into the basket. Slide the basket into the appliance. Make sure they are placed
correctly and closed completely. Otherwise the appliance will not work. Caution: Do not touch the basket
during use or after use in short time as it gets very hot. Only hold the basket by the handle.
5. Connect the power plug to a suitable outlet. The machine is now standby.
6. Press the power/start/stop button once to activate other buttons and indicators. Press the
temperature/time setting button and then “+” or “-” to set your desired temperature (80 ℃ – 220 ℃)
and time (1 – 60 minutes) for the ingredients. When the display flashes on the screen, the value can be
adjusted; when the display becomes still, the value is settled.
7. You can also press the menu selection button to directly choose the cooking functions. If you wish to
adjust the time and temperature manually, follow the step 6 above. Note that the dry fruit function has
adjustable temperature from 40 ℃ to 80 ℃ and adjustable time from 2 to 9 hours, other functions have
the adjustable range same as the manual settings.

- 7 -
8. Press the power/start/stop button again; the machine starts working. When the appliance is heating, the
heating indicator lights up. When the inner fan is working, the fan indicator lights up. These indicators
light on and off automatically according to the program control during the whole process.
9. When the whole cooking process is finished, the appliance will automatically stop and beep sounds are
sent out. You can also manually stop the appliance by pressing the power/start/stop button: short
pressing will make the appliance pause; long pressing will end the cooking process and turn the appliance
into standby. The screen flashes with “0:00” and the fan runs for a few seconds before the appliance
enters standby.
10. Pull out the basket from the appliance by the basket handle. Check if the ingredients are ready. If not,
simply slide the basket back into the appliance. Set the temperature and the timer to a few extra minutes.
Then press the power/start/stop button to run the machine again. NOTE: You can also pull out the basket
to check and shake the ingredients during cooking process. When you slide back the basket, the machine
will continue to work with the selected setting.
11. Empty the basket, putting the food into a bowl or onto a plate. To remove large or fragile ingredients, lift
the ingredients out of the basket by a pair of tongs.
To remove ingredients (e.g. beef, chicken, meat, any ingredients with original oil and will have excess oil
from ingredients collected on the bottom of the basket), please use tongs to pick ingredients one by one.
To remove ingredients (e.g. chips, vegetable or ingredients with no excess oil from the ingredients),
please pull out the basket, and pour ingredients to tableware.
12. After the cooking is done, the appliance is instantly ready for preparing another batch of ingredients if
needed.
FRYING TIPS
1. The optimal amount for crispy fries is 500 grams.
2. Add 3 more minutes to the preparation time when the appliance is cold, or you can also let the appliance
preheat approx. 4 minutes without any ingredients inside.
3. Some ingredients require shaking halfway through the cooking time. To shake or turn over the ingredients,
pull the basket out of the appliance by the handle and shake it or turn over the ingredients by fork (or
tongs). Then slide the basket back into the appliance.
4. Products with crust of dry breadcrumbs will get crispier by spraying them with a little vegetable oil.
5. Place a baking tin or an oven dish in the appliance if you want to bake a cake or quiche or other fragile
ingredients.
6. Do not prepare extremely greasy ingredients such as sausages in the appliance.
CAUTION:
1. Do not immerse the housing in water or rinse it under the tap.
2. Avoid any liquid entering the appliance to prevent from electric shock or short circuit.
3. Keep all ingredients in the basket to prevent any contact with heating elements.
4. Do not cover the air inlet and the outlet when the appliance is working. Leave at least 10cm free space
around and above the appliance.
5. Filling the basket with oil may cause a fire hazard!
6. Do not touch the inside of the appliance when it is in operation.
7. Be careful of the hot steam and air when you remove the basket from the appliance.
8. During operation, hot steam is released through the air outlet. Keep your hands and face at a safe distance
from the steam and the air outlet.
9. Immediately turn off and unplug the appliance if you see any dark smoke coming out of the appliance,
which means the food is overcooked or the appliance broke down.

- 8 -
CLEANING AND MAINTENANCE
1. Before handling or cleaning the appliance, let it cool down for approximately 30 minutes. Clean the
appliance on all the inside and outside regularly.
2. Clean the outside and inside of the appliance with a damp cloth and dry with a soft, clean cloth.
3. Never use abrasive cleaners or sponges.
4. Remove the basket to let the appliance cool down more quickly. Clean the basket and frying grill in warm
water with a washing liquid and a non-abrasive sponge. Dry well before use.
5. Clean the heating element inside of the housing (You can see it after pulling out the basket) with a
cleaning brush to remove any food residue.
Note: The basket and frying grill are dishwasher safe.
TROUBLE SHOOTING
Problem
Possible cause
Solution
The appliance does
not work.
The appliance is not plugged in.
Put the mains plug in an earthed wall socket.
You have not pressed the
power/start/stop button to turn on
the appliance.
Press the power/start/stop button to turn on
the appliance.
The ingredients are
not fried
completely.
The amount of the food in the basket
is too high.
Put smaller batches of ingredients in the
basket. Smaller batches are fired more
evenly.
The temperature is too low or the
time is not enough.
Increase the temperature or cook more
time.
The ingredients are
fried unevenly.
Different types of food may need to
be shaken halfway during cooking.
Shake food halfway during the cooking time.
Fried snacks are
not crispy
You used a type of snacks which shall
be cooked in a traditional deep fryer.
Use oven snacks or lightly brush some oil
onto the snacks for a crispier result.
White smoke
comes out from
the appliance.
You are preparing greasy ingredients.
When you fry greasy ingredients, oil will leak
into the basket. The oil produces white
smoke and the basket may heat up. This
does not affect the cooking result or hurt the
appliance.
The basket still contains grease
residue from previous use.
Clean the basket properly after each use.
Fresh fries are
fried unevenly.
You haven’t used the right potato
type.
Use fresh potatoes.
You haven’t rinsed the potato sticks
properly before frying.
Rinse the potato sticks properly to remove
starch from the outside of the sticks.
Fresh fries are not
crispy.
The criespiness of the fries depends
on the amount of oil and water in the
fries.
Make sure the potato sticks have been dried
properly before adding the oil.
Cut the potato sticks smaller for a crispier
result
Add slightly more oil for a crispier result.
TECHNICAL DATA
Operating voltage: 220-240V ~ 50-60Hz
Power: 1300W
GUARANTEE AND CUSTOMER SERVICE
Before delivery our devices are subjected to rigorous quality control. If, despite all care, damage has occurred
during production or transportation, please return the device to your dealer.

- 9 -
For the purchased device we provide 2 years guarantee, commencing from the day of sale. If you have a
defective product, you can directly go back to the point of purchase.
Defects which arise due to improper handling of the device and malfunctions due to interventions and repairs
by third parties or the fitting of non-original parts are not covered by this guarantee. Always keep your receipt,
without the receipt you can’t claim any form of warranty. Damage caused by not following the instruction
manual, will lead to a void of warranty, if this results in consequential damages then we will not be liable.
Neither can we hold responsible for material damage or personal injury caused by improper use if the
instruction manual is not properly executed. Damage to accessories does not mean free replacement of the
whole appliance. In such case please contact our service department. Broken glass or breakage of plastic parts
is always subject to a charge. Defects to consumables or parts subjected to wearing, as well as cleaning,
maintenance or the replacement of said parts are not covered by the warranty and are to be paid.
ENVIRONMENT FRIENDLY DISPOSAL
Recycling – European Directive 2012/19/EU
This marking indicates that this product should not be disposed with other household wastes. To
prevent possible harm to the environment or human health from uncontrolled waste disposal,
recycle it responsibly to promote the sustainable reuse of material resources. To return your used
device, please use the return and collection systems or contact the retailer where the product was
purchased. They can take this product for environmental safe recycling.
Emerio B.V. Customer service: Kundeninformation: Klantenservice:
Oudeweg 115 T: +31 (0) 23 3034369 T: +49 (0) 3222 1097 600 T: +31 (0) 23 3034369
2031 CC Haarlem www.emerio.eu/service www.emerio.eu/service www.emerio.eu/service
The Netherlands
Looking for spare parts? Have a look at https://spareparts.emerio.eu
Sie brauchen Ersatzteile? Besuchen Sie https://ersatzteile.emerio.eu
Onderdelen nodig? Kijk op https://onderdelen.emerio.eu

- 10 -
Bedienungsanleitung – German
SICHERHEITSHINWEISE
Lesen Sie vor dem Gebrauch unbedingt die nachfolgenden
Anleitungen, um Verletzungen oder Beschädigungen zu
vermeiden und das beste Ergebnis mit dem Gerät zu erzielen.
Bewahren Sie diese Bedienungsanleitung an einem sicheren
Ort auf. Wenn Sie dieses Gerät an eine andere Person
weitergeben, stellen Sie sicher, dass Sie auch diese
Bedienungsanleitung aushändigen.
Im Falle von Beschädigungen, die durch die Missachtung der
Anleitungen in dieser Bedienungsanleitung verursacht
wurden, wird die Garantie ungültig. Der
Hersteller/Importeur haftet nicht für Schäden, die durch
Missachtung der Bedienungsanleitung, fahrlässigen
Gebrauch oder Benutzung, die nicht in Übereinstimmung mit
den Anforderungen dieser Bedienungsanleitung erfolgt,
verursacht wurden.
1. Dieses Gerät kann von Kindern ab 8 Jahren und Personen
mit eingeschränkten körperlichen, sensorischen oder
geistigen Fähigkeiten oder mangelnder Erfahrung und
Kenntnis benutzt werden, wenn sie beaufsichtigt werden
oder in die sichere Benutzung des Gerätes unterwiesen
werden und die damit verbundenen Gefahren verstehen.
2. Kinder dürfen nicht mit dem Gerät spielen.
3. Die Reinigung und vom Benutzer auszuführende
Wartungsarbeiten sollten nicht von Kindern durchgeführt
werden; es sei denn, sie sind älter als 8 Jahre und werden
beaufsichtigt.
4. Halten Sie das Gerät und sein Netzkabel außer Reichweite
von Kindern unter 8 Jahren.
5. Wenn das Netzkabel beschädigt ist, muss es vom
Hersteller, seinem Kundendienst oder einer ähnlich
qualifizierten Person ausgewechselt werden, um
Gefahren zu vermeiden.

- 11 -
6. Um Informationen zur Reinigung der Flächen zu erhalten,
die mit Lebensmitteln oder Ö l in Berührung kommen,
lesen Sie bitte den Abschnitt „REINIGUNG UND
INSTANDHALTUNG“ in der Bedienungsanleitung.
7. Dieses Gerät ist für die Verwendung im Haushalt oder für
ähnliche Anwendungen vorgesehen, wie: in
Personalküchen von Geschäften, Büros und anderen
Arbeitsumgebungen; auf Bauernhöfen; von Kunden in
Hotels, Motels und in anderen Unterkünften; in
Unterkünften mit Halbpension.
8. Dieses Gerät ist nicht für die Bedienung über einen
externen Timer oder ein separates Fernbedienungssystem
bestimmt.
9. Bevor Sie den Stecker mit der Netzsteckdose verbinden,
prüfen Sie bitte, ob die Spannung und die Frequenz mit
den Angaben auf dem Typenschild übereinstimmen.
10. Ziehen Sie den Netzstecker aus der Steckdose, wenn das
Gerät nicht benutzt und bevor es gereinigt wird.
11. Falls ein Verlängerungskabel verwendet wird, muss es für
den Stromverbrauch des Gerätes geeignet sein, sonst
kann es zum Überhitzen des Verlängerungskabels
und/oder des Steckers kommen. Es besteht
Verletzungsgefahr durch Stolpern über das
Verlängerungskabel. Lassen Sie Vorsicht walten, um
gefährliche Situationen zu vermeiden.
12. Achten Sie darauf, dass das Netzkabel nicht über scharfe
Kanten hängt und halten Sie es von heißen Objekten und
offenen Flammen fern.
13. Tauchen Sie das Gerät oder den Netzstecker nicht in
Wasser oder andere Flüssigkeiten. Es besteht
Lebensgefahr aufgrund von Stromschlag!
14. Um den Stecker aus der Steckdose zu entfernen, ziehen
Sie am Stecker. Ziehen Sie nicht am Kabel.

- 12 -
15. Berühren Sie das Gerät nicht, wenn es ins Wasser gefallen
ist. Ziehen Sie den Stecker aus der Steckdose, schalten Sie
das Gerät aus und schicken Sie es an einen autorisierten
Kundendienst zwecks Reparatur.
16. Den Netzstecker des Gerätes nicht mit einer nassen Hand
aus der Steckdose ziehen oder mit der Steckdose
verbinden.
17. Versuchen Sie unter keinen Umständen, das Gehäuse des
Gerätes zu öffnen oder das Gerät selbst zu reparieren.
Dies könnte einen Stromschlag verursachen.
18. Lassen Sie das Gerät während des Gebrauchs niemals
unbeaufsichtigt.
19. Dieses Gerät ist nicht für den gewerblichen Gebrauch
konzipiert.
20. Verwenden Sie das Gerät nur zu seinem
bestimmungsgemäßen Zweck.
21. Wickeln Sie das Kabel nicht um das Gerät und knicken Sie
es nicht.
22. Stellen Sie das Gerät auf eine stabile, ebene Fläche, von
der es nicht herunterfallen kann.
23. Bitte schützen Sie das Produkt vor übermäßiger
Verschmutzung und Feuchtigkeit.
24. Reinigen Sie das Produkt selbst mit einem leicht
angefeuchteten Tuch.
25. Lassen Sie das Gerät nicht unbeaufsichtigt laufen. Wenn
Sie den Arbeitsplatz verlassen, schalten Sie das Gerät
immer aus oder ziehen Sie den Stecker aus der Steckdose
(ziehen Sie direkt am Stecker, nicht am Kabel).
26. Das Gerät nicht an eine Wand oder ein anderes Gerät
stellen. Lassen Sie mindestens 10 cm Platz an Rückseite,
Seiten und über dem Gerät.
27. Beim Frittieren mit Heißluft entweicht heißer Dampf
durch die Luftaustrittsöffnungen. Halten Sie Ihre Hände
und Ihr Gesicht in einem sicheren Abstand zum Dampf

- 13 -
und zu den Luftaustrittsöffnungen. Nehmen Sie sich auch
vor heißem Dampf und heißer Luft in Acht, wenn Sie den
Behälter aus dem Gerät entfernen.
28. Ziehen Sie sofort den Stecker des Gerätes aus der
Steckdose, wenn Sie dunklen Rauch aus dem Gerät
kommen sehen. Warten Sie, bis kein Rauch mehr zu sehen
ist, bevor Sie den Behälter aus dem Gerät nehmen.
29. Vergewissern Sie sich vor jedem Gebrauch des Gerätes,
dass das Heizelement und die Umgebung sauber und frei
von Speiseresten sind, um eine einwandfreie Funktion zu
gewährleisten.
30.
Vorsicht – heisse oberfläche
WARNUNG!! Bitte berühren Sie während des Gebrauchs
nicht die Oberfläche. Die Temperatur der zugänglichen
Oberflächen kann sehr hoch sein, wenn das Gerät in
Betrieb ist.
31. Aus dem Lüftungsschlitz an der Rückseite des Gerätes
kommt heiße Luft. Achten Sie darauf, ausreichend
Abstand zu Material, das hitzeempfindlich ist, wie zum
Beispiel Glas, einzuhalten.
32. Wenn Sie Produkte mit Antihaftbeschichtung benutzen,
stellen Sie bitte sicher, dass sich keine Vögel im gleichen
Zimmer befinden und dass das Zimmer komplett
geschlossen und gut belüftet werden kann.

- 14 -
AF-129369 DE
TEILEBESCHREIBUNG
1. Lufteinlass
2. Bedienfeld und Display
3. Korb
4. Korbgriff
5. Bratrost
6. Silikonfüße
7. Luftauslass
Bedienfeld und Display
1. Betriebs-/Start-/Stopptaste
2. Einstelltaste für Temperatur/Zeit
3. Taste zum Erhöhen der Temperatur/Zeit
4. Taste zum Verringern der Temperatur/Zeit
5. Menüauswahltaste
6. Display
7. Heizanzeige
8. Ventilatoranzeige
Menü:
a). Fleisch b). Pommes frites c). Kuchen d). Hähnchenschenkel
e). Fisch f). Steak g). Trockenobst h). Hähnchenflügel
BESCHREIBUNG DES MENÜS
Zutat
Standardtempe
ratur
Empfohlene
Garzeit
Speisen
wenden
Einstellbare
Temperatur
Einstellbare
Garzeit
Fleisch
220 ℃
15 Minuten
Ja
80 ℃ – 220 ℃
1-60 Minuten

- 15 -
Pommes frites
220 ℃
16 Minuten
Ja
80 ℃ – 220 ℃
1-60 Minuten
Kuchen
160 ℃
15 Minuten
80 ℃ – 220 ℃
1-60 Minuten
Hähnchenschenkel
220 ℃
20 Minuten
Ja
80 ℃ – 220 ℃
1-60 Minuten
Fisch
180 ℃
20 Minuten
Ja
80 ℃ – 220 ℃
1-60 Minuten
Steak
200 ℃
10 Minuten
Ja
80 ℃ – 220 ℃
1-60 Minuten
Trockenobst
40 ℃
4 Stunden.
40 ℃ – 80 ℃
2-9 Stunden.
Hähnchenflügel
220 ℃
13 Minuten
Ja
80 ℃ – 220 ℃
1-60 Minuten
Hinweis: Falls die Anweisungen auf der Produktverpackung von den Angaben in dieser Tabelle abweichen,
sollten die Anweisungen auf der Verpackung befolgt werden.
VOR DEM GEBRAUCH
Lesen Sie vor Gebrauch zuerst alle Anweisungen durch und bewahren Sie diese für späteres Nachschlagen auf.
Schließen Sie dieses Gerät ausschließlich an eine geerdete Steckdose an. Entfernen Sie vor der Erstnutzung das
Verpackungsmaterial. Frittierkorb und Bratrost reinigen. (siehe “REINIGUNG UND INSTANDHALTUNG”).
Reinigen Sie das Gerät innen und außen mit einem weichen Tuch. Achten Sie hierbei darauf, dass die
elektrischen Bauteile trocken bleiben. Dieses Gerät erhitzt Lebensmittel vollständig und für die meisten
Zutaten kann auf eine Hinzugabe von Ö l verzichtet werden.
Betreiben Sie das Gerät vor der erstmaligen Nutzung für ca. 10 Minuten, um evtl. Produktionsrückstände zu
verbrennen. Achten Sie auf eine gute Belüftung. Nach dem ersten Einschalten kann das Gerät etwas Rauch und
einen charakteristischen Geruch absondern. Das ist normal und vergeht nach relativ kurzer Zeit wieder.
Hinweis: Benutzen Sie den Bratrost immer mit den Silikonfüßen. Sie stabilisieren den Bratrost während des
Garvorgangs im Frittierkorb.
GEBRAUCH
1. Stellen Sie das Gerät auf eine trockene, feste und hitzebeständige Fläche.
2. Das Gerät wird während des Gebrauchs heiß; stellen Sie es daher nicht in die unmittelbare Nähe anderer
Objekte.
3. Ziehen Sie den Frittierkorb am Frittierkorbgriff aus dem Gerät. Stellen Sie den Bratrost in den Frittierkorb.
4. Speisen in den Frittierkorb geben. Frittierkorb in das Gerät schieben. Achten Sie darauf, dass der Korb
korrekt eingesetzt und das Gerät komplett geschlossen ist. Andernfalls wird das Gerät nicht funktionieren.
Vorsicht: Berühren Sie den Frittierkorb nicht während des Betriebs oder kurz nach dem Betrieb, da er sehr
heiß wird. Fassen Sie den Frittierkorb nur am Griff an.
5. Schließen Sie den Netzstecker an eine geeignete Steckdose an. Das Gerät ist jetzt im Standby-Betrieb.
6. Drücken Sie die Betriebs-/Start-/Stopptaste einmal, um die anderen Tasten und die Anzeigen zu aktivieren.
Drücken Sie die Einstelltaste für Temperatur/Zeit und dann „+“ oder „-“, um die gewünschte Temperatur
(80 ℃ – 220 ℃) und Garzeit (1- 60 Minuten) für die Zutaten einzustellen. Wenn die Anzeige auf dem
Bildschirm blinkt, kann der Wert eingestellt werden; wenn die Anzeige stetig leuchtet, ist der Wert
eingestellt.
7. Sie können auch die Menüauswahltaste drücken, um direkt aus den Garprogrammen. Wenn Sie die
Garzeit und Temperatur manuell einstellen möchten, folgen Sie wie oben beschrieben Schritt 6. Beachten
Sie, dass für das Trockenobstprogramm die Temperatur von 40 ℃ bis 80 ℃ und die Garzeit von 2 bis 9
Stunden eingestellt werden kann. Der einstellbare Bereich für die anderen Programme ist der gleiche wie
für die manuellen Einstellungen.
8. Drücken Sie die Betriebs-/Start-/Stopptaste erneut. Das Gerät startet nun den Garvorgang. Wenn das
Gerät aufheizt, leuchtet die Heizanzeige. Wenn der Ventilator im Gerät läuft, leuchtet die

- 16 -
Ventilatoranzeige auf. Diese Anzeigen schalten sich automatisch je nach Programm während des
gesamten Garvorgangs ein und aus.
9. Wenn der gesamte Garvorgang beendet ist, stoppt das Gerät automatisch und erzeugt akustische Signale.
Sie können das Gerät auch manuell stoppen, indem Sie die Betriebs-/Start-/Stopptaste drücken: Durch
kurzes Drücken wird das Gerät gestoppt; langes Drücken beendet den Garvorgang und schaltet das Gerät
in den Standby-Modus. Auf dem Display blinkt „0:00“ und der Ventilator arbeitet einige Sekunden weiter,
bevor das Gerät in den Standby-Modus geht.
10. Ziehen Sie den Korb am Frittierkorbgriff aus dem Gerät. Prüfen Sie, ob die Speisen gar sind. Falls nicht,
schieben Sie den Korb wieder in das Gerät. Stellen Sie die Temperatur wieder ein und wählen Sie
zusätzliche Garminuten vor. Drücken Sie anschließend die Betriebs-/Start-/Stopptaste, um das Gerät
erneut einzuschalten. HINWEIS: Während der Zubereitung können Sie auch den Korb herausziehen, um
den Zustand zu prüfen und dabei die Zutaten zu schütteln. Wenn Sie den Korb wieder einschieben, setzt
das Gerät den Garvorgang mit den gewählten Einstellungen fort.
11. Leeren Sie den Einsatz und legen Sie die Speisen in eine Schüssel oder auf einen Teller. Nehmen Sie große
oder zerbrechliche Zutaten mithilfe einer Zange aus dem Einsatz.
Nehmen Sie solche Speisen wie z. B. Rindfleisch, Huhn, andere Fleischsorten oder fetthaltige Speisen (das
überschüssige Fett der Speisen sammelt sich auf dem Boden des Frittierkorbs) bitte einzeln mit einer
Zange heraus.
Ziehen Sie zum Herausnehmen von solchen Speisen wie z.B. Pommes frites, Gemüse oder nicht fetthaltige
Zutaten den Frittierkorb heraus und geben Sie die Speisen auf das Geschirr.
12. Nach beendetem Garen ist das Gerät sofort für die Zubereitung einer weiteren Zutatenportion bereit.
FRITTIERTIPPS
1. Die optimale Menge für knusprige Pommes frites ist 500 Gramm.
2. Verlängern Sie die Zubereitungszeit um 3 Minuten, wenn das Gerät kalt ist, oder heizen Sie das leere Gerät
ungefähr 4 Minuten lang vor.
3. Manche Speisen müssen nach der Hälfte der Garzeit geschüttelt werden. Um die Speisen zu schütteln oder
umzudrehen, ziehen Sie den Frittierkorb am Griff aus dem Gerät und schütteln Sie ihn oder drehen Sie die
Speisen mit einer Gabel (oder Zange) um. Schieben Sie dann den Frittierkorb zurück ins Gerät.
4. Panierte Speisen werden knuspriger, wenn sie mit etwas Pflanzenöl eingesprüht werden.
5. Stellen Sie eine Backform oder eine Auflaufform in das Gerät, wenn Sie einen Kuchen, eine Quiche oder
andere mürbe Speisen backen möchten.
6. Bereiten Sie keine extrem fettigen Speisen, wie zum Beispiel Würstchen, in dem Gerät zu.
VORSICHT:
1. Tauchen Sie das Gehäuse nicht ins Wasser und spülen Sie es nicht unter dem Wasserhahn ab.
2. Vermeiden Sie das Eindringen von Flüssigkeiten in das Gerät, um einen Stromschlag oder Kurzschluss zu
verhindern.
3. Geben Sie die Zutaten ausschließlich in den Einsatz und vermeiden Sie so, dass die Zutaten in Kontakt mit
den Heizelementen kommen.
4. Der Luftein- und -auslass darf während der Betriebszeit des Geräts nicht abgedeckt werden. Lassen Sie
mindestens 10 cm Platz rund um und über dem Gerät.
5. Es besteht die Gefahr eines Feuers, wenn der Frittiereinsatz mit Ö l gefüllt wird!
6. Berühren Sie nicht die Innenseite des Gerätes, wenn es läuft.
7. Vorsicht mit heißem Dampf und heißer Luft, wenn der Einsatz aus dem Gerät genommen wird.
8. Während des Betriebs strömtt heißer Dampf aus dem Luftauslass. Halten Sie mit Händen und Gesicht
einen sicheren Abstand zum Luftauslass und Dampf.
9. Schalten Sie das Gerät sofort aus und ziehen Sie den Gerätestecker aus der Steckdose, wenn Sie dunklen
Rauch aus dem Gerät quellen sehen. Das bedeutet, dass die Speisen verbrannt sind oder das
Fehlfunktionen auftreten.

- 17 -
REINIGUNG UND INSTANDHALTUNG
1. Lassen Sie das Gerät für ca. 30 Minuten abkühlen, bevor Sie es anfassen oder säubern. Reinigen Sie das
Gerät regelmäßig von innen und außen.
2. Säubern Sie die Außen- und Innenseite des Geräts mit einem feuchten Tuch und reiben Sie es mit einem
weichen, sauberen Tuch trocken.
3. Keinesfalls scheuernde Reiniger oder Schwämme verwenden.
4. Entnehmen Sie den Korb, damit das Gerät schneller abkühlt. Reinigen Sie den Korb und den Bratrost mit
warmem Wasser und einem nicht scheuernden Schwamm. Trocknen Sie vor dem Gebrauch alle Elemente
gründlich.
5. Etwaige Speisereste vom Heizelement im Gehäuse (wird nach der Entnahme des Frittierkorbs sichtbar)
mit einer Reinigungsbürste entfernen.
Hinweis: Der Korb und der Bratrostsind spülmaschinenfest.
FEHLERBEHEBUNG
Problem
Mögliche Ursache
Lösung
Das Gerät funktioniert nicht.
Das Gerät ist nicht am Strom
angeschlossen.
Den Netzstecker an eine geerdete
Wand-Steckdose anschließen.
Sie haben die Ein-/Start-/Stopp-
Taste nicht gedrückt, um das Gerät
einzuschalten.
Drücken Sie die Ein-/Start-/Stopp-
Taste, um das Gerät einzuschalten.
Die Zutaten sind nicht
durchgegart.
Die Menge der Lebensmittel im
Frittiereinsatz ist zu groß.
Fügen Sie kleinere Mengen an Zutaten
in den Einsatz. Kleinere Mengen
werden gleichmäßiger frittiert.
Die Temperatur ist zu niedrig oder
die Zeit zu kurz eingestellt.
Temperatur erhöhen oder Garvorgang
verlängern.
Die Zutaten sind
ungleichmäßig frittiert.
Verschiedene Lebensmittelarten
müssen in der Hälfte der
Zubereitungszeit geschüttelt
werden.
Schütteln Sie die Lebensmittel
während der Hälfte der
Zubereitungszeit.
Die gebratenen Snacks sind
nicht knusprig.
Sie haben eine Art Snacks benutzt,
die in einer traditionellen Fritteuse
frittiert werden sollten.
Verwenden Sie Ofen-Snacks oder
streichen Sie ein bisschen Öl auf die
Snacks für ein knusprigeres Resultat.
Aus dem Gerät steigt weißer
Rauch.
Sie bereiten fettige Zutaten zu.
Beim Frittieren von fettigen
Lebensmitteln, tropft Fett in den
Frittierkorb. Das Fett erzeugt weißen
Rauch und der Behälter kann sich
erhitzen. Das Garergebnis wird
dadurch nicht beeinträchtigt und das
Gerät bleibt unversehrt.
Der Korb enthält noch Fettreste
vom vorherigen Gebrauch.
Den Korb nach jedem Gebrauch
reinigen.
Frische Pommes Fritten sind
ungleichmäßig frittiert.
Sie haben nicht die richtige
Kartoffelsorte verwendet.
Frische Kartoffeln verwenden.
Sie haben die Kartoffelstäbchen vor
dem Frittieren nicht gründlich
abgespült.
Spülen Sie die Kartoffelstäbchen
richtig ab, um Stärke von der
Außenseite der Stäbchen zu
entfernen.
Frische Pommes sind nicht
knusprig.
Die Knusprigkeit der Pommes
hängt vom Gehalt an Ö l und
Wasser in den Pommes ab.
Achten Sie darauf, dass die
Kartoffelstäbchen richtig abgetrocknet
wurden, bevor Sie Öl hinzufügen.
Schneiden Sie die Kartoffelstückchen

- 18 -
kleiner für ein knusprigeres Resultat.
Fügen Sie für ein knusprigeres Resultat
etwas mehr Öl hinzu.
TECHNISCHE DATEN
Betriebsspannung: 220-240V ~ 50-60Hz
Leistung: 1300W
GEWÄHRLEISTUNG UND KUNDENSERVICE
Vor der Lieferung werden unsere Geräte einer strengen Qualitätskontrolle unterzogen. Wenn, trotz aller
Sorgfalt, während der Produktion oder dem Transport Beschädigungen aufgetreten sind, senden Sie das Gerät
zurück an den Händler.
Wir bieten eine 2-Jahres-Gewährleistung für das erworbene Gerät, beginnend am Tag des Verkaufs. Wenn Sie
ein defektes Produkt haben, nehmen Sie bitte direkt Kontakt mit dem Verkäufer auf.
Defekte, die aufgrund von unangemessenem Umgang mit dem Gerät entstehen und Störungen aufgrund von
Eingriffen und Reparaturen Dritter oder das Montieren von nicht-Originalteilen werden nicht von dieser
Gewährleistung abgedeckt. Die Quittung immer aufbewahren, ohne Quittung wird jegliche Gewährleistung
ausgeschlossen. Bei Schäden durch Nichteinhalten der Bedienungsanleitung erlischt die Gewährleistung, Wir
sind für daraus resultierende Folgeschäden nicht haftbar. Für Materialschäden oder Verletzungen aufgrund
falscher Anwendung oder Nichtbefolgen der Sicherheitshinweise sind wir nicht haftbar. Schäden an den
Zubehörteilen bedeutet nicht, dass das gesamte Gerät kostenlos ausgetauscht wird. In diesem Fall
kontaktieren Sie unsere Kundendienst. Zerbrochenes Glas oder Kunststoffteile sind immer kostenpflichtig.
Schäden an Verbrauchsmaterialien oder Verschleißteilen, sowie Reinigung, Wartung oder Austausch der
besagten Teile werden durch die Gewährleistung nicht abgedeckt und sind deshalb kostenpflichtig.
UMWELTGERECHTE ENTSORGUNG
Wiederverwertung – Europäischen Richtlinie 2012/19/EG
Dieses Symbol zeigt an, dass das Produkt nicht zusammen mit Haushaltsabfällen entsorgt werden
darf. Um Umwelt- und Gesundheitsschäden durch unkontrollierte Abfallentsorgung zu verhindern,
bitte verantwortungsbewusst entsorgen, um die nachhaltige Wiederverwertung von Ressourcen zu
fördern. Nutzen Sie zur Rückgabe Ihres Altgeräts bitte die Rückgabe- und Sammelsysteme oder wenden Sie
sich an den Händler bei dem Sie dieses Gerät erworben haben. Dieser kann das Gerät umweltschonend
entsorgen.
Emerio B.V. Customer service: Kundeninformation: Klantenservice:
Oudeweg 115 T: +31 (0) 23 3034369 T: +49 (0) 3222 1097 600 T: +31 (0) 23 3034369
2031 CC Haarlem www.emerio.eu/service www.emerio.eu/service www.emerio.eu/service
The Netherlands
Looking for spare parts? Have a look at https://spareparts.emerio.eu
Sie brauchen Ersatzteile? Besuchen Sie https://ersatzteile.emerio.eu
Onderdelen nodig? Kijk op https://onderdelen.emerio.eu

- 19 -
Mode d’emploi – French
CONSIGNES DE SÉCURITÉ
Avant d’utiliser l’appareil, lisez toutes les consignes
suivantes pour éviter des blessures et des dommages, et
pour optimiser les performances de votre appareil.
Conservez cette notice d’utilisation dans un endroit sûr. Si
vous donnez ou transférez cet appareil à un tiers, veillez à lui
remettre également cette notice d’utilisation.
En cas de détérioration due au non-respect par l’utilisateur
des instructions de cette notice d’utilisation, la garantie est
annulée. Le fabricant/importateur rejette toute
responsabilité en cas de dommages dus au non-respect des
instructions de la notice d’utilisation, à un usage négligent
ou à l’usage non conforme aux exigences de cette notice
d’utilisation.
1. Cet appareil peut être utilisé par des enfants à partir de 8
ans et plus et par des personnes ayant des capacités
physiques, sensorielles ou mentales réduites ou un
manque d’expérience et de connaissances à condition
qu’elles aient reçu une supervision ou des instructions
concernant l’utilisation de l’appareil en toute sécurité et
qu’elles comprennent les dangers encourus.
2. Les enfants ne doivent pas jouer avec l’appareil.
3. Le nettoyage et l’entretien par l’usager ne doivent pas
être effectués par des enfants, sauf s’ils ont plus de 8 ans
et qu’ils sont surveillés.
4. Maintenir l’appareil et son cordon hors de portée des
enfants de moins de 8 ans.
5. Si le câble d'alimentation est endommagé, il doit être
remplacé par le fabricant, son service après vente ou des
personnes de qualification similaire afin d'éviter un
danger.
6. Pour obtenir des instructions sur comment nettoyer les
surfaces qui sont en contact avec des aliments ou de
Sidan laddas...
Sidan laddas...
Sidan laddas...
Sidan laddas...
Sidan laddas...
Sidan laddas...
Sidan laddas...
Sidan laddas...
Sidan laddas...
Sidan laddas...
Sidan laddas...
Sidan laddas...
Sidan laddas...
Sidan laddas...
Sidan laddas...
Sidan laddas...
Sidan laddas...
Sidan laddas...
Sidan laddas...
Sidan laddas...
Sidan laddas...
Sidan laddas...
Sidan laddas...
Sidan laddas...
Sidan laddas...
Sidan laddas...
Sidan laddas...
Sidan laddas...
Sidan laddas...
Sidan laddas...
Sidan laddas...
Sidan laddas...
Sidan laddas...
Sidan laddas...
Sidan laddas...
Sidan laddas...
Sidan laddas...
Sidan laddas...
Sidan laddas...
Sidan laddas...
Sidan laddas...
Sidan laddas...
Sidan laddas...
Sidan laddas...
-
 1
1
-
 2
2
-
 3
3
-
 4
4
-
 5
5
-
 6
6
-
 7
7
-
 8
8
-
 9
9
-
 10
10
-
 11
11
-
 12
12
-
 13
13
-
 14
14
-
 15
15
-
 16
16
-
 17
17
-
 18
18
-
 19
19
-
 20
20
-
 21
21
-
 22
22
-
 23
23
-
 24
24
-
 25
25
-
 26
26
-
 27
27
-
 28
28
-
 29
29
-
 30
30
-
 31
31
-
 32
32
-
 33
33
-
 34
34
-
 35
35
-
 36
36
-
 37
37
-
 38
38
-
 39
39
-
 40
40
-
 41
41
-
 42
42
-
 43
43
-
 44
44
-
 45
45
-
 46
46
-
 47
47
-
 48
48
-
 49
49
-
 50
50
-
 51
51
-
 52
52
-
 53
53
-
 54
54
-
 55
55
-
 56
56
-
 57
57
-
 58
58
-
 59
59
-
 60
60
-
 61
61
-
 62
62
-
 63
63
-
 64
64


på andra språk
- español: Emerio AF-129369 Manual de usuario
- Deutsch: Emerio AF-129369 Benutzerhandbuch
- polski: Emerio AF-129369 Instrukcja obsługi
- français: Emerio AF-129369 Manuel utilisateur
- Nederlands: Emerio AF-129369 Handleiding