DeLOCK 90433 Användarmanual
- Kategori
- RAID-styrenheter
- Typ
- Användarmanual

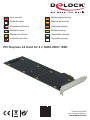
PCI Express x2 Card for 4 x SATA HDD / SSD
Product-No:90433
User manual no:90433-a
www.delock.com
User manual
Mode d’emploi
Uživatelská příručka
Manuale utente
Manual de utilizare
Korisnički priručnik
Bedienungsanleitung
Manual del usuario
Instrukcja obsługi
Bruksanvisning
Használati utasítás
Εγχειρίδιο χρήστη

-2-
English
Description
This PCI Express card by Delock expands the PC by four SATA 22 pin ports. Up to four 2.5″ SSD / HDD can be connected to this card.
When using more than one SATA port, there is the possibility to use dierent RAID modes.
HyperDuo support
The card supports a HyperDuo function. With this function it combines an SSD and an HDD to use the advantages of both data mediums,
the speed of an SSD and the capacity of an HDD.
RAID support
Furthermore, the card also supports various RAID modes such as RAID 0, 1, 10 or JBOD. Also, if enough SSD or HDD are installed, two
dierent RAID modes can be used at the same time. For example, two hard disks with RAID 0 and two hard disks can be congured in
HyperDuo or RAID 0 and RAID 1.
Specication
• Connectors:
internal:
1 x PCI Express x2, V2.0
4 x SATA 22 pin receptacle
• Chipset: Marvell 88SE9230
• Suitable for 2.5″ SATA HDD / SSD:
SATA HDD / SSD up to 6 Gb/s
supports 5 V HDD / SSD
• Supports RAID 0, 1, 10, JBOD, HyperDuo Virtual Disk (Safe/Capacity)
• Bootable
• Supports Native Command Queuing (NCQ)
• Supports S.M.A.R.T.
• Supports TRIM
• Supports DevSleep
• Hot Swap
• Dimensions (LxWxH): ca. 227 x 120 x 20 mm
System requirements
• Linux Kernel 4.9.4 or above
• Windows 7/7-64/8.1/8.1-64/10/10-64
• PC with one free PCI Express slot
Package content
• PCI Express card
• 16 x xing screw
• Driver CD
• User manual
Safety instructions
• Protect the product against moisture
• Avoid anti-static electricity when installing the card
Driver Installation
Note: Perform the driver installation before the hardware installation.
1. Switch on your computer.
2. Put the driver CD in the CD ROM drive.
3. Open Windows Explorer, select: CD-drive\MSU\MSUSetup.exe.
4. Follow the installation instruction and conrm the license terms.
5. The driver will now be installed.
6. After the driver installation please follow the hardware installation.
Hardware Installation
1. Turn o your PC and unplug the power cord.
2. Open the housing.
3. Insert the card straight and carefully into the free PCI Express slot, until it is well seated.
4. Connect your HDDs or SSDs to the SATA 22 pin connectors on the PCIe card and screw it.
5. Reattach the housing and connect the power cord to the AC adapter.
Installation
1. After restarting the computer, the PCIe card will be installed automatically.
2. You can now start to use the device.

-3-
English
Marvell BIOS Utility (MBU) for RAID / HyperDuo Setup
Warning: All data on the HDD / SSD associated with item 90433 will be irretrievably erased.
To create a RAID/HyperDuo virtual disk:
Skip this section if you are not going to create a RAID/HyperDuo virtual disk.
1. Start your Computer.
2. Press the [Ctrl] + [M] key on the keyboard at the same time to enter the Marvell BIOS Utility (MBU).
3. Once the MBU is entered, scroll to HBA0: Marvell 0 in the Topology pane by the up and arrow key on the keyboard and press Enter.
4. Choose Conguration Wizard and press Enter to start creating the RAID/HyperDuo virtual disk.
5. Select the free physical disks available by using the arrow keys to scroll through the disks and press Space Bar.
6. After selecting all the disks needed, press Enter to continue.
7. Choose the RAID option:
RAID Level: RAID 0 – Stripping
RAID 1 – Disk Mirroring
RAID 10 – Stripe of Mirrors
Stripe Size: 32K, 64K
It denes the size of the single data block on the virtual disk. The larger the stripe size, the longer it takes to read and write data blocks
on the physical disks. A large size is recommended for applications requiring large data transfers, e.g. audio, video and graphics. A
smaller size is suitable for applications with smaller size les, e.g. emails and documents.
8. Name: any value for the users to input. Input a user dened identier for the virtual disk.
9. Choose the HyperDuo option:
HyperDuo Mode: Safe – Mirrored Protection
Capacity – Cost-Optimized
Keep original data: Yes, No (Only available in Safe mode)
Preserve the data currently on your HDD or erase all data.
10. Threshold(%): 10-100 for the users to input
The number denes the percentage of your SSD the MBU uses to optimize performance. Default is 90.
11. Choose Next and press [Y] key to start creating the virtual disk.
12. Press F10 and [Y] key to exit the MBU.
Note: A HyperDuo virtual disk must at least contain one SSD and one HDD.
To rebuild a virtual disk:
1. When a hard disk in a RAID 1 virtual disk or a SSD in a HyperDuo Safe mode virtual disk is defective or the data inside are corrupted,
the Marvell BIOS Utility (MBU) will mark the virtual disk as Degrade.
2. Replace the defective hard disk/SSD with an identical hard disk/SSD or a hard disk/SSD which has a smaller size within the allowable
value set for the virtual disk.
3. Press the [Ctrl] + [M] key on the keyboard at the same time to enter the MBU.
4. In the Topology pane, scroll to the Virtual Disks ID, press Enter and select the Rebuild option.
5. Select the available replacement hard disk/SSD to be rebuilt to by pressing Space Bar and then Enter.
6. Press [Y] key to start. The utility will show the rebuild status and the completed percentage. This will take a long time to nish the
whole process and it depends on the size to be rebuilt.
Note: HyperDuo virtual disk created in Safe mode can be partially rebuilt if the SSD fails, but not if the HDD fails.
Marvell Storage Utility (MSU) for RAID/HyperDuo Setup
The Marvell Storage Utility (MSU) is a browser-based management utility for Marvell controllers. It creates and manages a RAID or
HyperDuo virtual disk using storage devices connected to the controller.
1. Switch on your computer.
2. Put the driver CD in the CD ROM drive.
3. Open Windows Explorer, select: CD-drive\MSU\4.1.0.2015\MSUSetup.exe.
4. Double click the desktop shortcut for the MSU.
5. When opening the MSU in some versions of Windows, Internet Explorer may detect a problem with the security certicate for the MSU
web page. Select Continue to this website (not recommended) to continue opening the MSU.
6. Opening the MSU will take you to a login page. If you have no password, leave this eld blank, and then click Login.
7. After entering the MSU user interface, select Adapter, which contains four physical disks, assume four physical disks are connected to
the controller card.
8. Roll over the Operation tab and you will see Create HyperDuo, Create RAID and Quick Create Wizard.
9. To create a HyperDuo virtual disk, you should have at least one HDD and one/multiple SSD.
10. Select Create HyperDuo, and then select Safe mode or Capacity mode.
11. Check Keep Original Data to preserve the data currently on your HDD or uncheck it to erase all data. This option is only available in
Safe mode.
12. Threshold(%): 10-100 for the users to input
13. The Threshold (%) number denes the percentage of your SSD the MSU uses to optimize performance. The default is 90.
14. Press Submit.
15. The MSU displays the Property tab for the HyperDuo virtual disk and begins initialization. It takes up to some minutes to complete.
System performance may slow during this period.

-4-
English
1. If you want to quickly create a HyperDuo virtual disk, select Quick Create Wizard.
2. Select Safe mode or Capacity mode, and then press Submit. The MSU will help you create the HyperDuo virtual disk automatically.
1. To create a RAID virtual disk, select Create RAID. Then select RAID level: RAID 0, RAID 1 or RAID 10.
2. Choose enough available physical disks (RAID0 needs at least two physical disks, RAID1 just needs two physical disks, and RAID10
needs four physical disks), and press "Next".
3. Enter the name for the virtual disk, or you can use the default name.
4. Select the Initialization method for the virtual disk.
5. Select the Stripe Size 32K or 64K for the virtual disk.
6. Press Submit. The MSU creates the virtual disk and displays the Property tab for the new virtual disk.
7. Restart your computer to use the virtual disk.
Support Delock
If you have further questions, please contact our customer support [email protected]
You can nd current product information on our homepage: www.delock.com
Final clause
Information and data contained in this manual are subject to change without notice in advance. Errors and misprints excepted.
Copyright
No part of this user manual may be reproduced, or transmitted for any purpose, regardless in which way or by any means, electronically or
mechanically, without explicit written approval of Delock.
Edition: 01/2020

-5-
Deutsch
Kurzbeschreibung
Diese PCI Express Karte von Delock erweitert den PC um vier SATA 22 Pin Ports. An die Karte können bis zu vier 2.5″ SSD / HDD
angeschlossen werden. Bei der Belegung von mehr als einem SATA Port besteht die Möglichkeit, verschiedene RAID Modi zu nutzen.
HyperDuo Unterstützung
Die Karte unterstützt die HyperDuo-Funktion. Mit dieser Funktion werden eine SSD und eine HDD kombiniert, um die Vorteile beider
Datenträger nutzen zu können, die Geschwindigkeit der SSD und die Kapazität der HDD.
RAID Unterstützung
Des weiteren unterstützt die Karte auch diverse RAID Modi wie RAID 0, 1, 10 oder JBOD. Zudem können, sofern genügend SSD oder
HDD verbaut sind, gleichzeitig zwei verschiedene RAID Modi betrieben werden. So können z. B. zwei Festplatten mit RAID 0 und zwei
Festplatten im HyperDuo konguriert werden oder auch RAID 0 und RAID 1.
Spezikation
• Anschlüsse:
intern:
1 x PCI Express x2, V2.0
4 x SATA 22 Pin Buchse
• Chipsatz: Marvell 88SE9230
• Für 2.5″ SATA HDD / SSD geeignet:
SATA HDD / SSD bis 6 Gb/s
Unterstützt 5 V HDD / SSD
• Unterstützt RAID 0, 1, 10, JBOD, HyperDuo Virtual Disk (Safe/Capacity)
• Bootfähig
• Unterstützt Native Command Queuing (NCQ)
• Unterstützt S.M.A.R.T.
• Unterstützt TRIM
• Unterstützt DevSleep
• Hot Swap
• Maße (LxBxH): ca. 227 x 120 x 20 mm
Systemvoraussetzungen
• Linux Kernel 4.9.4 oder höher
• Windows 7/7-64/8.1/8.1-64/10/10-64
• PC mit einem freien PCI Express Steckplatz
Packungsinhalt
• PCI Express Karte
• 16 x Befestigungsschraube
• Treiber CD
• Bedienungsanleitung
Sicherheitshinweise
• Produkt vor Feuchtigkeit schützen
• Vermeiden Sie antistatische Auadung beim Einbau der Karte
Treiberinstallation
Hinweis: Führen Sie die Treiberinstallation vor der Hardwareinstallation durch.
1. Schalten Sie den Computer ein.
2. Legen Sie die Treiber CD in Ihr Laufwerk ein.
3. Önen Sie mit dem Explorer folgendes Programm: CD-Laufwerk\MSU\MSUSetup.exe.
4. Folgen Sie den Installationsanweisungen und bestätigen Sie die Lizenzbedingungen.
5. Der Treiber wird nun installiert.
6. Nach der Treiberinstallation folgen Sie der Hardwareinstallation.
Hardwareinstallation
1. Schalten Sie Ihren PC aus, ziehen Sie das Netzkabel.
2. Önen Sie das Gehäuse.
3. Stecken Sie die Karte gerade und vorsichtig in den freien PCI Express Slot, bis sie fest sitzt.
4. Verbinden Sie Ihre HDDs bzw. SSDs mit den SATA 22 Pin Anschlüssen auf der PCIe Karte und schrauben sie fest.
5. Schließen Sie das Gehäuse wieder und verbinden Sie das Netzkabel mit dem Netzteil.
Installation
1. Nach dem Neustart des Computers wird die PCIe Karte automatisch installiert.
2. Sie können nun das Gerät verwenden.

-6-
Deutsch
Marvell BIOS Utility (MBU) für RAID / HyperDuo Setup
Achtung: Alle Daten auf den HDD / SSDs, die mit dem Artikel 90433 verbunden werden, werden unwiederbringlich gelöscht.
Erstellung einer RAID / HyperDuo virtual Disk:
Überspringen Sie diesen Teil, wenn Sie nicht vorhaben eine RAID / HyperDuo virtual Disk zu erstellen.
1. Starten Sie Ihren Computer.
2. Drücken Sie gleichzeitig die Tasten [Strg] + [M] um in das Marvell BIOS Utility zu gelangen.
3. Nachdem Sie ins Menu gelangt sind, scrollen Sie zum Punkt HBA0: Marvell im Fenster, mit Hilfe der Pfeiltasten und drücken Sie
anschließen die Eingabe Taste.
4. Wählen Sie den Conguration Wizard und drücken Sie die Eingabe Taste, um die Erstellung der RAID / HyperDuo virtual Disk zu
starten.
5. Wählen Sie die freien verfügbaren physische Festplatten aus, indem Sie mit Hilfe der Pfeiltasten scrollen und die Festplatten / SSDs
mit der Leertaste bestätigen.
6. Nachdem Sie alle Festplatten / SSDs ausgewählt haben, drücken Sie die Eingabe Taste.
7. Wählen Sie die RAID Option:
RAID Level: RAID 0 – Stripping
RAID 1 – Disk Mirroring
RAID 10 – Stripe of Mirrors
Stripe Size: 32K, 64K
Dies deniert die Größe eines einzelnen Datenblocks auf dem virtuellen Laufwerk. Je größer der Datenblock ist, desto länger dauert
das Lesen und Schreiben auf der physischen Festplatte. Ein großer Datenblock wird für Anwendung die eine hohe Datenübertragung
benötigen, wie z. B. Audio, Video und Grak, empfohlen. Ein kleiner Datenblock wird für Anwendungen, die kleinere Dateien, wie z. B.
E-Mails oder Dokumente, empfohlen.
8. Name: Geben Sie einen Wert ein, der für die Zuordnung der virtual Disk geeignet ist.
9. Wählen Sie die HyperDuo Option:
HyperDuo Mode: Safe – Mirrored Protection
Capacity – Cost-Optimized
Original Daten behalten: Ja / Nein (nur möglich im Safe Mode)
Speichern Sie die Daten auf Ihrer Festplatte oder löschen Sie alle Daten.
10. Der Grenzwert (%): 10 – 100 bei der Nutzereingabe
Der Wert gibt an, wieviel Prozent von der SSD das MBU nutzt um die Performance zu optimieren. Standardmäßig ist der Wert 90
eingestellt.
11. Wählen Sie Next aus und drücken Sie die Taste [Y] / [Z], um die Erstellung der virtual Disk zu starten.
12. Drücken Sie F10 und [Y] / [Z] um das MBU zu beenden.
Bemerkung: Ein HyperDuo virtual Disk muss mindestens eine SSD und eine HDD enthalten.
Wiederherstellen der virtual Disk:
1. Wenn eine Festplatte im RAID 1 virtual Disk Modus oder eine SSD im HyperDuo Safe mode virtual Disk Modus bendet und
beschädigt ist oder die Daten nicht mehr lesbar sind, das Marvell BIOS Utility (MBU) wird die virtual Disk als defekt kennzeichnen.
2. Ersetzen Sie die defekte Festplatte / SSD mit einer identischen oder mit einer HDD / SSD mit einer geringeren Größe, innerhalb der
angegebenen Werte für die virtual Disk.
3. Drücken Sie [Strg] + [M] gleichzeitig, um in das MBU zu gelangen.
4. In dem Auswahlfenster scrollen Sie bis zur virtual Disk und drücken die Eingabe Taste, anschließend wählen Sie die Rebuild Option
aus.
5. Wählen Sie die zu ersetzende HDD / SSD aus, indem Sie die Leertaste und anschließend die Eingabe Taste drücken.
6. Drücken Sie [Y] / [Z] um zu starten. Das MBU zeigt den Wiederherstellungsstatus in Prozent. Dieser Prozess wird einige Zeit in
Anspruch nehmen und ist abhängig von der Größe des wiederherzustellenden Systems.
Hinweis: HyperDuo virtual Disk welche im Safe mode erstellt wurden können teilweise wiederhergestellt werden wenn die SSD beschädigt
ist, jedoch nicht wenn die HDD beschädigt ist.
Marvell Storage Utility (MSU) für RAID / HyperDuo Setup
Das MSU ist ein Browser basierendes Verwaltungswerkzeug für Marvell Controller. Es erstellt und verwaltet ein RAID oder HyperDuo
virtual Disk, welche durch HDDs / SSDs an den Controller angeschlossen sind.
1. Schalten Sie den Computer ein.
2. Legen Sie die Treiber CD in Ihr Laufwerk ein.
3. Önen Sie mit dem Explorer folgendes Programm: CD-Laufwerk\MSU\4.1.0.2015\MSUSetup.exe.
4. Doppelklicken Sie auf das Desktop Symbol für das MSU.
5. Bei einigen Windows Versionen kann es passieren, dass der Internet Explorer ein Problem mit den Sicherheitszertikaten der MSU
Webseite hat. Wählen Sie weiter zu dieser Webseite, um die MSU Seite zu önen.
6. Es erscheint eine Login Seite. Wenn Sie kein Passwort haben, lassen Sie das Feld frei und klicken auf Login.
7. Nachdem Sie in die MSU Benutzeroberäche gelangt sind, wählen Sie die Adapter aus, die vier physische HDD / SSD enthalten,
vorausgesetzt Sie haben vier HDDs / SSDs an die Controllerkarte angeschlossen.
8. Wenn Sie über die Reiter für die Optionen fahren, sehen Sie die verschiedenen Einstellmöglichkeiten Create HyperDuo, Create RAID
und Quick Create Wizard.
9. Zur Erstellung einer HyperDuo virtual Disk, sollten Sie mindestens eine HDD und eine oder mehrere SSDs nutzen.
10. Wählen Sie Create HyperDuo und dann Safe mode oder Capacity mode.

-7-
Deutsch
11. Prüfen Sie, ob Sie Ihre Daten behalten möchten oder ob alle Daten gelöscht werden können. Diese Option ist nur im Safe Mode
möglich.
12. Der Grenzwert (%): 10 – 100 bei der Nutzereingabe
13. Der Wert gibt an, wieviel Prozent von der SSD das MSU nutzt um die Performance zu optimieren. Standardmäßig ist der Wert 90
eingestellt.
14. Klicken Sie Submit.
15. Die MSU zeigt die Registerkarte Eigenschaft für das virtuelle Laufwerk HyperDuo an und beginnt mit der Initialisierung. Es wird einige
Minuten bis zur Fertigstellung dauern. Die Systemleistung kann in dieser Zeit geringer sein.
1. Wenn Sie eine schnelle Erstellung der HyperDuo virtual Disk wünschen, wählen Sie Quick Create Wizard.
2. Wählen Sie Safe mode oder Capacity mode und drücken Sie Submit. Das MSU wird Ihnen helfen, die HyperDuo virtual Disk
automatisch zu erstellen.
1. Um ein RAID virtual Disk zu erstellen, wählen Sie Create RAID. Danach wählen Sie das RAID Level: RAID 0, RAID 1 oder RAID 10.
2. Wählen Sie genügend verfügbare physische HDDs / SSDs (RAID 0 benötigt mindestens zwei, RAID 1 benötigt nur zwei, RAID 10
benötigt vier) und drücken Sie "Next".
3. Geben Sie einen Namen für die virtual Disk ein, Sie können auch den voreingestellten benutzen.
4. Wählen Sie den Initialisierungsmethode für die virtual Disk.
5. Wählen Sie die Strip size 32K oder 64K für die virtual Disk.
6. Drücken Sie Submit. Das MSU erstellt die virtual Disk und zeigt eine Übersicht über die neue virtual Disk.
7. Starten Sie Ihren Computer neu, um die virtual Disk zu nutzen.
Support Delock
Bei weitergehenden Supportanfragen wenden Sie sich bitte an [email protected]
Aktuelle Produktinformationen und Treiber Downloads nden Sie auch auf unserer Homepage: www.delock.de
Schlussbestimmung
Die in diesem Handbuch enthaltenen Angaben und Daten können ohne vorherige Ankündigung geändert werden. Irrtümer und Druckfehler
vorbehalten.
Copyright
Ohne ausdrückliche schriftliche Erlaubnis von Delock darf kein Teil dieser Bedienungsanleitung für irgendwelche Zwecke vervielfältigt oder
übertragen werden, unabhängig davon, auf welche Art und Weise oder mit welchen Mitteln, elektronisch oder mechanisch, dies geschieht.
Stand: 01/2020

-8-
Français
Description
Cette carte PCI Express de Delock étend le PC de quatre ports SATA à 22 broches. Jusqu’à quatre SSD / HDD 2.5″ peuvent être
connectés à cette carte. Lorsque vous utilisez plus d'un port SATA, vous avez la possibilité d'utiliser diérents modes RAID.
Support HyperDuo
La carte est compatible avec une fonction HyperDuo. Avec cette fonction, il combine un SSD et un disque dur pour bénécier des
avantages des deux supports de données, la vitesse d'un SSD et la capacité d'un disque dur.
Support RAID
En outre, la carte est également compatible avec divers modes RAID comme RAID 0, 1, 10 ou JBOD. Egalement, si susamment de
SSD ou HDD sont installés, deux modes RAID diérents peuvent être utilisés en même temps. Par exemple, deux disques durs avec
RAID 0 et deux disques durs peuvent être congurés dans HyperDuo ou RAID 0 et RAID 1.
Spécications techniques
• Connecteurs :
interne :
1 x PCI Express x2, V2.0
4 x SATA 22 broches femelle
• Chipset : Marvell 88SE9230
• Convient à 2.5″ SATA HDD / SSD :
SATA HDD / SSD jusqu'à 6 Gb/s
supporte 5 V DD / SSD
• Prise en charge de RAID 0, 1, 10, JBOD, disque virtuel HyperDuo (modes Safe/Capacity)
• Amorçable
• Prise en charge Native Command Queuing (NCQ
• Prend en charge S.M.A.R.T.
• Prend en charge TRIM
• Prend en charge DevSleep
• Hot Swap
• Dimensions (LxlxH) : env. 227 x 120 x 20 mm
Conguration système requise
• Linux Kernel 4.9.4 ou version ultérieure
• Windows 7/7-64/8.1/8.1-64/10/10-64
• PC avec un slot PCI Express libre
Contenu de l’emballage
• PCI Express Carte
• 16 x vis de xation
• CD d’installation des pilotes
• Mode d’emploi
Instructions de sécurité
• Protéger le produit contre l’humidité
• Éviter l’électricité statique lors de l’installation de la carte
Installation du pilote
Note : Eectuez l'installation du pilote avant l'installation du matériel.
1. Allumez votre ordinateur.
2. Mettez le CD de pilotes dans le lecteur de CD ROM.
3. Ouvrez l'Explorateur Windows, sélectionnez : CD-drive\MSU\MSUSetup.exe.
4. Suivez les instructions d'installation et conrmez les conditions de la licence.
5. Le pilote va maintenant être installé.
6. Après l'installation du pilote, veuillez suivre l'installation du matériel.
Installation matérielle
1. Eteignez votre PC et débranchez le cordon d'alimentation.
2. Ouvrez le boîtier.
3. Insérez la carte tout droit et avec précaution dans le slot PCI Express libre jusqu'à ce qu'elle soit bien en place.
4. Connectez vos HDD ou SSD aux connecteurs SATA 22 broches sur la carte PCIe et la visser.
5. Remontez le boîtier et branchez le cordon d'alimentation et l'adaptateur AC.
Installation
1. Après avoir redémarré l’ordinateur, la carte PCIe sera automatiquement installée.
2. Vous pouvez à présent commencer à utiliser le périphérique.

-9-
Français
Utilitaire BIOS Marvell (MBU) pour conguration RAID/HyperDuo
Attention : Toutes les données sur les HDD / SSD connexes à l’élément 90433 seront eacées irrévocablement.
Pour créer un disque virtuel RAID/HyperDuo :
Sautez cette section si vous ne souhaitez pas créer de disque virtuel RAID/HyperDuo.
1. Allumez votre ordinateur.
2. Appuyez en même temps sur les touches [Ctrl] + [M] du clavier pour entrer dans l'utilitaire BIOS Marvell (MBU).
3. Une fois entré dans le MBU, faites déler jusqu'à HBA0 : Marvell 0 dans le panneau de topologie avec les touches haut et èche du
clavier et appuyez sur Entrée.
4. Choisissez l'assistant de conguration et appuyez sur Entrée pour commencer à créer le disque virtuel RAID/HyperDuo.
5. Sélectionnez les disques physiques libres disponibles à l'aide des touches échées pour faire déler les disques et appuyez sur la
barre d'espace.
6. Après avoir sélectionné tous les disques nécessaires, appuyez sur Entrée pour continuer.
7. Choisissez l'option RAID :
Niveau RAID : RAID 0 – Agrégation par bandes
RAID 1 – Mise en miroir des disques
RAID 10 –Agrégation de bandes ables
Taille des bandes : 32K, 64K
Elle dénit la taille du bloc de données simple sur le disque virtuel. Plus la taille des bandes est élevée, plus la lecture et l'écriture
de blocs de données sur les disques physiques prend du temps. Il est recommandé d'utiliser une grande taille pour les applications
nécessitant des transferts de données importants, telles que l'audio, la vidéo et les graphismes. Une taille inférieure est adaptée à des
applications avec des chiers de taille moindre, tels que les e-mails et les documents.
8. Nom : toute valeur à saisir par les utilisateurs. Saisissez un identiant déni par l'utilisateur pour le disque virtuel.
9. Choisissez l'option HyperDuo :
Mode HyperDuo : Sécurisé – Protection en miroir
Capacité – Optimisation des coûts
Conserver les données d'origine : Oui, Non (Uniquement disponible en mode Sécurisé)
Maintenir les données actuellement sur votre disque dur ou eacer toutes les données.
10. Seuil (%) : 10-100 à saisir par les utilisateurs
Le nombre dénit le pourcentage de votre SSD que le MBU utilise pour optimiser les performances. La valeur par défaut est 90.
11. Choisissez Suivant et appuyez sur la touche [Y] pour commencer la création du disque virtuel.
12. Appuyez sur les touches F10 et [Y] pour quitter le MBU.
Remarque : Un disque virtuel HyperDuo doit au moins contenir un SSD et un disque dur.
Pour reconstruire un disque virtuel :
1. Si un disque dur dans un disque virtuel RAID 1 ou un SSD dans un disque virtuel HyperDuo en mode Sécurisé est défectueux ou si
les données à l'intérieur sont corrompues, l'utilitaire BIOS Marvell (MBU) marque le disque virtuel comme Dégradé.
2. Remplacez le disque dur/SSD défectueux par un disque dur/SSD identique ou un disque dur/SSD de taille inférieure dans la valeur
admissible dénie pour le disque virtuel.
3. Appuyez en même temps sur les touches [Ctrl] + [M] du clavier pour entrer dans le MBU.
4. Dans le panneau de topologie, faites déler vers les identiants des disques virtuels, appuyez sur Entrée et sélectionnez l'option
Reconstruire.
5. Sélectionnez le disque dur/SSD de remplacement disponible à reconstruire en appuyant sur la barre d'espace puis sur Entrée.
6. Appuyez sur la touche [Y] pour commencer. L'utilitaire ache l'état de la reconstruction et le pourcentage eectué. La nalisation de
l'ensemble du processus dure longtemps. Cela dépend de la taille à reconstruire.
Remarque : Le disque virtuel HyperDuo créé en mode Sécurisé peut être partiellement reconstruit si le SSD tombe en panne, mais pas si
le disque dur tombe en panne.
Utilitaire de stockage Marvell (MSU) pour conguration RAID/HyperDuo
Le Marvell Storage Utility (MSU) est un utilitaire de gestion basé sur un moteur de recherche pour les contrôleurs Marvell. Il crée et gère
un disque virtuel RAID ou HyperDuo utilisant des appareils de stockage connectés au contrôleur.
1. Allumez votre ordinateur.
2. Mettez le CD de pilotes dans le lecteur de CD ROM.
3. Ouvrez l'Explorateur Windows, sélectionnez : CD-drive\MSU\4.1.0.2015\MSUSetup.exe.
4. Double cliquez sur la raccourci du bureau pour le MSU.
5. Lors de l'ouverture du MSU sur certaines versions de Windows, Internet Explorer peut détecter un problème avec le certicat de
sécurité de la page Web du MSU. Sélectionnez Continuer vers ce site Web (non recommandé) pour continuer l'ouverture du MSU.
6. L'ouverture du MSU vous dirige vers une page de connexion. Si vous n'avez pas de mot de passe, laissez ce champ vide, puis cliquez
sur Connexion.
7. Après être entré dans l'interface utilisateur du MSU, sélectionnez Adaptateur, qui contient quatre disques physiques, en supposant que
quatre disques physiques sont connectés à la carte contrôleur.
8. Passez la souris sur l'onglet Fonctionnement et vous pourrez voir Créer HyperDuo, Créer RAID et Assistant de création rapide.
9. Pour créer un disque virtuel HyperDuo, vous devez avoir au moins un disque dur et un ou plusieurs SSD.
10. Sélectionnez Créer HyperDuo, puis sélectionnez le mode Sécurisé ou le mode Capacité.
11. Cochez Conserver les données d'origine pour conserver les données actuellement sur votre disque dur ou décochez-le pour eacer
toutes les données. Cette option est uniquement disponible en mode Sécurisé.

-10-
Français
12. Seuil (%) : 10-100 à saisir par les utilisateurs
13. Le nombre Seuil (%) dénit le pourcentage de votre SSD que le MSU utilise pour optimiser les performances. La valeur par défaut est
90.
14. Appuyez sur Soumettre.
15. Le MSU ache l'onglet Propriétés pour le disque virtuel HyperDuo et commence l'initialisation. Cela peut prendre quelques minutes.
Les performances du système peuvent ralentir pendant cette période.
1. Si vous souhaitez créer rapidement un disque virtuel HyperDuo, sélectionnez l'Assistant de création rapide.
2. Sélectionnez le mode Sécurisé ou le mode Capacité, puis appuyez sur Soumettre. Le MSU vous aide automatiquement à créer le
disque virtuel HyperDuo.
1. Pour créer un disque virtuel RAID, sélectionnez Créer RAID. Puis sélectionnez le niveau RAID : RAID 0, RAID 1 ou RAID 10.
2. Choisissez susamment de disques physiques disponibles (RAID0 nécessite au moins deux disques physiques, RAID1 nécessite
seulement deux disques physiques et RAID10 nécessite quatre disques physiques), puis appuyez sur "Next" (Suivant).
3. Saisissez le nom du disque virtuel. Vous pouvez également utiliser le nom par défaut.
4. Sélectionnez la méthode d'initialisation pour le disque virtuel.
5. Sélectionnez la taille de bande, 32K ou 64K, pour le disque virtuel.
6. Appuyez sur Soumettre. Le MSU crée le disque virtuel et ache l'onglet Propriétés pour le nouveau disque virtuel.
7. Redémarrez votre ordinateur pour utiliser le disque virtuel.
Assistance Delock
Si vous avez d'autres questions, veuillez contacter notre assistance client : [email protected]
Vous pouvez trouver les informations sur nos produits actuels sur notre page d'accueil : www.delock.fr
Clause nale
Les informations et données contenues dans ce manuel sont sujettes à modications sans préavis. Sont exclues les erreurs et les fautes
d'impression.
Copyright
Aucune partie de ce manuel d'utilisation ne peut être reproduite ou transmise, quel qu'en soit le but, et sous quelque moyen que ce soit,
électronique ou mécanique, sans l'approbation écrite expresse de Delock.
Version : 01/2020

-11-
Español
Descripción
Esta tarjeta PCI Express de Delock amplía la PC con cuatro puertos SATA de 22 pines. Se pueden conectar hasta cuatro SSD / HDD de 2.5″
a esta tarjeta. Cuando utilice más de un puerto SATA, tiene la posibilidad de utilizar diferentes modos RAID.
Soporte HyperDuo
La tarjeta soporta una función hiperdúo. Con esta función, combina una unidad de estado sólido (SSD) y una unidad de disco duro (HDD)
para aprovechar las ventajas de ambos medios de datos: la velocidad de aquella y la capacidad de esta.
Compatibilidad con RAID
Además, la tarjeta también soporta varios modos RAID como RAID 0, 1, 10 o JBOD. Además, si se instalan sucientes SSD o HDD, se
pueden utilizar dos modos RAID diferentes al mismo tiempo. Por ejemplo, dos discos duros con RAID 0 y dos discos duros se pueden
congurar en HyperDuo o RAID 0 y RAID 1.
Especicación técnica
• Conectores:
interno:
1 x PCI Express x2, V2.0
4 x SATA de 22 pines hembra
• Conjunto de chips: Marvell 88SE9230
• Adecuado para unidades de estado sólido o unidades de disco duro SATA de 2.5″:
Unidad de estado sólido o unidad de disco duro SATA de hasta 6 Gb/s
Soporte 5 V HDD / SSD
• Soporta RAID 0, 1, 10, JBOD, Disco Virtual HyperDuo (Seguro/Capacidad)
• Permite el reinicio
• Admite unidades Native Command Queuing (NCQ)
• Compatible con S.M.A.R.T.
• Compatible con TRIM
• Compatible con DevSleep
• Hot Swap
• Dimensiones (LAxANxAL): aprox. 227 x 120 x 20 mm
Requisitos del sistema
• Linux Kernel 4.9.4 o superior
• Windows 7/7-64/8.1/8.1-64/10/10-64
• PC con una ranura PCI Express libre
Contenido del paquete
• Tarjeta PCI Express
• 16 x tornillo de jación
• Driver en CD
• Manual del usuario
Instrucciones de seguridad
• Proteja el producto contra el polvo
• Evite la electricidad estática cuando instale la tarjeta
Instalación del controlador
Nota: Instale el controlador antes de instalar el hardware.
1. Encienda su PC.
2. Inserte el CD del controlador en la unidad de CD ROM.
3. Abra el Explorador de Windows y seleccione Unidad_de_CD\MSU\MSUSetup.exe.
4. Siga las instrucciones de instalación y conrme los términos de licencia.
5. El controlador se instalará.
6. Después de instalar el controlador, realice la instalación del hardware.
Hardware Instalación
1. Apague su equipo y desconecte el cable de alimentación.
2. Abra la carcasa.
3. Inserte la tarjeta en posición recta y con cuidado en la ranura PCI Express libre hasta que quede correctamente asentada.
4. Conecte sus discos duros o SSD a los conectores SATA de 22 pines de la tarjeta PCIe y atorníllelos.
5. Vuelva a colocar la carcasa y conecte el adaptador de CA del cable de alimentación.
Instalación
1. Después de reiniciar el ordenador, la tarjeta PCIe se instalará automáticamente.
2. Ahora ya puede utilizar el dispositivo.

-12-
Español
Utilidad del BIOS de Marvell (MBU) para conguración RAID/HyperDuo
Advertencia: Todos los datos en el HDD / SSD asociados con el ítem 90433 serán borrados irremediablemente.
Para crear un disco virtual RAID/HyperDuo:
Omita esta sección si no va a crear un disco virtual RAID/HyperDuo.
1. Encienda su PC.
2. Presione la combinación de teclas [Ctrl] + [M] del teclado simultáneamente para entrar en la Utilidad del BIOS de Marvell (MBU).
3. Cuando haya entrado en la MBU, vaya a HBA0: Marvell 0 en el panel Topología mediante la tecla Arriba y de echa del teclado y
presione Entrar.
4. Elija Asistente para conguración y presione Entrar para comenzar a crear el disco virtual RAID/HyperDuo.
5. Seleccione los discos físicos disponibles mediante las teclas de fecha para recorrer los discos y presione la barra espaciadora.
6. Después de seleccionar todos los discos necesarios, presione Entrar para continuar.
7. Elija la opción RAID:
Nivel RAID: RAID 0 - Segmentación
RAID 1 - Duplicación de discos
RAID 10 - Segmentación de simetría
Tamaño de segmento: 32K y 64K
Dene el tamaño de un solo bloque de datos en el disco virtual. Cuanto mayor sea el tamaño del segmento, más tiempo se tardará
en leer y escribir los bloques de datos en el disco físico. Se recomienda un tamaño grande para aplicaciones que requieran grandes
transferencias de datos, como audio, vídeo y grácos. Un tamaño más pequeño es adecuado para aplicaciones con archivos de
tamaño más pequeño, como correos electrónicos y documentos.
8. Nombre: cualquier valor que pueden introducir los usuarios. Introduzca un identicador denido por el usuario para el disco virtual.
9. Elija la opción HyperDuo:
Modo HyperDuo: Seguro - Protección duplicada
Capacidad - Optimización del coste
Mantener imagen original: sí, no (solamente disponible en el modo Seguro)
Conserve los datos que se encuentran actualmente en la unidad de disco duro o borre todos los datos.
10. Umbral (%): 10-100. Valor que pueden introducir los usuarios.
El número dene el porcentaje de la unidad de estado sólido que utiliza la MBU para optimizar el rendimiento. El valor predeterminado
es 90.
11. Elija Siguiente y presione la tecla [S] para comenzar a crear el disco virtual.
12. Presione las teclas F10 y [S] para salir de MBU.
Nota: Un disco virtual HyperDuo debe contener al menos una unidad de estado sólido y una unidad de disco duro.
Para volver a crear un disco virtual:
1. Cuando un disco duro de un disco virtual RAID 1 o una unidad de estado sólido de un disco virtual del modo Seguro HyperDuo
esté defectuoso o los datos que contiene estén dañados, la Utilidad del BIOS de Marvell (MBU) marcará el disco duro virtual como
Degradar.
2. Reemplace el disco duro o la unidad estado sólido defectuosa por otra idéntica o por otra que tenga un tamaño más pequeño dentro
del valor permisible establecido para el disco virtual.
3. Presione la combinación de teclas [Ctrl] + [M] del teclado simultáneamente para entrar en la MBU.
4. En el panel Topología, desplácese al identicador de discos virtuales. Presione Entrar y seleccione la opción Reconstruir.
5. Seleccione el disco duro o la unidad de estado sólido de sustitución disponible para reconstruir presionando la barra espaciadora y, a
continuación, la tecla Entrar.
6. Presione la tecla [S] para comenzar. La utilidad mostrará el estado de reconstrucción y el porcentaje completado. Esta operación
tardará en nalizar todo el proceso y dependerá del tamaño que se desea reconstruir.
Nota: El disco virtual HyperDuo creado en el modo Seguro se puede reconstruir parcialmente si la unidad de estado sólido falla, pero no
si falla la unidad de disco duro.
Utilidad de almacenamiento de Marvell (MSU) para conguración RAID/HyperDuo
La utilidad de almacenamiento de Marvell (MSU) es una utilidad de gestión basada en navegador para los controladores de Marvell. Crea
y administra un disco virtual RAID o HyperDuo utilizando dispositivos de almacenamiento conectados al controlador.
1. Encienda su PC.
2. Inserte el CD del controlador en la unidad de CD ROM.
3. Abra el Explorador de Windows y seleccione Unidad_de_CD\MSU\4.1.0.2015\MSUSetup.exe.
4. Haga doble clic en el acceso directo del escritorio de la MSU.
5. Cuando abra la MSU en algunas versiones de Windows, Internet Explorer puede detectar un problema con el certicado de seguridad
para la página Web de MSU. Seleccione Continuar en este sitio Web (no recomendado) para continuar abriendo la MSU.
6. Al abrir la MSU se presentará la página de inicio de sesión. Si no tiene contraseña, deje este campo en blanco y, a continuación, haga
clic en Iniciar sesión.
7. Después de entrar en la interfaz de usuario de la MSU, seleccione Adaptador, que contiene cuatro discos físicos. Asuma que los
cuatro discos físicos están conectados a la tarjeta controladora.
8. Abra la pestaña Operación y verá las opciones Crear HyperDuo, Crear RAID y Asistente para creación rápida.
9. Para crear un disco virtual HyperDuo, debe tener al menos una unidad de disco duro y una o varias unidades de estado sólido.
10. Seleccione Crear HyperDuo y, a continuación, seleccione el modo Seguro o el modo Capacidad.

-13-
Español
11. Active la opción Conservar datos originales para conservar los datos que se encuentran actualmente en la unidad de disco duro o
desactive dicha opción para borrar todos los datos. Esta opción solamente está disponible en el modo Seguro.
12. Umbral (%): 10-100. Valor que pueden introducir los usuarios.
13. El número del campo Umbral (%) dene el porcentaje de la unidad de estado sólido que utiliza la MSU para optimizar el rendimiento.
El valor predeterminado es 90.
14. Presione Enviar.
15. La MSU muestra la cha Propiedad para el disco virtual HyperDuo y comienza la inicialización. Esta operación tarda varios minutos
en completarse. El rendimiento del sistema puede disminuir durante este período.
1. Si desea crear rápidamente un disco virtual HyperDuo, seleccione Asistente para creación rápida.
2. Seleccione modo Seguro o modo Capacidad y, a continuación, presione Enviar. La MSU le ayudará a crear el disco virtual HyperDuo
automáticamente.
1. Para crear un disco virtual RAID, seleccione Crear RAID. A continuación, seleccione el nivel de RAID: RAID 0, RAID 1 o RAID 10.
2. Elija sucientes discos físicos disponibles (RAID0 necesita al menos dos discos físicos, RAID1 solamente necesita dos discos físicos
y RAID10 necesita cuatro discos físicos) y presiones "Next" (Siguiente).
3. Escriba el nombre del disco virtual, aunque también puede utilizar el nombre predeterminado.
4. Seleccione el método de inicialización para el disco virtual.
5. Seleccione el tamaño de segmento 32K o 64K para el disco virtual.
6. Presione Enviar. La MSU crea el disco virtual y muestra la pestaña Propiedad correspondiente al nuevo disco virtual.
7. Reinicie su PC para utilizar el disco virtual.
Soporte técnico Delock
Si tiene alguna pregunta, póngase en contacto con nuestro servicio de atención al cliente [email protected]
Puede encontrar información actual del producto en nuestra página Web: www.delock.es
Cláusula nal
La información y los datos contenidos en este manual están sujetos a cambios sin previo aviso. Exceptuando errores y erratas.
Copyright
Queda prohibida la reproducción o transmisión para cualquier n de parte alguna de este manual del usuario, independientemente de la
forma en que se realice, ya sea, electrónicamente o mecánicamente, sin el consentimiento escrito de Delock.
Versión: 01/2020

-14-
České
Popis
Tato karta PCI Express Delock rozšiřuje PC o čtyři 22 pinové porty SATA. K této kartě lze připojit až čtyři 2.5″ SSD nebo HDD. Pokud
používáte vice jak jeden SATA port, je tady možnost užití různých RAID módů.
Podpora HyperDuo
Karta podporuje funkci HyperDuo. Při téhle funkci lze kombinovat SSD a HDD, a využívat výhod obou datových nosičů, rychlost SSD a
kapacitu HDD.
Podpora RAID
Kromě toho tato karta podporuje také různé režimy RAID, jako například RAID 0, 1, 10 nebo JBOD. A dále, jestliže bude nainstalováno
dostatek SSD nebo HDD, bude lze využívat dva různé režimy RAID najednou. Například lze nakongurovat dva pevné disky s RAID 0 a
dva pevné disky v HyperDuo nebo RAID 0 a RAID 1.
Specikace
• Konektor:
interní:
1 x PCI Express x2, V2.0
4 x SATA 22 pin samice
• Chipset: Marvell 88SE9230
• Vhodné pro 2.5″ SATA HDD / SSD:
SATA HDD / SSD až do 6 Gb/s
podporuje 5 V HDD / SSD
• Podporuje RAID 0, 1, 10, JBOD, HyperDuo Virtual Disk (Safe/Capacity)
• Možnost bootování
• Podpora Native Command Queuing (NCQ)
• Podporuje S.M.A.R.T.
• Podporuje TRIM
• Podporuje DevSleep
• Hot Swap
• Rozměry (DxŠxV): cca. 227 x 120 x 20 mm
Systémové požadavky
• Linux Kernel 4.9.4 nebo vyšší
• Windows 7/7-64/8.1/8.1-64/10/10-64
• PC s volným PCI Express slotem
Obsah balení
• Karta PCI Express
• 16 x upevňovací šroub
• CD s ovladači
• Uživatelská příručka
Bezpečnostní pokyny
• Chraňte produkt před vlhkostí
• Při instalaci karty se vyvarujte působení antistatické elektřiny
Instalace ovladače
Poznámka: Proveďte instalaci ovladače před instalací hardwaru.
1. Zapněte počítač.
2. Vložte CD s ovladači do mechaniky.
3. Spusťte prohlížeč, zvolte: CD-mechanika\MSU\MSUSetup.exe.
4. Následujte instalační instrukce a potvrďte licenční podmínky.
5. Ovladač bude nainstalován.
6. Po instalaci ovladače následuje instalace hardwaru.
Instalace hardware
1. Vypněte PC a odpojte přívodní šňůru napájení.
2. Otevřte kryt PC.
3. Vložte kartu opatrně do volného PCI Express slotu až zcela dosedne.
4. Připojte své HDD nebo SSD ke konektorům SATA 22 pin na kartě PCIe a přišroubujte je.
5. Nasaďte zpět kryt a připojte napájecí šňůru.
Instalace
1. Po restartování počítače bude karta PCIe automaticky nainstalována.
2. Zařízení můžete začít používat.

-15-
České
Marvell BIOS Utility (MBU) pro RAID / HyperDuo Setup
Varování: Všechna data na HDD / SSD souvisejícím s položkou 90433 budou nevratně vymazána.
Pro vytvoření RAID/HyperDuo virtuálního disku:
Přeskočte tuto sekci pokud se nechystáte vytvořit RAID/HyperDuo virtuální disk.
1. Zapněte počítač.
2. Stiskněte [Ctrl] + [M] na klávesnici pro vstup do Marvell BIOS Utility (MBU).
3. Jakmile jste vstoupili do MBU, sescrollujte do HBA0: Marvell 0 v topologii panelu pomocí klávesy šipky NAHORU a stiskněte Enter.
4. Vyberte možnost Conguration Wizard a stiskněte Enter pro začátek vytváření RAID/HyperDuo virtuálního disku.
5. Vyberte volné, fyzické disky kterou jsou k dispozici a použitím kláves šipky projděte disky a stiskněte mezerník.
6. Po výběru všech potřebných disků, stiskněte Enter k pokračování.
7. Zvolte možnost RAID:
RAID Level: RAID 0 – Stripping
RAID 1 – Disk Mirroring
RAID 10 – Stripe of Mirrors
Velikost pole: 32K, 64K
Denuje velikost jednoho datového bloku na virtuálním disku. Čím větší velikost pole, tím déle trvá zápis a čtení datového bloku na
fyzickém disku. Větší velikosti jsou pak doporučené pro aplikace vyžadující objemější přenos dat, například video, graka nebo audio.
Menší velikosti jsou pak vhodnější pro aplikace s menší velikostí souborů – například emaily nebo dokumenty.
8. Název: Jakkákoliv hodnota pro uživatele ke vstupu. Vstup uživatele je denován identikátorem pro virtuální disk.
9. Vyberte HyperDuo možnost:
HyperDuo mód: Zabezpečení – Zrcadlená ochrana
Kapacita – cenově optimalizovaná
Zachovat původní údaje: Ano, Ne (Dostupné pouze v nouzovém režimu)
Zachovat všechny aktuální, stávající data na Vašem HDD nebo vymazat všechny data.
10. Prahová hodnota (%): 10-100 pro uživatele ke vstupu
Čísla denují procentuální využití k optimalizaci výkonu Vašeho SSD MBU. Výchozí hodnota je 90.
11. Vybere Další a stiskněte [Y] ke startu tvorby virtuálního disku.
12. Stiskněte F10 a [Y] k výstupu MBU.
Poznámka: Virtuální disk HyperDuo musí obsahovat alespoň jeden SSD a jeden HDD.
Pokud virtuální disk chcete vytvořit znovu:
1. Pokud je hard disk ve virtuálním disku RAID 1 nebo SSD virtuální disk ve HyperDuo nouzevém režimu je vadný či data uvnitř jsou
poškozena, Marvell BIOS Utility (MBU) označí virtuální disk jako “Degrade”.
2. Vyměňte vadný HDD/SSD s identickým HDD/SSD nebo HDD/SSD který má menší velikost v rámci přípustné hodnoty nastavené pro
virtuální disk.
3. Stiskněte zároveň klávesnice [Ctrl] + [M] a vstupte do MBU.
4. V topologickém panelu sescrollujte na výběr “Virtual Disks ID”, stiskněte Enter a vyberte možnost “Rebuild”.
5. Vyberte dostupnou náhradu HDD/SSD k přetvoření stisknutím mezerníku a poté stiskněte Enter.
6. Stiskněte [Y] pro start. Zařízení zobrazí přetvořený stav a procentuální výplň. Dokončení tohoto procesu může trvat delší čas a záleží
na velikosti přetvorby.
Poznámka: HyperDuo virtuální disk, který byl vytvořen v nouzovém režimu může být take částečně přetvořen v případě že SSD selže.
Neplatí v případě pokud selže HDD.
Marvell Storage Utility (MSU) pro RAID/HyperDuo Setup
Marvell Storage Utility (MSU) je prohlížečový správcovský nástroj pro řadiče Marvell. Pomocí úložných zařízení připojených k řadiči vytváří
a spravuje virtuální disk RAID nebo HyperDuo.
1. Zapněte počítač.
2. Vložte CD s ovladači do mechaniky.
3. Spusťte prohlížeč, zvolte: CD-mechanika\MSU\4.1.0.2015\MSUSetup.exe.
4. Dvojklikněte na zástupce MSU.
5. Po otevření MSU v některé z verzí Windows, Internet Explorer může detekovat problém s certikátem zabezpečení pro webové
stránky MSU. Vyberte možnost Continue to this website (not recommended) pro pokračování otevření MSU.
6. Po otevření MSU se dostanete k přihlašovací stránce. Pokud nemáte heslo, nechte pole prázdné a klikněte na Login.
7. Po vstupu do MSU uživatelského rozhraní, vyberte Adapter, který obsahuje čtyři fyzické disky, za předpokladu že jsou čtyři fyzické
disky připojeny ke kartě řadiče.
8. Sescrollujte přes kartu operací a uvidíte možnost Create HyperDuo, Create RAID a Quick Create Wizard.
9. Pro vytvoření HyperDuo virtuálního disku by jste měli mít alespoň jeden HDD a jeden či vice SSD.
10. Vyberte možnost Create HyperDuo a poté vyberte Nouzový režim nebo režim kapacity.
11. Zatrhněte možnost Keep Original Data pro zachování stávajících dat na Vašem HDD nebo nechte nezatrhnuto pro smazání všech dat.
Tato možnost je dostupná pouze v nouzovém režimu.
12. Prahová hodnota (%): 10-100 pro uživatele ke vstupu
13. Threshold (%) číslo denuje percentuální využití Vašeho SSD MSU k optimalizaci výkonu. Výchozí hodnota je 90.
14. Stiskněte Potvrdit.
15. MSU zobrazí kartu Vlastnictví pro HyperDuo virtuální disk a začne s inicializací. Dokončení procesu trvá několik minut. Výkon systému
se během této akce může zpomalit.

-16-
České
1. Pokud chcete rychle vytvořit HyperDuo virtuální disk, vyberte možnost Quick Create Wizard.
2. Vyberte nouzový režim nebo režim Kapacity a poté stiskněte Potvrdit. MSU Vám pomůže vytvořit HyperDuo virtuální disk automaticky.
1. Pro vytvoření RAID virtuálního disku, vyberte možnost Create RAID. Poté vyberte RAID level: RAID 0, RAID 1 nebo RAID 10.
2. Vyberte dostatek fyzických disků, které máte k dispozici (RAID0 potřebuje alespoň 2 fyzické disky, RAID1 potřebuje pouze dva fyzické
disky a RAID10 potřebuje čtyři fyzické disky) a stiskněte "Next" (Další).
3. Vložte jméno pro virtuální disk nebo můžete použít výchozí jméno.
4. Vyberte možnost Initialization method pro virtuální disk.
5. Vyberte možnost Stripe Size 32K nebo 64K pro virtuální disk.
6. Potvrďte. MSU vytvoří virtuální disk a zobrazí kartu Vlastnictví pro nový virtuální disk.
7. Restartujte svůj počítač pro použití virtuálního disku.
Podpora Delock
S dalšími technickými otázkami můžete kontaktovat naše středisko podpory: [email protected]
Aktuální informace o produktu můžete nalézt i na našich webových stránkách: www.delock.cz
Závěrečné upozornění
Informace a data obsažená v této příručce mohou být změněny bez předchozího upozornění. Za tiskové chyby neručíme.
Copyright
Žádná část této uživatelské příručky nesmí být reprodukována, přenášena ani pro jakýkoli účel, bez ohledu na to, jakým způsobem nebo
jakými prostředky, elektronicky nebo mechanicky, bez výslovného písemného souhlasu Delock.
verze: 01/2020

-17-
Polsku
Opis
Karta PCI Express Delock rozszerza PC o cztery porty SATA 22 pin. Do karty można podłączyć do cztery SSD / HDD 2.5″. W przypadku
używania więcej niż jednego portu SATA, istnieje możliwość stosowania różnych trybów RAID.
Obsługa HyperDuo
Karta obsługuje funkcję HyperDuo. Dzięki tej funkcji, łączy on dysk SSD i HDD w celu używania korzyści oferowanych przez oba nośniki
danych, szybkość dysku SSD oraz pojemność dysku HDD.
Obsługa RAID
Ponadto karta obsługuje różne tryby RAID takie jak RAID 0, 1, 10 lub JBOD. Jeśli zainstalowany jest SSD lub HDD, dwa różne tryby RAID
mogą działać w tym samym czasie. Na przykład dwa dyski w trybie RAID 0 i dwa skongurowano jako HyperDuo lub RAID 0 lub RAID 1.
Specykacja
• Złącze:
wewnętrzne:
1 x PCI Express x2, V2.0
4 x 22-pinowe żeńskie złącze SATA
• Chipset: Marvell 88SE9230
• Odpowiednia do 2.5″-calowego dysku twardego / SSD SATA:
Dysk twardy/SSD z interfejsem SATA do 6 Gb/s
obsługuje HDD / SSD zasilane napięciem 5 V prądu stałego
• Obsługuje RAID 0, 1, 10, JBOD, hybrydowy dysk wirtualny (bezpieczeństwo/pojemność)
• Bootowalny
• Wspiera Native Command Queuing (NCQ)
• Obsługa S.M.A.R.T.
• Obsługa TRIM
• Obsługa DevSleep
• Hot Swap
• Wymiary (DxSxW): ok. 227 x 120 x 20 mm
Wymagania systemowe
• Linux Kernel 4.9.4 lub nowszy
• Windows 7/7-64/8.1/8.1-64/10/10-64
• PC z wolnym slotem PCI Express
Zawartość opakowania
• Karta PCI Express
• 16 x Śrubka mocująca
• Sterowniki na CD
• Instrukcja obsługi
Instrukcje bezpieczeństwa
• Produkt należy zabezpieczyć przed wilgocią
• Podczas instalacji karty należy się zabezpieczyć przed elektrycznością statyczną
Instalacja sterownika
Uwaga: Wykonaj instalację sterownika, zanim sprzęt zostanie zainstalowany.
1. Wyłącz komputer.
2. Włóż płytę CD-ROM ze sterownikami.
3. Otwórz Eksplorator Windows, wybierz: CD-drive\MSU\MSUSetup.exe.
4. Wykonaj instrukcje dotyczące instalacji i zatwierdź warunki licencji.
5. Zostanie teraz zainstalowany sterownik.
6. Po zakończeniu instalacji sterownika wykonaj instalację sprzętu.
Instalacja sprzętu
1. Wyłącz komputer i odłącz kabel zasilania.
2. Otwórz obudowę.
3. Wsuwaj kartę prosto i ostrożnie do wolnego slotu PCI Express, aż zostanie dobrze umocowana.
4. Podłączyć HDDs lub SSDs do złącza SATA 22 pin na karcie PCIe i przykręcić.
5. Zamknij z powrotem obudowę i podłącz kabel do zasilacza.
Instalacja
1. Pod restarcie komputera karta PCIe zainstaluje się automatycznie.
2. Teraz można już korzystać z urządzenia.

-18-
Polsku
Narzędzie Marvell BIOS Utility (MBU) do konguracji dysku RAID/HyperDuo
Ostrzeżenie: Wszystkie dane na HDD / SSD powiązane z przedmiotem 90433 zostaną nieodwracalnie usunięte.
Aby utworzyć dysk wirtualny RAID/HyperDuo:
Pomiń tę sekcję, jeżeli nie zamierzasz utworzyć dysku wirtualnego RAID/HyperDuo.
1. Wyłącz komputer.
2. Naciśnij jednocześnie klawisze [Ctrl] + [M], aby przejść do narzędzia Marvell BIOS Utility (MBU).
3. Po uruchomieniu narzędzia MBU przewiń do HBA0: Marvell 0 w oknie topologii przy użyciu klawisza strzałki w górę na klawiaturze i
naciśnij klawisz Enter.
4. Wybierz Kreator konguracji i naciśnij klawisz Enter, aby rozpocząć tworzenie dysku wirtualnego RAID/HyperDuo.
5. Wybierz dostępne dyski zyczne używając klawiszy strzałek do przewijania dysków, a następnie naciśnij klawisz spacji.
6. Po wybraniu wszystkich wymaganych dysków naciśnij klawisz Enter, aby przejść dalej.
7. Wybierz opcję RAID:
RAID Level (Poziom RAID): RAID 0 – Stripping (Dzielenie dysku)
RAID 1 – Disk Mirroring (Mirroring dysku)
RAID 10 – Stripe of mirrors (Pasek kopii lustrzanych)
Stripe Size (Rozmiar paska): 32K, 64K
Określa on rozmiar pojedynczego bloku danych na dysku wirtualnym. Im większa wielkość paska, tym dłużej dokonywany jest odczyt
i zapis bloków danych na dyskach zycznych. Duża wielkość jest zalecana w przypadku aplikacji wymagających dużych transferów
danych, np. audio, wideo i graka. Mniejszy rozmiar jest odpowiedni dla aplikacji, gdzie występują pliki o mniejszych rozmiarach, np.
wiadomości e-mail lub dokumenty.
8. Name (Nazwa): dowolna wartość wprowadzana przez użytkownika. Wprowadzenie dla dysku wirtualnego identykatora określonego
przez użytkownika.
9. Wybierz opcję HyperDuo:
HyperDuo Mode (Tryb HyperDuo): Safe – Mirrored Protection (Bezpieczeństwo – Ochrona dublowana)
Capacity – Cost-Optimized (Pojemność – Optymalizacja kosztów)
Keep original data (Zachowaj oryginalne dane): Yes (Tak), No (Nie) (tylko dostępne w trybie Safe)
Zapewnia ochronę danych, które aktualnie są zapisane na dysku twardym HDD lub kasuje wszystkie dane.
10. Threshold (Wartość progowa) (%): wprowadzana przez użytkownika w zakresie od 10 do 100
Liczba ta określa wartość procentową dysku SSD, jaką narzędzie MBU wykorzystuje do optymalizacji wydajności. Wartość domyślna
to 90.
11. Wybierz Next (Dalej) i naciśnij klawisz [Y], aby rozpocząć tworzenie dysku wirtualnego.
12. Naciśnij klawisz F10 i [Y], aby wyjść z narzędzia MBU.
Uwaga: Dysk wirtualny HyperDuo musi zawierać co najmniej jeden dysk SSD oraz jeden dysk twardy (HDD).
Aby odbudować dysk wirtualny:
1. Jeżeli dysk twardy w dysku wirtualnym RAID 1 lub dysk SSD w dysku wirtualnym w trybie Safe (Zabezpieczenie) HyperDuo jest
niesprawny, bądź dane wewnątrz są uszkodzone, narzędzie Marvell BIOS Utility (MBU) oznaczy dany dysk wirtualny jako Degrade
(Obniżona wydajność).
2. Wymień wadliwy dysk twardy/SSD na dysk twardy/SSD o podobnych parametrach lub na mniejszy w ramach dozwolonego zestawu
wartości dla dysku wirtualnego.
3. Naciśnij na klawiaturze jednocześnie klawisze [Ctrl] + [M], aby przejść do narzędzia MBU.
4. W oknie topologii przewiń do Virtual Disks ID (Identykator dysków wirtualnych), naciśnij klawisz Enter i wybierz opcję Rebuild
(Odbuduj).
5. Wybierz dostępny zamienny dysk twardy/SSD, który ma być odbudowany poprzez naciśnięcie klawisza spacji, a następnie naciśnij
klawisz Enter.
6. Naciśnij klawisz [Y], aby rozpocząć operację. Narzędzie wyświetli stan odbudowania i procentowy stan ukończenia. Zakończenie
procesu będzie długo trwało i jest ono uzależnione od rozmiaru, który ma być odbudowany.
Uwaga: Dysk wirtualny HyperDuo utworzony w trybie Safe (Zabezpieczenie) może być częściowo odbudowany, jeśli uszkodzeniu ulegnie
dysk SSD, a nie dysk HDD.
Narzędzie Marvell Storage Utility (MSU) do konguracji dysku RAID/HyperDuo
Marvell Storage Utility (MSU) to narzędzie działające na przeglądarkach służące do zarządzania kontrolerami Marvell. Tworzy i zarządza
RAID lub dyskiem wirtualnym HyperDuo za pomocą urządzeń podłączonych do kontrolera.
1. Wyłącz komputer.
2. Włóż płytę CD-ROM ze sterownikami.
3. Otwórz Eksplorator Windows, wybierz: CD-drive\MSU\4.1.0.2015\MSUSetup.exe.
4. Kliknij dwukrotnie skrót na pulpicie utworzony dla narzędzia MSU.
5. W przypadku otwarcia narzędzia MSU w pewnym wersjach systemu Windows, przeglądarka Internet Explorer może wykryć problem
dotyczący certykatu bezpieczeństwa dla strony internetowej narzędzia MSU. Wybierz Continue (Dalej) dla tej strony internetowej
(niezalecane), aby kontynuować otwarcie narzędzia MSU.
6. Otwarcie narzędzia MSU spowoduje przejście na stronę logowania. Jeżeli nie posiadasz hasła, pozostaw to pole puste, a następnie
kliknij polecenie Login (Logowanie).
7. Po przejściu do interfejsu użytkownika MSU wybierz adapter, który zawiera cztery dyski zyczne, przy założeniu, że do karty
sterownika są podłączone cztery dyski zyczne.

-19-
Polsku
8. Przejdź do zakładki Operation (Operacje), gdzie dostępne są następujące działania: Create HyperDuo (Utwórz dysk HyperDuo),
Create RAID (Utwórz dysk RAID) oraz Quick Create Wizard (Kreator szybkiego tworzenia).
9. Aby utworzyć dysk wirtualny HyperDuo, należy posiadać co najmniej jeden dysk twardy HDD oraz jeden/wiele dysków SSD.
10. Wybierz Create HyperDuo (Utwórz dysk HyperDuo), a następnie wybierz tryb Safe (Zabezpieczenie) lub Capacity (Pojemność).
11. Zaznacz pole Keep Original Data (Zachowaj oryginalne) dane, aby zachować aktualne dane zapisane na dysku twardym lub odznacz
je w celu skasowania wszystkich danych. Opcja ta jest tylko dostępna w trybie Safe.
12. Threshold (Wartość progowa) (%): wprowadzana przez użytkownika w zakresie od 10 do 100
13. Liczba w polu Threshold (Wartość progowa) (%) określa wartość procentową dysku SSD, jaką narzędzie MSU używa do optymalizacji
wydajności. Domyślna wartość to 90.
14. Naciśnij Submit (Prześlij).
15. Narzędzie MSU wyświetla kartę Property (Właściwości) dla dysku wirtualnego HyperDuo i rozpoczyna inicjalizację. Zakończenie
procesu zajmuje kilka minut. W tym czasie wydajność systemu może ulec obniżeniu.
1. Aby szybko utworzyć dysk wirtualny HyperDuo, wybierz Quick Create Wizard (Kreator szybkiego tworzenia).
2. Wybierz tryb Safe lub Capacity, a następnie naciśnij Submit (Prześlij). Narzędzie MSU pomaga utworzyć dysk wirtualny HyperDuo w
sposób automatyczny.
1. Aby utworzyć dysk wirtualny RAID, wybierz Create RAID (Utwórz dysk RAID). Następnie wybierz RAID level (Poziom RAID): RAID 0,
RAID 1 lub RAID 10.
2. Wybierz odpowiednią liczbę dysków zycznych (RAID0 wymaga co najmniej dwóch dysków zycznych, RAID1 jedynie wymaga dwóch
dysków zycznych, a RAID10 wymaga czterech dysków zycznych), a następnie naciśnij "Next" (Dalej).
3. Wprowadź nazwę dla dysku wirtualnego, bądź użyj nazwy domyślnej.
4. Wybierz sposób inicjalizacji dla dysku wirtualnego.
5. Wybierz Stripe Size (Rozmiar paska) 32K lub 64K dla dysku wirtualnego.
6. Naciśnij Submit (Prześlij). Narzędzie MSU tworzy dysk wirtualny i wyświetla kartę Property (Właściwości) dla nowego dysku
wirtualnego.
7. Uruchom ponownie komputer, aby używać dysku wirtualnego.
Wsparcie Delock
W przypadku dodatkowych pytań proszę skontaktować się z naszym Biurem Obsługi Klienta pod adresem [email protected]
Aktualną informację o produktach można znaleźć na naszej stronie internetowej: www.delock.pl
Zastrzeżenia końcowe
Zawarte w niniejszej instrukcji informacje i parametry mogą ulec zmianie bez wcześniejszego uprzedzenia. Błędy i pomyłki w druku
zastrzeżone.
Copyright
Żadna z części niniejszej instrukcji nie może być kopiowana lub przesyłana do jakichkolwiek celów, niezależnie od tego jaką drogą lub w
jakim znaczeniu, elektronicznie lub mechanicznie, bez specjalnej pisemnej zgody rmy Delock.
Wydanie: 01/2020

-20-
Italiano
Descrizione
Questa scheda PCI Express Delock espande il PC di quattro porte SATA a 22 pin. Si possono collegare no a quattro SSD / HDD da 2.5″
a questa scheda. Quando si utilizza più di una porta SATA, è possibile utilizzare varie modalità RAID.
Supporto HyperDuo
La scheda supporta una funzione HyperDuo. Con questa funzione, combina un SSD e un HDD per sfruttare i vantaggi di entrambi i
supporti, la velocità di un SSD e la capacità di un HDD.
Supporto RAID
Inoltre, la scheda supporta anche varie modalità RAID come RAID 0, 1, 10 o JBOD. Inoltre, se sono installati un numero suciente di SSD
o HDD, si possono utilizzare contemporaneamente due diverse modalità RAID. Ad esempio, due dischi rigidi con RAID 0 e due dischi
rigidi possono essere congurati in HyperDuo o RAID 0 e RAID 1.
Speciche
• Connettori:
interno:
1 x PCI Express x2, V2.0
4 x SATA a 22 pin femmina
• Chipset: Marvell 88SE9230
• Adatto per HDD / SSD SATA da 2.5″:
HDD / SSD SATA no a 6 Gb/s
supporta HDD / SSD 5 V
• Supporta disco virtuale RAID 0, 1, 10, JBOD, HyperDuo (Modalità provvisoria/Capacità)
• Avviabile
• Supporta Native Command Queuing (NCQ)
• Supporta S.M.A.R.T.
• Supporta TRIM
• Supporta DevSleep
• Hot Swap
• Dimensioni (LxPxA): ca. 227 x 120 x 20 mm
Requisiti di sistema
• Linux Kernel 4.9.4 o superiore
• Windows 7/7-64/8.1/8.1-64/10/10-64
• PC con uno slot PCI Express libero
Contenuto della confezione
• Scheda PCI Express
• 16 x vite di ssaggio
• CD contenente il driver
• Manuale utente
Istruzioni per la sicurezza
• Proteggere il prodotto dall'umidità
• Evitare l'elettricità antistatica durante l'installazione della scheda
Installazione del driver
Nota: Eseguire l'installazione del driver prima di installare l'hardware.
1. Accendere il computer.
2. Inserire il CD del driver nell'unità CD ROM.
3. Aprire Esplora risorse e selezionare unità CD\MSU\MSUSetup.exe.
4. Attenersi alle istruzioni di installazione e confermare i termini di licenza.
5. Il driver a questo punto verrà installato.
6. Dopo l'installazione del driver, seguire l'installazione dell'hardware.
Installazione dell'hardware
1. Spegnere il PC e scollegare il cavo di alimentazione.
2. Aprire l'alloggiamento.
3. Inserire la scheda in linea retta e con cura nello slot PCI Express libero nché non si trova in sede.
4. Collegare gli HDD o gli SSD ai connettori SATA 22 pin della scheda PCIe e avvitarli.
5. Reinserire l'alloggiamento e collegare il cavo di alimentazione all'adattatore CA.
Installazione
1. Dopo aver riavviato il computer, la scheda PCIe verrà installata automaticamente.
2. Ora è possibile iniziare a utilizzare il dispositivo.
Sidan laddas...
Sidan laddas...
Sidan laddas...
Sidan laddas...
Sidan laddas...
Sidan laddas...
Sidan laddas...
Sidan laddas...
Sidan laddas...
Sidan laddas...
Sidan laddas...
Sidan laddas...
Sidan laddas...
Sidan laddas...
Sidan laddas...
Sidan laddas...
Sidan laddas...
Sidan laddas...
-
 1
1
-
 2
2
-
 3
3
-
 4
4
-
 5
5
-
 6
6
-
 7
7
-
 8
8
-
 9
9
-
 10
10
-
 11
11
-
 12
12
-
 13
13
-
 14
14
-
 15
15
-
 16
16
-
 17
17
-
 18
18
-
 19
19
-
 20
20
-
 21
21
-
 22
22
-
 23
23
-
 24
24
-
 25
25
-
 26
26
-
 27
27
-
 28
28
-
 29
29
-
 30
30
-
 31
31
-
 32
32
-
 33
33
-
 34
34
-
 35
35
-
 36
36
-
 37
37
-
 38
38


DeLOCK 90433 Användarmanual
- Kategori
- RAID-styrenheter
- Typ
- Användarmanual
på andra språk
- italiano: DeLOCK 90433 Manuale utente
- čeština: DeLOCK 90433 Uživatelský manuál
- español: DeLOCK 90433 Manual de usuario
- Deutsch: DeLOCK 90433 Benutzerhandbuch
- polski: DeLOCK 90433 Instrukcja obsługi
- français: DeLOCK 90433 Manuel utilisateur
- English: DeLOCK 90433 User manual
- română: DeLOCK 90433 Manual de utilizare