Candy CMDNB 6204X1 Användarmanual
- Kategori
- Kylboxar
- Typ
- Användarmanual

USER MANUAL
COMBI

2

3
English
3
Italiano
27
Español
48
Deutsch
69
Portoguese
90
Français
111
Čeština
132
Slovenský
151
Ελληνικά
171
Magyar
192
Nederlands
209
Dansk
228
Suomi
245
Norsk
262
Svenska
279

4
English
Contents
1. SAFETY INFORMATION ...................................................................................... 5
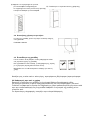
2. INSTALLATION .................................................................................................. 12
2.1
Location ........................................................................................................................ 12
2.2
Door Handle Install Illumination (optional) ................................................................... 12
2.3
Reversing the Door Swing ........................................................................................... 13
2.4
Door Space Requirements ........................................................................................... 15
2.5
Levelling the Unit.......................................................................................................... 15
2.6
Cleaning Before Use .................................................................................................... 15
2.7
Before Using Your Unit ................................................................................................ 15
2.8
Interior Accessories ..................................................................................................... 16
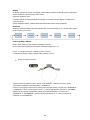
3. PRODUCT OVERVIEW ....................................................................................... 17
4. OPERATION ....................................................................................................... 18
4.1
Operation Instructions .................................................................................................. 18
4.2
Noise Inside the Unit! ................................................................................................... 24
4.3
Tips for Keeping Food in the Unit ................................................................................ 24
4.4
Change the Light Bulb ................................................................................................. 24
5. CLEANING .......................................................................................................... 25
5.1
Defrosting ..................................................................................................................... 25
5.2
Cleaning the Interior and the Exterior of the Unit ......................................................... 25
5.3
Cleaning Tips ............................................................................................................... 25
6. MAINTENANCE .................................................................................................. 25
6.1
Changing the Internal Light .......................................................................................... 25
6.2
Care When Handling / Moving Your Unit ..................................................................... 25
6.3
Servicing ...................................................................................................................... 25
6.4
Switching Off for Long Periods of Time ....................................................................... 25
6.5
Do not shield positions of air outlet and return air inlet of the refrigerator ................... 25
6.6
Do not keep foods of higher temperature close to temperature sensor....................... 25
6.7
Take out drawer of freezing chamber of refrigerator and put foods directly on
the glass partition ......................................................................................................... 25
7. TROUBLE SHOOTING ....................................................................................... 26
7.1
Warm tips ..................................................................................................................... 26
8. TIPS FOR ENERGY SAVING .............................................................................. 26
9. SCRAPPING OLD APPLIANCES ....................................................................... 27

5
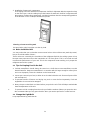
Thank you for purchasing this product.
Before using your refrigerator, please carefully read this instruction manual in order to
maximize its performance. Store all documentation for subsequent use or for other owners.
This product is intended solely for household use or similar applications such as:
- the kitchen area for personnel in shops, offices and other working environments
- on farms, by clientele of hotels, motels and other environments of a residential type
- at bed and breakfasts (B & B)
- for catering services and similar applications not for retail sale.
This appliance must be used only for purposes of storage of food, any other use is considered
dangerous and the manufacturer will not be responsible for any omissions. Also, it is
recommended that you take note of the warranty conditions.
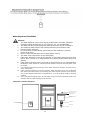
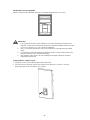
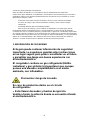
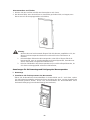
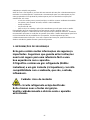
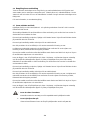
1. SAFETY INFORMATION
This guide contains many important safety
information. Please, we suggest you keep
these instructions in a safe place for easy
reference and a good experience with the
appliance. The refrigerator contains a
refrigerant gas (R600a: isobutane) and
insulating gas (cyclopentane), with high
compatibility with the environment, that are,
however, inflammable.
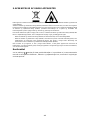
Caution: risk of fire
If the refrigerant circuit should be damaged:
Avoid opening flames and
sources of ignition.
Thoroughly ventilate the room in which the
appliance is situated
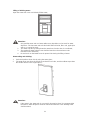
WARNING!
Care must be taken while
cleaning/carrying the appliance to avoid
touching the condenser metal wires at the
back of the appliance, as you might injure

6
your fingers and hands or damage your
product.
This appliance is not designed for stacking
with any other appliance. Do not attempt
to sit or stand on top of your appliance as
it is not designed for such use. You could
injure yourself or damage the appliance.
Make sure that mains cable is not caught
under the appliance during and after
carrying/moving the appliance, to avoid
the mains cable becoming cut or damaged.
When positioning your appliance take care
not to damage your flooring, pipes, wall
coverings etc. Do not move the appliance
by pulling by the lid or handle. Do not
allow children to play with the appliance
or tamper with the controls. Our company
declines to accept any liability should the
instructions not be followed.
Do not install the appliance in humid, oily
or dusty places, nor expose it to direct
sunlight and to water.
Do not install the appliance near heaters
or inflammable materials.
If there is a power failure do not open the
lid. Frozen food should not be affected if
the failure lasts for less than 20 hours. If
the failure is longer, then the food should
be checked and eaten immediately or
cooked and then refrozen.
If you find that the lid of the chest freezer
is difficult to open just after you have
closed it, don’t worry. This is due to the
pressure difference which will equalize
and allow the lid to be opened normally

7
after a few minutes.
Do not connect the appliance to the
electricity supply until all packing and
transit protectors have been removed.
Leave to stand for at least 4 hours before
switching on to allow compressor oil to
settle if transported horizontally.
This freezer must only be used for its
intended purpose (i.e. storing and freezing
of edible foodstuff).
Do not store medicine or research
materials in the Wine Coolers. When the
material that requires a strict control of
storage temperatures is to be stored, it is
possible that it will deteriorate or an
uncontrolled reaction may occur that can
cause risks.
Before performing any operation, unplug
the power cord from the power socket.
On delivery, check to make sure that the
product is not damaged and that all the
parts and accessories are in perfect
condition.
If in the refrigeration system a leak is
noted, do not touch the wall outlet and do
not use open flames. Open the window
and let air into the room. Then call a
service center to ask for repair.
Do not use extension cords or adapters.
Do not excessively pull or fold the power
cord or touch the plug with wet hands.
Do not damage the plug and/or the power
cord; this could cause electrical shocks or
fires.
If the supply cord is damaged, it must be

8
replaced by the manufacturer, its service
agent or similarly qualified person in order
to avoid a hazard.
Do not place or store inflammable and
highly volatile materials such as ether,
petrol, LPG, propane gas, aerosol spray
cans, adhesives, pure alcohol, etc. These
materials may cause an explosion.
Do not use or store inflammable sprays,
such as spray paint, near the Wine
Coolers. It could cause an explosion or
fire.
Do not place objects and/or containers
filled with water on the top of the
appliance.
We do not recommend the use of
extension leads and multi-way adapters.
Do not dispose of the appliance on a fire.
Take care not to damage, the cooling
circuit/pipes of the appliance in
transportation and in use. In case of
damage do not expose the appliance to
fire, potential ignition source and
immediately ventilate the room where the
appliance is situated.
The refrigeration system positioned
behind and inside the Wine Coolers
contains refrigerant. Therefore, avoid
damaging the tubes.
Do not use electrical appliances inside the
food storage compartments of the
appliance, unless they are of the type
recommended by the manufacturer.
Do not damage the refrigerant circuit.
Do not use mechanical devices or other

9
means to accelerate the defrosting
process, other than those recommended
by the manufacturer.
Do not use electrical appliances inside the
food storage compartments, unless they
are of the type recommended by the
manufacturer.
Do not touch internal cooling elements,
especially with wet hands, to avoid cracks
or injuries.
Maintain the ventilation openings in the
appliance enclosure or in the built-in
structure, free of obstruction.
Do not use pointed or sharp-edged objects
such as knives or forks to remove the
frost.
Never use hairdryers, electrical heaters or
other such electrical appliances for
defrosting.
Do not scrape with a knife or sharp object
to remove frost or ice that occurs. With
these, the refrigerant circuit can be
damaged, the spill from which can cause a
fire or damage your eyes.
Do not use mechanical devices or other
equipment to hasten the defrosting
process.
Absolutely avoid the use of open flame or
electrical equipment, such as heaters,
steam cleaners, candles, oil lamps and the
like in order to speed up the defrosting
phase.
Never use water wash the compressor
position, wipe it with a dry cloth
thoroughly after cleaning to prevent rust.

10
It is recommended to keep the plug clean,
any excessive dust residues on the plug can
be the cause fire.
The product is designed and built for
domestic household use only.
The guarantee will be void if the product is
installed or used in commercial or non-
residential domestic household premises.
The product must be correctly installed,
located and operated in accordance with
the instructions contained in the User
Instructions Booklet provided.
The guarantee is applicable only to new
products and is not transferable if the
product is resold.
Our company disclaims any liability for
incidental or consequential damages.
The guarantee does not in any way
diminish your statutory or legal rights.
Do not perform repairs on this Wine
Coolers. All interventions must be
performed solely by qualified personnel.
If you are discarding an old product with a
lock or latch fitted to the door, ensure that
it is left in a safe condition to prevent the
entrapment of children.
This appliance can be used by children
aged from 8 years and above and by
persons with reduced physical, sensory or
mental capabilities or with a lack of
experience and knowledge; provided that
they have been given adequate
supervision or instruction concerning how
to use the appliance in a safe way and
understand the hazards involved.

11
Children should not play with the
appliance. Cleaning and user maintenance
should not be made by children without
supervision.
Locks :If your Fridge/Freezer is fitted with
a lock, to prevent children being entrapped
keep the key out of reach and not in the
vicinity of the appliance. If disposing of an
old Fridge/Freezer break off any old locks
or latches as a safeguard.
Children aged from 3 to 8 years are allowed
to load and unload this appliance.
WARNING! When positioning the appliance,
ensure the supply cord is not trapped or
damaged.
WARNING! Do not locate multiple portable
socket-outlets or portable power supplies
at the rear of the appliance.
To avoid contamination of food, please
respect the following instructions
Opening the door for long periods can cause
a significant increase of the temperature in
the compartments of the appliance.
Clean regularly surfaces that can come in
contact with food and accessible drainage
systems.
Clean water tanks if they have not been
used for 48h; flush the water system
connected to a water supply if water has
not been drawn for 5 days.
Store raw meat and fish in suitable
containers in the refrigerator, so that it is
not in contact with or drip onto other food.

12
·
Two-star frozen-food compartments(if they
are presented in the appliance) are suitable
for storing pre-frozen food, storing or
making ice-cream and making ice cubes.
·
One-, two- and three -star compartments
(if they are presented in the appliance) are
not suitable for the freezing of fresh food.
·
If the appliance is left empty for long
periods, switch off, defrost, clean, dry and
leave the door open to prevent mould
developing within the appliance.
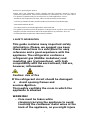
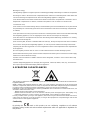
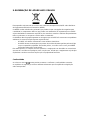
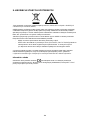
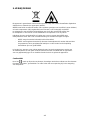
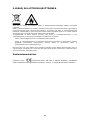
WARNING! During using, service and
disposal the appliance, please pay attention
to symbol as left side, which is located on
rear of appliance (rear panel or
compressor).
It’s risk of fire warning symbol. There are
flammable materials in refrigerant pipes
and compressor.
·
Please be far away fire source during using,
service and disposal.
FOR a freestanding appliance:
this refrigerating appliance is not intended
to be used as a built-in appliance.
ANY replacement or maintenance of the
LED lamps is intended to be made by the
manufacturer,its service agent or similar
qualified person.the energy efficiency class
of the lamp is grade G.
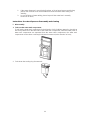
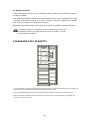
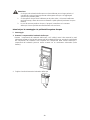
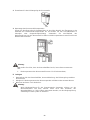
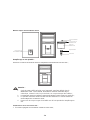
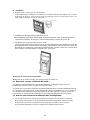
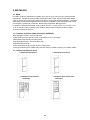
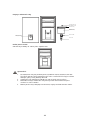
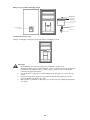
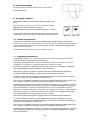
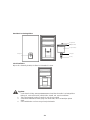
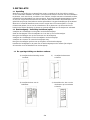
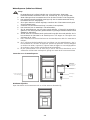
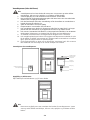
2. INSTALLATION
2.1
Location
When selecting a position for your unit you should make sure the floor is flat and firm, and the
room is well ventilated. Avoid locating your unit near a heat source, e.g. cooker, boiler or
radiator. Also avoid direct sunlight as it may increase the electrical consumption. Extreme cold
ambient temperatures may also cause the unit not to perform properly. This unit is not designed
for use in a garage or outdoor installation. Do not drape the unit with any covering.

13
When installing the unit, ensure that 10 cm of free space is left at both sides, 10 cm at the rear
and 30 cm at the top of the unit. This will allow cold air to circulate around the wine cooler and
improve the efficiency of the cooling process.
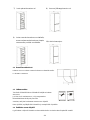
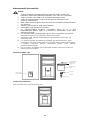
2.2
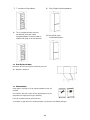
Door Handle Install Illumination (optional)
1)
Take out the screw caps from the door handle holes.
2)
Put the handles into the screw holes and then hit them to fix.
3)
Cap the screw caps on the handle screws.
4)
Take out the screw caps from the handle screw holes.
5)
Remove the screws and take the handles down.
6)
Cap the screw caps on the door handle holes again.
7)
Install the handles into the door handle holes of the other side in accordance with the handle
installation instructions.
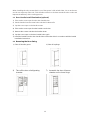
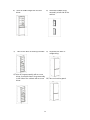
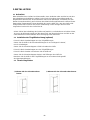
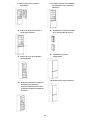
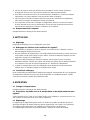
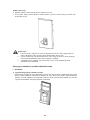
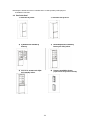
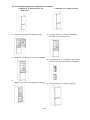
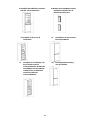
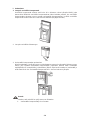
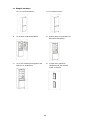
2.3
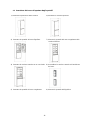
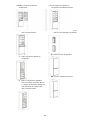
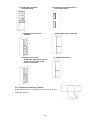
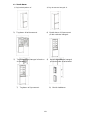
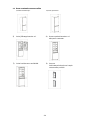
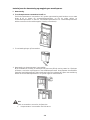
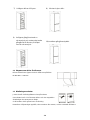
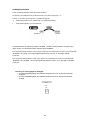
Reversing the Door Swing
1) Take off knuckle guard. 2) Take off top hinge.
3) Take off the door of refrigerating
chamber.
7) Assemble the door of freezer
chamber on the lower hinge.

14
4) Take off middle hinge with a screw
driver.
8) Assemble middle hinge
assembly to left side of the
cabinet.
5) Take off the door of freezing chamber.
9) Assemble the door of
refrigerating.
6) Take off hinge assembly with a screw
driver, Assemble lower hinge assembly
to left side of the cabinet with a screw
driver.
10) Take on knuckle guard.

15
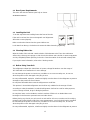
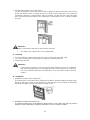
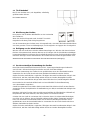
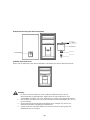
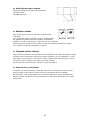
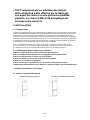
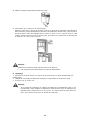
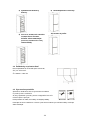
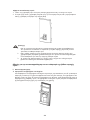
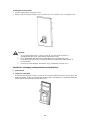
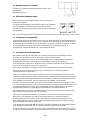
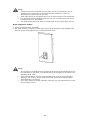
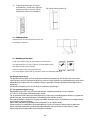
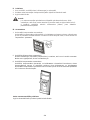
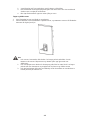
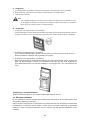
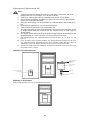
2.4
Door Space Requirements
The unit's door must be able to open fully as shown.
W×D≥990×1025mm
2.5
Levelling the Unit
To do this adjust the two levelling feet at the front of the unit.
If the unit is not level, the door and magnetic seal alignments
will not be covered properly.
Make sure that the foot touches the ground before use.
Look down from the top, clockwise and counterclockwise loosening, tightening.
2.6
Cleaning Before Use
Wipe the inside of the unit with a weak solution of bicarbonate soda. Then rinse with warm
water using a 'Wrung-out' sponge or cloth. Wash the shelves and salad bin in warm soapy water
and dry completely before replacing in the unit. Clean the exterior of the unit with a damp cloth.
If you require more information, refer to the Cleaning section.
2.7
Before Using Your Unit
The refrigerator adopts 220~240V/50Hz AC power, voltage fluctuations over the range of
187~264V will cause malfunction or even damage.
Do not damage the power cord under any condition so as to ensure safety use, do not use
when the power cord is damaged or the plug is worn.
Do not put flammable, explosive, volatile and highly corrosive items in the refrigerator to prevent
damages to the product or fire accidents.
Do not place flammable items near the refrigerator to avoid fires.
This product is household refrigerators and shall be only suitable for the storage of foods.
According to national standards, household refrigerators shall not be used for other purposes,
such as storage of blood, drugs or biological products.
Do not place items such as bottled or sealed container of fluid such as bottled beers and
beverages in the freezer to prevent bursts and other losses.
Before placing any food in your unit, turn it on and wait for 24 hours, to make sure it is working
properly and to allow it time to fall to the correct temperature. Your unit should not be overfilled.
Do not damage the power cord under any condition so as to ensure safety use, do not use
when the power cord is damaged or the plug is worn.
Do not put flammable, explosive, volatile and highly corrosive items in the refrigerator to prevent

16
damages to the product or fire accidents.
Do not place flammable items near the refrigerator to avoid fires.
This product is household refrigerators and shall be only suitable for the storage of foods.
According to national standards, household refrigerators shall not be used for other purposes,
such as storage of blood, drugs or biological products.
Do not place items such as bottled or sealed container of fluid such as bottled beers and
beverages in the freezer to prevent bursts and other losses.
Before placing any food in your unit, turn it on and wait for 24 hours, to make sure it is working
properly and to allow it time to fall to the correct temperature. Your unit should not be overfilled.
♦ Before Plugging in
You must check that you have a socket which is compatible with the plug
supplied with the unit.
♦ Before Turning On!
Do not turn on until two hours after moving the unit.
2.8
Interior Accessories
Various glass or plastic storage shelves are included with your appliance - different
models have different combinations.
You should always slide one of the full size glass storage shelves into the lowest set of
guides, above the fruit and vegetable containers, and keep it in this position. To do this,
pull the storage shelf forward until it can be swiveled upwards or downwards and
removed.
Please do the same in reverse to insert the shelf at a different height.
In order to make the most of the volume of the fresh food storage compartment and
frozen-food storage compartment, the user can remove one or more shelves, drawers,
out of the appliance, according to your daily use.

17
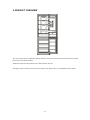
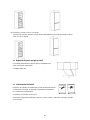
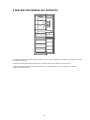
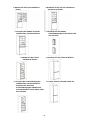
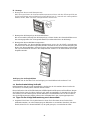
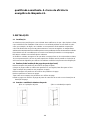
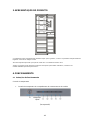
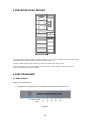
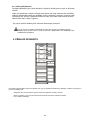
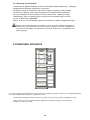
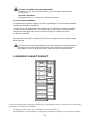
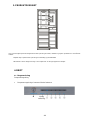
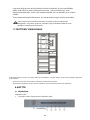
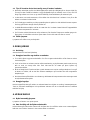
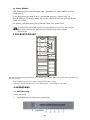
3. PRODUCT OVERVIEW
The most energy-saving configuration requires drawers, food box and shelves to be positioned in the product,
please refer to the above pictures.
*Dotted line represents the position of air outlet and return air inlet.
*All images in this instruction manual are for indication only; please refer to your individual unit for details.

18
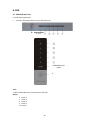
A
fast cool
fast cool
A
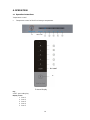
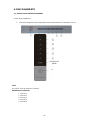
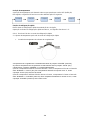
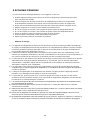
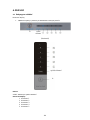
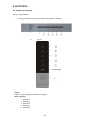
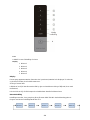
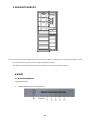
4. OPERATION
4.1
Operation Instructions
Temperature control
Temperature control of fresh food storage compartment.
External display
Key
A.SET: gear setting key.
Display screen
1
Gear 1
2
Gear 2
3
Gear 3
4
Gear 4
5
Gear 5

19
(summer)
(winter)
Display
For the first power-on, the display screen (including the key light) will be displayed in full for 3s,
and then the gear in the middle displays the state of running.
Display of normal running
On the occurrence of a failure, the corresponding LED light will give a combined display of
failure code (loop display);
Where there is no failure, the LED light will display the current running gear of the refrigerator.
Gear setting
The gear will be changed once every time when you press the key SET. Then, the refrigerator
will run under the setting value after 15s.
Fast cool function
Enter: Circulating modulation rapid cooling mode.
Operate: Indicator of rapid cooling lights up, and the refrigerator operates at 2°C.
Exit: 1. Operate 150min under the rapid cooling mode.
2.
Temperature adjustment can exit from the rapid cooling mode.
Temperature control of freezing chamber
The freezing temperature is relatively low in “COLDER” position, while the freezing temperature
is relatively high in “COLD” position, thus, “NORMAL” position is generally used.
When ambient temperature is high in summer, the temperature shall be in the range from
“NORMAL" to “COLD”. If the ambient temperature is above 35°C, then “COLD” position shall
prevail.
When ambient temperature is low in winter, the temperature shall be in the range from “NORMAL"
to “COLDER”. If the ambient temperature is below 10°C, then “COLDER” position shall prevail.
Gear 1
Gear 2
Gear 3
Gear 4
Gear 5

20
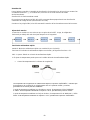
Water Dispenser (if available)
Attention:
1.
The water dispenser can be used only for purified water. Hot water, soft drinks
containing carbon dioxide such as cola, fruit juice, etc. are not applicable;
2.
The water injection by taking down the water box from the door is not allowed;
3.
The maximum water injection rate shall be lower than the maximum scale
indicated on the water box;
4.
In case of failure of water taking, please inspect if the water box is normally
located on its base;
5.
Please confirm that the water tank is empty before moving;
6.
The water valve components are non-detachable;
7.
If the water dispenser is used for the first time, or it has been kept unused for long
period, then it needs to be disassembled and cleaned before water taking and
drinking;
8.
If the water in the water tank is not used for long period, then it is suggested that
the water in water dispenser shall be drained and then the clean drinking water shall
be added;
9.
It is suggested that the mechanism of the water dispenser shall be cleaned once in
every 3-6 months;
10.
If the cleaning solution is used for cleaning water dispenser, then it is suggested
that, before the water taking and drinking, the water shall be drained to the amount
of 5-6 cups after the water tank is installed back, so as to avoid the residue cleaning
solution.
11.
Upon opening/closing the door, do not apply excessive force to prevent water from
overflow due to water sloshing inside the tank.
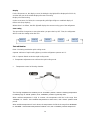
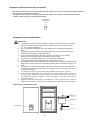
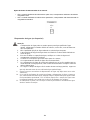
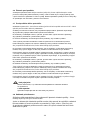
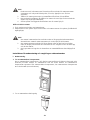
Instruction of water dispenser
Water dispenser cover
Water tank cover of
water dispenser
Water tank of water
dispenser
Handle of water outle of
water dispenser
Sealing ring
Water valve
Sidan laddas ...
Sidan laddas ...
Sidan laddas ...
Sidan laddas ...
Sidan laddas ...
Sidan laddas ...
Sidan laddas ...
Sidan laddas ...
Sidan laddas ...
Sidan laddas ...
Sidan laddas ...
Sidan laddas ...
Sidan laddas ...
Sidan laddas ...
Sidan laddas ...
Sidan laddas ...
Sidan laddas ...
Sidan laddas ...
Sidan laddas ...
Sidan laddas ...
Sidan laddas ...
Sidan laddas ...
Sidan laddas ...
Sidan laddas ...
Sidan laddas ...
Sidan laddas ...
Sidan laddas ...
Sidan laddas ...
Sidan laddas ...
Sidan laddas ...
Sidan laddas ...
Sidan laddas ...
Sidan laddas ...
Sidan laddas ...
Sidan laddas ...
Sidan laddas ...
Sidan laddas ...
Sidan laddas ...
Sidan laddas ...
Sidan laddas ...
Sidan laddas ...
Sidan laddas ...
Sidan laddas ...
Sidan laddas ...
Sidan laddas ...
Sidan laddas ...
Sidan laddas ...
Sidan laddas ...
Sidan laddas ...
Sidan laddas ...
Sidan laddas ...
Sidan laddas ...
Sidan laddas ...
Sidan laddas ...
Sidan laddas ...
Sidan laddas ...
Sidan laddas ...
Sidan laddas ...
Sidan laddas ...
Sidan laddas ...
Sidan laddas ...
Sidan laddas ...
Sidan laddas ...
Sidan laddas ...
Sidan laddas ...
Sidan laddas ...
Sidan laddas ...
Sidan laddas ...
Sidan laddas ...
Sidan laddas ...
Sidan laddas ...
Sidan laddas ...
Sidan laddas ...
Sidan laddas ...
Sidan laddas ...
Sidan laddas ...
Sidan laddas ...
Sidan laddas ...
Sidan laddas ...
Sidan laddas ...
Sidan laddas ...
Sidan laddas ...
Sidan laddas ...
Sidan laddas ...
Sidan laddas ...
Sidan laddas ...
Sidan laddas ...
Sidan laddas ...
Sidan laddas ...
Sidan laddas ...
Sidan laddas ...
Sidan laddas ...
Sidan laddas ...
Sidan laddas ...
Sidan laddas ...
Sidan laddas ...
Sidan laddas ...
Sidan laddas ...
Sidan laddas ...
Sidan laddas ...
Sidan laddas ...
Sidan laddas ...
Sidan laddas ...
Sidan laddas ...
Sidan laddas ...
Sidan laddas ...
Sidan laddas ...
Sidan laddas ...
Sidan laddas ...
Sidan laddas ...
Sidan laddas ...
Sidan laddas ...
Sidan laddas ...
Sidan laddas ...
Sidan laddas ...
Sidan laddas ...
Sidan laddas ...
Sidan laddas ...
Sidan laddas ...
Sidan laddas ...
Sidan laddas ...
Sidan laddas ...
Sidan laddas ...
Sidan laddas ...
Sidan laddas ...
Sidan laddas ...
Sidan laddas ...
Sidan laddas ...
Sidan laddas ...
Sidan laddas ...
Sidan laddas ...
Sidan laddas ...
Sidan laddas ...
Sidan laddas ...
Sidan laddas ...
Sidan laddas ...
Sidan laddas ...
Sidan laddas ...
Sidan laddas ...
Sidan laddas ...
Sidan laddas ...
Sidan laddas ...
Sidan laddas ...
Sidan laddas ...
Sidan laddas ...
Sidan laddas ...
Sidan laddas ...
Sidan laddas ...
Sidan laddas ...
Sidan laddas ...
Sidan laddas ...
Sidan laddas ...
Sidan laddas ...
Sidan laddas ...
Sidan laddas ...
Sidan laddas ...
Sidan laddas ...
Sidan laddas ...
Sidan laddas ...
Sidan laddas ...
Sidan laddas ...
Sidan laddas ...
Sidan laddas ...
Sidan laddas ...
Sidan laddas ...
Sidan laddas ...
Sidan laddas ...
Sidan laddas ...
Sidan laddas ...
Sidan laddas ...
Sidan laddas ...
Sidan laddas ...
Sidan laddas ...
Sidan laddas ...
Sidan laddas ...
Sidan laddas ...
Sidan laddas ...
Sidan laddas ...
Sidan laddas ...
Sidan laddas ...
Sidan laddas ...
Sidan laddas ...
Sidan laddas ...
Sidan laddas ...
Sidan laddas ...
Sidan laddas ...
Sidan laddas ...
Sidan laddas ...
Sidan laddas ...
Sidan laddas ...
Sidan laddas ...
Sidan laddas ...
Sidan laddas ...
Sidan laddas ...
Sidan laddas ...
Sidan laddas ...
Sidan laddas ...
Sidan laddas ...
Sidan laddas ...
Sidan laddas ...
Sidan laddas ...
Sidan laddas ...
Sidan laddas ...
Sidan laddas ...
Sidan laddas ...
Sidan laddas ...
Sidan laddas ...
Sidan laddas ...
Sidan laddas ...
Sidan laddas ...
Sidan laddas ...
Sidan laddas ...
Sidan laddas ...
Sidan laddas ...
Sidan laddas ...
Sidan laddas ...
Sidan laddas ...
Sidan laddas ...
Sidan laddas ...
Sidan laddas ...
Sidan laddas ...
Sidan laddas ...
Sidan laddas ...
Sidan laddas ...
Sidan laddas ...
Sidan laddas ...
Sidan laddas ...
Sidan laddas ...
Sidan laddas ...
Sidan laddas ...
Sidan laddas ...
Sidan laddas ...
Sidan laddas ...
Sidan laddas ...
Sidan laddas ...
Sidan laddas ...
Sidan laddas ...
Sidan laddas ...
Sidan laddas ...
Sidan laddas ...
Sidan laddas ...
Sidan laddas ...
Sidan laddas ...
Sidan laddas ...
Sidan laddas ...
Sidan laddas ...
Sidan laddas ...
Sidan laddas ...
Sidan laddas ...
Sidan laddas ...
Sidan laddas ...
Sidan laddas ...
Sidan laddas ...
Sidan laddas ...
Sidan laddas ...
Sidan laddas ...
Sidan laddas ...
Sidan laddas ...
Sidan laddas ...
Sidan laddas ...
Sidan laddas ...
Sidan laddas ...
Sidan laddas ...
Sidan laddas ...
Sidan laddas ...
Sidan laddas ...
Sidan laddas ...
Sidan laddas ...
Sidan laddas ...
Sidan laddas ...
Sidan laddas ...
Sidan laddas ...
Sidan laddas ...
Sidan laddas ...
Sidan laddas ...
Sidan laddas ...
Sidan laddas ...
Sidan laddas ...
Sidan laddas ...
Sidan laddas ...
Sidan laddas ...
Sidan laddas ...
Sidan laddas ...
Sidan laddas ...
Sidan laddas ...
Sidan laddas ...
Sidan laddas ...
Sidan laddas ...
Sidan laddas ...
Sidan laddas ...
Sidan laddas ...
Sidan laddas ...
Sidan laddas ...
Sidan laddas ...
Sidan laddas ...
Sidan laddas ...
Sidan laddas ...
Sidan laddas ...
Sidan laddas ...
Sidan laddas ...
-
 1
1
-
 2
2
-
 3
3
-
 4
4
-
 5
5
-
 6
6
-
 7
7
-
 8
8
-
 9
9
-
 10
10
-
 11
11
-
 12
12
-
 13
13
-
 14
14
-
 15
15
-
 16
16
-
 17
17
-
 18
18
-
 19
19
-
 20
20
-
 21
21
-
 22
22
-
 23
23
-
 24
24
-
 25
25
-
 26
26
-
 27
27
-
 28
28
-
 29
29
-
 30
30
-
 31
31
-
 32
32
-
 33
33
-
 34
34
-
 35
35
-
 36
36
-
 37
37
-
 38
38
-
 39
39
-
 40
40
-
 41
41
-
 42
42
-
 43
43
-
 44
44
-
 45
45
-
 46
46
-
 47
47
-
 48
48
-
 49
49
-
 50
50
-
 51
51
-
 52
52
-
 53
53
-
 54
54
-
 55
55
-
 56
56
-
 57
57
-
 58
58
-
 59
59
-
 60
60
-
 61
61
-
 62
62
-
 63
63
-
 64
64
-
 65
65
-
 66
66
-
 67
67
-
 68
68
-
 69
69
-
 70
70
-
 71
71
-
 72
72
-
 73
73
-
 74
74
-
 75
75
-
 76
76
-
 77
77
-
 78
78
-
 79
79
-
 80
80
-
 81
81
-
 82
82
-
 83
83
-
 84
84
-
 85
85
-
 86
86
-
 87
87
-
 88
88
-
 89
89
-
 90
90
-
 91
91
-
 92
92
-
 93
93
-
 94
94
-
 95
95
-
 96
96
-
 97
97
-
 98
98
-
 99
99
-
 100
100
-
 101
101
-
 102
102
-
 103
103
-
 104
104
-
 105
105
-
 106
106
-
 107
107
-
 108
108
-
 109
109
-
 110
110
-
 111
111
-
 112
112
-
 113
113
-
 114
114
-
 115
115
-
 116
116
-
 117
117
-
 118
118
-
 119
119
-
 120
120
-
 121
121
-
 122
122
-
 123
123
-
 124
124
-
 125
125
-
 126
126
-
 127
127
-
 128
128
-
 129
129
-
 130
130
-
 131
131
-
 132
132
-
 133
133
-
 134
134
-
 135
135
-
 136
136
-
 137
137
-
 138
138
-
 139
139
-
 140
140
-
 141
141
-
 142
142
-
 143
143
-
 144
144
-
 145
145
-
 146
146
-
 147
147
-
 148
148
-
 149
149
-
 150
150
-
 151
151
-
 152
152
-
 153
153
-
 154
154
-
 155
155
-
 156
156
-
 157
157
-
 158
158
-
 159
159
-
 160
160
-
 161
161
-
 162
162
-
 163
163
-
 164
164
-
 165
165
-
 166
166
-
 167
167
-
 168
168
-
 169
169
-
 170
170
-
 171
171
-
 172
172
-
 173
173
-
 174
174
-
 175
175
-
 176
176
-
 177
177
-
 178
178
-
 179
179
-
 180
180
-
 181
181
-
 182
182
-
 183
183
-
 184
184
-
 185
185
-
 186
186
-
 187
187
-
 188
188
-
 189
189
-
 190
190
-
 191
191
-
 192
192
-
 193
193
-
 194
194
-
 195
195
-
 196
196
-
 197
197
-
 198
198
-
 199
199
-
 200
200
-
 201
201
-
 202
202
-
 203
203
-
 204
204
-
 205
205
-
 206
206
-
 207
207
-
 208
208
-
 209
209
-
 210
210
-
 211
211
-
 212
212
-
 213
213
-
 214
214
-
 215
215
-
 216
216
-
 217
217
-
 218
218
-
 219
219
-
 220
220
-
 221
221
-
 222
222
-
 223
223
-
 224
224
-
 225
225
-
 226
226
-
 227
227
-
 228
228
-
 229
229
-
 230
230
-
 231
231
-
 232
232
-
 233
233
-
 234
234
-
 235
235
-
 236
236
-
 237
237
-
 238
238
-
 239
239
-
 240
240
-
 241
241
-
 242
242
-
 243
243
-
 244
244
-
 245
245
-
 246
246
-
 247
247
-
 248
248
-
 249
249
-
 250
250
-
 251
251
-
 252
252
-
 253
253
-
 254
254
-
 255
255
-
 256
256
-
 257
257
-
 258
258
-
 259
259
-
 260
260
-
 261
261
-
 262
262
-
 263
263
-
 264
264
-
 265
265
-
 266
266
-
 267
267
-
 268
268
-
 269
269
-
 270
270
-
 271
271
-
 272
272
-
 273
273
-
 274
274
-
 275
275
-
 276
276
-
 277
277
-
 278
278
-
 279
279
-
 280
280
-
 281
281
-
 282
282
-
 283
283
-
 284
284
-
 285
285
-
 286
286
-
 287
287
-
 288
288
-
 289
289
-
 290
290
-
 291
291
-
 292
292
-
 293
293
-
 294
294
-
 295
295
-
 296
296
-
 297
297
-
 298
298
-
 299
299
-
 300
300
-
 301
301
-
 302
302
-
 303
303
-
 304
304
-
 305
305
-
 306
306
-
 307
307
-
 308
308
-
 309
309
-
 310
310
-
 311
311
-
 312
312
-
 313
313
-
 314
314
-
 315
315
-
 316
316
-
 317
317
-
 318
318
-
 319
319
-
 320
320


Candy CMDNB 6204X1 Användarmanual
- Kategori
- Kylboxar
- Typ
- Användarmanual
på andra språk
- italiano: Candy CMDNB 6204X1 Manuale utente
- čeština: Candy CMDNB 6204X1 Uživatelský manuál
- slovenčina: Candy CMDNB 6204X1 Používateľská príručka
- español: Candy CMDNB 6204X1 Manual de usuario
- Deutsch: Candy CMDNB 6204X1 Benutzerhandbuch
- português: Candy CMDNB 6204X1 Manual do usuário
- français: Candy CMDNB 6204X1 Manuel utilisateur
- English: Candy CMDNB 6204X1 User manual
- dansk: Candy CMDNB 6204X1 Brugermanual
- suomi: Candy CMDNB 6204X1 Ohjekirja
- Nederlands: Candy CMDNB 6204X1 Handleiding
Relaterade papper
Andra dokument
-
Hoover HKTLS 604WHK Användarmanual
-
-
-
Hoover HBRUP 164 NK/N Refrigerators Användarmanual
-
AEG A92860GNX3 Användarmanual
-
LG GC-L207TVWK.CSWQSWE Bruksanvisning
-
HoMedics PAC-20 Bruksanvisning
-
-
Groupe Brandt C29710X Bruksanvisning
-
Groupe Brandt BFL85BARX Bruksanvisning