Indesit DFP 58T93 A NX SK Användarguide
- Kategori
- Diskmaskiner
- Typ
- Användarguide
Denna manual är också lämplig för

EN
English
Operating instructions
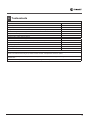
DISHWASHER - Contents
Operating instructions,1
Precautions and advice, 2-3
Product Data, 8
Assistance, 10
Installation, 11-12
Description of the appliance, 13
Refined salt and rinse aid, 14
Loading the racks, 15-16
Detergent and dishwasher use, 17
Wash cycles, 18
Special wash cycles and options, 19
Care and maintenance, 20
Troubleshooting, 21
1
DA
Dansk
Brugsanvisning
OPVASKEMASKINE - Oversigt
Brugsanvisning,1
Forskrifter og råd, 3-4
Servicetjeneste, 10
Installation, 23-24
Beskrivelse af apparatet, 25
Salt og afspændingsmiddel, 26
Fyldning af kurve, 27-28
Opvaskemiddel og brug af opvaskemaskinen, 29
Programmer, 30
Specialprogrammer og tilvalgsfunktioner, 31
Vedligeholdelse, 32
Fejl og afhjælpning, 33
NO
Norsk
Bruksanvisning
OPPVASKMASKIN - Innholdsfortegnelse
Bruksanvisning, 1
Forholdsregler og gode råd, 4-5
Service, 10
Installasjon, 34-35
Beskrivelse av apparatet, 36
Regenereringssalt og glansemiddel, 37
Fylle kurvene, 38-39
Oppvaskmiddel og bruk av oppvaskmaskinen, 40
Programmer, 41
Spesielle programmer og tilleggsfunksjoner, 42
Vedlikehold og ettersyn, 43
Feil og feilretting, 44
SE
Svenska
Bruksanvisning
DISKMASKIN - Innehållsförteckning
Bruksanvisning, 1
Säkerhetsföreskrifter och råd
, 5-6
Informationsblad
, 8
Assistens, 10
Installation, 46-47
Beskrivning av apparaten, 48
Härdningssalt och
sköljmedel
, 49
Fyll korgarna, 50-51
Diskmedel och användning av diskmaskinen, 52
Program, 53
Specialprogram och tillval, 54
Underhåll och skötsel, 55
Fel och åtgärder, 56
FI
Suomi
Käyttöohjeet
ASTIANPESUKONE - Sisältö
Käyttöohjeet, 1
Varotoimet ja suosituksia, 6-7
Tuoteseloste, 9
Huoltoapu, 10
Asennus, 57-58
Laitteen kuvaus, 59
Elvytyssuola ja huuhtelukirkaste, 60
Korien täyttäminen, 61-62
Pesuaine ja astianpesukoneen käyttö, 63
Ohjelmat, 64
Erikoisohjelmat ja lisätoiminnot, 65
Huolto ja hoito, 66
Häiriöt ja korjaustoimet, 67
DFP 58T93

2
EN
Precautions and advice
This appliance was designed and
manufactured in compliance with international
safety standards. The following information has
been provided for safety reasons and should
be read carefully.
Keep this instruction manual in a safe place for
future reference. If the appliance is sold, given
away or moved, make sure the manual is kept
with the machine.
Read the instructions carefully, as they include
important information on safe installation, use
and maintenance.
This appliance was designed for domestic use
or similar applications, for example:
- farmhouses;
- use by guests in hotels, motels and other
residential settings;
- bed & breakfasts.
Remove the appliance from all packaging
and make sure it was not damaged during
transportation. If it was damaged, contact the
retailer and do not proceed any further with the
installation process.
General safety
• This appliance should not be operated
by children younger than 8 years, people
with reduced physical, sensory or mental
capacities, or inexperienced people who
are not familiar with the product, unless they
are given close supervision or instructions on
how to use it safely and are made aware by
a responsible person of the dangers its use
might entail.
• Children must not play with the appliance.
• It is the user's responsibility to clean and
maintain the appliance. Children should
never clean or maintain it unless they are
given supervision.
• The appliance was designed for domestic
use inside the home and is not intended for
commercial or industrial use.
• The appliance must be used to wash
domestic crockery in accordance with the
instructions in this manual.
• The appliance must not be installed outdoors,
even in covered areas. It is extremely
dangerous to leave the machine exposed to
rain and storms.
• Do not touch the appliance when barefoot.
• When unplugging the appliance always pull
the plug from the mains socket. Do not pull
on the cable.
• The water supply tap must be shut off and the
plug should be removed from the electrical
socket at the end of every cycle and before
cleaning the appliance or carrying out any
maintenance work.
• The maximum number of place settings is
shown in the product sheet.
• If the appliance breaks down, do not under
any circumstances touch the internal parts in
an attempt to perform the repair work yourself.
• Do not lean or sit on the open door: this may
cause the appliance to overturn.
• The door should not be left open as it may
create a dangerous obstacle.
• Keep detergent and rinse aid out of reach of
children.
• The packaging material should not be used
as a toy.
• Knives and other utensils with sharp edges
must be placed either with the points/blades
facing downwards in the cutlery basket or
horizontally on the tip-up compartments or
in the tray/third basket, if available.
• Connect the appliance to the water mains
using the new supply hose provided with the
appliance. Do not re-use the old hose.
• Install the back side of a free-standing
dishwasher against a wall.
Disposal
• To dispose of any packaging materials, follow
local legislation so that the packagings may
be reused.
• The European Directive 2012/19/EU relating
to Waste Electrical and Electronic Equipment
(WEEE) states that household appliances
should not be disposed of using the
normal solid urban waste cycle. Exhausted
appliances should be collected separately
in order to optimise the cost of reusing and
recycling the materials inside the machine,
while preventing potential damage to the
atmosphere and public health. The crossed-
out dustbin symbol shown on all products
reminds the owners of their obligations
regarding separated waste collection.
For further information relating to the correct
disposal of household appliances, owners
may contact the relevant public authority or
the local appliance dealer.
Saving energy and respecting the
environment
Saving water and energy
• Only begin a wash cycle when the dishwasher

3
DA
Forskrifter og råd
Apparatet er konstrueret og bygget i
overensstemmelse med de internationale
sikkerhedsregler. Følgende oplysninger gives
af sikkerhedsmæssige årsager, og de skal
læses omhyggeligt.
Det er vigtigt, at dette hæfte opbevares, så det
altid kan konsulteres. Ved salg eller flytning
skal man sørge for, at hæftet bliver sammen
med apparatet.
Læs venligst hæftet omhyggeligt: Det
indeholder vigtige oplysninger vedrørende
installation, brug og sikkerhed.
Dette apparat er beregnet til brug i hjemmet
eller lignende anvendelse, f.eks.:
- sommerhuse
- brug af kunder på hotel, motel eller andre
beboelsestyper
- bed & breakfast.
Pak apparatet ud, og kontrollér, at det ikke er
blevet beskadiget under transporten. Hvis det
er beskadiget, skal man ikke tilslutte det, men
derimod kontakte forhandleren.
Generelt om sikkerheden
• Dette husholdningsapparat kan anvendes
af børn i alderen fra 8 år og derover og af
personer med nedsatte fysiske, sensoriske
eller mentale evner, eller manglende
nødvendig erfaring eller viden, såfremt det
sker under nøje opsyn af en person, der er
ansvarlig for deres sikkerhed, eller hvis de
har fået anvisning vedrørende sikker brug
af apparatet og er bevidste om farerne, der
er forbundet hermed.
• Lad aldrig børn lege med apparatet.
• Rengøring og vedligeholdelse af apparatet
skal udføres af brugeren. Det må ikke
udføres af børn uden opsyn.
• Apparatet er beregnet til ikke-professionel
brug i hjemmet.
• Apparatet er beregnet til opvask til
husholdningsbrug og skal betjenes i
overensstemmelse med anvisningerne i
dette hæfte.
• Apparatet må ikke installeres udenfor, heller
ikke hvis stedet er overdækket, idet det er
farligt at efterlade det i regnvejr og uvejr.
• Undgå at røre ved opvaskemaskinen, hvis
du er barfodet.
• Træk ikke stikket ud af stikkontakten ved at
trække i ledningen, men tag fat om selve
stikket.
• Vandhanen skal lukkes, og stikket skal
tages ud af stikkontakten efter hver opvask
og inden rengøring eller vedligeholdelse af
apparatet.
• Maks. antal kuverter er angivet i
produktbladet.
• I tilfælde af fejlfunktion må man under
ingen omstændigheder åbne op til de
indvendige mekanismer og forsøge at
reparere apparatet.
• Man må ikke støtte sig på eller sidde på den
åbne låge. Apparatet kan vælte.
• Lågen må ikke holdes åben, da man kan
støde ind i den.
• Opbevar opvaskemiddel og
afspændingsmiddel uden for børns
rækkevidde.
• Emballagen må ikke bruges som legetøj af
børn.
• Knive og køkkenredskaber med skarpe
kanter skal placeres i bestikkurven med
spidserne/bladene nedad, i lodret position
i klapperne eller i bestikholderen/den tredje
kurv (hvis den findes).
• Apparatet skal være tilsluttet vandforsyningen
ved hjælp af den nye slange, og den gamle
slange må ikke genbruges.
• Hvis opvaskemaskinen er frit installeret, skal
bagsiden placeres mod en væg.
Bortskaffelse
• Bortskaffelse af emballagemateriale: Følg de
lokale regler, så emballagen kan genbruges.
• Det europæiske direktiv 2012/19/EU om
affald af elektrisk og elektronisk udstyr (WEEE)
foreskriver, at husholdningsapparater ikke
is full. While waiting for the dishwasher to be
filled, prevent unpleasant odours with the
Soak cycle
(if available, see Wash Cycles).
• Select a wash cycle that is suited to the type of
crockery and to the soil level using the Table
of Wash Cycles:
- For dishes with a normal soil level, use
the Eco wash cycle, which guarantees low
energy and water consumption levels.
- If the load is smaller than usual activate
the Half Load option
(see Special wash cycles and
options, if available).
• If your electricity supply contract gives details
of electricity-saving time bands, run the wash
cycles when electricity prices are lower. The
Delayed Start option can help you organise
the wash cycles accordingly
(see Special wash
cycles and options, if available).

4
må smides ud sammen med almindeligt
husholdningsaffald. Kasserede apparater
skal indsamles separat, så man kan genbruge
og genudvinde flest mulige materialer og
begrænse eventuelle sundhedsmæssige
og miljømæssige skader. Symbolet med
den overstregede affaldsspand findes på
alle produkter for at minde om, at de skal
indsamles separat.
For yderligere oplysninger om korrekt
bortskaffelse af husholdningsapparater
kan man rette henvendelse til den offentlige
affaldsservice eller til forhandleren.
Spar på energien og værn om miljøet
Spar på vand og energi
• Start kun opvaskemaskinen, når den
er helt fyldt. Mens man venter på, at
opvaskemaskinen fyldes op, kan man
forebygge mod dårlig lugt med cyklussen
Iblødsætning
(hvis den findes - se Programmer).
• Vælg et egnet program til typen af opvask
og mængden af snavs i henhold til
Programtabellen:
- Ved normalt snavset opvask kan man
bruge programmet Eco, som sparer på
energi og vand.
- Hvis opvaskemaskinen kun er halvt
fuld, skal man vælge programmet Halv
fyldning
(hvis det findes - se Specialprogrammer og
tilvalgsfunktioner).
• Hvis der i dit område findes en
energibesparelsesordning med lavere
takster for strøm på bestemte tidspunkter,
så udfør opvasken på disse tidspunkter.
Tilvalgsfunktionen Forsinket start er beregnet
til at planlægge opvasken netop for at spare
på energien
(hvis den findes - se Specialprogrammer
og tilvalgsfunktioner).
NO
Forholdsregler og gode råd
Apparatet er utviklet og fremstilt i
overensstemmelse med de internasjonale
sikkerhetsstandarder. Disse forholdsreglene
gis av sikkerhetsmessige årsaker og må leses
nøye.
Det er viktig at du tar godt vare på håndboken,
slik at du har den for hånden når du trenger
den. Ved eventuelt salg, overdragelse eller
flytting, må man forsikre seg om at håndboken
følger med maskinen.
Les anvisningene nøye: Her finnes viktig
informasjon om installasjon, bruk og sikkerhet.
Dette apparatet er prosjektert for
husholdningsbruk eller lignende, for eksempel:
- feriekolonier;
- for kunder på hoteller, moteller og andre
overnattingssteder;
- bed and breakfast.
Ta av emballasjen og kontrollere at maskinen
ikke har blitt påført skader under transporten.
Hvis den er skadet, må du ikke koble den til,
men kontakte forhandleren.
Generelle sikkerhetsregler
• Dette husholdningsapparatet kan benyttes
av barn over 8 år og av personer med
reduserte fysiske, sensoriske eller mentale
evner eller personer uten erfaring eller
nødvendig kunnskap, på betingelse av at de
holdes under strengt oppsyn av en ansvarlig
person, eller at de har fått instruksjon om
hvordan apparatet skal behandles på en
trygg måte og har forstått hvilke farer som
følger med dette.
• La ikke barn leke med apparatet.
• Rengjøring og vedlikehold av apparatet skal
gjøres av brukeren. La ikke barn gjøre det
uten overvåkning.
• Dette apparatet er ment til hjemmebruk, ikke
til profesjonell bruk.
• Apparatet skal benyttes til
husholdningsoppvask i overensstemmelse
med anvisningene i denne håndboken.
• Apparatet må ikke installeres utendørs, selv
ikke dersom området er beskyttet, fordi det
er veldig farlig å utsette det for regn og uvær.
• Rør ikke oppvaskmaskinen når du er
barbeint.
• Ikke trekk i kabelen når du skal ta støpselet ut
av stikkontakten, men ta godt tak i støpselet.
• Man må stenge vannkranen og trekke
støpselet ut av stikkontakten når
oppvaskprogrammet er avsluttet, og
før rengjøring og vedlikehold utføres på
maskinen.
• Maksimum antall kuverter er angitt i
produktskjemaet.
• Oppstår det en feil, må du aldri prøve å
reparere de innvendige mekanismene.
• Ikke len deg eller sett deg på den åpne
døren: apparatet kan velte.
• La ikke døren bli stående åpen, man kan
snuble i den.
• Oppvaskmiddelet og glansemiddelet skal
oppbevares utilgjengelig for barn.

5
• Emballasjen er ikke leketøy for barn.
• Kniver og skarpe redskaper må settes i
bestikkurven med spissen/eggen ned, eller
legges horisontalt på kopphyllene eller i
bestikkskuffen/den tredje kurven i modeller
hvor det finnes.
• Apparatet skal kobles til vannledningen
med en ny tilførselsslange. Den gamle
tilførselsslangen skal ikke brukes igjen.
• Hvis oppvaskmaskinen er frittstående skal
baksiden av maskinen plasseres mot en
vegg.
Kassering
• Håndtering av emballasjen: Følg de lokale
forskrifter slik at emballasjen kan gjenvinnes.
• Det europeiske direktivet 2012/19/EF om
avfallsbehandling av elektrisk og elektronisk
utstyr (WEEE), foreskriver at hvitevarer
ikke må avsettes sammen med vanlig
husholdningsavfall. Brukte apparater må
samles inn separat slik at gjenbruk og
gjenvinning av materialene de består av
optimeres og for å unngå mulige skader for
helse og miljø. Søppelkurvsymbolet med
kryss over finnes på alle produktene for å
minne om kravet om separat innsamling.
For ytterligere opplysninger om korrekt
avfallsbehandling av hvitevarer, kan man
henvende seg til det lokale renholdsverket
eller til forhandlerne.
Energisparing og miljøhensyn
Spare vann og energi
• Sett oppvaskmaskinen i gang først når den
er full. I påvente av at oppvaskmaskinen
blir full, kan du unngå at det dannes dårlig
lukt ved å kjøre en bløtleggingssyklus
(hvor det
finnes - se programmer)
.
• Velg et program som er egnet for serviset
som skal vaskes og etter hvor skittent det er
ved hjelp av Programtabellen:
- For normalt skitten oppvask, bruk
programmet Eco, som har lavt strøm- og
vannforbruk.
- Hvis det er lite som skal vaskes, kan du
bruke funksjonen Halvfull maskin
(hvor det
finnes se spesielle programmer og tilleggsfunksjoner).
• Hvis strømavtalen din har tidsregulert
energisparing, bør du bruke
oppvaskmaskinen på den tiden av dagen
det koster minst. Funksjonen Utsatt start
kan i så fall være til god hjelp
(
hvis det finnes se
spesielle programmer og tilleggsfunksjoner).
SE
Säkerhetsföreskrifter och råd
Apparaten är framtagen och konstruerad
i enlighet med internationella
säkerhetsföreskrifter. Dessa föreskrifter ingår
i bruksanvisningen av säkerhetsskäl och ska
läsas med stor uppmärksamhet.
Det är viktigt att denna bruksanvisning
bevaras så att den kan konsulteras vid behov.
I händelse av försäljning, överlåtelse eller flytt,
ska du försäkra dig om att bruksanvisningen
följer med utrustningen.
Läs noggrant anvisningarna: Det finns
viktig information angående installation,
användning och säkerhet.
Denna utrustning är avsedd att
användas i hemmet eller för liknande
användningsområden, såsom:
- Bondgårdar
- Användning av gäster på hotell, motell eller
andra boendeformer.
- Bed and breakfast.
Packa upp diskmaskinen och kontrollera att
den inte har skadats under transporten. Om
den skulle finnas skador ska du inte ansluta
den utan kontakta återförsäljaren.
Säkerhet i allmänhet
• Denna apparat får inte användas av
barn under 8 år eller av personer med
nedsatt fysisk eller psykisk förmåga eller
som saknar erfarenhet eller nödvändig
kunskap, såvida de inte övervakas av en
ansvarig person eller har fått instruktioner
om användningen av apparaten och om de
faror som är förenade med användningen
av apparaten.
• Barn ska inte leka med apparaten.
• Rengöring och underhåll av apparaten
måste utföras av användaren. Rengöring
och underhåll får inte utföras barn utan en
vuxens tillsyn.
• Apparaten är avsedd för en ej yrkesmässig
användning i hemmet.
• Maskinen ska användas för att diska disk
för hushållsbruk. Maskinen ska endast
användas i hemmet och i enlighet med
anvisningarna i denna bruksanvisning.
• Maskinen får inte installeras utomhus (ej
heller om utrymmet är skyddat) eftersom
det är mycket farligt att låta den utsättas
för väder och vind.
• Ta inte i maskinen om du är barfota.

6
• Ta inte ut stickkontakten ur vägguttaget
genom att dra i elkabeln. Ta istället tag i
stickkontakten.
• Det är nödvändigt att stänga vattenkranen
och dra ut stickkontakten ur vägguttaget
efter varje program och innan rengörings-
och underhållsmoment utförs.
• Max. antal kuvert anges i produktbladet.
• Ingrip aldrig på inre mekanismer för att
försöka reparera apparaten vid funktionsfel.
• Luta dig inte eller sätt dig på den öppna
luckan: Maskinen kan tippa
• Luckan ska inte stå öppen. Du kan snava
dig i luckan.
• Förvara diskmedel och sköljmedel utom
räckhåll för barn.
• Emballagematerialet ska inte användas
som leksaker för barn.
• Knivar och andra köksgeråd med vassa
kanter ska sättas i bestickkorgen med
spetsarna vända nedåt eller läggas
horisontellt på den övre de uppfällbara
hyllorna eller i brickan/tredje korgen på
modeller där sådan finns.
• Apparaten ska anslutas till vattennätet
med den nya vatteninloppsslangen. Den
gamla vatteninloppsslangen ska inte
återanvändas.
• Om diskmaskinen installeras fristående,
ska den bakre delen av diskmaskinen
placeras mot en vägg.
Kassering
• Kassering av emballagematerial:
Respektera gällande lokala föreskrifter,
på så sätt kan emballaget återanvändas.
• EU-direktivet 2012/19/EG om avfall som
utgörs av eller innehåller elektriska eller
elektroniska produkter (WEEE), förutser
att hushållsmaskinerna inte ska slängas
med de vanliga hushållssoporna. De
kasserade apparaterna ska samlas upp
separat för att optimera återvinningen
av materialet som ingår i apparaten och
förhindra potentiella skador på hälsan och
miljön. Den överkryssade papperskorgen
som sitter på alla produkter påminner om
att produkten ska sopsorteras.
För ytterligare information angående
korrekt kassering av hushållsmaskiner kan
du vända dig till din lokala sopstation eller
återförsäljare.
Spara energi och respektera miljön
Spara vatten och energi
• Starta endast diskmaskinen med full
last. I väntan på att maskinen fylls
upp kan du motverka dålig lukt med
Upplösningsprogrammet
(om sådant finns - se
Program).
• Välj ett program beroende på vilken typ av
disk som ska diskas och hur smutsig den
är, se Programtabellen:
- För normalt smutsad disk, använd
programmet Eco som garanterar låg
energi- och vattenförbrukning.
- Välj tillvalet Halv last om maskinen inte är
full
(om sådant finns, se Specialprogram och tillval).
• Om ditt elabonnemang har särskilda
energiförbrukningstariffer, ska diskningarna
göras under de reducerade tiderna.
Tillvalet Senarelagd start är till stor hjälp
för att organisera diskningarna i denna
riktning
(om sådant finns, se Specialprogram och
tillval).
FI
Varotoimet ja suosituksia
Laite on suunniteltu ja valmistettu
kansainvälisten turvallisuusmääräysten
mukaisesti. Nämä varoitukset toimitetaan
turvallisuussyistä ja ne on luettava huolellisesti.
On tärkeää säilyttää tämä ohjekirja, jotta
sitä voidaan tutkia tarvittaessa. Myynnin,
luovutuksen tai muuton yhteydessä varmista,
että se pysyy yhdessä laitteen kanssa.
Lue ohjeet huolellisesti: niissä on tärkeitä tietoja
asennuksesta, käytöstä ja turvallisuudesta.
Tämä laite on suunniteltu kotikäyttöön tai
vastaaviin sovelluksiin kuten esimerkiksi:
- maatilamajoitukseen;
- asiakkaiden käyttöön hotellissa, motellissa
ja muissa vuokrattavissa asuntotiloissa;
- aamiaismajoitukseen.
Pura laite pakkauksesta ja tarkista, ettei se
ole vahingoittunut kuljetuksen aikana. Jos
siinä on havaittavissa vaurioita, älä liitä sitä
ja ota yhteys jälleenmyyjään.
Yleinen turvallisuus
• Tätä kodinkonetta saavat käyttää 8-vuotiaat
ja sitä vanhemmat lapset sekä henkilöt,
joiden fyysinen, aistitoimintojen tai henkinen
suorituskyky on alentunut tai joilla ei ole
kokemusta tai tarvittavia tietoja, mikäli heitä
valvoo vastuuhenkilö, tai sen jälkeen, kun
heille on annettu laitteen turvallista käyttöä
koskevat ohjeet ja he ymmärtävät siihen

7
liittyvät vaarat.
• Lapset eivät saa leikkiä laitteella.
• Käyttäjän on suoritettava laitteen puhdistus
ja huolto. Sitä ei saa antaa lasten tehtäväksi
ilman valvontaa.
• Laite on suunniteltu ei-ammattimaiseen
käyttöön asuinhuoneistossa.
• Laitetta on käytettävä astioiden pesuun
kotitalouksissa tässä kirjasessa olevien
ohjeiden mukaisesti.
• Laitetta ei saa asentaa ulos edes suojattuun
tilaan, koska on erittäin vaarallista jättää se
alttiiksi sateelle ja ukkoselle.
• Älä kosketa astianpesukonetta paljain
jaloin.
• Älä irrota pistoketta sähköpistorasiasta
johdosta vetämällä vaan ota kiinni
pistokkeesta.
• On ehdottomasti suljettava vesihana ja
irrotettava sähköpistoke jokaisen jakson
päätyttyä sekä ennen puhdistus- ja
huoltotoimenpiteiden suorittamista.
• Astioiden enimmäismäärä osoitetaan
tuoteselosteessa.
• Vian tapauksessa älä missään tapauksessa
yritä avata pesukoneen sisäosia korjauksen
suorittamiseksi.
• Älä nojaa tai istu avoimelle luukulle: laite
voi kaatua.
• Luukkua ei saa säilyttää aukinaisessa
asennossa, koska siihen voidaan
vahingossa kompastua.
• Säilytä pesu- ja huuhtelukirkasteet lasten
ulottumattomissa.
• Pakkaukset eivät ole lasten leluja.
• Veitset ja teräväreunaiset välineet
on sijoitettava kärki/terä alaspäin
ruokailuvälinekoriin tai ne on laitettava
vaakasuoraan asentoon väliseinämille
tai alustalle/kolmanteen koriin malleissa,
joissa se on varusteena.
• Laite on yhdistettävä vesijohtoverkkoon
uudella syöttöletkulla ja vanhaa syöttöletkua
ei saa käyttää uudelleen.
• Jos astianpesukone on vapaasti
asennettava, sen takalaita on asetettava
seinää vasten.
Hävittäminen
• Pakkausmateriaalien hävittäminen:
noudata paikallisia määräyksiä, siten
pakkausmateriaalit voidaan käyttää
uudelleen.
• Sähköisten ja elektronisten laitteiden
muodostamia jätteitä käsittelevä Euroopan
direktiivi (WEEE) 2012/19/EU määrää, että
hävitettäviä kodinkoneita ei saa laittaa
tavallisten kaupunkijätteiden sekaan.
Hävitettävät laitteet on kerättävä erikseen,
jotta optimoidaan materiaalien kierrätys ja
estetään mahdolliset vahingot terveydelle
ja ympäristölle. Ruudutettu roskakoritunnus
on liitetty kaikkiin tuotteisiin muistuttamaan
velvollisuudesta lajitella jätteet.
Kodinkoneiden asianmukaista hävittämistä
koskevien lisätietojen saamiseksi haltijat
voivat kääntyä paikallisen julkisen palvelun
tai jälleenmyyjien puoleen.
Säästä rahaa ja kunnioita luontoa
Säästä vettä ja energiaa
• Käynnistä astianpesukone ainoastaan
täyteen lastattuna. Odotettaessa koneen
täyttymistä, voit estää ikävien hajujen
muodostumisen liotusjaksolla
(mikäli saatavilla
- ks. Ohjelmat).
• Valitse ohjelma pestävien astioiden
tyypin ja likaisuuden mukaan noudattaen
ohjelmataulukon suosituksia:
- käytä normaalilikaisille astioille Eco-
ohjelmaa, joka takaa alhaisen energian ja
veden kulutuksen.
- jos laite ei ole täysi, käytä puolitäyttöä
(mikäli saatavilla, ks. Erikoisohjelmat ja lisätoiminnot).
• Jos sopimuksesi sähkölaitoksen kanssa
sisältää halvemman hinnan tiettyinä
kellonaikoina, suorita pesut alhaisen
hinnan aikoina. Lisätoiminto viivästetty
käynnistys on avuksi töiden järjestelyssä
kyseistä tarkoitusta varten
(mikäli saatavilla, ks.
Erikoisohjelmat ja lisätoiminnot).

8
Product Fiche
Brand
INDESIT
Model
DFP 58T93
Rated capacity in standard place settings (1)
14
Energy efciency class on a scale from A+++ (low consumption) to D (high consumption)
A++
Energy consumption per year in kWh (2)
265.0
Energy consumption of the standard cleaning cycle in kWh
0.93
Power consumption of the off-mode in W
0.5
Power consumption of the left-on mode in W
5.0
Water consumption per year in litres (3)
2520.0
Drying efcacy class on a scale from G (low efcacy) to A (high efcacy)
A
Programme time for standard cleaning cycle in minutes
190
The duration of the left-on mode in minutes
12
Noise in dB(A) Re 1pW
43
Built-in model
No
NOTES
1) The information on the label and che relates to the standard cleaning cycle, this programme is suitable to clean normally soiled
tableware and it is the most efcient programme in terms of combined energy and water consumption. The standard cleaning cycle
corresponds to the Eco cycle.
2) Based on 280 standard cleaning cycles using cold water ll and the consumption of the low power modes. Actual energy consumption
depends on how the appliance is used.
3) Based on 280 standard cleaning cycles. Actual water consumption depends on how the appliance is used.
EN
Product Data (product fiche)
SE
Informationsblad
Informationsblad
Varumärke
INDESIT
Modell
DFP 58T93
Kapacitet/Antal standardkuvert (1)
14
Energieffektivitetsklass på en skala mellan A + + + (låg förbrukning) till D (hög förbrukning)
A++
Energiförbrukning per år i kWh (2)
265.0
Energiförbrukning av standard programmet i kWh
0.93
Strömförbrukning i avstängt läge i W
0.5
Strömförbrukning vid på-läge i W
5.0
Vattenförbrukningen per år i liter (3)
2520.0
Tork effekt på en skala från G (låg effekt) till A (hög effekt)
A
Programtid för standard program i minuter
190
Varaktighet vid på-läge i minuter
12
Buller i dB (A) re 1 pW
43
Inbyggd modell
Nej
OBS!
1) Informationen på etiketten och informationsbladet avser standard programmet och lämpar sig att rengöra normalt smutsigt porslin
och det är det mest effektiva programmet i form av kombinerad energi-och vattenförbrukning. Standard programmet motsvarar Eco
cykeln.
2) Baserat på 280 standard diskar med kallt vatten, användandet av lågenergiläget. Den faktiska energiförbrukningen beror på hur
maskinen används.
3) Baserat på 280 standard diskar. Den faktiska vattenförbrukningen beror på hur maskinen används.

9
Tuoteseloste
Merkki
INDESIT
Toimittajan mallin tunniste
DFP 58T93
Nimelliskapasiteetti vakioasetuksissa (1)
14
Energiatehokkuusluokka asteikolla A+++:sta (vähän kuluttava) D:hen (paljon kuluttava)
A++
Vuotuinen energiankulutus kWh (2)
265.0
Vakiopesukerran energiankulutus kWh:ina
0.93
Energiankulutus off-tilassa watteina
0.5
Energiankulutus päälle jätettynä watteina
5.0
Vuotuinen vedenkulutus litroina (3)
2520.0
Kuivausteholuokka asteikolla G:stä (minimiteho) A:han (maksimiteho)
A
Vakiopesukerran ohjelma-aika minuutteina
190
Päälle jätetty -tilan kesto minuutteina
12
Melu dB(A) re 1 pW
43
Upotettava malli
Ei
Huomaa
1) Tarran ja selosteen tiedot koskevat vakiopesukertaa. Tämä ohjelma soveltuu normaalilikaisten astioiden pesuun.
Ohjelma on erittäin tehokas energian- ja vedenkulutuksen suhteen. Vakiopesukerta vastaa Eco-jaksoa.
2) Perustuu 280 peruspesukertaan kylmävesiliitännällä ja pientehotiloihin. Todellinen energiankulutus riippuu laitteen
käyttötavoista.
3) Perustuu 280 vakiopesukertaan. Todellinen vedenkulutus riippuu laitteen käyttötavoista.
FI
Tuoteseloste

10
DA
Servicetjeneste
Inden der rettes henvendelse til
Servicecentret, skal man gøre følgende:
• Undersøg, om fejlen selv kan afhjælpes
(se Fejl og
afhjælpning)
.
• Start programmet for at kontrollere, om fejlen er
udbedret.
• Hvis ikke, så kontakt et Autoriseret Teknisk Servicecenter.
Kontakt aldrig ikke-autoriserede teknikere.
Oplys om følgende:
• Type af fejl.
• opvaskemaskinens modeltype (Mod.),
• serienummeret (S/N).
Disse oplysninger findes på typeskiltet på apparatet.
(se Beskrivelse af opvaskemaskinen).
NO
Service
Før du kontakter Teknisk assistanse:
• Sjekk om du kan løse feilen selv
(se Feil og feilretting)
.
• Start programmet på nytt for å se om problemet er blitt
løst.
• I motsatt fall, kontakt et autorisert Servicesenter.
Henvend deg aldri til uautoriserte teknikere.
Oppgi:
• type feil
• maskinmodell (Mod.)
• serienummer (S/N).
Disse opplysningene finner du på merkeskiltet som sitter
på apparatet
(se Beskrivelse av apparatet).
SE
Assistens
Innan du kontaktar serviceverkstaden:
• Kontrollera om du kan åtgärda felet på egen hand
(se
Fel och åtgärder)
.
• Starta programmet igen för att kontrollera om problemet
är löst.
• Om problemet kvarstår, kontakta auktoriserad teknisk
assistans.
Anlita aldrig obehöriga tekniker.
Uppge:
• typ av fel,
• maskinmodell (Mod.),
• serienummer (S/N).
Denna informationen anges på märkskylten som sitter på
maskinen
(se Beskrivning av maskinen).
FI
Huoltoapu
Ennen huoltoapuun soittamista:
• Tarkista, voidaanko häiriö poistaa omin voimin
(katso
Häiriöt ja korjaustoimet)
.
• Käynnistä ohjelma uudelleen tarkistaaksesi, onko
ongelma jo ratkennut.
• Mikäli häiriö ei ole korjaantunut, ota yhtyettä valtuutettuun
tekniseen huoltoliikkeeseen.
Älä koskaan käytä valtuuttamattomia teknikoita.
Ilmoita:
• häiriön tyyppi;
• koneen malli (Mod.);
• sarjanumero (S/N).
Nämä tiedot löytyvät laitteessa olevasta arvokilvestä
(katso Laitteen kuvaus).
EN
Assistance
Before contacting Assistance:
• Check whether the problem can be resolved using the
Troubleshooting guide
(see Troubleshooting).
• Restart the programme to check whether the problem has
ceased to exist.
• If the problem persists, contact the Authorised Technical
Assistance Service.
Never use the services of unauthorised technicians.
Please have the following information to hand:
• The type of malfunction.
• The appliance model (Mod.).
• The serial number (S/N).
This information can be found on the appliance data plate
(see Description of the appliance)
.

11
EN
If the appliance must be moved at any time, keep it in an
upright position; if absolutely necessary, it may be tilted onto
its back.
Connecting the water supply
Adaptation of the water supply for installation should only
be performed by a qualified technician.
The water inlet and outlet hoses may be positioned towards
the right or the left in order to achieve the best possible
installation.
Make sure the dishwasher does not bend or squash the
hoses.
Connecting the water inlet hose
• To a 3/4” gas cold or hot water connection point (max.
60°C).
• Run the water until it is perfectly clear.
• Screw the inlet hose tightly into position and turn off the
tap.
If the inlet hose is not long enough, contact a specialist
store or an authorised technician
(see Assistance)
.
The water pressure must be within the values indicated
in the Technical Data table - otherwise the dishwasher may
be function properly.
Make sure the hose is not bent or compressed.
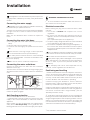
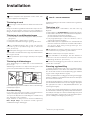
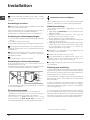
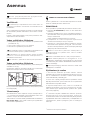
Connecting the water outlet hose
Connect the outlet hose to a drain duct with a minimum
diameter of 2 cm. (A)
The outlet hose connection must be at a height ranging from
40 to 80 cm from the floor or surface where the dishwasher
rests.
Before connecting the water outlet hose to the sink drain,
remove the plastic plug (B).
Anti-flooding protection
To ensure floods do not occur, the dishwasher:
- is provided with a special system which blocks the water
supply in the event of anomalies or leaks from inside the
appliance.
Some models are also equipped with the supplementary
safety device New Acqua Stop*, which guarantees anti-
flooding protection even in the event of a supply hose rupture.
WARNING: HAZARDOUS VOLTAGE!
Under no circumstances should the water inlet hose be cut
as it contains live electrical parts.
Electrical connection
Before inserting the plug into the electrical socket, make
sure that:
• The socket is earthed and complies with current
regulations;
• the socket can withstand the maximum load of the
appliance as shown on the data plate located on the inside
of the door
(see chapter Description of the appliance);
• The power supply voltage falls within the values indicated
on the data plate on the inside of the door.
• The socket is compatible with the plug of the appliance. If
this is not the case, ask an authorised technician to replace
the plug (
see Assistance
). Do not use extension cables or
multiple sockets.
Once the appliance has been installed, the power supply
cable and the electrical socket should be easily accessible.
The cable should not be bent or compressed.
If the power supply cable is damaged, have it replaced
by the manufacturer or its authorised Technical Assistance
Service in order to prevent all potential hazards.
(See
Assistance)
The Company shall not be held responsible for any
incidents, if these regulations are not observed.
Positioning and levelling
1. Position the dishwasher on a level sturdy floor. If the floor is
uneven, the front feet of the appliance may be adjusted until
it reaches a horizontal position. If the appliance is levelled
correctly, it will be more stable and much less likely to move
or cause vibrations and noise while it is operating.
2. Before recessing the dishwasher, stick the adhesive
transparent strip* under the wooden shelf in order to protect
it from any condensation which may form.
3. Place the dishwasher so that its sides or back panel are in
contact with the adjacent cabinets or the wall. This appliance
can also be recessed under a single worktop*
(see the
Assembly instruction sheet)
.
4*. To adjust the height of the rear foot, turn the red hexagonal
bushing on the lower central part at the front of the dishwasher
using a hexagonal spanner with an opening of 8 mm. Turn the
spanner in a clockwise direction to increase the height and
in an anticlockwise direction to decrease it.
(see Building-in
instruction sheet attached to the documentation)
Installation
MIN 40 cm
MAX 80 cm
* Only available in selected models.

12
EN
Advice regarding the first wash cycle
After the installation, remove the stoppers from the racks and
the retaining elastic elements from the upper rack
(if any).
Water softener settings
Before starting the first wash cycle, set the hardness lev-
el of the water from the mains supply.
(see chapter Rinse
aid and refined salt).
First load the softener tank with water, then introduce about
1 kg of salt. It is perfectly normal for water to flow out.
As soon as this procedure is complete, run a wash cycle.
Only use salt that has been specifically designed for dish-
washers.
After the salt has been poured into the machine, the LOW
SALT indicator light* switches off.
If the salt container is not filled, the water softener and
the heating element may be damaged as a result.
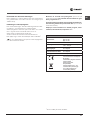
Technical data
Dimensions
width 60 cm
height 85 cm
depth 60 cm
Capacity 14 standard place-settings
Water supply pressure
0,05 ÷ 1MPa (0.5 ÷ 10 bar)
7,25 psi – 145 psi
Power supply voltage See appliance data plate
Total absorbed power See appliance data plate
Fuse See appliance data plate
This dishwasher conforms to the
following European Community
Directives:
-2006/95/EC (Low Voltage)
-2004/108/EC (Electromagnetic
Compatibility)
-2009/125/EC (Comm. Reg.
1016/2010) (Ecodesign)
-97/17/EC (Labelling)
-2012/19/ CE Waste Electrical
and Electronic Equipment (WEEE)
* Only available in selected models.
The machine has a buzzer/set of tones
(depending on the
dishwasher model
) to inform the user that a command has
been implemented: power on, cycle end etc.
The symbols/indicator lights/LEDs on the control panel/
display may vary in colour and may have a flashing or fixed
light
(depending on the dishwasher model)
.
The display* provides useful information concerning the
type of wash cycle, drying/wash-cycle phase, remaining
time, temperature etc.

13
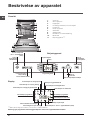
EN
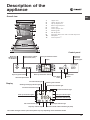
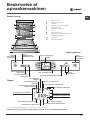
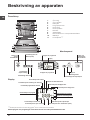
Description of the
appliance
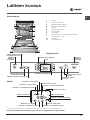
The number and type of wash cycles and options may vary depending on the dishwasher model.
Overall view
Control panel
1. Upper rack
2. Upper sprayer arm
3. Tip-up dispensers
4. Rack height adjuster
5. Lower rack
6. Lower sprayer arm
7. Washing filter
8. Salt dispenser
9. Detergent dispenser and rinse-aid dispenser
10. Data plate
11. Control panel***
Wash-cycle indicator lights
Wash-cycle indicator lights
Half Load indicator lights
Low Rinse-Aid indicator light
Low Salt indicator light
Blocked Filter indicator light
Super Dry indicator light
Multi-Functional Tablets indicator light (Tabs)
Washing and Drying indicator lights
Tap Shut-Off indicator light
Delayed Start indicator light
Super Rapid indicator light
Remaining Time indicator
Display
Super Rapid
button
Start/Pause
button and
indicator lights
Button and
indicator light
On-Off/Reset
Super Dry option button
Half Load option button
Delayed Start
buttons
Multi-functional Tablets
option button (Tabs)
Display
Wash-Cycle Selection buttons
Wash-Cycle Selection buttons

14
EN
Refined Salt and Rinse Aid
* Only available in selected models.
Only use products which have been specifically designed
for dishwashers. Do not use table salt or industrial salt.
Follow the instructions given on the packaging.
If you are using a multi-function product, we recommend
that you add salt in any case, especially if the water is hard
or very hard.
(Follow the instructions given on the packaging.)
If you do not add salt or rinse aid, the LOW SALT* and
LOW RINSE AID* indicator lights will remain lit.
Measuring out the refined salt
The use of salt prevents the formation of LIMESCALE on the
dishes and on the machine's functional components.
• It is important that the salt dispenser be never empty.
• It is important to set the water hardness.
The salt dispenser is located in the lower part of the dishwasher
(see Description)
and should be filled:
• When the LOW RINSE AID indicator light in the control panel
is lit *;
• When the green float* on the cap of the salt dispenser is no
longer visible.
• See autonomy in the water hardness table.
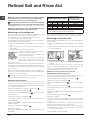
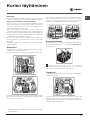
1. Remove the lower rack and unscrew the
container cap (anticlockwise).
2. Only the first time you do this: fill the water
dispenser up to the edge.
3. Position the funnel
(see figure)
and
fill the salt container right up to its edge
(approximately 1 kg); it is not unusual for a
little water to leak out.
4. Remove the funnel and wipe any salt residue away from the
opening; rinse the cap under running water and then screw it on.
It is advisable to perform this procedure every time you add salt
to the container.
Make sure the cap is screwed on tightly, so that no detergent can
get into the container during the wash cycle (this could damage
the water softener beyond repair).
Whenever you need to add salt, we recommend carrying out
the procedure before the washing cycle is started.
Setting the water hardness
For perfect water softener operation, it is essential that the
adjustment be based on the water hardness in your house. Ask
your local water supplier for this information. The factory setting
is for medium water hardness.
• Switch the dishwasher on using the On/Off button.
• Switch it off using the On/Off button
• Hold down the START/PAUSE button
for 5 seconds until
you hear a beep.
• Switch it on using the On/Off button
• The display shows the current selection level number and the
salt indicator light.
• Press button ECO to select the desired hardness level
(see
Hardness Table).
• Switch it off using the On/Off button
• Setting is complete!
Even if using multi-functional tablets, the salt dispenser should
still be filled.
(°dH = hardness measured in German degrees - °f = hardness
measured in French degrees – mmol/l = millimoles per litre)
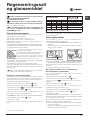
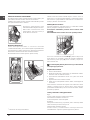
Measuring out the rinse aid
Rinse aid makes dish DRYING easier. The rinse aid dispenser
should be filled:
• When the LOW RINSE AID indicator light on the panel/display
is lit *;
• When the dark optical indicator* on the dispenser door “D”
becomes transparent.
1. Open the dispenser “D” by pressing and pulling up the tab
on the lid;
2. Carefully introduce the rinse aid as far as the maximum
reference notch in the filling space - avoid spilling it. If this
happens, clean the spill immediately with a dry cloth.
3. Press the lid down until you hear a click to close it.
NEVER pour the rinse aid directly into the tub.
Adjusting the amount of rinse aid
If you are not completely satisfied with the drying results, you
may want to adjust the quantity of rinse aid used.
• Switch the dishwasher on using the On/Off button.
• Switch it off using the On/Off button
• Press the START/PAUSE button
3 times - a beep will be
heard.
• Switch it on using the On/Off button
• The display shows the current selection level and the rinse aid
indicator light.
• Press button ECO to select the level of rinse aid quantity to be
supplied.
• Switch it off using the On/Off button
• Setting is complete!
If the rinse aid level is set to ZERO, the rinse aid will not be
supplied and the low rinse aid indicator light will not be lit if you
run out of it.
A maximum of 4 levels can be set according to the dishwasher
model. The factory setting is for a medium level.
• If you see bluish streaks on the dishes, set a low number (1-2).
• If there are drops of water or limescale marks on the dishes,
set a high number (3-4).
Water Hardness Table
Average autonomy
salt dispenser with 1
wash cycle per day
level °dH °fH mmol/l months
1 0 - 6 0 - 10 0 - 1 7 months
2 6 - 11 11 - 20 1.1 - 2 5 months
3 12 - 17 21 - 30 2.1 - 3 3 months
4 17 - 34 31 - 60 3.1 - 6 2 months
5*
34 - 50 61 - 90 6.1 - 9 2/3 weeks
For values between 0°f and 10°f, we do not recommend the use
of salt. A setting of 5 may increase cycle duration.
M
A
X

15
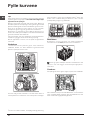
EN
Loading the racks
Tips
Before loading the racks, remove all food residues from the
crockery and empty liquids from glasses and containers. No
preventive rinsing is needed under running water.
Arrange the crockery so that it is held in place firmly and does
not tip over; and arrange the containers with the openings facing
downwards and the concave/convex parts placed obliquely,
thus allowing the water to reach every surface and flow freely.
Make sure that the lids, handles, trays and frying pans do not
prevent the sprayer arms from rotating. Place any small items
in the cutlery basket.
Since plastic dishes and non-stick frying pans usually retain more
water drops, their drying will be not so good as that of ceramic
or stainless-steel dishes.
Lightweight items such as plastic containers should be placed
in the upper rack and arranged so that they cannot move.
After loading the appliance, make sure that the sprayer arms
can rotate freely.
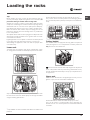
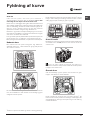
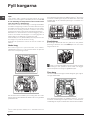
Lower rack
The lower rack can hold pans, lids, dishes, salad bowls, cutlery
etc. Large plates and lids should ideally be placed at the sides.
Very soiled dishes and pans should be placed in the lower rack
because in this sector the water sprays are stronger and allow
a higher washing performance.
Several dishwasher models are fitted with tip-up sectors*.
They can be used in a vertical position when arranging dishes
or in a horizontal position (lower) to load pans and salad bowls
easily.
Cutlery basket
The modular basket is equipped with top grilles for improved
cutlery arrangement. The cutlery basket should be positioned
only at the front of the lower rack
Knives and other utensils with sharp edges must be placed
in the cutlery basket with the points facing downwards or they
must be positioned horizontally in the tip-up compartments on
the upper rack
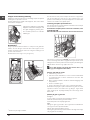
Upper rack
Load this rack with delicate and lightweight crockery such as
glasses, cups, saucers and shallow salad bowls.
Several dishwasher models are fitted with tip-up sectors*.
They can be used in a vertical position when arranging tea/
dessert saucers or in a lower position to load bowls and food
containers.
*Only available in selected models with different numbers and
positions.

16
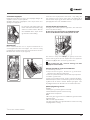
EN
* Only available in selected models.
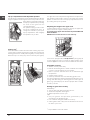
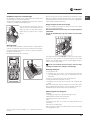
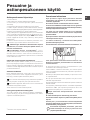
Adjusting the height of the upper rack
In order to make it easier to arrange the crockery, the upper rack
may be moved to a higher or lower position.
The height of the upper rack should be adjusted WHEN THE
RACK IS EMPTY.
NEVER raise or lower the rack on one side only.
If the rack is equipped with a Lift-Up device*
(see figure)
, lift
it up by holding its sides. To restore the lower position, press
the levers (A) at the sides of the rack and follow the rack down.
Unsuitable crockery
• Wooden crockery and cutlery.
• Delicate decorated glasses, artistic handicraft and antique
crockery. Their decorations are not resistant.
• Parts in synthetic material which do not withstand high
temperatures.
• Copper and tin crockery.
• Crockery soiled with ash, wax, lubricating grease or ink.
The colours of glass decorations and aluminium/silver pieces can
change and fade during the washing process. Some types of
glass (e.g. crystal objects) can become opaque after a number
of wash cycles too.
Damage to glass and crockery
Caused by:
• Type of glass and glass production process.
• Chemical composition of detergent.
• Water temperature of rinse cycle.
Tips:
• Only use glasses and porcelain guaranteed by the
manufacturer as dishwasher safe.
• Use a delicate detergent suitable for crockery.
• Collect glasses and cutlery from the dishwasher as soon as
the wash cycle is over.
The upper rack can be adjusted for height based on requirements:
high position to place bulky crockery in the lower rack and low
position to make the most of the tip-up compartments/sectors
by creating more space upwards.
Tip-up compartments with adjustable position
The side tip-up compartments can be positioned at three different
heights to optimize the arrangement of crockery inside the rack.
Wine glasses can be placed safely in
the tip-up compartments by inserting
the stem of each glass into the
corresponding slots.
For optimum drying results incline
the tip-up compartments more. To
change the inclination, pull up the
tip-up compartment, slide it slightly
and position it as you wish.
Cutlery tray*
Some dishwasher models are fitted with a sliding tray which
can be used to hold serving utensils or small cups. For optimum
washing performance avoid positioning bulky crockery directly
below the tray. The cutlery tray can be removed
(see Figure).

17
EN
Detergent and
dishwasher use
* Only available in selected models.
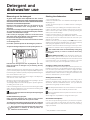
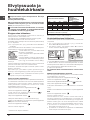
Measuring out the detergent
A good wash result also depends on the correct
amount of detergent being used. Exceeding the stated
amount does not result in a more effective wash and
increases environmental pollution.
Based on how soiled the items are, the amount can be
adjusted to individual cases using powder or liquid
detergent.
In the case of normally soiled items, use approximately either
35 gr (powder detergent) or 35 ml (liquid detergent). If tablets
are used, one tablet will be enough.
If the crockery is only lightly soiled or if it has been rinsed
with water before being placed in the dishwasher, reduce
the amount of detergent used accordingly.
For good washing results also follow the instructions shown
on the detergent box.
For further questions please ask the detergent producers.
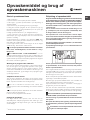
To open the detergent dispenser use the opening device “A”.
Introduce the detergent into the dry dispenser “B” only.
Place the amount of detergent for pre-washing directly
inside the tub.
1. When measuring out the detergent refer to the Table of wash
cycles to add the proper quantity. Compartment B comprises a
level showing the maximum quantity of liquid or powder detergent
that can be added to each cycle.
2. Remove detergent residues from the edges of the dispenser
and close the cover until it clicks.
3. Close the lid of the detergent dispenser by pulling it up until
the closing device is secured in place.
The detergent dispenser automatically opens up at the right time
according to the wash cycle.
If all-in-one detergents are used, we recommend using the TABS
option, because it adjusts the cycle so that the best washing and
drying results are always achieved.
Only use detergent which has been specifically designed
for dishwashers.
DO NOT USE washing up liquid.
Using excessive detergent may result in foam residues
remaining in the machine after the cycle has ended.
To achieve the best washing and drying results, the combined
use of detergent, rinse aid liquid and refined salt is required.
We recommend using detergents that do not contain
phosphates or chlorine, as these products are
harmful to the environment.
Starting the dishwasher
1. Turn the water tap on.
2. Press the ON/OFF button: The ON/OFF indicator light and the
display light up.
3. Open the door and pour in a suitable amount of detergent
(see below).
4. Load the racks
(see Loading the racks)
and shut the door.
5. Select the wash cycle in accordance with the type of crockery
and its soil level
(see Table of wash cycles)
by pressing the
wash-cycle selection buttons.
6. Select the wash options*
(see adjacent information).
7. Start the cycle by pressing the Start/Pause button: The wash
indicator light comes on and the time left to the end of the cycle
appears on the display.
8. At the end of the cycle, the display shows END. Switch off the
appliance by pressing the ON/OFF button, shut off the water tap
and unplug the appliance from the electricity socket.
9. Wait for a few minutes before removing the crockery in order
to avoid burns. Unload the racks, beginning with the lower level.
- The machine will switch off automatically during long
periods of inactivity in order to minimise electricity
consumption.
AUTO WASH CYCLES*:some dishwasher models are
equipped with a special sensor which can be used to assess
the level of soiling and automatically select the most efficient and
economical wash cycle accordingly. The duration of the auto
wash cycles may vary due to the operation of the sensor.
Changing a wash cycle in progress
If a mistake was made in the wash cycle selection process, it is
possible to change the cycle provided that it has only just begun:
once the wash cycle has started, in order to change the wash
cycle switch off the machine by pressing and holding the ON/
OFF/Reset button. Switch it back on using the same button and
select the desired wash cycle and options.
Adding extra crockery
Press the Start/Pause button and open the door, taking care to
avoid the escaping steam, and place the crockery inside the
dishwasher. Press the Start/Pause button: The cycle will start
again after a long beep has been emitted.
If the delayed start has been set, at the end of the countdown
the wash cycle will not start. It will stay in Pause mode.
Press the Start/Pause button to pause the machine; the wash
cycle is stopped.
At this stage it is not possible to change the wash cycle.
Accidental interruptions
If the door is opened during the wash cycle or there is a power
cut, the cycle stops. It starts again from the point at which it
was interrupted once the door has been shut or the electricity
supply is restored.

18
EN
Wash-cycle data is measured under laboratory conditions according to European Standard EN 50242.
Based on the different conditions of use, the wash-cycle duration and data can change.
The number and type of wash cycles and options may vary depending on the dishwasher model.
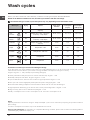
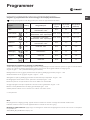
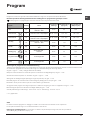
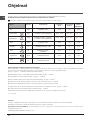
Wash cycles
Instructions on wash-cycle selection and detergent dosage
1. The ECO wash cycle is the standard cycle to which the energy label data refers. It can be used to wash crockery with a normal
soil level and is the most efficient cycle in terms of energy and water consumption for this type of crockery.
29 gr/ml + 6 gr/ml** – 1 Tab
(**Quantity of pre-washing detergent)
2. Heavily soiled dishes and pans (not to be used for delicate items). 35 gr/ml – 1 Tab
3. Normally soiled pans and dishes. 29 gr/ml + 6 gr/ml** – 1 Tab
4. Cycle for delicate items, which are more sensitive to high temperatures 35 gr/ml – 1 Tab
5. Fast cycle to be used for slightly dirty dishes (ideal for 2 place settings) 25 gr/ml – 1 Tab
6. Pre-wash while awaiting completion of the load with the dishes from the next meal. No detergent.
7. High-temperature disinfecting cycle. Ideal to clean crockery and feeding bottles. 30 gr/ml – 1 Tab
8. Large crockery.
(Do not use on delicate items)
35 gr/ml – 1 Tab
Standby consumption: Left-on mode consumption: 5,0 W - Off mode consumption: 0.5 W
Wash Cycle Drying Options
Wash Cycle
Duration
Water
Consumption
(l/cycle)
Energy
Consumption
(kWh/cycle)
1. Eco Yes
Delayed start – Tabs – Half Load –
Super Dry
03:10’ 9,0 0,93
2. Auto
Intensive
Yes
Delayed start – Tabs – Half Load –
Super Dry – Super Rapid
02:00’ - 03:10’ 14,0 - 15,5 1,50 - 1,80
3. Auto
Normal
Yes
Delayed start – Tabs – Half Load –
Super Dry – Super Rapid
01:30’ - 02:30’ 14,5 - 16,0 1,20 - 1,35
4. Delicates Yes
Delayed start – Tabs – Half Load –
Super Dry
01:40’ 11,0 1,10
5. Rapid No Delayed start – Tabs
00:30’ 9,0 0,50
6. Prewash No Delayed start – Half Load 00:12’ 4,5 0,01
7. Hygiene Yes Delayed start 01:20’ 10,0 1,25
8. Extra No Delayed start
01:00’ 11,0 n.a.
Notes:
Optimum performance levels when using the “Daily and "Rapid” cycles can be achieved by respecting the specified number of
place settings.
To reduce consumption even further, only run the dishwasher when it is full.
Note for Test Laboratories: for information on comparative EN testing conditions, please send an email to the following address:

19
EN
Special wash cycles
and Options
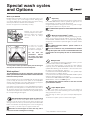
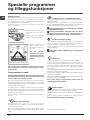
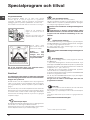
Wash cycle EXTRA
EXTRA makes it possible to carry out a heavy-duty wash cycle
of large crockery up to a max height of 53cm: baking pans,
oven grids, dripping pans, hob grids, large saucepans, serving
dishes, pizza dishes, stainless-steel hood filters.
Remove the upper rack to load bulky crockery.
Release the two locks (right
and left) and pull out the rack.
When the upper rack is fitted,
the locks must be always
closed.
In order for the water
to reach the crockery
everywhere, arrange it
as shown in the Figure.
Do not start the
dishwasher without
the upper rack using
wash cycles other than
EXTRA.
To carry out the wash cycle Extra option pour the detergent
directly into the tub and not into the dispenser.
* Only available in selected models.
Super Dry
To improve the dryness level of the crockery, press
the SUPER DRY button and the symbol will light up. If it is
pressed again, the option will be deselected.
A higher temperature during the final rinsing and a longer
drying phase improve the dryness level.
The SUPER DRY option increases the duration of the
wash cycle.
Delayed start
It is possible to delay the start time of the cycle for
a period of time between 1 and 24 hours:
1. Select the desired wash cycle and any other options
required, press the DELAYED START button. The relevant
symbol starts flashing. Use the buttons + and - to select when
the wash cycle will start (h01, h02 etc.)
2. Confirm with the START/PAUSE button. The symbol stops
flashing and the countdown begins.
3. Once this time has elapsed, the DELAYED START symbol
switches off and the wash cycle begins.
To deselect the DELAYED START option, press the DELAYED
START button until the text OFF appears.
The Delayed Start function cannot be set once a wash
cycle has been started.
Wash options*
The OPTIONS may only be set, changed or reset after the
wash cycle has been selected and before the Start/Pause
button has been pressed.
Only the options which are compatible with the type of wash
cycle set may be selected. If an option is not compatible
with the selected wash cycle
(see Table of wash cycles)
, the
corresponding symbol flashes rapidly 3 times.
If an option is selected which is not compatible with another
(previously selected) option, it will flash 3 times and switch
off, while the most recently selected option will remain active.
To deselect an option which has been set by mistake, press
the corresponding button again.
Multi-functional tablets* (Tabs)
This option optimises washing and drying results.
When using multi-functional tablets, press the MULTI-
FUNCTIONAL TABLETS button; the corresponding symbol
will light up. If the button is pressed again, the option will be
deselected.
The “Multi-functional tablets” option results in a
longer wash cycle.
The use of tablets is only recommended for models
having this option and it is not recommended with wash
cycles which do not specify the use of multi-functional
tablets.
Super Rapid option
This option can be used to reduce the duration of
the main wash cycles while maintaining the same washing and
drying performance levels.
After selecting the wash cycle, press the Super Rapid option
button;
To deselect the option, press the same button again.
Half load Option using the upper or lower rack
If there are not many dishes to be washed, a half
load cycle may be used in order to save water, electricity and
detergent. Select the wash cycle and then press the HALF LOAD
button: the indicator corresponding to the chosen rack lights up
and the wash cycle starts only in the upper or lower rack.
Remember to load the upper or lower rack only, and to
reduce the amount of detergent accordingly.

20
EN
Care and maintenance
Shutting off the water and electricity
supplies
• Turn off the water tap after every wash cycle to avoid leaks.
• Always unplug the appliance when cleaning it and when
performing maintenance work.
Cleaning the dishwasher
• The external surfaces of the machine and the control panel
can be cleaned using a non-abrasive cloth which has been
dampened with water. Do not use solvents or abrasive
products.
• Any marks on the inside of the appliance may be removed
using a cloth dampened with water and a little vinegar.
Preventing unpleasant odours
• Always keep the door of the appliance ajar in order to avoid
moisture from forming and being trapped inside the machine.
• Clean the seals around the door and detergent dispensers
regularly using a damp sponge. This will avoid food becoming
trapped in the seals, which is the main cause behind the
formation of unpleasant odours.
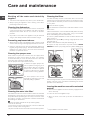
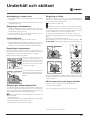
Cleaning the sprayer arms
Food residue may become encrusted onto the sprayer arms
and block the holes used to spray the water. It is therefore
recommended that you check the arms from time to time and
clean them with a small non-metallic brush.
The two sprayer arms may both be removed.
To remove the upper sprayer arm,
turn the plastic locking ring in an
anti-clockwise direction. The upper
sprayer arm should be replaced
so that the side with the greater
number of holes is facing upwards.
The lower sprayer arm can be
removed by pressing on the side
tabs and pulling it upwards.
Cleaning the water inlet filter*
If the water hoses are new or have not been used for an extended
period of time, let the water run to make sure it is clear and free
of impurities before performing the necessary connections. If this
precaution is not taken, the water inlet could become blocked
and damage the dishwasher.
Clean the water inlet filter at the tap outlet regularly.
- Turn off the water tap.
- Unscrew the end of the water inlet hose, remove the filter and
clean it carefully under running water.
- Re-place the filter and screw the water hose back into position.
Cleaning the filters
The filter assembly consists of three filters which remove food
residues from the washing water and then recirculate the water.
They should be cleaned if you wish to achieve the best results
in every wash.
Clean the filters regularly.
The dishwasher should not be used without filters or if the
filter is loose.
• After several washes, check the filter assembly and if necessary
clean it thoroughly under running water, using a non-metallic
brush and following the instructions below:
1. Turn the cylindrical filter C in an anti-clockwise direction and
pull it out
(fig. 1).
2. Remove the cup filter B by exerting a slight pressure on the
side flaps
(fig. 2);
3. Slide out the stainless-steel plate filter A.
(fig. 3).
4. Inspect the trap and remove any food residues. NEVER
REMOVE the wash-cycle pump protection
(black detail) (fig.4).
After cleaning the filters, re-place the filter assembly and fix it in
position correctly; this is essential for maintaining the efficient
operation of the dishwasher.
Leaving the machine unused for extended
periods
• Disconnect the appliance from the electricity supply and shut
off the water tap.
• Leave the door of the appliance ajar.
• When you return, run a wash cycle when the dishwasher is
empty.
* Only available in selected models.
Sidan laddas ...
Sidan laddas ...
Sidan laddas ...
Sidan laddas ...
Sidan laddas ...
Sidan laddas ...
Sidan laddas ...
Sidan laddas ...
Sidan laddas ...
Sidan laddas ...
Sidan laddas ...
Sidan laddas ...
Sidan laddas ...
Sidan laddas ...
Sidan laddas ...
Sidan laddas ...
Sidan laddas ...
Sidan laddas ...
Sidan laddas ...
Sidan laddas ...
Sidan laddas ...
Sidan laddas ...
Sidan laddas ...
Sidan laddas ...
Sidan laddas ...
Sidan laddas ...
Sidan laddas ...
Sidan laddas ...
Sidan laddas ...
Sidan laddas ...
Sidan laddas ...
Sidan laddas ...
Sidan laddas ...
Sidan laddas ...
Sidan laddas ...
Sidan laddas ...
Sidan laddas ...
Sidan laddas ...
Sidan laddas ...
Sidan laddas ...
Sidan laddas ...
Sidan laddas ...
Sidan laddas ...
Sidan laddas ...
Sidan laddas ...
Sidan laddas ...
Sidan laddas ...
Sidan laddas ...
-
 1
1
-
 2
2
-
 3
3
-
 4
4
-
 5
5
-
 6
6
-
 7
7
-
 8
8
-
 9
9
-
 10
10
-
 11
11
-
 12
12
-
 13
13
-
 14
14
-
 15
15
-
 16
16
-
 17
17
-
 18
18
-
 19
19
-
 20
20
-
 21
21
-
 22
22
-
 23
23
-
 24
24
-
 25
25
-
 26
26
-
 27
27
-
 28
28
-
 29
29
-
 30
30
-
 31
31
-
 32
32
-
 33
33
-
 34
34
-
 35
35
-
 36
36
-
 37
37
-
 38
38
-
 39
39
-
 40
40
-
 41
41
-
 42
42
-
 43
43
-
 44
44
-
 45
45
-
 46
46
-
 47
47
-
 48
48
-
 49
49
-
 50
50
-
 51
51
-
 52
52
-
 53
53
-
 54
54
-
 55
55
-
 56
56
-
 57
57
-
 58
58
-
 59
59
-
 60
60
-
 61
61
-
 62
62
-
 63
63
-
 64
64
-
 65
65
-
 66
66
-
 67
67
-
 68
68


Indesit DFP 58T93 A NX SK Användarguide
- Kategori
- Diskmaskiner
- Typ
- Användarguide
- Denna manual är också lämplig för
på andra språk
Relaterade papper
Andra dokument
-
Whirlpool DFG 253 SK Användarguide
-
-
-
-
-
-
-
-
-
KitchenAid KICO 3T133 PFES Användarguide