
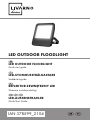
LED OUTDOOR FLOODLIGHT
Quick start guide
LED-UTOMHUSSTRÅLKASTARE
Snabbstartsguide
REFLEKTOR ZEWNĘTRZNY LED
Skrócona instrukcja obsługi
LED-AUSSENSTRAHLER
Quick-Start-Guide
LED OUTDOOR FLOODLIGHT
IAN 378599_2104

GB Quick start guide Page 5
SE Snabbstartsguide Sidan 22
PL Skrócona instrukcja obsługi Strona 39
DE/AT/CH
Quick-Start-Guide Seite 56

This quick start guide is a fixed part of the operating instructions,
which enables you to start up your product immediately. Read the
operating instructions before use, and pay particular attention to the
safety instructions.
In order to fully understand all functions of the product, please
select the User Manual link in the app’s Me tab. You may
also download the full operating instructions from this website:
http://www.lidl-service.com
Keep this quick start guide in a safe place. When passing this product
on to third parties, be sure to include all documentation.
Denna snabbguide är en integrerad del av bruksanvisningen.
Den gör det möjligt för dig att genast börja använda produkten.
Läs bruksanvisningen noga före användning och beakta särskilt
säkerhetsanvisningarna.
För att fullständigt kunna kontrollera alla funktioner i produkten,
välj länken Bruksanvisning i appens meny Jag. Du kan
också ladda ner hela bruksanvisningen från denna webbsida:
http://www.lidl-service.com
Förvara denna snabbguide på en säker plats. När du överlämnar
produkten till tredje man, se då till att samtidigt lämna över alla
handlingar.

Niniejsza skrócona instrukcja obsługi jest integralną częścią
instrukcji obsługi. Umożliwia natychmiastowe uruchomienie produktu.
Przed użyciem należy przeczytać instrukcję obsługi i zwrócić
szczególną uwagę na zawarte w niej instrukcje bezpieczeństwa.
Aby móc w pełni korzystać ze wszystkich funkcji produktu, wybierz
łącze Instrukcja obsługi w menu Ja aplikacji. Pełną instrukcję
obsługi można też pobrać z tej strony: http://www.lidl-service.com
Tę skróconą instrukcję obsługi należy przechowywać w bezpiecznym
miejscu. Przekazując produkt osobom trzecim należy przekazać
wszystkie dokumenty.
Diese Kurzanleitung ist fester Bestandteil der
Bedienungsanleitung. Sie dient dazu, dieses Produkt sofort
in Betrieb nehmen zu können. Lesen Sie vor der Verwendung
die Bedienungsanleitung und beachten Sie insbesondere die
Sicherheitshinweise.
Um alle Funktionen des Produkts vollständig nachlesen zu können,
wählen Sie bitte den Link Bedienungsanleitung im App-Menü
Ich aus. Sie können die vollständige Bedienungsanleitung auch von
der folgenden Website herunterladen: http://www.lidl-service.com
Bewahren Sie diese Kurzanleitung an einem sicheren Ort auf.
Händigen Sie bei Weitergabe des Produkts an Dritte alle Unterlagen
mit aus.

5GB
LED OUTDOOR FLOODLIGHT
Intended use .............................. Page 6
Scope of delivery ......................... Page 6
You will need.............................. Page 7
Description of parts....................... Page 8
Technical data............................. Page 9
Before installation........................ Page 11
Installation ................................ Page 12
Pairing product and mobile device..... Page 16
Unpairing product from
mobile device ............................. Page 18
Resetting product manually............. Page 19
Disposal.................................... Page 20
Simplified EU declaration
of conformity.............................. Page 21

6 GB
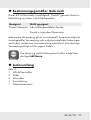
Intended use
This LED outdoor floodlight (hereinafter called “product”) is used for
lighting for indoors or outdoors.
Suitable Not suitable
Private use Industrial/commercial purposes
Use in tropical climates
Any other use is considered improper. Any claims resulting from
improper use or due to unauthorised modification of the product will
be considered unwarranted. Any such use is at your own risk.
The Lidl Home app is required to control and set up the
product.
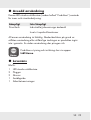
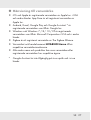
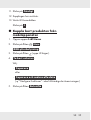
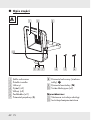
Scope of delivery
Fig. A:
1 LED outdoor floodlight
2 Dowels
2 Screws
1 Quick start guide
1 Safety instructions

7GB
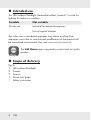
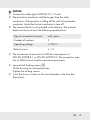
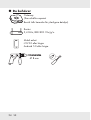
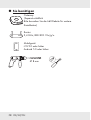
You will need
Gateway
(Sold separately
Please visit Lidl website for further details)
Router:
2.4 GHz, IEEE 802.11b/g/n
Mobile device:
iOS 9.0 or higher
Android 5.0 or higher
Ø 8 mm

8 GB
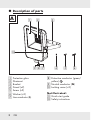
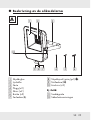
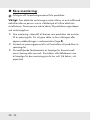
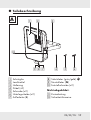
Description of parts
A
[1]
[8]
[9]
[7]
[]
[2]
[3]
[4][5][6]
[1] Protection glass
[2] Illuminant
[3] Bracket
[4] Dowel (x2)
[5] Screw (x2)
[6] Washer (x2)
[7] Line conductor (L)
[8] Protective conductor (green/
yellow)
[9] Neutral conductor (N)
[] Locking screw (x2)
Not illustrated:
[] Quick start guide
[] Safety instructions

9GB
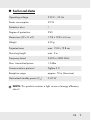
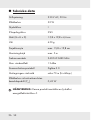
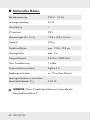
Technical data
Operating voltage 230 V∼, 50 Hz
Power consumption 30 W
Protection class I
Degree of protection IP65
Dimensions (W x H x D) 15.8 x 19.8 x 4.6 cm
Weight 650 g
Projected area max. 15.8 x 19.8 cm
Mounting height max. 5m
Frequency band 2405 to 2480 MHz
Max. transmitted power 13 dBm
Communication protocol ZigBee 3.0
Reception range approx. 70 m (free area)
Networked standby power (Pnet) 0.43 W
NOTE: This product contains a light source of energy efficiency
class F.

10 GB
Trademark notices
iOS and Apple are registered trademarks of Apple Inc. in the
USA and other countries. App Store is a registered trademark of
Apple Inc.
Android, Gmail, Google Play and Google Assistant* are
registered trademarks of Google Inc.
Windows and Windows 7 / 8 / 10 / XP are registered
trademarks of Microsoft Corporation in the USA and other
countries.
Zigbee is a registered trademark of The Zigbee Alliance.
The LIVARNO Home trademark and trade name is the property
of their respective owners.
Any other names and products may be trademarks or registered
trademarks of their respective owners.
* Google Assistant is not available in certain languages and
countries.

11GB
Before installation
Remove all packaging materials from the product.
Important: The electrical connection must be established by
a qualified electrician or a person trained to perform electrical
installations. This person must be familiar with the properties of the
product and the connection regulations.
Before installation, ensure that the circuit, to which the product
will be connected, is not energised. To do so, remove the fuse or
switch off the circuit breaker in the fuse box (0 position).
Use a voltage tester to verify the de-energised status.
The included mounting material is suitable for ordinary solid
concrete or masonry construction. Check which mounting material
is suitable for your chosen mounting surface. If necessary, seek
expert advice.

12 GB
Installation
Check the location of the hole before drilling into the wall. Avoid
any electrical, gas or water lines.
Use a power drill to drill the holes into the brick wall. Always
observe all safety instructions for the power drill in the power
drill’s manual. Misuse may result in death or injury due to electric
shock.
When selecting the mounting location, pay attention to the
following:
The placement of the product should illuminate the desired area.

13GB
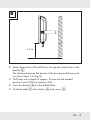
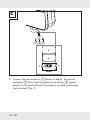
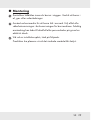
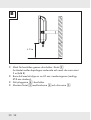
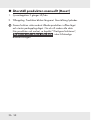
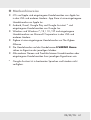
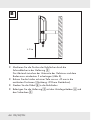
B
≥ 3 m
Mark the position of the drill holes through the screw holes in the
bracket [3].
The distance between the bottom of the housing and the ground
must be at least 3 m (Fig. B).
Drill holes with a depth of approx. 45 mm into the marked
positions (tool: Ø 8 mm masonry drill).
Insert the dowels [4] into the drilled holes.
Fix the bracket [3] with washers [6] and screws [5].

14 GB
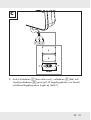
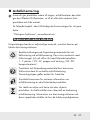
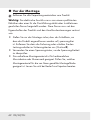
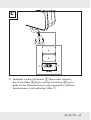
[7] [8][9]
C
IP65
Connect the line conductor [7] (brown or black), the neutral
conductor [9] (blue) and the protective conductor [8] (green/
yellow) to the terminal block of a properly installed junction box
(not included) (Fig. C).

15GB
NOTES:
Connection cable type: H05RN-F 3G 1.0 mm²
The protective conductor shall be longer than the other
conductors. If the product is falling off the wall, the protective
conductor should be the last conductor to tear off.
The terminal block is not included in the delivery. The terminal
block must have at least the following specifications:
Type of connection terminal: with screws
Number of contacts: 3
Operating voltage: ≥ 230 V∼
Rated current: ≥ 1 A
The connection terminal has to fulfil the requirements of
DIN EN 60998-2-1 or DIN EN 60995-2-2. The connection type
has to fulfil the local and the national requirements.
Loosen both locking screws [].
Tilt the housing into desired position.
Tighten the locking screws.
Insert the fuse or switch on the circuit breaker in the fuse box
(I position).

16 GB
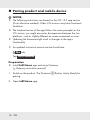
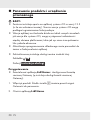
Pairing product and mobile device
NOTES:
The following instructions are based on the iOS 13.3 app version
(if not otherwise marked). Older iOS versions may have functional
limitations.
The Android version of the app follows the same principles as the
iOS version; you might encounter discrepancies between the two
platforms, such as slightly different on-screen commands or icons.
Updating the firmware might result in changes to the app’s
functionality.
An updated instruction manual can be found here:
{
Me
}
tab:
Tap
{
User Manual
}
.
Preparation
Install Lidl Home app and setup Gateway
( Gateway instruction manual).
1. Switch on the product. The illuminant [2] flashes slowly. Ready for
pairing.
2. Open Lidl Home app.

17GB
3.
{
Home
}
tab:
Tap (add further devices).
4. Select category:
{
Lighting
}
5. Select:
{
RGB outdoor Spot Light
}
NOTE: You may choose any of the displayed RGB outdoor lights.
6. Select Gateway.
Only necessary, if you have 2 or more Gateways.
7. Follow the app instructions.
8. Establishing connection.
9. Naming the product:
Tap and enter a name.
10. Tap one of the rooms to set location of product (selected room is
grayed out).
If more than one product is connected: You can rename the
product and define its location.

18 GB
11. Tap
{
Done
}
.
12. Pairing completed.
13. Return to home screen:
Tap
{
<
}
.
Unpairing product from mobile device
1. Open Lidl Home app.
2.
{
Home
}
tab:
Tap
{
RGB outdoor Spot Light
}
.
3. Tap (top right).
4. Tap
{
Remove Device
}
.
Select:
–
{
Disconnect
}
or
–
{
Disconnect and wipe data
}
( “Additional functions” in the full instruction manual).
5. Tap
{
Confirm
}
.

19GB
Resetting product manually
1. Light switch on/off 3 times.
2. Switch on. The product flashes slowly. Reset successful.
This function only resets the product and starts the pairing mode. If
you want to remove all data from the product and the cloud, refer
to the chapter “Additional functions”,
{
Disconnect and wipe
data
}
in the full instruction manual.

20 GB
Disposal
Before passing on, disposing of or returning the product to the
manufacturer, make sure that all data has been deleted from the
product and the cloud.
To do this, refer to the full instruction manual’s chapter:
“Additional functions”, menu point:
{
Disconnect and wipe data
}
The packaging is made entirely of recyclable materials, which you
may dispose of at local recycling facilities.
Observe the marking of the packaging materials for waste
separation, which are marked with abbreviations (a) and
numbers (b) with following meaning: 1–7: plastics / 20–22:
paper and fibreboard / 80–98: composite materials.
The product and packaging materials are recyclable,
dispose of it separately for better waste treatment.
The Triman logo is valid in France only.
Contact your local refuse disposal authority for more details
of how to dispose of your worn-out product.
To help protect the environment, please dispose of the
product properly when it has reached the end of its
useful life and not in the household waste. Information on
collection points and their opening hours can be obtained
from your local authority.
Sidan laddas...
Sidan laddas...
Sidan laddas...
Sidan laddas...
Sidan laddas...
Sidan laddas...
Sidan laddas...
Sidan laddas...
Sidan laddas...
Sidan laddas...
Sidan laddas...
Sidan laddas...
Sidan laddas...
Sidan laddas...
Sidan laddas...
Sidan laddas...
Sidan laddas...
Sidan laddas...
Sidan laddas...
Sidan laddas...
Sidan laddas...
Sidan laddas...
Sidan laddas...
Sidan laddas...
Sidan laddas...
Sidan laddas...
Sidan laddas...
Sidan laddas...
Sidan laddas...
Sidan laddas...
Sidan laddas...
Sidan laddas...
Sidan laddas...
Sidan laddas...
Sidan laddas...
Sidan laddas...
Sidan laddas...
Sidan laddas...
Sidan laddas...
Sidan laddas...
Sidan laddas...
Sidan laddas...
Sidan laddas...
Sidan laddas...
Sidan laddas...
Sidan laddas...
Sidan laddas...
Sidan laddas...
Sidan laddas...
Sidan laddas...
Sidan laddas...
Sidan laddas...
Sidan laddas...
-
 1
1
-
 2
2
-
 3
3
-
 4
4
-
 5
5
-
 6
6
-
 7
7
-
 8
8
-
 9
9
-
 10
10
-
 11
11
-
 12
12
-
 13
13
-
 14
14
-
 15
15
-
 16
16
-
 17
17
-
 18
18
-
 19
19
-
 20
20
-
 21
21
-
 22
22
-
 23
23
-
 24
24
-
 25
25
-
 26
26
-
 27
27
-
 28
28
-
 29
29
-
 30
30
-
 31
31
-
 32
32
-
 33
33
-
 34
34
-
 35
35
-
 36
36
-
 37
37
-
 38
38
-
 39
39
-
 40
40
-
 41
41
-
 42
42
-
 43
43
-
 44
44
-
 45
45
-
 46
46
-
 47
47
-
 48
48
-
 49
49
-
 50
50
-
 51
51
-
 52
52
-
 53
53
-
 54
54
-
 55
55
-
 56
56
-
 57
57
-
 58
58
-
 59
59
-
 60
60
-
 61
61
-
 62
62
-
 63
63
-
 64
64
-
 65
65
-
 66
66
-
 67
67
-
 68
68
-
 69
69
-
 70
70
-
 71
71
-
 72
72
-
 73
73


på andra språk
- Deutsch: LIVARNO 378599 Bedienungsanleitung
- polski: LIVARNO 378599 Instrukcja obsługi