Goobay 59509 Pedestal Fan Användarmanual
- Kategori
- Hushållsfläktar
- Typ
- Användarmanual

Gebruiksaanwijzing
Brugervejledning
Bruksanvisning
Návod k použití
Instrukcja obsługi
Betriebsanleitung
User manual
Mode d‘emploi
Istruzioni per l‘uso
Instrucciones de uso
Art. 59509
16 Zoll Standventilator
16 Inch Pedestal Fan
Ventilateur sur pied de 16 pouces
Ventilatore a piedistallo da 16 pollici
Ventilador de pedestal de 16 pulgadas
Ventilator op voetstuk van 16 Zoll
16 tommer piedestalventilator
16 tum Piedestaläkt
16palcový podstavcový ventilátor
Wentylator podłogowy 16 cali

Betriebsanleitung
1
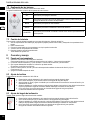
DE BETRIEBSANLEITUNG
Inhaltsverzeichnis
1 Sicherheitshinweise �������������������������������������������������������������������������������� 2
2 Beschreibung und Funktion �������������������������������������������������������������������� 3
2�1 Produkt ����������������������������������������������������������������������������������������������������3
2�2 Lieferumfang �������������������������������������������������������������������������������������������� 3
2�3 Bedienelemente ��������������������������������������������������������������������������������������� 4
2�4 Technische Daten ������������������������������������������������������������������������������������4
3 Bestimmungsgemäßer Gebrauch ����������������������������������������������������������� 5
4 Vorbereitung ������������������������������������������������������������������������������������������� 5
5 Montage �������������������������������������������������������������������������������������������������� 5
6 Funktionstasten und Statusanzeigen ������������������������������������������������������ 6
7 Fernbedienung ���������������������������������������������������������������������������������������� 6
7�1 Fernbedienung aktivieren ������������������������������������������������������������������������6
7�2 Erläuterung der Tasten ����������������������������������������������������������������������������7
7�3 Batterie wechseln ������������������������������������������������������������������������������������7
8 Anschluss Bedienung ����������������������������������������������������������������������������� 7
8�1 Inbetriebnahme ���������������������������������������������������������������������������������������� 7
8�2 Höhe einstellen ����������������������������������������������������������������������������������������7
8�3 Neigungswinkel einstellen �����������������������������������������������������������������������7
9 Wartung,Pege,LagerungundTransport ���������������������������������������������� 8
10 Entsorgungshinweise ������������������������������������������������������������������������������ 8
10�1 Produkt ����������������������������������������������������������������������������������������������������8
10�2 Batterien ��������������������������������������������������������������������������������������������������8
10.3Verpackung ���������������������������������������������������������������������������������������������� 8
11 EU-Konformitätserklärung ���������������������������������������������������������������������� 8
12 Verwendete Symbole ������������������������������������������������������������������������������ 8

DE
2
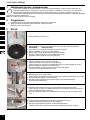
1 Sicherheitshinweise
Die Betriebsanleitung ist Bestandteil des Produktes und enthält wichtige Hinweise zum korrekten Gebrauch.
• Lesen Sie die Betriebsanleitung vollständig und sorgfältig vor Gebrauch.
Die Betriebsanleitung muss bei Unsicherheiten und Weitergabe des Produktes verfügbar sein.
• Bewahren Sie die Betriebsanleitung auf.
Stromschlaggefahr
Kommt das Produkt mit Wasser in Berührung, kann das zu Stromschlägen führen.
• Benutzen Sie das Produkt nicht mit feuchten Händen.
• Benutzen Sie das Produkt nicht in unmittelbarer Nähe von Wasser, wie z. B. Badewannen, Waschbecken oder Pools.
Regen, der auf das Produkt spritzt, kann zu einem Stromschlag führen.
• Stellen Sie das Produkt nicht an ein offenes Fenster.
Spannungsfrei nur bei gezogenem Stecker.
• Ziehen Sie im Notfall, nach Gebrauch und bei Gewitter den Netzstecker direkt am Steckergehäuse aus der Steckdose.
• Öffnen Sie niemals das Gehäuse.
• Modizieren Sie Produkt und Zubehör nicht.
• Schließen Sie Anschlüsse und Schaltkreise nicht kurz.
• Überprüfen Sie regelmäßig, ob das Gerätekabel noch intakt ist.
• Benutzen Sie das Produkt nicht, wenn das Kabel beschädigt ist.
Ein defektes Gerät darf nicht in Betrieb genommen werden, sondern muss sofort vom Netz getrennt und gegen unbeabsichtigte Wei-
terbenutzung gesichert werden.
• Benutzen Sie Produkt, Produktteile und Zubehör nur in einwandfreiem Zustand.
• Wenden Sie sich bei Fragen, Defekten, mechanischen Beschädigungen, Störungen und anderen nicht durch die Begleitdoku-
mentation behebbaren Problemen, an Händler oder Hersteller.
• Reparieren Sie defekte Produkte nicht selbst, sondern wenden Sie sich an den Händler oder Hersteller.
Einzugsgefahr
Rotierende Teile können lockere Kleidung, Haare oder Ähnliches einziehen. Dies kann zu Verletzungen oder Schäden am Gerät füh-
ren.
• Halten Sie Ihre Haare und lose Kleidung von rotierenden Teilen fern.
• Stellen Sie sicher, dass sich der Ventilator nicht in der Nähe von Vorhängen oder Gegenständen bendet, die in den Ventilator
gezogen werden können.
Verletzungsgefahr durch bewegliche Produktteile
Hinter dem Schutzgitter des Ventilators benden sich bewegliche Teile.
• Stecken Sie keine Finger oder Gegenstände durch das Schutzgitter.
Dies kann zu Verletzungen oder Schäden am Gerät führen.
• Betreiben Sie das Gerät nur mit geschlossenem, intaktem Schutzgitter.
• Verwenden Sie das Gerät nicht, wenn das Schutzgitter beschädigt ist.
• Schalten Sie das Gerät aus und ziehen Sie den Netzstecker, bevor Sie das Schutzgitter entfernen.
• Ziehen Sie das Produkt immer am Stecker, nicht am Kabel.
Stolpergefahr
• Achten Sie darauf, dass das Anschlusskabel so verlegt wird, dass es niemanden behindert und nicht beschädigt wird.
Aufgrund unterschiedlich hoher Risiken und Gefahrenpotentiale dürfen einige Arbeitsschritte nur von geschulten Fachkräften ausge-
führt werden.
• Montage, Betrieb, Pege, Lagerung, Transport und Entsorgung dürfen nur von Endverbrauchern und Benutzern mit mechani-
schen und elektrotechnischen Grundkenntnissen vorgenommen werden.
• Demontage, Wartungsarbeiten und Reparaturen dürfen nur von geschulten Fachkräften durchgeführt werden.
Hierfür sind spezielle Sicherheitsmaßnahmen, Fachwissen und Werkzeuge nötig.
Nicht für Kinder und Personen mit physisch und/oder psychisch eingeschränkten Fähigkeiten geeignet.
• Sichern Sie das Produkt gegen unbeabsichtigte Benutzung.
• Sichern Sie Verpackung, Kleinteile und Dämmmaterial gegen unbeabsichtigte Benutzung.
Betriebs- und Lagerbedingungen
• Lassen Sie das Produkt im Betrieb NIE unbeaufsichtigt.
• Decken Sie das Produkt nicht ab.
• Halten Sie Ventilatorschlitze und Lüftungsschlitze frei.
• Betreiben Sie das Produkt nicht in staubigen Umgebungen oder bei mangelhafter Belüftung.
• Betreiben Sie das Produkt nicht im Bereich von explosiven und/oder brennbaren Gasen.
• Platzieren und betreiben Sie das Produkt nicht in der Nähe von offenen Flammen und Koch- oder wärmeerzeugenden Produk-
ten wie Heizkörpern oder Öfen.
• Platzieren, installieren und transportieren Sie Produkt, Produktteile und Zubehör sicher.
• Platzieren Sie das Produkt auf einer stabilen, ebenen, trockenen und staubfreien Fläche, sodass es während des Betriebs
nicht kippen und der Untergrund nicht durch Vibrationen beschädigt werden kann.
• Achten Sie auf einen festen Stand.
Der Ventilator darf nicht auf dem Netzkabel stehen, damit er während des Betriebs nicht umkippt.
• Vermeiden Sie extreme Belastungen wie Hitze und Kälte, Nässe und direkte Sonneneinstrahlung, Mikrowellen sowie Vibratio-
nen und mechanischen Druck.
• Schalten Sie das Gerät aus und trennen Sie das Produkt bei Nichtgebrauch, zur Reinigung oder bei Störung vom Netz.
Batteriegefahren
Die Fernbedienung ist mit einer Lithium-Knopfzelle ausgestattet. Diese ist tauschbar.
• Halten Sie Batterien von Kindern fern.

Betriebsanleitung
3
DE Wenn diese verschluckt wird, kann dies zu schweren inneren Verätzungen und zum Tode führen. Wenn Sie vermuten, dass die Batte-
rie verschluckt oder auf andere Weise in den Körper gelangt ist, suchen Sie umgehend einen Arzt auf.
• Verwenden Sie niemals Batterien, wenn diese verbeult, undicht oder beschädigt sind.
• Entfernen Sie ausgelaufene, deformierte oder korrodierte Zellen aus dem Produkt und entsorgen Sie diese mittels geeigneter
Schutzvorrichtungen.
Wenn eine Batterie ausgelaufen ist, vermeiden Sie den Kontakt mit Haut, Augen und Schleimhäuten. Spülen Sie ggf. die betroffenen
Stellen mit Wasser und suchen Sie umgehend einen Arzt auf.
• Verformen, verbrennen oder zerlegen Sie Batterien nicht und zerlöchern Sie diese niemals mit einem scharfen Gegenstand.
Extreme Hitzeeinwirkung kann zu einer Explosion und/oder zum Austreten von ätzenden Flüssigkeiten führen. Mechanische Beschä-
digungen können zu gasförmigen Substanzen führen, die stark reizend, brennbar oder giftig sein können.
• Schließen Sie Batterien nicht kurz und tauchen Sie diese nicht in Flüssigkeiten ein.
Es besteht die Gefahr von Explosion, Feuer, Hitze, Rauch und/oder Gasentwicklung.
• Nehmen Sie die Batterie sofort aus dem Wasser, wenn sie versehentlich hineingefallen ist. Legen Sie die Batterie in einen si-
cheren, offenen Bereich und halten Sie sich fern, bis sie vollständig getrocknet ist. Verwenden Sie die getrocknete Batterie
nicht wieder, sondern entsorgen Sie diese wie in Kapitel 10.2 angegeben.
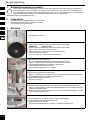
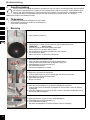
2 Beschreibung und Funktion
2.1 Produkt
Dieses Produkt ist ein leistungsstarker Standventilator, der Belüftung in 3 verschiedenen Stufen und unterschiedlichen Modi erzeugt.
○mit Fernbedienung und Timer
○3 Leistungsstufen: Leicht, Stark, Turbo
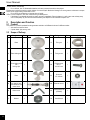
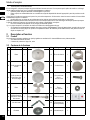
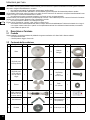
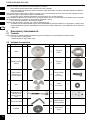
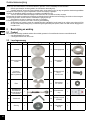
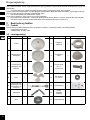
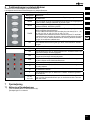
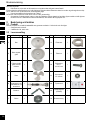
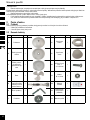
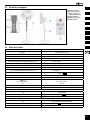
2.2 Lieferumfang
Nr. Beschreibung Stk. Abbildung Nr. Beschreibung Stk. Abbildung
1Sockel 18Fixiermutter 1
2Hinteres
Schutzgitter 19Fixierschraube 1
3
Vorderes
Schutzgitter mit
Versiegelungs-
klemmen
110
Kreuzschlitz-
schraube
Ø x L =
4,4 x 9,2 mm
1
4Rotor 111 Schraubenmutter
Ø = 4,9 mm 1
5
Ständer mit Funk-
tionstasten, Sta-
tusanzeigen und
Motorblock
112 Fernbedienung 1
6Sockelschraube 113 Lithium-
Knopfzelle
(CR2025) 1 -
7Unterlegscheibe 114 Betriebsanleitung 1 -

DE
4
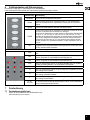
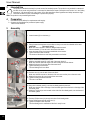
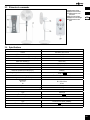
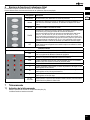
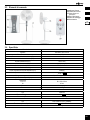
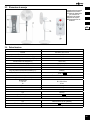
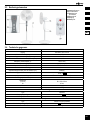
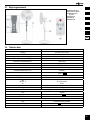
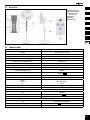
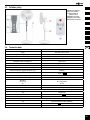
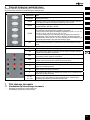
2.3 Bedienelemente
15 Statusanzeigen
16 Funktionstasten
17 Netzkabel mit
Eurostecker
18 Feststellschraube
19 Feststellring
20 Batteriefach
2.4 Technische Daten
Artikelnummer 59509
Eingang 220-240 V , 50 Hz
Nennleistung 45 W
Ventilator Leistungsaufnahme (P) 38,1 W
Leistungsaufnahme im Bereitschaftszustand (PSB) 0,4 W
Max. Volumenstrom (F) 33,5 m³/min
Serviceverhältnis (SV) 0,9 (m³/min)/W
Messnorm für die Ermittlung des Serviceverhältnisses IEC 60879:2019
Max. Luftgeschwindigkeit (c) 2,0 m/s
Schallleistungspegel (LWA) 58 dB(A)
Schutzart / Schutzklasse IPX0 / II
Geräteanschluss Eurostecker (Typ C, CEE 7/16)
Kabellänge (inkl. Stecker) 1,6 m
Maße
B x H x T
Ø39 x 125 x 39 cm
43 cm
Farbe weiß-grau
Gewicht 4550 g
Fernbedienung
Typ Infrarot
Eingangsspannung 3,0 V
Maße | Gewicht 40 x 86 x 7 | 11 g
Batterie
Typ Lithium-Knopfzelle (CR2025)
Nennspannung, Kapazität 3,0 V , 150-165 mAh
Gewicht 3 g

Betriebsanleitung
5
DE 3 Bestimmungsgemäßer Gebrauch
Dieses Produkt ist ausschließlich für den privaten Gebrauch und den dafür vorgesehenen Zweck geeignet. Dieses Produkt
ist nicht für den gewerblichen Gebrauch bestimmt. Eine andere als in Kapitel „Beschreibung und Funktion“ bzw. in den
„Sicherheitshinweisen“ beschriebene Verwendung ist nicht gestattet. Dieses Produkt darf nur in trockenen Innenräumen
benutzt werden. Das Nichtbeachten und Nichteinhalten dieser Bestimmungen und der Sicherheitshinweise kann zu
schweren Unfällen, Personen- und Sachschäden führen.
IPX0: Dieses Produkt ist nicht gegen Wasser geschützt.
4 Vorbereitung
1. Kontrollieren Sie den Lieferumfang auf Vollständigkeit und Unversehrtheit.
2. Vergleichen Sie die technischen Daten von Produkt und Stromnetz.
Diese müssen identisch sein.
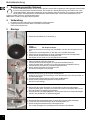
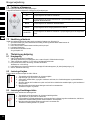
5 Montage
1. Stecken Sie den Ständer (5) in den Sockel (1).
2. Legen Sie Ständer und Sockel auf die Seite, so dass Sie die Unterseite vom Sockel sehen
können.
VORSICHT! Der Sockel ist schwer!
• Achten Sie darauf, dass keine Finger oder Gliedmaßen unter dem Sockel eingeklemmt wer-
den!
3. Platzieren Sie die Unterlegscheibe (7) über dem Loch in der Mitte des Sockels.
4. Stecken Sie die Sockelschraube (6) mit der Gewindeseite durch die Unterlegscheibe.
5. Drehen Sie die Sockelschraube im Uhrzeigersinn fest.
Der Ständer und der Sockel sind nun fest miteinander verbunden.
6. Stellen Sie Ständer und Sockel wieder auf.
7. Schieben Sie das hintere Schutzgitter (2) auf die Achse des Motorblocks (5).
Achten Sie dabei darauf, dass das Loch am Rand des hinteren Schutzgitters unten ist.
8. Schieben Sie die Fixiermutter (8) auf die Achse des Motorblocks.
9. Drehen Sie die Fixiermutter im Uhrzeigersinn fest.
Das hintere Schutzgitter ist nun befestigt.
10. Schieben Sie den Rotor (4) auf die Achse des Motorblocks.
Achten Sie darauf, dass die Aussparungen auf der Rückseite des Rotors über den Stiften auf
der Motorachse liegen.
11. Schieben sie die Fixierschraube (9) auf die Achse des Motorblocks.
12. Drehen Sie die Fixierschraube gegen den Uhrzeigersinn fest.
Der Rotor ist nun befestigt.
13. Hängen Sie das vordere Schutzgitter (3) mit dem Haken an das hintere Schutzgitter.
Achten Sie dabei darauf, dass das Loch am Rand des vorderen Schutzgitters dem Loch am
Rand des hinteren Schutzgitters gegenübersteht.
14. Schieben Sie die 4 Verriegelungsklemmen, die sich jeweils seitlich am vorderen Schutzgitter
benden, über die Rahmen von beiden Schutzgittern.
15. Schieben Sie die Kreuzschlitzschraube (10) durch die Löcher der beiden Schutzgitter.
16. Fixieren Sie die Kreuzschlitzschraube mit der Schraubenmutter (11).
17. Drehen Sie die Kreuzschlitzschraube im Uhrzeigersinn fest.
Das vordere Schutzgitter ist nun befestigt und der Ventilator ist einsatzbereit.

DE
6
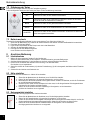
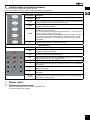
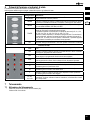
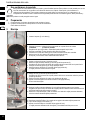
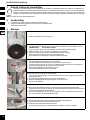
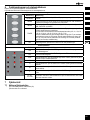
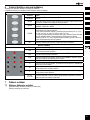
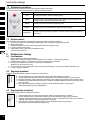
6 Funktionstasten und Statusanzeigen
Der Ventilator verfügt über 5 Funktionstasten und 12 Statusanzeigen.
In der nachfolgenden Tabelle werden die Funktionstasten und die Statusanzeigen erläutert.
Funktionstasten
Bezeichnung Beschreibung
ON/SPEED Drücken Sie die Taste, um den Ventilator einzuschalten. Drücken Sie die Taste
erneut, um die Leistungsstufe auszuwählen.
SWING Drücken Sie die Taste, um die Oszillationsfunktion ein- oder auszuschalten.
Wenn die Oszillationsfunktion angeschaltet ist, bewegt sich der Ventilator hin
und her.
MODE Drücken Sie die Taste, um den gewünschten Modus einzustellen. Sie können
zwischen den Modi NORMAL, NATURAL und SLEEP wählen.
TIMER
Drücken Sie die Taste, um die Timerfunktion zu aktivieren. Drücken Sie die Tas-
te erneut, um die Dauer der Timerfunktion zu verlängern.
Sie können die Timerfunktion in einem Intervall von einer halben Stunde einstel-
len (0,5h, 1h, 1,5h, 2h, 2,5h, 3h, 3,5h, 4h, 4,5h, 5h, 5,5h, 6h, 6,5h, 7h, 7,5h).
Nachdem die eingestellte Zeit abgelaufen ist, schaltet sich der Ventilator selbst
aus. Um die Timerfunktion zu beenden, drücken Sie die Taste bis alle Status-
anzeigen für den Timer (4H, 2H, 1H, 0.5H) erloschen sind. Alternativ können
Sie den Ventilator aus- und wieder einschalten, um den eingestellten Timer zu
löschen.
OFF Drücken Sie die Taste, um den Ventilator auszuschalten. Die eingestellte Leis-
tungsstufe und der eingestellte Modus bleiben gespeichert und sind aktiv, wenn
sie den Ventilator wieder einschalten.
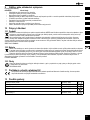
Statusanzeigen
POW Wenn die Statusanzeige leuchtet, ist der Ventilator mit dem Stromnetz verbun-
den.
SLE Wenn die Statusanzeige leuchtet, ist der Modus SLEEP aktiv. Der Ventilator
führt ein Programm von unterschiedlichen Gebläsestufen aus.
NAT Wenn die Statusanzeige leuchtet, ist der Modus NATURAL aktiv. Der Ventilator
führt ein Programm von unterschiedlichen Gebläsestufen aus.
NOR Wenn die Statusanzeige leuchtet, ist der Modus NORMAL aktiv. Der Ventilator
erzeugt gleichmäßig Gebläse in der eingestellten Leistungsstufe.
SW Wenn die Statusanzeige leuchtet, ist die Oszillationsfunktion aktiviert.
HWenn die Statusanzeige leuchtet, ist die Leistungsstufe H eingestellt. Der Venti-
lator erzeugt starkes Gebläse.
MWenn die Statusanzeige leuchtet, ist die Leistungsstufe M eingestellt. Der Venti-
lator erzeugt mittelstarkes Gebläse.
LWenn die Statusanzeige leuchtet, ist die Leistungsstufe L eingestellt. Der Venti-
lator erzeugt leichtes Gebläse.
4H, 2H,
1H, 0.5H
Wenn eine der Statusanzeigen leuchtet, ist die Timerfunktion für die angegebe-
ne Zeit aktiv. Wenn mehrere der Statusanzeigen leuchten, ist die Timerfunktion
für die zusammengerechnete Zeit aktiv.
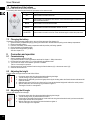
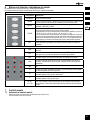
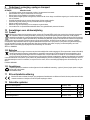
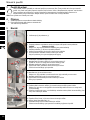
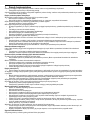
7 Fernbedienung
7.1 Fernbedienung aktivieren
• Ziehen Sie den Kontaktschutz aus dem Batteriefach (20).
Die Fernbedienung ist nun aktiviert.

Betriebsanleitung
7
DE 7.2 Erläuterung der Tasten
Sie können den Ventilator alternativ über die Fernbedienung steuern.
In der nachfolgenden Tabelle wird die Funktion der Tasten auf der Fernbedienung beschrieben.
Bezeichnung Beschreibung
OFF Drücken Sie die Taste, um den Ventilator auszuschalten.
TIMER Drücken Sie die Taste, um die Timerfunktion zu aktivieren. Drücken Sie die Taste er-
neut, um die Dauer der Timerfunktion zu verlängern.
MODE Drücken Sie die Taste, um den gewünschten Modus einzustellen.
SWING Drücken Sie die Taste, um die Oszillationsfunktion ein- oder auszuschalten.
ON/SPEED Drücken Sie die Taste, um den Ventilator einzuschalten. Drücken Sie die Taste erneut,
um die Leistungsstufe auszuwählen.
7.3 Batterie wechseln
Tauschen Sie die leere Batterie bei Bedarf mit einer neuen gleichen Typs. Siehe hierzu Kapitel 2.4.
1. Öffnen Sie das Batteriefach (20), indem sie den kleinen Hebel zur Seite drücken und dann das Batteriefach herausziehen.
2. Entnehmen Sie die leere Batterie.
3. Legen Sie die neue Batterie mit dem Pluspol nach oben in das Batteriefach.
4. Schieben Sie das Batteriefach wieder zu.
5. Entsorgen Sie die leere Batterie fachgerecht.
Lesen Sie hierzu auch das Kapitel 10.2.
8 Anschluss Bedienung
8.1 Inbetriebnahme
1. Wählen Sie einen geeigneten Standort für den Ventilator aus.
Achten Sie dabei insbesondere auf die in Kapitel 1 „Sicherheitshinweise“ genannten Bedingungen.
2. Schließen Sie das Netzkabel (17) des Ventilators an eine freie und gut zugängliche Steckdose an.
3. Drehen Sie die Vorderseite des Ventilators in die Richtung, in die Sie lüften wollen.
Der Ventilator ist nun betriebsbereit.
4. Stellen Sie mit Hilfe der Funktionstasten (16) oder der Fernbedienung (12) die Leistungsstufe, den Modus und die Timerfunk-
tion ein.
5. Schalten Sie den Ventilator nach Gebrauch aus.
8.2 Höhe einstellen
Sie können die Höhe des Ventilators von 108 bis 128 cm einstellen.
1. Ziehen Sie das Netzkabel aus der Steckdose, bevor Sie die Höhe einstellen.
2. Drehen Sie den Feststellring (19) gegen den Uhrzeigersinn, um ihn zu lösen.
3. Beschweren Sie den Sockel mit Ihrem Fuß und greifen Sie den Ventilator am Gehäuse, wo sich die Funktionstas-
ten und die Statusanzeigen benden.
4. Schieben Sie den oberen Teil des Ventilators hoch oder runter, bis Sie die gewünschte Höhe eingestellt haben
und halten Sie den Ventilator auf dieser Position.
5. Drehen Sie mit der anderen Hand den Feststellring im Uhrzeigersinn, um ihn festzuziehen.
Die Höhe des Ventilators ist nun eingestellt.
8.3 Neigungswinkel einstellen
Sie können außerdem den Neigungswinkel des Ventilators einstellen.
1. Ziehen Sie das Netzkabel aus der Steckdose, bevor Sie den Neigungswinkel einstellen.
2. Drehen Sie die Feststellschraube (18) gegen den Uhrzeigersinn, um ihn zu lösen.
3. Fassen Sie den Ventilator am Schutzgitter und bewegen Sie ihn entlang der horizontalen Achse hin und her, bis
Sie den gewünschten Neigungswinkel eingestellt haben. Halten Sie den Ventilator an dieser Position.
4. Drehen Sie mit der anderen Hand die Feststellschraube im Uhrzeigersinn, um sie festzuziehen.
Der Neigungswinkel des Ventilators ist nun eingestellt.

DE
8
9 Wartung, Pege, Lagerung und Transport
Das Produkt ist wartungsfrei.
ACHTUNG! Sachschäden
• Ziehen Sie vor jeder Reinigung den Netzstecker.
• Verwenden Sie zum Reinigen nur ein trockenes und weiches Tuch.
• Verwenden Sie keine Reinigungsmittel und Chemikalien.
• Lagern Sie das Produkt bei längerem Nichtgebrauch für Kinder unzugänglich und in trockener und staubgeschützter Umge-
bung.
• Entnehmen Sie die Batterien / Akkus bei längerem Nichtgebrauch.
• Kontrollieren Sie regelmäßig den festen Sitz des Produktes/der Schrauben.
• Lagern Sie das Produkt kühl und trocken.
• Heben Sie die Originalverpackung für den Transport auf.
• Lassen Sie Wartungs-, Demontage und Reparaturarbeiten nur von Fachpersonal durchführen.
10 Entsorgungshinweise
10.1 Produkt
Elektrische und elektronische Geräte dürfen nach der europäischen WEEE Richtlinie nicht mit dem Hausmüll entsorgt werden.
Deren Bestandteile müssen getrennt der Wiederverwertung oder Entsorgung zugeführt werden, weil giftige und gefährliche
Bestandteile bei unsachgemäßer Entsorgung die Gesundheit und Umwelt nachhaltig schädigen können.
Sie sind als Verbraucher nach dem Elektrogesetz (ElektroG) verpichtet, elektrische und elektronische Geräte am Ende ihrer
Lebensdauer an den Hersteller, die Verkaufsstelle oder an dafür eingerichtete, öffentliche Sammelstellen kostenlos zurückzugeben.
Einzelheiten dazu regelt das jeweilige Landesrecht. Das Symbol auf dem Produkt, der Betriebsanleitung und/oder der Verpackung
weist auf diese Bestimmungen hin. Mit dieser Art der Stofftrennung, Verwertung und Entsorgung von Altgeräten leisten Sie einen wich-
tigen Beitrag zum Schutz unserer Umwelt.
WEEE Nr.: 82898622
10.2 Batterien
Batterien und Akkumulatoren dürfen nicht mit dem Hausmüll entsorgt werden. Deren Bestandteile müssen getrennt der
Wiederverwertung oder Entsorgung zugeführt werden, weil giftige und gefährliche Bestandteile bei unsachgemäßer
Entsorgung die Umwelt nachhaltig schädigen können. Sie sind als Verbraucher verpichtet, diese am Ende ihrer Lebensdauer
an den Hersteller, die Verkaufsstelle oder an dafür eingerichtete, öffentliche Sammelstellen kostenlos zurückzugeben.
Einzelheiten dazu regelt das jeweilige Landesrecht. Das Symbol auf dem Produkt, der Betriebsanleitung und/oder der Verpackung
weist auf diese Bestimmungen hin. Mit dieser Art der Stofftrennung, Verwertung und Entsorgung von Altbatterien und -akkumulatoren
leisten Sie einen wichtigen Beitrag zum Schutz unserer Umwelt.
D-34000-1998-0099
10.3 Verpackung
Verpackungen können kostenlos in den entsprechenden Sammelstellen entsorgt werden - Papier in der Papiertonne,
Kunststoffe im gelben Sack und Glas im Altglas-Container.
DE4535302615620
11 EU-Konformitätserklärung
Mit dem CE-Zeichen erklärt Goobay®, eine registrierte Marke der Wentronic GmbH, dass das Produkt die grundlegenden
Anforderungen und Richtlinien der europäischen Bestimmungen erfüllt.
12 Verwendete Symbole
Nur zur Verwendung im Innenbereich IEC 60417- 5957
Wechselspannung IEC 60417- 5032
Gleichspannung IEC 60417- 5031
Recycling ISO 7001 - PI PF 066
Schutzklasse II IEC 60417- 5172

User Manual
9
EN
USER MANUAL
Table of contents
1 Safety instructions �������������������������������������������������������������������������������� 10
2 DescriptionandFunction ���������������������������������������������������������������������� 11
2�1 Product �������������������������������������������������������������������������������������������������� 11
2.2 ScopeofDelivery ����������������������������������������������������������������������������������� 11
2.3 OperatingElements �������������������������������������������������������������������������������12
2.4 Specications �����������������������������������������������������������������������������������������12
3 Intended Use ���������������������������������������������������������������������������������������� 13
4 Preparation ������������������������������������������������������������������������������������������� 13
5 Assembly ���������������������������������������������������������������������������������������������� 13
6 Function buttons and status indicators ������������������������������������������������� 14
7 Remote control ������������������������������������������������������������������������������������� 14
7�1 Activating the remote control �����������������������������������������������������������������14
7.2 Explanationofthebuttons ���������������������������������������������������������������������15
7�3 Changing the battery �����������������������������������������������������������������������������15
8 Connectionandoperation ��������������������������������������������������������������������� 15
8�1 Commissioning ��������������������������������������������������������������������������������������15
8�2 Adjusting the height �������������������������������������������������������������������������������15
8�3 Adjusting the tilt angle ����������������������������������������������������������������������������15
9 Maintenance,Care,StorageandTransport ������������������������������������������ 16
10Disposalinstructions ����������������������������������������������������������������������������� 16
10�1 Product ��������������������������������������������������������������������������������������������������16
10�2 Batteries �������������������������������������������������������������������������������������������������16
10�3 Packaging ����������������������������������������������������������������������������������������������16
11 EU Declaration of conformity ���������������������������������������������������������������� 16
12 Symbols used ��������������������������������������������������������������������������������������� 16

10
EN
1 Safety instructions
The user manual is part of the product and contains important information for correct use.
• Read the user manual completely and carefully before use.
The user manual must be available for uncertainties and passing the product.
• Keep this user manual.
Risk of electric shock
When the product comes into contact with water, this may cause an electric shock.
• Do not use the product with wet hands.
• Do not use the product in the immediate vicinity of water, such as bathtubs, washbasins or pools.
Rain splashing on the product may cause an electric shock.
• Do not place the product near an open window.
Voltage-free only with pulled plug.
• In case of emergency, after use and during a thunderstorm, pull the mains plug out of the socket directly at the plug housing.
• Do not open the housing.
• Do not modify product and accessories.
• Do not short-circuit connectors and circuits.
• Check regularly that the appliance cable is still intact.
• Do not use the product if the cable is damaged.
A defective device may not be put into operation, but must be disconnected from mains and protected against further use.
• Use product, product parts and accessories only in perfect condition.
• In case of questions, defects, mechanical damage, trouble and other problems non-recoverable by the documentation, contact
your dealer or producer.
• Do not repair defective products yourself, but contact the dealer or the manufacturer.
Risk of entry
Rotating parts can pull loose clothing and hair. This may result in injuries or damage to the device.
• Keep hair and loose clothing away from rotating parts.
• Make sure that the fan is not near curtains or other objects that could be pulled into the fan.
Risk of injury by moving product parts
There are moving parts behind the blade guard of the fan.
• Do not insert your nger or other objects through the blade guard.
This may result in injuries or damage to the device
• Only operate the device if the blade guard is closed and in good order.
• Do not use the device if the blade guard is damaged.
• Switch the device off and unplug the power cord before removing the blade guard.
• Always pull the product by the plug, not the cable.
Tripping hazard
• Mind placing cables in a way that nobody will be disabled and the cable not be damaged.
Caused to different risk levels and hazard potentials some working steps only may be done by trained specialists.
• Assembly, operation, maintenance, storage, transport and disposal may only be carried out by end users and users with basic
mechanical and electrical knowledge.
• Disassembly, maintenance work and repairs may only be carried out by trained specialists.
Special safety measures, expertise and tools are required for this.
Not recommended for children and people with physical and/or mentally limited capabilities.
• Secure the product against accidental use.
• Secure packaging, small parts and insulation against accidental use.
Operation and storage conditions
• NEVER leave the product unattended while in operation.
• Do not cover the product.
• Keep fan slots and vents free.
• Do not operate the product in dusty environments or in areas with inadequate ventilation.
• Do not operate the fan in the vicinity of explosive and/or ammable gases.
• Do not place or operate the product near open ames, cooking appliances or devices that generate heat such as radiators or
stoves.
• Place, install and transport product, product parts and accessories in a safe way.
• Place the product on a stable, level, dry and dust-free surface so that it cannot tip over during operation and the surface cannot
be damaged by vibrations.
• Make sure that the product stands securely.
The fan must not stand on the mains cable so that it does not tip over during operation.
• Avoid stresses such as heat and cold, moisture and direct sunlight, microwaves, vibrations and mechanical pressure.
• Switch off the device and disconnect it from the mains when not in use, for cleaning or in the event of a malfunction.
Battery hazards
The remote control is equipped with a lithium button cell. It can be replaced.
• Keep batteries out of the reach of children.
If swallowed, there is a risk of severe internal burns or even death. Seek immediate medical attention if you believe someone may
have swallowed or otherwise ingested the battery.
• Never use batteries when they are dented, leaked or damaged.
• Remove leaked, deformed or corroded batteries from the product and dispose them by appropriate protectives.
If a battery has leaked, avoid contact with skin, eyes and mucous membranes. If necessary, rinse affected areas with water and seak

User Manual
11
EN
medical attention immediately.
• Do not deform, burn or disassemble batteries and never puncture them with a sharp object.
Extreme heat can lead to explosion and/or leakage of corrosive liquid. Mechanical damage can cause gaseous substances to escape,
which can be highly irritating, ammable or toxic.
• Do not short-circuit batteries or immerse them in liquids.
There is a risk of explosion, re, heat, smoke and/or gas development.
• If the battery is accidentally dropped into water, remove it immediately. Place the battery in a safe, open area and stay away
until it is completely dry. Do not reuse the dried battery, but dispose of it as indicated in chapter 10.2.
2 Description and Function
2.1 Product
This product is a powerful pedestal fan that generates ventilation at 3 different levels and in different modes.
○with remote control and timer
○3 power levels: light, strong, turbo
2.2 Scope of Delivery
No. Designation Pcs. Description No. Designation Pcs. Description
1Base 18Fixing nut 1
2Rear blade guard 19Fixing screw 1
3Front blade guard
with
locking clips 110 Phillips screw
Ø x L =
4.4 x 9.2 mm 1
4Rotor 111 Screw nut
Ø = 4.9 mm 1
5
Stand with func-
tion buttons, sta-
tus indicators and
motor block
112 Remote control 1
6Base screw 113 Lithium button cell
(CR2025) 1 -
7Washer 114 User Manual 1 -

12
EN
2.3 Operating Elements
15 Status indicators
16 Function buttons
17 Mains cable with
euro plug
18 Locking screw
19 Locking ring
20 Battery compartment
2.4 Specications
Article number 59509
Input 220-240 V , 50 Hz
Rated power 45 W
Fan power input (P) 38.1 W
Standby power consumption (PSB) 0.4 W
Max. fan ow rate (F) 33.5 m³/min
Service value (SV) 0.9 (m³/min)/W
Measurement standard for service value IEC 60879:2019
Max. air velocity (c) 2.0 m/s
Fan sound power level (LWA) 58 dB(A)
Protection level / Protection class IPX0 / II
Device connection Euro plug (Type C. CEE 7/16)
Cable length (incl. plug) 1.6 m
Dimensions
W x H x D
Ø39 x 125 x 39 cm
43 cm
Colour white-grey
Weight 4550 g
Remote control
Type Infrared
Input voltage 3.0 V
Dimensions | Weight 40 x 86 x 7 | 11 g
Battery
Typ Lithium button cell (CR2025)
Nominal voltage, Capacity 3.0 V , 150-165 mAh
Weight 3 g

User Manual
13
EN
3 Intended Use
This product is intended exclusively for private use and its intended purpose. This product is not intended for commercial
use. We do not permit using the device in other ways like described in chapter „Description and Function“ or in the „Safety
Instructions“. Use the product only in dry interior rooms. Not attending to these regulations and safety instructions might
cause fatal accidents, injuries, and damages to persons and property.
IPX0: This product is not protected against water.
4 Preparation
1. Check the scope of delivery for completeness and integrity.
2. Compare the specications of product and power supply.
These must be identical.
5 Assembly
1. Insert the stand (5) into the base (1).
2. Place the stand and the base on their sides so that you can see the underside of the base.
CAUTION! The base is heavy!
• Make sure that no ngers or limbs are wedged under the base!
3. Place the washer (7) over the hole in the centre of the base.
4. Insert the base screw (6) with the threaded side in the washer.
5. Tighten the base screw clockwise.
The stand and the base are now rmly connected to each other.
6. Put the stand and the base back in place.
7. Slide the rear blade guard (2) on the axle of the motor block (5).
Make sure that the hole at the edge of the rear blade guard is at the bottom.
8. Slide the xing nut (8) onto the axle of the motor block.
9. Tighten the xing nut clockwise.
The rear blade guard is now xed.
10. Push the rotor (4) onto the axle of the motor block.
Make sure that the recesses on the back of the rotor are over the pins on the motor axle.
11. Slide the xing screw (9) onto the axle of the motor block.
12. Tighten the xing screw anticlockwise.
The rotor is now xed.
13. Hang the front blade guard (3) onto the rear blade guard with the hook.
Make sure that the hole on the edge of the front blade guard faces the hole on the edge of the
rear blade guard.
14. Slide the 4 locking clips, each located on the side of the front blade guard, over the frames of
both blade guards.
15. Push the Phillips screw (10) through the holes of both blade guards.
16. Fix the Phillips screw with the screw nut (11).
17. Tighten the Phillips screw clockwise.
The front blade guard is now xed and the fan is ready for use.

14
EN
6 Function buttons and status indicators
The fan has 5 function buttons and 12 status indicators.
In the following table, the function buttons and the status indicators are explained.
Function buttons
Designation Description
ON/SPEED Press the button to switch on the fan. Press the button again to select the pow-
er level.
SWING Press the button to switch the oscillation function on or off. When the oscillation
function is switched on, the fan moves from side to side.
MODE Press the button to set the desired mode. You can choose between the modes
NORMAL, NATURAL and SLEEP.
TIMER
Press the button to activate the timer function. Press the button again to extend
the duration of the timer function.
You can set the timer function at half-hour intervals (0.5h, 1h, 1.5h, 2h, 2.5h, 3h,
3.5h, 4h, 4.5h, 5h, 5.5h, 6h, 6.5h, 7h, 7.5h).
After the set time has elapsed, the fan switches itself off. To end the timer func-
tion, press the button until all status displays for the timer (4H, 2H, 1H, 0.5H)
have gone out. Alternatively, you can switch the fan off and on again to clear
the set timer.
OFF Press the button to switch off the fan. The set power level and mode remain sa-
ved and are active when you switch the fan on again.
Status indicators
POW When the status indicator lights up, the fan is connected to the mains.
SLE When the status indicator lights up, the SLEEP mode is active. The fan runs a
programme of different fan speeds.
NAT When the status indicator lights up, the NATURAL mode is active. The fan is
running a programme of different fan speeds.
NOR When the status indicator lights up, the NORMAL mode is active. The fan is ge-
nerating a steady ow of air at the set power level.
SW When the status indicator lights up, the oscillation function is activated.
HWhen the status indicator lights up, the power level H is set. The fan generates
strong airow.
MWhen the status indicator lights up, the power level M is set. The fan generates
medium-strong airow.
LWhen the status indicator lights up, the power level L is set. The fan generates
light airow.
4H, 2H,
1H, 0.5H
If one of the status indicators lights up, the timer function is active for the spe-
cied time. If several of the status indicators light up, timer function covers the
sum of the active time intervals.
7 Remote control
7.1 Activating the remote control
• Pull the contact protector out of the battery compartment (20).
The remote control is now activated.

User Manual
15
EN
7.2 Explanation of the buttons
You can also control the fan via the remote control.
The following table describes the function of the buttons on the remote control.
Designation Description
OFF Press the button to switch off the fan.
TIMER Press the button to activate the timer function. Press the button again to extend the du-
ration of the timer function.
MODE Press the button to set the desired mode.
SWING Press the button to switch the oscillation function on or off.
ON/SPEED Press the button to switch on the fan. Press the button again to select the power level.
7.3 Changing the battery
If necessary, replace the empty battery with a new one of the same type. See chapter 2.4.
1. Open the battery compartment (20) by pushing the small lever to the side and then pulling out the battery compartment.
2. Remove the empty battery.
3. Place the new battery in the battery compartment with the positive pole facing upwards.
4. Close the battery compartment again.
5. Dispose of the empty battery properly.
See also chapter 10.2.
8 Connection and operation
8.1 Commissioning
1. Select a suitable location for the fan.
Pay particular attention to the requirements mentioned in chapter 1 „Safety instructions“.
2. Connect the fan‘s mains cable (17) to a free and easily accessible socket.
3. Turn the front of the fan in the direction you want to ventilate.
The fan is now ready for operation.
4. Set the power level, mode and timer function using the function buttons (16) or the remote control (12).
5. Switch off the fan after use.
8.2 Adjusting the height
You can adjust the height of the fan from 108 to 128 cm.
1. Unplug the mains cable from the socket before adjusting the height.
2. Turn the locking ring (19) anticlockwise to loosen it.
3. Weight down the base with your foot and grasp the fan by the housing where the function buttons and status indi-
cators are located.
4. Slide the upper part of the fan up or down until you have set the desired height and hold the fan at this position.
5. With the other hand, turn the locking ring clockwise to tighten it.
The height of the fan is now adjusted.
8.3 Adjusting the tilt angle
You can also adjust the fan‘s tilt angle.
1. Unplug the mains cable from the socket before adjusting the tilt angle.
2. Turn the locking screw (18) anticlockwise to loosen it.
3. Hold the fan by the blade guard and move it back and forth along the horizontal axis until you have set the desi-
red tilt angle. Hold the fan in this position.
4. With the other hand, turn the locking screw clockwise to tighten it.
The fan‘s tilt angle is now adjusted.

16
EN
9 Maintenance, Care, Storage and Transport
The product is maintenance-free.
NOTICE! Material damage
• Always disconnect the mains plug before cleaning.
• Only use a dry and soft cloth for cleaning.
• Do not use detergents or chemicals.
• Store the product out of the reach of children and in a dry and dust-protected environment when not in use.
• Remove batteries / rechargeable batteries when not in use.
• Regularly check the tightness of product/screws.
• Store cool and dry.
• Keep and use the original packaging for transport.
• Have maintenance, disassembly and repair work carried out by qualied personnel only.
10 Disposal instructions
10.1 Product
According to the European WEEE directive, electrical and electronic equipment must not be disposed with consumers waste.
Its components must be recycled or disposed apart from each other. Otherwise contaminative and hazardous substances can
damage the health and pollute the environment.
As a consumer, you are committed by law to dispose electrical and electronic devices to the producer, the dealer, or public
collecting points at the end of the devices lifetime for free. Particulars are regulated in national right. The symbol on the product, in the
user manual, or at the packaging alludes to these terms. With this kind of waste separation, application, and waste disposal of used
devices you achieve an important share to environmental protection.
WEEE No: 82898622
10.2 Batteries
(Rechargeable) batteries must not be disposed of with household waste. Their components have to be supplied separately to
the recycling or disposal, because toxic and dangerous ingredients can harm the environment if not disposed of sustainably.
As a consumer, you are obliged to return them at the end of their service lives to the manufacturer, the sales outlet or
established for this purpose, public collection points for free. Details regulates the respective country‘s law. The symbol on the
product, the instruction manual and / or the packaging draws attention to those provisions. With this kind of material separation,
recovery and disposal of waste (rechargeable) batteries you make an important contribution to protecting our environment.
D-34000-1998-0099
10.3 Packaging
Packaging can be disposed of free of charge at the suitable collection points – paper belongs in paper bins, plastics belong in
yellow sacks and glass belongs in used glass bins.
DE4535302615620
11 EU Declaration of conformity
With the CE sign Goobay®, a registered trademark of the Wentronic GmbH ensures, that the product is conformed to the
basic European standards and directives.
12 Symbols used
For indoor use only IEC 60417- 5957
Alternating current IEC 60417- 5032
Direct current IEC 60417- 5031
Recycling ISO 7001 - PI PF 066
Class II equipment IEC 60417- 5172

Mode d‘emploi
17
FR
MODE D‘EMPLOI
Table des matières
1 Consignes de sécurité �������������������������������������������������������������������������� 18
2 Descriptionetfonction �������������������������������������������������������������������������� 19
2�1 Produit ���������������������������������������������������������������������������������������������������19
2�2 Contenu de la livraison ��������������������������������������������������������������������������19
2�3 Eléments de commande ������������������������������������������������������������������������20
2.4 Spécications �����������������������������������������������������������������������������������������20
3 Utilisationprévue ���������������������������������������������������������������������������������� 21
4 Préparation ������������������������������������������������������������������������������������������� 21
5 Montage ������������������������������������������������������������������������������������������������ 21
6 Boutons de fonction et indicateurs d‘état ���������������������������������������������� 22
7 Télécommande ������������������������������������������������������������������������������������� 22
7�1 Activation de la télécommande ��������������������������������������������������������������22
7.2 Explicationdesboutons ������������������������������������������������������������������������� 23
7.3 Remplacementdelapile �����������������������������������������������������������������������23
8 Connexion et fonctionnement ��������������������������������������������������������������� 23
8�1 Mise en service �������������������������������������������������������������������������������������� 23
8�2 Réglage de la hauteur ���������������������������������������������������������������������������23
8�3 Réglage de l‘angle d‘inclinaison ������������������������������������������������������������23
9 Maintenance,Entretien,StockageetTransport ������������������������������������ 24
10Instructionspourl’élimination ��������������������������������������������������������������� 24
10�1 Produit ���������������������������������������������������������������������������������������������������24
10�2 Batteries �������������������������������������������������������������������������������������������������24
10�3 Emballages ��������������������������������������������������������������������������������������������24
11 Déclaration UE de conformité ��������������������������������������������������������������� 24
12 Symboles utilisés ���������������������������������������������������������������������������������� 24

18
FR
1 Consignes de sécurité
Le mode d‘emploi fait partie intégrante du produit et comprend d‘importantes informations pour une bonne installation et une bonne
utilisation.
• Lisez le mode d‘emploi attentivement et complètement avant de l‘utiliser.
Le mode d‘emploi doit être disponible à des incertitudes et transfert du produit.
• Conservez soigneusement ce mode d‘emploi.
Risque de choc électrique
Lorsque le produit entre en contact avec de l‘eau, cela peut provoquer un choc électrique.
• N’utilisez pas le produit avec des mains humides.
• N‘utilisez pas le produit à proximité immédiate de l‘eau, comme les baignoires, les lavabos ou les piscines.
La pluie éclaboussant le produit peut provoquer un choc électrique.
• Ne posez pas le produit près d’une fenêtre ouverte.
Sans surcharge de tension uniquement lorsque le bouchon est tiré.
• En cas d‘urgence, après l‘utilisation et pendant un orage, retirez la che secteur de la prise directement au niveau du boîtier de
la che.
• Ne pas ouvrir le boîtier.
• Ne modiez pas le produit et les accessoires.
• Pas court-circuiter des connexions et circuits.
• Vériez régulièrement si le câble de l’appareil est encore intact.
• N’utilisez pas le produit si le câble est endommagé.
Un appareil défectueux ne doit pas être mis en service. Il doit au contraire être immédiatement mis hors tension et protégé contre tou-
te utilisation involontaire.
• Utilisez le produit, pièces et accessoires des produits uniquement en parfait état.
• En cas de questions, les défauts, les dommages mécaniques, des ingérences et d‘autres problèmes, non récupérables par la
documentation, contactez votre revendeur ou le producteur.
• Ne réparez pas vous-même les produits défectueux, mais contactez le revendeur ou le fabricant.
Risque de happement
Les pièces rotatives peuvent happer les vêtements légers et les cheveux. Cela pourrait provoquer des blessures ou endommager l’ap-
pareil.
• Tenez vos cheveux et vêtements lâches à l’écart des pièces rotatives.
• Veillez à ne pas poser le ventilateur à proximité de rideaux ou d’objets pouvant être aspirés.
Risque de blessure par le mouvement des composants du produit
Derrière la grille protectrice du ventilateur se trouvent des pièces mobiles.
• N’insérez pas vos doigts ni d’objets à travers la grille protectrice
Cela pourrait provoquer des blessures ou endommager l’appareil.
• N’utilisez l’appareil qu’avec une grille protectrice fermée et intacte.
• N’utilisez pas l’appareil si la grille protectrice est endommagée.
• Éteignez l’appareil et débranchez la che secteur avant de retirer la grille protectrice.
• Tirez toujours le produit par la che, et non par le câble.
Risque de trébucher
• Faire attention à placer les câbles de sorte que qu‘ils ne soient pas endommagés et que personne ne soit entravé.
A cause de risques de niveaux différents et de dangers potentiels, certains travaux ne peuvent être effectués que par des spécialis-
tes entraînés.
• Le montage, l‘utilisation, l‘entretien, le stockage, le transport et l‘élimination ne doivent être effectués que par des utilisateurs -
naux et des utilisateurs ayant des connaissances mécaniques et électriques de base.
• Le démontage, les travaux d‘entretien et les réparations ne doivent être effectués que par des spécialistes qualiés.
Des mesures de sécurité, des compétences et des outils spéciaux sont nécessaires à cet effet.
Non recommandé pour les enfants et les personnes dont les capacités physiques et/ou mentaux limités.
• Protégez le produit contre toute utilisation accidentelle.
• Sécuriser l‘emballage, petites pièces et l‘isolation contre l‘utilisation accidentelle.
Exploitation et les conditions de stockage
• NE JAMAIS laisser sans surveillance pendant l‘opération.
• Ne couvrez pas le produit.
• Gardez les fentes de ventilation et les évents libre.
• N’utilisez pas le produit dans des environnements poussiéreux ou insufsamment aérés.
• N’utilisez pas le produit à proximité de gaz explosifs et/ou inammables.
• N’installez et n’utilisez pas le produit à proximité de ammes nues et de produits de cuisson ou générant de la chaleur comme
les radiateurs ou les fours.
• Placer, installer et transporter le produit, pièces et accessoires des produits d‘une manière secure.
• Placez le produit sur une surface stable, plane, sèche et sans poussière an qu‘il ne puisse pas basculer pendant le fonction-
nement et que la surface ne soit pas endommagée par les vibrations.
• Veillez à ce que le produit tienne bien debout.
Le ventilateur ne doit pas reposer sur le câble secteur an qu‘il ne se renverse pas pendant le fonctionnement.
• Éviter des conditions extrêmes, telles que la chaleur extrême et froid, l‘humidité et de la lumière directe du soleil, ainsi que mi-
croondes, des vibrations et de la pression mécanique.
• Éteignez l‘appareil et débranchez-le du secteur lorsque vous ne l‘utilisez pas, pour le nettoyer ou en cas de dysfonctionnement.
Risques de batterie
La télécommande est équipée d‘une pile bouton au lithium. Elle peut être remplacée.

Mode d‘emploi
19
FR
• Tenez les piles à l’écart des enfants.
En cas d’ingestion, cela peut provoquer de graves brûlures internes et la mort. Si vous pensez que la pile a été avalée ou a été ingé-
rée de quelque manière que ce soit, consultez immédiatement un médecin.
• N’utilisez jamais des piles cabossées, endommagées ou qui fuient.
• Retirer expiré, les cellules déformées ou corrodées au moyen de dispositifs de sécurité appropriés à partir du produit et en dis-
poser.
Si une pile a fui, évitez tout contact avec la peau, les yeux et les muqueuses. Si nécessaire, rincez les zones touchées à l‘eau et faites
immédiatement appel à un médecin.
• Ne déformez pas, ne brûlez pas et ne démontez pas les piles et ne les perforez jamais avec un objet pointu.
Une chaleur extrême peut entraîner une explosion et/ou une fuite de liquide corrosif. Les dommages mécaniques peuvent provoquer
la fuite de substances gazeuses, qui peuvent être très irritantes, inammables ou toxiques.
• Ne court-circuitez pas les piles et ne les plongez pas dans des liquides.
Il y a un risque d‘explosion, d‘incendie, de chaleur, de fumée et/ou de dégagement de gaz.
• Si la batterie est accidentellement tombée dans l‘eau, retirez-la immédiatement. Placez la batterie dans un endroit sûr et ouvert
et tenez-vous à l‘écart jusqu‘à ce qu‘elle soit complètement sèche. Ne réutilisez pas la batterie sèche, mais jetez-la comme in-
diqué au chapitre 10.2.
2 Description et fonction
2.1 Produit
Ce produit est un puissant ventilateur sur pied qui génère une ventilation à 3 niveaux différents et en plusieurs modes.
○avec télécommande et minuterie
○3 niveaux de puissance : léger, fort, turbo
2.2 Contenu de la livraison
N° Désignation Pcs. Description N° Désignation Pcs. Description
1Base 18Écrou de xation 1
2Grille protectrice
arrière 19Vis de xation 1
3Grille protectrice
avant avec clips
de verrouillage 110 Vis cruciforme
Ø x L =
4,4 x 9,2 mm 1
4Rotor 111 Écrou
Ø = 4,9 mm 1
5
Support avec bou-
tons de fonction,
indicateurs d‘état et
bloc moteur
112 Télécommande 1
6Vis de la base 1 13 Pile bouton au
lithium (CR2025) 1 -
7Rondelle 114 Mode d‘emploi 1 -
Sidan laddas...
Sidan laddas...
Sidan laddas...
Sidan laddas...
Sidan laddas...
Sidan laddas...
Sidan laddas...
Sidan laddas...
Sidan laddas...
Sidan laddas...
Sidan laddas...
Sidan laddas...
Sidan laddas...
Sidan laddas...
Sidan laddas...
Sidan laddas...
Sidan laddas...
Sidan laddas...
Sidan laddas...
Sidan laddas...
Sidan laddas...
Sidan laddas...
Sidan laddas...
Sidan laddas...
Sidan laddas...
Sidan laddas...
Sidan laddas...
Sidan laddas...
Sidan laddas...
Sidan laddas...
Sidan laddas...
Sidan laddas...
Sidan laddas...
Sidan laddas...
Sidan laddas...
Sidan laddas...
Sidan laddas...
Sidan laddas...
Sidan laddas...
Sidan laddas...
Sidan laddas...
Sidan laddas...
Sidan laddas...
Sidan laddas...
Sidan laddas...
Sidan laddas...
Sidan laddas...
Sidan laddas...
Sidan laddas...
Sidan laddas...
Sidan laddas...
Sidan laddas...
Sidan laddas...
Sidan laddas...
Sidan laddas...
Sidan laddas...
Sidan laddas...
Sidan laddas...
Sidan laddas...
Sidan laddas...
Sidan laddas...
Sidan laddas...
-
 1
1
-
 2
2
-
 3
3
-
 4
4
-
 5
5
-
 6
6
-
 7
7
-
 8
8
-
 9
9
-
 10
10
-
 11
11
-
 12
12
-
 13
13
-
 14
14
-
 15
15
-
 16
16
-
 17
17
-
 18
18
-
 19
19
-
 20
20
-
 21
21
-
 22
22
-
 23
23
-
 24
24
-
 25
25
-
 26
26
-
 27
27
-
 28
28
-
 29
29
-
 30
30
-
 31
31
-
 32
32
-
 33
33
-
 34
34
-
 35
35
-
 36
36
-
 37
37
-
 38
38
-
 39
39
-
 40
40
-
 41
41
-
 42
42
-
 43
43
-
 44
44
-
 45
45
-
 46
46
-
 47
47
-
 48
48
-
 49
49
-
 50
50
-
 51
51
-
 52
52
-
 53
53
-
 54
54
-
 55
55
-
 56
56
-
 57
57
-
 58
58
-
 59
59
-
 60
60
-
 61
61
-
 62
62
-
 63
63
-
 64
64
-
 65
65
-
 66
66
-
 67
67
-
 68
68
-
 69
69
-
 70
70
-
 71
71
-
 72
72
-
 73
73
-
 74
74
-
 75
75
-
 76
76
-
 77
77
-
 78
78
-
 79
79
-
 80
80
-
 81
81
-
 82
82


Goobay 59509 Pedestal Fan Användarmanual
- Kategori
- Hushållsfläktar
- Typ
- Användarmanual
på andra språk
- italiano: Goobay 59509 Pedestal Fan Manuale utente
- español: Goobay 59509 Pedestal Fan Manual de usuario
- Deutsch: Goobay 59509 Pedestal Fan Benutzerhandbuch
- polski: Goobay 59509 Pedestal Fan Instrukcja obsługi
- français: Goobay 59509 Pedestal Fan Manuel utilisateur
- dansk: Goobay 59509 Pedestal Fan Brugermanual
- Nederlands: Goobay 59509 Pedestal Fan Handleiding