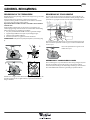
Whirlpool WIC 3C24 PE Bruksanvisning
- Kategori
- Diskmaskiner
- Typ
- Bruksanvisning
Denna manual är också lämplig för

1
EN
DAILY REFERENCE
GUIDE
THANK YOU FOR BUYING A WHIRLPOOL PRODUCT.
In order to receive a more complete assistance, please
register your appliance on:
www.whirlpool.eu/register
You can download the Safety Instructions and the Use
and Care Guide, by visiting our website
http://docs.whirlpool.eu and following the Instructions
on the back of this booklet.
Before using the appliance carefully read Health and Safety guide.
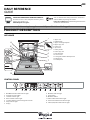
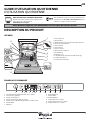
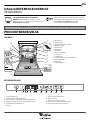
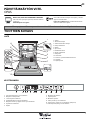
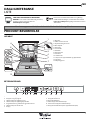
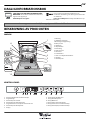
PRODUCT DESCRIPTION
APPLIANCE
1. Upper rack
2. Foldable flaps
3. Upper rack height adjuster
4. Upper spray arm
5. Lower rack
6. Space Zone
7. Cutlery basket
8. Lower spray arm
9. Filter Assembly
10. Salt reservoir
11. Detergent and Rinse Aid dispensers
12. Rating plate
13. Control panel
0000 000 00000
Service:
1
2
3
4
5
6
11
13
7
12
10
8
9
CONTROL PANEL
1. On-Off/Reset button with indicator light
2. Program selection button
3. Salt refill indicator light
4. Rinse Aid refill indicator light
5. Program number and remaining time indicator
6. Delay indicator light
7. Display
8. Multizone indicator light
9. Delay button
10. Multizone button
11. Turbo button with indicator light
12. Power Clean button with indicator light
13. Tablet (Tab) button with indicator light
1 2 3
4
5 6 7
8 9 10 11 12 13

2
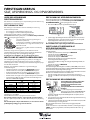
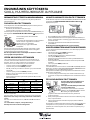
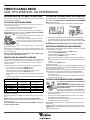
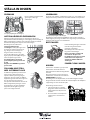
FIRST TIME USE
SALT, RINSE AID AND DETERGENT
ADVICE REGARDING THE FIRST TIME USE
After installation, remove the stoppers from the racks and the retaining
elastic elements from the upper rack.
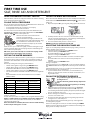
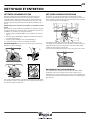
FILLING THE SALT RESERVOIR
The use of salt prevents the formation of LIMESCALE on the dishes and
on the machine’s functional components.
• It is important that the salt reservoir be never empty.
• It is important to set the water hardness.
The salt reservoir is located in the lower part of the dishwasher (see
PROGRAMS DESCRIPTION) and should be filled when the SALT REFILL
indicator light
in the control panel is lit.
1.Remove the lower rack and unscrew the
reservoir cap (anticlockwise).
2.Position the funnel
(see figure)
and fill the salt
reservoir right up to its edge (approximately 1 kg);
it is not unusual for a little water to leak out.
3.Remove the funnel and wipe any salt residue
away from the opening.
Make sure the cap is screwed on tightly, so that no detergent can get
into the container during the wash program (this could damage the
water softener beyond repair).
Whenever you need to add salt, we recommend carrying out the
procedure before the washing cycle is started.
SETTING THE WATER HARDNESS
To allow the water softener to work in a perfect way, it is essential that
the water hardness setting is based on the actual water hardness in
your house. This information can be obtained from your local water
supplier.
The factory setting is for average (3) water hardness.
• Switch on the appliance by pressing the ON/OFF button.
• Switch off the appliance by pressing the ON/OFF button.
• Hold down button P for 5 seconds, until you hear a beep.
• Switch on the appliance by pressing the ON/OFF button.
• The current selection level number and the salt indicator light both
flash.
• Press button P to select the desired hardness level (see Water
Hardness Table).
• Switch off the appliance by pressing the ON/OFF button.
Setting is complete!
As soon as this procedure is complete, run a program without loading.
Only use salt that has been specifically designed for dishwashers.
After the salt has been poured into the machine, the SALT REFILL
indicator light switches off.
If the salt container is not filled, the water softener and the heating
element may be damaged as a result.
FILLING THE RINSE AID DISPENSER
Rinse aid makes dish DRYING easier. The rinse aid dispenser A should
be filled when the RINSE AID REFILL indicator light
in the control
panel is lit.
1. Open the dispenser
B
by pressing and pulling up the tab on the lid.
2. Carefully introduce the rinse aid as far as the maximum (110 ml)
reference notch of the filling space - avoid spilling it. If this happens,
clean the spill immediately with a dry cloth.
3. Press the lid down until you hear a click to close it.
NEVER pour the rinse aid directly into the tub.
ADJUSTING THE DOSAGE OF RINSE AID
If you are not completely satisfied with the drying results, you can ad-
just the quantity of rinse aid used.
• Switch the dishwasher on using the ON/OFF button.
• Switch it off using the ON/OFF button.
• Press button P three times - a beep will be heard.
• Switch it on using the ON/OFF button.
• The current selection level number and rinse aid indicator light
flash.
• Press button P to select the level of rinse aid quantity to be
supplied.
• Switch it off using the ON/OFF button
Setting is complete!
If the rinse aid level is set to ZERO (ECO), no rinse aid will be supplied.
The LOW RINSE AID indicator light will not be lit if you run out of rinse
aid.
A maximum of 4 levels can be set according to the dishwasher model.
The factory setting is for a medium level.
• If you see bluish streaks on the dishes, set a low number (1-2).
• If there are drops of water or limescale marks on the dishes, set a
high number (3-4).
FILLING THE DETERGENT DISPENSER
To open the detergent dispenser use the
opening device A.
Introduce the detergent into the dry dispenser B
only.
Place the amount of detergent for pre-washing
directly inside the tub.
1. When measuring out the detergent refer to the
(see PROGRAMS
TABLE)
to add the proper quantity. Compartment
B
comprises a
level showing the maximum quantity of liquid or powder detergent
that can be added to each cycle.
2. Remove detergent residues from the edges of the dispenser and
close the cover until it clicks.
3. Close the lid of the detergent dispenser by pulling it up until the
closing device is secured in place.
The detergent dispenser automatically opens up at the right time
according to the program.
If all-in-one detergents are used, we recommend using the TABLET
button, because it adjusts the program so that the best washing and
drying results are always achieved.
Water Hardness Table
Level
°dH
German degrees
°fH
French degrees
1 Soft 0 - 6 0 - 10
2 Medium 7 - 11 11 - 20
3 Average 12 - 17 21 - 30
4 Hard 17 - 34 31 - 60
5 Very hard 35 - 50 61 - 90
M
A
X
MAX
A
B
A
B

3
EN
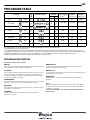
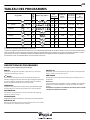
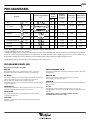
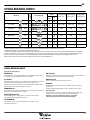
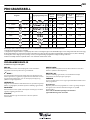
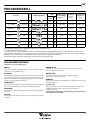
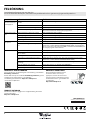
PROGRAMS TABLE
ECO program data is measured under laboratory conditions according to European Standard EN 50242.
*) Not all options can be used simultaneously.
**) The duration of the program shown on the display or in the booklet is an estimate calculated on standard conditions. The actual time may vary
depending on many factors such as temperature and pressure of the incoming water, room temperature, amount of detergent, quantity and type of load,
load balancing, additional selected options and sensor calibration. The sensor calibration can increase program duration up to 20 min.
Standby consumption: Left-on mode consumption: 5 W - Off mode consumption: 0.5 W
PROGRAMS DESCRIPTION
Instructions on wash cycle selection.
ECO 50°
Normally soiled crockery. Standard program, the most efficient in terms
of its combined energy and water consumption.
6
th
SENSE ®
For normally soiled dishes with dried food residues. Senses the level of
soiling on the dishes and adjusts the program accordingly. When the
sensor is detecting the soil level an animation appears in the display
and the cycle duration is updated.
INTENSIVE 65°
Program recommended for heavily soiled crockery, especially suitable
for pans and saucepans (not to be used for delicate items).
DAILY 50°
Normally soiled crockery. Everyday cycle, that ensures optimal cleaning
performance in shorter time.
SILENT50°
Suitable for night-time operation of the appliance. Optimum
performance ensured.
RAPID 30’ 50°
Program to be used for lightly-soiled dishes with no dried food
residues. (Ideal for 2 place settings).
CRISTAL 45°
Cycle for delicate items, which are more sensitive to high temperatures,
for example glasses and cups.
PRE-WASH
Crockery to be washed later. No detergent to be used with this
program.
Notes:
Optimum performance levels when using the “1 Hour” and “Rapid”
programs can be achieved by observing the maximum amounts of
specified place settings.
To reduce consumption even further, only run the dishwasher
when it is full.
Program
Drying
phase
Available options
*)
Detergent
container
Duration of
wash program
(h:min)
**)
Water con-
sumption
(litres/cycle)
Energy con-
sumption
(kWh/cycle)
Tub B
1. Eco 50°
3:10 9,5 0,93
2.
6
th
Sense
50 - 60°
1:25-3:00 7,0-14,0 0,9-1,40
3. Intensive 65°
- 2:50 14,0 1,50
4. Daily 50°
- 1:30 12,0 1,15
5. Silent 50°
- 3:30 15,0 1,15
6. Rapid 30’ 50° -
- 0:30 9,0 0,5
7. Cristal 45°
- 1:40 11 1,1
8. PreWash - -
- - 0:12 4,5 0,01

4
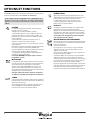
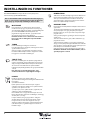
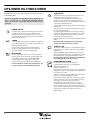
OPTIONS AND FUNCTIONS
OPTIONS can be selected directly by pressing the corresponding
button (see CONTROL PANEL).
MULTIZONE
If there are not many dishes to be washed, a half loading
may be used in order to save water, electricity and
detergent.
Select the wash cycle and then press the MULTIZONE
button: the indicator corresponding to the chosen rack
lights up and the wash cycle starts only in the upper or
lower rack.
Remember to load the upper or lower rack only, and
to reduce the amount of detergent accordingly.
TABLET (Tab)
This setting allows you to optimize the performance of
the program according to the type of detergent used.
Press the TABLET button (the indicator light will light up)
if you use combined detergents in tablet form (rinse aid,
salt and detergent in 1 dose).
If you use powder or liquid detergent, this option
should be off.
DELAY
The start time of the program may be delayed for a period
of time between 1 and 12 hours.
1.Press the DELAY button: the corresponding symbol
appears on the display; each time you press the button,
the time (1h, 2h, etc. up to max. 12h) from the start of the
selected wash cycle will be increased.
2.Select the wash program and close the door: the timer
will begin counting down;
3.Once this time has elapsed, the indicator light switches
off and the wash cycle begins.
To adjust the delay time and select a shorter period of
time, press the DELAY button. To cancel it, press the
button repeatedly until the selected delayed start
indicator light switches off.
The wash program will start automatically as soon as the
door is shut.
The Delay function cannot be set once a wash cycle
has been started.
TURBO
This option can be used to reduce the duration of the
main programs while maintaining the same washing and
drying performance levels.
After selecting the program, press the TURBO button and
the indicator light will switch on. To deselect the option,
press the same button again.
POWER CLEAN®
Thanks to the additional power jets this option provides
a more intensive and powerful wash in the lower rack, in
the specific area. This option is recommended for
washing pots and casseroles. Press this button to activate
POWER CLEAN (the indicator lights up).
LIGHT POINT
A LED light projected on the floor indicates that the
dishwasher is working.
One of the following operating modes can be selected:
a) Disabled function.
b) When the cycle starts the light goes on for few
seconds, stays off during the cycle and flashes at the end
of the cycle.
c) The light stays on during the cycle and flashes at the
end of the cycle (default mode).
If the delayed start was set, the light goes on either for the
first few seconds or the entire duration of the
countdown, based on whether mode b) or c) was set.
The light goes off every time the door is opened. To select
the mode you prefer, switch on the machine, hold down
button P until one of the three letters appears on the
display, press button P until you reach the desired letter
(or mode), hold down button P to confirm the selection.
If an option is not compatible with the selected program see
PROGRAMS TABLE, the corresponding LED flashes rapidly 3 times
and beeps will sound. The option will not be enabled.

5
EN
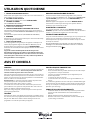
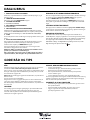
DAILY USE
1. CHECK WATER CONNECTION
Check that the dishwasher is connected to the water supply and that
the top is open.
2. SWITCH ON THE DISHWASHER
Open the door and press the ON/OFF button.
3. LOAD THE RACKS
(see LOADING THE RACKS)
4. FILLING THE DETERGENT DISPENSER
(see PROGRAMS TABLE).
5. CHOOSE THE PROGRAM AND CUSTOMISE THE CYCLE
Select the most appropriate program in accordance with the type of
crockery and its soiling level (see PROGRAMS DESCRIPTION) by pressing
the P button.
Select the desired options (see OPTIONS AND FUNCTIONS).
6. START
Start the wash cycle by closing the door. When the program starts you
hear a beep.
7. END OF WASH CYCLE
The end of the wash cycle is indicated by beeps and by the flashing of
the wash cycle number on the display. Open the door and switch off
the appliance by pressing the ON/OFF button.
Wait for a few minutes before removing the crockery - to avoid burns.
Unload the racks, beginning with the lower one.
The machine will switch off automatically during certain extended
periods of inactivity, in order to minimise electricity consumption.
If the crockery is only lightly soiled or if it has been rinsed with
water before being placed in the dishwasher, reduce the amount
of detergent used accordingly.
MODIFYING A RUNNING PROGRAM
If a wrong program was selected, it is possible to change it, provided
that it has only just begun: open the door (be ware of HOT steam!),
press and hold the ON/OFF button, the machine will switch off.
Switch the machine back on using the ON/OFF button and select the
new wash cycle and any desired options; start the cycle by closing the
door.
ADDING EXTRA CROCKERY
Without switching off the machine, open the door (be ware of HOT
steam!) and place the crockery inside the dishwasher. Close the door
and the cycle will begin from the point at which it was interrupted.
ACCIDENTAL INTERRUPTIONS
If the door is opened during the wash cycle, or if there is a power cut,
the cycle stops. It starts again from the point at which it was
interrupted once the door has been closed or the electricity supply is
restored.
For more information about the functions, you can request or download
from the WEB a Use & Care Guide by following the instructions on the last
page.
ADVICE AND TIPS
TIPS
Before loading the baskets, remove all food residues from the crockery
and empty the glasses. You do not need to rinse beforehand under
running water.
Arrange the crockery so that it is held in place firmly and does not tip
over; and arrange the containers with the openings facing downwards
and the concave/convex parts placed obliquely, thus allowing the
water to reach every surface and flow freely.
Warning: lids, handles, trays and frying pans do not prevent the
sprayer arms from rotating.
Place any small items in the cutlery basket.
Very soiled dishes and pans should be placed in the lower basket
because in this sector the water sprays are stronger and allow a higher
washing performance.
After loading the appliance, make sure that the sprayer arms can rotate
freely.
HYGIENE
To avoid odour and sediment which can be accumulated in the
dishwasher please run a high temperature program at least one a
month. Use a tea spoon of detergent and run it without the loading to
clean your appliance.
UNSUITABLE CROCKERY
• Wooden crockery and cutlery.
• Delicate decorated glasses, artistic handicraft and antique
crockery. Their decorations are not resistant.
• Parts in synthetic material which do not withstand high
temperatures.
• Copper and tin crockery.
• Crockery soiled with ash, wax, lubricating grease or ink.
The colours of glass decorations and aluminium/silver pieces can
change and fade during the washing process. Some types of glass (e.g.
crystal objects) can become opaque after a number of wash cycles too.
DAMAGE TO GLASS AND CROCKERY
• Only use glasses and porcelain guaranteed by the manufacturer as
dishwasher safe.
• Use a delicate detergent suitable for crockery
• Collect glasses and cutlery from the dishwasher as soon as the
wash cycle is over.

6
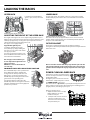
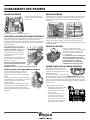
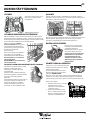
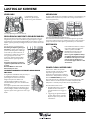
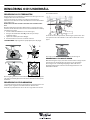
LOADING THE RACKS
UPPER RACK
Load delicate and light dishes:
glasses, cups, saucers, low salad
bowls.
(loading example for the upper rack)
ADJUSTING THE HEIGHT OF THE UPPER RACK
The height of the upper rack can be adjusted: high position to place
bulky crockery in the lower basket and low position to make the most
of the tip-up supports by creating more space upwards and avoid
collision with the items loaded into lower rack.
The upper rack is equipped with a
Upper Rack height adjuster
(see figure), without pressing the
levers, lift it up by simply holding the
rack sides, as soon as the rack is stable
in its upper position.
To restore to the lower position, press
the levers A at the sides of the rack and
move the basket downwards.
We strongly recommend that you
do not adjust the height of the rack
when it is loaded.
NEVER raise or lower the basket on
one side only.
FOLDABLE FLAPS WITH ADJUSTABLE POSITION
The side foldable flaps can be positioned at
three different heights to optimize the
arrangement of crockery inside the rack.
Wine glasses can be placed safely in the
foldable flaps by inserting the stem of each
glass into the corresponding slots.
For optimum drying results incline the
foldable flaps more. To change the inclination,
pull up the foldable flap, slide it slightly and
position it as you wish.
LOWER RACK
For pots, lids, plates, salad bowls, cutlery etc. Large plates and lids
should ideally be placed at the sides to avoid interferences with the
spray arm.
(loading example for the lower rack)
The lower rack has tip-up supports which can be used in a vertical
position when arranging plates or in a horizontal position (lower) to
load pans and salad bowls easily.
CUTLERY BASKET
The basket is equipped with top grilles for improved cutlery
arrangement. The cutlery basket should be positioned only at the front
of the lower rack.
Knives and other utensils with sharp edges must be placed in the
cutlery basket with the points facing downwards or they must be
positioned horizontally in the tip-up compartments on the upper
rack.
POWER CLEAN IN LOWER RACK
Power Clean® uses the special water jets in
the rear of cavity to wash more intensively
the high dirty items.
Placing the pots/casseroles faced to the
Power Clean® component please activate
the POWER CLEAN on the panel.
The lower rack has a Space Zone, a special pull-out support in the rear
of the rack that can be used to support frying pans or baking pans in
upright position, thus taking up less space.
How to use Power Clean®:
1. Adjust the Power Clean® area (G)
folding down the rear plate
holders to load pots.
2. Load pots and casseroles inclined
vertically in Power Clean® area.
Pots have to be inclined towards
the power water jets.

7
EN
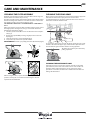
CARE AND MAINTENANCE
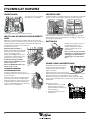
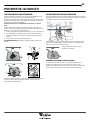
CLEANING THE FILTER ASSEMBLY
Regularly clean the filter assembly so that the filters do not clog and
that the waste water flows away correctly.
The filter assembly consists of three filters which remove food residues
from the washing water and then recirculate the water: to obtain the
best washing results, you need to keep them clean.
The dishwasher must not be used without filters or if the filter is
loose.
After several washes, check the filter assembly and if necessary clean it
thoroughly under running water, using a non-metallic brush and
following the instructions below:
1. Turn the cylindrical filter
A
in an anti-clockwise direction and pull it
out
(Fig 1)
.
2. Remove the cup filter
B
by exerting a slight pressure on the side
flaps
(Fig 2)
.
3. Slide out the stainless-steel plate filter
C
(Fig 3)
.
4. Inspect the trap and remove any food residues.
NEVER REMOVE the wash-cycle pump protection (black detail) (Fig 4).
After cleaning the filters, re-place the filter assembly and fix it in
position correctly; this is essential for maintaining the efficient
operation of the dishwasher.
CLEANING THE SPRAY ARMS
On occasions, food residue may become encrusted onto the spray arms
and block the holes used to spray the water. It is therefore
recommended that you check the arms from time to time and clean
them with a small non-metallic brush.
To remove the upper spray arm, turn the plastic locking ring in an anti-
clockwise direction. The upper spray arm should be replaced so that
the side with the greater number of holes is facing upwards.
The lower spray arm may be removed by
pulling it upwards.
CLEANING THE WATER INLET HOSE
If the water hoses are new or have not been used for an extended
period of time, let the water run to make sure it is clear and free of
impurities before performing the necessary connections. If this
precaution is not taken, the water inlet could become blocked and
damage the dishwasher.
A
A
B
C
12
34

8
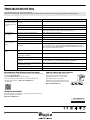
TROUBLESHOOTING
MAINTENANCE AND TROUBLESHOOTING GUIDE
For more information, maintenance procedures and troubleshooting,
see the Use and Care Guide.
The Use and Care Guide can be obtained by:
• After-Sales Service; phone number see in warranty booklet.
• download from website: http://docs.whirlpool.eu
• use QR code:
TECHNICAL DATASHEET
The technical data containing the energy consumption data can be
downloaded from the website:
http://docs.whirlpool.eu
CONTACTING AFTER-SALES SERVICE
When you contact the After-Sales Service,
you must provide the codes shown on
the rating plate attached to the left or
right side inside the door of the
dishwasher. The phone number is listed
in the warranty booklet or on the website:
http://www.whirlpool.eu
Your dishwasher may not work properly.
Before contacting the Service Centre check if the problem can be solved by going through the following list.
PROBLEMS POSSIBLE CAUSES SOLUTIONS
The dishwasher
won’t start or does
not respond to com-
mands.
The appliance has not been plugged in
properly.
Insert the plug into the socket.
Power outage. The dishwasher starts automatically when the power returns.
The dishwasher door is not closed. Vigorously push the door until you hear the “click”.
It does not respond to commands. Switch off the appliance by pressing the ON/OFF button, switch it back on
after approximately one minute and reset the program.
The dishwasher
won’t drain.
The wash cycle has not finished yet. Wait until the wash cycle finishes.
The drain hose is bent. Check that the drain hose is not bent (see INSTALATION INSTRUCTION).
The sink drain pipe is blocked. Clean the sink drain pipe.
The filter is clogged up with food residues Clean the filter (see CLEANING THE FILTER ASSEMBLY).
The dishwasher
makes excessive
noise.
The dishes are rattling against each. Arrange the crockery correctly (see LOADING THE RACKS).
An excessive amount of foam has been
produced.
The detergent has not been measured out correctly or it is not suitable for
use in dishwashers (see FILLING THE DETERGENT DISPENSER). Reset dish-
washer by pressing the DRAIN button (see OPTIONS AND FUNCTIONS) and
run new program without detergent.
The dishes are not
clean.
The crockery has not been arranged prop-
erly.
Arrange the crockery correctly (see LOADING THE RACKS).
The spray arms cannot rotate freely, being
hindered by the dishes.
Arrange the crockery correctly (see LOADING THE RACKS).
The wash cycle is too gentle. Select an appropriate wash cycle (see PROGRAMS TABLE).
An excessive amount of foam has been
produced.
The detergent has not been measured out correctly or it is not suitable for
use in dishwashers (see FILLING THE DETERGENT DISPENSER).
The cap on the rinse aid compartment has
not been shut correctly.
Make sure the cap of the rinse aid dispenser is closed.
The filter is soiled or clogged. Clean the filter assembly (see CARE AND MAINTENANCE).
There is no salt. Fill the salt reservoir (see FILLING THE SALT RESERVOIR).
IEC 436
:
195142833.01
03/2016 - jk- Xerox Fabriano
001

1
FR
GUIDE D'UTILISATION QUOTIDIENNE
D'UTILISATION QUOTIDIENNE
MERCI D'AVOIR CHOISI UN PRODUIT WHIRLPOOL.
Afin de recevoir une assistance plus complète, merci
d'enregistrer votre appareil sur on :
www.whirlpool.eu/register
Vous pouvez télécharger les Consignes d'utilisation en
visitant notre site Web http://docs.whirlpool.eu et en
suivant les consignes au dos de ce livret.
Avant d'utiliser l'appareil, lisez attentivement les Consignes de santé et sécurité.
DESCRIPTION DU PRODUIT
APPAREIL
1. Panier supérieur
2. Volets pliables
3. Bouton de réglage de la hauteur du panier supérieur
4. Bras d'aspersion supérieur
5. Panier inférieur
6. Zone d'espace
7. Panier à couvert
8. Bras d'aspersion inférieur
9. Ensemble filtre
10. Réservoir à sel
11. Distributeurs de détergent et liquide de rinçage
12. Plaque signalétique
13. Panneau de commande
0000 000 00000
Service:
1
2
3
4
5
6
11
13
7
12
10
8
9
PANNEAU DE COMMANDE
1. Touche Marche-Arrêt/Réinitialisation avec le voyant
2. Sélecteur de programme
3. Voyant de niveau de sel
4. Voyant de niveau de liquide de rinçage
5. Voyant pour le numéro du programme et le temps restant
6. Voyant Différé
7. Affichage
8. Voyant Multizone
9. Touche Différé
10. Touche Multizone
11. Touche Turbo avec le voyant
12. Touche Power Clean avec le voyant
13. Touche Pastille avec le voyant
1 2 3
4
5 6 7
8 9 10 11 12 13

2
PREMIÈRE UTILISATION
SEL, LIQUIDE DE RINÇAGE, ET DÉTERGENT
CONSEILS AU SUJET DE LA PREMIÈRE UTILISATION
Après l'installation, enlevez les boulons d'arrêt sur les paniers et les
éléments élastiques qui retiennent le panier supérieur.
REMPLIR LE RÉSERVOIR DE SEL
L’utilisation de sel empêche la formation de CALCAIRE sur la vaisselle et sur les
composantes fonctionnelles de l’appareil.
• Il est important de s’assurer que le réservoir de sel ne soit jamais vide.
• Il est important de régler la dureté de l'eau.
Le réservoir de sel est situé dans la partie inférieure du lave-vaisselle
(voir
DESCRIPTION DES PROGRAMMES)
et devrait être rempli quand le
voyant
NIVEAU DE SEL
est allumé sur le panneau de commande.
1.Enlevez le panier inférieur et dévissez le bouchon du
réservoir (sens antihoraire).
2.Placez l'entonnoir
(voir figure)
et remplissez le
réservoir de sel jusqu'au bord (environ 1 kg); il est
normal qu'un peu d'eau déborde.
3.Enlevez l’entonnoir et essuyez les résidus de sel
autour de l’ouverture.
Assurez-vous que le bouchon est bien serré pour éviter que du détergent
pénètre dans le réservoir durant le cycle de lavage (le réservoir pourrait
s’endommager au point de ne plus être réparable).
Lorsque vous devez ajouter du sel, nous vous recommandons
d’effectuer l’opération avant de lancer le cycle de lavage.
RÉGLER LA DURETÉ DE L'EAU
Pour que l'adoucisseur d'eau fonctionne à la perfection, il est important de
régler la dureté de l'eau aux conditions existantes dans votre résidence. Cette
information peut être obtenue de votre fournisseur d'eau local.
Le réglage par défaut est pour une dureté d'eau normale (3).
•
Éteindre l'appareil en appuyant sur la touche
MARCHE/ARRÊT
.
•
Éteindre l'appareil en appuyant sur la touche
MARCHE/ARRÊT
.
•
Appuyez sur la touche
P
pour 5 secondes; un bip se fait entendre.
• Éteindre l'appareil en appuyant sur la touche
MARCHE/ARRÊT
.
• Le numéro de la sélection actuelle et le voyant de niveau de sel
clignotent.
•
Appuyez sur la touche
P
pour sélectionner le niveau de dureté
désiré
(voir Tableau de dureté de l'eau).
•
Éteindre l'appareil en appuyant sur la touche
MARCHE/ARRÊT
.
Le réglage est terminé!
Une fois cette opération complétée, lancez un programme sans charger le
lave-vaisselle.
Utilisez seulement le sel spécialement conçu pour les lave-vaisselles.
Lorsque le sel est versé dans l’appareil, le voyant AJOUTER DU SEL s’éteint.
Si le réservoir de sel n’est pas rempli, l’adoucisseur d’eau et l’élément
chauffant pourraient s’endommager
.
REMPLIR LE DISTRIBUTEUR DE LIQUIDE DE RINÇAGE
Le liquide de rinçage permet à la vaisselle de SÉCHER plus facilement.
Le distributeur de liquide de rinçage A devrait être rempli lorsque le
voyant de NIVEAU DE LIQUIDE DE RINÇAGE est allumé à l'écran.
1. Ouvrez le distributeur
B
en appuyant et en tirant sur l'onglet sur le
couvercle.
2. Versez doucement du liquide de rinçage jusqu'à la marque de
référence (110 ml) du réservoir de remplissage - évitez les
débordements. Si cela se produit, nettoyez les dégâts
immédiatement avec un linge sec.
3. Appuyez sur le bouchon pour le fermer; un clic se fait entendre.
Ne JAMAIS verser le liquide de rinçage directement dans la cuve.
AJUSTER LE DOSAGE DU LIQUIDE DE RINÇAGE
Si vous n'êtes pas complètement satisfait avec le séchage, vous pouvez ajuster
la quantité de liquide de rinçage utilisée.
• Allumez le lave-vaisselle en utilisant la touche
MARCHE/ARRÊT
.
• Éteignez-le en utilisant la touche
MARCHE/ARRÊT
.
• Appuyez sur la touche
P
à trois reprises - vous entendrez un bip.
• Allumez-le en utilisant la touche
MARCHE/ARRÊT
.
• Le numéro du niveau de sélection actuelle et le voyant du niveau de liquide
de rinçage clignotent.
• Appuyez sur la touche
P
pour sélectionner la quantité de liquide de rinçage
qui doit être utilisée.
• Éteignez-le en utilisant la touche
MARCHE/ARRÊT
Le réglage est terminé!
Si le niveau de liquide de rinçage est à ZÉRO (ÉCO), il n'y aura pas de liquide de
rinçage distribué. Le voyant LIQUIDE DE RINÇAGE BAS ne s'allumera pas s'il ne
reste plus de liquide de rinçage.
Un maximum de 4 niveaux peuvent être réglés selon le modèle du lave-vais-
selle. Le réglage par défaut est sur le niveau moyen.
• Si vous observez des traces bleuâtres sur la vaisselle, placez sur un niveau
plus bas (1-2).
• Si vous observez des gouttelettes d'eau ou des traces de calcaire sur la
vaisselle, placez sur un niveau plus haut (3-4).
REMPLIR LE DISTRIBUTEUR DE DÉTERGENT
Pour ouvrir le distributeur de détergent, utilisez le
dispositif d'ouverture A
.
Insérez le détergent dans le distributeur sec B
seulement.
Placez la quantité de détergent pour le prélavage
directement dans la cuve.
1. Lorsque vous mesurez le détergent, reportez-vous au
(voir TABLEAU DES
PROGRAMMES)
pour ajouter la bonne quantité. Le compartiment
B
comprend une marque qui indique la quantité maximale de détergent
liquide ou en poudre qui peut être ajoutée à chaque cycle.
2. Enlevez les résidus de détergent sur le bord des récipients avant de
fermer le couvercle; un clic se fait entendre.
3. Fermez le couvercle du distributeur de détergent en le tirant vers le haut
jusqu'à ce que le dispositif soit fermement en place.
Le distributeur de détergent s'ouvre automatiquement, au moment
déterminé par le programme.
Si vous utilisez un détergent «tout-en-un», nous vous conseillons d'utiliser la
touche
PASTILLE
, elle ajuste le programme de façon à toujours obtenir les
meilleurs résultats de lavage et séchage.
Tableau de dureté de l'eau
Niveau
°dH
Degrés allemand
°fH
Degrés français
1 Très douce 0 - 6 0 - 10
2 Moyenne 7 - 11 11 - 20
3 Douce 12 - 17 21 - 30
4 Dure 17 - 34 31 - 60
5 Très dure 35 - 50 61 - 90
M
A
X
MAX
A
B
A
B

3
FR
TABLEAU DES PROGRAMMES
Les données du programme Éco sont mesurées sous des conditions en laboratoire conformément à la norme européenne EN 50242.
*) Les options ne peuvent pas toutes être utilisées en même temps.
**) La durée du programme affichée à l'écran ou dans le livret est une approximation calculée dans des conditions normales. Le temps réel peut varier selon des facteurs
comme la température et la pression de l'eau, la température de la pièce, la quantité de détergent, la quantité et le type de vaisselle, l'équilibre de la charge, les options
supplémentaires sélectionnées, et la calibration du capteur. La calibration du capteur peut augmenter la durée du programme jusqu'à 20 minutes.
Consommation en Veille : Consommation allumé: 5 W - Consommation éteint: 0,5 W
Programme
Durées de
la phase
Options disponibles
*)
Récipient
pour
détergent
Durée du pro-
gramme de
lavage
(h:min)
**)
Consomma-
tion d'eau
(litres/cycle)
Consomma-
tion d'éner-
gie
(kWh/cycle)
Cuve B
1. Éco 50°
3:10 9,5 0,93
2.
6
th
Sense®
50 - 60°
1:25-3:00 7,0-14,0 0,9-1,40
3. Intensif 65°
- 2:50 14,0 1,50
4. Quotidien 50°
- 1:30 12,0 1,15
5. Silence 50°
- 3:30 15,0 1,15
6. Rapide 30 min 50° -
- 0:30 9,0 0,5
7. Cristal 45°
- 1:40 11 1,1
8. Prélavage - -
- - 0:12 4,5 0,01
DESCRIPTION DES PROGRAMMES
Consignes pour la sélection du cycle de lavage.
ÉCO 50°
Vaisselle sale. Programme standard, le plus efficace en termes de
consommation d'énergie et d'eau.
6
th
SENSE ®
Pour la vaisselle normalement sale avec des résidus de nourriture secs.
Détermine le degré de saleté de la vaisselle et règle le programme en fonction
de celui-ci. Lorsque le capteur détecte le degré de saleté, une animation
apparaît sur l'afficheur et la durée du cycle est mise à jour.
INTENSIF 65°
Programme conseillé pour une vaisselle très sale, particulièrement adapté
pour les poêles et les casseroles (ne pas utiliser avec la vaisselle délicate).
QUOTIDIEN 50°
Vaisselle sale. Cycle quotidien, assure un rendement de nettoyage
optimal en moins de temps.
SILENCIEUX 50°
Adéquat lorsque l'appareil fonctionne la nuit. Assure un rendement optimal.
RAPIDE 30’ 50°
Utilisez ce programme pour la vaisselle légèrement sale et sans résidus
de nourriture secs. (Idéal pour deux couverts).
CRISTAL 45°
Programme pour la vaisselle délicate, plus sensible aux températures
élevées, comme les verres et les tasses.
PRÉLAVAGE
Vaisselle qui sera lavée plus tard. N'utilisez pas de détergent avec ce
programme.
Remarques:
Lorsque vous utilisez les programmes «
1 Heure
» et «
Rapide
», vous obtiendrez
des niveaux de rendement optimal en respectant le nombre de couverts
indiqués.
Pour réduire encore plus la consommation, attendez que le lave-vaisselle
soit plein avant de le faire fonctionner.

4
OPTIONS ET FONCTIONS
Les OPTIONS peuvent être sélectionnées directement en appuyant sur
la touche correspondante (voir PANNEAU DE COMMANDE).
DIFFÉRÉ
Le début du programme peut être retardé pour une
période entre 1 et 12 heures.
1.Appuyez sur la touche DIFFÉRÉ: le symbole
correspondant apparaît à l'écran; chaque fois que vous
appuyez sur la touche, le temps (1 heure, 2 heures, etc.
jusqu'à un max de 12 heures) avant le début du cycle de
lavage augmente.
2.Sélectionnez le programme et fermez la porte : la
minuterie commence le compte à rebours;
3.Une fois le temps écoulé, le voyant s'éteint et le cycle de
lavage démarre.
Pour ajuster le délai et sélectionner une période de temps
plus courte, appuyez sur la touche DIFFÉRÉ. Pour
l'annuler, appuyez sur la touche à plusieurs reprises pour
éteindre le voyant départ différé sélectionné.
Le programme de lavage démarre automatiquement
aussitôt que la porte est fermée.
La fonction DIFFÉRÉ ne peut pas réglée une fois le
programme en cours.
MULTIZONE
Le programme demi-charge permet de laver une petite
vaisselle et de faire des économies d’eau, d’électricité et
de produit de lavage. Sélectionner le programme,
appuyer sur la touche MULTIZONE, en succession: le
voyant correspondant au panier choisi s'allume et le
lavage démarre uniquement dans le panier supérieur ou
uniquement dans le panier inférieur.
Chargez seulement le panier supérieur ou inférieur,
et réduisez la quantité de détergent en conséquence.
TURBO
Cette option permet de réduire la durée des programmes
principaux tout en conservant les niveaux de rendement
du lavage et du séchage.
Après avoir sélectionné le programme, appuyez sur la
touche TURBO et le voyant s'illumine. Appuyez de
nouveau sur la touche pour annuler l'option.
POWER CLEAN®
Grâce aux jets haute pression supplémentaires, cette
option fournit un lavage plus intensif et puissant dans le
panier inférieur, dans la zone spécifique. Elle est
recommandée pour le lavage des poêles et des
casseroles. Appuyez sur cette touche pour activer
Power Clean® (le voyant s'allume).
PASTILLE
Ce réglage vous permet d'optimiser le rendement du
programme selon le type de détergent utilisé.
Appuyez sur la touche PASTILLE (le voyant s'illumine) si
vous utilisez un détergent sous la forme d'une pastille
(liquide de rinçage, sel, et détergent en une seule dose).
Si vous utilisez un détergent en poudre ou liquide,
cette option devrait être éteinte.
INDICATEUR DE FONCTIONNEMENT
Un voyant projeté sur le sol signale le fonctionnement du
lave-vaisselle.Un des modes de fonctionnement suivant
peut être sélectionné:
a) Fonction désactivée.
b) Lorsque que le cycle est lancé, le voyant s'illumine
quelques secondes; il reste éteint durant le cycle et
clignote à la fin du cycle.
c) Le voyant reste allumé durant le cycle et clignote à la
fin du cycle (mode par défaut).
Si le Départ différé est sélectionné, le voyant s'illumine
durant les premières secondes, ou pour la durée du
compte à rebours, selon que le mode b) ou c) ait été réglé.
Le voyant s'éteint chaque fois que la porte est ouverte.
Pour sélectionner votre mode préférez, allumez
l'appareil, appuyez sur la touche P jusqu'à ce qu'une des
trois lettre apparaisse à l'écran, appuyez sur la touche P
pour afficher la lettre (mode) désiré, et appuyez de
nouveau sur la touche P pour confirmer votre sélection.
Si une option n'est pas compatible avec le programme sélec-
tionnévoir TABLEAU DES PROGRAMMES, le voyant correspondant
clignote 3 fois et un bip se fait entendre. La fonction n'est pas
activée.

5
FR
UTILISATION QUOTIDIENNE
1. VÉRIFIER LE BRANCHEMENT DE L'EAU
Assurez-vous que l'appareil est raccordé à un réseau d'alimentation et
que le robinet de l'eau est ouvert.
2. ALLUMER LE LAVE-VAISSELLE
Ouvrez la porte et appuyez sur la touche MARCHE/ARRÊT.
3. CHARGER LES PANIERS
(voir CHARGEMENT DES PANIERS)
4. REMPLIR DE DISTRIBUTEUR DE DÉTERGENT
(voir TABLEAU DES PROGRAMMES).
5. CHOISIR LE PROGRAMME ET PERSONNALISER LE CYCLE
Sélectionnez le meilleur programme selon le type de vaisselle et le
niveau de saleté (voir DESCRIPTION DES PROGRAMMES) en appuyant sur
la touche P.
Sélectionnez les options désirées (voir OPTIONS ET FONCTIONS).
6. DÉMARRER
Démarrez le cycle de lavage en fermez la porte. Vous entendez un bip
lorsque le programme démarre.
7. FIN DU CYCLE DE LAVAGE
La fin du programme est signalée par des signaux acoustiques et le
numéro du programme clignote sur l’afficheur. Ouvrez la porte et
éteignez l'appareil en appuyant sur la touche MARCHE/ARRÊT.
Pour éviter de vous brûler, attendez quelques minutes avant de retirer
la vaisselle.
L'appareil s'éteint automatiquement durant des périodes
d'inactivité prolongées pour réduire la consommation d'énergie.
Si la vaisselle est légèrement sale ou si elle a été rincée avec à l'eau
avant d'être placée dans le lave-vaisselle, réduisez la quantité de
détergent utilisée en conséquence.
MODIFIER UN PROGRAMME EN COURS
Si vous avez sélectionné le mauvais programme, vous pouvez le
changer si c'est fait au début du cycle : ouvrez la porte (attention à la
vapeur CHAUDE!), appuyez sur la touche MARCHE/ARRÊT pour
éteindre l'appareil.
Rallumez l'appareil en appuyant sur la touche MARCHE/ARRÊT et
sélectionnez le nouveau cycle de lavage et les options désirées;
démarrez le cycle en fermant la porte.
AJOUTER DE LA VAISSELLE
Sans éteindre l'appareil, ouvrez la porte (attention à la vapeur
CHAUDE!) et placez la vaisselle à l'intérieur du lave-vaisselle. Fermez la
porteet le cycle démarre au point où il a été interrompu.
INTERRUPTIONS IMPRÉVUES
Si la porte est ouverte durant le cycle de lavage, ou s'il y a une panne de
courant, le cycle s'interrompt. Il redémarre au point où il a été
interrompu une fois que la porte est bien refermée ou que le courant
électrique est restauré.
Pour plus d’information sur les fonctions, vous pouvez demander ou
télécharger sur le Web le Guide d’utilisation et entretien en suivant les
consignes à la dernière page.
AVIS ET CONSEILS
CONSEILS
Avant de charger les paniers, enlevez tous les résidus de nourriture sur
la vaisselle et videz les verres. Vous n'avez pas besoin de rincer la
vaisselle avant de la placer dans le lave-vaisselle.
Placez la vaisselle pour qu'elles tiennent bien en place et ne risque pas
de tomber; et placez les récipients avec les ouvertures vers le bas et les
parties concaves/convexes de côté pour permettre à l'eau d'atteindre
toutes les surfaces et couler librement.
Avertissement : les couvercles, poignées, plaques et poêles à frire
n'empêchent pas les bras d'aspersion de tournez.
Placez les petits articles dans le panier à couvert.
La vaisselle et les casseroles très sales devraient être placées sur le
panier inférieur car les jets d'eau sont plus fort dans cette section et
permet un meilleur rendement lors du lavage.
Après avoir chargé l'appareil, assurez-vous que les bras d'aspersion
peuvent bouger librement.
HYGIÈNE
Pour éviter les odeurs et les dépôts qui pourraient s'accumuler dans le
lave-vaisselle, lancer un programme à haute température au moins une
fois par mois. Utilisez une cuillère à thé de détergent et lancer le
programme sans vaisselle pour nettoyer l'appareil.
VAISSELLE QUI NE CONVIENT PAS
• Vaisselle et couverts en bois.
• Verres décoratifs délicats, produits artisanaux, et vaisselle antique.
Les garnitures ne sont pas résistantes.
• Les pièces en matériel synthétique qui ne supportent pas les
hautes températures.
• La vaisselle en cuivre ou en étain.
• La vaisselle tachée de cendre, de cire, de graisse lubrifiante, ou
d'encre.
Les couleurs des garnitures de verre et des pièces d'aluminium/argent
peuvent changer et ternir durant le cycle de lavage. Certains types de
verre (p. ex. les objets en cristal) peuvent aussi devenir opaque après
plusieurs cycles de lavage.
VERRES ET VAISSELLE ENDOMMAGÉS
• Seulement utiliser des verres ou de la porcelaine qui sont lavable
au lave-vaisselle conformément aux recommandations du
fabricant.
• Utilisez un détergent doux, adéquat pour la vaisselle
• Retirez les verres et les couverts du lave-vaisselle aussitôt que le
cycle de lavage est terminé.

6
CHARGEMENT DES PANIERS
PANIER SUPÉRIEUR
Chargez la vaisselle délicate et
légère: verres, tasses, soucoupes,
saladiers bas.
(exemple de chargement du panier supérieur)
AJUSTER LA HAUTEUR DU PANIER SUPÉRIEUR
Vous pouvez ajuster la hauteur du panier supérieur : position élevée
pour placer la vaisselle encombrante sur le panier inférieur, et la
position basse pour profiter au maximum des supports rabattables et
créant plus d'espace vers le haut et éviter les chocs avec les articles sur
le panier inférieur.
Le panier supérieur comprend un
dispositif de réglage de la hauteur
du panier supérieur (voir figure), sans
appuyer sur les leviers, simplement
soulever en tenant le panier sur les
côtés jusqu'à ce qu'il soit stable en
position élevée.
Pour abaisser le panier, appuyez sur
les leviers A sur les côtés du panier et
déplacez-le vers le bas.
Nous vous conseillons fortement de
ne pas ajuster la hauteur du panier
lorsqu'il est chargé.
Ne JAMAIS soulever ou abaisser un seul côté du panier.
VOLETS PLIABLES AVEC POSITIONS AJUSTABLES
Les volets pliables latéraux peuvent être
placés à trois hauteurs différentes pour
optimiser le rangement de la vaisselle sur le
panier.
Les verres de vin peuvent être placés de façon
sécuritaire dans les volets pliables en insérant
le pied de chaque verre dans la fente
correspondante.
Pour de meilleurs résultats lors du séchage,
inclinez encore plus les volets pliables. Pour
changer l'inclinaison, tirez le volet pliable,
glissez-le légèrement, et placez-le à la position
souhaitée.
PANIER INFÉRIEUR
Pour les poêles, les couvercles, les plats, les saladiers, les couverts, etc.
Les grands plats et les grands couvercles devraient être placés sur le
côté pour éviter qu'ils n'entravent le fonctionnement des bras
d'aspersion.
(exemple de chargement du panier supérieur)
Le panier inférieur comprend des supports rabattables qui peuvent
être placés en position verticale pour charger des plaques, ou en
position horizontale (bas) pour faciliter le chargement des casseroles et
des bols de salade.
PANIER À COUVERT
Le panier comprend des grilles
supérieures pour placer les couverts plus
facilement. Le panier à couvert doit
uniquement être placé à l'avant du
panier inférieur.
Les couteaux et autres ustensiles avec
des bords tranchants doivent être
placés dans le panier à couvert avec la
pointe vers le bas, ou placés à
l'horizontal dans le compartiment
rabattable sur le panier supérieur.
POWER CLEAN SUR LE PANIER INFÉRIEUR
Power Clean® utilise des jets d'eau
spéciaux, situés à l'arrière de la cavité,
pour laver les articles très sales avec une
intensité plus élevée.
Placez les poêles et les casseroles face à la
composante Power Clean® et activez POWER CLEAN sur le panneau.
Le panier inférieur comprend une zone d'espace, un support spécial
qui se trouve à l'arrière du panier, qui peut être utilisé pour supporter
les poêles à frire et les moules dans une position verticale, prenant ainsi
moins de place.
Comment utiliser Power Clean® :
1. Réglez la zone Power Clean®
G
en
rabattant les supports pour
assiettes arrières pour charger
des casseroles.
2. Chargez les grands plats et les
casseroles en les inclinant à la
verticale dans la zone Power
Clean®. Les casseroles doivent
être inclinées dans la direction
des jets d'eau haute pression.

7
FR
NETTOYAGE ET ENTRETIEN
NETTOYER L'ENSEMBLE FILTRE
Nettoyez régulièrement l'ensemble filtre pour éviter qu'ils ne se
bouchent et pour permettre aux eaux usées de bien s'éliminer.
L'ensemble filtre comprend trois filtres qui séparent les résidus de
nourriture de l'eau de lavage pour ensuite faire circuler l'eau : vous
devez les garder propre pour obtenir les meilleurs résultats lors du
lavage.
N'utilisez pas le lave-vaisselle sans les filtres ou si un filtre est mal
ajusté.
Après plusieurs lavage, vérifiez l'ensemble filtre et, au besoin, nettoyez-
le soigneusement avec de l'eau courante, en utilisant une brosse non
métallique, et en suivant les consignes suivantes :
1. Tournez le filtre cylindrique
A
dans le sens antihoraire et retirez-le
(Fig. 1)
.
2. Enlevez le panier du filtre
B
en appliquant une légère pression sur
les volets latéraux
(Fig. 2)
.
3. Retirez la plaque du filtre en acier inoxydable
C
(Fig. 3)
.
4. Inspecter la cavité et enlever les résidus de nourriture.
NE JAMAIS ENLEVER la protection de la pompe du cycle de lavage
(détails en couleur noir) (Fig 4).
Après avoir nettoyé les filtres, assemblez de nouveau l'ensemble filtre
et remettez-le en place correctement; c'est très important pour que le
lave-vaisselle garde son efficacité.
NETTOYER LES BRAS D'ASPERSION
À l'occasion, des résidus de nourriture s’incrustent dans les bras
d'aspersion et bloquent les trous utilisés pour asperger de l'eau. Il est
donc conseillé de vérifier les bras de temps en temps et de les nettoyer
avec une petite brosse non métallique.
Pour enlever le bras d'aspersion supérieur, tournez l'anneau de
verrouillage en plastique dans le sens antihoraire. Le bras d'aspersion
supérieur doit être replacé de façon que le côté avec le plus grand
nombre de trous est placé vers le haut
.
Le bras d'aspersion inférieur peut être enlevé en le tirant vers le haut.
NETTOYER LE TUYAU D'ARRIVÉE D'EAU
Si les tuyaux d'eau sont neufs ou s'ils n'ont pas été utilisés depuis
longtemps, laissez l'eau couler pour vous assurer qu'il n'y a pas
d'impureté ou de saleté avant de les brancher. Si vous n'effectuez pas
cette opération, l'arrivée d'eau pourrait se boucher et endommager le
lave-vaisselle.
A
A
B
C
12
34

8
DÉPANNAGE
GUIDE D'ENTRETIEN ET DE DÉPANNAGE
Plus plus d'information sur les procédures d'entretien et de
dépannage, voir les Consignes d'utilisation.
Les Consignes d'utilisation peuvent être obtenu de la façon suivante :
• Service après-vente; numéro de téléphone, voir le livret de garantie.
• télécharger du site Web : http://docs.whirlpool.eu
• utilisez le code QR :
FICHE TECHNIQUE
La fiche technique, qui contient les données de consommation
d'énergie, peut être téléchargée sur le site Web:
http://docs.whirlpool.eu
CONTACTER LE SERVICE APRÈS-VENTE
Lorsque vous communiquez avec le
Service Après-vente, vous devez donner
les codes affichés sur la plaque
signalétique qui se trouve du côté
intérieur gauche ou droit de la porte du
lave-vaisselle. Le numéro de téléphone
est disponible dans le livret de garantie
ou sur le site Web:
http://www.whirlpool.eu
Il est possible que votre lave-vaisselle ne fonctionne pas correctement.
Avant de contacter le Service Après-vente, vérifiez si vous ne pouvez pas régler le problème vous-même avec l'aide de
la liste suivante.
PROBLÈMES CAUSES POSSIBLES SOLUTIONS
Le lave-vaisselle ou
les commandes ne
fonctionnent pas.
L'appareil n'est pas bien branché. Insérez la fiche dans la prise de courant.
Panne de courant. Le lave-vaisselle démarre automatiquement lorsque le courant revient.
La porte du lave-vaisselle n'est pas fermée. Poussez vigoureusement la porte pour entendre le « clic ».
Les commandes ne fonctionnent pas. Éteindre l'appareil en appuyant sur la touche MARCHE/ARRÊT, rallumez-le
environ une minute après, et réinitialisez le programme.
Le lave-vaisselle ne
se vidange pas.
Le cycle de lavage n'est pas encore ter-
miné.
Attendre que le cycle se termine.
Le tuyau de vidange est plié. Assurez-vous que le tuyau de vidange n'est pas plié (voir CONSIGNES D’INS-
TALLATION).
Le conduit de vidange de l'évier est bou-
ché.
Nettoyez le conduit de vidange de l'évier.
Le filtre est bouché par des résidus de
nourriture
Nettoyez le filtre (voir NETTOYAGE DE L’ENSEMBLE FILTRE).
Le lave-vaisselle fait
beaucoup de bruit.
La vaisselle s'entrechoque. Replacez la vaisselle (voir CHARGEMENT DES PANIERS).
Il y a une trop grande quantité de mousse. Le détergent a été mal mesuré ou il n'est pas adéquat pour les lave-vais-
selles (voir REMPLIR LE DISTRIBUTEUR DE DÉTERGENT). Réinitialisez le lave-
vaisselle en appuyant sur la touche DRAINER (voir OPTIONS ET FONCTIONS)
et lancez un nouveau programme sans détergent.
La vaisselle n'est pas
propre.
La vaisselle n'est pas bien placée. Replacez la vaisselle (voir CHARGEMENT DES PANIERS).
Les bras d'aspersion ne bougent pas libre-
ment, ils sont gênés par la vaisselle.
Replacez la vaisselle (voir CHARGEMENT DES PANIERS).
Le cycle de lavage est trop délicat. Sélectionnez le cycle de lavage approprié (voir TABLEAU DES PROGRAMMES).
Il y a une trop grande quantité de mousse. Le détergent a été mal mesuré ou il n'est pas adéquat pour les lave-vais-
selles (voir REMPLIR LE DISTRIBUTEUR DE DÉTERGENT).
Le bouchon du compartiment de liquide
de rinçage n'est pas bien fermé.
Assurez-vous que le bouchon du distributeur de liquide de rinçage est
fermé.
Le filtre est sale ou bouché. Nettoyez l'ensemble de filtre (voir NETTOYAGE ET ENTRETIEN).
Il n'y a pas de sel. Remplir le réservoir de sel (voir REMPLIR LE RÉSERVOIR DE SEL).
IEC 436
:
195142833.01
03/2016 - jk- Xerox Fabriano
001

1
DA
DAGLIG REFERENCEOVERSIGT
VEJLEDNING
TAK FORDI DU HAR KØBT ET WHIRLPOOL-
PRODUKT. Med henblik på at modtage en mere
komplet assistance, bedes du registrere dit apparat på:
www.whirlpool.eu/register
Du kan downloade Sikkerhedsanvisningerne og Brugs-
og vedligeholdelsesvejledningen ved at gå ind på vores
website http://docs.whirlpool.eu og følge
anvisningerne på bagsiden af dette hæfte.
Læs omhyggeligt Sundheds- og sikkerhedsvejledning før brug af apparatet.
PRODUKTBESKRIVELSE
APPARAT
1. Øverste kurv
2. Vipbare hylder
3. Højdejustering af øverste kurv
4. Øverste spulearm
5. Nederste kurv
6. Afstandszone
7. Bestikkurv
8. Nederste spulearm
9. Filterenhed
10. Saltbeholder
11. Doseringsrum til opvaskemiddel og
afspændingsmiddel
12. Typeplade
13. Betjeningspanel
0000 000 00000
Service:
1
2
3
4
5
6
11
13
7
12
10
8
9
BETJENINGSPANEL
1. Tænd/sluk-/Nulstil-knap med kontrollampe
2. Programvælgerknap
3. Kontrollampe for påfyldning af salt
4. Kontrollampe for påfyldning af afspændingsmiddel
5. Indikatoren Programnummer og tilbageværende tid
6. Kontrollampe for udskudt start
7. Display
8. Kontrollampe for Multizone
9. Knap til valg af udskudt start
10. Multizone-knap
11. Turbo-knap med kontrollampe
12. Knappen Power Clean med kontrollampe
13. Tablet-knap (Tab) med kontrollampe
1 2 3
4
5 6 7
8 9 10 11 12 13

2
FØRSTEGANGSBRUG
SALT, AFSPÆNDINGS- OG OPVASKEMIDDEL
GODE RÅD VEDRØRENDE
FØRSTEGANGSBRUG
Når maskinen er installeret, fjernes stopanordningerne fra kurvene og
plastholderne fra den øverste kurv.
PÅFYLDNING AF SALT
Når der bruges salt, forhindres dannelse af KALK på servicet og
maskinens komponenter.
• Det er vigtigt, at saltbeholderen aldrig er tom.
• Det er vigtigt, at vandets hårdhedsgrad indstilles.
Saltbeholderen sidder nederst i opvaskemaskinen (se
PROGRAMBESKRIVELSEN) og skal fyldes, når indikatorlampen PÅFYLD
SALT
på betjeningspanelet lyser.
1.Tag den nederste kurv ud, og skru låget af
beholderen (mod uret).
2.Sæt tragten i
(se billedet)
, og fyldsaltbeholderen
helt op til kanten (ca. 1 kg). Det er normalt, at der
løber lidt vand ud.
3.Fjern tragten, og aftør eventuel salt omkring
åbningen.
Kontroller, at låget er skuet godt fast, så der ikke kan komme
opvaskemiddel i beholderen under vaskeprogrammet (hvilket kan
forårsage uoprettelig skade på blødgøringsanlægget).
Vi anbefaler, at salt påfyldes, før et vaskeprogram startes.
INDSTILLING AF VANDETS HÅRDHEDSGRAD
For at blødgøringsanlægget kan fungere perfekt, er det vigtigt, at
indstillingen af vandets hårdhedsgrad er baseret på den faktiske
hårdhedsgrad for vandet i din bolig. Du kan få hårdhedsgraden oplyst
hos dit lokale vandværk.
Maskinen er fra fabrikken indstillet til en gennemsnitlig (3)
vandhårdhedsgrad.
• Tænd for maskinen ved at trykke på TÆND/SLUK-knappen.
• Sluk for maskinen ved at trykke på TÆND/SLUK-knappen.
•Hold knappen P trykket i 5 sekunder, indtil der lyder et bip.
• Tænd for maskinen ved at trykke på TÆND/SLUK-knappen.
• Nummeret for det valgte niveau og kontrollampen for salt blinker.
• Tryk på knappen P for at vælge den ønskede hårdhedsgrad (se
Tabel over vandhårdhedsgrader).
• Sluk for maskinen ved at trykke på TÆND/SLUK-knappen.
Indstillingen er nu udført!s
Kør umiddelbart herefter et program med tom maskine.
Der må kun anvendes salt, der er beregnet til opvaskemaskiner.
Når der er fyldt salt på maskinen, slukkes kontrollampen for påfyldning
af salt.
Hvis der ikke fyldes salt på saltbeholderen, er der risiko for skader
på blødgøringsanlægget og varmeelementet.
PÅFYLDNING AF AFSPÆNDINGSMIDDEL
Afspændingsmiddel fremmer TØRRINGEN af servicet. Afspændingsmidlets
doseringsrum
A
skal fyldes op, når
kontrollampen for PÅFYLDNING AF
AFSPÆNDINGSMIDDEL
på betjeningspanelet er tændt.
1. Åbn rummet
B
ved at trykke og trække dækslet opad.
2. Fyld forsigtigt afspændingsmidlet i til maksimumsreferencen (110 ml) i
påfyldningsområdet - og undgå at spilde. Hvis det sker, skal det spildte
afspændingsmiddel straks tørres op med en klud.
3. Tryk låget nedad til der lyder et klik, for at lukke det.
Der må ALDRIG hældes afspændingsmiddel direkte ind i maskinen.
INDSTILLING AF DOSERINGEN AF
AFSPÆNDINGSMIDDEL
Hvis du ikke er helt tilfreds med tørreresultatet, kan du indstille mængden af af-
spændingsmiddel.
• Tænd for opvaskemaskinen med knappen
TÆN D/ SLUK
.
• Sluk den vha. knappen
TÆN D/ SLUK
.
• Tryk tre gange på knappen
P
- der vil lyde et bip.
• Tænd den vha. knappen
TÆ ND / SLU K
.
• Nummeret for det valgte niveau og kontrollampen for
afspændingsmiddel blinker begge to.
• Tryk på knappen
P
, for at vælge den mængde afspændingsmiddel, der
skal leveres.
• Sluk den vha. knappen
TÆN D/ SLUK
Indstillingen er nu udført!
Hvis afspændingsmiddelmængden er indstillet på NUL (ØKO), leveres der in-
tet afspændingsmiddel. Kontrollampen LAVT AFSPÆNDINGSMIDDELNIVEAU
vil ikke tænde, hvis afspændingsmidlet opbruges.
Der kan maksimalt indstilles 4 niveauer i funktion af opvaskemaskinens model.
Maskinen er fra fabrikken indstillet til et middelniveau.
• Hvis der er blålige striber på servicet, skal du vælge et lavt tal (1-2).
• Hvis der er vanddråber eller kalkpletter på servicet, skal du vælge et højt
tal (3-4).
PÅFYLDNING AF OPVASKEMIDDEL
Anvend åbningsanordningen A til at åbne
doseringsrummet til opvaskemiddel
.
Fyld kun opvaskemidlet i det tomme
doseringsrum B.
Fyld opvaskemidlet til forvasken direkte i
maskinen.
1. Indhent oplysninger om den korrekte
mængde opvaskemiddel i
PROGRAMTABELLEN
.
Rummet
B
omfatter et niveau, der viser den
maksimale mængde af opvaskemiddel (flydende eller pulver) der kan
føjes til hver cyklus.
2. Fjern eventuelle rester af opvaskemiddel fra doseringsrummets kanter og
luk dækslet, til det siger klik.
3. Luk låget på opvaskemidlets doseringsrum ved at trække det opad, indtil
lukkeanordningen er anbragt korrekt.
Opvaskemiddelrummet åbnes automatisk på det rigtige tidspunkt i
programmet.
Hvis de anvendes alt-i-ét-opvaskemiddel, anbefaler vi, at du bruger knappen
TABLET
. Så justeres programmet, så du altid opnår det bedste vaske- og
tørreresultat.
Tabel over vandhårdhedsgrader
Niveau
°dH
Tysk hårdhed
°fH
Fransk hårdhed
1 Blødt 0 - 6 0 - 10
2 Mellem 7 - 11 11 - 20
3 Gennemsnitligt 12 - 17 21 - 30
4 Hårdt 17 - 34 31 - 60
5 Meget hårdt 35 - 50 61 - 90
M
A
X
MAX
A
B
A
B

3
DA
PROGRAMTABEL
Data for Øko-programmet er målt under laboratorieforhold iht. europæisk standard EN 50242.
*) Ikke alle indstillinger kan anvendes samtidigt.
**) Programvarigheden, som vises på displayet eller i hæftet, er beregnet ud fra standardforhold. Den faktiske tid kan variere afhængig af mange faktorer,
eksempelvis temperatur og tryk på vandtilførslen, rumtemperaturen, mængden af opvaskemiddel, mængden og typen af service, servicets afbalancering,
øvrige valgte indstillinger og sensorens kalibrering. Sensorens kalibrering kan forøge programmets varighed med op til 20 min.
Program
Tørrings-
fase
Disponible ekstrafunktio-
ner
*)
Beholder til
opvaske-
middel
Vaskepro-
grammets
varighed
(h:min)
**)
Vandforbrug
(liter/cyklus)
Strøm-forbrug
(kWh/program)
Behol
der
B
1. Øko 50°
3:10 9,5 0,93
2.
6
th
Sense
50 - 60°
1:25-3:00 7,0-14,0 0,9-1,40
3. Intensiv 65°
- 2:50 14,0 1,50
4. Dagligt 50°
- 1:30 12,0 1,15
5. Stille 50°
- 3:30 15,0 1,15
6. Hurtigprogram 30’ 50° -
- 0:30 9,0 0,5
7. Krystal 45°
- 1:40 11 1,1
8. Forvask - -
- - 0:12 4,5 0,01
Standbyforbrug: Forbrug ved tændt maskine: 5 W - Forbrug ved slukket maskine: 0,5 W
PROGRAMBESKRIVELSER
Anvisninger om valg af vaskecyklus.
ØKO 50°
Normalt tilsmudset service. Standardprogrammet er den mest
effektive med hensyn til kombineret energi- og vandforbrug.
6
th
SENSE ®
Til normalt tilsmudset service med indtørrede madrester. Registrerer
graden af tilsmudsning på servicet og justerer programmet i
overensstemmelse hermed. Når sensoren registrerer
tilsmudsningsgraden, vises en animation i displayet, og programmets
varighed opdateres.
INTENSIV 65°
Dette program anbefales til meget snavset service og er især velegnet
til pander og gryder (må ikke bruges til sart service).
DAGLIGT 50°
Normalt tilsmudset service. Hverdagscyklus som sikrer optimal
rengøring på kortere tid.
STILLE 50°
Velegnet, når opvaskemaskinen skal køre om natten. Garanti for
optimal ydeevne.
HURTIGPROGRAM 30’ 50°
Program til let tilsmudset service uden indtørrede madrester. (Velegnet
til 2 kuverter).
KRYSTAL 45°
Program til sart service, som er mere følsomt over for høje
temperaturer, f.eks. glas og kopper.
FORVASK
Service, der skal vaskes senere. Der skal ikke benyttes opvaskemiddel til
dette program.
Bemærk:
Det optimale resultat ved brug af programmerne “1 Time” og
“Hurtigprogram” opnås ved at overholde de angivne maksimale antal
kuverter.
Forbruget kan reduceres yderligere ved kun at starte
opvaskemaskinen, når den er fuld.

4
INDSTILLINGER OG FUNKTIONER
EKSTRAFUNKTIONER kan vælges direkte ved at trykke på den
tilsvarende knap (jfr. BETJENINGSPANEL).
MULTIZONE
Hvis man kun har en smule opvask, kan man fylde
maskinen halvt op og spare på både vand, energi og
opvaskemiddel. Vælg programmet, og tryk efterfølgende
på tasten MULTIZONE: Kontrollampen for den
pågældende valgte kurv tændes, og opvasken kun i
øverste kurv eller nederste kurv aktiveres.
Husk kun at stille service i den øverste eller nederste
kurv og at reducere mængden af opvaskemiddel
tilsvarende.
TURBO
Denne indstilling kan bruges til at reducere
hovedprogrammernes varighed, samtidig med at vaske-
og tørreresultatet bevares.
Vælg et program, og tryk derefter på knappen Turbo,
hvorefter indikatorlampen tændes. Tryk på den samme
knap igen for at annullere indstillingen.
TABLET (Tab)
Med denne indstilling kan du optimere programmets
ydeevne i forhold til det opvaskemiddel, der anvendes.
Tryk på knappen TABLET (kontrollampen tænder) hvis
der anvendes en kombination af opvaskemiddel i
tabletform (afspændingsmiddel, salt og opvaskemiddel i
1 dosis).
Hvis du bruger opvaskemiddel i pulver- eller
væskeform skal denne valgmulighed fravælges.
ILAMPE
En LED-lys projiceret på gulvet indikerer, at
opvaskemaskinen fungerer. En af følgende driftstilstande
kan vælges:
a) Inaktiveret funktion
b) Når cyklussen starter tændes lampen i nogle få
sekunder, hvorefter den slukkes, mens cyklussen kører,
og blinker, når cyklussen er slut.
c) Lampen lyser, mens cyklussen kører, og blinker, når
cyklussen er slut (standardtilstand).
Hvis Udskudt start er valgt, tændes lampen enten i de
første sekunder eller under hele nedtællingen, afhængig
af om b) eller c) er valgt.
Lampen slukkes, hver gang lågen åbnes. Vælg den
ønskede tilstand ved at tænde for maskinen, holde
knappen P inde, til et af de tre bogstaver vises på
displayet, trykke på knappen P, til det ønskede bogstav
(eller tilstand) vises, og holde knappen P inde for at
bekræfte valget.
POWER CLEAN
Takket være de ekstra vanddyser giver denne funktion en
mere intensiv og kraftig opvask i den nederste kurv, i
dette specielle område. Denne funktion anbefales til
opvask af kogegrej. Tryk på denne knap for at aktivere
Power Clean (kontrollampen tænder).
UDSKUDT START
Programmets starttidspunkt kan udskydes med mellem 1
og 12 timer.
1.Tryk på knappen Udskudt start: Det tilhørende symbol
vises på displayet. Hver gang du trykker på knappen,
forlænges tiden (1t, 2t osv. op til maks. 12t), til det valgte
program starter.
2.Vælg et vaskeprogram, og luk lågen: Timeren betynder
at tælle ned.
3.Når den indstillede tid er gået, slukkes indikatoren, og
programmet starter.
Tiden til start kan indstilles, og en kortere periode kan
vælges, ved at trykke på knappen Udskudt start. Udskudt
start annulleres ved at trykke flere gange på knappen, til
kontrollampen for udskudt start slukkes.
Vaskeprogrammet starter automatisk, når lågen lukkes.
Funktionen Udskudt start kan ikke indstilles, efter et
opvaskeprogram er startet.
Hvis en ekstrafunktion ikke er kompatibel med det valgte pro-
gram (jfr. PROGRAMTABEL), blinker den tilsvarende lysdiode hur-
tigt 3 gange og der lyder bip. Indstillingen aktiveres ikke.
Sidan laddas...
Sidan laddas...
Sidan laddas...
Sidan laddas...
Sidan laddas...
Sidan laddas...
Sidan laddas...
Sidan laddas...
Sidan laddas...
Sidan laddas...
Sidan laddas...
Sidan laddas...
Sidan laddas...
Sidan laddas...
Sidan laddas...
Sidan laddas...
Sidan laddas...
Sidan laddas...
Sidan laddas...
Sidan laddas...
Sidan laddas...
Sidan laddas...
Sidan laddas...
Sidan laddas...
Sidan laddas...
Sidan laddas...
Sidan laddas...
Sidan laddas...
-
 1
1
-
 2
2
-
 3
3
-
 4
4
-
 5
5
-
 6
6
-
 7
7
-
 8
8
-
 9
9
-
 10
10
-
 11
11
-
 12
12
-
 13
13
-
 14
14
-
 15
15
-
 16
16
-
 17
17
-
 18
18
-
 19
19
-
 20
20
-
 21
21
-
 22
22
-
 23
23
-
 24
24
-
 25
25
-
 26
26
-
 27
27
-
 28
28
-
 29
29
-
 30
30
-
 31
31
-
 32
32
-
 33
33
-
 34
34
-
 35
35
-
 36
36
-
 37
37
-
 38
38
-
 39
39
-
 40
40
-
 41
41
-
 42
42
-
 43
43
-
 44
44
-
 45
45
-
 46
46
-
 47
47
-
 48
48


Whirlpool WIC 3C24 PE Bruksanvisning
- Kategori
- Diskmaskiner
- Typ
- Bruksanvisning
- Denna manual är också lämplig för