
SBC SP 370 – Power Switch
ON – OFF
Instructions for use
Mode d’emploi
Instrucciones de manejo
Bedienungsanleitung
Gebruiksaanwijzing
Instruzioni per l’uso
Manual de utilização
Ãδηγίες øρήσεως
Bruksanvisning
Instrukcja obs¬ugi

2
English............................................4
Français ..........................................8
Español.........................................12
Deutsch.........................................17
Nederlands...................................21
Italiano..........................................25
Português......................................29
Έλληνικά
.....................................33
Svenska ........................................37
Polski ............................................41

3
•
•
•
•
•
•
•
•
•
•
•
•
•
•
•
•
A
B
C
D
E
F
G
H
I
J
K
L
M
N
O
P
1
2
3
4
5
6
7
8
9
1
0
1
1
1
2
1
3
1
4
1
5
1
6
GROUP
HOUSE
UNIT
ON
OFF
HOUSE
HOUSE
•
•
•
•
•
•
•
•
•
•
•
•
•
•
•
•
A
B
C
D
E
F
G
H
I
J
K
L
M
N
O
P
ON – OFF
1 • 5
2 • 6
3 • 7
4 • 8
1 • 4 5 • 8
A
LL
1 • 5
2 • 6
3 • 7
4 • 8
1 • 4 5 • 8
A
LL
ON – OFF
1
3
2

INTRODUCTION
Congratulations on your purchase of the Philips Power switch
(SBC
SP370). This switch can be used together with a Philips Power remote
control (SBC SR315). With the Power Remote Control system you can
operate electrical appliances (e.g. lamps, coffee-maker etc.) in and
around your house via the remote control without getting out of your
chair! Before connecting an appliance to the Power switch
, please
read this document carefully.
English
4
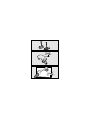
QUICK REFERENCE
1.
Make sure the house code of the new Power switch is the
same as with the used remote control
(fig.1)
.
2.
Connect the Power switch to a mains power outlet
(fig. 2)
.
3
Select the appliance, e.g. a lamp, you want to control and
plug it into the Power switch
(fig. 2)
.
• Check the power consumption of the selected appliance
before plugging it into the Power switch. This Power
switch can control appliances with a maximum power
rating of 1000 Watts!
• If the selected appliance has its own ON/OFF switch,
make sure it is switched on.
4.
Use the remote control to operate the appliance
(fig. 3)
.
The Power switch operates with button 1 as its default
setting.
If the right side (+) of the button is pressed, the appliance
switches on. If the left side (-) of the button is pressed, the
appliance switches off again.

CHANGING HOUSE CODE
The house code is meant to prevent interference with the Power
Control System of your neighbour. The Power switch will only respond
to signals with the correct house code. This means the house code of
the Power switch should be set to the same position as with the used
remote control. To change the house code
(fig. 1)
:
• Unscrew the battery door at the rear of the remote control.
• Check the position of the house code switch inside the remote
control.
• Adjust the house code of the Power switch by turning the house
code selection wheel at the rear of the switch (A-P) with a
screwdriver.
• Please note that the selected house-code for the remote control
and Power switch(es) should be the same! The house code’s
default setting is A.
CHANGING UNIT CODE
A unit code should be set on the Power switch. The selected unit code
corresponds to the button which has to be pressed on the remote
control. If for example, unit-code 3 is set, the Power switch is operated
via the 3rd button on the remote control. The unit code’s default
setting is 1. To change the unit code
(fig. 1)
:
• Set the unit code of the Power switch by turning the unit code
selection wheel at the rear of the plug (1-16) with a screwdriver.
• The Power switch is operated by pressing the correct button on the
remote control.
• It is possible to activate more Power switches at the same time by
selecting the same unit code.
5
English

Note: Although the unit code on the Power switch can be set from 1
to 16, the remote control can only operate Power switches with
unit code set from 1 to 8.
• To operate Power switches with unit code 1-4, the toggle switch on
the remote control should be set to the left (1-4).
– The first 4 buttons on the remote control correspond with unit code
1 to 4 respectively.
– If the toggle switch on the remote control is set to the right (5-8),
the first 4 buttons correspond with unit code 5 to 8 respectively.
INSTALLATION
Your appliance must be connected to the Power switch before you can
control it with the remote control
(fig. 2)
.
• Select the appliance (e.g. a lamp) you want to control and plug it
into the Power switch
(fig. 2)
.
• Please check the power consumption of the selected appliance. The
Power switch can control appliances with a maximum power rating
of 1000 Watts!
• If the selected appliance has its own ON/OFF switch, make sure it
is switched on.
English
6

OPERATION
The connected appliance can now be operated via the remote control
(fig. 3)
. If correct house code has been set, the Power switch is
operated with button 1 by default.
• If the right side (+) of the button is pressed, the appliance switches
on. If the left side (-) of the button is pressed, the appliance
switches off again.
–
If unit code has been changed, the Power switch is operated with
another button on the remote control!
The Power switch can also be operated with the last button of the
remote control (ALL). This button is designed to operate more Power
switches at the same time.
• Set the GROUP toggle switch on the rear of the Power switch to
the right side (= ON). The switch will now respond when the 5th
button (ALL) of the remote control is pressed. If the right side (+) of
the button is pressed, the appliance switches on. If the left side (-)
of the button is pressed, the appliance switches off again.
MANUAL OPERATION
The Power switch has a button for manual operation. This means that
your appliance can still be operated without the remote control.
• Press button at the front of the Power switch once.
– The Power switch switches on.
• Press button at the front of the Power switch once again.
– The Power switch switches off again.
English
7

1. INTRODUCTION
Félicitations pour votre achat de l'interrupteur Marche/Arrêt Philips
SBC SP370. Cet interrupteur peut être utilisé avec une télécommande
Philips SBC SR315.
Grâce à ce système de commande, vous pouvez allumer/éteindre
divers appareils électriques de la maison (cafetière, lampes…), sans
quitter votre fauteuil! Lisez attentivement ce document avant de
raccorder un appareil à ce système de commande.
Français
8
GUIDE DE REFERENCE RAPIDE
1.
Assurez-vous que le code maison du nouvel interrupteur est
identique à celui de la télécommande que vous utilisez
(fig. 1)
.
2.
Raccordez l'interrupteur Marche/Arrêt à une prise secteur
(fig. 2)
.
3.
Choisissez l'appareil, une lampe par exemple, que vous désirez
contrôler et raccordez-le à l'interrupteur M/A
(fig. 2)
.
• Vérifiez la consommation de l'appareil avant de le raccorder
à l'interrupteur M/A. Ces interrupteurs acceptent une
puissance de 1000 W maximum !
• Si l'appareil choisi est doté de son propre interrupteur
marche/arrêt, assurez-vous que celui-ci soit en position
marche.
4.
Vous pouvez allumer/éteindre l'appareil à l'aide de la
télécommande
(fig. 3)
.
L'interrupteur répond par défaut au bouton 1.
Il suffit d'appuyer sur le côté droit du bouton (+) pour mettre
l’appareil en marche, et d'appuyer sur le côté gauche (-) pour
l’éteindre.

CHANGER LE CODE MAISON
Le code maison est destiné à éviter les interférences avec le système
de commande électrique installé chez votre voisin. Les systèmes de
commande répondent seulement aux signaux émis avec le code
maison approprié. Ce qui signifie que l’interrupteur et la télécommande
doivent être sur le même code. Pour modifier ce code maison
(fig. 1)
:
• Dévissez le couvercle du compartiment à piles situé au dos de la
télécommande.
• Vérifiez la position du sélecteur du code maison à l'intérieur de la
télécommande.
• Réglez le code maison de l'interrupteur M/A en tournant la molette
du code maison au dos de l'interrupteur (A-P) à l'aide d'un tournevis.
• Notez que les codes maison sélectionnés pour la télécommande et
pour tous les interrupteurs doit être identiques. Le code par défaut
est A.
CHANGER LE CODE UNITE
Il est recommandé de définir un code unité pour l'interrupteur
Marche/Arrêt. Le code unité sélectionné correspond au bouton de la
télécommande sur lequel vous appuierez. Si, par exemple, le code
unité est 3, vous pourrez commander l'interrupteur en appuyant sur le
troisième bouton de la télécommande. Le code unité par défaut est 1.
Modifier le code unité
(fig. 1)
comme suit:
• Pour définir le code unité de l'interrupteur, tournez la molette du
code unité (UNIT) au dos de la prise (1 - 16) à l'aide d'un tournevis.
• Pour commander l'interrupteur, appuyez sur le bouton approprié de
la télécommande.
• Vous pouvez commander plusieurs interrupteurs simultanément si
vous sélectionnez le même code unité pour tous.
Français
9

Remarque:
Même si le code unité de l'interrupteur peut être compris entre 1 et
16, la télécommande se limite aux codes unité entre 1 et 8.
• Pour commander des interrupteurs Marche/Arrêt avec des codes
unité 1-4, le sélecteur de la télécommande doit être basculé vers la
gauche (positions 1-4).
– Les 4 premiers boutons de la télécommande correspondent aux
codes unité 1-4.
– Si le sélecteur de la télécommande est basculé vers la droite
(positions 5-8), les 4 premiers boutons correspondent aux codes
unité 5-8.
INSTALLATION
L'appareil doit être raccordé à l'interrupteur si vous voulez le contrôler
à partir de la télécommande
(fig. 2
).
• Choisissez l'appareil, une lampe par exemple, que vous désirez
contrôler et raccordez-le à l'interrupteur
(fig. 2
).
• Vérifiez la consommation de l'appareil avant de le raccorder à
l'interrupteur M/A. Ces interrupteurs acceptent une puissance de
1000 W maximum !
• Si l'appareil choisi est doté de son propre interrupteur
marche/arrêt, assurez-vous que celui-ci soit en position marche.
Français
10

FONCTIONNEMENT
Vous pouvez maintenant allumer/éteindre l'appareil à partir de la
télécommande
(fig. 3
). Si le code maison défini est valide,
l'interrupteur répond par défaut au bouton 1.
• Pour mettre l'appareil en marche, appuyez sur le côté droit du
bouton (+).
Pour l'éteindre, appuyez sur le côté gauche du bouton (-).
– Si vous avez modifié le code unité, l'interrupteur répondra à un
autre bouton de la télécommande !
Vous pouvez également contrôler l'interrupteur avec le dernier bouton
de la télécommande. Ce bouton permet de commander simultanément
plusieurs interrupteurs.
• Placez le sélecteur GROUP situé au dos de l'interrupteur M/A sur le
côté droit (ON/marche).
– Vous pouvez maintenant contrôler l'interrupteur en appuyant sur le
cinquième bouton de la télécommande. Il suffit d'appuyer sur le
côté droit du bouton (+) pour mettre tous les appareils en marche,
et d'appuyer sur le côté gauche (-) pour les éteindre tous.
FONCTIONNEMENT MANUEL
L'interrupteur Marche/Arrêt est doté d'un bouton de commande
manuelle pour vous permettre de contrôler les appareils même sans
l'aide de la télécommande.
• Appuyez une fois sur le bouton situé sur l'avant de
l'interrupteur M/A.
– L'interrupteur est activé (ON).
• Appuyez de nouveau sur le bouton situé sur l'avant de
l'interrupteur M/A.
– L'interrupteur est désactivé (OFF).
Français
11

INTRODUCCIÓN
Felicitaciones por haber comprado el Conmutador de Potencia Philips
(SBC SP370). Este conmutador puede usarse junto con un mando a
distancia Philips (SBC SR315). Con el sistema de Mando a Distancia,
usted puede operar los aparatos eléctricos (por ej. lámparas, cafetera,
etc.) en su casa y sus alrededores mediante el mando a distancia, ¡sin
tener que levantarse de su silla!
Antes de conectar los aparatos al Sistema de Control de Potencia, por
favor lea este documento con cuidado.
Español
12
REFERENCIA RÁPIDA
1.
Asegúrese que el código de casa del nuevo Conmutador de
Potencia es igual al del mando a distancia usado
(fig. 1)
.
2.
Conecte el Conmutador de Potencia a una toma de corriente de
la red
(fig. 2)
.
3.
Seleccione el aparato, por ejemplo una lámpara, que quiere
controlar y enchúfelo en el Conmutador de Potencia
(fig. 2)
.
• Verifique el consumo de potencia del aparato seleccionado
antes de enchufarlos en el Conmutador de Potencia. Este
Conmutador de Potencia puede controlar aparatos con una
potencia nominal máxima de 1000 vatios.
• Si el aparato seleccionado tiene su propio conmutador,
asegúrese de que esté encendido.
4.
Use el mando a distancia para operar el aparato
(fig. 3)
.
El Conmutador de Potencia se opera con el botón 1 como su
ajuste por defecto.
Si se pulsa la parte derecha de un botón (+) el aparato se
enciende. Si se pulsa la parte izquierda de un botón (-), el
aparato se apaga.

CAMBIANDO EL CÓDIGO DE CASA
La idea del código de casa es la de prevenir interferencia del Sistema
de Control de su vecino. Los Sistemas de Control de Potencia
responderán a las señales que tienen el código de casa correcto. Para
cambiar el código de casa
(fig. 1)
:
• Destornille la tapa en la parte trasera del mando a distancia
• Verifique la posición del código de casa, dentro del mando a
distancia
• Ajuste el código de casa del Conmutador de Potencia, girando la
rueda de selección de código de casa en la parte trasera del
conmutador (A-P) usando un destornillador.
• Por favor nótese que el código de casa para el mando a distancia y
el del Conmutador de Potencia deben ser iguales. El código de
casa, por defecto, es A.
CAMBIANDO EL CÓDIGO DE LA UNIDAD
Un código de unidad debe ser ajustado en el Conmutador de Potencia.
El código de unidad seleccionado corresponde al botón que tiene que
pulsarse en el mando a distancia. Si, por ejemplo, se ajusta el código
de unidad a 3, el Conmutador de Potencia se opera con el tercer botón
del mando a distancia. El código de unidad, por defecto, es 1. Para
cambiar un código de unidad
(fig. 1)
:
• Ajuste el código de unidad del Conmutador de Potencia girando la
rueda de selección de códigos de unidad (UNIT) en la parte trasera
del enchufe (1-16) con un destornillador.
• El Conmutador de Potencia se opera pulsando el botón correcto en
el mando a distancia.
• Es posible activar más de un Conmutador de Potencia a la vez,
seleccionando el mismo código.
Español
13

Nota: Aunque el código de unidad en el Conmutador de Potencia
puede ajustarse a un número entre 1 y 16, el mando a distancia
puede operar los Conmutadores de Potencia solamente con
códigos entre 1 y 8.
• Para operar los Conmutadores de Potencia con códigos entre 1 y 4,
deje el conmutador en el mando a distancia hacia la izquierda
(1-4).
– Los primeros 4 botones del mando a distancia corresponden a los
códigos 1 a 4 respectivamente.
– Si el conmutador de mando a distancia está ajustado hacia la
derecha (5-8), los primeros botones corresponden a los códigos 5 a
8 respectivamente.
INSTALACIÓN
Su aparato tiene que ser conectado al Conmutador de Potencia antes
de que pueda controlarlo con el mando a distancia
(fig. 2)
.
• Seleccione el aparato (por ej. una lámpara) que quiere controlar y
enchúfelo en el Conmutador de Potencia
(fig. 2)
.
• Por favor verifique el consumo de potencia del aparato
seleccionado. El Conmutador de Potencia puede controlar aparatos
con una potencia nominal máxima de 1000 vatios.
• Si el aparato seleccionado tiene su propio conmutador, asegúrese
de que esté encendido.
Español
14

OPERACIÓN
El aparato conectado ahora puede ser operado mediante el mando a
distancia
(fig. 3)
. Si se ha ajustado el código de casa correctamente,
el Conmutador de Potencia es operado con el botón 1, por defecto.
• Si se pulsa la parte derecha de un botón (+) el aparato se enciende.
Si se pulsa la parte izquierda de un botón (-), el aparato se apaga.
– Si se ha cambiado el código de unidad, el Conmutador de Potencia
es operado con otro botón en el mando a distancia.
El Conmutador de Potencia puede ser operado también con el último
botón del mando a distancia. Este botón está diseñado para operar
más Conmutadores de Potencia al mismo tiempo.
• Ajuste el conmutador GROUP en la parte trasera del Conmutador
de Potencia al lado derecha (ON - encendido).
– El conmutador ahora responderá cuando se pulse el quinto botón
del mando a distancia. Si se pulsa el lado derecha del botón (+), el
aparato se enciende. Si se pulsa la parte izquierda de un botón (-),
el aparato se apaga.
OPERACIÓN MANUAL
El Conmutador de Potencia tiene un botón para la operación manual.
Este significa que su aparato puede operarse todavía sin el mando a
distancia.
• Pulse el botón en la parte delantera del Conmutador de Potencia
una vez.
– Se enciende el Conmutador de Potencia
• Pulse el botón en la parte delantera del Conmutador de Potencia
una vez más.
– Se apaga el Conmutador de Potencia.
Español
15

OPERACIÓN MANUAL
El Conmutador de Potencia tiene un botón para operación manual. Este
significa que su aparato puede operarse todavía sin el mando a
distancia.
• Pulse el botón en la parte delantera del Conmutador de Potencia
una vez.
– Se enciende el Conmutador de Potencia
• Pulse el botón en la parte delantera del Conmutador de Potencia
una vez más.
– Se apaga el Conmutador de Potencia.
Español
16

EINFÜHRUNG
Herzlichen Glückwunsch zum Erwerb des Philips Funk-steckers (SBC
SP370). Dieser Schalter kann zusammen mit einer Philips Funk-
fernbedienung (SBC SR315) benutzt werden. Mit dem Funk-
Steuerungssystem können Sie von Ihrem Sessel aus elektrische Geräte
(z.B. Lampen, Kaffeemaschine, etc.) in Ihrem und um Ihr Haus mit der
Fernbedienung ein- und ausschalten!
Bevor Sie ein Gerät an den Funk-stecker anschließen, lesen Sie bitte
dieses Anleitung genau durch.
Deutsch
17
KURZÜBERSICHT
1.
Prüfen Sie, ob der Hauscode des Funk-stecker identisch mit dem
der Fernbedienung ist
(Abb. 1)
.
2.
Stecken Sie den Funk-stecker in eine Steckdose
(Abb. 2)
.
3.
Wählen Sie das Gerät aus, z.B. eine Lampe, das Sie schalten
wollen, und schließen Sie dieses an den Funk-stecker an
(Abb.
2)
• Prüfen Sie vor dem Anschließen des ausgewählten Geräts an
den Funk-stecker dessen Stromverbrauch. An den Funk-
stecker darf nur ein Gerät mit höchstens 1000 Watt
angeschlossen werden.
• Besitzt das ausgewählte Gerät einen eigenen Ein-/Aus-
Schalter, prüfen Sie, ob das Gerät eingeschaltet ist.
4.
Schalten Sie das Gerät mit der Fernbedienung
(Abb. 3)
.
Der Funk-stecker wird mit der Taste 1 geschaltet
(Standardeinstellung).
Wird die rechte Seite einer Taste (+) gedrückt, wird das Gerät
eingeschaltet. Wird die linke Seite einer Taste (-) gedrückt, wird
das Gerät ausgeschaltet.

ÄNDERN DES HAUSCODE
Der Hauscode soll eine Interferenz mit dem Funk-Steuerungssystem
Ihres Nachbarn verhindern.
Der Funk-stecker reagiert nur auf Signale mit dem korrekten Hauscode.
Dazu muß der Hauscode für den Funk-stecker und die Fernbedienung
identisch sein. Zum ändern des Hauscode
(Abb. 1)
:
• Schrauben Sie den Deckel des Batteriefachs auf der Rückseite der
Fernbedienung ab.
• Prüfen Sie die Stellung des Hauscodeschalters in der
Fernbedienung.
• Drehen Sie zum Einstellen des Hauscodes des Funk-steckers das
Hauscode-Einstellrad auf der Rückseite des Schalters (A-P) mit
einem Schraubenzieher.
• Bitte beachten Sie, daß der Hauscode für die Fernbedienung und
den/die Funk-stecker identisch sein muß! Die Standardeinstellung
für den Hauscode ist A.
ÄNDERN DES GERÄTECODE
An den Funk-steckern muß ein Gerätecode eingestellt werden. Der
ausgewählte Gerätecode entspricht der Taste, die auf der
Fernbedienung gedrückt werden muß. Wird zum Beispiel der
Gerätecode 3 eingestellt, wird der Funk-stecker mit der 3. Taste der
Fernbedienung geschaltet. Die Standardeinstellungen der Gerätecode
ist 1. Zum Ändern des Gerätecodes
(Abb. 1)
:
• Drehen Sie zum Einstellen des Gerätecodes des Funk-steckers das
Gerätecode-Einstellrad (UNIT) auf der Rückseite des Funk-steckers
(1-16) mit einem Schraubenzieher.
• Der Funk-stecker wird durch Drücken der entsprechende Taste auf
der Fernbedienung geschaltet.
Deutsch
18

• Durch Einstellen des gleichen Gerätecodes können mehrere Funk-
stecker gleichzeitig aktiviert werden.
Beachte: Der Gerätecode der Funk-stecker kann zwar von 1 bis 16
eingestellt werden, jedoch kann die Fernbedienung nur
Funk-stecker mit einem Gerätecode von 1 bis 8 schalten.
• Zum Schalten der Funk-stecker mit dem Gerätecode 1-4 müssen Sie
den Kippschalter auf der Fernbedienung nach links stellen (1-4).
– Die ersten 4 Tasten der Fernbedienung entsprechen den
Gerätecodes 1 bis 4.
– Ist der Kippschalter an der Fernbedienung nach rechts gestellt (5-8),
entsprechen die ersten 4 Tasten der Fernbedienung den
Gerätecodes 5 bis 8.
INSTALLATION
Ihr Gerät muß an den Funk-stecker angeschlossen werden, bevor Sie
es mit der Fernbedienung schalten können
(Abb. 2)
.
• Wählen Sie das gerät (z.B. eine Lampe) aus, das Sie schalten
wollen, und schließen Sie es an den Funk-stecker an
(Abb. 2)
.
• Prüfen Sie vor dem Anschließen des ausgewählten Geräts an den
Funk-stecker dessen Stromverbrauch. An den Funk-stecker darf nur
ein Gerät mit höchstens 1000 Watt angeschlossen werden.
• Besitzt das ausgewählte Gerät einen eigenen Ein-/Aus-Schalter,
prüfen Sie, ob das Gerät eingeschaltet ist.
Deutsch
19

BEDIENUNG
Das angeschlossene Gerät kann jetzt mit der Fernbedienung geschaltet
werden
(Abb. 3)
.Nach Einstellen des korrekten Hauscodes wird der
Funk-stecker in der Standardeinstellung mit der Taste 1 betätigt.
• Wird die rechte Seite einer Taste (+) gedrückt, wird das Gerät
eingeschaltet. Wird die linke Seite einer Taste (-) gedrückt, wird
das Gerät ausgeschaltet.
– Wurde der Gerätecode geändert, wird der Funk-stecker mit einer
anderen Taste der Fernbedienung betätigt!
Der Funk-stecker kann auch mit der letzten Taste der Fernbedienung
(ALL) geschaltet werden. Mit dieser Taste können mehrere Funk-
stecker gleichzeitig geschaltet werden.
• Stellen Sie den GROUP Schalter auf der Rückseite des Funk-
steckers nach rechts (= ON - Ein).
– Der Funk-stecker reagiert jetzt, wenn die 5. Taste der
Fernbedienung (ALL) gedrückt wird. Wird die rechte Seite der Taste
(+) gedrückt, werden die Geräte eingeschaltet. Wird die linke Seite
der Taste (-) gedrückt, werden die Geräte ausgeschaltet.
MANUELLES SCHALTEN
Der Funk-stecker besitzt eine Taste für manuelles Schalten. Das heißt,
Ihr Gerät kann weiterhin auch ohne Fernbedienung ein- bzw.
ausgeschaltet werden.
• Drücken Sie die Taste auf der Vorderseite des Funk-steckers einmal.
– Der Funk-stecker ist eingeschaltet.
• Drücken Sie die Taste auf der Vorderseite des Funk-steckers erneut.
– Der Funk-stecker ist ausgeschaltet.
Deutsch
20
Sidan laddas...
Sidan laddas...
Sidan laddas...
Sidan laddas...
Sidan laddas...
Sidan laddas...
Sidan laddas...
Sidan laddas...
Sidan laddas...
Sidan laddas...
Sidan laddas...
Sidan laddas...
Sidan laddas...
Sidan laddas...
Sidan laddas...
Sidan laddas...
Sidan laddas...
Sidan laddas...
Sidan laddas...
Sidan laddas...
Sidan laddas...
Sidan laddas...
Sidan laddas...
Sidan laddas...
Sidan laddas...
Sidan laddas...
-
 1
1
-
 2
2
-
 3
3
-
 4
4
-
 5
5
-
 6
6
-
 7
7
-
 8
8
-
 9
9
-
 10
10
-
 11
11
-
 12
12
-
 13
13
-
 14
14
-
 15
15
-
 16
16
-
 17
17
-
 18
18
-
 19
19
-
 20
20
-
 21
21
-
 22
22
-
 23
23
-
 24
24
-
 25
25
-
 26
26
-
 27
27
-
 28
28
-
 29
29
-
 30
30
-
 31
31
-
 32
32
-
 33
33
-
 34
34
-
 35
35
-
 36
36
-
 37
37
-
 38
38
-
 39
39
-
 40
40
-
 41
41
-
 42
42
-
 43
43
-
 44
44
-
 45
45
-
 46
46


på andra språk
- italiano: Philips SBCSP370 Manuale utente
- español: Philips SBCSP370 Manual de usuario
- Deutsch: Philips SBCSP370 Benutzerhandbuch
- polski: Philips SBCSP370 Instrukcja obsługi
- português: Philips SBCSP370 Manual do usuário
- français: Philips SBCSP370 Manuel utilisateur
- English: Philips SBCSP370 User manual
- Nederlands: Philips SBCSP370 Handleiding