Yamaha (AE041) Bruksanvisning
- Kategori
- Tangentbord
- Typ
- Bruksanvisning
Denna manual är också lämplig för

1
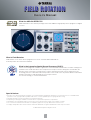
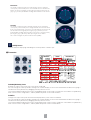
FIELD ROTATION
FIELD ROTATION
FIELD ROTATION
Owner’s Manual
Owner’s Manual
Owner’s Manual
What Are ADD-ON EFFECTS?
ADD-ON EFFECTS are software packages that install additional high-quality effects programs on digital
consoles.
What is Field Rotation
Field Rotation is one of the effects programs that can be used with ADD-ON EFFECTS.
It virtually rotates the surround sound field.
What is the Interactive Spatial Sound Processor (iSSP)?
iSSP is a technology that combines a geometric sound simulator that attenuates sound according to an
estimate of the sound reflection that accompanies the shape of a room, taking into consideration the
direction of the sound source and the room’s surface materials with multi-channel signal processor
technology that uses information about the position of the sound source to perform distance attenuation
based on the balance and delay/filter for each output channel.
This iSSP technology is used in Field Rotation.
Special Notices
• Except in cases where reproduction for private use is permitted under copyright law, reproduction of commercial music or sound data without
permission of the copyright holder is prohibited. Be sure to consult a qualified expert in copyright law when using.
•Yamaha Corporation owns all copyrights to this software and manual.
• Reproducing or altering this software or manual in whole or in part without permission is prohibited.
•Yamaha takes no responsibility whatsoever for results or effects arising from the usage of this software or manual.
• The screenshots included in this manual are for explanatory purposes. They may differ from the actual screens.
• Company and product names mentioned in this manual are trademarks or registered trademarks of their respective owners.
© 2005 Yamaha Corporation. All rights reserved.

2
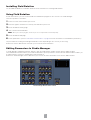
Installing Field Rotation
See the ADD-ON EFFECTS Installation Guide for more information on installing Field Rotation.
Using Field Rotation
As with other effects, you can recall and edit the Field Rotation program on the console or in Studio Manager.
The basic operation is as follows:
1 Select one of the internal effects processors.
2 Patch the signal to and from the currently selected effects processor.
3 Locate the Effects Library page.
4 Select and recall Field Rotation.
n When you recall the program, all effects processor outputs will be muted temporarily.
5 Locate the Effects Edit page.
6 Set the parameters. (See the “Part Names and Functions” on page 3 for more information on Field Rotation parameters.)
The procedure for recalling and editing Field Rotation varies depending on the console you are using.
Refer to the Owner’s Manual that came with your console for more information.
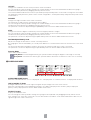
Editing Parameters in Studio Manager
In Studio Manager, editable parameters appear in both the Field Rotation window and the Generic Editor window.
The Field Rotation window enables you to edit Field Rotation specific parameters, and the Generic Editor window enables you
to edit parameters common to Field Rotation and other Effects.
Refer to the Studio Manager Owner’s Manual for your console for more information on the Generic Editor window.
Studio Manager Generic Editor window

3
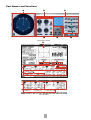
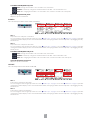
Part Names and Functions
1
34 6
5
2
2
3
3
3
3
5
4
5
6
7
Field Rotation window
Console display

4
1 Parameter View
Switches the parameters to be displayed or edited.
[EDIT] Button: Edits parameters in the current data.
[KEY 1] Button: Edits parameters for KEY 1, which is the start point for automation.
[KEY 2] Button: Edits parameters for KEY 2, which is the end point for automation.
2 Field Scope
Displays the status and allows editing of the actual speaker arrangement, along with the rotation, movement, and shape of
the virtual sound field.
See “3 Parameter” on page 5 for information on operations in the Generic Editor window and the console.
Virtual Sound Field
Changes the virtual sound field.
Enlarge/Reduce
Enlarge/Reduce Vertically Enlarge/Reduce Horizontally Enlarge/Reduce Overall
In Field Scope, the virtual sound field can
be enlarged or reduced in the vertical
direction by dragging the mouse at the
point where the circle that indicates the
virtual sound field intersects the straight
line that extends vertically from the circle’s
center. It can also be enlarged or reduced
by pressing the arrow keys [↑] [↓] on the
keyboard while holding down the button on
the mouse.
In Field Scope, the virtual sound field can
be enlarged or reduced in the horizontal
direction by dragging the mouse at the
point where the circle that indicates the
virtual sound field intersects the straight
line that extends horizontally from the
circle’s center. It can also be enlarged or
reduced by pressing the arrow keys [←]
[→] on the keyboard while holding down
the button on the mouse.
The virtual sound field can be enlarged or
reduced in all directions by dragging the
mouse at the point where the circle that
indicates the virtual sound field intersects
the straight line that extends at a 45 degree
angle from the center of that circle. It can
also be enlarged or reduced by pressing
the arrow keys [↑] and [↓] on the keyboard
while holding down the button on the
mouse.
Virtual Sound Field
[VIEW] button

5
Movement
The virtual sound field can be moved by using the mouse to drag the
center point (control handle) of the circle that indicates the virtual sound
field. It can also be enlarged or reduced by pressing the arrow keys [↑]
[↓] [←] [→] on the keyboard while holding down the button on the mouse.
Rotation
The virtual sound field can be rotated by using the mouse to drag the
center point (control handle) of the straight line that extends to the virtual
front-center speaker from center of the circle that indicates the field. It can
also be rotated to the right by pressing the [↑] [→] arrow keys on the
keyboard while holding down the button on the mouse, and to the left by
pressing the [↓] [←] arrow keys while pressing the mouse button.
This can be changed only if the Parameter View is [EDIT].
[VIEW] Button
Switches between displaying and hiding the virtual speakers in Field Scope.
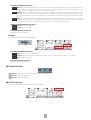
3 Parameter
RADIUS/[RADIUS] Knob
Enlarges or reduces the overall size of the virtual sound field.
You can change this value by double clicking in the number display section of the Field Rotation window, then typing a
number from the keyboard, or by dragging vertically with the mouse.
In the Generic Editor window and console, the [RADIUS] knob can be used to change the current data. The [RADI KY1]
knob can be used to change KEY 1, and the [RADI KY2] knob can be used for KEY 2.
R.RATIO
Changes the aspect ratio (vertical and horizontal proportions) of the virtual sound field.
You can change this value by double clicking in the number display section of the Field Rotation window, then typing a
number from the keyboard, or by dragging vertically with the mouse.
In the Generic Editor window and console, the [R.RATIO] knob can be used to change the current data. The [RRAT KY1]
knob can be used to change KEY 1, and the [RRAT KY2] knob can be used for KEY 2.

6
OFFSET
Changes the coordinates for the center point of the virtual sound field.
You can change this value by double clicking in the number display section of the Field Rotation window, then typing a
number from the keyboard, or by dragging vertically with the mouse.
In the Generic Editor window and console, the [X OFFSET] and [Y OFFSET] knobs can be used to change the current data.
The [XOFS KY1] and [YOFS KY1] knobs can be used to change KEY 1, and the [XOFS KY2] and [YOFS KY2] knobs can be
used for KEY 2.
DEGREE
Changes the angle of rotation of the virtual sound field.
This parameter is valid only when the Parameter View is [EDIT].
You can change this value by double clicking in the number display section of the Field Rotation window, then typing a
number from the keyboard, or by dragging vertically with the mouse.
This parameter can also be adjusted using the [DEGREE] knob in the Generic Editor window and console.
STEP
Changes the interval in degrees of rotation by which the Degree parameter changes.
You can change this value by double clicking in the number display section of the Field Rotation window, then typing a
number from the keyboard, or by dragging vertically with the mouse.
This parameter can also be adjusted using the [DEG STEP] knob in the Generic Editor window and console.
DISTANCE/[DISTANCE] Knob
Adjusts the strength of attenuation in volume caused by distance.
By changing the value for DISTANCE, you can adjust the difference in volume between when the sound source is near or far
away.
The amount of attenuation strengthens (reduces the volume of a distant sound) as this value is increased
This parameter can also be adjusted using the [DISTANCE] knob in the Generic Editor window and console.
Rotation Mode
These modes relate to rotation.
[CAV] Button: Constant Angular Velocity (the speed of rotation through the degrees of the angle is constant).
[CLV] Button: Constant Linear Velocity (the speed of rotation around the circumference of the circle is constant).
4 SURROUND MODE
SURROUND MODE Display
When the surround mode is 6.1, “6.1” is displayed. “3-1” is displayed for 3-1 surround, and “5.1” is displayed for all others.
[DIV] Knob/[DIV F] Knob
Sets right and left for the front center signal, along with the percentage sent to the center channel.
When the surround mode in the Field Rotation window is 6.1, [DIV.F] is displayed. For all others, [DIV] is displayed.
[DIV.F] is always displayed in the Generic Editor window and console.
DIV/DIV F Display
Displays the DIV/DIV F value.
You can change this value by double clicking, then typing from the keyboard, or by dragging vertically with the mouse.
If the setting is zero, only L/R is used. If 50 is set, the ratio between L/R and the center will be 50:50. When 100 is set, the
signal will go to the center channel only.

7
[DIV R] Knob
Sets right and left for the rear center signal, along with the percentage sent to the center channel.
This is displayed in the Field Rotation window only when Surround Mode is 6.1. Otherwise it will be grayed out.
DIV R Display
Displays the DIV R value.
You can change this value by double clicking, then typing a number from the keyboard, or by dragging vertically with the
mouse.
If the setting is zero, only L/R is used. If 50 is set, the ratio between L/R and the center will be 50:50. When 100 is set, the
signal will go to the center channel only.
[LINK] Button/[F/R LINK] Knob
Links DIV R to the DIV F value.
When the two are linked, the DIV R value will be the same as the DIV F.
This is displayed in the Field Rotation window only when Surround Mode is 6.1. Otherwise it will be grayed out.
5 AUTOMATION
Settings related to Automation.
In Field Rotation, automation operates based on the virtual sound field set for KEY 1 and KEY 2 respectively. However,
because automation can be set using each parameter for size, aspect ratio, position, and angle individually, very complex
movement can be simulated.
Automation Preview Scope
With Preview Scope, you can view a preview animation of automation play,
based on the currently set automation parameters.
Because preview animation operates through emulation on the editor side, it
has no connection to whether automation in the unit itself is operating or not.
Furthermore, because it operates always, even when offline, it is not
synchronized with operation in the main unit.
RADIUS
This sets the size of the virtual sound field.
KEY 1
Size at the start point of automation.
You can change this value using the procedure in section “2 Field Scope” on page 4 or in section “3 Parameter” on page 5, by double
clicking in the number display section of the Field Rotation window, then typing a number from the keyboard, or by dragging vertically
with the mouse.
KEY 2
Size at the end point of automation.
You can change this value using the procedure in section “2 Field Scope” on page 4 or in section “3 Parameter” on page 5, by double
clicking in the number display section of the Field Rotation window, then typing a number from the keyboard, or by dragging vertically
with the mouse.

8
PLAYBACK MODE/[RADI PB] Knob
ONCE: Changes from the KEY 1 size to the KEY 2 size, then finishes.
GO&REV: Continuously changes back and forth between the KEY 1 size and the KEY 2 size.
LOOP: After changing from the KEY 1 size to the KEY 2 size, it returns to the KEY 1 size and repeats.
Speed Slider/[RADI SPD] Knob
Adjusts the speed of automation.
R.RATIO
This sets the aspect ration of the virtual sound field.
KEY 1
Aspect ratio at the start point of automation.
You can change this value using the procedure in section “2 Field Scope” on page 4 or in section “3 Parameter” on page 5, by double
clicking in the number display section of the Field Rotation window, then typing a number from the keyboard, or by dragging vertically
with the mouse.
KEY 2
Aspect ratio at the end point of automation.
You can change this value using the procedure in section “2 Field Scope” on page 4 or in section“3 Parameter” on page 5, by double
clicking in the number display section of the Field Rotation window, then typing a number from the keyboard, or by dragging vertically
with the mouse.
PLAYBACK MODE/[RRAT PB] Knob
ONCE: Changes from the KEY 1 ratio to the KEY 2 ratio, then finishes.
GO&REV: Continuously changes back and forth between the KEY 1 ratio and the KEY 2 ratio.
LOOP: After changing from the KEY 1 ratio to the KEY 2 ratio, it returns to the KEY 1 ratio and repeats.
Speed Slider/[RRAT SPD] Knob
Adjusts the speed of automation.
OFFSET
This sets the position of the virtual sound field.
KEY 1
Position at the start point of automation.
You can change this value using the procedure in section “2 Field Scope” on page 4 or in section “3 Parameter” on page 5, by double
clicking in the number display section of the Field Rotation window, then typing a number from the keyboard, or by dragging vertically
with the mouse.
KEY 2
Position at the end point of automation.
You can change this value using the procedure in section “2 Field Scope” on page 4 or in section “3 Parameter” on page 5, by double
clicking in the number display section of the Field Rotation window, then typing a number from the keyboard, or by dragging vertically
with the mouse.

9
PLAYBACK MODE/[OFS PB] Knob
ONCE: When the Interpolation Mode is Linear, moves from the KEY 1 position to the KEY 2 position, then finishes. When it is
“Circle,” it makes one revolution around the circumference of a circle whose diameter is formed by a straight line connecting
the KEY 1 position to the KEY 2 position. After one revolution, it finishes.
GO&REV: When the Interpolation Mode is Linear, it makes a round trip from the KEY 1 position to the KEY 2 position and
back. When it is “Circle,” it makes one revolution around the circumference of a circle whose diameter is formed by a straight
line connecting the KEY 1 position and the KEY 2 position. It then makes a revolution in the reverse direction and repeats the
process.
LOOP: When the Interpolation Mode is Linear, it loops by moving from the KEY 1 position to the KEY 2 position, then jumping
back to the KEY 1 position before repeating. When it is “Circle,” it continuously rotates around the circumference of a circle
whose diameter is formed by a straight line connecting the KEY 1 position and the KEY 2 position.
INTERPOLATION MODE/[OFS IP] Knob
LINEAR: Moves in a straight line.
CIRCLE: Moves in a circle.
Speed Slider/[RRAT SPD] Knob
Adjusts the speed of automation.
DEGREE
This sets the rotation of the virtual sound field.
PLAYBACK MODE/[DEG PB] Knob
ONCE: Rotates from zero to 360 degrees.
GO&REV: After rotating from zero to 360 degrees, rotates the reverse direction to zero degrees, and repeats.
LOOP: Continuously rotates.
Speed Slider/[RRAT SPD] Knob
Adjusts the speed of automation.
6 TRANSPORT BAR
Button: Moves the sound source position to the start position.
Button: Turns OFF automation.
Button: Starts automation.
7 [JOYSTICK] Knob
Turn On or Off JOYSTICK to move the path on the console.
-
 1
1
-
 2
2
-
 3
3
-
 4
4
-
 5
5
-
 6
6
-
 7
7
-
 8
8
-
 9
9


Yamaha (AE041) Bruksanvisning
- Kategori
- Tangentbord
- Typ
- Bruksanvisning
- Denna manual är också lämplig för
på andra språk
- italiano: Yamaha (AE041) Manuale del proprietario
- čeština: Yamaha (AE041) Návod k obsluze
- español: Yamaha (AE041) El manual del propietario
- Deutsch: Yamaha (AE041) Bedienungsanleitung
- polski: Yamaha (AE041) Instrukcja obsługi
- português: Yamaha (AE041) Manual do proprietário
- français: Yamaha (AE041) Le manuel du propriétaire
- Türkçe: Yamaha (AE041) El kitabı
- English: Yamaha (AE041) Owner's manual
- dansk: Yamaha (AE041) Brugervejledning
- русский: Yamaha (AE041) Инструкция по применению
- suomi: Yamaha (AE041) Omistajan opas
- Nederlands: Yamaha (AE041) de handleiding
- română: Yamaha (AE041) Manualul proprietarului