SENZ GO 7" TWIN BÆRBAR DVD-SPILLER Bruksanvisning
- Kategori
- DVD-spelare
- Typ
- Bruksanvisning

CAUTION: TO REDUCE THE RISK OF ELECTRIC SHOCK,
DO NOT REMOVE ANY COVER. NO USER-SERVICEABLE
PARTS INSIDE, REFER ANY SERVICING TO QUALIFIED
SERVICE PERSONNEL.
• Take the time to follow the instructions in this
owner’s guide carefully. It will help you set up and
operate your system properly and enjoy all of its
advanced features.
• Retain the manual. If you pass the unit onto a third
party make sure to include this manual.
• The rating label is located on the back of the unit.
• This unit must be used indoors. It is neither
designed nor tested for use outdoors, in recreation
vehicles, or on boats.
To reduce the risk of fire, electric shock or product
damage, do not expose this unit to rain, moisture,
dripping or splashing. No objects filled with liquids,
such as vases, should be placed on the unit.
• If you spill any liquid into the unit, it can cause
serious damage. Switch it off at the mains
immediately. Withdraw the mains plug and consult
your dealer.
• Only use attachments/accessories specified by the
manufacturer.
• In the interests of safety and to avoid unnecessary
energy consumption, never leave the unit switched
on while unattended for long periods of time, e.g.
overnight, while on holiday or while out of the
house.
• Switch it off and disconnect the mains plug from the
mains socket.
• To reduce the risk of electric shock, do not
remove screws. The unit does not contain any
userserviceable parts. Please leave all maintenance
work to qualified personnel.
• Do not continue to operate the unit if you are in any
doubt about it working normally, or if it is damaged
in any way - switch off, withdraw the mains adapter
and consult your dealer.
• Do not open any fixed covers as this may expose
dangerous voltages.
• Use proper power sources - Plug the unit into a
proper power source, as described in the operating
instructions or as marked on the unit.
CAUTION
RISK OF ELECTRIC SHOCK!
DO NOT OPEN!
This symbol on the product or in the
instructions means that your electrical and
electronic equipment should be disposed at
the end of its life separately from your
household waste. There are separate collection
systems for recycling in the EU. For more information,
please contact the local authority or your retailer where
you purchased the product.
Follow the advice below for safe operations.
ON PROTECTION AGAINST LASER ENERGY EXPOSURE
• As the laser beam used in this compact disc
player is harmful to the eyes, do not attempt to
disassemble the casing.
• Stop operation immediately if any liquid or solid
object should fall into the cabinet.
• Do not touch the lens or poke at it. If you do, you
may damage the lens and the player may not
operate properly.
• Do not put anything in the safety slot. If you do, the
laser diode will be ON when the CD door is still open.
• If the unit is not to be used for a long period of time,
make sure that all power sources are disconnected
from the unit. Remove all batteries from the battery
compartment.
• This unit employs a laser. The use of controls or
adjustment or performance of procedures other
than those specified here may result in exposure to
hazardous radiation.
Should any trouble occur, remove the power source
and refer servicing to qualified personnel.
In The Box
Carefully remove your DVD Player from the packaging.
Inside the box you will find:
Main Unit (DVD player)
Slave Screen (2nd Screen)
Remote Control
Instruction Booklet
Mains Adapter
Incar Power Adapter
Headrest Mounting Straps
AV Cable
Earphone(s) x 2
Power Cable
Mains Power
Your DVD player requires a mains supply of 230-240V
AC ~ 50Hz.
Please ensure that your mains supply is compatible
before use.
Disconnect the Power Cord from the mains when not
in use.

SENZGO7TWDVD
Instruction Manual
Position of DVD Player
Place on a flat, stable surface that is not subject to
vibrations. Avoid
the following locations:
• Where it is exposed to direct sunlight
• Where it is close to heat radiating sources
• Where the humidity is high and ventilation is poor
• Where it is dusty
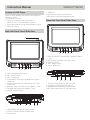
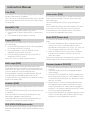
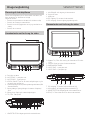
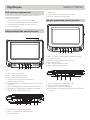
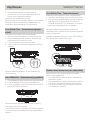
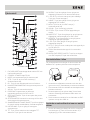
Main Unit Front View & Side View
B C D E F G A
H
+VOLVOL -
A. DVD compartment door open.
B. VOL-. Volume Down.
C. VOL+. Volume Up.
D. PLAY/PAUSE. Press to begin playback or pause
playback.
E. Remote control sensor / Red charge LED / Blue
power LED
F. Backskip. Skip to the start of the Chapter / Track
G. Fastskip. Skip to the next Chaper / Track
H. ON/OFF. Power ON/OFF
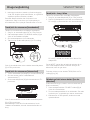
N
IJ K L M
I. HEADPHONE. Headphone output socket.
J. AV OUT. AV Output socket to Slave Unit.
K. SD Card Slot
L. USB Port.
M. DC Output. For power to Slave Unit.
N. DC Input. Power input/charging socket.
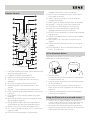
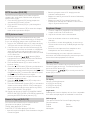
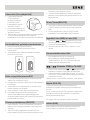
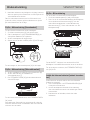
Slave Unit Front View & Side View
DISPLAY SE TUP
MUTE
DISPLAY ON/OFF+
VOLVOL-
SO P Q R
O. DISPLAY ON/OFF. Turn ON or OFF display of Slave
unit.
P. MUTE. Mute the audio of the Slave Unit.
Q. DISPLAY SETUP.
R. VOL-. Volume Down.
S. VOL+. Volume Up.
DC IN AV IN OFF/ON
T U V W
T. DC Input. For power from Main unit. (M)
U. AV Input. AV input from Main unit (J)
V. HEADPHONE. Headphone output socket.
W. OFF/ON. Power ON or OFF this Slave Unit.

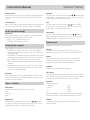
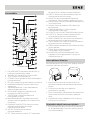
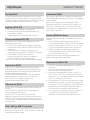
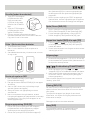
Remote Control
PROG
REPEAT
AUDIO
GOTOZOOM
ST-BY DISPLAY
MODE ANGLESETUP TFT
VOL- VOL+
1 2 3
456
78 9
0 10+
MUTE
MENUTITLE
SUBTITLE
01
12
13
14
15
02
03
04
05
06
07
08
09
10
11
21
22
23
24
25
16
17
18
19
20
OK
DVD
1. DVD/USB/CARD mode button. Switch between DVD
and inserted media devices.
2. STANDBY. STANDBY mode ON/OFF.
3. MODE. Not implemented for this model
4. TITLE. Press to display the DVD Title menu (if
available)
5. OK . Press to select or activate a function.
6. NAVIGATION BUTTONS. Navigate menu’s and
options.
7. VOLUME -. Press to decrease the volume level
8. PROG. Program an alternate playback sequence for
DVD & CD
9. PLAY/PAUSE. Press to begin playback or pause
playback
10. NUMERIC BUTTONS. Used to enter digits or direct
skip to chapter numbers.
11. QUICK SEARCH RWD/FWD. Press repeatedly to
cycle between the fast rewind/forward speeds.
12. SETUP. Press once to enter the system menu.
13. TFT. Press to disable the built-in TFT screen. Press
again to enable
14. DISPLAY. Press repeatedly to cycle through
available information for the current disc
15. MUTE. Press to temporarily silence audio output.
Press again to resume.
16. ANGLE: Press repeatedly to cycle through any
available DVD angles.
17. MENU. Press to display the DVD menu (if available)
18. VOLUME +. Press to increase the volume level
19. STOP. Press to STOP playback of any media.
20. SUBTITLE. Press repeatedly to cycle through
available subtitles tracks on a DVD disc
21. REPEAT. Press repeatedly to cycle through available
repeat modes.
22. AUDIO. Press repeatedly to cycle through available
audio tracks
23. GOTO. Specify an exact point on a DVD or CD to
jump to.
24. ZOOM. Increase the image size up to 4 x larger or
smaller.
25. SKIP PREV/NEXT. Press to skip DVD chapters/CD
tracks , or media files.
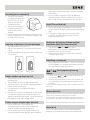
In-Car Headrest Mount
Follow the below instructions to mount the portable
DVD player to a car headrest pole.
1. Use the straps
provided and loop them though the 2 strap holders
on the back of the unit.
2. Loop the straps around the vertical headrest poles
of the car headrest.
3. Like a belt, use the buckle to fasten the device
firmly to the car-seat in between the seat and the
headrest.
4. Tighten the strap tightly to avoid the DVD player
from moving or falling off.
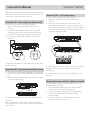
Using the Slave unit as a second screen
1. Connect the AV cable (Supplied) into the AV out
socket on the main unit (J). Connect the other end
into the A/V input socket (U) on the slave unit.
2. Once both units are powered up and operational,
whatever is played on the main unit will now also be
duplicated on the slave unit’s screen.

SENZGO7TWDVD
Instruction Manual
Note: The master unit will have full control of the audio
level, make sure to turn up the volume on the main unit
if the audio on the slave unit is too low.
Power On/Off - Mains Operation(Main Unit)
To Power On the main unit by Mains Adapter
1. Make sure the power switch (H) is in the OFF
position.
2. Insert the Mains adapter jack into the DC INPUT
socket (N) on the side of the portable DVD player.
3. Connect the mains adapter plug to a wall outlet.
4. Power on by sliding power switch (H) to the ON
position.
To Power Off the main unit, slide the power switch (H) to
the OFF position.
Power On/Off - Mains Operation (Slave unit)
1. Connect the Power Cable (supplied) to Main Unit (M)
2. Connect the other end of Power Cable to Slave Unit
(T)
3. Slide the Power OFF/ON (W) on the side of the slave
unit to the ON position.
To Power off the Slave Unit, slide the POWER ON/OFF
(W) to OFF.
Notes. Always turn off the Power of Slave unit before
you disconnect the Power Cable or when the Slave unit
is not in use.
DC IN AV IN OFF/ON
DI SP L AY ON/OFF+
VO LVO L-
DC IN AV IN OFF/ON
Power On/Off - In-Car Operation
To Power on the main unit by InCar Adapter.
1. Make sure the power switch (H) is in the OFF
position.
2. Insert one of the small jack ends of the In-Car
power adapter into the DC socket of the main unit
(N), and the other small jack end into the DC socket
of the slave unit (T)Insert the other end into a 12V
car power adapter socket.
It is VERY important not to connect to a 24V car power
adapter. Please check your vehicle manual before
attempting.
To Power Off the unit, slide the Power ON/OFF to Off
(H) & (W).
Charging the Internal Battery (Main unit only)
Before using the battery, please make sure it is fully
charged. (Main unit only)
1. Insert the Mains adapter jack into the DC INPUT
socket (N) on the side of the main unit.
2. Connect the mains adapter plug to a wall outlet,
the red LED will light and charging will start
automatically.
3. When the battery is fully charged the red LED
charging indicator will go out.
WARNING
12V ONLY

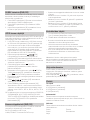
Standby (Main unit only)
1. Press the ST-BY button
on the remote control or
cycle the power switch (H)
OFF/ON to wake the unit
from STANDBY mode.
2. Press the ST-BY button
on the remote control to
enter STANDBY mode.
3. This unit will
automatically enter auto standby after 20 minutes
inactivity. To wake follow point 1 above.
Fitting the Remote Batteries
1. Remove the battery cover (as shown).
2. Insert 2 x AAA batteries, taking note that the
polarities match up.
3. Replace the battery cover, in the same manner as
you removed it.
Power On and Play a DVD
1. Slide the POWER switch (H) to the ON position (the
green power LED will illuminate).
2. Flip up the disc compartment OPEN/CLOSE (A) to
open the disc Compartment.
3. Place a DVD disc inside, and pres gently down onto
the spindle. (label facing upwards).
4. Close the disc compartment and the playback
starts automatically.
5. When a menu screen appears on the screen, use
the navigation buttons on remote to select the
menu option you require, then press the OK button
to start playback.
Stopping Playback (DVD/CD)
1. Pressing the STOP button on the remote once
during playback will stop play at the current
position.
2. Pressing the PLAY/PAUSE button (D or remote (09)
at this point will resume playback from the position
you stopped playback from.
3. If you press the STOP button on the remote twice,
playback will cease and the resume option will not
be available.
Play/Pause (DVD/CD)
1. If you need to pause the playback at any time, press
the PLAY/PAUSE button (D or remote (09) ).
2. To resume playback press the PLAY/PAUSE button
(D or remote (09) ) again.
Skip chapter (DVD) or track (CD)
1. Press either or buttons (25) during
playback to skip a chapter (DVD) or a track (CD)
ahead or backwards.
2. This function may not work during the “Warning”
section of a DVD.
Volume controls
1. Use the VOLUME +/- buttons (B, C, R, S, 07 &18) on
the portable DVD player or remote to increase or
decrease the listening level.
/ Quick Search FWD & RWD
1. During playback, press either or buttons (11)
to fast search forwards or backwards.
2. Each press increases the search speed from 2X,
4X, 8X 16X & 32X the next press of the button will
resume normal playback.
This function may not work during the “Warning”
section of a DVD.
Display (DVD/CD)
When playing a disc, pressing the DISPLAY button (14)
will display various information about the playing disc.
You will need to press the DISPLAY button four times to
view all the information whilst another press will hide
the display infomation.
Different types of disc will show different options.
Menu (DVD)
Pressing the MENU button (17 remote) during playback
displays the disc main menu.
DVDDVD
MODE
SETUP TFT

SENZGO7TWDVD
Instruction Manual
Title (DVD)
Pressing the TITLE button (04) during playback displays
the discs title menu (if available).
The TITLE menu is the beginning track of a disc. (not all
discs contain these and as such the TITLE button may
not respond).
Mute (DVD, CD)
This function will instantly silence the audio.
1. Press the MUTE button (remote (15) ) to silence the
audio.
2. Press the MUTE button again to resume.
Repeat (DVD/CD)
The repeat function allows you to view a section of a
disc repeatedly.
1. Press the REPEAT button (21) once during playback
to activate the REPEAT function.
2. Press repeatedly to cycle the REPEAT modes
available for the current disc type.
3. Press the REPEAT button until you reach OFF to
disable the REPEAT mode.
Some discs may not allow repeat functions.
Multi-angle (DVD)
Some discs contain scenes which have been shot
simultaneously from a number of different angles. For
these discs, the same scene can be viewed from each
of these angles by using the ANGLE button.
During playback, pressing the ANGLE button (16) will
cycle through the available angles (if any exist).
A single DVD disc can contain up to 9 different viewing
angle Audio tracks (DVD)
Subtitles (DVD)
Many DVD discs contain subtitle tracks to aid in various
ways.
Press the SUBTITLE button (20) to activate the first set
of subtitles.
Press the SUBTITLE button (20) repeatedly to cycle
through the available subtitle options.
Press the SUBTITLE button (20) repeatedly until you
reach OFF to disable the subtitle function.
DVD, USB & CARD Input modes
Press the DVD/USB/CARD button remote (01) to switch
between DISC playback, USB & CARD card photo viewer
modes.
Audio tracks (DVD)
It is common for a DVD disc to contains more than one
audio track for example 5.1 audio, stereo audio and
other languages.
Press the AUDIO button (22) to cycle through the
tracks.
This Portable DVD Player does NOT support DTS audio.
If you select a DTS audio track or one is selected
automatically no sound will be output. Should this
occur select a compatible audio track.
Zoom (DVD/Picture disc)
To zoom into the displayed image follow the below
steps.
1. Press the ZOOM button (24) to activate the zoom
setting of 2X. Every subsequent press cycles
through the zoom options e.g. 3X, 4X, 1/2, 1/3 & 1/4.
The next press will return to the OFF setting.
2. When in ZOOM mode you can use the navigation
buttons on the remote to scroll the picture up,
down, left & right.
Zooming into the picture will degrade the quality of the
viewed image as the pixels are being stretched.
Program playback (DVD/CD)
1. Press the PROG button (08) to begin the program
function.
2. Use the navigation buttons to highlight program
order number.
3. Enter the TITLE/CHAPTER or TRACK number using
the numeric buttons (10) e.g.- Title/Chapter /Track
22 would mean pressing the ‘10+’ button twice and
then the ‘2’ button.
4. Repeat steps 2-3 until you have programmed all
the chapters/tracks required. Should you require
more Title/Chapters or Tracks than 10, navigate to
the NEXT icon and press the OK button (05). Tracks
11-20 will now be programmable.
5. Once the programming is complete navigate to the
START icon and press the OK button (05) to begin
playback of your programmed sequence.

GOTO function (DVD/CD)
The GOTO function allows you to enter a specific
chapter, title, audio track, subtitle track, angle and
specific time codes.
1. Press the GOTO button (23) during playback to
activate the GOTO menu screen.
2. Press the GOTO button (23) to cycle through the
GOTO options.
3. Use the numeric buttons (10) to enter the chapter,
track or time you wish to skip to.
JPEG picture viewer
JPEG picture discs can be obtained from any good
photo developing lab, created manually on a computer
or you can load jpeg images onto a USB flash drive.
1. Insert a disc, USB flash drive or SD card containing
JPEG pictures into the USB slot (L) or SD slot (M).
2. If the files are on a disc the file browser menu will
be displayed. If the files are located on a USB flash
drive or SD card you will need to press the DVD/
USB/SD(CARD) remote button (01) to switch to USB
or SD card mode.
3. Use the navigation ( ) buttons (06) to
navigate the list of pictures & press the OK button
(05) to begin a slide show of the folder.
4. Press the MENU button (17) to return to the file
browser screen.
5. Press the STOP button (19) during a slideshow to
display a thumbnail view of the selected folder.
6. To display an image indefinitely press the PLAY/
PAUSE button (09). To resume the slide show press
the PLAY/PAUSE button once again.
7. During the slide show the navigation buttons will
rotate the displayed image.
8. Press the / buttons (25) to skip to the
previous or next image.
9. Press the ZOOM button (remote (24) ) to activate the
default zoom setting of 100%. Every subsequent
press cycles through the zoom options eg: 100%,
125%, 150%, 200%, 75% & 50%.
10. Repeat can be set to SHUFFLE, RANDOM, SINGLE,
REPEAT ONE, REP FOLDER or FOLDER by repeatedly
pressing the REPEAT button (remote (21) ).
Numeric Keypad (DVD/CD)
You can use the numeric keys to control various
functions on the player, for example:-
TRACK: when playing a CD disc
CHAPTER/TITLE: When playing a DVD disc.
• Input the required chapter or track number using the
numeric keypad.
• Selecting chapter or track 1-9 simply press the
relevant number button.
• Chapter or track 10, press the 10+ button followed by
the 0 button.
• Chapter or track 22 (for example) press the 10+
button twice and then the 2 button. If the second
digit is ‘0’ press the 0 button.
Earphone Usage
1. Connect earphones (supplied) to the 3.5mm (I & V)
output on the side of the main unit.
2. Adjust the volume in the normal manner
• Listen at moderate volumes to avoid hearing
damage.
• If you hear no sound during playing, do not turn up
volume as the music may suddenly begin at a high
volume.
• Excessive sound pressure from earphones and
headphones can cause hearing loss.
To avoid damaging your ears, adjust the volume to
the lowest safe level before playing, and turn up to the
desired level when playback has started.
System Setup
The setup menu contains various preferences for
functions found on the unit. To enter the Setup menu
press the SETUP button (12).
Use the buttons (06) to scroll; press the OK
button (05) to select.
General
TV display
Choose a setting between:-
4:3/PS (Pan and Scan)
4:3/PS (Pan and Scan)
4:3/LB (Letter Box)
Angle mark
Enabling this function displays an icon for a compatible
disc when multiple angles are available for selection.
OSD language
This option sets the On Screen Display language.
Choose between:-
English
Finnish
Norwegian
Danish
Sweedish

SENZGO7TWDVD
Instruction Manual
Screen saver
When the unit is not in use, the DVD logo will appear as
a screen saver to prevent screen burn in. Choose ON
or OFF.
Last memory
When set to ON the unit will remember the last position
on a disc before the unit was shut down (STANDBY).
Audio (speaker setup)
Downmix
This option allows you to change the way the audio is
assigned to each speaker. Choose from:-
• LT/RT - Left / Right mixed mode
• STEREO - Stereo audio output
Dolby (Audio output)
DUAL MONO: Only applies to discs with Dolby Digital 5.1
• STEREO: The audio frequency on the Left & Right
channels will be output respectively from the Left &
Right speakers.
• LEFT-MONO: The audio frequency on the Left & Right
channels will be output only from the Left speaker.
• RIGHT-MONO: The audio frequency on the Left &
Right channels will be output only from the Right
speaker.
• MIX-MONO: The audio frequency on the Left & Right
channels will be merged together and output from
both Left & Right speakers.
Dynamic
When watching a disc with high dynamic audio at low
volumes you can increase the dynamic range to reduce
the loss of sound details.
Video > Quality
Sharpness
Set the video sharpness level. Select from:-
Low
Medium
High
Brightness
Set the video brightness level. Use the / buttons
(G, 06) to increase or decrease from -20 to +20. Press
the OK button (06) to complete the setting.
Contrast
Set the video contrast level. Use the / buttons (06)
to increase or decrease from -20 to +20. Press the OK
button (06) to complete the setting.
Hue
Set the video hue level. Use the / buttons (06)
to increase or decrease from -9 to +9. Press the OK
button (05) to complete the setting.
Saturation
Set the video saturation level. Use the / buttons
(06) to increase or decrease from -9 to +9. Press the
OK button (05) to complete the setting.
Preferences
Available only when no disc is loaded
TV type
Set this option to whatever type of disc you are
watching. PAL, MULTI (to set automatically) or NTSC.
Audio
Choose the default audio setting. This means the
Portable DVD Player will automatically select this
language as the audio track (if available).
Subtitle
Select the default subtitle language.
Disc menu
This option sets the default DVD menu language. Once
set if the DVD you are watching contains a menu with
your specified language that is used by default.
Parental
Choose between:-
• Kid Safe
• PG-R
• G
• R
• PG
• NC17
• PG13
• Adult
When changing the parental level you will be asked to
enter the password. The default password is ‘1234’.
Default
Activating this option resets every setting to the
factory default.

Slave unit Display setup menu”
The display setup on the slave unit is preset for the
best picture and should not need adjusting. If you need
to adjust any of the setting the following should be
noted.
1. Press Display setup (Q) on the slave unit to enter the
menu.
2. Repeatedly press Display Setup (Q) until the required
sub heading is reached.
3. Use Vo1- & Vol + (R & S) to scroll down to the required
line.
4. Use Display ON/OFF & MUTE (O & P) to adjust the
setting, the value is automatically stored.
5 To exit the menu press Display Setup (Q) several
times.
Disc Handling
• Do not touch the playback side of the disc.
• Do not attach paper or tape to disc.
• Fingerprints and dust on the disc cause picture and
sound deterioration. Wipe the disc from the centre
outwards with a soft cloth. Always keep the disc
clean.
• If you cannot wipe off the dust with a soft cloth, wipe
the disc lightly with a slightly moistened soft cloth
and finish with a dry cloth.
• Do not use any type of solvent such as thinner,
benzene, commercially available cleaners or
antistatic spray for vinyl.
It may damage the disc.
• Do not store discs in a place subject to direct
sunlight or near heat source.
• Do not store discs in a place subject to moisture and
dust such as a bathroom or near a humidifier.
• Store discs vertically in a case, stacking or placing
object on discs outside or their case may cause
warping.
Disc Information
• Normally, DVD discs are divided into titles, and the
titles are sub-divided into chapters. Audio CD discs are
divided into tracks.
• Each title, chapter, or track is assigned a number,
which is called title number, chapter number or track
number respectively. There may be discs that do not
have these numbers.
Copyright Information
This product incorporates copyright protection
technology that is protected by U.S. patents and
other intellectual property rights. Use of this
copyright protection technology must be authorized
by Macrovision, and is intended for home and other
limited viewing uses only unless otherwise authorized
by Macrovision. Reverse engineering or disassembly is
prohibited.
Manufactured under license from Dolby Laboratories.
Dolby, Dolby Audio and the double-D symbol are
trademarks of Dolby Laboratories.
Disc Types
Audio and Video
Disc size 12cm
Single side, single layer / single side, double layer
PAL and NTSC DVD disc
Playback time 135min / 240min max
Notes on battery usage
Do not insert batteries into the remote control in the
wrong direction.
Do not charge, heat, open or short-circuit the batteries.
Do not throw batteries into a fire.
If the remote control does not function correctly or
if the operating range becomes reduced, replace all
batteries with new ones.
Improper replacement of batteries may result in
explosive hazard. It must be replaced only by batteries
with the same or equivalent type.
Audio
Disc size 12cm / 8cm CD disc Playback time
74min/20min max
Picture
JPG format disc
* Player is DVD-Video, DVD+/-R, DVD+/-RW, CD-DA, CD-
R, CD-RW compatible.
Region Management Information
This DVD Player is designed and
manufactured to respond to the Region
Management Information that is recorded
on a DVD disc. If the Region number described on the
DVD disc does not correspond to the Region number of
this DVD Player, this DVD player cannot play that disc.
The Region number of this DVD player is ‘REGION 2’

SENZGO7TWDVD
Instruction Manual
Notes on battery usage
Do not insert batteries into the remote control in the
wrong direction.
Do not charge, heat, open or short-circuit the batteries.
Do not throw batteries into a fire.
If the remote control does not function correctly or
if the operating range becomes reduced, replace all
batteries with new ones.
Improper replacement of batteries may result in
explosive hazard. It must be replaced only by batteries
with the same or equivalent type.

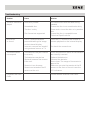
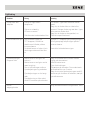
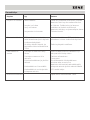
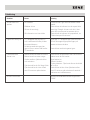
Troubleshooting
Problem Cause Solution
The disc cannot be
played
Incorrectly loaded
Unreadable disc
The disc is dirty
Disc format not supported
Re-load the disc with the label facing
upwards
Ensure the disc is not scratched or dirty.
Clean and re-insert the disc or try another
disc
Ensure the disc is compatible see
‘Technical Specifications’
No picture
or sound
The TFT button has been
pressed disabling the image
on the internal display
Incorrect connections made if
using external source or TV.
Press the TFT button on the remote to
resume playback on the internal display.
Re-check the connections.
The remote does
not respond
The batteries may be inserted
incorrectly.
The batteries may be low.
Obstacle between the remote
& the unit.
Remote is too far away
Remote not aimed at the IR
sensor on the unit.
Check the polarities match & the batteries
are correctly inserted.
Replace the batteries.
Remove the obstacle.
Move closer. The range of the remote is
approx 6m
Make sure you aim the remote at the IR
sensor on the front of the unit near the
LED indicators
Forgotten the Pass
Code
Use the default override code ‘1369’.

SENZGO7TWDVD
Instruction Manual
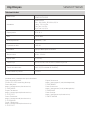
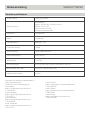
Technical Specifications
Model Number SENZGO7TWDVD
Power Supply
Power Adapter
Input - AC 100~240V 50/60Hz 0.5A
Output - DC 9V 1.5A
Main : Input 9V 1.5A
Slave : Input 9V 0.5A
Input voltage DC 9-12V
Battery Lithium battery
Battery capacity 1000mAh / 7.4V
Dynamic range ≥ 85dB
Video output 1 Vp-p75 Ω unbalanced
Frequency response 20Hz~20KHz
Screen size 7” (17.5cm)
Supported Discs CD, CD-R, DVD, DVD-R, DVD+R, PICTURE CD & JPG
Supported memory formats USB, SD (SD up to 16Gb SDHC)
Remote battery 2 x AAA
Imported and Exclusively marketed by:
Power International AS,
PO Box 523, 1471 Lørenskog, Norway
Power Norge:
https://www.power.no/kundeservice/
T: 21 00 40 00
Expert Danmark:
https://www.expert.dk/kundeservice/
T: 70 70 17 07
Power Danmark:
https://www.power.dk/kundeservice/
T: 70 33 80 80
Punkt 1 Danmark:
https://www.punkt1.dk/kundeservice/
T: 70 70 17 07
Expert Finland:
https://www.expert.fi/tuki/asiakaspalvelu/
T: 020 7100 670
Power Finland:
https://www.power.fi/tuki/asiakaspalvelu/
T: 0305 0305
Power Sverige:
https://www.power.se/kundservice/
T: 08 517 66 000

PAS PÅ: FOR AT UNDGÅ ELEKTRISK STØD
MÅ APPARATET IKKE ÅBNES. PRODUKTET
INDEHOLDER INGEN DELE, DU SELV KAN REPARERE.
REPARATIONER SKAL UDFØRES AF AUTORISEREDE
SERVICETEKNIKERE.
• Tag dig tid til at læse anvisningerne i denne
brugervejledning nøje. Det vil hjælpe dig med at
konfigurere og betjene dit system korrekt og nyde
alle dets avancerede funktioner.
• Opbevar denne vejledning til senere reference. Hvis
enheden gives videre til en tredjepart, skal du sørge
for, at denne vejledning følger med.
• Produktmærkatet findes på bagsiden af apparatet.
• Dette produkt er beregnet til indendørs brug. Det er
hverken designet til eller testet for udendørs brug
eller i køretøjer eller både.
For at mindske risikoen for brand, elektrisk stød og
beskadigelse af enheden må den ikke udsættes for
regn, fugt, dryp eller sprøjt. Stil ikke genstande fyldt
med væske, såsom vaser, på apparatet.
• Hvis der spildes væske på apparatet, kan det
forårsage alvorlige skader. Sluk øjeblikkelig for
stikkontakten. Træk stikket ud, og kontakt din
forhandler.
• Brug kun tilbehør, som er specificeret af fabrikanten.
• For en sikkerheds skyld, og for at undgå unødvendigt
energiforbrug, må apparatet aldrig efterlades tændt
uden opsyn i længere tid, f.eks. natten over, mens
du er på ferie eller ude af huset.
• Sluk den, og træk stikket ud af stikkontakten.
• For at mindske risikoen for elektrisk stød må du ikke
fjerne skruerne i kabinettet. Apparatet indeholder
ikke nogen dele, som brugeren selv kan reparere. Du
bedes venligst efterlade al vedligeholdelsesarbejde
til kvalificeret personale.
• Apparatet må ikke bruges, hvis du er i tvivl om, at
det virker normalt, eller hvis det er beskadiget på
nogen måde - sluk apparatet, tag stikket ud af
stikkontakten og kontakt din forhandler.
• Du må ikke åbne påmonterede afskærmninger, da
dette kan udsætte dig for farlige spændinger.
• Brug passende strømkilder - Tilslut enheden
til en passende strømkilde som beskrevet i
brugervejledningen eller som markeret på enheden.
Advarsel
Fare for elektrisk stød!
Åben ikke!
Dette symbol på produktet eller i vejledningen
betyder, at det udtjente elektriske eller
elektroniske udstyr ikke må bortskaffes
sammen med husholdningsaffald. I EU-lande
findes der separate genbrugsordninger.
Kontakt de lokale myndigheder eller forhandleren for
yderligere oplysninger.
Følg nedenstående råd for sikker brug.
VEDRØRENDE BESKYTTELSE MOD UDSÆTTELSE FOR
LASERENERGI
• Da laserstrålen, der bruges i denne cd-afspiller, er
skadelig for øjnene, må kabinettet ikke skilles ad.
• Hold øjeblikkeligt op med at bruge enheden, hvis
der kommer væske eller en fast genstand ind i
kabinettet.
• Rør ikke linsen eller sæt fingrene på det. Hvis dette
sker, kan det beskadige linsen og afspilleren holder
muligvis op med at virke ordentligt.
• Stik ikke noget ind i sikkerhedsstikket. Hvis dette
sker, lyser laserdioden, når cd-lågen er åben.
• Hvis enheden ikke skal bruges i længere tid, skal du
sørge for, at alle strømkilder afbrydes fra enheden.
Tag batterierne ud af batterikammeret.
• Dette apparatet bruger en laser. Brug af knapper,
indstillinger eller procedurer andre end dem, der
er anført heri, kan medføre udsættelse for farlig
stråling.
Hvis der opstår problemer, skal du afbryde strømkilden
og få enheden repareret af kvalificeret personale.
I boksen
Tag forsigtigt din dvd-afspiller ud af emballagen.
I boksen finder du:
Hovedenhed (DVD-
afspiller)
Slave-skærm (2. skærm)
Fjernbetjening
Instruktionshåndbog
Strømforsyning
Biladapter
Monteringsstropper til
nakkestøtte
AV-kabel
Øretelefon x 2
Ledning
Strøm fra stikkontakten
Din dvd-afspiller bruger en strømforsyning på 230-240
V AC ~ 50 Hz.
Sørg for, at din strømforsyning er kompatibel inden
brug.
Træk ledningen ud af stikkontakten, når den ikke er i
brug.

SENZGO7TWDVDBrugervejledning
Placering af dvd-afspilleren
Placer dvd-afspilleren på en flad, stabil overflade, der
ikke udsættes for vibrationer. Undgå
følgende steder:
• Steder, hvor produktet udsættes for direkte sollys
• Steder, der er tæt på varmekilder
• Steder, hvor luftfugtigheden er høj og ventilation er
dårlig
• Steder, der er støvet
Hovedenheden set forfra og fra siden
B C D E F G A
H
+VOLVOL -
A. Dvd-låge er åben.
B. LYDSTYRKE-. Lydstyrke ned.
C. LYDSTYRKE+. Lydstyrke op.
D. AFSPIL/PAUSE. Tryk for at starte afspilningen og for
at sætte den på pause.
E. Fjernbetjeningssensor/Rød opladningsindiaktor/Blå
strømindikator
F. Spring tilbage. Spring tilbage til starten af kapitel/
spor
G. Spring frem. Spring til næste kapitel/spor
H. TIL/FRA. Tænd/sluk
N
IJ K L M
I. HOVEDTELEFON. Udgangsstik til hovedtelefoner.
J. AV-UDGANG. AV-udgang til slaveenhed.
K. Stik til SD-kort
L. USB-port.
M. DC-udgang. For strøm til slaveenhed.
N. DC-indgang. Strømindgang/opladningsstik.
Slaveenheden set forfra og fra siden
DISPLAY SE TUP
MUTE
DISPLAY ON/OFF+
VOLVOL-
SO P Q R
O. Skærm TIL/FRA. Slå visning af slaveenhed TIL eller
FRA.
P. LYDLØS. Sluk for lyden fra slaveenheden.
Q. SKÆRMOPSÆTNING.
R. LYDSTYRKE-. Lydstyrke ned.
S. LYDSTYRKE+. Lydstyrke op.
DC IN AV IN OFF/ON
T U V W
T. DC-indgang. Til strøm fra hovedenhed. (M)
U. AV-indgang. AV-indgang fra hovedenhed (J)
V. HOVEDTELEFON. Udgangsstik til hovedtelefoner.
W. FRA/TIL. Tænd eller sluk for denne slaveenhed.

Fjernbetjening
PROG
REPEAT
AUDIO
GOTOZOOM
ST-BY DISPLAY
MODE ANGLESETUP TFT
VOL- VOL+
1 2 3
456
78 9
0 10+
MUTE
MENUTITLE
SUBTITLE
01
12
13
14
15
02
03
04
05
06
07
08
09
10
11
21
22
23
24
25
16
17
18
19
20
OK
DVD
1. DVD/USB/KORT-funktionsknap. Skift mellem dvd og
isatte medieenheder.
2. STANDBY. STANDBY TIL/FRA.
3. FUNKTION. Ikke implementeret til denne model
4. TITEL. Tryk for at åbne dvd-titelmenuen (hvis
tilgængelig).
5. OK. Tryk for at vælge eller aktivere en funktion.
6. NAVIGATIONSKNAPPER. Naviger i menuerne og
indstillingerne.
7. LYDSTYRKE-. Tryk for at skrue ned for lydstyrken.
8. PROG. Programmer en anden afspilningsrækkefølge
på dvd'er og cd'er
9. AFSPIL/PAUSE. Tryk for at starte afspilningen og for
at sætte den på pause.
10. TALKNAPPER Bruges til at indtaste cifre og skifte
mellem numrene.
11. SPOL HURTIG FREM/TILBAGE. Tryk gentagne gange
for at skifte mellem spolehastighederne.
12. OPSÆTNING. Tryk en gang for at åbne
systemmenuen.
13. TFT. Tryk for at deaktivere den indbyggede TFT-
skærm. Tryk igen for at aktivere den
14. SKÆRM. Tryk gentagne gange for at skifte mellem
tilgængelige oplysninger på den aktuelle disk
15. LYDLØS. Tryk for at slå lyden fra. Tryk igen for at slå
lyden til igen.
16. VINKEL: Tryk gentagne gange for at skifte mellem
eventuelle tilgængelige vinkler på dvd'en.
17. MENU. Tryk for at åbne dvd-menuen (hvis
tilgængelig)
18. LYDSTYRKE+. Tryk for at skrue op for lydstyrken.
19. STOP. Tryk for at stoppe afspilning af et medie.
20. UNDERTEKSTER. Tryk gentagne gange for at skifte
mellem tilgængelige undertekster på dvd'en
21. GENTAG. Tryk gentagne gange for at skifte mellem
gentagelsesfunktionerne.
22. LYD. Tryk gentagne gange for at skifte mellem
tilgængelige lydnumre
23. GÅTIL. Angiv et nøjagtigt punkt på en dvd eller cd,
hvor den skal afspilles fra.
24. ZOOM. Forøg billedstørrelsen op til 4 x større eller
mindre.
25. SPRING TIL NÆSTE/FORRIGE. Tryk for at springe
mellem dvd-kapitlerne/cd-numrene eller
mediefilerne.
Montering på nakkestøtten i bilen
Følg nedenstående anvisninger for at montere den
bærbare dvd-afspiller på en nakkestøtte i bilen.
1. Brug de medfølgende
stropper og stik dem gennem de 2 stropholdere på
bagsiden af enheden.
2. Vikl stropperne rundt om de lodrette stænger på
nakkestøtten i bilen.
3. Ligesom på et bælte, skal du bruge spændet til at
fastgøre enheden til bilsædet mellem sædet og
nakkestøtten.
4. Spænd stroppen godt så dvd-afspilleren ikke flytter
sig eller falder af.
Brug af slaveenheden som en anden
skærm
1. Sæt AV-kablet (medfølger) i AV-udgangen på
hovedenheden (J). Sæt den anden ende i A/V-
indgangen (U) på slaveenheden.

SENZGO7TWDVDBrugervejledning
2. Når begge enheder er tændt og funktionsdygtige,
vil alt, der afspilles på hovedenheden, nu også blive
duplikeret på slaveenhedens skærm.
Bemærk: Masterenheden har fuld kontrol over
lydniveauet. Sørg for at skrue op for lydstyrken på
hovedenheden, hvis lyden på slaveenheden er for lav.
Tænd/sluk for strømmen (hovedenhed)
Tænde for hovedenheden ved hjælp af netadapter
1. Sørg for, at strømafbryderen (H) er i FRA-position.
2. Sæt netadapterstikket i DC INGANG-stikket (N) på
siden af den bærbare afspiller.
3. Slut strømadapteren til en stikkontakt.
4. Tænd ved at skubbe afbryderen (H) til TIL-stilling.
Sluk for hovedenheden ved at skubbe strømafbryderen
(H) til FRA-positionen.
Tænd/sluk for strømmen (slaveenhed)
1. Tilslut strømkablet (medfølger) til hovedenheden (M)
2. Slut den anden ende af strømkablet til
slaveenheden (T)
3. Skub strømafbryderen (W) på slaveenheden til TIL-
positionen.
Sluk for slaveenheden ved at skubbe strømafbryderen
(H) til FRA-positionen.
Bemærkninger. Sluk altid for slaveenheden, før du
frakobler strømkablet, eller når slaveenheden ikke er i
brug.
DC IN AV IN OFF/ON
DI SP L AY ON/OFF+
VO LVO L-
DC IN AV IN OFF/ON
Tænd/sluk - brug i bilen
Tænde for slaveenheden ved hjælp af biladapter.
1. Sørg for, at strømafbryderen (H) er i FRA-position.
2. Sæt et af biladapterens små stik i hovedenhedens
DC-stik (N), og det andet lille stik i slaveenhedens
DC-stik (T). Indsæt den anden ende i bilens 12 V
adapterstik.
Det er MEGET vigtigt ikke at forbinde enheden til en
24 V strømadapter til biler. Kontroller venligst din
bilmanual, inden du gør dette.
Enheden slukkes ved at skubbe TÆND/SLUK til Fra-
stilling (H) og (W).
Opladning af det interne batteri (kun ho-
vedenhed)
Inden batteriet bruges, skal du at det er ladet helt op.
(Kun hovedenhed)
1. Sæt netadapterstikket i DC INPUT-stikket (N) på
siden af hovedenheden.
2. Tilslut netadapterstikket til en stikkontakt. Den røde
lysdiode lyser, og opladningen starter automatisk.
3. Når batteriet er fuldt opladet, slukker den røde
opladeindikator.
WARNING
12V ONLY

Standby (kun hovedenhed)
1. Tryk på ST-BY-knappen
på fjernbetjeningen eller
brug FRA/TIL (H) for at
aktivere enheden fra
STANDBY-tilstand.
2. Tryk på ST-BY-knappen
på fjernbetjeningen for
at sætte enheden på
standby.
3. Denne enhed går automatisk på standby efter 20
minutters inaktivitet. For at aktivere enheden, skal
du følge punkt 1 ovenfor.
Isætning af batterier i fjernbetjeningen
1. Tag batteridækslet af (som vist).
2. Sæt 2 x AAA-batterier i, og sørg for at de vender
rigtigt.
3. Sæt batteridækslet på igen, på samme måde som
du tog det af.
Tænd enheden og afspil en dvd
1. Skub afbryderen (H) til TIL-positionen (den grønne
lysdiode lyser).
2. Tryk på ÅBN/LUK (A) for at åbne diskrummet.
3. Sæt en dvd-disk i, og tryk den forsigtigt på plads i
bakken. (etiket vendt opad).
4. Luk diskrummet, og afspilningen starter
automatisk.
5. Når der vises en menu på skærmen, skal du bruge
navigationsknapperne på fjernbetjeningen til at
vælge det ønskede menupunkt, og tryk derefter på
OK-knappen for at starte afspilningen.
Sådan stoppes afspilningen (dvd/cd)
1. Hvis du trykker på STOP-knappen på
fjernbetjeningen en gang under afspilningen,
stoppes afspilningen det aktuelle sted.
2. Hvis du trykker på AFSPIL/PAUSE-knappen (D
eller på fjernbetjeningen (09)) på dette tidspunkt,
genoptages afspilningen derfra, hvor du stoppede
afspilningen.
3. Hvis du trykker to gange på STOP-knappen på
fjernbetjeningen, afbrydes afspilningen, og det er
ikke muligt, at starte afspilning fra det sted igen.
Afspil/Pause (dvd/cd)
1. Du kan altid stoppe afspilningen ved at trykke på
AFSPIL/PAUSE-knappen (D eller på fjernbetjeningen
(09)).
2. For at starte afspilningen igen, skal du trykke
på AFSPIL/PAUSE-knappen igen (D eller på
fjernbetjeningen (09)).
Sådan går du frem og til bage mellem
kapitlerne (dvd) eller numrene (cd)
1. Tryk på enten eller (25) under
afspilningen, for at gå frem og tilbage mellem
kapitlerne (dvd) og numrene (cd).
2. Denne funktion fungerer muligvis ikke i afsnittet
"Advarsel" på en dvd.
Indstilling af lydstyrke
1. Brug knapperne LYDSTYRKE +/- (B, C, R, S, 07 og 18)
på den bærbare dvd-afspiller eller fjernbetjeningen
til at øge eller mindske lydniveauet.
/ Hurtig spolning frem og
tilbage
1. Tryk på enten eller (11) under afspilningen, for
at spole frem og tilbage.
2. Hver tryk øger hastigheden med 2X, 4X, 8X 16X & 32X.
Det efterfølgende tryk på knappen genoptager normal
afspilning.
Denne funktion fungerer muligvis ikke i afsnittet "Advarsel"
på en dvd.
Skærm (dvd/cd)
Når du afspiller en disk, kan du trykke på SKÆRM-knappen
(14) for at se forskellige oplysninger om disken.
Du skal trykke på knappen SKÆRM fire gange for at få vist
al information. Tryk igen for at skjule skærminformationen.
Der er forskellige valgmuligheder på forskellige slags diske.
Menu (dvd)
Diskens hovedmenu åbnes ved at trykke på MENU-
knappen (17 på fjernbetjeningen) under afspilningen.
DVDDVD
MODE
SETUP TFT

SENZGO7TWDVDBrugervejledning
Titel (dvd)
Diskens titelmenu (hvis tilgængelig) åbnes ved at
trykke på TITEL-knappen (04 på fjernbetjeningen) under
afspilningen.
TITEL-menuen er startnummeret på en disk (på diske,
der ikke har et startnummer, sker der ingenting, når der
trykkes på TITLE-knappen).
Lyd fra (dvd, cd)
Denne funktion slår øjeblikkeligt lyden fra.
1. Tryk på LYDLØS-knappen (15 på fjernbetjeningen)
for at slå lyden fra.
2. Tryk igen på LYDLØS-knappen, for at slå lyden til
igen.
Gentag (dvd/cd)
Gentagelsesfunktionen giver dig mulighed for at se et
afsnit på en disk flere gange.
1. Tryk én gang på GENTAG-knappen (21) under
afspilningen, for at aktivere gentagelsesfunktionen.
2. Tryk gentagne gange for at skifte mellem
gentagelsesfunktionerne på den aktuelle disk.
3. Tryk på GENTAG-knappen, indtil
gentagelsesfunktionen slås FRA.
Gentagelsesfunktionen virker ikke på alle diske.
Visning af forskellige vinkler (dvd)
Nogle diske indeholder scener, der er filmet samtidigt
fra forskellige vinkler. På disse diske kan den samme
scene ses fra forskellige vinkler ved brug af VINKEL-
knappen.
Tryk på VINKEL-knappen (16) under afspilningen for at
skifte mellem de forskellige vinkler (hvis disse findes).
En enkelt dvd-disk kan indeholde op til 9 forskellige
synsvinkler for lydspor (dvd)
Undertekster (dvd)
Mange dvd'er indeholder undertekster.
Tryk på knappen UNDERTEKSTER (20) for at aktivere
det første sæt af undertekster.
Tryk gentagne gange på UNDERTEKSTER-knappen (20)
for at skifte mellem de tilgængelige undertekster.
Tryk gentagne gange på UNDERTEKSTER-knappen (20)
indtil underteksterne slås FRA.
Indgangsfunktionerne dvd, USB og KORT
Tryk på knappen DVD/USB/KORT (01) på
fjernbetjeningen for at skifte mellem diskafspilning,
USB og billedvisning fra filer på et kort.
Lydspor (dvd)
Det er almindeligt, at en dvd indeholder mere end et
lydspor, f.eks. et spor med 5.1 lyd, stereolyd og andre
lydspor.
Tryk på LYD-knappen (22) for at skifte mellem sporene.
Denne bærbare dvd-afspiller understøtter IKKE DTS-lyd.
Hvis du vælger et DTS-lydspor eller hvis et lydspor
vælges automatisk, afspiller enheden ikke nogen lyd.
Skulle dette ske, skal du vælge et kompatibelt lydspor.
Zoom (dvd/disk med billeder)
For at zoome ind på det viste billede, skal du følge
nedenstående trin.
1. Tryk på ZOOM (24) for at aktivere standard-zoom
på 2X. Hver efterfølgende tryk skifter mellem
zoomfunktionerne, f.eks. 3X, 4X, 1/2, 1/3 og 1/4. Ved
det efterfølgende tryk slås zoomfunktionen FRA.
2. Når du er i ZOOM-funktionen, kan du bruge
navigationsknapperne på fjernbetjeningen til at
rulle op på, ned til venstre og højre på billedet.
Når der zoomes ind på billedet, reduceres
billedkvaliteten og pixlerne bliver mere tydelige.
Programafspilning (dvd/cd)
1. Tryk på PROG-knappen (08) for at starte
programfunktionen.
2. Brug navigationsknapperne til at markere
programrækkefølgen.
3. Indtast nummeret til TITLEN/KAPITLET eller
NUMMERET med talknapperne 10. F.eks. - Titel/
Kapitel/Nummer 22 betyder, at du skal trykke på
"10+" to gange og dernæst på "2".
4. Gentag trin 2-3, indtil du har programmeret alle de
ønskede kapitler/numre. Hvis du ønsker at tilføje
flere Titler/Kapitler eller Numre end 10, skal du gå
til NÆSTE-ikonet og trykke på OK-knappen (05).
Numrene 11-20 er nu programmerbare.
5. Når programmeringen er færdig, skal du gå til
START-ikonet og trykke på OK-knappen (05) for
at starte afspilningen af din programmerede
rækkefølge.

GÅTIL-funktionen (dvd/cd)
GÅTIL-funktionen giver dig mulighed for at indtaste et
bestemt kapitel, titel, lydspor, undertekstspor, vinkel og
bestemte tidskoder.
1. Tryk på GÅTIL-knappen (23) under afspilning for at
åbne GÅTIL-menuskærmen.
2. Tryk på GÅTIL-knappen (23) for at skifte mellem
GÅTIL-valgmulighederne.
3. Brug talknapperne (10) til at indtaste kapitlet, sporet
eller den tid, du ønsker at springe til.
Fremvisning af JPEG-billeder
JPEG billed-cd'er kan fås fra ethvert godt
fotofremkaldningslaboratorie. Du kan også danne dem
manuelt på en computer eller indlæse jpg-billederne på et
USB flash-drev.
1. Indsæt en disk, et USB-flashdrev eller et SD-kort med
JPEG-billeder i USB-porten (L) eller SD-åbningen (M).
2. Hvis filerne er på en disk, vises filmenuen. Hvis filerne
er på et USB-flashdrev eller et SD-kort, skal du trykke
på DVD/USB/SD (KORT)-knappen (01) for at skifte til
USB- eller SD-kortfunktionen.
3. Brug navigationsknapperne ( ) (06) til at
navigere på listen med billeder, og tryk på OK-knappen
(05) for at starte en fremvisning af billederne i mappen.
4. Tryk på MENU-knappen (17) for at gå tilbage til
filmenuen.
5. Tryk på STOP-knappen (19) under et diasshow for at
se en miniaturevisning af den valgte mappe.
6. Hvis du vil se et billede på ubestemt tid, skal du trykke
på AFSPIL/PAUSE-knappen (09). For at genoptage
fremvisningen, skal du trykke på AFSPIL/PAUSE-
knappen igen.
7. Under diasshowet vil navigationsknapperne dreje det
viste billede.
8. Tryk på / knapper (25) for at gå frem og
tilbage mellem billederne.
9. Tryk på ZOOM-knappen (på fjernbetjeningen (24)) for at
aktivere standard-zoom på 100 %. Hver efterfølgende
tryk skifter mellem zoomindstillingerne, f.eks. 100%,
125%, 150%, 200%, 75% og 50%.
10. Gentag kan indstilles til BLAND, VILKÅRLIG, ENKELT,
GENTAG ÉN, GENTAG MAPPE eller MAPPE ved
gentagne gange at trykke på GENTAG-knappen (på
fjernbetjeningen (21)).
Taltastaturet (dvd/cd)
Du kan bruge taltasterne til at styre forskellige
funktioner på afspilleren, som f.eks. -
NUMMER: Når du afspiller en cd
KAPITEL/TITEL: Når du afspiller en dvd.
• Indtast det ønskede kapitel eller nummer med
taltastaturet.
• Vælg kapitel eller nummer 1-9 ved at trykke på den
relevante talknap.
• For kapitel eller nummer 10, skal du trykke på knappen
10+ efterfulgt af knappen 0.
• For kapitel eller nummer 22, skal du trykke to gange på
knappen 10+ efterfulgt af knappen 2. Hvis det andet
ciffer er '0', skal du trykke på 0-knappen.
Brug af høretelefoner
1. Tilslut øretelefoner (medfølger) til 3,5 mm (I og V)
udgangen på siden af hovedenheden.
2. Juster lydstyrken på normal måde.
• Lyt på en moderat lydstyrke, for at undgå høreskader.
• Hvis du ikke hører nogen lyd under afspilningen, skal du
ikke skrue op for lydstyrken, da musikken pludselig kan
begynde at spille på en høj lydstyrke.
• For stort lydtryk fra øretelefoner og hovedtelefoner kan
forårsage alvorlige høreskader.
For at undgå beskadigelse af din hørelse, skal du skrue ned
for lydstyrken, inden du starter afspilningen. Skru derefter
langsom op til den ønskede lydstyrke, når afspilningen er
startet.
Systemopsætning
Opsætningsmenuen indeholder forskellige præferencer for
enhedens funktioner. For at åbne opsætningsmenuen, skal
du trykke på OPSÆTNING-knappen (12).
Brug knapperne (06) til at rulle med. Tryk på OK-
knappen for at vælge.
Generelt
Tv-skærm
Vælg en indstilling blandt:
4:3/PS (Pan and Scan)
4:3/PS (Pan and Scan)
4:3/LB (Letter Box)
Vinkelmærke
Når denne funktion slås til, vises et ikon for en
kompatibel disk, hvis det er muligt at vælge flere
vinkler.
Sproget i skærmmenuen
Dette menupunkt indstiller sproget i skærmmenuen.
Du kan vælge imellem:
Engelsk
Suomi
Norsk
Dansk
Svensk

SENZGO7TWDVDBrugervejledning
Pauseskærm
Når enheden ikke er i brug, vises dvd-logoet som en
pauseskærm for at forhindre skærmbrænding. Vælg TIL
eller FRA.
Sidste hukommelse
Når den er indstillet til TIL, husker enheden den sidste
position på en disk, før enheden blev lukket (STANDBY).
Lyd (højttaleropsætning)
Downmix
Denne indstilling giver dig mulighed for at ændre den
måde, som lyden spilles på hver højttaler. Du kan vælge
imellem:
• LT/RT - Venstre/højre blandet tilstand
• STEREO - lydafspilning i stereo
Dolby (lydafspilning)
DUAL MONO: Gælder kun på diske med Dolby Digital 5.1
• STEREO: Lydfrekvensen i venstre og højre kanal
sendes fra henholdsvis venstre og højre højttaler.
• VENSTRE-MONO: Lydfrekvensen i venstre og højre
kanal sendes kun fra venstre højttaler.
• HØJRE-MONO: Lydfrekvensen i venstre og højre
kanal sendes kun fra højre højttaler.
• MIX-MONO: Lydfrekvensen i venstre og højre kanal
samles og sendes fra både venstre og højre
højttaler.
Dynamisk
Når du ser en disk med høj dynamisk lyd på lave
lydstyrker, kan du øge det dynamiske område, for at
reducere tabet af lyddetaljer.
Video > Kvalitet
Skarphed
Indstil videobilledets skarphed. Vælg imellem:
Low (Lav)
Medium
High (Høj)
Lysstyrke
Indstil videobilledets lysstyrke. Brug knapperne /
(G, 06) til at øge eller reducere fra -20 til +20. Tryk på
knappen OK (06) for at afslutte indstillingen.
Kontrast
Indstil videobilledets kontrast. Brug knapperne
/ (06) til at øge eller reducere fra -20 til +20. Tryk
på knappen OK (06) for at afslutte indstillingen.
Nuance
Indstil videobilledets farvetone. Brug knapperne
/ (06) til at øge eller reducere fra -9 til +9. Tryk på
knappen OK (05) for at afslutte indstillingen.
Mætning
Indstil videobilledets farvemætning. Brug knapperne
/ (06) til at øge eller reducere fra -9 til +9. Tryk på
knappen OK (05) for at afslutte indstillingen.
Indstillinger
Kun muligt, når der ikke sidder en disk i enheden
Tv-type
Indstil dette menupunkt til hvilken type disk, du ser.
PAL, MULTI (for at indstille automatisk) eller NTSC.
Lyd
Vælg standard lydindstillingen. Det betyder, at den
bærbare dvd-afspiller automatisk vælger dette sprog
som lydsporet (hvis det er tilgængeligt).
Undertekster
Vælg et standard undertekstsprog.
Diskmenu
Dette menupunkt indstiller standardsproget i dvd-
menuen. Når dette punkt er indstillet, vises dvd-
menuen på standardsproget, hvis dvd-menuen findes
på dette sprog.
Forældrekontrol
Du kan vælge imellem:
• Børnesikker
• PG-R
• G
• R
• PG
• NC17
• PG13
• Voksen
Når du ændrer forældrekontrol-niveauet bliver du bedt
om at indtaste adgangskoden. Standardadgangskoden
er '1234'.
Standard
Når denne indstilling slås til, nulstilles alle
indstillingerne til fabriksindstillingerne.
Sidan laddas ...
Sidan laddas ...
Sidan laddas ...
Sidan laddas ...
Sidan laddas ...
Sidan laddas ...
Sidan laddas ...
Sidan laddas ...
Sidan laddas ...
Sidan laddas ...
Sidan laddas ...
Sidan laddas ...
Sidan laddas ...
Sidan laddas ...
Sidan laddas ...
Sidan laddas ...
Sidan laddas ...
Sidan laddas ...
Sidan laddas ...
Sidan laddas ...
Sidan laddas ...
Sidan laddas ...
Sidan laddas ...
Sidan laddas ...
Sidan laddas ...
Sidan laddas ...
Sidan laddas ...
Sidan laddas ...
-
 1
1
-
 2
2
-
 3
3
-
 4
4
-
 5
5
-
 6
6
-
 7
7
-
 8
8
-
 9
9
-
 10
10
-
 11
11
-
 12
12
-
 13
13
-
 14
14
-
 15
15
-
 16
16
-
 17
17
-
 18
18
-
 19
19
-
 20
20
-
 21
21
-
 22
22
-
 23
23
-
 24
24
-
 25
25
-
 26
26
-
 27
27
-
 28
28
-
 29
29
-
 30
30
-
 31
31
-
 32
32
-
 33
33
-
 34
34
-
 35
35
-
 36
36
-
 37
37
-
 38
38
-
 39
39
-
 40
40
-
 41
41
-
 42
42
-
 43
43
-
 44
44
-
 45
45
-
 46
46
-
 47
47
-
 48
48


SENZ GO 7" TWIN BÆRBAR DVD-SPILLER Bruksanvisning
- Kategori
- DVD-spelare
- Typ
- Bruksanvisning
