POINT PRO PO2289BL SVART MELKESKUMMER Bruksanvisning
- Kategori
- Mixer / matberedare tillbehör
- Typ
- Bruksanvisning

MILK FROTHER
PO2289BL
User Manual
1

Thank you for purchasing your new POINT PRO SERIES Milk Frother.
These operating instructions will help you use it properly and safely.
We recommend that you spend some time reading this instruction manual
in order that you fully understand all the operational features it oers.
Read all the safety instructions carefully before use and keep this
instruction manual for future reference.
Takk for at du kjøpte denne nye melkeskummeren fra POINT PRO SERIES.
Denne bruksanvisningen hjelper deg med å bruke den ordentlig og sikkert.
Vi anbefaler at du tar deg tid til å lese gjennom hele bruksanvisningen for
å bli fortrolig med alle funksjonene den har.
Les alle sikkerhetsanvisningene nøye før bruk, og oppbevar
bruksanvisningen for fremtidig referanse.
Kiitos, kun valitsit uuden POINT PRO SERIES-maidonvaahdottimen.
Nämä käyttöohjeet opastavat sinua käyttämään laitetta oikein ja
turvallisesti.On suositeltavaa käyttää aikaa tämän käyttöoppaan
lukemiseen, jotta ymmärrät täysin, mitä toiminnallisia ominaisuuksia tuote
tarjoaa.Lue kaikki turvallisuusohjeet huolellisesti ennen laitteen käyttöä,
ja säilytä käyttöopas myöhempää käyttöä varten.
Tak for købet af din nye mælkeskummer fra POINT PRO SERIES.
Denne brugsanvisning hjælper dig med at bruge mælkeskummeren rigtigt
og sikkert.Vi anbefaler, at du læser denne brugervejledning, så du får en
fuld forståelse af, hvordan alle betjeningsfunktionerne virker.
Læs alle sikkerhedsinstruktioner nøje før brug, og opbevar denne
brugeranvisning til senere reference.
Tack för att du har köpt en ny mjölkskummare från POINT PRO SERIES .
Denna bruksanvisning hjälper dig att använda den säkert och på rätt sätt.
Vi rekommenderar att du tar dig tid att läsa igenom denna bruksanvisning
för att till fullo förstå alla driftfunktioner som den erbjuder.
Läs noga igenom alla säkerhetsinstruktioner före användning och spara
sedan bruksanvisningen för framtida bruk.

4 - 13
44 - 53
34 - 43
14 - 23
24 - 33
3

SAFETY WARNINGS
1. Please read all the instructions and
familiarise yourself with the features
and operation of your unit before
using the appliance. Make sure you
read all the safety notes carefully and
retain for future reference.
2. Before using this appliance ensure
that the voltage of your electricity
supply is the same as that indicated
on the rating plate of the appliance.
3. Do not use the appliance for any
other uses than its intended use.
4. To avoid damaging the heating
elements, do not operate the unit
without milk in it.
5. Disconnect the unit from the power
supply when not in use and before
cleaning.
6. Ensure that the mains cable does
not touch any hot surface and that it
does not overhang a table edge.
4

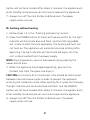
7. Do not use the a
pp
liance near a
source of heat or on an unstable
surface.
8. Use the appliance only on heat
resistant surfaces. If the work surface
is excessively smooth the appliance
should be placed on a non-slipmat.
9. Never insert any hard object or
implement into the unit when it is
operating. This may cause damage
to the appliance and personal injury.
10.Do not immerse the a
pp
liance or
the mains cable or
p
lu
g
in water or
other li
q
uids.
11.Do not touch the hot surface. Use
the handle.
12.
A
void contactin
g
the movin
g
p
arts.
13.Do not use attachments or
accessories that did not come with
this appliance, or that are not
recommended by the manufacturer.
5

14.Check the appliance and the mains
cable regularly for damage. If there is
damage of any kind, the appliance
should not be used. Do not repair
the appliance yourself, always consult
a qualified technician.
15. Do not use the a
pp
liance for an
y
other uses than its intended use.
16. This appliance can be used by
children aged from 8 years and above
and persons with reduced physical,
sensory or mental capabilities or lack of
experience and knowledge if they have
been given supervision or instruction
concerning use of the appliance in a
safe way and understand the hazards
involved. Children shall not play with
the appliance. Cleaning and user
maintenance shall not be made by
children without supervision.
17.Alwa
y
so
p
erate the a
pp
liance
with the lid in
p
lace.
6

18.This appliance is for normal
household use only. Do not use it for
professional catering.
19. Do not use the unit outdoors.
7

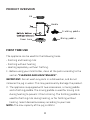
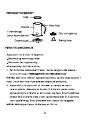
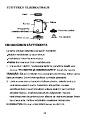
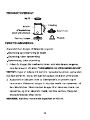
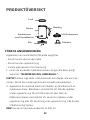
PRODUCT OVERVIEW
FIRST TIME USE
The appliance can be used for the following tasks:
-Frothing and heating milk
-Frothing without heating
-Heating separately, without frothing.
1. Before using your milk frother, clean all the parts according to the
section
“CLEANING AND MAINTENANCE”
.
IMPORTANT:
Do not wash any parts in a dishwasher, and do not
immerse the jug in water. This may permanently damage the product.
2. The appliance is equipped with two accessories, a mixing paddle
and a frothing paddle. The mixing paddle is used for mixing milk
during heating to prevent it from sticking. The frothing paddle is
used for frothing milk during heating, or for frothing without
heating. Select desired accessory according to your task.
NOTE:
The max capacity of the jug is 450ml.
8
Lid
Switch b tton
( )
u
Jug Handle
Mixing paddle
Frothing paddle
Power base

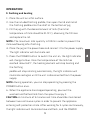
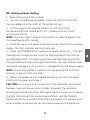
OPERATION
I.
Frothing and heating
1. Place the unit on a flat surface.
2. Use the included frothing paddle, then open the lid and install
the frothing paddle onto the shaft at the bottom of jug.
3. Fill the jug with the desired amount of milk (the initial
temperature of milk should be 10-15°C), observing the fill lines
and replace the lid.
NOTE:
The maximum milk quantity is 100ml in order to prevent the
milk overflowing after frothing.
4. Place the jug on the power base and connect it to the power supply.
The light indicator will illuminate red.
5. Press the POWER button to switch the unit on, the light indicator
will change to blue. Once the temperature of the milk has
reached about 65℃, the heating element will stop heating and
the frothing
paddle will stop rotating automatically, the light indicator will
illuminate red again until the unit is disconnected from the power
supply.
NOTE:
During operation, you can stop operating by pressing the
POWER button once.
6. When the appliance has stopped operating, pour out the
warmed and frothed milk from the spout to enjoy it.
CAUTION:
A minimum of 3 minutes rest time should be maintained
between two continuous cycles in order to prevent the appliance
entering self-protection state. After working for 5 cycles continuously,
the light indicator will illuminate blue and flash, and the POWER
9

button will not be activated. After about 5 minutes, the appliance will
enter standby state and you can continue to operate the appliance.
7. Always turn off the milk frother and disconnect the power
supply when not use.
II.
Frothing without heating
1. Follow steps 1-4 in the “Frothing and heating” section.
2. Press the POWER button 3 times continuously within 2s, the light
indicator will illuminate blue and flash, and the frothing paddle
will rotate to froth the milk separately. The heating element will
not heat up. The appliance will automatically stop rotating after
operating. The light indicator will illuminate red again until the
unit is disconnected from the power supply.
NOTE:
During operation, you can stop operating by pressing the
power button once.
3. When the appliance has stopped operating, pour out the
frothed milk from the spout and enjoy it.
CAUTION:
A minimum of 3 minutes rest time should be maintained
between two continuous cycles in order to prevent the appliance
entering self-protection state. After working for 5 cycles continuously,
the light indicator will illuminate blue and flash, and the POWER
button will not be activated. After about 5 minutes, the appliance will
enter standby state and you can continue to operate the appliance.
4. Always turn off the milk frother and disconnect the power
supply when not use.
10

III.
Heating without frothing
1.Place the unit on a flat surface.
2.Use the included mixing paddle . Open the lid and install the
mixing paddle onto the shaft at the bottom of jug.
3.Fill the
j
ug with the desired amount of milk (the initial
temperature of milk should be 10-15°C), observing the fill lines
and replace the lid.
NOTE:
The maximum milk quantity is 200ml in order to prevent the
milk overflowing after mixing.
4.Place the
j
ug on the power base and connect the unit into a power
supply. The light indicator will illuminate red.
5.Press the POWER button twice continuously within 2s, the light
indicator will change to blue. Once the temperature of the milk has
reached about 65℃, the heating element will stop heating and the
mixing paddle will stop rotating automatically, the light indicator will
illuminate red again until the unit is unplugged from the power supply.
NOTE:
The mixing paddle is used only for preventing the milk from
sticking. It will not froth the milk.
6.When the appliance has stopped operating, pour out the warm
milk from the spout and enjoy it.
CAUTION:
A minimum of 3 minutes rest time should be maintained
between two continuous cycles in order to prevent the appliance
entering self-protection state. After working for 5 cycles continuously,
the light indicator will illuminate blue and flash, and the POWER
button will not be activated. After about 5 minutes, the appliance will
enter standby state and you can continue to operate the appliance.
11

7
Always turn off the milk frother and disconnect the power supply
when not use.
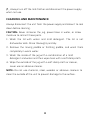
CLEANING AND MAINTENANCE
Always disconnect the unit from the power supply and allow it to cool
down before cleaning.
CAUTION:
Never immerse the jug, power base in water, or allow
moisture to contact these parts.
1. Wash the lid with water and mild detergent. The lid is not
dishwasher safe. Rinse thoroughly and dry.
2. Remove the mixing paddle or frothing paddle, and wash them
completely in warm water.
3. Wash the inside of the jug with a combination of a mild
detergent and water and then wipe clean with a soft damp cloth.
4. Wipe the outside of the jug with a soft damp cloth or cleaner,
never use an abrasive cleaner.
NOTE:
Do not use chemical, steel, wooden or abrasive cleaners to
clean the outside of the unit to prevent damage to the surface.
12

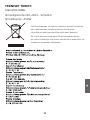
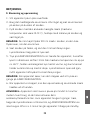
SPECIFICATIONS:
Model:PO2289BL
Rated voltage:220-240V~ 50/60Hz
Rated power:450W
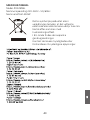
This symbol on the product or in the instructions means
that your electrical and electronic equipment should be
disposed at the end of its life separately from your
household waste.
There are separate collection systems for recycling in the
EU.
For more information, please contact the local authority or
your retailer where you purchased the product.
13

SIKKERHETSADVARSLER
1.Les alle anvisningene og gjør deg kjent
med funksjonene til og bruken av
apparatet før du bruker det. Sørg for at
du leser alle sikkerhetsnotatene nøye,
og ta vare på dem for senere oppslag.
2.Før du bruker dette apparatet, må du
sørge for at spenningen i
strømforsyningen er den samme som
angitt på merkeskiltet på apparatet.
3.Ikke bruk a
pp
aratet til noe annet enn
tiltenkt bruk.
4.For å unngå skade på
varmeelementene må enheten ikke
brukes uten melk.
5.Koble enheten fra strømforsyningen
når den ikke er i bruk og før rengjøring.
6.Sørg for at strømledningen ikke er nær
noen varm overflate og at den ikke
henger over kanten på arbeidsflaten.
14

2
overflater. Hvis arbeidsflaten er svært
glatt, må apparatet settes på en
sklisikker matte.
9.Ikke legg harde gjenstander eller
redskap i enheten når den er i drift.
Dette kan føre til skader på apparatet
og personskader.
10.A
pp
aratet, strømlednin
g
en eller
stø
p
slet må ikke dy
pp
es i vann eller
andre væsker.
11.Ikke ta på den varme overflaten. Bruk
håndtaket.
12.Unn
g
å å berøre beve
g
eli
g
e deler.
13.Ikke bruk ekstrautstyr eller tilbehør
som ikke fulgte med dette apparatet
eller som ikke anbefales av
produsenten.
7.A
pp
aratet må ikke brukes i nærheten av
en varmekilde eller på en ustødi
g
flate.
8.Bruk apparatet kun på varmesikre
15

3
16.Dette apparatet kan brukes av barn fra
og med 8 år og personer med
reduserte fysiske, sensoriske eller
mentale evner eller mangel på erfaring
og kunnskap hvis de er under tilsyn
eller har mottatt instruksjoner om bruk
avapparatetpåensikkermåteog
forstår faren dette innebærer. Barn
skal ikke leke med apparatet. Barn må
ikke foreta rengjøring og vedlikehold
uten tilsyn.
17.Bruk alltid apparatet med lokket på.
14.Kontroller apparatet og strømkabelen
regelmessig for skader. Hvis det er
skade av noe slag, skal apparatet ikke
brukes. Ikke reparer apparatet selv.
Alltid ta kontakt med en kvalifisert
tekniker.
15.Ikke bruk a
pp
aratet til noe annet enn
tiltenkt bruk.
16

18.Dette apparatet er kun for vanlig
husholdningsbruk. Det må ikke brukes
til profesjonell catering.
19.Ikke bruk
pparatet utendørs.
apparatet utendørs.
17

18

BRUK
I.
Skumme og varme opp
1. Plasser enheten på et flatt underlag.
2. Åpne lokket og monter den medfølgende skummepinnen på
akselen på bunnen av kannen.
3. Fyll kannen med ønsket mengde melk (melken bør være 10–15 °C)
opp til fyllemerkene, og sett på lokket.
MERK:
Kun opptil 100 ml kan fylles. Dette er for å hindre at melken
renner over etter skumming.
4. Plasser kannen på strømbasen, og koble den til strømforsyningen.
Indikatorlampen lyser rødt.
5. Trykk på STRØMKNAPPEN for å slå på enheten. Indikatorlampe
lyser blått. Når temperaturen på melken har nådd omtrent 65 ℃,
vil varmeelementet stoppe oppvarming, skummepinnen slutter å
rotere automatisk, og indikatorlampen lyser rødt igjen til enheten
kobles fra strømforsyningen.
MERK:
Under drift kan du stoppe apparatet ved å trykke på
STRØMKNAPPEN én gang.
6. Når apparatet har stoppet, heller du ut den oppvarmede og
skummede melken gjennom tuten.
FORSIKTIG:
Du må vente minst 3 minutter mellom hver syklus for å
hindre at apparatet går inn i beskyttelsesmodus. Når apparatet har
vært på i 5 kontinuerlige sykluser, vil indikatorlampen lyse blått og
blinke, og STRØMKNAPPEN vil ikke fungere. Etter ca. 5 minutter går
apparatet i ventemodus, og du kan fortsette å bruke apparatet.
19

7. Melkeskummeren må alltid slås av og kobles fra
stikkontakten når den ikke er i bruk.
II.
Skumme uten oppvarming
1. Følg trinn 1–4 i delen "Skumme og varme opp".
2. Trykk på STRØMKNAPPEN tre ganger på to sekunder, så vil
indikatorlampen lyse blått og blinke, og skummepinnen vil
rotere for å skumme melken separat. Varmeelementet
varmes ikke opp. Apparatet vil automatisk slutte å rotere
etter bruk. Indikatorlampen lyser rødt igjen til enheten kobles
fra strømforsyningen.
MERK:
Under drift kan du stoppe apparatet ved å trykke på
strømknappen én gang.
3. Når apparatet har stoppet, heller du ut den skummede
melken gjennom tuten.
FORSIKTIG:
Du må vente minst 3 minutter mellom hver syklus
for å hindre at apparatet går inn i beskyttelsesmodus. Når
apparatet har vært på i 5 kontinuerlige sykluser, vil
indikatorlampen lyse blått og blinke, og STRØMKNAPPEN vil
ikke fungere. Etter ca. 5 minutter går apparatet i ventemodus,
og du kan fortsette å bruke apparatet.
4. Melkeskummeren må alltid slås av og kobles fra
stikkontakten når den ikke er i bruk.
III.
Oppvarming uten skumming
1.Plasser enheten på et flatt og jevnt underlag.
2.Bruk den medfølgende rørepinnen. Åpne lokket og monter
rørepinnen på akselen på bunnen av kannen.
20
Sidan laddas ...
Sidan laddas ...
Sidan laddas ...
Sidan laddas ...
Sidan laddas ...
Sidan laddas ...
Sidan laddas ...
Sidan laddas ...
Sidan laddas ...
Sidan laddas ...
Sidan laddas ...
Sidan laddas ...
Sidan laddas ...
Sidan laddas ...
Sidan laddas ...
Sidan laddas ...
Sidan laddas ...
Sidan laddas ...
Sidan laddas ...
Sidan laddas ...
Sidan laddas ...
Sidan laddas ...
Sidan laddas ...
Sidan laddas ...
Sidan laddas ...
Sidan laddas ...
Sidan laddas ...
Sidan laddas ...
Sidan laddas ...
Sidan laddas ...
Sidan laddas ...
Sidan laddas ...
Sidan laddas ...
Sidan laddas ...
Sidan laddas ...
Sidan laddas ...
-
 1
1
-
 2
2
-
 3
3
-
 4
4
-
 5
5
-
 6
6
-
 7
7
-
 8
8
-
 9
9
-
 10
10
-
 11
11
-
 12
12
-
 13
13
-
 14
14
-
 15
15
-
 16
16
-
 17
17
-
 18
18
-
 19
19
-
 20
20
-
 21
21
-
 22
22
-
 23
23
-
 24
24
-
 25
25
-
 26
26
-
 27
27
-
 28
28
-
 29
29
-
 30
30
-
 31
31
-
 32
32
-
 33
33
-
 34
34
-
 35
35
-
 36
36
-
 37
37
-
 38
38
-
 39
39
-
 40
40
-
 41
41
-
 42
42
-
 43
43
-
 44
44
-
 45
45
-
 46
46
-
 47
47
-
 48
48
-
 49
49
-
 50
50
-
 51
51
-
 52
52
-
 53
53
-
 54
54
-
 55
55
-
 56
56


POINT PRO PO2289BL SVART MELKESKUMMER Bruksanvisning
- Kategori
- Mixer / matberedare tillbehör
- Typ
- Bruksanvisning
