
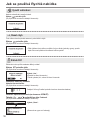
Before operating the unit, please read these operating instructions thoroughly and keep them for
future reference. Before installation, the installer should: Read the Installation Instructions, then
request the customer keep them for future reference.
2-19
Antes de utilizar la unidad, sírvase leer atentamente estas instrucciones de funcionamiento y
conservarlas para futuras consultas. Antes de la instalación, el instalador debe: Lea las
Instrucciones de instalación y pida al cliente que las conserve para futuras consultas.
20-37
Prima di utilizzare l’unità, leggere attentamente le istruzioni e conservare questo opuscolo per
potervi fare riferimento in futuro. Prima dell’installazione, l’installatore deve: Leggere le istruzioni
d’installazione, quindi richiedere al cliente di conservarle per riferimento futuro.
38-55
Lees voordat u de unit gebruikt deze gebruiksaanwijzing zorgvuldig door en bewaar hem voor
later gebruik. Vóór de installatie moet de installateur: de installatiehandleiding lezen en de klant
vragen om hem voor later gebruik te bewaren.
56-73
Προτού θέσετε τη μονάδα σε λειτουργία, διαβάστε προσεκτικά αυτές τις οδηγίες χρήσης και φυλάξτε τις
για μελλοντική αναφορά. Πριν από την εγκατάσταση, ο τεχνικός εγκατάστασης θα πρέπει: Να διαβάσει τις
Οδηγίες εγκατάστασης και κατόπιν να ζητήσει από τον πελάτη να τις φυλάξει για μελλοντική χρήση.
74-91
Před zahájením používání jednotky si pečlivě přečtěte tento návod k použití a uchovejte jej k
pozdějšímu nahlédnutí. Před instalací by měl technik provádějící instalaci: Prostudovat instalační
pokyny a poté požádat zákazníka, aby si je uschoval pro budoucí použití.
92-109
Avant d’utiliser l’appareil, veuillez lire ce mode d’emploi dans son intégralité et conservez-le
pour toute référence ultérieure. Avant de commencer l’installation, l’installateur doit : Lire les
instructions d’installation, puis demander au client de les conserver pour plus tard.
110-127
Bevor Sie das Gerät in Betrieb nehmen, lesen Sie bitte diese Bedienungsanleitung aufmerksam durch und
bewahren Sie sie als künftige Referenz auf. Vor der Installation sollte der Installateur Folgendes tun: Die
Installationsanleitung lesen und den Kunden bitten, diese als künftige Referenz aufzubewahren.
128-145
Üniteyi çalıştırmadan önce, lütfen bu çalıştırma talimatlarını dikkatlice okuyunuz ve ileride
kullanmak üzere muhafaza ediniz. Tesisatçı kurulumdan önce şunları yapmalıdır: Kurulum
talimatlarını okumalı ve müşteriden ileride referans için bunları saklamasını istemelidir.
146-163
Läs dessa driftsanvisningar noggrant innan enheten används, och bevara dem för framtida bruk.
Innan installationen ska installatören: Läsa installationsanvisningarna och sedan säga åt kunden
att bevara dem för framtida bruk.
164-181
Lue nämä käyttöohjeet huolellisesti ennen laitteen käyttöä ja säilytä ne tulevan tarpeen varalle.
Asentajan täytyy lukea asennusohjeet ennen asennusta ja pyytää asiakasta säilyttämään ne
tulevan tarpeen varalle.
182-199
Les disse driftsinstruksjonene grundig før enheten betjenes, og oppbevar dem fremtidig referanse.
Før installasjonen må installatøren: Les installasjonsinstruksjonene og be deretter kunden om å
oppbevare dem fremtidig referanse.
200-217
Przed przystąpieniem do obsługi urządzenia należy dokładnie zapoznać się z niniejszą instrukcją i zachować ją w
celu ponownego wykorzystania w przyszłości. Przed przystąpieniem do instalacji instalator powinien: Zapoznać się
z instrukcją instalacji, a następnie poprosić klienta o zachowanie jej do wykorzystania w przyszłości.
218-235
A rendszer használata előtt, kérjük, alaposan olvassa el ezeket a használati utasításokat, majd tegye el
azokat a későbbi felhasználáshoz. A beszerelés előtt a szerelőnek: El kell olvasnia a beszerelési útmutatót,
majd fel kell kérnie az ügyfelet, hogy őrizze meg, hogy a későbbiekben bármikor fellapozható legyen.
236-253
English (EN)
Magyar (HU)
Español (ES)
Italiano (IT)
Nederlands (NL)
Ελληνικά (EL)
Český (CS)
Français (FR)
Deutsch (DE)
Türkçe (TR)
Svenska (SV)
Suomi (FI)
Norsk (NO)
Polski (PL)
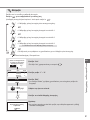
Operating Instructions
Wired Remote Controller
Model No. CZ-RTW1
ACXF55-36640

2
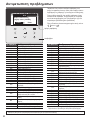
Table of contents
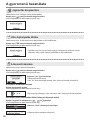
Safety precautions .........................................................2-3
Remote Controller buttons and display .........................4-5
Initialization .......................................................................6
Quick Menu ......................................................................7
How to use the Quick Menu ........................................8-12
Menus ........................................................................13-17
1 Function setup ...................................................13-14
1.1 Weekly timer
1.2 Holiday timer
1.3 Quiet timer
1.4 Quiet priority
1.5 Room heater
1.6 Tank heater
1.7 Sterilization
1.8 DHW mode
2 System check .........................................................15
2.1 Energy monitor
2.2 System information
2.3 Error history
2.4 Compressor
2.5 Heater
3 Personal setup ...................................................16-17
3.1 Remote control No.
3.2 Touch sound
3.3 LCD contrast
3.4 Backlight
3.5 Backlight intensity
3.6 Clock format
3.7 Date & Time
3.8 Language
3.9 Unlock password
Troubleshooting ..............................................................18
Information ......................................................................19
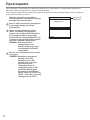
Thank you for purchasing Panasonic product.
Any translation into other language shall be deemed as reference and English version shall prevail in any case.
The illustrations in this manual are for explanation purposes only and may differ from the actual unit. They are subject to change without notice.
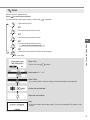
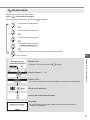
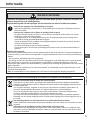
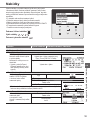
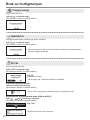
Safety precautions
To prevent personal injury, injury to others or property damage, please comply with the following:
Incorrect operation due to failure to follow instructions below may cause harm or damage, the
seriousness of which is classifi ed as below:
This appliances is not intended for accessibility by the general public.
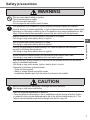
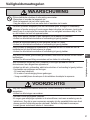
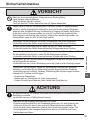
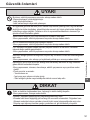
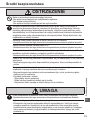
WARNING
This sign warns of death or serious injury.
CAUTION
This sign warns of injury or damage to
property.
The instructions to be followed are classifi ed by the following symbols:
This symbol denotes an action
that is PROHIBITED. These symbols denote actions
COMPULSORY.

3
EN
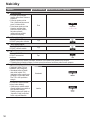
Safety precautions
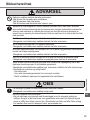
WARNING
This can cause electric shock or ignition.
• Do not disassemble or modify.
• Do not touch with wet hands.
• Do not wipe with wet cloths or wash in water.
This application is not intended for use by persons (including children) with reduced
physical, sensory or mental capabilities, or lack of experience and knowledge, unless under
supervision or instruction concerning use of the appliance by a person responsible for their
safety. Children should be supervised to ensure they do not play with the appliances.
Request installation only from the place of purchase or an installer.
• Not doing so may cause electric shock or ignition.
Shut off power supply when installing CNT cable.
• Not doing so may cause electric shock or ignition.
Use only the specifi ed parts when installing CNT cable and perform the installation
correctly by following the instructions.
• Not doing so may cause electric shock or ignition.
Ensure cables are installed properly so that external forces cannot affect them.
• Not doing so may lead to overheating which can lead to ignition.
Stop use as soon as any problems or malfunctions are detected and shut off the electric
supply to connected appliances.
• Not doing so may cause smoke, ignition, electric shock, or burns.
• Examples of problems and malfunctions:
- There is a burning smell
- Water or foreign objects have gotten inside
- Immediately request repair from the place of purchase or the installer.
CAUTION
Before connecting wires and cables, discharge any static electricity.
• Not doing so may cause malfunction.
Check the following requirements in advance:
• There should be no abnormality in the air conditioner such as change of airfl ow. Ensure
no object(s) which may be displaced easily due to the airfl ow blowing directly at it. The
fallen or moved object(s) might lead to danger such as fi re, injury etc.
Safety precautions

4
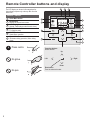
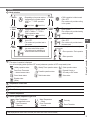
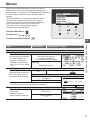
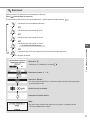
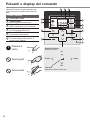
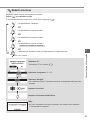
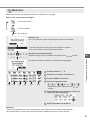
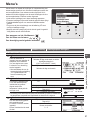
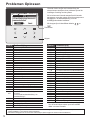
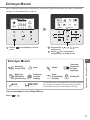
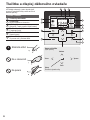
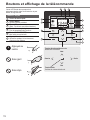
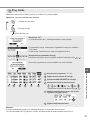
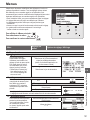
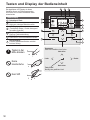
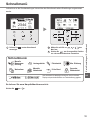
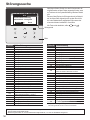
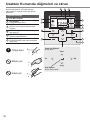
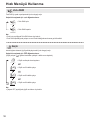
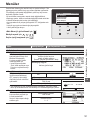
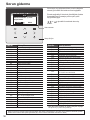
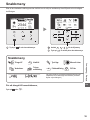
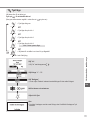
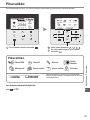
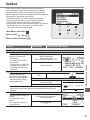
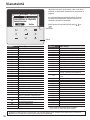
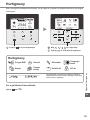
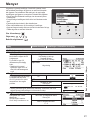
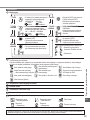
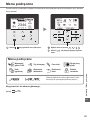
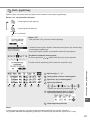
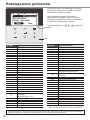
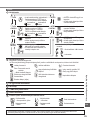
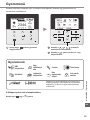
Remote Controller buttons and display
The LCD display as shown in this manual are for
instructional purpose only, and may differ from the
actual unit.
Buttons / Indicator
1Quick Menu button
2Back button
Returns to the previous screen
3LCD Display
(Actual - Dark background with white icons)
4Main Menu button
For function setup
5ON/OFF button
Starts/Stops operation
6Operation indicator
Illuminates during operation, blinks during
alarm.
Press centre
No glove
No pen
2
A
1
4
E
F
5
6
B C D
3
G
Cross key buttons
Selects an item.
Enter button
Fixes the selected content.
Up
Down
Left Right

5
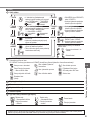
EN
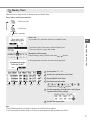
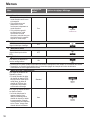
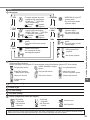
Display
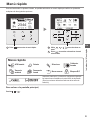
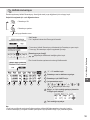
AMode selection
*1, *2 AUTO • Depending on the preset outdoor
temperature, the system selects
HEAT or *1, *2 COOL operation
mode.
Auto Heat Auto Cool
*1, *2 COOL • COOL operation is either turned
ON or OFF.
• The outdoor unit provides cooling
to the system.
*1, *2 AUTO
+ TANK • Depending on the preset outdoor
temperature, the system selects
HEAT + TANK or *1, *2 COOL +
TANK operation mode.
Auto Heat Auto Cool
*1, *2 COOL
+ TANK • The outdoor unit provides cooling
to the system.
• The outdoor unit provides heating
when boiling tank.
HEAT • HEAT operation is either turned
ON or OFF.
• The outdoor unit provides heat to
the system.
TANK • TANK operation is either turned
ON or OFF.
• The outdoor unit provides heat to
the water tank.
HEAT
+ TANK • The outdoor unit provides heat to
the water tank and the system.
• This mode can be selected only
when the water tank is installed.
* The direction icons point to the currently
active mode.
• Room operation / Tank operation.
• Deice operation.
BOperation icons
The status of operation is displayed.
Icon will not display (under operation OFF screen) whenever operation is OFF except weekly timer.
Holiday operation status Weekly Timer operation status Quiet operation status
Zone: Room Thermostat
→Internal sensor status Powerful operation status Demand Control or
SG ready or SHP status
Room Heater status Tank Heater status Solar status
Bivalent status
(Boiler)
CTemperature of each zone
DTime and day
EWater Tank temperature
FOutdoor temperature
GSensor type/Set temperature type icons
Water Temperature
→Compensation curve Water Temperature
→Direct Pool only
Room Thermostat
→External Room Thermostat
→Internal Room Thermistor
*1The system is locked to operate without COOL mode. It can be unlocked only by authorised installers or our authorised service partners.
*2Only displayed when COOL mode is unlocked (This means when COOL mode is available).
Remote Controller buttons and display

6
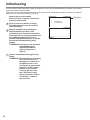
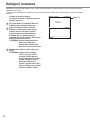
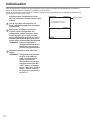
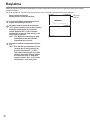
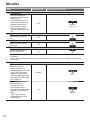
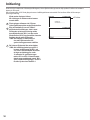
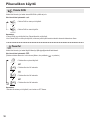
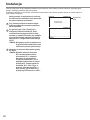
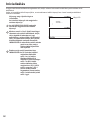
Initialization
Before starting to install the various menu settings, please initiate the Remote Controller by selecting the language of
operation and installing the date and time correctly.
When power is turned on for the fi rst time, it becomes the setting screen automatically. It can also be set from personal
setting of the menu.
Wait while the display is initializing.
When initializing screen ends, it turns to
normal screen.
LCD blinking
1On fi rst power ON, initialization screen will
appear on Second remote controller.
2After installer has selected “Dual” on Remote
control setup, please wait for at least 30
seconds for synchronisation between Main
remote controller (RC-1) & Second remote
controller (RC-2) to take place before operating
this Second remote controller.
*NOTE : All buttons are disabled on Second
remote controller until synchronisation
process completes.
3Then this remote controller is ready to be used.
*NOTE : Any setting adjustment on RC-2
will be refl ected on RC-1 and vice
versa. Generally there will be
around 10 seconds idle required for
synchronisation between RC-1 and
RC-2. Sometimes there will be pop
up message of “RC-1 & RC-2 sync.
in progress!” when RC-2 is trying to
synchronize with RC-1.

7
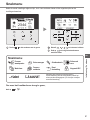
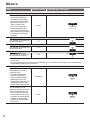
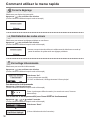
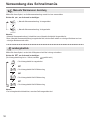
EN
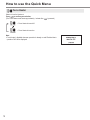
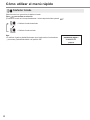
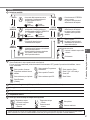
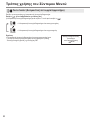
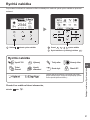
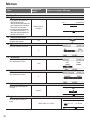
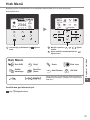
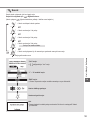
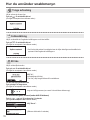
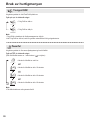
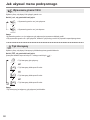
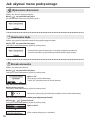
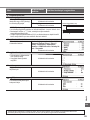
After the initial settings have been completed, you can select a quick menu from the following options and edit
the setting.
Select each setting and confi rm the setting according to
the instructions displayed at the bottom of the screen.
(The icons refer to each selection key.)
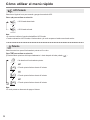
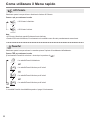
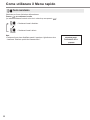
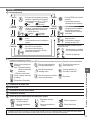
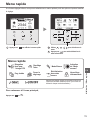
Quick Menu
Force DHW Powerful Quiet Force Heater
Weekly Timer Force Defrost Error Reset R/C Lock
1Press to display the quick menu. 2Use to select menu.
3Press to turn on/off the select menu.
To return to the Main Screen,
Press or .
Quick Menu
Initialization / Quick Menu

8
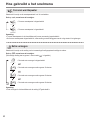
How to use the Quick Menu
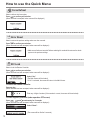
Force DHW
Select this icon to turn the Tank DHW on or off.
Press to confi rm your selection.
• Force DHW is turned off.
• Force DHW is turned on.
Note:
• Force DHW is disabled when Force Heater is turned on.
• When Force DHW is turned off, operation & mode should change back to the previous memorized status.
Powerful
Select this icon to operate the heating/cooling system powerfully.
Press to confi rm your selection.
(The powerful operation starts approximately 1 minute after is pressed.)
• Powerful mode is set off.
• The Powerful mode operates for 30 minutes.
• The Powerful mode operates for 60 minutes.
• The Powerful mode operates for 90 minutes.
Note:
• Powerful is disabled when operation is turned OFF.

9
EN
Quiet
Select this icon to operate quietly.
Press to confi rm your selection.
(The quiet operation starts approximately 1 minute after is pressed.)
• Quiet mode is set off.
• The Quiet mode operates at level 1.
• The Quiet mode operates at level 2.
• The Quiet mode operates at level 3.
Level 3 is the most quiet mode.
• Select this to set a timer for the Quiet mode operation.
After 1 sec delay.
Select “Yes”.
• Select “Yes” using buttons.
Select pattern “1” ~ “6”.
Select “Edit”.
• If you select “Delete”, the timer setting of the selected pattern will be deleted.
Set the hour and minutes.
Select the level of Quiet.
Note:
• If the time overlaps with another pattern, “Set time is overlapped!” will appear on the
screen.
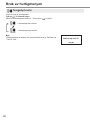
How to use the Quick Menu

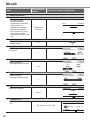
10
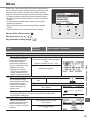
Force Heater
Select to force the Heater on.
Press to confi rm your selection.
(The Force Heater mode starts approximately 1 minute after is pressed.)
• Force Heater is turned off.
• Force Heater is turned on.
Note:
• Force Heater is disabled whenever operation is already on and “Disabled due to
operation ON!” will be displayed.
How to use the Quick Menu

11
EN
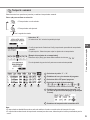
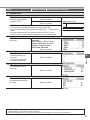
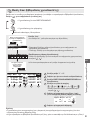
Weekly Timer
Select this icon to delete (cancel) or change the pre-set Weekly Timer.
Press to confi rm your selection.
• Timer is not ON.
• Timer is set.
After 1 sec delay.
Select “Yes”.
• If you select “No”, the screen will return to the Main Screen.
• Timer setup: Select Timer setup to edit the Weekly Timer.
• Timer copy: Select to copy a timer setting.
[Example of a Timer setup]
Select the day(s) which you wish to edit using buttons.
If all 6 patterns are not preset, this screen will be displayed.
1 2 3 4 5 6
1Select pattern “1” ~ “6”.
2Set the hour and minutes of the Timer.
3Select ON/OFF of the Timer.
4Select the operation mode.
/ / / / / /
• Select mode using buttons.
5Set the temperature for both Zone 1 and 2 (if your
system has the 2-Zone setting).
6Set the Tank temperature.
Note:
• Timer is disabled when Force Heater is turned on or Heat-Cool SW is enabled.
• If you have preset the Weekly Timer on 2 zones, you must repeat the same procedure with Zone 2.
How to use the Quick Menu

12
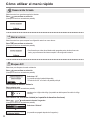
How to use the Quick Menu
Force Defrost
Select to defrost the frozen pipes.
Press to confi rm your selection.
(When the mode is accepted, below screen will be displayed.)
Error Reset
Select to restore the previous settings when error has occurred.
Press to confi rm your selection.
(When the mode has been accepted, below screen will be displayed.)
• Make sure all units are turned off before selecting this mode which restores the whole
system to the previous settings.
R/C Lock
Select to lock the Remote Controller.
Press to confi rm your selection.
(When the mode has been accepted, below screen will be displayed.)
Select “Yes”.
(The Main Screen will be locked.)
• If “No” is selected, the screen will return to the Main Screen.
To unlock the Remote Controller
Press any key.
(When the mode has been accepted, below screen will be displayed.)
Enter any 4 digits of number (if the number is correct, the screen will be unlocked).
To reset forgotten password (under operation OFF screen)
Press , and continuously for 5 seconds.
(When the mode has been accepted, below screen will be displayed.)
Select “Reset”.
(The screen will be off after 3 seconds.)

13
EN
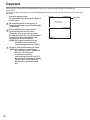
Select menus and determine settings according to the system
available in the household. All initial settings must be done by an
authorised dealer or a specialist. It is recommended that all alterations
of the initial settings are also done by an authorised dealer or a
specialist.
• After initial installation, you may manually adjust the settings.
• The initial setting remains active until the user changes it.
• The Remote Controller can be used for multiple installations.
• Ensure the operation indicator is OFF before setting.
• The system may not work properly if set wrongly.
Please consult an authorised dealer.
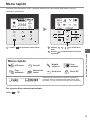
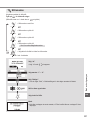
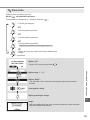
To display <Main Menu>:
To select menu:
To confi rm the selected content:
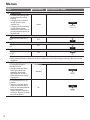
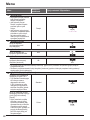
Menu Default Setting Setting Options / Display
1 Function setup
1.1 Weekly timer
Once the weekly timer is set up,
User can edit from Quick Menu.
To set up to 6 patterns of
operation on a daily basis.
• Disabled if Heat-Cool SW is
select “Yes” or if Force Heater
is on.
Timer setup
Select day of the week and
set the patterns needed
(Time / Operation ON/OFF / Mode)
Timer copy
Select day of the week
1.2 Holiday timer
To save energy, a holiday
period may be set to either turn
OFF the system or lower the
temperature during the period.
OFF
ON
Holiday start and end.
Date and time
Select Confirm
10:34am,Mon
Holiday: End
/ 01 / 01
Year/Month/Day
Hour : Min
10 : 00 am2022
OFF or lowered temperature
• Weekly timer setting may be temporarily disabled during Holiday timer setting
but it will be restored once the Holiday timer is completed.
1.3 Quiet timer
To operate quietly during the
preset period.
6 patterns may be set.
Level 0 means the mode is off.
Time to start Quiet :
Date and time
Level of quietness:
0 ~ 3
Menus
How to use the Quick Menu / Menus

14
Menus
Menu Default Setting Setting Options / Display
1.4 Quiet priority
• To select priority during Quiet
mode between Sound and
Capacity.
• If Sound priority is selected,
unit will operate in quiet
condition only.
• If Capacity priority is selected,
unit will operate in quiet
condition but it will prioritize on
providing required capacity at
the same time.
Sound Capacity
Sound
1.5 Room heater
To set the room heater ON or
OFF. OFF
1.6 Tank heater
To set the tank heater ON or
OFF. OFF
1.7 Sterilization
To set the auto sterilization ON
or OFF. ON
• Do not use the system during sterilization in order to prevent scalding with hot water, or overheating of shower.
• Ask an authorised dealer to determine the level of sterilization function fi eld settings according to the local laws and
regulations.
1.8 DHW mode (Domestic Hot Water)
To set the DHW mode to
Standard or Smart.
• Standard mode have faster
DHW Tank heat up time.
Meanwhile Smart mode
take longer time to heat up
DHW time with lower energy
consumption.
Standard
To set the tank sensor to Top
or Center.
• Selection of the tank sensor
to top slow down the start of
boiling up the tank and reduce
power consumption.
Please change this selection
to “Center” when the hot water
becomes insuffi cient.
Top

15
EN
Menu Default Setting Setting Options / Display
2 System check
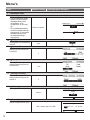
2.1 Energy monitor
Present or historical chart of
energy consumption, generation
or COP.
Present
Month Mode
Total consumption (1year)
0.0
1year 123456789101112
kWh
kWh Approx.
CMth
Jan, 2022: 0.0
Select and retrieve
Historical chart
Select and retrieve
• COP= Coeffi cient of Performance.
• For historical chart, the period is selected from 1 day/1 week/1year.
• Energy consumption (kWh) of heating, *1, *2 cooling, tank and total may be
retrieved.
• The total power consumption is an estimated value based on AC 230 V and
may differ from value measured by precise equipment.
2.2 System information
Shows all system information in
each area.
Actual system information of 11 items:
Inlet / Outlet / Zone 1 / Zone 2 / Tank /
Buffer tank / Solar / Pool / COMP
frequency / Pump fl owrate / Water pressure
Select and retrieve
2.3 Error history
• Refer to Troubleshooting for
error codes.
• The most recent error code is
displayed at the top. Select and retrieve
2.4 Compressor
Shows the compressor
performance.
Select and retrieve
2.5 Heater
Total hours of ON time for
Room heater/Tank heater.
Select and retrieve
*1The system is locked to operate without COOL mode. It can be unlocked only by authorised installers or our authorised service partners.
*2Only displayed when COOL mode is unlocked (This means when COOL mode is available).
Menus

16
Menus
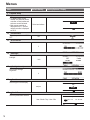
Menu Default Setting Setting Options / Display
3 Personal setup
3.1 Remote control No.
• To display remote control
number of a particular remote
controller so that installer and
end user are well informed.
• Main remote controller is
displayed as RC-1. Second
remote controller is displayed
as RC-2.
Select and retrieve
RC No.
Confirm
10:34am,Mon
RC-2
3.2 Touch sound
Turns the operation sound ON/
OFF. ON
3.3 LCD contrast
Sets the screen contrast.
3
3.4 Backlight
Sets the duration of screen
backlight.
1 min
3.5 Backlight intensity
Sets screen backlight
brightness.
4
3.6 Clock format
Sets the type of clock display.
am/pm
Select Confirm
10:34am,Mon
Clock format
24h
am/pm
3.7 Date & Time
Sets the present date and time.
Year / Month / Day / Hour / Min
Select Confirm
10:34am,Mon
Date & Time
/ 01 / 01
Year/Month/Day
Hour : Min
10 : 00 am2022

17
EN
Menu Default Setting Setting Options / Display
3.8 Language
Sets the display language for
the top screen.
ENGLISH / FRANÇAIS / DEUTSCH /
ITALIANO / ESPAÑOL / DANISH /
SWEDISH / NORWEGIAN / POLISH /
CZECH / NEDERLANDS / TÜRKÇE /
SUOMI / MAGYAR / SLOVENŠČINA /
HRVATSKI / LIETUVIŲ / PORTUGUÊS /
БЪЛГАРСКИ / EESTI / LATVIEŠU /
ROMÂNĂ / SHQIP / SLOVENČINA /
МАКЕДОНСКИ / УКРАЇНСЬКА / ΕΛΛΗΝΙΚΑ
3.9 Unlock password
4 digit password for all the
settings.
0000
Menus

18
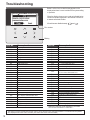
Troubleshooting
Blinking
Error number
Below is a list of error codes that may appear on the
display when there is some trouble with the system setting
or operation.
When the display shows an error code as indicated below,
contact the number registered in the Remote Controller or
a nearest authorised installer.
All switches are disabled except and .
Error No. Error explanation
H12 Capacity mismatch
H15 Compressor sensor error
H20 Pump error
H21 Water pressure error
H22 Tank sensor 2 error
H23 Refrigerant sensor error
H27 Service valve error
H28 Solar sensor error
H31 Pool sensor error
H36 Buffer tank sensor error
H38 Brand mismatch error
H42 Low pressure protection
H43 Zone 1 sensor error
H44 Zone 2 sensor error
H62 Water fl ow error
H63 Low pressure sensor error
H64 High pressure sensor error
H65 Deice water circulation error
H67 External thermistor 1 error
H68 External thermistor 2 error
H70 Back-up heater OLP error
H72 Tank sensor 1 error
H74 PCB communication error
H75 Low water temp protection
H76 RC-1 & Indoor communication error
RC-1 & RC-2 communication error
H90 Indoor-Outdoor communication error
H91 Tank heater OLP error
H95 Voltage connection error
H98 High pressure protection
H99 Indoor freeze prevention
Error No. Error explanation
F12 Pressure switch activated
F14 Poor compressor rotation
F15 Fan motor lock error
F16 Current protection
F20 Compressor overload protection
F22 Transistor module overload protection
F23 DC peak
F24 Refrigerant cycle error
F25 *1, *2 Cool / heat cycle error
F27 Pressure switch error
F29 Low discharge super heat
F30 Water outlet sensor 2 error
F32 RC-1’s internal thermostat error
RC-2’s internal thermostat error
F34 Indoor water heat exchanger leak
F35 External meter communication error
F36 Outdoor ambient sensor error
F37 Water inlet sensor error
F40 Outdoor discharge sensor error
F41 Power factor correction error
F42 Outdoor heat exchanger sensor error
F43 Outdoor defrost sensor error
F45 Water outlet sensor error
F46 Current transformer disconnection
F48 Evaporator outlet sensor error
F49 Bypass outlet sensor error
F50 Water inlet 2 sensor error
F51 Economizer outlet sensor error
F52 Bypass inlet sensor error
F95 *1, *2 Cooling high pressure error
* Some error code may not be applicable to your model.
Consult authorised dealer for clarifi cation.
*1The system is locked to operate without COOL mode. It can be unlocked only by authorised installers or our authorised service partners.
*2Only displayed when COOL mode is unlocked (This means when COOL mode is available).

19
EN
Information
Information when connect to Network Adaptor (Optional Accessories Part)
WARNING
Before use, check the safety around the Air-to-Water system. Confi rm human and living objects at
surrounding before operation.
Incorrect operation due to failure to follow instructions may cause harm and damage.
Confi rm the below before operation (inside premises)
- Timer setting condition. Unpredictable on/off operation may cause serious injury or damage to human and
living objects.
Confi rm the below before and during operation (outside from premises)
- If is known someone in the premises, notify the person from outside of new operation setting prior executing.
This is to avoid sudden shock to the person and any serious health breakdown duly from operation changed.
- Please do not use this appliance when infant, physical dissability person or elderly who unable to operate the
appliance by themselves in the premises.
- Check the setting and operation status frequently.
- Stop the operation when error code is displayed and consult an authorised dealer or specialist.
Please confi rm before use
• The system may not usable when communication condition is bad. Please check “Operation Status” from the application
display after operation. The following condition may happen in the remote operation.
- Cannot operate, operation time is not refl ected.
- Air-to-Water operation is not refl ected when operation is set outside of premises.
• It is recommended to lock screen the smart phone device to prevent miss-operation.
• Do not use other remote control, communication and operation device not specifi ed by an authorised dealer or specialist.
• Use under the agreement of “Terms of Service” and “Handling of Personal Information” of Panasonic Smart Application.
• For extended non-use of Panasonic Smart Application, disconnect the network adaptor from the device.
Information for Users on Collection and Disposal of Old Equipment
Only for European Union and countries with recycling systems
These symbols on the products, packaging, and/or accompanying documents mean that used electrical and
electronic products and batteries must not be mixed with general household waste.
For proper treatment, recovery and recycling of old products and used batteries, please take them to
applicable collection points in accordance with your national legislation.
By disposing of them correctly, you will help to save valuable resources and prevent any potential negative
effects on human health and the environment.
For more information about collection and recycling, please contact your local authority.
Penalties may be applicable for incorrect disposal of this waste, in accordance with national legislation.
For business users in the European Union and some other European countries
If you wish to discard electrical and electronic equipment, please contact your dealer or supplier for further
information.
[Information on Disposal in other Countries outside the European Union]
These symbols are only valid in the European Union. If you wish to discard these items, please contact your
local authority or dealer and ask for the correct method of disposal.
Troubleshooting / Information

20
Contenido
Precauciones de seguridad .......................................20-21
Botones y pantalla de mando a distancia ..................22-23
Inicialización ...................................................................24
Menú rápido ....................................................................25
Cómo utilizar el menú rápido .....................................26-30
Menús ........................................................................31-35
1 Confi g. de funciones ..........................................31-32
1.1 Temporiz. semanal
1.2 Temporiz. vacaciones
1.3 Temp. modo silenc.
1.4 Prioridad silenciosa
1.5 Calent. sala
1.6 Resistencia depósito
1.7 Esterilización
1.8 Modo ACS
2 Comprob. sistema ..................................................33
2.1 Monitor de energía
2.2 Info. del sistema
2.3 Historial de errores
2.4 Compresor
2.5 Resisitencia
3 Confi g. personal ................................................34-35
3.1 Control remoto n.º
3.2 Sonido de contacto
3.3 Contraste LCD
3.4 Retroiluminación
3.5 Intesidad retroilum.
3.6 Formato de hora
3.7 Fecha y Hora
3.8 Idioma
3.9 Desbloq. contraseña
Localización de averías ..................................................36
Información .....................................................................37
Gracias por comprar un producto Panasonic.
Cualquier traducción a otro idioma será considerada como referencia y prevalecerá la versión en inglés.
Las ilustraciones de este manual sirven únicamente para describir las explicaciones y pueden no coincidir exactamente con las del aparato suministrado.
Están sujetas a cambios sin previo aviso.
Precauciones de seguridad
Para evitar lesiones personales, lesiones a terceros, o daños materiales, cumpla lo siguiente:
El uso incorrecto por no seguir las instrucciones puede causar daños o averías; su gravedad se
clasifi ca con las indicaciones siguientes:
Este aparato no está pensado para ser manipulado por el público en general.
ADVERTENCIA
Esta indicación advierte del posible peligro
de muerte o de daños graves.
PRECAUCIÓN
Esta indicación advierte de los posibles
daños o desperfectos materiales.
Las instrucciones que deben seguirse están clasifi cadas mediante los siguientes símbolos:
Este símbolo denota una acción
que está PROHIBIDA. Estos símbolos indican aquellas
acciones que son OBLIGATORIAS.
Sidan laddas ...
Sidan laddas ...
Sidan laddas ...
Sidan laddas ...
Sidan laddas ...
Sidan laddas ...
Sidan laddas ...
Sidan laddas ...
Sidan laddas ...
Sidan laddas ...
Sidan laddas ...
Sidan laddas ...
Sidan laddas ...
Sidan laddas ...
Sidan laddas ...
Sidan laddas ...
Sidan laddas ...
Sidan laddas ...
Sidan laddas ...
Sidan laddas ...
Sidan laddas ...
Sidan laddas ...
Sidan laddas ...
Sidan laddas ...
Sidan laddas ...
Sidan laddas ...
Sidan laddas ...
Sidan laddas ...
Sidan laddas ...
Sidan laddas ...
Sidan laddas ...
Sidan laddas ...
Sidan laddas ...
Sidan laddas ...
Sidan laddas ...
Sidan laddas ...
Sidan laddas ...
Sidan laddas ...
Sidan laddas ...
Sidan laddas ...
Sidan laddas ...
Sidan laddas ...
Sidan laddas ...
Sidan laddas ...
Sidan laddas ...
Sidan laddas ...
Sidan laddas ...
Sidan laddas ...
Sidan laddas ...
Sidan laddas ...
Sidan laddas ...
Sidan laddas ...
Sidan laddas ...
Sidan laddas ...
Sidan laddas ...
Sidan laddas ...
Sidan laddas ...
Sidan laddas ...
Sidan laddas ...
Sidan laddas ...
Sidan laddas ...
Sidan laddas ...
Sidan laddas ...
Sidan laddas ...
Sidan laddas ...
Sidan laddas ...
Sidan laddas ...
Sidan laddas ...
Sidan laddas ...
Sidan laddas ...
Sidan laddas ...
Sidan laddas ...
Sidan laddas ...
Sidan laddas ...
Sidan laddas ...
Sidan laddas ...
Sidan laddas ...
Sidan laddas ...
Sidan laddas ...
Sidan laddas ...
Sidan laddas ...
Sidan laddas ...
Sidan laddas ...
Sidan laddas ...
Sidan laddas ...
Sidan laddas ...
Sidan laddas ...
Sidan laddas ...
Sidan laddas ...
Sidan laddas ...
Sidan laddas ...
Sidan laddas ...
Sidan laddas ...
Sidan laddas ...
Sidan laddas ...
Sidan laddas ...
Sidan laddas ...
Sidan laddas ...
Sidan laddas ...
Sidan laddas ...
Sidan laddas ...
Sidan laddas ...
Sidan laddas ...
Sidan laddas ...
Sidan laddas ...
Sidan laddas ...
Sidan laddas ...
Sidan laddas ...
Sidan laddas ...
Sidan laddas ...
Sidan laddas ...
Sidan laddas ...
Sidan laddas ...
Sidan laddas ...
Sidan laddas ...
Sidan laddas ...
Sidan laddas ...
Sidan laddas ...
Sidan laddas ...
Sidan laddas ...
Sidan laddas ...
Sidan laddas ...
Sidan laddas ...
Sidan laddas ...
Sidan laddas ...
Sidan laddas ...
Sidan laddas ...
Sidan laddas ...
Sidan laddas ...
Sidan laddas ...
Sidan laddas ...
Sidan laddas ...
Sidan laddas ...
Sidan laddas ...
Sidan laddas ...
Sidan laddas ...
Sidan laddas ...
Sidan laddas ...
Sidan laddas ...
Sidan laddas ...
Sidan laddas ...
Sidan laddas ...
Sidan laddas ...
Sidan laddas ...
Sidan laddas ...
Sidan laddas ...
Sidan laddas ...
Sidan laddas ...
Sidan laddas ...
Sidan laddas ...
Sidan laddas ...
Sidan laddas ...
Sidan laddas ...
Sidan laddas ...
Sidan laddas ...
Sidan laddas ...
Sidan laddas ...
Sidan laddas ...
Sidan laddas ...
Sidan laddas ...
Sidan laddas ...
Sidan laddas ...
Sidan laddas ...
Sidan laddas ...
Sidan laddas ...
Sidan laddas ...
Sidan laddas ...
Sidan laddas ...
Sidan laddas ...
Sidan laddas ...
Sidan laddas ...
Sidan laddas ...
Sidan laddas ...
Sidan laddas ...
Sidan laddas ...
Sidan laddas ...
Sidan laddas ...
Sidan laddas ...
Sidan laddas ...
Sidan laddas ...
Sidan laddas ...
Sidan laddas ...
Sidan laddas ...
Sidan laddas ...
Sidan laddas ...
Sidan laddas ...
Sidan laddas ...
Sidan laddas ...
Sidan laddas ...
Sidan laddas ...
Sidan laddas ...
Sidan laddas ...
Sidan laddas ...
Sidan laddas ...
Sidan laddas ...
Sidan laddas ...
Sidan laddas ...
Sidan laddas ...
Sidan laddas ...
Sidan laddas ...
Sidan laddas ...
Sidan laddas ...
Sidan laddas ...
Sidan laddas ...
Sidan laddas ...
Sidan laddas ...
Sidan laddas ...
Sidan laddas ...
Sidan laddas ...
Sidan laddas ...
Sidan laddas ...
Sidan laddas ...
Sidan laddas ...
Sidan laddas ...
Sidan laddas ...
Sidan laddas ...
Sidan laddas ...
Sidan laddas ...
Sidan laddas ...
Sidan laddas ...
Sidan laddas ...
Sidan laddas ...
Sidan laddas ...
Sidan laddas ...
Sidan laddas ...
Sidan laddas ...
Sidan laddas ...
Sidan laddas ...
Sidan laddas ...
Sidan laddas ...
Sidan laddas ...
Sidan laddas ...
Sidan laddas ...
Sidan laddas ...
Sidan laddas ...
Sidan laddas ...
-
 1
1
-
 2
2
-
 3
3
-
 4
4
-
 5
5
-
 6
6
-
 7
7
-
 8
8
-
 9
9
-
 10
10
-
 11
11
-
 12
12
-
 13
13
-
 14
14
-
 15
15
-
 16
16
-
 17
17
-
 18
18
-
 19
19
-
 20
20
-
 21
21
-
 22
22
-
 23
23
-
 24
24
-
 25
25
-
 26
26
-
 27
27
-
 28
28
-
 29
29
-
 30
30
-
 31
31
-
 32
32
-
 33
33
-
 34
34
-
 35
35
-
 36
36
-
 37
37
-
 38
38
-
 39
39
-
 40
40
-
 41
41
-
 42
42
-
 43
43
-
 44
44
-
 45
45
-
 46
46
-
 47
47
-
 48
48
-
 49
49
-
 50
50
-
 51
51
-
 52
52
-
 53
53
-
 54
54
-
 55
55
-
 56
56
-
 57
57
-
 58
58
-
 59
59
-
 60
60
-
 61
61
-
 62
62
-
 63
63
-
 64
64
-
 65
65
-
 66
66
-
 67
67
-
 68
68
-
 69
69
-
 70
70
-
 71
71
-
 72
72
-
 73
73
-
 74
74
-
 75
75
-
 76
76
-
 77
77
-
 78
78
-
 79
79
-
 80
80
-
 81
81
-
 82
82
-
 83
83
-
 84
84
-
 85
85
-
 86
86
-
 87
87
-
 88
88
-
 89
89
-
 90
90
-
 91
91
-
 92
92
-
 93
93
-
 94
94
-
 95
95
-
 96
96
-
 97
97
-
 98
98
-
 99
99
-
 100
100
-
 101
101
-
 102
102
-
 103
103
-
 104
104
-
 105
105
-
 106
106
-
 107
107
-
 108
108
-
 109
109
-
 110
110
-
 111
111
-
 112
112
-
 113
113
-
 114
114
-
 115
115
-
 116
116
-
 117
117
-
 118
118
-
 119
119
-
 120
120
-
 121
121
-
 122
122
-
 123
123
-
 124
124
-
 125
125
-
 126
126
-
 127
127
-
 128
128
-
 129
129
-
 130
130
-
 131
131
-
 132
132
-
 133
133
-
 134
134
-
 135
135
-
 136
136
-
 137
137
-
 138
138
-
 139
139
-
 140
140
-
 141
141
-
 142
142
-
 143
143
-
 144
144
-
 145
145
-
 146
146
-
 147
147
-
 148
148
-
 149
149
-
 150
150
-
 151
151
-
 152
152
-
 153
153
-
 154
154
-
 155
155
-
 156
156
-
 157
157
-
 158
158
-
 159
159
-
 160
160
-
 161
161
-
 162
162
-
 163
163
-
 164
164
-
 165
165
-
 166
166
-
 167
167
-
 168
168
-
 169
169
-
 170
170
-
 171
171
-
 172
172
-
 173
173
-
 174
174
-
 175
175
-
 176
176
-
 177
177
-
 178
178
-
 179
179
-
 180
180
-
 181
181
-
 182
182
-
 183
183
-
 184
184
-
 185
185
-
 186
186
-
 187
187
-
 188
188
-
 189
189
-
 190
190
-
 191
191
-
 192
192
-
 193
193
-
 194
194
-
 195
195
-
 196
196
-
 197
197
-
 198
198
-
 199
199
-
 200
200
-
 201
201
-
 202
202
-
 203
203
-
 204
204
-
 205
205
-
 206
206
-
 207
207
-
 208
208
-
 209
209
-
 210
210
-
 211
211
-
 212
212
-
 213
213
-
 214
214
-
 215
215
-
 216
216
-
 217
217
-
 218
218
-
 219
219
-
 220
220
-
 221
221
-
 222
222
-
 223
223
-
 224
224
-
 225
225
-
 226
226
-
 227
227
-
 228
228
-
 229
229
-
 230
230
-
 231
231
-
 232
232
-
 233
233
-
 234
234
-
 235
235
-
 236
236
-
 237
237
-
 238
238
-
 239
239
-
 240
240
-
 241
241
-
 242
242
-
 243
243
-
 244
244
-
 245
245
-
 246
246
-
 247
247
-
 248
248
-
 249
249
-
 250
250
-
 251
251
-
 252
252
-
 253
253
-
 254
254
-
 255
255
-
 256
256


på andra språk
- italiano: Panasonic CZRTW1 Istruzioni per l'uso
- slovenčina: Panasonic CZRTW1 Návod na používanie
- Deutsch: Panasonic CZRTW1 Bedienungsanleitung
- Türkçe: Panasonic CZRTW1 Kullanma talimatları
- dansk: Panasonic CZRTW1 Betjeningsvejledning