
OWNER’S MANUAL
MODE D’EMPLOI
MANUAL DE INSTRUCCIONES
CLP
-
480
IMPORTANT
— Check your power supply —
Make sure that your local AC mains voltage matches the voltage specified on the name plate on the bottom panel. In some areas a
voltage selector may be provided on the rear panel of the main keyboard unit near the power cord. Make sure that the voltage
selector is set for the voltage in your area. The voltage selector is set at 240V when the unit is initially shipped. To change the
setting use a “minus” screwdriver to rotate the selector dial so that the correct voltage appears next to the pointer on the panel.
For information on assembling the instrument, refer to the instructions at the end of this manual.
IMPORTANT
— Vérifiez votre alimentation électrique —
Vérifiez que la tension de l’alimentation secteur correspond à celle indiquée sur la plaque du fabricant, située sur le panneau
inférieur. Les instruments destinés à certaines régions disposent d’un sélecteur de tension. Il est installé sur le panneau arrière de
l’unité principale du clavier, à côté du câble d’alimentation. Assurez-vous que ce sélecteur est réglé sur la tension utilisée dans
votre pays. À sa sortie d’usine, le sélecteur est réglé sur 240 V. Pour modifier ce réglage, utilisez un tournevis plat et faites tourner
le cadran du sélecteur jusqu’à ce que la valeur correcte apparaisse à côté de l’indicateur figurant sur le panneau.
Pour plus d’informations sur l’assemblage de l’instrument, reportez-vous aux instructions figurant à la fin de ce manuel.
IMPORTANTE
— Revise la fuente de alimentación —
Asegúrese de que la tensión de la red eléctrica local de CA coincida con la tensión especificada en la placa del panel inferior. Es
posible que, en algunas zonas, se suministre un selector de tensión en el panel posterior del teclado principal, junto al cable de
alimentación. Asegúrese de que este selector esté ajustado según la tensión de la zona. El selector viene ajustado de fábrica para
240 V. Para cambiar el ajuste, utilice un destornillador de punta normal para girar el selector hasta que la tensión correcta
aparezca al lado del puntero del panel.
Para obtener más información sobre el montaje del instrumento, consulte las instrucciones que encontrará al final de este manual.
ENGLISHFRANÇAISESPAÑOL
ES
FR
EN

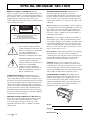
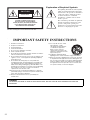
SPECIAL MESSAGE SECTION
PRODUCT SAFETY MARKINGS: Yamaha
electronic products may have either labels similar to the
graphics shown below or molded/stamped facsimiles of
these graphics on the enclosure. The explanation of these
graphics appears on this page. Please observe all
cautions indicated on this page and those indicated in the
safety instruction section.
See bottom of Keyboard enclosure for graphic symbol markings.
The exclamation point within the
equilateral triangle is intended to alert
the user to the presence of important
operating and maintenance
(servicing) instructions in the
literature accompanying the product.
The lightning flash with arrowhead
symbol, within the equilateral
triangle, is intended to alert the user to
the presence of uninsulated
“dangerous voltage” within the
product’s enclosure that may be of
sufficient magnitude to constitute a
risk of electrical shock.
IMPORTANT NOTICE: All Yamaha electronic
products are tested and approved by an independent
safety testing laboratory in order that you may be sure
that when it is properly installed and used in its normal
and customary manner, all foreseeable risks have been
eliminated. DO NOT modify this unit or commission
others to do so unless specifically authorized by Yamaha.
Product performance and/or safety standards may be
diminished. Claims filed under the expressed warranty
may be denied if the unit is/has been modified. Implied
warranties may also be affected.
SPECIFICATIONS SUBJECT TO CHANGE: The
information contained in this manual is believed to be
correct at the time of printing. However, Yamaha
reserves the right to change or modify any of the
specifications without notice or obligation to update
existing units.
ENVIRONMENTAL ISSUES: Yamaha strives to
produce products that are both user safe and
environmentally friendly. We sincerely believe that our
products and the production methods used to produce
them, meet these goals. In keeping with both the letter
and the spirit of the law, we want you to be aware of the
following:
Battery Notice: This product MAY contain a small non-
rechargeable battery which (if applicable) is soldered in
place. The average life span of this type of battery is
approximately five years. When replacement becomes
necessary, contact a qualified service representative to
perform the replacement.
Warning: Do not attempt to recharge, disassemble, or
incinerate this type of battery. Keep all batteries away
from children. Dispose of used batteries promptly and as
regulated by applicable laws. Note: In some areas, the
servicer is required by law to return the defective parts.
However, you do have the option of having the servicer
dispose of these parts for you.
Disposal Notice: Should this product become damaged
beyond repair, or for some reason its useful life is
considered to be at an end, please observe all local, state,
and federal regulations that relate to the disposal of
products that contain lead, batteries, plastics, etc.
NOTICE: Service charges incurred due to lack of
knowledge relating to how a function or effect works
(when the unit is operating as designed) are not covered
by the manufacturer’s warranty, and are therefore the
owners responsibility. Please study this manual carefully
and consult your dealer before requesting service.
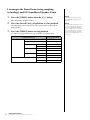
NAME PLATE LOCATION: The graphic below
indicates the location of the name plate. The model
number, serial number, power requirements, etc., are
located on this plate. You should record the model
number, serial number, and the date of purchase in the
spaces provided below and retain this manual as a
permanent record of your purchase.
Model
Serial No.
Purchase Date
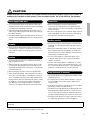
CAUTION
RISK OF ELECTRIC SHOCK
DO NOT OPEN
CAUTION: TO REDUCE THE RISK OF ELECTRIC SHOCK.
DO NOT REMOVE COVER (OR BACK).
NO USER-SERVICEABLE PARTS INSIDE.
REFER SERVICING TO QUALIFIED SERVICE PERSONNEL.
92-469- 1 (bottom)

* This applies only to products distributed by YAMAHA CORPORATION OF AMERICA. (class B)
1. IMPORTANT NOTICE: DO NOT MODIFY THIS
UNIT!
This product, when installed as indicated in the
instructions contained in this manual, meets FCC
requirements. Modifications not expressly approved
by Yamaha may void your authority, granted by the
FCC, to use the product.
2. IMPORTANT
: When connecting this product to
accessories and/or another product use only high
quality shielded cables. Cable/s supplied with this
product MUST be used. Follow all installation
instructions. Failure to follow instructions could void
your FCC authorization to use this product in the
USA.
3. NOTE: This product has been tested and found to
comply with the requirements listed in FCC
Regulations, Part 15 for Class “B” digital devices.
Compliance with these requirements provides a
reasonable level of assurance that your use of this
product in a residential environment will not result in
harmful interference with other electronic devices.
This equipment generates/uses radio frequencies
and, if not installed and used according to the
instructions found in the users manual, may cause
interference harmful to the operation of other
electronic devices. Compliance with FCC regulations
does not guarantee that interference will not occur in
all installations. If this product is found to be the
source of interference, which can be determined by
turning the unit “OFF” and “ON”, please try to
eliminate the problem by using one of the following
measures:
Relocate either this product or the device that is
being affected by the interference.
Utilize power outlets that are on different branch
(circuit breaker or fuse) circuits or install AC line filter/s.
In the case of radio or TV interference, relocate/
reorient the antenna. If the antenna lead-in is 300
ohm ribbon lead, change the lead-in to co-axial type
cable.
If these corrective measures do not produce
satisfactory results, please contact the local retailer
authorized to distribute this type of product. If you
can not locate the appropriate retailer, please contact
Yamaha Corporation of America, Electronic Service
Division, 6600 Orangethorpe Ave, Buena Park,
CA90620
The above statements apply ONLY to those products
distributed by Yamaha Corporation of America or its
subsidiaries.
FCC INFORMATION (U.S.A.)
COMPLIANCE INFORMATION STATEMENT
(DECLARATION OF CONFORMITY PROCEDURE)
Responsible Party :
Yamaha Corporation of America
Address : 6600 Orangethorpe Ave.,
Buena Park, Calif. 90620
Telephone : 714-522-9011
Type of Equipment : Digital Piano
Model Name : CLP-480
This device complies with Part 15 of the FCC Rules.
Operation is subject to the following two conditions:
1) this device may not cause harmful interference, and
2) this device must accept any interference received includ-
ing interference that may cause undesired operation.
See user manual instructions if interference to radio recep-
tion is suspected.
*This applies only to products distributed by
YAMAHA CORPORATION OF AMERICA.
(FCC DoC)
IMPORTANT NOTICE FOR THE UNITED KINGDOM
Connecting the Plug and Cord
IMPORTANT. The wires in this mains lead are
coloured in accordance with the following code:
BLUE : NEUTRAL
BROWN : LIVE
As the colours of the wires in the mains lead of this
apparatus may not correspond with the coloured makings
identifying the terminals in your plug proceed as follows:
The wire which is coloured BLUE must be connected to the
terminal which is marked with the letter N or coloured BLACK.
The wire which is coloured BROWN must be connected to the
terminal which is marked with the letter L or coloured RED.
Making sure that neither core is connected to the earth termi-
nal of the three pin plug.
•This applies only to products
distributed by Yamaha Music U.K. Ltd.
(2 wires)

4
PRECAUTIONS
PLEASE READ CAREFULLY BEFORE PROCEEDING
* Please keep this manual in a safe place for future reference.
WARNING
Always follow the basic precautions listed below to avoid the possibility of serious injury or even death from
electrical shock, short-circuiting, damages, fire or other hazards. These precautions include, but are not
limited to, the following:
• Do not place the power cord near heat sources such as heaters
or radiators, and do not excessively bend or otherwise damage
the cord, place heavy objects on it, or place it in a position
where anyone could walk on, trip over, or roll anything over it.
• Only use the voltage specified as correct for the instrument.
The required voltage is printed on the name plate of the
instrument.
• Use only the supplied power cord/plug.
• Check the electric plug periodically and remove any dirt or
dust which may have accumulated on it.
• This instrument contains no user-serviceable parts. Do not
open the instrument or attempt to disassemble or modify the
internal components in any way. If it should appear to be
malfunctioning, discontinue use immediately and have it
inspected by qualified Yamaha service personnel.
• Do not expose the instrument to rain, use it near water or in
damp or wet conditions, place on it any containers (such as
vases, bottles or glasses) containing liquids which might spill
into any openings. If any liquid such as water seeps into the
instrument, turn off the power immediately and unplug the
power cord from the AC outlet. Then have the instrument
inspected by qualified Yamaha service personnel.
• Never insert or remove an electric plug with wet hands.
• Do not put burning items, such as candles, on the unit.
A burning item may fall over and cause a fire.
• When one of the following problems occur, immediately turn
off the power switch and disconnect the electric plug from the
outlet. Then have the device inspected by Yamaha service
personnel.
• The power cord or plug becomes frayed or damaged.
• It emits unusual smells or smoke.
• Some object has been dropped into the instrument.
• There is a sudden loss of sound during use of the
instrument.
Power supply/Power cord
Do not open
Water warning
Fire warning
If you notice any abnormality
DMI-3 1/2

5
CAUTION
Always follow the basic precautions listed below to avoid the possibility of physical injury to you or others, or
damage to the instrument or other property. These precautions include, but are not limited to, the following:
• Do not connect the instrument to an electrical outlet using a
multiple-connector. Doing so can result in lower sound quality,
or possibly cause overheating in the outlet.
• When removing the electric plug from the instrument or an
outlet, always hold the plug itself and not the cord. Pulling by
the cord can damage it.
• Remove the electric plug from the outlet when the instrument is
not to be used for extended periods of time, or during electrical
storms.
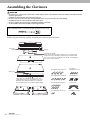
• Read carefully the attached documentation explaining the
assembly process. Failure to assemble the instrument in the
proper sequence might result in damage to the instrument or
even injury.
• Do not place the instrument in an unstable position where it
might accidentally fall over.
• When transporting or moving the instrument, always use two
or more people. Attempting to lift the instrument by yourself
may damage your back, result in other injury, or cause damage
to the instrument itself.
• Before moving the instrument, remove all connected cables.
• When setting up the product, make sure that the AC outlet you
are using is easily accessible. If some trouble or malfunction
occurs, immediately turn off the power switch and disconnect
the plug from the outlet. Even when the power switch is turned
off, electricity is still flowing to the product at the minimum
level. When you are not using the product for a long time,
make sure to unplug the power cord from the wall AC outlet.
• Before connecting the instrument to other electronic
components, turn off the power for all components. Before
turning the power on or off for all components, set all volume
levels to minimum.
• Be sure to set the volumes of all components at their minimum
levels and gradually raise the volume controls while playing
the instrument to set the desired listening level.
• Do not insert a finger or hand in any gaps on the key cover or
instrument. Also take care that the key cover does not pinch
your finger.
• Never insert or drop paper, metallic, or other objects into the
gaps on the key cover, panel or keyboard. This could cause
physical injury to you or others, damage to the instrument or
other property, or operational failure.
• Do not rest your weight on, or place heavy objects on the
instrument, and do not use excessive force on the buttons,
switches or connectors.
• Do not use the instrument/device or headphones for a long
period of time at a high or uncomfortable volume level, since
this can cause permanent hearing loss. If you experience any
hearing loss or ringing in the ears, consult a physician.
• Do not place the bench in an unstable position where it might
accidentally fall over.
• Do not play carelessly with or stand on the bench. Using it as a
tool or stepladder or for any other purpose might result in
accident or injury.
• Only one person should sit on the bench at a time, in order to
prevent the possibility of accident or injury.
• For benches that can be adjusted, do not attempt to adjust the
bench height while sitting on the bench, since this can cause
excessive force to be imposed on the adjustment mechanism,
possibly resulting in damage to the mechanism or even injury.
• If the bench screws become loose due to extensive long-term
use, tighten them periodically using the included tool.
Always turn the power off when the instrument is not in use.
Power supply/Power cord
Assembly
Location
Connections
Handling caution
Using the bench (If included)
Yamaha cannot be held responsible for damage caused by improper use or modifications to the instrument, or data that is lost or
destroyed.
DMI-3 2/2

6
NOTICE
To avoid the possibility of malfunction/ damage to
the product, damage to data, or damage to other
property, follow the notices below.
Handling and Maintenance
• Do not use the instrument in the vicinity of a TV,
radio, stereo equipment, mobile phone, or other
electric devices. Otherwise, the instrument, TV, or
radio may generate noise.
• Do not expose the instrument to excessive dust or
vibrations, or extreme cold or heat (such as in direct
sunlight, near a heater, or in a car during the day) to
prevent the possibility of panel disfiguration, damage
to the internal components or unstable operation.
(Verified operating temperature range: 5° – 40°C, or
41° – 104°F.)
• Do not place vinyl, plastic or rubber objects on the
instrument, since this might discolor the panel or
keyboard.
• In the case of a model with a polished finish, bumping
the surface of the instrument with metal, porcelain, or
other hard objects can cause the finish to crack or peel.
Use caution.
• During extreme changes in temperature or humidity,
condensation may occur and water may collect on the
surface of the instrument. If water is left, the wooden
parts may absorb the water and be damaged. Make
sure to wipe any water off immediately with a soft
cloth.
Saving data
• Saved data may be lost due to malfunction or incorrect
operation. Save important data to a USB storage
device/external device such as a computer.
• To protect against data loss through media damage, we
recommend that you save your important data onto
two USB storage devices.
Information
About copyrights
• Copying of the commercially available musical data
including but not limited to MIDI data and/or audio
data is strictly prohibited except for your personal use.
• This product incorporates and bundles computer
programs and contents in which Yamaha owns
copyrights or with respect to which it has license to use
others’ copyrights. Such copyrighted materials include,
without limitation, all computer software, style files,
MIDI files, WAVE data, musical scores and sound
recordings. Any unauthorized use of such programs
and contents outside of personal use is not permitted
under relevant laws. Any violation of copyright has
legal consequences. DON’T MAKE, DISTRIBUTE OR
USE ILLEGAL COPIES.
About functions/data bundled with the
instrument
• Some of the Preset Songs have been edited for length
or arrangement, and may not be exactly the same as
the original.
• This device is capable of using various types/formats of
music data by optimizing them to the proper format
music data for use with the device in advance. As a
result, this device may not play them back precisely as
their producers or composers originally intended.
About this manual
• The illustrations and LCD screens as shown in this
manual are for instructional purposes only, and may
appear somewhat different from those on your
instrument.
• Windows is a registered trademark of Microsoft®
Corporation in the United States and other countries.
• Apple, Mac and Macintosh are trademarks of Apple
Inc., registered in the U.S. and other countries.
• The company names and product names in this
manual are the trademarks or registered trademarks of
their respective companies.
This instrument is compatible with the following
formats.
GM System Level 2
“GM (General MIDI)” is one of the most common Voice
allocation formats. “GM System Level 2” is a standard
specification that enhances the original “GM” and improves
Song data compatibility. It provides for increased polyphony,
greater Voice selection, expanded Voice parameters, and
integrated effect processing.
XG
XG is a major enhancement of the GM System Level 1
format, and was developed by Yamaha specifically to provide
more Voices and variations, as well as greater expressive
control over Voices and effects, and to ensure compatibility of
data well into the future.
GS
GS was developed by the Roland Corporation. In the same
way as Yamaha XG, GS is a major enhancement of the GM
specifically to provide more Voices and Drum kits and their
variations, as well as greater expressive control over Voices
and effects.

7
Included Accessories
Thank you for choosing the Yamaha Clavinova.
In order to make the most of your Clavinova’s performance potential and features, please read this Owner’s
Manual thoroughly, and keep it in a safe place for later reference.
Included Accessories
•Owner’s Manual (this book)
•Data List
• “50 greats for the Piano” (Music Book)
• My Yamaha Product User Registration
The PRODUCT ID on the sheet will be needed when
you fill out the User Registration form.
•AC power cord
• Bench (included or optional depending on
locale)
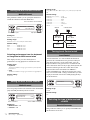
About the Manuals
This instrument has the following documents and
instructional materials.
Included Documents
Owner’s Manual (this book)
This document explains how to use the
Clavinova.
•Introduction:
This section explains how to set up and start using your
Clavinova. Setup is so simple, you can start playing right
away.
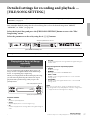
• Advanced Functions:
This section explains various functions useful for your
practice, such as Preset Song playback and Song
recording.
•Detailed Settings:
This section explains how to make detailed settings for
the Clavinova’s various functions. Refer to this section as
necessary.
•Appendix:
This section introduces Message List, a description of
Preset Voices, and other reference material.
Data List
This document contains lists of XG Voices
and Effect types that can be selected by
[VOICE SETTING].
Online Materials (Downloadable
from the web)
Data List Complete Version
This includes all data lists relevant to the
instrument, including the data lists included
with the instrument, as well as those for Effects,
MIDI-related information and so on.
MIDI Basics (only in English, French
and German)
If you want to know more about MIDI and how
to use it, refer to this introductory book.
These materials are available for downloading from
the internet web site, Yamaha Manual Library. Visit
the following URL, enter “CLP-480” or “MIDI
Basics” to the Model Name box to search for the
above materials.
Yamaha Manual Library
http://www.yamaha.co.jp/manual/

8
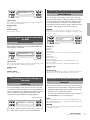
Main Features
Main Features
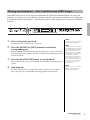
Real Grand Expression (RGE) Sound Engine
This lets you enjoy the playing response and expressive capability of a concert grand piano. In addition to providing
smooth tonal changes that respond to your playing touch, it also features a new Smooth Release function which can
clearly enunciate staccato notes and produce the sound of lingering resonance when gently lifting your fingers from the
keys. It succeeds in capturing the essence of a piano performance to create grand piano-like, richly expressive
experiences.
GP Soundboard Speakers for simulating a Grand Piano
This special speaker system, located on the rear panel, will simulate or produce the reverberation and spaciousness of the
sound as if there were the soundboard of a grand piano.
NW (Natural Wood) keyboard with synthetic ivory keytops and Linear Graded
Hammer
The CLP-480 features a keyboard that has the feel of real ivory. The key surface is soft and slightly porous, giving the keys
added grip and a natural friction that lets you play easily. The special Natural Wood keyboard uses real-wood white keys
just as an actual grand piano. Moreover, Linear Graded Hammer features the lower keys are heavy in touch and the
higher keys are light, with all the natural gradations in between. The CLP-480 provides the performance functions and
expressive power found only on grand pianos, such as having repeated plays of the same note perfectly articulated, even
when playing at high speed or with partial key release.
Tri-Amp System
The instrument has a built-in Tri-Amp System that features separate amplification for each speaker range—high, mid,
and low—providing greater clarity and accuracy from each speaker, ensuring optimum volume balance for each octave
range, and letting you enjoy richer, more natural, expansive sound.
Audio Playing and Recording from a USB Flash Memory
Audio files (.wav) saved to a USB storage device such as a USB flash memory can be played back on the instrument.
Moreover, since you can record your performance as audio data to a USB flash memory device, it is possible to listen to
your performance on portable music players, with the data transferred by computer.

9
Table of Contents
Table of Contents
PRECAUTIONS ..................................................4
NOTICE...............................................................6
Included Accessories ...........................................7
About the Manuals ..............................................7
Main Features ......................................................8
Introduction
Panel Controls and Terminals ..........................10
Getting Started — Playing the Clavinova as a
Piano ..................................................................12
Turning the power on ......................................................12
Music rest...........................................................................13
Music braces ......................................................................14
Adjusting the display contrast — [CONTRAST].........14
Setting the volume — [MASTER VOLUME]...............14
Using headphones.............................................................15
Realistic soundboard effects
— [S. BOARD SPEAKER] ...............................................15
Using the pedals ................................................................16
Using the metronome — METRONOME [ON/OFF] 17
Touch Response ................................................................17
Introduction to the controls............................................18
Maintenance ......................................................19
Advanced Functions
Playing various musical instrument sounds
(Voices) ..............................................................20
Selecting Voices.................................................................20
Listening to the Voice Demo Songs ...............................21
Enhancing and customizing the sound
— [BRILLIANCE]/[REVERB]/[CHORUS]..................23
Playing two Voices simultaneously (Dual) ...................24
Splitting the keyboard range and playing two different
Voices (Split mode) ..........................................................25
Playing back Songs ............................................27
Playing back a Song ..........................................................27
Useful playback functions................................................30
Playing a one-hand part
— Part Cancel function (MIDI Songs) ..........................31
Repeat function (MIDI Songs)........................................32
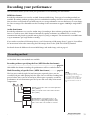
Recording your performance ............................33
Recording method ............................................................33
Recording without specifying the Part
(MIDI/Audio data format) ..............................................34
Multi Recording of specific Parts (MIDI data format)36
Other recording techniques.............................................37
Handling Song files — [FILE/SONG SETTING]
........................................................................... 41
Basic File operation.......................................................... 42
Deleting files — “Delete”................................................. 43
Renaming files — “Rename” .......................................... 43
Copying files — “Copy” .................................................. 44
Moving files — “Move” ................................................... 45
Making folders in the USB storage device
— “MakeFolder”............................................................... 45
Formatting a USB storage device — “Format” ............ 46
Converting a MIDI Song to an Audio Song during
playback — “MIDItoAUDIO” ....................................... 46
Confirming the amount of free memory area and all
memory area on the USB storage device
— “DriveProperty” .......................................................... 47
Automatically selecting a Song when connecting the USB
storage device — “SongAutoOpen”............................... 48
Changing the type of characters on the display
— “CharacterCode” ......................................................... 48
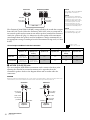
Connections ...................................................... 49
Connectors ........................................................................ 49
Connecting a USB storage device .................................. 51
Connecting a computer................................................... 52
Connecting external MIDI devices................................ 53
Detailed Settings
Parameter List ................................................... 54
Detailed settings for recording and playback
— [FILE/SONG SETTING] .............................. 57
Detailed settings for the metronome
— METRONOME [SETTING] ......................... 60
Detailed settings for Voices
— [VOICE SETTING] ...................................... 61
Detailed settings for acoustic effects ................ 67
Other settings — [FUNCTION] ....................... 68
Appendix
Preset Voice List (Detailed) .............................. 75
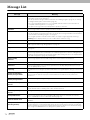
Message List....................................................... 78
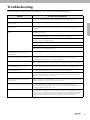
Troubleshooting................................................ 81
Assembling the Clavinova................................. 82
Specifications .................................................... 87
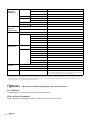
Options.............................................................. 88
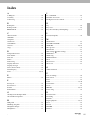
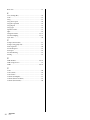
Index.................................................................. 89

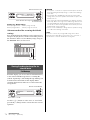
10
Introduction
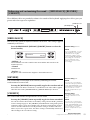
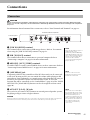
Panel Controls and Terminals
Introduction
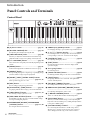
Panel Controls and Terminals
Control Panel
[ ] Power switch .......................................page 13
[MASTER VOLUME] dial..........................page 14
For adjusting the volume level using this dial.
[SONG BALANCE] slider..........................page 40
This lets you adjust the volume balance between the Song
playback and the sound you are playing on the keyboard.
[I. A. CONTROL] button...........................page 14
This controls the tonal quality automatically depending on the
volume.
[DEMO] button..........................................page 21
Demonstration playback is available for each Voice group.
[REPEAT] button.......................................page 32
For repeatedly playing back a single Song or specifying a range
(in beats) within a Song for repeated playback.
[RIGHT], [LEFT], [EXTRA PARTS] buttons
............................................................ pages 31, 36
Turns specific Song parts on or off.
[REC] button..............................................page 33
For recording your keyboard performance.
[PLAY/PAUSE], [STOP] buttons ...............page 28
For playing back the Preset Songs, your recorded material.
[SONG SELECT] button .................... pages 27, 34
For selecting a Song to play back or edit.
[FILE/SONG SETTING] button................page 41
For handling Song files. Also lets you make detailed settings
for Song recording and playback.
METRONOME [ON/OFF], METRONOME
[SETTING] buttons ........................... pages 17, 60
For using the metronome functions.
TEMPO [UP] [DOWN] buttons ............... page 17
For changing the tempo (speed) of the Song and metronome.
A – D [–] [+] buttons, Display................... page 18
For selecting an item or setting a value shown at the location
corresponding to each of A – D buttons in the display.
[CONTRAST] knob .................................. page 14
For adjusting the display contrast.
[EXIT] button............................................ page 18
Pressing this button returns to the Voice display (main
operation display).
Voice group buttons .................................. page 20
For selecting Voices.
[VOICE SETTING] button ....................... page 61
For making detailed changes to the Voice sound and effects.
[SPLIT] button .......................................... page 25
For playing different Voices on the left- and right-hand
sections of the keyboard.
[REVERB], [CHORUS] buttons................ page 23
For adding reverb and chorus effects to the sound.
BRILLIANCE [MELLOW] [BRIGHT] buttons
................................................................... page 23
For adjusting the brightness of the sound.
[S. BOARD SPEAKER] button ................. page 15
Turns on or off the effect of GP Sound Board Speaker.
[FUNCTION] button ................................ page 68
This lets you make detailed settings, such as adjusting the
keyboard touch (Touch Response), making fine adjustments
to the pitch or MIDI settings.
[USB TO DEVICE] terminal..................... page 51
For connecting the instrument to a USB storage device,
allowing you to save the recorded Song to the connected
device and play back the Song on the connected device.
A-1 B-1 C0 D0 E0 F0 G0 A0 B0 C1 D1 E1 F1 G1 A1 B1 C2 D2 E2 F2 G2 A2 B2 C3 D3 E3


12
Introduction
Getting Started — Playing the Clavinova as a Piano
Getting Started — Playing the Clavinova as a Piano
With the full set of pedals and expressive keyboard, this instrument can be played just like a real acoustic
piano. This section shows you how to simply set up the instrument and play it. It also shows you how to use
the built-in metronome, convenient for practice purposes. We’ve also included for your piano-playing
pleasure “50 greats for the Piano” (Music Book) to help you master the instrument.
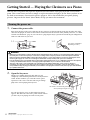
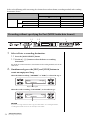
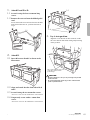
1. Connect the power cable.
First insert the plug of the power cable into the AC connector on this instrument, then plug the other end of the
cable into the proper AC outlet on the wall. For an illustration of the location of the [AC IN] connector, see “Panel
Controls and Terminals” (page 11). In some areas a plug adaptor may be provided to match the pin configuration
of the AC wall outlets in your area.
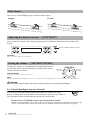
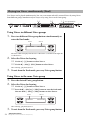
2. Open the key cover.
Lift the cover slightly, then push and slide it to end
completely so that both the panel buttons and keyboard are
visible. In this condition, you can make various panel
operations such as Voice selection and Song recording/
playback as well as playing the keyboard.
You can open the key cover so that only the keyboard
appears. This hides the “electronic” panel controls and lets
you feel as if you’re playing an actual acoustic piano.
Turning the power on
WARNING
• Make sure your instrument is rated for the AC voltage supplied in the area in which it is to be used (voltage rating appears on
the name plate on the bottom panel). In some areas, a voltage selector may be provided on the bottom panel of the main
keyboard unit near the AC IN. Make sure that the voltage selector is set for the voltage in your area. Connecting the unit to
the wrong AC supply can cause serious damage to the internal circuitry and may even pose a shock hazard!
• Use only the AC power cord supplied with your instrument. If the supplied cord is lost or damaged and needs to be replaced,
contact your Yamaha dealer. The use of an inappropriate replacement can pose a fire and shock hazard!
• The type of AC power cord provided with your instrument may be different depending on the country in which it is
purchased. (In some areas a plug adaptor may be provided to match the pin configuration of the AC wall outlets in your
area.) Do NOT modify the plug provided with your instrument. If the plug will not fit the outlet, have a proper outlet installed
by a qualified electrician.
1-1
1-2
(The shape of plug differs
depending on locale.)
Be careful to avoid catching your fingers
when opening/closing the cover.

13
Introduction
Getting Started — Playing the Clavinova as a Piano
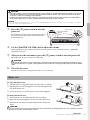
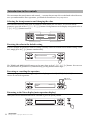
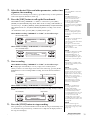
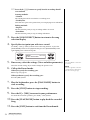
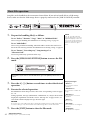
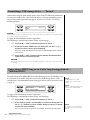
3. Press the [ ] power switch to turn the
power on.
The display located in the center of the front panel and
the power indicator located below the left end of the
keyboard lights up.
4. Use the [MASTER VOLUME] dial to adjust the volume.
While playing the keyboard, adjust the volume level. For details, refer to “Setting the volume — [MASTER
VOLUME]” on page 14.
5. After you use the instrument, press the [ ] power switch to turn the power off.
The display and the power indicator are turned off.
CAUTION
Even when the instrument is turned off, electricity is still flowing to the instrument at the minimum level. When you are not
using the instrument for a long time or during electrical storms, make sure you unplug the AC power plug from the wall AC
outlet.
6. Close the key cover.
Slide the cover toward you and gently lower the cover over the keys.
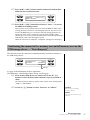
To raise the music rest:
1. Pull the music rest up and toward yourself as far as it will go.
2. Flip down the two metal supports at the left and right on the
rear of the music rest.
3. Lower the music rest so that it rests on the metal supports.
To lower the music rest:
1. Pull the music rest toward yourself as far as it will go.
2. Raise the two metal supports (at the rear of the music rest).
3. Gently lower the music rest backward until it is all the way
down.
CAUTION
Do not try to use the music rest in a half-raised position. Also, when raising or lowering the music rest, do not release your hands
from the music rest until it is all the way up or down.
CAUTION
• Do not place objects such as a piece of metal or paper on top of the key cover. Small objects placed on the key cover may fall
inside the unit when the cover is opened and may be nearly impossible to remove. This could cause electric shock, short
circuit, fire or other serious damage to the instrument.
• Hold the cover with both hands when opening or closing it. Do not release it until it is fully opened or closed. Be careful to
avoid catching fingers (yours or others, especially children’s) between the cover and the unit.
NOTICE
Disconnect the optional USB storage device connected to the [USB TO DEVICE] terminal before closing the key cover. Closing the cover with the
device still connected may damage the device.
Music rest
The power indicator
lights up.
Power switch

14
Introduction
Getting Started — Playing the Clavinova as a Piano
These braces are for holding the pages of music books in place.
You can adjust the contrast of the display by turning the [CONTRAST] knob located to the right of the
display.
CONTRAST
Difference between brightness and darkness.
To adjust the volume, use the [MASTER VOLUME] dial located at
the left of the panel. Play the keyboard to actually produce sound
while you adjust the volume.
MASTER VOLUME:
The volume level of the entire keyboard sound
NOTE
Adjusting the [MASTER VOLUME] dial also affects the output level of the [PHONES] jacks and the output level of the AUX OUT jack.
CAUTION
Do not use the instrument at a high volume level for a long period of time, or your hearing may be damaged.
I.A. Control (Intelligent Acoustic Control)
I.A. Control is a function which automatically adjusts and controls the sound
quality according to the overall volume of the instrument. Even when the volume is
low, it permits both low sounds and high sounds to be clearly heard.
Pressing the [I.A. CONTROL] button turns the function on and off.
When it is on, the lamp lights. I.A. Control is effective only from the sound output of the instrument speakers. You
can also set the depth of I.A. Control. For details, refer to “Detailed settings for acoustic effects” on page 67.
Music braces
Adjusting the display contrast — [CONTRAST]
Setting the volume — [MASTER VOLUME]
To open To close
Turn this to adjust the display contrast.
Increases
the level.
Decreases
the level.

15
Introduction
Getting Started — Playing the Clavinova as a Piano
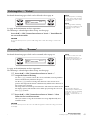
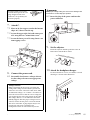
Connect a pair of headphones to one of the [PHONES] jacks.
When the headphones are plugged into either of the [PHONES]
jacks, the internal speaker system is automatically shut off. Two
[PHONES] jacks are provided. Two sets of standard stereo
headphones can be plugged in. (If you are using only one pair of
headphones, you can plug them into either of these jacks.)
CAUTION
Do not use headphones at a high volume for an extended period of time.
Doing so may cause hearing loss.
Optional headphones
HPE-160 Yamaha headphones
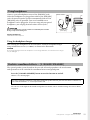
Using the headphone hanger
You can hang the headphones on the instrument. Install the headphone hanger
using included two screws (4 × 10mm) as shown in the illustration.
NOTICE
Do not hang anything other than the headphones on the hanger. Otherwise, the instrument or the hanger
may be damaged.
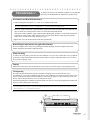
This special speaker system, located on the rear side, effectively reproduces the reverberation
and spaciousness of the sound of the soundboard on an actual grand piano.
Press the [S. BOARD SPEAKER] button to turn the function on and off.
When it is on, the lamp lights.
You can also set the depth of GP Soundboard Speaker. For details, refer to “Detailed settings for acoustic effects”
on page 67.
Using headphones
Realistic soundboard effects — [S. BOARD SPEAKER]
To ensure optimum performance of the GP Soundboard Speaker function, place the instrument so that the rear
side of the instrument is 1– 2 cm away from the wall.
Bottom surface
Standard stereo
phone plug

16
Introduction
Getting Started — Playing the Clavinova as a Piano
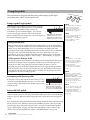
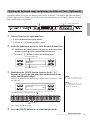
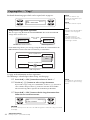
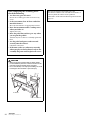
This instrument is equipped with three foot pedals: damper pedal (right),
sostenuto pedal (center), and soft pedal (left).
Damper pedal (right pedal)
When you press the damper pedal, the notes you play
have a longer sustain. When you select a Grand Piano
Voice, pressing the damper pedal activates the
instrument’s special “Sustain Samples” to accurately
recreate the unique resonance of an acoustic grand
piano’s soundboard and strings. You can set the depth of
the Sustain Sampling (page 71).
Sostenuto pedal (center pedal)
If you play a note or chord on the keyboard and press the
sostenuto pedal while holding the note(s), the notes will
sustain as long as the pedal is held. All subsequent notes
will not sustain.
Soft pedal (left pedal)
The soft pedal reduces the volume and slightly changes the timbre of notes played
while the pedal is pressed. The soft pedal will not affect notes that are already playing
when it is pressed. When you wish to apply this effect, play notes after pressing the
pedal.
Keep in mind that this pedal function will be changed from the Soft pedal depending
on the selected Voice. When the Jazz Organ or Mellow Organ is selected, pressing
and releasing this pedal switches between “fast” and “slow” of the Rotary Speaker
speed (“RotarySpeed” on page 64). When the Vibraphone is selected, this pedal
switches between on and off of the Vibrato (“VibeRotorOnOff ” on page 64).
Using the pedals
When you press the damper
pedal here, the notes you
play before you release the
pedal have a longer sustain.
NOTE
For details about the Grand
Piano Voices to which the
Sustain Sampling can be
applied, refer to Preset Voice
List (detailed) on page 75.
NOTE
You can assign other functions
to each pedal by using
“RPedalFunc,” ”CPedalFunc”
and ”LPedalFunc” in Voice
Setting (page 65).
NOTE
While the sostenuto (center)
pedal is held, the Voices in the
[PIPE ORGAN], [JAZZ
ORGAN], [STRINGS], [CHOIR]
and some Voices in the [XG]
may sound continuously
without decay after the notes
have been released.
NOTE
The center pedal or left pedal
can be used as equivalent to
the [PLAY/PAUSE] button on
the panel by setting the
“PedalPlay/Pause” parameter
(page 70).
NOTE
The pedals are covered with
vinyl covers when shipped
from the factory. For optimum
use of the GP Responsive
Damper Pedal, we
recommend that you remove
the cover from the damper
pedal.
Half-pedal function
This instrument also has a Half-pedal function which allows you to use half-damper
techniques, in which the damper is pressed somewhere between all the way down and
all the way up. In this half-damper state (on a real piano), the damper felts only
partially mute the strings. The Half-pedal function on the Clavinova lets you delicately
and expressively control the damper muting, and create subtle nuances in your
performance. It also lets you finely control the point at which pressure on the pedal
affects the damper muting. (Refer to “Other settings — [FUNCTION]” on page 70.)
GP Responsive Damper Pedal
The damper pedal of this instrument is the GP Responsive Damper Pedal. This special
pedal has been designed to provide enhanced tactile response and, when pressed, is
much closer in feel to the pedal of an actual grand piano. It makes it easier to
physically experience the half-pedal point and more easily apply the half-pedal effect
than other pedals. Since the pressing sensation may vary depending on the situation,
including the location where the instrument is installed, you should adjust the half-
pedal point to the desired setting (page 70).
When you press the sostenuto
pedal here while holding the
note(s), the notes will sustain
as long as you hold the pedal.

17
Introduction
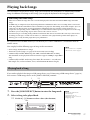
Getting Started — Playing the Clavinova as a Piano
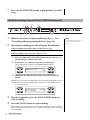
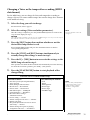
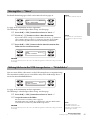
The instrument has a built-in metronome (a device that keeps an accurate tempo) that is a convenient tool
for practice.
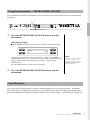
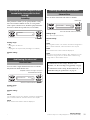
1. Press the METRONOME [ON/OFF] button to start the
metronome.
Adjusting the tempo
Press the TEMPO [DOWN] or [UP] button to call up the tempo in the display.
To adjust the tempo (number of beats per minute: 5 – 500), use the TEMPO
[DOWN]/[UP] or the D [–]/[+] buttons. To reset the tempo to the default setting
(120), press the [DOWN] and [UP] buttons or the D [–] and [+] buttons
simultaneously.
Press the [EXIT] button to return to the Voice display.
2. Press the METRONOME [ON/OFF] button to stop the
metronome.
You can specify the Touch Response (how the sound responds to the way you play the keys). You should
adjust this setting according to the specific Voice you’re playing or the particular Song you’re performing, as
desired. For information about how to make settings, refer to “Other settings — [FUNCTION]” on page 68.
Using the metronome — METRONOME [ON/OFF]
12
TEMPO [DOWN] [UP] buttons
NOTE
You can set the time signature,
metronome volume, and
metronome sound using the
METRONOME [SETTING]
button (page 60).
Tempo
120
Touch Respons e

18
Introduction
Getting Started — Playing the Clavinova as a Piano
This instrument has many buttons and controls — so many that you may feel overwhelmed at first. However,
once you understand the basic operations, you’ll find the instrument is very easy to use.
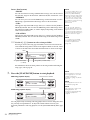
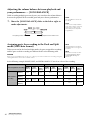
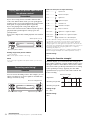
Selecting the item/parameter and changing the value
Each function may have many items or parameters from which you can choose. To select an item or
parameter, press one of the A [–][+] – D [–][+] buttons. Each parameter in the display corresponds to the A
[–][+] – D [–][+] button next to it.
Resetting the value to the default setting
If you’ve changed the parameter values or settings, you may want to reset them to their default settings. To do
this, simply press the [–][+] buttons simultaneously.
The TEMPO and BRILLIANCE buttons are the same shape as the A [–][+] – D [–][+] buttons. You can reset
the related values or parameters by simultaneously pressing buttons of this shape.
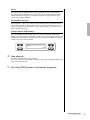
Executing or canceling the operation
When a prompt is shown on the upper right of the display, press the B [+ (YES)] / B [– (NO)] button to
execute or cancel the operation.
Returning to the Voice display (main operation display)
After you’ve used a function and want to exit from it, press the [EXIT] button.
Introduction to the controls
GrandPiano Harpsi.8'
Vibraphone WoodBass
MetronomeVolume
82
Format Start?
_
>
USB1
NO: cancel
YES: execute
Grand Piano

19
Introduction
Maintenance
Maintenance
To keep your Clavinova in optimum condition, we recommend
that you periodically follow the maintenance points below.
Instrument and Bench Maintenance
• When cleaning the instrument, use a soft, dry or slightly damp cloth.
If you are using a model with a polished finish, gently remove dust and dirt with a soft cloth. Do not
wipe too hard since small particles of dirt can scratch the instrument’s finish.
To keep the surface polished, apply commercially available piano polisher to a soft cloth and wipe the
instrument’s surface with it. Then, polish it with a separate cloth. Before using any piano polisher,
make sure to read the instructions for proper usage.
• Tighten the screws of the instrument and bench periodically.
NOTICE
Do not use paint thinners, solvents, cleaning fluids, or chemical-impregnated wiping cloths.
Bench Height Adjustment (for applicable benches)
The bench height can be adjusted by rotating the handle. Rotating clockwise heightens the bench.
(Before shipment, the handle is firmly fastened.)
Pedal Cleaning
As with an acoustic piano, pedals may become tarnished over years of use. When this occurs, polish the
pedal with a compound designed for piano pedals. Before using the compound, make sure to read the
instructions for proper usage.
Tuning
Unlike an acoustic piano, the instrument does not need to be tuned. It always stays perfectly in tune.
Transporting
You can transport the instrument along with other belongings. You can move the unit as it is
(assembled) or you can disassemble the unit down to the condition it was in when you first took it out of
the box. Transport the keyboard horizontally. Do not lean it up against a wall or stand it up on its side.
Do not subject the instrument to excessive vibration or shock.
When transporting the assembled instrument, make sure all screws are properly tightened and have not
been loosened by moving the instrument.
NOTE
To ensure optimum performance of the GP Soundboard Speaker function, place the instrument so that the rear side
of the instrument is 1 – 2 cm away from the wall.

20
Advanced Functions
Playing various musical instrument sounds (Voices)
Advanced Functions
Playing various musical instrument sounds (Voices)
In addition to the wonderfully realistic piano sounds, you can select and play other musical instrument
sounds (Voices), such as organ or stringed instruments.
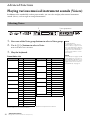
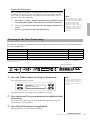
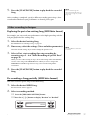
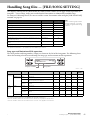
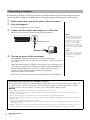
1. Press one of the Voice group buttons to select a Voice group.
2. Use A [–]/[+] buttons to select a Voice.
Refer to the Preset Voice list below.
3. Play the keyboard.
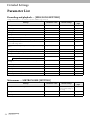
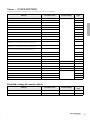
Preset Voice List
*For details on XG Voices, refer to the “XG Voice list” (Data List Complete Version which is
downloadable from the Yamaha website).
Selecting Voices
12
Voice group buttons
NOTE
To learn about the
characteristics of the Voices,
listen to Demo Songs for each
Voice group (page 21). Refer to
“Preset Voice List (detailed)” on
page 75 for more information
on the characteristics of each
Preset Voice.
NOTE
Touch Response (page 17) will
not be applied to some Voices.
For information about Voices to
which Touch Response can be
applied, refer to “Preset Voice
List (detailed)” on page 75.
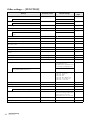
Voice group No. Voice name Voice group No. Voice name
GRAND PIANO1 1 Grand Piano JAZZ ORGAN 24 Jazz Organ
2 Ballad Grand 25 Rotary Organ
3 Rock Piano 26 Mellow Organ
4 HonkyTonk Piano STRINGS 27 Strings
GRAND PIANO2 5 Mellow Grand 28 Synth Strings
6 Warm Grand 29 Slow Strings
GRAND PIANO3 7 Bright Grand CHOIR 30 Choir
8 Pop Grand 31 Slow Choir
GRAND PIANO4 9 Live Grand 32 Scat
10 Dynamic Grand SYNTH.PAD 33 Synth Pad 1
E.PIANO1 11 DX E.Piano 34 Synth Pad 2
12 Synth Piano GUITAR 35 Nylon Guitar
E.PIANO2 13 Stage E.Piano 36 Steel Guitar
14 Vintage E.Piano BASS 37 Wood Bass
HARPSICHORD 15 Harpsichord 8' 38 Bass & Cymbal
16 Harpsichord 8'+4' 39 Electric Bass
VIBRAPHONE 17 Vibraphone 40 Fretless Bass
18 Marimba XG XG Voice
19 Celesta
PIPE ORGAN 20 Pipe Organ Principal
21 Pipe Organ Tutti
22 Pipe Organ Flute 1
23 Pipe Organ Flute 2
Sidan laddas...
Sidan laddas...
Sidan laddas...
Sidan laddas...
Sidan laddas...
Sidan laddas...
Sidan laddas...
Sidan laddas...
Sidan laddas...
Sidan laddas...
Sidan laddas...
Sidan laddas...
Sidan laddas...
Sidan laddas...
Sidan laddas...
Sidan laddas...
Sidan laddas...
Sidan laddas...
Sidan laddas...
Sidan laddas...
Sidan laddas...
Sidan laddas...
Sidan laddas...
Sidan laddas...
Sidan laddas...
Sidan laddas...
Sidan laddas...
Sidan laddas...
Sidan laddas...
Sidan laddas...
Sidan laddas...
Sidan laddas...
Sidan laddas...
Sidan laddas...
Sidan laddas...
Sidan laddas...
Sidan laddas...
Sidan laddas...
Sidan laddas...
Sidan laddas...
Sidan laddas...
Sidan laddas...
Sidan laddas...
Sidan laddas...
Sidan laddas...
Sidan laddas...
Sidan laddas...
Sidan laddas...
Sidan laddas...
Sidan laddas...
Sidan laddas...
Sidan laddas...
Sidan laddas...
Sidan laddas...
Sidan laddas...
Sidan laddas...
Sidan laddas...
Sidan laddas...
Sidan laddas...
Sidan laddas...
Sidan laddas...
Sidan laddas...
Sidan laddas...
Sidan laddas...
Sidan laddas...
Sidan laddas...
Sidan laddas...
Sidan laddas...
Sidan laddas...
Sidan laddas...
Sidan laddas...
Sidan laddas...
Sidan laddas...
Sidan laddas...
Sidan laddas...
Sidan laddas...
-
 1
1
-
 2
2
-
 3
3
-
 4
4
-
 5
5
-
 6
6
-
 7
7
-
 8
8
-
 9
9
-
 10
10
-
 11
11
-
 12
12
-
 13
13
-
 14
14
-
 15
15
-
 16
16
-
 17
17
-
 18
18
-
 19
19
-
 20
20
-
 21
21
-
 22
22
-
 23
23
-
 24
24
-
 25
25
-
 26
26
-
 27
27
-
 28
28
-
 29
29
-
 30
30
-
 31
31
-
 32
32
-
 33
33
-
 34
34
-
 35
35
-
 36
36
-
 37
37
-
 38
38
-
 39
39
-
 40
40
-
 41
41
-
 42
42
-
 43
43
-
 44
44
-
 45
45
-
 46
46
-
 47
47
-
 48
48
-
 49
49
-
 50
50
-
 51
51
-
 52
52
-
 53
53
-
 54
54
-
 55
55
-
 56
56
-
 57
57
-
 58
58
-
 59
59
-
 60
60
-
 61
61
-
 62
62
-
 63
63
-
 64
64
-
 65
65
-
 66
66
-
 67
67
-
 68
68
-
 69
69
-
 70
70
-
 71
71
-
 72
72
-
 73
73
-
 74
74
-
 75
75
-
 76
76
-
 77
77
-
 78
78
-
 79
79
-
 80
80
-
 81
81
-
 82
82
-
 83
83
-
 84
84
-
 85
85
-
 86
86
-
 87
87
-
 88
88
-
 89
89
-
 90
90
-
 91
91
-
 92
92
-
 93
93
-
 94
94
-
 95
95
-
 96
96


Yamaha 480 Bruksanvisning
- Kategori
- Digitala pianon
- Typ
- Bruksanvisning
på andra språk
- italiano: Yamaha 480 Manuale del proprietario
- čeština: Yamaha 480 Návod k obsluze
- español: Yamaha 480 El manual del propietario
- Deutsch: Yamaha 480 Bedienungsanleitung
- polski: Yamaha 480 Instrukcja obsługi
- português: Yamaha 480 Manual do proprietário
- français: Yamaha 480 Le manuel du propriétaire
- Türkçe: Yamaha 480 El kitabı
- English: Yamaha 480 Owner's manual
- dansk: Yamaha 480 Brugervejledning
- русский: Yamaha 480 Инструкция по применению
- suomi: Yamaha 480 Omistajan opas
- Nederlands: Yamaha 480 de handleiding
- română: Yamaha 480 Manualul proprietarului
Relaterade papper
-
Yamaha CLAVINOVA C L P - 3 8 Bruksanvisning
-
-
-
-
Yamaha CLP-170 Bruksanvisning
-
-
-
-
-