Ninja Foodi AG551EU Bruksanvisningar
- Kategori
- Mätning, testning
- Typ
- Bruksanvisningar

INSTRUCTIONS
BEDIENUNGSANLEITUNG
GEBRAUCHSANWEISUNG
INSTRUCCIONES
BRUGERVEJLEDNING
ISTRUZIONI
INSTRUCTIES
INSTRUKSJONER
OHJEET
INSTRUKTIONER
ninjakitchen.eu
AG551EU
Grill &
Air Fryer

TECHNICAL SPECIFICATIONS
Voltage: 220-240V~, 50-60Hz
Watts: 2460W
TIP: You can find the model and serial
numbers on the QR code label on the
back of the unit by the power cord.
RECORD THIS INFORMATION
Model Number: �����������������
Serial Number: ������������������
Date of Purchase: ����������������
(Keep receipt)
Store of Purchase: ���������������
REGISTER YOUR PURCHASE
ninjakitchen.eu
Scan QR code using mobile device
This marking indicates this product
should not be disposed of with
other household wastes throughout
the EU. To prevent possible harm
to the environment or human health
from uncontrolled waste disposal, recycle it
responsibly to promote the sustainable reuse
of material sources. To return your used
device, please use the return and collection
systems or contact the retailer where this
product was purchased. They can take this
product for environmentally safe recycling.
ENGLISH
2 3
ninjakitchen.eu ninjakitchen.eu
CONTENTS
THANK YOU
for purchasing the Ninja® Foodi® Max Grill & Air Fryer
Important Safeguards .................................4
Parts ................................................6
Getting to Know Your Grill ..............................7
Function Buttons ........................................7
Operating Buttons .......................................7
Before First Use .......................................7
Using Your Grill .......................................8
Splatter Guard ...........................................8
GrillControl Technology ...................................8
Batch Grilling ........................................8
Using the Digital Cooking Probe .......................9
Using the Probe in Dierent Cooking Scenarios ........ 10
How to Correctly Insert the Probe .....................11
Cooking Functions ...................................12
Grill .................................................12
Air Fry ..............................................13
Roast .............................................. 14
Bake ................................................15
Dehydrate ...........................................16
Reheat ..............................................17
Troubleshooting ..................................... 18
Cleaning. . . . . . . . . . . . . . . . . . . . . . . . . . . . . . . . . . . . . . . . . . . . . 19
Product Registration .................................20

ENGLISH
IMPORTANT SAFEGUARDS
HOUSEHOLD USE ONLY • READ ALL INSTRUCTIONS BEFORE USE
Read all instructions before using your Ninja® Foodi® Grill & Air Fryer.
When using electrical appliances, basic safety precautions should always
be followed, including the following:
WARNING
1 To eliminate a choking hazard for
young children, discard all packaging
materials immediately upon unpacking.
2 This appliance can be used by persons
with reduced physical, sensory
or mental capabilities or lack of
experience and knowledge if they have
been given supervision or instruction
concerning use of the appliance in a
safe way and understand the hazards
involved.
3 Keep the appliance and its cord out
of reach of children. DO NOT allow
the appliance to be used by children.
Close supervision is necessary when
used near children.
4 This appliance is for household use
only. DO NOT use this appliance for
anything other than its intended use.
DO NOT use in moving vehicles or
boats. DO NOT use outdoors.
Misuse may cause injury.
5 Ensure the surface is level, clean
and dry. DO NOT place the appliance
near the edge of a worktop
during operation.
6 ALWAYS ensure the appliance is
properly assembled before use.
7 When using this appliance, provide at
least 15.25 cm (6 inches) of space above
and on all sides for air circulation.
8 DO NOT use an extension cord. A
short power-supply cord is used to
reduce the risk of children grabbing
the cord or becoming entangled and
to reduce the risk of people tripping
over a longer cord.
9 To protect against electrical shock
DO NOT immerse cord, plugs, or main
unit housing in water or other liquid.
10 DO NOT use the appliance if there is
damage to the power cord or plug.
Regularly inspect the appliance
and power cord. If the appliance
malfunctions or has been damaged
in any way, immediately stop use
and call Customer Service.
11 NEVER use socket below
worktop surface.
12 NEVER connect this appliance to
an external timer switch or separate
remote-control system.
13 DO NOT place appliance and let cord
hang over edges of tables, counters
or touch hot surfaces including on
or near a hot gas or electric burner,
or in a heated oven.
14 Only use recommended accessories
included with this appliance or
authorized by SharkNinja. The use
of accessories or attachments not
recommended by SharkNinja may
cause a risk of fire or injury.
15 Before placing any accessory into the
cooker, ensure they are clean and dry.
16 DO NOT use the appliance without
the removable cooking pot and
splatter guard installed.
17 ALWAYS ensure lid is fully closed
before operating.
18 DO NOT move the appliance when
in use.
19 DO NOT cover the air intake vent or
air socket vent while unit is operating.
Doing so will prevent even cooking
and may damage the unit or cause
it to overheat.
20 DO NOT touch hot surfaces. Appliance
surfaces are hot during and after
operation. To prevent burns or personal
injury, ALWAYS use protective hot
pads or insulated oven gloves and
use available handles and knobs.
21 DO NOT touch accessories during or
immediately after cooking. The grill
plate and basket becomes extremely
hot during the cooking process.
Avoid physical contact while
removing the accessory from the
appliance. To prevent burns or
personal injury ALWAYS use care
when interfacing with product.
Recommend use of long handed
utensil and protective hot pads or
insulated oven gloves.
22 DO NOT use this appliance for
deep-frying.
23 DO NOT place hands near the Digital
Cooking Thermometer cord when in
use to prevent burning or scalding.
24 The Digital Cooking Thermometer
does NOT replace an external food
thermometer.
25 To prevent possible illness, ALWAYS
use a thermometer to check that
your food is cooked to the
recommended temperatures.
26
Should a grease fire occur or the unit
emits black smoke, unplug immediately.
Wait for smoking to stop before
removing any cooking accessories.
27 Please refer to the Cleaning &
Maintenance section for regular
maintenance of the appliance.
28 To disconnect, turn any control to
“off”, then unplug from socket when
not in use and before cleaning.
29 Allow to cool before cleaning,
disassembly, putting in or taking off
parts and for storage.
30 DO NOT clean with metal scouring
pads. Pieces can break off the pad
and touch electrical parts, creating
a risk of electric shock.
31 Cleaning and user maintenance shall
not be made by children.
SAVE THESE INSTRUCTIONS
Indicates to read and review instructions to understand operation and use of product.
Indicates the presence of a hazard that can cause personal injury, death or
substantial property damage if the warning included with this symbol is ignored.
Take care to avoid contact with hot surface. Always use hand protection to
avoid burns.
For indoor and household use only.
4 5
ninjakitchen.eu ninjakitchen.eu

ENGLISH
6 7
ninjakitchen.eu ninjakitchen.eu
PARTS GETTING TO KNOW YOUR GRILL
1 Remove all packaging material, promotional labels, and tape from the unit.
2 Remove all accessories from the package and read this manual carefully. Please pay
particular attention to operational instructions, warnings, and important safeguards
to avoid any injury or property damage.
3 Wash the grill plate, splatter guard, crisper basket, probe, cleaning brush, and cooking
pot in warm, soapy water, then rinse and dry thoroughly. All accessories, except the
probe, are dishwasher safe. NEVER clean the main unit or probe in the dishwasher.
BEFORE FIRST USE
FUNCTION BUTTONS
GRILL Grill indoors while creating even
char, grill marks and grilled flavour.
AIR FRY For crispiness and crunch with
little to no oil.
BAKE Cakes, treats, desserts and more.
ROAST Meats, roast vegetables,
and more.
DEHYDRATE Dehydrate meats, fruits,
and vegetables for healthy snacks.
REHEAT Revive leftovers by gently warming
them, leaving you with crispy results.
OPERATING BUTTONS
POWER button Once the unit is
plugged in, press the power button to
turn on the
unit. Pressing it during cooking
stops the current
cooking function and
turns o the unit.
Left arrows Use the up and down
arrows to the left of the display to adjust
the cooking temperature in any function
or to set the internal outcome when using
PRESET and MANUAL buttons.
MANUAL button Switches the display screen
so you can manually set the probe internal
outcome. Manual button does not work with
Dehydrate function.
PRESET button Switches the display screen
so you can set the probe, food type, and
internal outcome based on the preset
temperatures. Preset button does not work
with Dehydrate function.
Right arrows Use the up and down
arrows to the right of the display to set the
food type when using PRESET or to adjust
the cook time when not cooking with the
Foodi Probe.
START/STOP button After selecting
temperature and time, press the
START/STOP button to begin cooking.
Standby Mode If there has been no
interaction with the control panel for
10 minutes and the unit is not cooking,
the unit will go into Standby Mode and
the control panel will dim.
Preheat If the unit is preheating, it will
be indicated by a progress bar on the
display screen and the PREHEAT button
will illuminate. To turn o preheat, press the
PREHEAT button. “ADD FOOD” will then
be displayed on the unit.
The control panel display shows time in an HH:MM format.
The display to the right reads 20 minutes.
Onboard
Probe Storage
Removable
Splatter Guard
Lid
Main Unit
(power cord
not shown)
Grill Plate
Crisper Basket
Cooking Pot
Control
Panel
Digital Cooking
Probe
Double-sided
Cleaning Brush
NOTE: To adjust the temperature or time
during cooking, press the up and down
arrows. The unit will then resume at
those settings.
Kebab Skewers
(Not included with all models)
To order additional parts and accessories visit ninjakitchen.eu

ENGLISH
8 9
ninjakitchen.eu ninjakitchen.eu
USING YOUR GRILL
GRILL CONTROL TECHNOLOGY
When using the Grill function, you will need
to select the grill plate temperature setting.
Below are recommended temperature levels
for common ingredients.
SPLATTER GUARD
Located on the underside of the lid, the
splatter guard keeps the heating element
clean. ALWAYS ensure the splatter guard is
installed when cooking. Failure to use the
splatter guard will result in oil buildup on the
heating element, which can cause smoking.
Removing the splatter guard
Remove the splatter guard for cleaning
after every use. Once the splatter guard has
cooled completely, remove it by pushing
the upper right knob towards the back of
the lid. This will release the splatter guard,
allowing you to pull it out of the slot along
the back of the lid.
Installing the splatter guard
To install, slide the guard under the fixed
tab to the left hand side. Insert the smoke
screen so the grooves on the smoke screen
match that of the fixed heat guard ring.
Then gently push the splatter guard upward
until it clicks into the clip on the front of
the lid.
USING THE DIGITAL
COOKING PROBE
Before First Use
Make sure the probe jack is free of any
residue and the cord is free of knots before
plugging it into the socket.
1 Pull the probe storage compartment on
the right side of the unit outward. Then
unwind the wire from the compartment
to remove the probe.
2 Plug the probe into the input jack Push
firmly on the plug until it cannot go into
the jack any further. Place the storage
compartment back onto the side of the
unit.
3 Once the probe is plugged into the
jack, it will enable and illuminate the
PRESET and MANUAL probe buttons.
Select the desired cook function and
cook temperature.
NOTE: There is no need to set a cook
time, as the unit will automatically turn
o the heating element and alert you
when your food has completed cooking.
NOTE: The unit may produce smoke when
cooking ingredients on a hotter setting
than what is recommended. For more
cooking charts, refer to your Inspiration
Guide or visit ninjakitchen.eu.
NOTE: For less smoke, we recommend
using vegetable, coconut, avocado,
grapeseed, or vegetable oil instead of olive
oil. Heating oil past its smoke point can
impart food with a burnt, acrid flavour.
LOW
(200°C)
MED
(230°C)
HI
(250°C)
MAX
(260°C)
• Bacon
• Sausages
• When
using
thick BBQ
sauce
• Frozen
meats
• Marinated/
sauced
meats
• Steaks
• Chicken
• Burgers
• Hot dogs
• Meat
kebabs
• Veggies
• Fruit
• Pizzas
• Fresh/
frozen
seafood
• Veggie
Kebabs
Switching to Grill after using
another function
If the unit is already warm from using
a dierent function, “ADD FOOD” may
appear on the screen immediately. We
recommend allowing the grill plate to heat
up for at least 6 minutes before placing
ingredients on it.
Batch grilling
When grilling more than two consecutive
batches of food, it is recommended
that you empty the fat/oil from the
removable cooking pot. It is also HIGHLY
recommended to clean the splatter shield
in between uses. This will help prevent
grease from burning and causing smoke.
If you would like to skip the Preheat
process, press the PREHEAT button.
4 Press PRESET and use the arrows to the
right of the display to select your desired
food type and the arrows to the left of
the display to set the internal outcome of
your food (Rare through Well).
If selecting MANUAL button, use the below
recommended internal cook temps.
5 Place the accessory required for your
selected cook function in the unit and
close the lid. Press START/STOP to begin
preheating.
FOOD TYPE: SET LEVEL TO:
Fish Medium Rare (50˚C)
Medium (55˚C)
Medium Well (60˚C)
Well Done (65˚C)
Chicken/Turkey Well Done (75˚C)
Pork Medium Rare (50˚C)
Medium (55˚C)
Medium Well (65˚C)
Well Done (70˚C)
Beef/Lamb Rare (50˚C)
Medium Rare (55˚C)
Medium (60˚C)
Medium Well (65˚C)
Well Done (70˚C)
NOTE: Cooking dierent meats or to
dierent preferences? Refer to page 10 for
details on programming.
NOTE: Refer to the UK food standards
agency for recommended food safe
temperatures.
NOTE: Preset cooking levels for
BEEF/LAMB are lower than normal
recommendations as unit will carry-over
cook 5-10°C.
Heat Shield
Ring Notch
Press Tab
IMPORTANT: DO NOT place hands near
Digital Cooking Probe cord when in use to
prevent burning or scalding.

ENGLISH
11
ninjakitchen.eu
10 ninjakitchen.eu
USING THE PROBE IN DIFFERENT
COOKING SCENARIOS:
Cooking 2 or more proteins of the same
size to dierent levels of outcome:
Insert probe in the protein with the higher
desired level of outcome. Use the Preset
feature to choose the level of outcome,
then monitor the progress bar—when the
desired lower level of outcome is reached
in that protein, remove the protein without
the probe from the unit. Continue cooking
the remaining protein until the desired level
of outcome is reached.
Cooking 2 or more proteins
of dierent sizes:
Insert probe in the smaller protein and
use the Preset feature to choose the level
of outcome. When that protein is done
cooking, remove it from the unit. Then
transfer probe to the larger protein and
use the Preset feature to choose its level of
outcome.
Cooking 2 or more dierent
types of protein:
Insert probe in the protein with the lower
desired level of outcome. Use the Manual
feature to choose the desired internal
temperature. When that protein is done
cooking, remove it from the unit. Then
transfer probe to the other protein and use
the Manual feature to choose the desired
internal temperature.
6 While the unit is preheating, insert the
probe horizontally into the centre of the
thickest part of the piece of protein.
Refer to the chart on the adjacent page
on further probe placement instructions.
7 When the unit has preheated and
“ADD FOOD” appears on the screen,
open the lid, place food with inserted
probe in the unit, and close the lid over
the probe cord.
8 The progress bar at the top of the display
will track the stages of cook. Flashing
indications progression to that stage.
9 The unit will automatically stop when
your selection is almost reached, as it
accounts for carry-over cooking and
GET FOOD will display on the screen.
10 Transfer the protein to a plate while REST
displays on the screen. The protein will
continue to cook which will take about
3-5 minutes. This is an important step, as
not resting could lead to results looking
“less cooked”. Carry-over cook times
can vary based on size of protein, cut of
protein and type of protein.
USING YOUR GRILL – CONT.
NOTE: To check the internal temperature
of other pieces of protein, press and hold
MANUAL and insert the thermometer into
each piece of meat.
NOTE: The probe will be HOT. Use either
oven gloves or tongs to take the probe out
of the food.
HOW TO INSERT THE PROBE
NOTE: DO NOT use the probe with frozen foods or for cuts of meat thinner than 1.5cm.
NOTE: When using Roast and Grill, the
unit will beep and display FLIP. Flipping is
optional but recommended
Correct probe placement.
Probe grip is fully inside unit.
FOOD TYPE: PLACEMENT CORRECT INCORRECT
Steaks
Pork chops
Lamb chops
Chicken breasts
Burgers
Tenderloins
Fish fillets
• Insert thermometer
horizontally into the
centre of the thickest
part of the meat.
• Make sure the tip of the
thermometer is
inserted straight into
the centre of the meat,
not angled toward the
bottom or top of it.
• Make sure the
thermometer is close to
(but not touching) the
bone and away
from any fat or gristle.
NOTE: The thickest part
of the fillet may not be
the centre. It is important
that the end of the
thermometer hits the
thickest part so desired
results are achieved.
Whole chicken • Insert thermometer
horizontally into the
thickest part of the
breast, parallel to, but
not touching, the bone.
• Make sure the top
reaches the centre of
the thickest part of the
breast and doesn’t go
all the way through the
breast into the cavity.

ENGLISH
12 13
ninjakitchen.eu ninjakitchen.eu
Air Fry
1 Place cooking pot in the unit with the
indent on the pot aligned with the bump
on the main unit. Place the crisper basket
in the pot. Ensure the splatter guard is in
place, then close the lid.
2 Press the AIR FRY button. The default
temperature setting will display. Use
the set of arrows to the left of the
display to adjust the temperature.
3 Use the set of arrows to the right of
the display to adjust the cook time, in
1-minute increments, up to 1 hour, or, if
using the probe, refer to the instructions
on pages 9–11.
4 Press START/STOP to begin preheating.
The progress bar will begin illuminating.
It will take approximately 3 minutes for
the unit to preheat.
5 When preheating is complete, the unit will
beep and “ADD FOOD” will appear on
the display.
6 Open the lid and place ingredients
in the crisper basket. Once the lid is
closed, cooking will begin and the timer
will start counting down.
7 For best results, we recommend
shaking ingredients frequently. When
you open the lid, the unit will pause.
Use silicone-tipped tongs or oven
mitts to shake the basket. When done,
replace the basket and close the
lid
.
Cooking will automatically resume after
lid
is closed.
8 When cook time is complete, the unit
will beep and END will appear on the
display.
NOTE: While preheating is strongly
recommended for best results, you can
skip it by pressing the PREHEAT button.
“ADD FOOD” will appear on the display.
Open the lid and place ingredients in the
crisper basket. Once the lid is closed,
cooking will begin and the timer will
start counting down.
NOTE: If you would like to use the probe
to check your food’s internal temperature,
press MANUAL for 2 seconds and the
food’s internal temp will appear on the
screen for 5 seconds.
USING YOUR GRILL – CONT.
4 Press START/STOP to begin
preheating.
The progress bar will begin illuminating. It
will take approximately 10 minutes for the
unit to preheat.
5 When preheating is complete, the unit
will beep and “ADD FOOD” will appear
on the display.
6 Open the lid and place ingredients on
the grill plate. Once the lid is closed,
cooking will begin and the timer will
start counting down.
7 When cook time is complete, the unit will
beep and END will appear on the display.
COOKING FUNCTIONS
Plug in the unit and press the power
button to turn it on.
Grill
1 Place the cooking pot in the unit with
the indent on the pot aligned with
the rear bump on the main unit. Then
place the grill plate in the pot with the
handles facing up. Ensure the splatter
guard is in place, then close the lid.
2 Press the GRILL button. The default
temperature setting will display. Use the
set of arrows to the left of the display to
adjust the temperature.
3 Use the set of arrows to the right of
the display to adjust the cook time, in
1-minute increments, up to 30 minutes,
or, if using the probe, refer to the
instructions on pages 9–11. NOTE: If batch cooking, refer to page 8
for instructions.
NOTE: If you would like to use the
probe to check your food’s internal
temperature, press MANUAL for
2 seconds and the food’s internal
temperature will appear on the screen
for 5 seconds.
NOTE: If you are using the probe, refer to
pages 9–11 for instructions.

ENGLISH
14 15
ninjakitchen.eu ninjakitchen.eu
USING YOUR GRILL – CONT.
5 When preheating is complete, the unit
will beep and “ADD FOOD” will appear
on the display.
6 Open the lid and add ingredients to the
pot or set the bake pan directly in the
pot, and close the lid to start cooking.
Once the lid is closed, cooking will
begin and the timer will start counting
down.
7 When cook time is complete, the unit will
beep and END will appear on the display.
Bake
1 Place cooking pot in the unit with the
indent on the pot aligned with the bump
on the main unit. Ensure the splatter
guard is in place, then close the lid.
2 Press the BAKE button. The default
temperature setting will display. Use the
set of arrows to the left of the display to
adjust the temperature.
3 Use the set of arrows to the right of the
display to adjust the cook time, in 1-minute
increments, up to 1 hour and in 5-minutes
increments from 1 to 2 hours, or, if using
the probe, refer to the instructions on
pages 9–11.
4 Press START/STOP to begin preheating.
PRE will illuminate on the right side of the
display and the progress bar will begin
illuminating. It will take approximately 3
minutes for the unit to preheat.
NOTE: While preheating is strongly
recommended for best results, you can
skip it by pressing the PREHEAT button.
“ADD FOOD” will appear on the display.
Open the lid and place ingredients in the
crisper basket. Once the lid is closed,
cooking will begin and the timer will start
counting down.
NOTE: Convert traditional oven recipes by
reducing the temperature by 10°C. Check
food frequently to avoid overcooking.
NOTE: If you would like to use the probe
to just check your food’s internal outcome,
press MANUAL for 2 seconds and the
food’s internal temperature will appear on
the screen for 5 seconds.
Roast
1 Place cooking pot in the unit with the
indent on the pot aligned with the bump
on the main unit. Ensure the splatter
guard is in place, then close the lid.
2 Press the ROAST button. The default
temperature setting will display. Use the
set of arrows to the left of the display to
adjust the temperature.
3 Use the set of arrows to the right of
the display to adjust the cook time, in
1-minute increments up to 1 hour and
5-minute increments from 1 to 4 hours, or,
if using the probe, refer to the instructions
on pages 9–11.
4 Press START/STOP to begin preheating.
PRE will illuminate on the right side of the
display and the progress bar will begin
illuminating. It will take approximately 3
minutes for the unit to preheat.
5 When preheating is complete, the unit
will beep and “ADD FOOD” will appear
on the display.
6 Open the lid and place ingredients in
the pot. Once the lid is closed, cooking
will begin and the timer will start
counting down.
7 When cook time is complete, the unit will
beep and END will appear on the display.
NOTE: While preheating is strongly
recommended for best results, you can
skip it by pressing the PREHEAT button.
“ADD FOOD” will appear on the display.
Open the lid and place ingredients in
the cooking pot. Once the lid is closed,
cooking will begin and the timer will
start counting down.
NOTE: Convert traditional oven recipes by
reducing the temperature by 10°C. Check
food frequently to avoid overcooking.
NOTE: If you would like to use the probe
to check your food’s internal temperature,
press MANUAL for 2 seconds and the
food’s internal temperature will appear on
the screen for 5 seconds.
Bake pan
not included

ENGLISH
17
ninjakitchen.eu
16 ninjakitchen.eu
Dehydrate
1 Place cooking pot in the unit with the
indent on the pot aligned with the bump
on the main unit. Place a single layer of
ingredients in the pot. Then place the
crisper basket in the pot on top of the
ingredients and add another layer of
ingredients to the basket. Ensure the
splatter guard is in place, then close
the lid.
2 Press the DEHYDRATE button. The
default temperature setting will display.
Use the set of arrows to the left of the
display to adjust the temperature.
3 Use the set of arrows to the right of the
display to adjust the dehydration time, in
15-minute increments, up to 12 hours.
4 Press START/STOP to begin. (The unit
does not preheat in Dehydrate mode.)
5 When dehydration time is complete, the
unit will beep and END will appear on
the display.
Reheat
1 Place cooking pot in the unit with the
indent on the pot aligned with the
bump on the main unit. Place the crisper
basket in the pot, then close the lid.
2 Press the REHEAT button. The default
temperature setting will display. Use the
set of arrows to the left of the display to
adjust the temperature.
3 Use the up and down right arrows to set
the cook time, in 1-minute increments,
up to 1 hour, or follow the instructions on
the previous pages to set a temperature
using preset or manual.
4 Press START/STOP to begin preheating.
PRE will illuminate on the right side
of the display and the progress bar
will begin showing. It can take up to 3
minutes to preheat.
5 When preheating is complete, the unit
will beep and “ADD FOOD” will appear
on the display screen.
6 Open the lid and place ingredients
in the crisper basket. Once the lid is
closed, cooking will begin and the timer
will start counting down.
7 For best results, we recommend
shaking ingredients frequently. When
you open the lid, the unit will pause.
Use silicone-tipped tongs or oven
mitts to shake the basket. When done,
replace the basket and close the
lid
.
Cooking will automatically resume after
lid
is closed.
8 When cook time is complete, the unit
will beep and END will appear on the
display.
USING YOUR GRILL – CONT.
NOTE: If you would like to use the probe
to check your food’s internal temperature,
press MANUAL for 2 seconds and the
food’s internal temp will appear on the
screen for 5 seconds.

ENGLISH
18 19
ninjakitchen.eu ninjakitchen.eu
CLEANING YOUR GRILL
The unit should be cleaned thoroughly
after every use. Always let the appliance
cool before cleaning.
• Unplug the unit from the wall socket
before cleaning. Keep the lid open after
removing your food to allow the unit to
cool more quickly.
• The cooking pot, grill plate, crisper
basket, splatter guard, cleaning brush,
and any other included accessories are
dishwasher safe, except the probe.
DO NOT place the probe in the
dishwasher.
• For the best dishwasher cleaning
results, we recommend rinsing the grill
plate, crisper basket, splatter guard and
any other accessories with warm water
before placing them in the dishwasher.
• If hand-washing, we recommend using
the included cleaning brush to help
wash the parts. Use the opposite end
of the cleaning brush as a scraper to
assist with releasing baked-on sauces
or cheese. Air-dry or towel-dry all parts
after hand-washing.
• If food residue or grease are stuck on the
grill plate, splatter guard, or any other
removable part, soak in warm soapy
water before cleaning.
• Clean the splatter guard after every use.
Soaking the splatter guard overnight will
help soften the baked-on grease. After
soaking, use the cleaning brush to remove
the grease from the stainless steel frame
and front tabs.
• Deep clean the splatter guard by
putting it in a pan of water and boiling
it for 10 minutes. Then, rinse with room
temperature water and allow to dry
completely.
• To deep clean the probe, soak the
stainless steel tip and silicone grip in
warm, soapy water. DO NOT immerse the
cord or jack in water or any other liquid.
The probe storage compartment holder is
handwash only.
NOTE: NEVER use abrasive tools or
cleaners. NEVER immerse the main unit
in water or any other liquid.
NOTE: DO NOT use liquid cleaning
solution on or near the probe socket.
We recommend using compressed air
or a cotton swab to avoid damaging
the socket.
TROUBLESHOOTING
• “ADD FOOD” appears on the control panel display.
The unit has completed preheating and it is now time to add your ingredients.
• “Shut Lid” appears on the control panel display.
The lid is open and needs to be closed for the selected function to start.
• “Plug In” appears on the control panel display.
The probe is not plugged into the socket on the right side of the control panel. Plug the
probe in before proceeding. Press the probe in until you hear a click.
• “PRBE ERR” appears on the control panel display.
This means the unit timed out before food reached the set internal temperature. As a
protection for the unit, it can run for only certain lengths of time at specific temperatures.
• “E” appears on the control panel display.
The unit is not functioning properly. Please contact Customer Service at ninjakitchen.eu
• Why is my food overcooked or undercooked even though I used the probe?
It is important to insert the probe lengthwise into the thickest part of the ingredient
to get the most accurate reading. Make sure to allow food to rest for 3-5 minutes to
complete cooking. For more information, refer to the Using the Digital Cooking Probe
section.
• Why does the preheat progress bar not start from the beginning?
When the unit is warm from previously being used, it will not require the full preheating time.
• Can I cancel or override preheating?
Preheating is highly recommended for best results, but you can skip it by selecting the
PREHEAT button after you press the START/STOP button.
• Should I add my ingredients before or after preheating?
For best results, let the unit preheat before adding ingredients.
• Why is my unit emitting smoke?
When using the Grill function, always select the recommended temperature setting.
Recommended settings can be found in the Quick Start Guide and in the Inspiration
Guide. Make sure the splatter guard is installed.
• How do I pause the unit so I can check my food?
When the lid is opened during a cooking function, the unit will automatically pause.
• Will the probe grip melt if it touches the hot grill plate?
No, the grip is made of a high-temperature silicone that can handle the Ninja® Foodi® Max
Grill & Air Fryer’s high temperatures.
• My food is burned.
Do not add food until recommended preheat time is complete. For best results, check
progress throughout cooking, and remove food when desired level of outcome has been
achieved. Remove food immediately after the cook time is complete to avoid overcooking.
• Why does the unit have a 1-9 scale for the Beef Preset?
Perception of how well something is cooked diers. The 1-9 scale provides a wide range
of options for each level of cook so you can customise to your liking.

PRODUCT REGISTRATION
TWO (2) YEAR LIMITED GUARANTEE
When you buy a product in Germany as a consumer, you get the benefit of legal rights
relating to the quality of the product (your “statutory rights”). You can enforce these
statutory rights against your retailer. However, at Ninja we are so confident about the quality
of our products (the “Products”) that we give you an additional manufacturer’s guarantee of
up to two years. This guarantee only applies to the Product if it is bought in new and unused
condition. These terms and conditions relate to our guarantees only – your statutory rights as
a buyer are unaected. Please note that the 2 year guarantee is available in all EU countries
and in the UK if it stops being an EU country during the guarantee term.
The conditions below describe the prerequisites and scope of our guarantees which are
issued by SharkNinja Germany GmbH, Kurt–Blaum–Platz 8, 63450 Hanau (Germany) (“us”,
“our” or “we”). They do not aect your statutory rights or the obligations of your retailer
and your contract with them. The same applies if you have purchased the product directly
from Ninja.
Ninja® Guarantees
A household kitchen appliance constitutes a sizeable investment. Your new machine
needs to work properly for as long as possible. The guarantee it comes with is an important
consideration - and reflects how much confidence the manufacturer has in its product and
manufacturing quality.
Our customer service helpline (0800 000 9063) is open from 9.00am to 6.00pm Monday -
Friday. It’s free to call, and you’ll be put straight through to a Ninja representative. You’ll also
find online support at www.ninjakitchen.eu.
How do I register my guarantee?
You can register your guarantee online within 28 days of purchase. To save time, you’ll need
the following information about your machine:
• Model no.
• Serial Number (only if available)
• Date of purchase of the Product (receipt or delivery note)
To register online, please visit www.ninjakitchen.eu
IMPORTANT
• The guarantee covers your Product for 2 years starting on the date of purchase.
• Please keep the receipt at all times. Should you need to use your guarantee we will need
the receipt to verify the information supplied to us is correct. The inability to produce a
valid receipt will invalidate your guarantee.
What are the benefits of registering my guarantee?
When you register your guarantee, you can choose to receive our newsletter containing
tips, advice and competitions. Hear the latest news about new Ninja technology and
launches. If you register your guarantee online, you’ll get instant confirmation that
we’ve received your details.
For details of our privacy policy please visit www.ninjakitchen.eu
How long are our Products guaranteed for?
Our confidence in our design and quality control means that your Product is guaranteed
for a total of two years.
What is covered by the guarantee?
Repair or replacement (at Ninja’s discretion) of your Product, including all parts and labour in
case of any defect in design, materials and workmanship (including transport and shipping
costs). Our guarantee is in addition to your legal rights as a consumer.
What is not covered by the guarantee?
• Normal wear and tear.
• Accidental damage, faults caused by negligent use or care, misuse, neglect, careless
operation or handling of the kitchen appliance which is not in accordance with the Ninja®
Instruction Manual supplied with your machine.
• Use of the kitchen appliance for anything other than normal domestic household purposes.
• Use of parts not assembled or installed in accordance with the operating instructions.
• Use of parts and accessories which are not Ninja® Genuine Components.
• Faulty installation (except where installed by Ninja®).
• Repairs or alterations carried out by parties other than Ninja or its agents, Repairs or
alterations carried out by parties other than Ninja or its agents, unless you can show that
the repairs or alterations carried out by others are not related to the defect for which you
exercise the guarantee.
What happens when my guarantee runs out?
Ninja does not design products to last for a limited time. We do appreciate that there may
be a desire for our customers to want to repair their kitchen appliance after the guarantee
has elapsed. In this case please contact our free phone customer service help line and ask
about our guarantee program, on 0800 000 9063 .
Where can I buy genuine Ninja spares and accessories?
Ninja spares and accessories are developed by the same engineers who developed your
Ninja kitchen appliance. You’ll find a full range of Ninja spares, replacement parts and
accessories for all Ninja machines at www.ninjakitchen.eu
Please remember that using non-Ninja spares may invalidate your manufacturer's guarantee.
However, your statutory rights are unaected.
ENGLISH
20 21
ninjakitchen.eu ninjakitchen.eu

FRANÇAIS
NOUS VOUS REMERCIONS
d’avoir acheté l’appareil Gril et friteuse à air chaud Ninja® Foodi® Max
VEUILLEZ LIRE ATTENTIVEMENT
ET CONSERVER POUR
CONSULTATION ULTÉRIEURE.
CARACTÉRISTIQUES TECHNIQUES
Tension: 220-240V~, 50-60Hz
Watts: 2460W
CONSEIL: Vous trouverez les numéros
de modèle et de série sur l’étiquette du
codeQR située à l’arrière de l’appareil,
au niveau du câble d’alimentation.
ENREGISTREZ CES INFORMATIONS
Numéro de modèle: �������������
Numéro de série:: ���������������
Date de l’achat: ����������������
(garder un justificatif d’achat)
Magasin d'achat: ���������������
ENREGISTREZ VOTRE ACHAT
ninjakitchen.eu
Scannez le code QR avec
un appareil mobile
Ce marquage indique que ce
produit ne doit pas être jeté
avec d’autres déchets ménagers
dans toute l’UE. Pour prévenir
d’éventuels dommages sur
l’environnement ou la santé résultant de
la décharge non contrôlée des déchets,
recycler l’appareil de manière responsable
afin de favoriser la réutilisation rationnelle
des matériaux. Pour renvoyer votre
appareil usagé, utiliser les systèmes de
retour et de collecte ou contacter le
détaillant chez qui ce produit a été acheté.
Ceux-ci peuvent procéder au recyclage du
produit en toute sécurité.
22 23
ninjakitchen.eu ninjakitchen.eu
TABLE DES MATIÈRES
Mises en garde importantes ...........................24
Pièces .............................................. 26
Descriptif technique de votre gril ......................27
Boutons de fonctions ....................................27
Boutons de commande ..................................27
Avant la première utilisation ...........................27
Utilisation de votre gril ................................28
Grille anti-éclaboussures .................................28
Technologie GrillControl .................................28
Griller en plusieurs fournées ..............................28
Utiliser la sonde de cuisson digitale ...................29
Utiliser la sonde dans diérents scénarios de cuisson ...30
Insérer correctement la sonde .........................31
Fonctions de cuisson ................................32
Grill (Cuire au gril) ...................................32
Air Fry (Frire à l’air chaud) ...........................33
Roast (Rôtir) ........................................34
Bake (Cuire au four) .................................35
Dehydrate (Déshydrater) .............................36
Reheat (Réchauer) .................................37
Dépannage ..........................................38
Nettoyage ...........................................39
Enregistrement du produit ............................40

FRANÇAIS
MISES EN GARDE IMPORTANTES
APPAREIL DESTINÉ UNIQUEMENT À UN USAGE DOMESTIQUE • VEUILLEZ LIRE
ATTENTIVEMENT TOUTES LES INSTRUCTIONS AVANT D’UTILISER VOTRE APPAREIL
Veuillez lire attentivement toutes les instructions avant d’utiliser la Grill et
friteuse à air chaud
Lors de l’utilisation d’un appareil électrique, il faut toujours prendre quelques
précautions simples et respecter les consignes de sécurité qui suivent:
MISE EN GARDE
1 Pour éliminer tout risque de
suffocation pour les enfants, jeter
tous les éléments de l’emballage dès
le déballage de l’appareil.
2
Cet appareil peut être utilisé par
des personnes dont les capacités
mentales, sensorielles ou physiques
sont réduites, ou présentant
un manque d’expérience et de
connaissances, à condition qu’elles
soient surveillées ou aient
reçu des instructions sur la manière
d’utiliser l’appareil en toute sécurité,
et qu’elles comprennent les risques
liés à son utilisation.
3 Tenir l’appareil et son cordon
d’alimentation hors de portée des
enfants. NE PAS laisser les enfants
utiliser cet appareil. Redoubler de
vigilance en cas d’utilisation de
l’appareil à proximité d’enfants.
4 Cet appareil est uniquement destiné
à un usage domestique. NE PAS
utiliser cet appareil à des fins autres
que celles prévues. NE PAS utiliser
dans des véhicules en mouvement
ou sur des bateaux. NE PAS utiliser
l’appareil à l’extérieur. Une mauvaise
utilisation peut causer des blessures.
5 S’assurer que la surface est plane,
propre et sèche. NE PAS placer
l’appareil au bord du plan de travail
lorsqu’il est en cours d’utilisation.
6 TOUJOURS s’assurer que l’appareil
est correctement assemblé avant de
l’utiliser.
7 Prévoir un espace d’au moins 15,25cm
au-dessus et sur les côtés de l’appareil
pour permettre la circulation de l’air lors
de son fonctionnement.
8 NE PAS utiliser de rallonge. Un
cordon d’alimentation court est utilisé
pour réduire le risque que des enfants
l’attrapent, s’y emmêlent ou que des
personnes trébuchent sur un cordon
plus long.
9 Afin d’éviter un choc électrique, NE
PAS immerger le cordon, les prises ou
le boîtier de l’unité principale dans de
l’eau ou un autre liquide.
10 NE PAS utiliser l’appareil si le cordon
d’alimentation ou la prise est
endommagé(e). Inspecter
régulièrement l’appareil et le cordon
d’alimentation. Si l’appareil ne
fonctionne pas correctement ou a été
endommagé de quelque façon que
ce soit, arrêter immédiatement de
l’utiliser et appeler
le service d’assistance à la clientèle.
11 NE JAMAIS utiliser de prise de
courant située sous la surface du plan
de travail.
12 NE JAMAIS utiliser cet appareil avec
un dispositif de programmation
externe ou un système de
télécommande indépendant.
13 NE PAS placer l’appareil ou laisser le
cordon d’alimentation pendre du bord
d’une table ou d’un plan de travail et
éviter tout contact avec des surfaces
chaudes, notamment à proximité de
plaques de cuisson électriques ou au
gaz chaudes, ou dans un four chaud.
14 Utiliser uniquement les accessoires
recommandés fournis avec cet
appareil ou approuvés par SharkNinja.
L’utilisation d’accessoires non
recommandés par SharkNinja peut
entraîner des risques d’incendie ou de
blessures. CONSERVER CES INSTRUCTIONS
Invite à lire et à examiner les consignes pour comprendre le fonctionnement
et l’utilisation du produit.
Indique la présence d’un risque qui peut provoquer un dommage corporel,
la mort ou un dommage matériel important si la mise en garde représentée
par ce symbole n’est pas prise en compte.
Ne pas toucher les surfaces chaudes. Toujours porter des gants de protection
pour éviter les brûlures.
Pour usage intérieur et ménager uniquement.
15 Avant de placer les accessoires dans
le cuiseur, s’assurer qu’ils sont propres
et secs.
16 NE PAS utiliser l’appareil sans la cuve
de cuisson amovible et la grille anti-
éclaboussures.
17 TOUJOURS s’assurer que le couvercle
est complètement fermé avant
utilisation.
18 NE PAS déplacer l’appareil lorsqu’il est
en cours d’utilisation.
19 NE PAS couvrir l’entrée ou la
sortie d’air pendant que l’appareil
fonctionne. Ceci provoquerait
une cuisson inégale et pourrait
endommager l’appareil ou
le faire surchauffer.
20 NE PAS toucher les surfaces chaudes.
Les surfaces de l’appareil sont chaudes
pendant et après son utilisation.
Pour éviter toute brûlure ou blessure,
TOUJOURS utiliser des maniques ou
des gants de cuisine isolants, et utiliser
les poignées et boutons prévus à cet
effet.
21 NE PAS toucher les accessoires
pendant ou immédiatement après la
cuisson. La plaque à griller et le bac
à cuisson deviennent extrêmement
chauds lors du processus de cuisson.
Éviter tout contact physique en
retirant l’accessoire de l’appareil.
Pour éviter toute brûlure ou blessure,
prendre TOUJOURS les précautions
nécessaires lors du contact avec le
produit. Utilisation recommandée
d’ustensiles à long manche et de
maniques ou de gants
de cuisine isolants.
22 NE PAS utiliser cet appareil pour la
friture.
23 N’APPROCHEZ PAS vos mains du
câble du thermomètre de cuisson
numérique lorsque celui-ci est en
marche afin d’éviter de vous brûler ou
de vous ébouillanter.
24 Le thermomètre de cuisson
numérique ne remplace PAS un
thermomètre pour aliments externe.
25 Pour éviter toute maladie éventuelle,
TOUJOURS utiliser un thermomètre
pour vérifier que vos aliments sont
cuits aux températures recommandées.
26
En cas de feu d’huile ou si l’appareil
émet de la fumée noire, le débrancher
immédiatement. Attendre que l’appareil
arrête d’émettre de la fumée avant de
retirer les accessoires de cuisson.
27 Veuillez consulter la section Nettoyage
et entretien pour l’entretien régulier de
l’appareil.
28 Pour débrancher, mettre n’importe quel
bouton sur «off» (arrêt), puis retirer de
la prise lorsque l’appareil n’est pas
utilisé et avant de le nettoyer.
29 Laisser l’appareil refroidir avant de le
nettoyer, de le démonter, d’ajouter ou
de retirer des pièces, ou de le ranger.
30 NE PAS nettoyer avec des tampons
abrasifs métalliques. Des morceaux
peuvent se détacher du tampon et
toucher des composants électriques,
créant ainsi un risque d’électrocution.
31 Le nettoyage et la maintenance par
l’utilisateur ne doivent pas être
effectués par des enfants.
24 25
ninjakitchen.eu ninjakitchen.eu

FRANÇAIS
26 27
ninjakitchen.eu ninjakitchen.eu
1 Retirez tous les matériaux d’emballage, les étiquettes et le ruban adhésif de l’appareil.
2 Retirez tous les accessoires de l’emballage et lisez attentivement ce manuel. Veuillez prêter une
attention toute particulière aux instructions de fonctionnement, aux avertissements et aux mises en
garde importantes afin d’éviter tout risque de blessure ou de dommage matériel.
3 Lavez la plaque à griller, la grille anti-éclaboussures, le bac à cuisson, la brosse et la cuve de cuisson
dans de l’eau tiède savonneuse, puis rincez et séchez soigneusement. Tous les accessoires, à
l’exception de la sonde, peuvent aller au lave-vaisselle. Ne lavez JAMAIS l’unité principale ou la sonde
au lave-vaisselle.
AVANT LA PREMIÈRE UTILISATION
BOUTONS DE FONCTIONS
GRILL (Cuire au gril) Gril uniforme en intérieur et
création de marques de gril ainsi que d’une saveur
grillée.
AIR FRY (frire à l’air chaud) Pour donner du
croustillant aux aliments, avec peu ou pas d’huile.
BAKE (cuire au four) Cuire des gâteaux, pâtisseries,
desserts, etc.
ROAST (rôtir) Préparer des viandes tendres,
légumes rôtis, etc.
DEHYDRATE (déshydrater) Déshydrater vos
viandes, fruits et
légumes pour des petits en-cas sains.
REHEAT (réchauer) Rendre aux restes tout leur
croustillant en les réchauant en douceur.
BOUTONS DE COMMANDE
BOUTON marche/arrêt Une fois l’appareil
branché, appuyez sur le bouton marche/arrêt
pour allumer
l’appareil. Si vous appuyez sur le bouton
pendant la cuisson
, la fonction de cuisson en cours
s’arrêtera et l’appareil s’éteindra.
Flèches de gauche Les flèches haut et bas
situées à gauche de l’écran permettent de régler la
température de cuisson dans toutes les fonctions, ou
de définir la cuisson à cœur lorsque vous utilisez les
boutons PRESET et MANUAL.
Bouton MANUAL (MANUEL) Permet d’utiliser
l’écran d’achage afin de régler manuellement
la cuisson à cœur avec la sonde. Ce bouton ne
fonctionne pas avec la fonction Déshydrater.
Bouton PRESET (PRÉRÉGLAGE) Permet d’utiliser
l’écran d’achage afin de régler la sonde, le type
d’aliment et la cuisson à cœur selon les températures
préréglées. Ce bouton ne fonctionne pas avec la
fonction Déshydrater.
Flèches de droite Les flèches haut et bas
situées à droite de l’écran permettent de définir
le type d’aliment lorsque vous utilisez la fonction
PRESET ou de régler le temps de cuisson lorsque
vous n’utilisez pas la sonde Foodi.
Bouton START/STOP (MARCHE/ARRÊT) Après
avoir sélectionné la durée et la température, appuyez
sur le bouton START/STOP (MARCHE/ARRÊT) pour
démarrer la cuisson.
Mode Standby (veille) En l’absence d’interaction
avec le panneau de commande pendant
10minutes et si l’unité n’est pas en marche,
celle-ci passe en mode Standby et
le panneau de commande s’estompe.
Préchauage Si l’unité est en cours de
préchauage, une barre de progression s’ache sur
l’écran et le bouton PREHEAT s’allume. Pour éteindre
le préchauage, appuyez sur le bouton PREHEAT.
«ADD FOOD» (AJOUTER DES ALIMENTS) est
ensuite aché sur l’unité.
L’écran du panneau de commande ache l’heure au format HH:MM.
L’écran sur l’illustration de droite ache 20minutes.
Rangement de sonde
intégré
Grille anti-
éclaboussures
amovible
Couvercle
Unité principale
(câble d’alimentation
non illustré)
Plaque à griller
Bac à cuisson
Marmite
Panneau de
commande
Sonde de cuisson
numérique
Brosse de nettoyage
double face
REMARQUE: Pour ajuster la température
ou le temps au cours de la cuisson, utilisez
les flèches haut et bas. La cuisson reprendra
ensuite selon les réglages définis.
Piques de brochettes
(non incluses pour tous les modèles)
Pour commander des pièces et accessoires supplémentaires rendez-vous sur ninjakitchen.eu
PIÈCES DESCRIPTIF TECHNIQUE DE VOTRE GRIL

FRANÇAIS
4 Appuyez sur PRESET et utilisez les flèches
à droite de l’écran pour sélectionner le type
d’aliment. Utilisez ensuite les flèches de gauche
pour régler la cuisson à cœur de vos aliments
(entre saignant et à point).
Si vous utilisez le bouton MANUAL, inspirez-vous
des temps de cuisson à cœur recommandés ci-
dessous.
5 Placez l’accessoire requis pour la fonction de
cuisson que vous avez sélectionnée dans l’unité,
et fermez le couvercle. Appuyer sur START/STOP
pour démarrer le préchauage.
UTILISER LA SONDE
DE CUISSON DIGITALE
Avant la première utilisation
Assurez-vous que la prise de la sonde ne présente
aucun résidu et que le câble n’est pas emmêlé
avant le branchement.
1 Faites glisser la trappe du compartiment de
rangement de la sonde vers la droite et l’extérieur
de l’unité. Déroulez ensuite le câble hors du
compartiment pour sortir la sonde.
2 Branchez la sonde dans la prise. Appuyez
fermement sur la fiche jusqu’à ce qu’elle s’enfonce
à fond. Replacez la trappe du compartiment de
rangement sur le côté de l’unité.
3 Une fois la sonde branchée,
celle-ci s’active et allume les boutons PRESET
et MANUAL. Sélectionnez la fonction et la
température de cuisson souhaitées.
28 29
ninjakitchen.eu ninjakitchen.eu
UTILISATION DE VOTRE GRIL
TECHNOLOGIE GRILLCONTROL
Lorsque vous utilisez la fonction Grill, vous devez
régler la température de la plaque à griller. Vous
trouverez ci-dessous les niveaux de température
recommandés pour les ingrédients communs.
Grille ANTI-ÉCLABOUSSURES
Située sous le couvercle, la grille anti-
éclaboussures protège la résistance. Assurez-vous
systématiquement que la grille anti-éclaboussures
est installée lorsque vous utilisez l’appareil. En cas
contraire, un dépôt d’huile se forme sur la résistance
et peut provoquer l’apparition de fumée.
Retrait de la grille anti-éclaboussures
Retirez la grille anti-éclaboussures pour le nettoyage
après chaque utilisation. Une fois que la grille a
complètement refroidi, retirez-la en poussant
le bouton situé en haut à droite vers l’arrière du
couvercle. Cela libère la grille anti-éclaboussures,
vous permettant de la faire sortir de la fente sur la
partie arrière du couvercle.
Installation de la grille anti-éclaboussures
Pour poser la grille, faites-la glisser sous la languette
fixe du côté gauche. Insérez le tamis anti-fumée de
telle sorte que ses fentes soient alignées avec celles
de l’anneau fixe de protection contre la chaleur.
Puis pressez doucement la grille anti-éclaboussures
jusqu’à ce qu’elle s’enclenche dans le loquet du
devant du couvercle.
REMARQUE: Il est inutile de définir un temps
de cuisson. L’appareil éteint automatiquement
la résistance et vous avertit lorsque la cuisson
est terminée.
REMARQUE: L’appareil peut générer de la
fumée pendant la cuisson d’aliments, ou s’il est
réglé à une température plus élevée que celle
recommandée. Pour plus de tableaux de cuisson,
consultez votre Guide d’inspiration ou rendez-
vous sur le site ninjakitchen.eu..
REMARQUE: Pour éviter la fumée, nous
recommandons l’utilisation d’huile végétale,
d’huile de coco, d’avocat ou de pépins de raisin
à la place de l’huile d’olive. Une huile de cuisson
qui a dépassé son point de fumée peut altérer
les aliments en leur donnant une saveur brûlée
et âcre.
LOW
(200°C)
MED
(230°C)
HI
(250°C)
MAX
(260°C)
• Bacon
• Saucisses
• Utilisation
d’une
sauce
barbecue
épaisse
• Viandes
surgelées
• Viande
marinée/
en sauce
• Steaks
• Poulet
• Hamburgers
• Hot-dogs
• Brochettes
à la viande
• Légumes
• Fruits
• Pizzas
• Fruits de
mer frais/
surgelés
• Brochettes
de légumes
Utilisation du gril après l’utilisation
d’une autre fonction
Si l’unité est déjà chaude suite à l’utilisation d’une
autre fonction, «ADD FOOD» (AJOUTER DES
ALIMENTS) peut apparaître directement sur
l’écran. Il est recommandé de laisser la plaque à
griller se réchauer pendant au moins 6 minutes
avant de mettre des ingrédients dessus.
Griller en plusieurs fournées
Si vous faites plus de deux fournées consécutives,
il est recommandé de vider la graisse et
l’huile de la cuve de cuisson amovible. Il est
également VIVEMENT recommandé de nettoyer
la protection anti-éclaboussures entre chaque
utilisation. Ceci permettra d’éviter à l’huile de
prendre feu et de produire de la fumée.
Si vous souhaitez passer le processus de
préchauage, appuyez sur le bouton PREHEAT.
TYPE
D’ALIMENT: RÉGLER SUR:
Poisson Entre saignant et à point (50˚C)
À point (55˚C)
Entre à point et bien cuit (60˚C)
Bien cuit (65˚C)
Poulet/dinde Bien cuit (75˚C)
Porc Entre saignant et à point (50˚C)
À point (55˚C)
Entre à point et bien cuit (65˚C)
Bien cuit (70˚C)
Bœuf/agneau Saignant (50˚C)
Entre saignant et à point (55˚C)
À point (60˚C)
Entre à point et bien cuit (65˚C)
Bien cuit (70˚C)
REMARQUE: Vous cuisinez diérentes viandes
ou cuissons? Consultez la page30 pour plus
d’informations sur la programmation.
REMARQUE: Veuillez vous référer aux
recommandations de la Food Standards Agency
(Royaume-Uni) pour obtenir les températures de
cuisson sûre des aliments.
REMARQUE: Les niveaux de cuisson préréglés
pour le BŒUF/AGNEAU sont inférieurs aux
recommandations normales, car l’appareil tient
compte de la poursuite de la cuisson liée à la
chaleur résiduelle de 5 à 10°C.
Encoche de
l’anneau de
protection
contre la
chaleur
Appuyez sur la
languette
IMPORTANT: N’APPROCHEZ PAS vos mains du
câble de la sonde de cuisson numérique lorsque
celle-ci est en marche afin d’éviter de vous brûler
ou de vous ébouillanter.

FRANÇAIS
TYPE D’ALIMENT: PLACEMENT CORRECT INCORRECT
Steaks
Côtes de porc
Côtes d’agneau
Blancs de poulet
Hamburgers
Filets
Filets de poisson
• Insérez le thermomètre
horizontalement au
centre de la pièce la plus
épaisse.
• Assurez-vous que l’embout
du thermomètre est
inséré tout droit dans le
centre de la pièce,
et non incliné vers le bas
ou vers le haut.
• Assurez-vous que le
thermomètre se trouve à
proximité
de l’os (sans le toucher) et
à distance de
corps gras ou de cartilage.
REMARQUE: La partie la
plus épaisse du filet n’est pas
toujours située au centre. Il
est essentiel que l’extrémité
du thermomètre se trouve
dans la partie la plus épaisse
pour obtenir les résultats
souhaités.
Poulet entier • Insérez le thermomètre
horizontalement dans la
partie la plus épaisse du
filet, parallèle à l’os (sans le
toucher).
• Assurez-vous que le haut
se trouve au centre de la
partie la plus épaisse du
filet et ne le traverse pas de
part en part jusque dans la
cavité.
6 Lorsque l’appareil est en cours de préchauage,
insérez la sonde horizontalement au centre de la
partie la plus épaisse de la pièce à cuire.
Consultez le tableau sur la page adjacente
pour plus d’informations sur le positionnement
de la sonde.
7 Lorsque le préchauage est terminé et que
«ADD FOOD» (AJOUTER DES ALIMENTS)
apparaît à l’écran, ouvrez le couvercle, placez
les aliments avec la sonde dans l’unité, et
fermez le couvercle sur le câble de la sonde.
8 La barre de progression en haut de l’écran
indique les étapes de la cuisson: les étapes
clignotent lorsqu’elles sont en cours jusqu’à la
cuisson souhaitée.
9 L’appareil s’arrête automatiquement lorsque
la cuisson est presque terminée car il tient
compte de la poursuite de la cuisson liée à la
chaleur résiduelle. GET FOOD (SORTIR LES
ALIMENTS) apparaît à l’écran.
10 Transférez la pièce de protéine dans une assiette.
REST (REPOS) apparaît à l’écran. La pièce
continue à cuire pendant 3 à 5minutes. Il s’agit
d’une étape importante. En eet, l’absence de
repos peut entraîner une sous-cuisson. Le temps
de cuisson avec la chaleur résiduelle varie selon la
taille de la pièce, la découpe et le type de pièce.
31
ninjakitchen.eu
30 ninjakitchen.eu
UTILISER LA SONDE DANS DIFFÉRENTS
SCÉNARIOS DE CUISSON:
Cuire 2pièces de protéine ou plus de la même
taille avec diérentes cuissons:
Insérez la sonde dans la pièce présentant le
niveau de cuisson à cœur attendu le plus élevé.
Utilisez la fonction Preset (Préréglage) pour
sélectionner le niveau de cuisson, puis contrôlez
la barre de progression. Lorsque le niveau de
cuisson le moins élevé est atteint pour cette
pièce, retirez-la tout en laissant la sonde dans
l’appareil. Poursuivez la cuisson de la pièce
restante jusqu’à atteindre le niveau de cuisson
souhaité.
Cuire 2pièces de protéine ou plus
de tailles diérentes:
Insérez la sonde dans la plus petite pièce et
utilisez la fonction Preset (Préréglage) pour
sélectionner le niveau de cuisson. Lorsque la
cuisson est terminée pour cette pièce, sortez-la
de l’appareil. Positionnez ensuite la sonde dans
la pièce la plus imposante et utilisez la fonction
Preset (Préréglage) pour sélectionner le niveau
de cuisson.
Cuire 2pièces ou plus
de protéines diérentes:
Insérez la sonde dans la pièce présentant le
niveau de cuisson le moins élevé attendu.
Utilisez la fonction Manuel (Manuel) pour
sélectionner la température à cœur souhaitée.
Lorsque la cuisson est terminée pour cette
pièce, sortez-la de l’appareil. Positionnez
ensuite la sonde dans l’autre pièce et utilisez la
fonction Manuel (Manuel) pour sélectionner la
température à cœur souhaitée.
UTILISATION DE VOTRE GRIL (SUITE)
REMARQUE: Pour contrôler la température
à cœur des autres pièces, appuyez quelques
secondes sur MANUAL (MANUEL) et insérez le
thermomètre dans chaque pièce.
REMARQUE: La sonde sera BRÛLANTE. Utilisez
des gants ou une pince pour la sortir des aliments.
COMMENT INSÉRER LA SONDE
REMARQUE: N’UTILISEZ PAS la sonde avec des aliments congelés ou des morceaux supérieurs à 1,5cm.
REMARQUE: Avec les fonctions Roast (Rôtir)
et Grill (Gril), l’appareil émet un signal sonore et
ache FLIP (RETOURNER). Cette action n’est
pas obligatoire, mais elle est recommandée
Veillez à bien placer la sonde. L’unité doit être
complètement à l’intérieur de l’appareil.

FRANÇAIS
32 33
ninjakitchen.eu ninjakitchen.eu
5 Lorsque le préchauage est terminé, l’appareil
sonne et «ADD FOOD» (AJOUTER DES
ALIMENTS) apparaît sur l’écran.
6 Ouvrez le couvercle et mettez les ingrédients
dans le bac à cuisson. Une fois le couvercle
fermé, la cuisson commence et la minuterie se
met en marche.
7 Pour de meilleurs résultats, nous
recommandons de secouer fréquemment les
ingrédients. Lorsque vous ouvrez le couvercle,
l’appareil se met en pause. Utilisez des gants
ou des pinces avec des embouts en silicone
pour secouer le panier. Ensuite, remettez le
panier en place et fermez le
couvercle
. La
cuisson reprendra automatiquement une fois
le
couvercle
refermé.
8 Lorsque le temps de cuisson est atteint, l’appareil
sonne et END (FIN) apparaît sur l’écran.
Air Fry (Frire à l’air chaud)
1 Introduisez la cuve de cuisson dans l’appareil
en alignant l’encoche de la cuve avec la saillie
de l’unité principale. Placez le bac à cuisson
dans la cuve. Assurez-vous que la grille anti-
éclaboussures est bien en place et fermez le
couvercle.
2 Appuyez sur le bouton AIR FRY (Frire à
l’air chaud). Le réglage par défaut de la
température s’ache. Utilisez les flèches à
gauche de l’écran pour régler la température.
3 Utilisez les flèches à droite de l’écran pour régler
le temps de cuisson, par paliers de 1minute
jusqu’à 1heure ou, si vous utilisez la sonde,
consultez les instructions aux pages 29 à 31.
4 Appuyer sur START/STOP pour démarrer le
préchauage. La barre de progression s’illumine.
Le préchauage de l’appareil dure environ
3minutes.
4 Appuyer sur START/STOP pour démarrer
le
préchauage.
La barre de progression s’illumine.
Le préchauage de l’appareil
dure environ 10minutes.
5 Lorsque le préchauage est terminé, l’appareil
sonne et «ADD FOOD» (AJOUTER DES
ALIMENTS) apparaît sur l’écran.
6 Ouvrez le couvercle et placez les ingrédients
sur la plaque à griller. Une fois le couvercle
fermé, la cuisson commence et la minuterie se
met en marche.
7 Lorsque le temps de cuisson est atteint, l’appareil
sonne et END (FIN) apparaît sur l’écran.
FONCTIONS DE CUISSON
Branchez l’appareil, puis appuyez sur le bouton
marche/arrêt pour l’allumer.
Grill (Cuire au gril)
1 Introduisez la cuve de cuisson dans l’appareil
en alignant l’encoche de la cuve avec la saillie
arrière de l’unité principale. Puis placez la
plaque à griller dans la cuve, les poignées
tournées vers le haut. Assurez-vous que la
grille anti-éclaboussures est bien en place et
fermez le couvercle.
2 Appuyez sur le bouton GRILL (CUIRE AU
GRIL). Le réglage par défaut de la température
s’ache. Utilisez les flèches à gauche de l’écran
pour régler la température.
3 Utilisez les flèches à droite de l’écran pour régler
le temps de cuisson, par paliers de 1minute
jusqu’à 30 minutes ou, si vous utilisez la sonde,
consultez les instructions aux pages 29 à 31.
REMARQUE: Si vous utilisez la sonde, consultez
les instructions aux pages 29 à 31.
REMARQUE: Le préchauage est fortement
recommandé pour obtenir de meilleurs résultats,
mais vous pouvez l’omettre en appuyant sur
le bouton PREHEAT (PRÉCHAUFFER). «ADD
FOOD» (AJOUTER DES ALIMENTS) s’ache
à l’écran. Ouvrez le couvercle et mettez les
ingrédients dans le bac à cuisson. Une fois le
couvercle fermé, la cuisson commence et la
minuterie se met en marche.
REMARQUE: Si vous souhaitez utiliser la sonde
pour contrôler la température à cœur de vos
aliments, appuyez sur MANUAL (MANUEL)
pendant 2secondes. La température à cœur
s’ache à l’écran pendant 5secondes.
UTILISATION DE VOTRE GRIL (SUITE)
REMARQUE: Si vous réalisez une cuisson
groupée, consultez la page28 pour plus
d’informations.
REMARQUE: Si vous souhaitez utiliser la
sonde pour contrôler la température à cœur
de vos aliments, appuyez sur MANUAL
(MANUEL) pendant 2secondes. La
température à cœur s’ache à l’écran pendant
5secondes.

FRANÇAIS
5 Lorsque le préchauage est terminé, l’appareil
sonne et «ADD FOOD» (AJOUTER DES
ALIMENTS) apparaît sur l’écran.
6 Ouvrez le couvercle et introduisez les
ingrédients dans la cuve ou placez directement
votre plat de cuisson dans la cuve. Fermez le
couvercle pour commencer la cuisson. Une fois
le couvercle fermé, la cuisson commence et la
minuterie se met en marche.
7 Lorsque le temps de cuisson est atteint, l’appareil
sonne et le mot END (FIN) apparaît sur l’écran.
Bake (Cuire au four)
1 Introduisez la cuve de cuisson dans l’appareil
en alignant l’encoche de la cuve avec la saillie
de l’unité principale. Assurez-vous que la grille
anti-éclaboussures est bien en place et fermez le
couvercle.
2 Appuyez sur le bouton BAKE (CUIRE AU
FOUR). Le réglage par défaut de la température
s’ache. Utilisez les flèches à gauche de l’écran
pour régler la température.
3 Utilisez les flèches à droite de l’écran pour régler le
temps de cuisson, par paliers de 1minute jusqu’à
1heure, par paliers de 5minutes de 1 à 2heures ou,
si vous utilisez la sonde, consultez les instructions
aux pages 29 à 31.
4 Appuyer sur START/STOP pour démarrer le
préchauage. PRE s’allume sur le côté droit
de l’écran, ainsi que la barre de progression. Le
préchauage de l’appareil dure environ 3minutes.
4 Appuyer sur START/STOP pour démarrer le
préchauage. PRE s’allume sur le côté droit
de l’écran, ainsi que la barre de progression.
Le préchauage de l’appareil dure environ
3minutes.
5 Lorsque le préchauage est terminé, l’appareil
sonne et «ADD FOOD» (AJOUTER DES
ALIMENTS) apparaît sur l’écran.
6 Ouvrez le couvercle et mettez les ingrédients
dans la cuve. Une fois le couvercle fermé, la
cuisson commence et la minuterie se met en
marche.
7 Lorsque le temps de cuisson est atteint, l’appareil
sonne et le mot END (FIN) apparaît sur l’écran.
Roast (Rôtir)
1 Introduisez la cuve de cuisson dans l’appareil
en alignant l’encoche de la cuve avec la saillie
de l’unité principale. Assurez-vous que la grille
anti-éclaboussures est bien en place et fermez le
couvercle.
2 Appuyez sur le bouton ROAST (RÔTIR). Le
réglage par défaut de la température s’ache.
Utilisez les flèches à gauche de l’écran pour
régler la température.
3 Utilisez les flèches à droite de l’écran pour régler
le temps de cuisson, par paliers de 1minute
jusqu’à 1heure, par paliers de 5minutes de 1 à
4heures ou, si vous utilisez la sonde, consultez les
instructions aux pages 29 à 31.
34 35
ninjakitchen.eu ninjakitchen.eu
REMARQUE: Le préchauage est fortement
recommandé pour obtenir de meilleurs
résultats, mais vous pouvez l’omettre
en appuyant sur le bouton PREHEAT
(PRÉCHAUFFER). «ADD FOOD» (AJOUTER
DES ALIMENTS) s’ache à l’écran. Ouvrez le
couvercle et mettez les ingrédients dans le bac
à cuisson. Une fois le couvercle fermé, la cuisson
commence et la minuterie se met en marche.
REMARQUE: Réalisez vos recettes utilisant un
four traditionnel en réduisant la température de
10°C. Vérifiez régulièrement les aliments pour
ne pas trop les faire cuire.
REMARQUE: Si vous souhaitez utiliser la sonde
pour contrôler la température à cœur de vos
aliments, appuyez sur MANUAL (MANUEL)
pendant 2secondes. La température à cœur
apparaît sur l’écran pendant 5secondes.
REMARQUE: Le préchauage est fortement
recommandé pour obtenir de meilleurs résultats,
mais vous pouvez l’omettre en appuyant sur
le bouton PREHEAT (PRÉCHAUFFER). «ADD
FOOD» (AJOUTER DES ALIMENTS) s’ache
à l’écran. Ouvrez le couvercle et mettez les
ingrédients dans la cuve de cuisson. Une fois
le couvercle fermé, la cuisson commence et la
minuterie se met en marche.
REMARQUE: Réalisez vos recettes utilisant un
four traditionnel en réduisant la température de
10°C. Vérifiez régulièrement les aliments pour ne
pas trop les faire cuire.
REMARQUE: Si vous souhaitez utiliser la sonde
pour contrôler la température à cœur de vos
aliments, appuyez sur MANUAL (MANUEL)
pendant 2secondes. La température à cœur
s’ache à l’écran pendant 5secondes.
Plat de cuisson
non inclus.
UTILISATION DE VOTRE GRIL (SUITE)

FRANÇAIS
5 Lorsque le préchauage est terminé, l’appareil
sonne et «ADD FOOD» (AJOUTER DES
ALIMENTS) clignote sur l’écran.
6 Ouvrez le couvercle et mettez les ingrédients
dans le bac à cuisson. Une fois le couvercle
fermé, la cuisson commence et la minuterie se
met en marche.
7 Pour de meilleurs résultats, nous
recommandons de secouer fréquemment les
ingrédients. Lorsque vous ouvrez le couvercle,
l’appareil se met en pause. Utilisez des gants
ou des pinces avec des embouts en silicone
pour secouer le panier. Ensuite, remettez le
panier en place et fermez le
couvercle
. La
cuisson reprendra automatiquement une fois le
couvercle
refermé.
8 Lorsque le temps de cuisson est atteint, l’appareil
sonne et END (FIN) apparaît sur l’écran.
Reheat (Réchauer)
1 Introduisez la cuve de cuisson dans l’appareil en
alignant l’encoche de la cuve avec la saillie de
l’unité principale. Placez le bac à cuisson dans la
cuve, puis fermez le couvercle.
2 Appuyez sur le bouton REHEAT
(RÉCHAUFFER). Le réglage par défaut de la
température s’ache. Utilisez les flèches à
gauche de l’écran pour régler la température.
3 Utilisez les flèches haut et bas à droite de
l’écran pour régler le temps de cuisson, par
paliers de 1minute jusqu’à 1heure, ou consultez
les instructions des pages précédentes pour
régler une température à l’aide des boutons de
préréglage ou manuel.
4 Appuyer sur START/STOP pour démarrer le
préchauage. PRE s’allume sur le côté droit de
l’écran, et la barre de progression s’ache. Le
préchauage peut prendre jusqu’à 3minutes.
Dehydrate (Déshydrater)
1 Introduisez la cuve de cuisson dans l’appareil en
alignant l’encoche de la cuve avec la saillie de
l’unité principale. Introduisez une seule couche
d’ingrédients dans la cuve. Placez ensuite le
bac à cuisson dans la cuve au-dessus des
ingrédients, et ajoutez une couche d’ingrédients
dans le bac. Assurez-vous que la grille anti-
éclaboussures est bien en place et fermez
le couvercle.
2 Appuyez sur le bouton DEHYDRATE
(Déshydrater). Le réglage par défaut de la
température s’ache. Utilisez les flèches à
gauche de l’écran pour régler la température.
3 Utilisez les flèches à droite de l’écran pour régler
le temps de déshydratation, par paliers de
15minutes jusqu’à 12heures.
37
ninjakitchen.eu
36 ninjakitchen.eu
4 Appuyer sur START/STOP pour démarrer la
cuisson. (L’unité ne réalise pas de préchauage
en mode Dehydrate).
5 Lorsque le temps de déshydratation est
terminé, l’appareil sonne et END (FIN) apparaît
sur l’écran.
UTILISATION DE VOTRE GRIL (SUITE)
REMARQUE: Si vous souhaitez utiliser la sonde
pour contrôler la température à cœur de vos
aliments, appuyez sur MANUAL (MANUEL)
pendant 2secondes. La température à cœur
s’ache à l’écran pendant 5secondes.

FRANÇAIS
38 39
ninjakitchen.eu ninjakitchen.eu
NETTOYAGE DE VOTRE GRILL
L’appareil doit être soigneusement nettoyé
après chaque utilisation. Laissez toujours
l’appareil refroidir avant de le nettoyer.
• Débranchez l’appareil avant le nettoyage.
Laissez le couvercle ouvert après avoir
retiré les aliments pour permettre un
refroidissement plus rapide de l’appareil.
• La cuve de cuisson, la plaque à griller, le
bac à cuisson, la grille anti-éclaboussures,
la brosse et tous les éventuels accessoires
supplémentaires peuvent aller au lave-
vaisselle, à l’exception de la sonde.
NE METTEZ PAS la sonde au lave-vaisselle.
• Pour obtenir de meilleurs résultats, nous vous
recommandons de rincer la plaque à griller, le
bac à cuisson, la grille anti-éclaboussures et
tout autre accessoire à l’eau chaude avant de
les mettre au lave-vaisselle.
• En cas de lavage à la main, nous vous
recommandons d’utiliser la brosse fournie
pour nettoyer les diérentes pièces. Utilisez
l’extrémité opposée de la brosse comme une
raclette pour ôter les résidus de sauce ou de
fromage cuits. Laissez toutes les pièces sécher
à l’air libre ou essuyez-les après le nettoyage
à la main.
• Si des résidus d’aliment ou de la graisse
attachent à la plaque à griller, la grille anti-
éclaboussures ou toute autre pièce amovible,
faites tremper la pièce dans une eau chaude
additionnée de savon avant le nettoyage.
• Nettoyez la grille anti-éclaboussures après
chaque utilisation. Laisser tremper toute la nuit
la grille anti-éclaboussures permettra de ramollir
la graisse cuite qui attache. Après le trempage,
utilisez la brosse pour enlever la graisse du
cadre en acier inoxydable et des languettes
avant.
• Réalisez un nettoyage approfondi de la grille
anti-éclaboussures en la mettant dans une
casserole d’eau bouillante pendant 10minutes.
Rincez ensuite avec de l’eau à température
ambiante, et laissez sécher complètement.
• Pour réaliser un nettoyage approfondi de la
sonde, immergez l’embout en acier inoxydable
et la poignée en silicone dans une eau chaude
additionnée de savon. NE TREMPEZ PAS le
câble ou la prise dans de l’eau ou tout autre
liquide.
Le support du compartiment de rangement de la
sonde est lavable à la main uniquement.
REMARQUE: NE JAMAIS utiliser
d’instruments ou de nettoyants abrasifs. NE
JAMAIS immerger l’unité principale dans de
l’eau ou d’autres liquides.
REMARQUE: NE PAS utiliser de produit de
nettoyage liquide sur ou à proximité de la
prise de la sonde. Nous vous recommandons
d’utiliser un coton-tige ou de l’air comprimé
pour éviter d’endommager
la prise.
RÉSOLUTION DES PROBLÈMES
• «ADD FOOD» (AJOUTER DES ALIMENTS) s’ache sur l’écran du panneau de commande.
L’appareil a terminé le préchauage et il est maintenant temps d’ajouter vos ingrédients.
• «Shut Lid» (Fermer le couvercle) s’ache sur l’écran du panneau de commande.
Le couvercle est ouvert et doit être fermé pour que la fonction sélectionnée soit activée.
• «Plug In» (Brancher) s’ache sur l’écran du panneau de commande.
La sonde n’est pas branchée dans la prise du côté droit du panneau de commande. Branchez la
sonde avant de poursuivre. Appuyez sur la sonde jusqu'au déclic.
• «PRBE ERR» (ERR SONDE) s’ache sur l’écran du panneau de commande.
Cette erreur signifie que la cuisson s’est interrompue avant que les aliments n’atteignent la
température à cœur souhaitée. Afin de protéger l’appareil, la cuisson ne peut fonctionner que
pendant un certain temps à des températures spécifiques.
• «E» s’ache sur l’écran du panneau de commande.
L’appareil ne fonctionne pas correctement. Veuillez contacter le service client sur ninjakitchen.eu
• Pour quelle raison mes aliments sont-ils sur-cuits ou sous-cuits, même si j’utilise la sonde?
Il est important d’insérer la sonde sur toute sa longueur dans la partie la plus épaisse de la pièce
pour obtenir le relevé le plus précis. Veillez à laisser reposer les aliments 3 à 5minutes pour
finaliser la cuisson. Pour plus d’informations, consultez la section Utiliser la sonde de cuisson
numérique.
• Pourquoi la barre de progression du préchauage ne commence-t-elle pas depuis le début?
Lorsque l’appareil est chaud suite une utilisation antérieure, un préchauage entier n’est
pas nécessaire.
• Puis-je annuler ou ignorer le préchauage?
Le préchauage est fortement recommandé pour de meilleurs résultats, mais vous pouvez le
passer en appuyant sur le bouton PREHEAT (PRÉCHAUFFER) après avoir appuyé sur le bouton
START/STOP (MARCHE/ARRÊT).
• Dois-je ajouter mes ingrédients avant ou après le préchauage?
Pour de meilleurs résultats, laissez l’appareil préchauer avant d’y placer des ingrédients.
• Pourquoi mon appareil dégage-t-il de la fumée?
Lors de l’utilisation de la fonction Grill (Cuire au gril), choisissez toujours le réglage de
température recommandé. Vous trouverez les réglages recommandés dans le Guide de
démarrage rapide et dans le Guide d’inspiration. Assurez-vous que la grille anti-éclaboussures
est installée.
• Comment puis-je mettre l’appareil sur pause pour vérifier mes aliments?
Lorsque le couvercle est ouvert pendant la cuisson, l’appareil se met automatiquement en pause.
• La poignée de la sonde ne risque-t-elle pas de fondre si elle touche la plaque à griller
chaude?
Non. La poignée est conçue en silicone résistant à des températures élevées. Elle supporte donc
les températures élevées de l’appareil Grill et friteuse à air chaud Ninja® Foodi® Max.
• Les aliments ont brûlé.
Ne mettez pas d’aliments avant la fin du délai de préchauage recommandé. Pour de
meilleurs résultats, contrôlez la cuisson et retirez les aliments dès que vous jugez qu’ils sont
susamment cuits. Retirez immédiatement les aliments à la fin du temps de cuisson pour éviter
de trop les cuire.
• Pour quelle raison l’appareil propose-t-il 9niveaux de réglage pour le bœuf?
Les goûts varient d’une personne à l’autre. Cette échelle de 1 à 9 ore un vaste éventail
d’options pour chaque niveau de cuisson, afin de la personnaliser selon vos envies.
Sidan laddas...
Sidan laddas...
Sidan laddas...
Sidan laddas...
Sidan laddas...
Sidan laddas...
Sidan laddas...
Sidan laddas...
Sidan laddas...
Sidan laddas...
Sidan laddas...
Sidan laddas...
Sidan laddas...
Sidan laddas...
Sidan laddas...
Sidan laddas...
Sidan laddas...
Sidan laddas...
Sidan laddas...
Sidan laddas...
Sidan laddas...
Sidan laddas...
Sidan laddas...
Sidan laddas...
Sidan laddas...
Sidan laddas...
Sidan laddas...
Sidan laddas...
Sidan laddas...
Sidan laddas...
Sidan laddas...
Sidan laddas...
Sidan laddas...
Sidan laddas...
Sidan laddas...
Sidan laddas...
Sidan laddas...
Sidan laddas...
Sidan laddas...
Sidan laddas...
Sidan laddas...
Sidan laddas...
Sidan laddas...
Sidan laddas...
Sidan laddas...
Sidan laddas...
Sidan laddas...
Sidan laddas...
Sidan laddas...
Sidan laddas...
Sidan laddas...
Sidan laddas...
Sidan laddas...
Sidan laddas...
Sidan laddas...
Sidan laddas...
Sidan laddas...
Sidan laddas...
Sidan laddas...
Sidan laddas...
Sidan laddas...
Sidan laddas...
Sidan laddas...
Sidan laddas...
Sidan laddas...
Sidan laddas...
Sidan laddas...
Sidan laddas...
Sidan laddas...
Sidan laddas...
Sidan laddas...
Sidan laddas...
Sidan laddas...
Sidan laddas...
Sidan laddas...
Sidan laddas...
Sidan laddas...
Sidan laddas...
Sidan laddas...
Sidan laddas...
Sidan laddas...
Sidan laddas...
-
 1
1
-
 2
2
-
 3
3
-
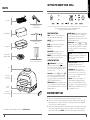 4
4
-
 5
5
-
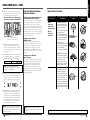 6
6
-
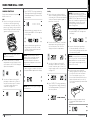 7
7
-
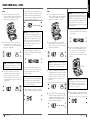 8
8
-
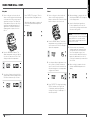 9
9
-
 10
10
-
 11
11
-
 12
12
-
 13
13
-
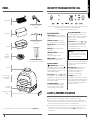 14
14
-
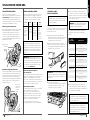 15
15
-
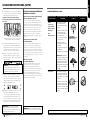 16
16
-
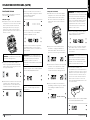 17
17
-
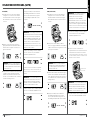 18
18
-
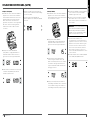 19
19
-
 20
20
-
 21
21
-
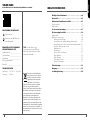 22
22
-
 23
23
-
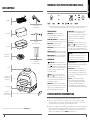 24
24
-
 25
25
-
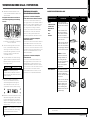 26
26
-
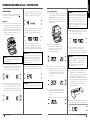 27
27
-
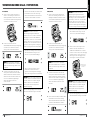 28
28
-
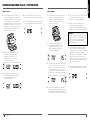 29
29
-
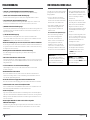 30
30
-
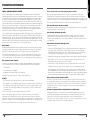 31
31
-
 32
32
-
 33
33
-
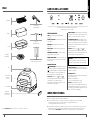 34
34
-
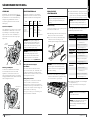 35
35
-
 36
36
-
 37
37
-
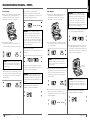 38
38
-
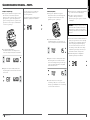 39
39
-
 40
40
-
 41
41
-
 42
42
-
 43
43
-
 44
44
-
 45
45
-
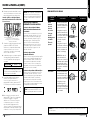 46
46
-
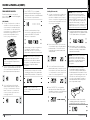 47
47
-
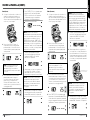 48
48
-
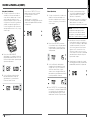 49
49
-
 50
50
-
 51
51
-
 52
52
-
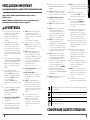 53
53
-
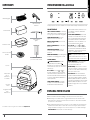 54
54
-
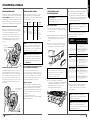 55
55
-
 56
56
-
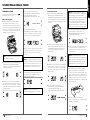 57
57
-
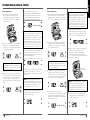 58
58
-
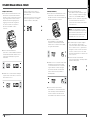 59
59
-
 60
60
-
 61
61
-
 62
62
-
 63
63
-
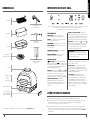 64
64
-
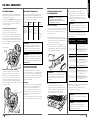 65
65
-
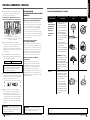 66
66
-
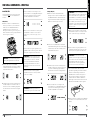 67
67
-
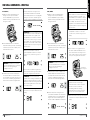 68
68
-
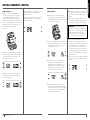 69
69
-
 70
70
-
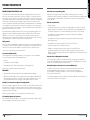 71
71
-
 72
72
-
 73
73
-
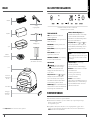 74
74
-
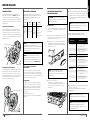 75
75
-
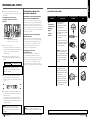 76
76
-
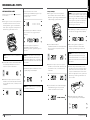 77
77
-
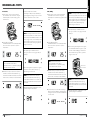 78
78
-
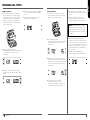 79
79
-
 80
80
-
 81
81
-
 82
82
-
 83
83
-
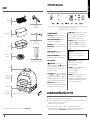 84
84
-
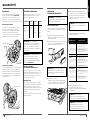 85
85
-
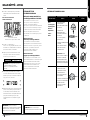 86
86
-
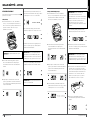 87
87
-
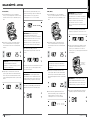 88
88
-
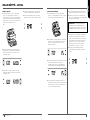 89
89
-
 90
90
-
 91
91
-
 92
92
-
 93
93
-
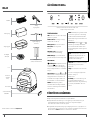 94
94
-
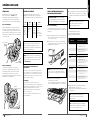 95
95
-
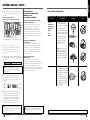 96
96
-
 97
97
-
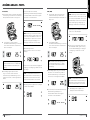 98
98
-
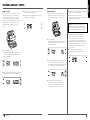 99
99
-
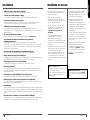 100
100
-
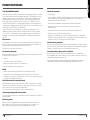 101
101
-
 102
102


Ninja Foodi AG551EU Bruksanvisningar
- Kategori
- Mätning, testning
- Typ
- Bruksanvisningar
på andra språk
- italiano: Ninja Foodi AG551EU Istruzioni per l'uso
- eesti: Ninja Foodi AG551EU Kasutusjuhend
- español: Ninja Foodi AG551EU Instrucciones de operación
- Deutsch: Ninja Foodi AG551EU Bedienungsanleitung
- français: Ninja Foodi AG551EU Mode d'emploi
- dansk: Ninja Foodi AG551EU Betjeningsvejledning
- Nederlands: Ninja Foodi AG551EU Handleiding
Andra dokument
-
Ninja FOODI MAX AG551EU GRILL & AIRFRYER Bruksanvisning
-
-
-
-
Cosori PREMIUM II PLUS AIRFRYER, SVART Användarmanual
-
Ninja AF300EU Bruksanvisningar
-
-
-
-