
EnglishDeutschFrançaisEspañol
Português
EN
JA
FR
DE
PT
ES
RU
ZH
KO
VIBRAPHONE VARIABLE-SPEED DRIVER
YVD20
YVD10
Make sure to read the “PRECAUTIONS” on page 13.
Lesen Sie unbedingt die “VORSICHTSMASSNAHMEN” auf Seite 22.
Assurez-vous de lire “PRÉCAUTIONS D’USAGE” à la page 31.
Asegúrese de leer “PRECAUCIONES” en la página 40.
Certifique-se de ler “PRECAUÇÕES” na página 49.
Обязательно прочтите разделы «ПРАВИЛА ТЕХНИКИ БЕЗОПАСНОСТИ» на стр. 58.
Pусский
Owner’s Manual
Benutzerhandbuch
Mode d’emploi
Manual de instrucciones
Manual do Proprietário
Руководство пользователя

13
YVD20 YVD10 Owner’s Manual
PLEASE READ CAREFULLY BEFORE PROCEEDING
Please keep this manual in a safe and handy place for future reference.
WARNING
Always follow the basic precautions listed below to avoid the possibility of serious injury or even
death from electrical shock, short-circuiting, damages, fire or other hazards. These precautions
include, but are not limited to, the following:
•This product contains no user-serviceable parts. Do not
open the units or attempt to disassemble or modify the
internal components in any way. If they should appear to
be malfunctioning, discontinue use immediately and
have it inspected by qualified Yamaha service
personnel.
•Repairs or part replacement should not be attempted
unless instructions are provided in the manual.
•Do not use or store the units in any of the following
locations. Doing so may cause fire or electric shock.
- In places subject to high temperatures (near a heating
device or in direct sunlight, etc.).
- In places subject to low temperatures.
- In places where the units may be exposed to moisture
(bathroom, on wet floors, etc.) and excessive humidity.
- In places where the units may be exposed to rain.
- In places with excessive dust.
- In places subject to vibrations.
•Never insert or remove an electric plug with wet hands.
Improper grounding may result in electrical shock.
•Never put foreign objects (combustible objects, coins,
wire, etc.) or liquids (water, juice, etc.) in the units.
Doing so can cause fire or electrical shock.
•Only use the voltage specified as correct for the
instrument. The required voltage is printed on the name
plate of the instrument.
•Do not place the power cord of the AC adaptor near heat
sources such as heaters or radiators. Also, do not
excessively bend or otherwise damage the cord or place
heavy objects on it.
•Use the specified AC adaptor only. Using the wrong AC
adaptor can result in damage to the units or overheating.
•Check the electric plug periodically and remove any dirt
or dust which may have accumulated.
•Do not connect the controller unit to an electrical outlet
using a multiple-connector. Doing so may cause the
outlet to overheat.
•When removing the electric plug from the unit or an
outlet, always hold the plug itself and not the cord.
Pulling by the cord can damage it.
•Turn off the power switch and remove the electric plug
from the outlet when the unit is not being used or during
electrical storms.
•When one of the following problems occur, immediately
turn off the power switch, unplug the AC adapter and
have the device inspected by Yamaha service personnel.
- If the AC adapter or power cord becomes damaged.
- If foreign objects or liquids have gotten into the unit.
- If the unit gets wet (rain, etc.).
- If the unit operates abnormally or is broken.
PRECAUTIONS
Do not disassemble
Handling
Power supply/AC adaptor
If you notice any abnormality
DMI-7 1/2

14
YVD20 YVD10 Owner’s Manual
CAUTION
Always follow the basic precautions listed below to avoid the possibility of physical injury to you or
others, or damage to the units or other property. These precautions include, but are not limited to,
the following:
•Treating the controller or driver roughly may damage the
internal circuit board, etc.
•Keep small parts out of the reach of infants. Your
children may accidentally swallow them.
•Do not place heavy objects on the units, and do not use
excessive force on the buttons, switches or connectors.
•Never touch the rotating pulleys. Doing so may result in
pinching your fingers, etc.
•Assemble the units in the proper sequence by following
the assembly instructions in this manual. Also, make
sure to tighten screws and bolts regularly. Failure to do
so might result in damage to the units or even injury.
•Use the bolts that comes with the vibraphone.
•Do not place the units in an unstable position where it
might accidentally fall over.
•Before moving the instrument, disconnect all cables to
prevent damage to the cables and injury to anyone who
might trip over them.
•When setting up the instrument, make sure the AC outlet
you are using is easily accessible. If some trouble or
malfunction occurs, immediately turn off the power
switch and disconnect the plug from the outlet. Even
when the power switch is turned off, electricity is still
flowing to the product at the minimum level. When the
unit is not in use for extended periods of time, unplug
the power cord from the wall AC outlet.
•When moving the instrument, move it gently avoiding
shocks and impacts. The instrument is sensitive to
shocks and may become damaged.
Always turn the power off when the instrument is not in use.
Handling
Assembly
Transportation and Installation
Yamaha cannot be held responsible for damage caused by improper use or modifications to the instrument.
DMI-7 2/2

15
YVD20 YVD10 Owner’s Manual
NOTICE
• Do not use the units in locations with poor ventilation.
• Parts such as switches, volume control and jacks are called consumable parts and
their functions will deteriorate over time. The level of deterioration will vary depending
upon the conditions under which the units are used. However, deterioration cannot
be completely avoided. When replacing consumable parts, please contact your
dealer or qualified Yamaha service personnel.
• Do not place vinyl, plastic or rubber objects on the instrument, since this might dis-
color the units.
• When cleaning the units, wipe with a soft, dry cloth. Do not use paint thinners, sol-
vents, alcohol, cleaning fluids or chemical-impregnated wiping cloths.
INFORMATION
• The illustrations as shown in this manual are for instructional purposes only and may
appear somewhat different from those on your instrument.
• The company and product names in this manual are trademarks or registered trade-
marks of their respective companies.
(rear_en_01)
The model number, serial number, power requirements, etc., may be found on or
near the name plate, which is at the rear of the unit. You should note this serial
number in the space provided below and retain this manual as a permanent
record of your purchase to aid identification in the event of theft.
Model No.
Serial No.

16
YVD20 YVD10 Owner’s Manual
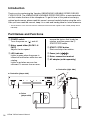
Introduction
Thank you for purchasing the Yamaha VIBRAPHONE VARIABLE-SPEED DRIVER
YVD20 YVD10. The VIBRAPHONE VARIABLE-SPEED DRIVER is a motorized drive
unit that rotates the fans of the vibraphone. To get full use of this product and enjoy
optimal performance, please read this owner’s manual carefully before using the units.
After you have read the manual, keep it in a safe and handy place for future reference.
* The illustrations in this manual show the YVD20, but the information applies to the YVD10 (except where
indicated).
Part Names and Functions
q POWER switch
Turns the power on ( ) and off.
w Motor speed slider (SLOW 1–6
FAST)
Adjusts the fan speed.
e LED indicator
Lights in green when the power is
turned on and flashes while fans are
rotating.
Lights in red when an error has
occurred. To recover from an error,
remove the factors that hinder fan
rotation, and then press the r
START/STOP button.
r START / STOP button
Starts and stops fan rotation.
t Power jack ( )
y Driver connection terminal
u AC adaptor (sold separately)
12V
re w q y
t
u
Controller (player side)
Controller (right side)
Driver
(player side)

17
YVD20 YVD10 Owner’s Manual
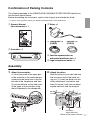
Confirmation of Packing Contents
The shipping package of the VIBRAPHONE VARIABLE-SPEED DRIVER should con-
tain the parts shown below.
Before assembling the instrument, confirm that all parts are included as listed.
* If a part is missing, please contact your dealer or qualified Yamaha service personnel.
q Owner’s Manual
(this document) × 1
w Controller × 1
e Driver × 1
t Yamaha representative or
authorized distributor list × 1
y Legal compliance leaflet × 1
Assembly
1.
Attach the controller.
(1) Hook the notch at the upper part
of the controller to the screw that pro-
trudes from the lower front of the tre-
ble side of the vibraphone, and then
(2) secure the hole on the other side
of the upper of the controller using
the bolt attached to the vibraphone.
2. Attach the driver.
With the pulley to your right side and
the connector end of the cable fac-
ing you, (1) insert the driver into the
driver attachment from below, and
then (2) secure it with the cup head
square neck bolt and the wing nut.
r Timing belt × 2
(YVD20)
Fan belt × 2
(YVD10)
(1)
(2)
(1)
(2)
Pulley
Cup head
square neck bolt

18
YVD20 YVD10 Owner’s Manual
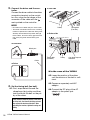
3. Connect the driver and the con-
troller.
Connect the driver cable to the driver
connection terminal on the control-
ler. Also, align the flat shape of the
connector of the cable with the
mark printed on the controller.
NOTICE
* Be careful not to break the pins of the cable.
* The driver connection terminal has a locking
function to prevent the cable from being inad-
vertently disconnected. To prevent damage
to the cables, be sure to firmly grip the metal
part of the plug when disconnecting the
cable.
4. Set the timing belt (fan belt).
4-1.First, wrap the belt around the
vibraphone (fan) pulley, and then
twist and hook the belt on the pul-
ley of the driver.
In the case of the YVD20
4-2.Lower the position of the driver
until the tension of the belt is suffi-
cient.
4-3.Prepare a separately sold AC
adaptor.
4-4.Connect the DC plug of the AC
adaptor to the power jack
().
If the distance between pulleys is too wide
to fit the belt, first loosen the wing nut and
then adjust the tension of the belt. After
adjusting the tension, tighten the wing nut
firmly.
12V
Controller
Driver
Cable
Metal part
Fan side
Pulley Timing belt
(Fan belt)
Timing belt
(Fan belt)
Pulley Cup head square
neck bolt
Driver side

19
YVD20 YVD10 Owner’s Manual
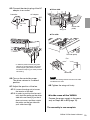
4-5.Connect the electric plug of the AC
adaptor to an outlet.
4-6.Turn on the controller power.
The driver returns to its default
position.
4-7.Adjust the position of the fan.
4-7-1. Loosen the wing nut to loosen
the tension of the belt.
4-7-2. In order to position the fan verti-
cally, hold the pulley on the driver
side with one hand (1) so that it
does not move, and then rotate
the pulley on the fan side with
your other hand (2).
4-8.Tighten the wing nut firmly.
In the case of the YVD10
Prepare the power supply in the same
way as Steps 4-3 to 4-5 (page 18).
The assembly is now complete.
12V
4-4
4-5
Controller
AC adaptor
DC 12V
IN
AC
* In order to prevent the DC plug from
coming out unintentionally, we recom-
mend wrapping the power cord once
around the body leg (as shown) before
connecting.
Perform this setting for both the natural and the
accidental tone side.
Driver side
pulley
Wing nut
Driver side
Fan side
Fan side pulley
Resonator
Fan
(1)
(2)
NOTE

20
YVD20 YVD10 Owner’s Manual
* Order a replacement timing belt (sold separately)
or fan belt (sold separately) using the following
number. When ordering, please contact your
dealer or qualified Yamaha service personnel.
Replace the two timing belts (fan belts) at the
same time.
Model YVD20 YVD10
Part No. W5128092 W5128070
Part name Timing belt Fan belt
When using for a long time, the fan belt will stretch
and the pulley will run idle. If this happens, adjust
the tension of the fan belt by slightly lowering the
mounting position of the driver unit.
NOTE
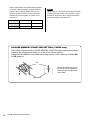
PAUSE MEMORY FUNCTION SETTING (YVD20 only)
The YVD20 is equipped with a PAUSE MEMORY FUNCTION which stops the fan always
in exactly the same position when it is turned off (no vibrato applied).
Set the PAUSE MEMORY to the desired fan stop position in the same way as Steps
4-6
to 4-8 (page 19).
Resonator
Fan
We recommend that you set
the fan to a vertical position,
to ensure the strongest reso-
nator effect.

21
YVD20 YVD10 Owner’s Manual
Specifications
Rated speed: 30–145 RPM
Power consumption: 3 W
Operating temperature range: 5–40 degrees Celsius
Dimensions (W × H × D)
Controller: 172 × 67 × 43 mm
Driver: 92.8 × 65.5 × 183 mm (excluding the cable; approx. 250 mm)
Weight:
YVD20: 0.6 kg (including the timing belt)
YVD10: 0.6 kg (including the fan belt)
Included accessories: Timing belt (YVD20), Fan belt (YVD10)
Separately sold accessories (May not be available depending on your area):
AC adaptor (PA-130: output DC12V 1.0A, PA-130B: output DC12V 0.7A, PA-150B:
output DC12V 1.5A or an equivalent recommended by Yamaha)
* The contents of this manual apply to the latest specifications as of the publishing date. To obtain the latest
manual, access the Yamaha website and then download the manual file. Since specifications, equipment or
separately sold accessories may not be the same in every locale, please check with your Yamaha dealer.
(weee_eu_en_02)
Information for users on collection and disposal of old equipment:
This symbol on the products, packaging, and/or accompanying documents
means that used electrical and electronic products should not be mixed with
general household waste.
For proper treatment, recovery and recycling of old products, please take
them to applicable collection points in accordance with your national legisla-
tion.
By disposing of these products correctly, you will help save valuable
resources and prevent any potential negative effects on human health and the
environment which could otherwise arise from inappropriate waste handling.
For more information about collection and recycling of old products, please
contact your local municipality, your waste disposal service or the point-of-
sale where you purchased the items.
For business users in the European Union:
If you wish to discard electrical and electronic equipment, please contact
your dealer or supplier for further information.
Information on Disposal in other Countries outside the European Union:
This symbol is only valid in the European Union. If you wish to discard these
items, please contact your local authorities or dealer and ask for the correct
method of disposal.

VDE9920
Manual Development Group
© 2021 Yamaha Corporation
Published 03/2021
POOD-B0
-
 1
1
-
 2
2
-
 3
3
-
 4
4
-
 5
5
-
 6
6
-
 7
7
-
 8
8
-
 9
9
-
 10
10
-
 11
11


Yamaha YVD10 Bruksanvisning
- Typ
- Bruksanvisning
- Denna manual är också lämplig för
på andra språk
- italiano: Yamaha YVD10 Manuale del proprietario
- čeština: Yamaha YVD10 Návod k obsluze
- español: Yamaha YVD10 El manual del propietario
- Deutsch: Yamaha YVD10 Bedienungsanleitung
- polski: Yamaha YVD10 Instrukcja obsługi
- português: Yamaha YVD10 Manual do proprietário
- français: Yamaha YVD10 Le manuel du propriétaire
- 日本語: Yamaha YVD10 取扱説明書
- Türkçe: Yamaha YVD10 El kitabı
- English: Yamaha YVD10 Owner's manual
- dansk: Yamaha YVD10 Brugervejledning
- русский: Yamaha YVD10 Инструкция по применению
- suomi: Yamaha YVD10 Omistajan opas
- Nederlands: Yamaha YVD10 de handleiding
- română: Yamaha YVD10 Manualul proprietarului
Relaterade papper
-
Yamaha YVRD-2700 Bruksanvisning
-
-
-
-
-
-
-
-
-
Yamaha CLP-170 Bruksanvisning