
Norsk
123
456
7
S
89
0
P
—VOLUME—
MENU
P
CD
AUDIO2
SAT/CBL
AUDIO1
VCR
TV
123
456
7
S
89
0
P
—VOLUME—
MENU
P
CD
AUDIO2
SAT/CBL
AUDIO1
VCR
TV
SBC RU 460
Instructions for Use
Mode d’emploi
Bedienungsanleitung
Gebruiksaanwijzing
Instrucciones de manejo
Manual de utilização
Istruzioni per l’uso
δηγίες ρήσεως
Bruksanvisning
Brugsanvisning
Bruksanvisning
Käyttöohje
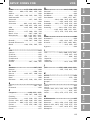
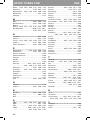
Code list
Universal Remote Control

2
Instructions For Use English
You just made a great choice by buying this Philips universal remote
control! It takes the place of as many as six separate remote controls
and is pre-programmed to operate the most frequently used functions
of almost any brand of TV, VCR, satellite tuner, cable decoder, CD-player
and audio receiver. If you want to operate another device or if your
device is not included in the code list, the RU460 offers you the
opportunity to copy (learn) the codes of your original remote control.
Best of all, it’s quick to setup and easy to use and with the green
backlighting you can even use it in dimly lit rooms! Here’s how...
AT A GLANCE
Once you’ve installed the batteries, this remote is ready to work with
any Philips RC5 TV, VCR, satellite tuner, CD-player, tuner and amplifier.
Simply press the mode selector as indicated below - for the Philips
device you wish to operate, and press a few keys to test. For other
brands, it needs to be set up first - see Getting Started.
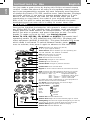
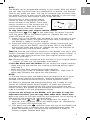
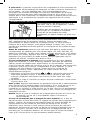
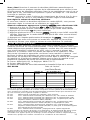
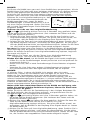
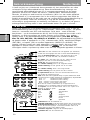
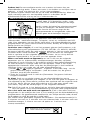
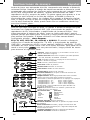
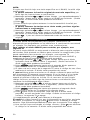
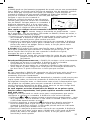
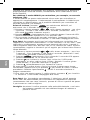
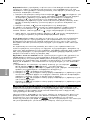
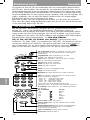
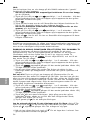
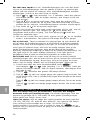
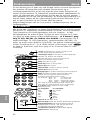
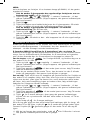
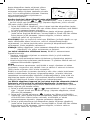
Select TV, VCR, SAT/CBL, CD, AUDIO1 or AUDIO2 The remote has 6
operating modes: TV, VCR, satellite tuner (SAT/CBL), CD-player and
other equipment (AUDIO1 & AUDIO2)). The green indicator LED shows
which mode is activated. To switch between modes, press
once to activate, then press it again to advance to the next mode.
123
456
7
S
89
0
P
—VOLUME—
MENU
P
CD
AUDIO2
SAT/CBL
AUDIO1
VCR
TV
Power switches your device off (and on,
if so on your original remote)
Mode Selector selects whether you are operating the
TV, VCR, SAT/CBL, CD, AUDIO1 or AUDIO2
Menu switches menu on (and off,
if so on your original remote)
Channel Up changes to next channel
Channel Down changes to previous channel
Volume Up turns volume up
Volume Down turns volume down
Keypad for direct channel selection and other functions
Mute switches sound on and off
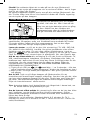
Shift: hold this key while pressing other keys to access
additional functions (if available on your equipment).
For instance: Shift - P+: brightness+/menu up
Shift - P- : brightness-/menu down
Shift - volume +: colour+/menu right
Shift - volume -: colour-/menu left
Try these and other combinations on your equipment to
discover which functions are available
1/2 Digits switches between one and two-digit
channel selection and display
for TV FastText for VCR
red Rewind
green Stop
yellow Play
blue Forward
white Pause
Record
Teletext Off switches Teletext off
Teletext On switches Teletext on
Teletext Enlarge enlarges the Teletext display
Teletext Hold keeps the current Teletext page on screen
Backlighting switches the keypad backlighting on and off;
it will stay on for four seconds after the last key press.
English

3
RU240- page 3
Try it out! The easiest way to find out how your new remote works, is
to try pressing the keys and see what happens - don’t worry, you won’t
damage anything! Most of the keys work just like on your original
remote control. Of course, if your TV or VCR does not offer a specific
function, pressing that key will have no effect.
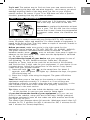
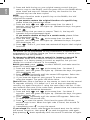
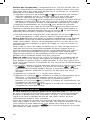
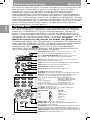
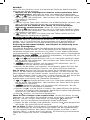
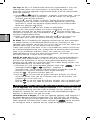
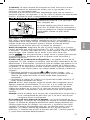
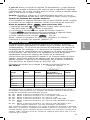
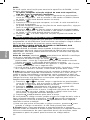
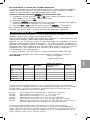
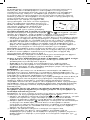
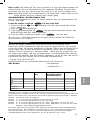
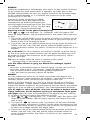
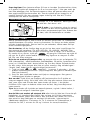
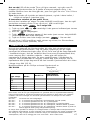
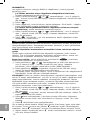
DON'T FORGET THE BATTERIES!
You'll need two 1.5V batteries, type UM3,
LR6 or AA only. Put them in like this.
Remember to replace the batteries at least
once a year. The RU 460 has the unique
feature that it won’t loose the programmed
or learned codes when the batteries are
empty.
GETTING STARTED
This remote is ready to work with any Philips RC5 TV, VCR, satellite
tuner, CD-player, tuner and amplifier. For other brands of equipment, it
needs to be set up first. That only takes a couple of seconds, thanks to
Philips’ Simple System Setup!
Before you start, make sure you’re in the right mode for the
equipment you’re setting up (TV, VCR, SAT/CBL, CD, AUDIO1, AUDIO2).
The green indicator LED shows which mode is selected. To switch
between modes, press once to activate, then press it again to
advance to the next mode. Also, make sure the equipment is switched
on. Sit right in front of it.
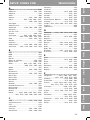
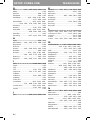
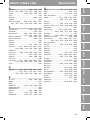
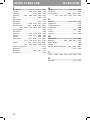
If you know the brand of your device and your equipment is one of
the following: TV, VCR, Satellite-receiver, Cable-box, CD-player,
Amplifier or Tuner, look at the code list at the back of this booklet,
and find the first 3-digit code for your equipment. If your device is not
included above, follow the instructions in the section ‘copy (learn)
codes from your original remote’.
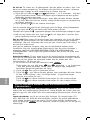
1 Press and hold and at the same time -for about 3
seconds- until the green LED lights up. (Release the keys, the green
LED should stay on)
2 Enter the 3-digit code using the keypad. The green LED blinks
twice.
That’s it! Now, press a few keys on the remote to check that the
equipment responds correctly. If it doesn’t or if not all keys are
responding correctly, try again using the next code in the list. In the
rare instance that none of the codes work properly, follow the
instructions in the next section.
Tip: Make a note of the code inside the battery case, and in the back
of this booklet in case you ever need to setup again.
If you don’t know the brand of your equipment or if you can not
find it in the codelist, setup still won’t take long. Philips’ patented
Handsfree autosearch tests all the codes one after another and finds
the right one for you!
The search time averages about 90 seconds. (Maximum search time is 5
minutes for TV; 2 minutes for VCR; 4 minutes for SAT, 1 minutes for CD
and 1 minutes for Tuners/Amplifiers.)
3
3
1
1
+
+
-
+
English

RU240- page 4
4
Make sure the TV, VCR etc. is switched on. If it’s a VCR, insert a tape
and start playback. You will know when the correct code has been found
because the equipment will switch off or the VCR will stop playback.
1 Press and hold and at the same time - for about 3
seconds - until the green LED lights up. (Release the keys, the
green LED should stay on)
2 Press to start the search. Each time the green LED blinks,
another code is sent. When the right code is found, the equipment
switches off (the VCR will stop playing).
3 Immediately press to stop the search.
If you missed the correct code because the search went too far, switch
the equipment back on, then press to send the previous code
again. Keep pressing down repeatedly until the equipment
switches off again.
4 Once you’ve found the correct code, press to lock the code in the
memory. The green LED will blink twice.
That’s it! Now, switch the equipment on again manually, then press a
few keys on the remote to check that the equipment responds
correctly. In the rare instance that it doesn’t, try again from step 1 to
find a better code.
In case none of the codes work or if you are still missing certain
functions of your original remote control, try the solution we offer you
in the section ‘Copy (learn) codes from your original remote control’ or
call our free-phone helpline, they can help you out with any query you
might have.
Note that code! To save time if you ever need to setup again, make a
note of the correct code inside the battery case and in the back of this
booklet. In case you have forgotten to note the code you can still
‘read out’ the code from the remote. Here’s how:
1 Make sure you’ve selected the right mode (with ).
Then press and hold and at the same time -for about 3
seconds- until the green LED lights up. (Release the keys, the green
LED should stay on)
2 Press . The green LED goes out.
3 Press and count the number of times the green LED blinks. This
is the first digit of the 3-digit code. (No blinks means the digit is
zero.)
Press and count the number of blinks for the second digit.
Press and count the number of blinks for the third digit.
COPY (LEARN) CODES FROM YOUR ORIGINAL REMOTE CONTROL
If your equipment is not included in the codelist, or if specific
codes on your remote control are missing, the RU460 has the solution.
It can copy and replicate up to 100 codes from your original remote
controls. Here’s how...
Before you start, make sure you’re in the mode you’re setting up (TV,
VCR, SAT/CBL, CD, AUDIO1, AUDIO2). The green indicator LED shows
which mode is selected. To switch between modes, press once
to activate, then press it again to advance to the next mode.
3
3
2
2
1
1
6
6
1
1
P
P
P
P
3
3
1
1
English

5
RU240- page 5
NOTE:
The RU460 can be programmed entirely to your needs. With the RU460
you can copy functions from any combination of devices, and allocate
them to any mode you want. You can for instance copy functions from
the remote control of your second VCR under AUDIO2, or you can copy
functions from your DVD remote control under SAT/CBL.
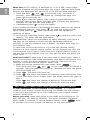
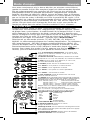
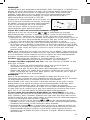
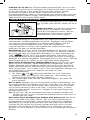
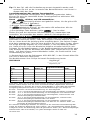
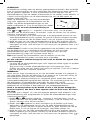
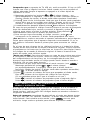
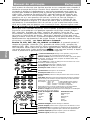
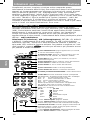
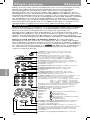
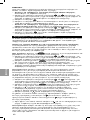
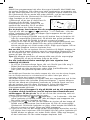
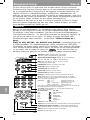
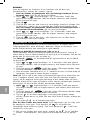
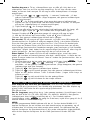
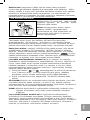
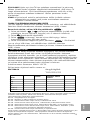
Place the top of your original remote
control so that it’s facing the infrared
sensor window of the RU460. Place both
remote controls on a flat surface and 3-8
centimeters apart. Make sure that both
remote controls have fresh batteries.
To copy codes from your original remote control
Press and hold and at the same time -for about 3 seconds-
until the green LED on the RU460 lights up. (Release the keys, the
green LED should stay on)
1 Press a key on the RU460 that you want to copy a function of your
original remote under, the green LED blinks once, indicating that
the RU460 is ready to receive a signal.
2 Press and hold the key on your original remote control that you
want to copy to the RU460, until the green LED on the RU460
blinks three times and stays off. Release the key, the function for
the selected key has now been copied.
That’s it ! You’ve now copied a function in the RU460, this key is now
ready to transmit the same function as your original remote control. If
you want to copy more functions from your original remote control,
start again from step 1.
Tip: Choose keys that correspond with the keys on your original remote
control, so that you can remember them easily.
If all LEDs blink once the RU460 did not receive the signal correctly,
– make sure that the remotes are correctly positioned and try again
from step 3.
– Make sure that both remotes have fresh batteries.
– try to copy your codes in different light conditions. Light from TL-
tubes may influence the signal you are learning.
NOTE:
In the rare instance that the RU460 does not respond at all or stops
working, please remove the batteries. Insert the batteries after 2
seconds, the remote should be back in normal operation mode.
Our RU460 is designed and tested extensively and is ready to copy
almost all infrared remote control signals. In some rare instances
manufacturers use infrared signals that cannot be copied into any
remote control. But please try the Handsfree Autosearch to see if this
code is included in our pre-programmed library.
If you run out of keys on the RU460, or if you want to copy less
important functions, you can copy them under shift. Here’s how:
Make sure you’re in the right mode for the equipment you’re setting up
and position the remotes as indicated above.
1 Press and hold and at the same time -for about 3
seconds- until the green LED of the RU460 lights up. (Release the
keys, the green LED should stay on)
2 First press and hold and then press the key on the RU460 that
you want to copy a function from your original remote under, the
green LED blinks once, indicating that the RU460 is ready to
receive a signal. Release both keys.
S
S
6
6
4
4
6
6
4
4
3 - 8
English

6
3 Press and hold the key on your original remote control that you
want to copy to the RU460, until the green LED on the RU460 blinks
three times and stays off. Release the key, the function for the
selected key has now been copied.
NOTE:
If you copy a function under a specific key on the RU460, the ‘old’
signal will be erased.
– If you want to restore the original function of a specific key,
please follow the instructions below:
1 Press and hold and at the same time -for about 3
seconds- until the green LED lights up. (Release the keys, the green
LED should stay on)
2 Press .
3 Press the key that you want to restore. That’s it, the key will
transmit the pre-programmed signal.
– If you want to restore all keys in a certain mode, please follow
the instructions below:
1 Press and hold and at the same time -for about 3
seconds- until the green LED lights up. (Release the keys, the green
LED should stay on)
2 Press . That’s it, you have now restored all keys to their original
functions.
ADVANCED TIPS AND TRICKS
The RU460 can be programmed for any combination of devices pre-
programmed in it’s library. Below you find an example, of course other
combinations are also possible.
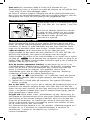
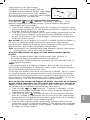
To change the AUDIO2 mode to control for instance a second TV
The AUDIO2 mode on this remote is used to control additional
equipment. It is factory preset to control an amplifier, but you can
change it to control a second TV, for example.
Before you start, press to select AUDIO2, and make sure the
second TV is switched on.
1 Press and hold and at the same time - for about 3
seconds - until the green LED lights up. (Release the keys, the green
LED should stay on)
2 Press repeatedly until the second LED appears. Select the
TV mode with the second LED.
3 If you know the brand of your second TV, enter the 3-digit code
using the keypad. The green LED blinks twice.
That’s it! Now, press a few keys on the remote to check that the second
TV responds correctly. If it doesn’t or if not all keys are responding
correctly, try again from point 1 using the next code in the list. In the
rare instance that none of the codes work, please follow the instructions
below to start the Handsfree Autosearch:
1 Press and hold and at the same time - for about 3
seconds - until the green LED lights up. (Release the keys, the green
LED should stay on)
2 Press repeatedly until the second LED appears. Select the
TV mode with the second LED.
3 Press to start the search. Each time the green LED blinks,
another code is sent. When the right code is found, the second TV
switches off.
4 Immediately press to stop the search.
If you missed the correct code because the search went too far, switch
the second TV back on, then press to send the previous code again.
Keep pressing down repeatedly until the second TV switches off again.
P
P
P
P
3
3
1
1
3
3
1
1
6
6
6
6
1
1
7
7
6
6
1
1
English

7
5 Once you’ve found the correct code, press to lock the code in the
memory. The green LED will blink twice.
That’s it! Now, switch the second TV on again manually, then press a few
keys on the remote to check that the second TV responds correctly. In
the rare instance that it doesn’t, try again from step 1 to find a better
code.
Tip: Make a note of the code inside the battery case, and in the back of
this booklet in case you ever need to setup again.
To control the second TV’s volume
If you have installed a second TV under AUDIO2 mode, you can also
control that TV’s volume when you are in VCR mode.
Before you start, press to select VCR.
1 Press and hold and at the same time until the green LED
lights up (about 3 seconds).
2 On the keypad, press .
3 Press repeatedly until the second LED appears. Select the
Audio 2 mode with the second LED.
4 Press any key (except ). That’s it!
Now, when you’re in VCR mode, press volume+ and volume- to control the
volume of the second (AUDIO2) TV.
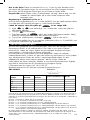
NEED HELP?
If you have questions about your remote or if you are missing certain func-
tions on your remote, call our free-phone helpline! Before you call, please
read the manual carefully. Most questions will be answered here. However,
if you don’t find an answer to your questions, make a note of your equip-
ment in the table below - this makes it easier for the operators to help you
quickly. Look for model numbers in the equipment instruction manual, or
on the back of the equipment. Be in front of the equipment, this way our
operators can help you to see if your remote is working properly.
In the UK. call 0800 968 118. In Ireland, call 1 800 553 136.
The model number of your Philips universal remote control is:
SBC RU460 Date of purchase:
____/____/____
Day/month/year
As you add new components to your home entertainment system, Philips again
offers a universal remote control that will fit your new needs. Look below for the
unique full range of universal remote controls from Philips at a retailer near you.
RU 110 : Universal easy TV zapper
RU 410 : 1 in 1 Universal TV Remote with digits and TXT
RU 422 : 2 in 1 Universal Remote Control for TV and VCR
RU 430 : 3 in 1 Universal Remote Control for TV, VCR and SAT/Cable
RU 440 : 4 in 1 Universal Remote Control for TV, VCR, SAT/Cable and Audio
RU 455 : 4 in 1 Universal Remote Control for TV, VCR, SAT/Cable and AUX for a
second device, with convenient backlighting
Another very attractive product from Philips is the Philips SBC LI510 Remote
Control Extender Set, the wireless extension of your infra-red (IR) remote control!
This system allows you to operate every IR driven equipment (i.e. Sat-receivers,
VCRs or Hi-Fi-sets) from anywhere in or around the house.
3
3
6
6
1
1
English
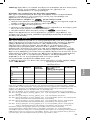
Equipment
TV
VCR
SAT
CD
AUDIO 1
AUDIO 2
Brand
Model nr.
Model number of
original remote Code

8
Français
Mode d'emploi Français
Vous avez certainement pris la bonne décision en achetant cette télécom-
mande universelle Philips! Elle remplace jusqu'à six télécommandes séparées.
Elle est préprogrammée pour exploiter les fonctions les plus utilisées de
pratiquement toutes les marques de téléviseur, magnétoscope, récepteur
satellite, décodeur de télévision câblée, lecteur de disque laser et récepteur
audio. Si vous voulez utiliser un autre appareil ou si votre appareil ne figure
pas sur la liste de codes, le RU460 vous offre la possibilité de copier (c.a.d.
d'apprendre) les codes de votre télécommande d'origine. Cette télécommande
comporte un autre avantage considérable, elle est très facile à régler et à
utiliser. Elle est dotée d'un éclairage de fond vert ce qui vous permet de
l'employer même dans des salles à lumière tamisée! Et voici comment....
D'UN COUP D'OEIL
Lorsque vous avez inséré les piles, cette télécommande est prête à être
utilisée avec tout téléviseur RC5, magnétoscope, récepteur satellite, lecteur
de disque laser, syntonisateur, et amplificateur de la marque Philips. Il vous
suffit d'appuyer sur le sélecteur de mode, comme indiqué ci-dessous pour
obtenir le dispositif Philips que vous désirez utiliser et d'appuyer sur quelques
touches pour faire un essai. Si le matériel est d'une autre marque, il faut
commencer par régler la commande - reportez-vous à Prise en main.
Sélectionnez un des modes suivants: TV, VCR, SAT/CBL, CD, AUDIO1 ou
AUDIO2. La télécommande dispose de 6 modes d'exploitation: TV (téléviseur),
VCR (magnétoscope), SAT/CBL (récepteur satellite/télévision câblée), CD
(lecteur de disque laser) et autres appareils (AUDIO1 et AUDIO2). La diode
électroluminescente verte ou DEL indique le mode dans lequel vous vous
trouvez. Pour passer d'un mode à l'autre, appuyez une fois sur pour
l'activer, puis une deuxième fois pour passer au mode suivant.
123
456
7
S
89
0
P
—VOLUME—
MENU
P
CD
AUDIO2
SAT/CBL
AUDIO1
VCR
TV
Avec le commutateur d'alimentation, vous arrêtez votre
appareil (ou le mettez en marche, si c'est le cas, sur votre
télécommande d'origine).
Le sélecteur de mode (Mode Selector) sélectionne le mode
d'exploitation c.a.d. TV, VCR, SAT/CBL, CD, AUDIO1 ou AUDIO2
Le menu active le menu (et le désactive, si c'est le cas,
sur votre télécommande d'origine).
Avec 'Chaîne +' vous passez à la chaîne suivante.
Avec 'Chaîne -' vous passez à la chaîne précédente.
Avec 'Volume +' vous augmentez le volume.
Avec 'Volume -' vous baissez le volume.
Le pavé numérique permet de sélectionner une chaîne
directe et d'autres fonctions.
La sourdine permet d'activer ou de désactiver le son.
Avec 'Décaler' (Shift): maintenez cette touche enfoncée en appuyant
simultanément sur d'autres touches pour accéder à d'autres fonctions
supplémentaires (si elles sont disponibles sur votre matériel).
Par ex.:Décaler (Shift) - P+: luminosité+/menu suivant
Décaler (Shift) - P-: luminosité-/menu précédent
Décaler (Shift) - volume+:couleur+/menu à droite
Décaler (Shift) - volume-: couleur-/menu à gauche
Essayez celles-ci et d'autres combinaisons sur votre matériel
pour découvrir les fonctions disponibles.
Avec "1/2 chiffres" (1/2 Digits) vous commutez entre
affichage et sélection de chaîne à un et deux chiffres.
pour téléviseur à texte rapidepour magnétoscope
rouge Rembobinage
vert Stop
jaune Lecture
bleu Avance
blanc Pause
Enregistrement
L'arrêt télétexte désactive le télétexte.
La marche télétexte active le télétexte.
L'agrandissement télétexte agrandit l'écran de télétexte.
Le maintien télétexte maintient sur l'écran
la page de télétexte courante.
L'éclairage de fond active et désactive l'éclairage de fond du
pavé numérique pendant quatre secondes après avoir appuyé
sur la dernière touche.

9
Français
RU240- page 9
A votre tour! La manière la plus facile de comprendre le fonctionnement de
votre nouvelle télécommande est d'appuyer sur des touches et d'observer ce
qui se passe - ne vous inquiétez pas, vous n'endommagerez rien!
La plupart des touches du RU460 fonctionnent exactement de la même
manière que celles de votre télécommande d'origine. Pour autant, il est
évident que si votre téléviseur ou magnétoscope ne dispose pas de fonction
spécifique, il ne se passera rien lorsque vous appuierez sur la touche
correspondante.
N'OUBLIEZ PAS LES PILES!
Vous aurez besoin de deux piles de 1,5 V,
type UM3, LR6 ou AA uniquement. Insérez-
les de la manière indiquée.
N'oubliez pas de remplacer les piles au moins
une fois par an. Le RU460 a la qualité
unique de ne pas perdre les codes
programmés ou appris lorsque les piles sont
usées.
PRISE EN MAIN
Cette télécommande peut être utilisée immédiatement avec tout téléviseur
RC5, magnétoscope ou récepteur satellite, lecteur de disque laser,
syntonisateur et amplificateur de la marque Philips. Si vous utilisez le
matériel d'une autre marque, vous devrez d'abord la régler. Ceci ne doit
prendre que quelques secondes grâce à la configuration de système simple
de Philips!
Avant de commencer, assurez-vous que vous êtes dans le mode correct
correspondant au matériel que vous voulez régler (TV, VCR, SAT/CBL, CD,
AUDIO1 ou AUDIO2). La DEL verte indique le mode sélectionné. Pour passer
d'un mode à un autre, appuyez une fois sur pour l'activer, puis une
deuxième fois pour passer au mode suivant. Vérifier également que le
matériel est allumé. Installez-vous bien en face.
Si vous reconnaissez la marque de votre appareil et de votre matériel
parmi les suivantes: TV, VCR, récepteur satellite, décodeur de télévision
câblée, lecteur de disque laser, amplificateur ou syntonisateur, reportez-
vous à la liste de codes qui se trouve à la fin de ce manuel, puis recherchez
le premier code à trois chiffres correspondant à votre matériel. Si votre
appareil n'est pas indiqué ci-dessus, suivez alors les consignes du
paragraphe intitulé ‘copier (apprendre) les codes à partir de votre
télécommande d'origine’!
1Appuyez à la fois sur les touches et et maintenez ces touches
enfoncées pendant environ 3 secondes jusqu'à ce que la DEL verte
s'allume. (Relâchez maintenant les touches, la DEL verte doit rester
allumée).
2Saisissez le code à 3 chiffres au moyen du pavé numérique. La DEL verte
clignote deux fois.
Vous y êtes! Appuyez maintenant sur quelques touches de la télécommande
pour vérifier que le matériel réagit correctement. Si ce n'est pas le cas ou,
si toutes les touches ne réagissent pas correctement, recommencez
l'opération en utilisant le code suivant sur la liste. Dans le cas extrêmement
rare, où aucun des codes ne marche comme il faut, suivez les consignes du
paragraphe suivant.
Astuce: Notez le code à l'intérieur du compartiment de piles et à la fin de
ce manuel, au cas où il vous faudrait régler à nouveau la
télécommande.
Si vous ne connaissez pas la marque de votre matériel ou, si elle ne
figure pas dans la liste des codes, le réglage ne prendra pas longtemps pour
autant. L'option de recherche automatique sans les mains brevetée de
Philips teste tous les codes les uns après les autres et est à votre
disposition pour trouver le code correct! Cette recherche du code doit
prendre en moyenne 90 secondes (la durée de recherche maximale pour le
téléviseur est de 5 minutes, de 2 minutes pour le magnétoscope, de 4
minutes pour le récepteur satellite, d'1 minute pour le lecteur de disque
laser et d'1 minute pour les syntonisateurs/amplificateurs).
3
3
1
1
+
+
-
+

10
Français
RU240- page 10
Vérifiez que le téléviseur, le magnétoscope etc. est bien allumé. Dans le
cas d'un magnétoscope, insérez une cassette et faites-la passer. Vous vous
apercevrez que le bon code a été détecté car, à ce moment là, le matériel
s'éteindra ou la cassette s'arrêtera.
1Appuyez à la fois sur les touches et et maintenez ces touches
enfoncées pendant environ 3 secondes jusqu'à ce que la DEL verte
s'allume. (Relâchez les touches, la DEL verte doit rester allumée).
2Appuyez sur la touche pour commencer la recherche. Un autre code est
transmis à chaque fois que la DEL verte clignote. Lorsque le bon code a
été détecté, le matériel s'éteint (la cassette du magnétoscope s'arrête).
3Appuyez immédiatement sur la touche pour arrêter la recherche.
Si vous avez raté le bon code du fait que la recherche soit allée trop loin,
rallumez le matériel puis appuyez sur la touche pour retransmettre le
code précédent. Appuyez plusieurs fois sur la touche et maintenez-la
enfoncée jusqu'à ce que le matériel s'éteigne à nouveau.
4Dès que vous aurez trouvé le bon code, appuyez sur la touche pour le
mettre en mémoire. La DEL verte se mettra à clignoter deux fois.
Vous y êtes! Rallumez maintenant le matériel manuellement puis appuyez
sur quelques touches de la télécommande pour vérifier que le matériel
réagit correctement. Dans le cas extrêmement rare où ce n'est pas le cas,
recommencez alors l'opération à partir de l'étape no.1 afin de trouver un
meilleur code.
Dans le cas où aucun des codes ne marche ou, s'il vous manque toujours
certaines fonctions de votre télécommande d'origine, essayez alors la
solution proposée au paragraphe intitulé ‘Copier (apprendre) des codes à
partir de votre télécommande d'origine’ ou appelez notre ligne d'aide
téléphonique gratuite où des opérateurs seront en mesure de vous aider
quelque soit le problème auquel vous êtes confronté.
Notez ce code! Inscrivez le code correct à l'intérieur du compartiment de
piles et à la fin de ce manuel pour gagner du temps et dans le cas où il
vous faudrait à nouveau régler la télécommande. Si vous avez oublié de le
noter, vous avez toujours la possibilité de ‘lire’ le code sur la télécommande.
Voici comment:
1A cet effet, vérifiez que vous avez bien sélectionné le mode correct (avec
le ). Ensuite, appuyez à la fois sur les touches et et
maintenez-les enfoncées pendant environ 3 secondes jusqu'à ce que la
DEL verte s'allume. (Relâchez les touches. La DEL verte doit rester
allumée).
2Appuyez sur la touche (-/--). La DEL verte s'éteint.
3Appuyez sur la touche et comptez le nombre de clignotements de la
DEL verte. Il correspond au premier chiffre du code à 3 chiffres.
(L'absence de clignotement indique que le numéro est zéro).
Appuyez sur la touche et comptez le nombre de clignotements qui
correspond au deuxième chiffre.
Appuyez sur la touche et comptez le nombre de clignotements qui
correspond au troisième chiffre.
COPIEZ (APPRENEZ) LES CODES À PARTIR DE VOTRE
TÉLÉCOMMANDE D'ORIGINE
Si votre matériel ne fait pas partie de la liste des codes ou, dans le cas
où vous ne pouvez utiliser certains codes à partir de votre télécommande
d'origine, le RU460 vous offre la solution. En effet, il est en mesure de
copier et de faire la réplique de près de 100 codes à partir de votre
télécommande d'origine. Voici comment...
Avant de commencer, assurez-vous que vous êtes bien dans le mode que
vous voulez régler à savoir (TV, VCR, SAT/CBL, CD, AUDIO1, AUDIO2). La DEL
verte indique le mode sélectionné. Pour passer d'un mode à un autre,
appuyez une fois sur la touche pour l'activer et appuyez à nouveau
pour passer au mode suivant.
3
3
2
2
1
1
6
6
1
1
P
P
P
P
3
3
1
1

11
Français
RU240- page 11
REMARQUE:
Le RU460 peut être programmé entièrement selon vos besoins. Le RU460 vous
permet de copier des fonctions à partir de n'importe quelle combinaison
d'appareils et de les attribuer à n'importe quel mode. Vous pouvez par
exemple copier des fonctions à partir de votre télécommande de votre
deuxième magnétoscope en AUDIO2 ou copier des fonctions de la
télécommande de votre DVD en SAT/CBL.
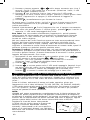
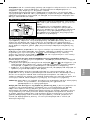
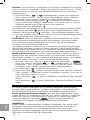
Dirigez votre télécommande de sorte qu'elle soit
bien en face de la fenêtre du senseur infrarouge
du RU460. Positionnez les deux télécommandes
à plat en les espaçant de 3 à 8 centimètres
l'une de l'autre. Veillez à ce que les deux
télécommandes aient des piles neuves.
Copier des codes de votre télécommande d'origine
Appuyez à la fois sur les touches et et maintenez ces touches
enfoncées pendant environ 3 secondes jusqu'à ce que la DEL verte DEL du
RU460 s'allume. (Relâchez les touches, la DEL verte doit rester allumée).
1Appuyez sur une touche du RU460 sous laquelle vous souhaitez copier la
fonction de votre télécommande d'origine. Dès que la DEL verte clignote
une fois, cela veut dire que le RU460 est prêt à recevoir un signal.
2Appuyez sur la touche de votre télécommande dont vous voulez copier
la fonction sur le RU460 et maintenez-la enfoncée jusqu'à ce que la DEL
verte DEL du RU460 clignote trois fois et finit par s'éteindre. Relâchez la
touche, vous venez de copier la fonction de la touche que vous avez
sélectionnée.
Voilà! Vous venez donc de copier une fonction sur le RU460. Cette touche est
enfin prête à transmettre la même fonction que votre télécommande d'origine.
Si vous souhaitez copier d'autres fonctions à partir de votre télécommande
d'origine, recommencez l'opération à partir de l'étape no.1.
Conseils: Choisissez des touches qui correspondent à celles de votre
télécommande d'origine pour les retenir plus facilement.
Si toutes les DELs clignotent une fois, cela veut dire que le RU460 n'a pas
bien reçu le signal.
– Veillez à ce que les télécommandes soient bien positionnées et
recommencez l'opération à partir de l'étape no.3.
– Assurez-vous que les piles des deux télécommandes sont neuves.
– Essayez de copier vos codes dans plusieurs conditions de luminosité. En
effet, l'éclairage de tube néon peut exercer une influence sur le signal
que vous êtes en train d'apprendre.
REMARQUE:
Dans le cas extrêmement rare, où le RU460 ne réagit pas du tout ou ne
fonctionne plus, enlevez les piles. Remettez les piles en place après 2 secondes.
La télécommande devrait à nouveau fonctionner normalement.
Notre RU460 a été conçu et testé à multiples reprises et est prêt à copier
pratiquement tout signal provenant d'une télécommande infrarouge. Dans
certains cas extrêmement rares, des fabricants utilisent des signaux
infrarouges qu'il est impossible de copier sur une télécommande quelque soit
le type. Mais nous insistons pour que vous essayiez la recherche sans mains
pour voir si ce code fait partie de labibliothèque préprogrammée.
Si vous n'avez plus de touches disponibles sur votre RU460 ou si vous
voulez copier des touches de moindre importance, vous pouvez le faire sous
shift (décaler). Voici comment: Assurez-vous que vous êtes bien dans le bon
mode du matériel que vous voulez régler et positionnez les télécommandes en
suivant les consignes mentionnées ci-dessus.
1Appuyez à la fois sur les touches et en les maintenant enfoncées
pendant environ 3 secondes jusqu'à ce que la DEL verte du RU460 s'allume.
(Relâchez les touches, la DEL verte doit rester allumée).
2Appuyez la touche en la maintenant enfoncée et appuyez ensuite sur
la touche du RU460 sous laquelle vous désirez copier la fonction de votre
télécommande d'origine jusqu'à ce que la DEL verte clignote une fois
indiquant que le RU460 est prêt à recevoir le signal. Relâchez ensuite les
deux touches.
S
S
6
6
4
4
6
6
4
4
3 - 8

12
Français
3Appuyez sur la touche de votre télécommande d'origine dont vous souhaitez
copier la fonction sur le RU460 et maintenez-la enfoncée jusqu'à ce que la
DEL verte de votre RU460 se mette à clignoter trois fois et finit par
s'éteindre. Relâchez la touche, la fonction de la touche que vous venez de
sélectionner vient d'être copiée.
REMARQUE:
Si vous copiez une fonction sous une touche spécifique du RU460, vous
effacerez par là-même le signal.
– Si vous voulez restaurer la fonction d'origine d'une touche spécifique,
suivez alors les consignes indiquées ci-dessous:
1Appuyez à la fois sur les touches et en les maintenant enfoncées
pendant environ 3 secondes jusqu'à ce que la DEL verte s'allume. (Relâchez
les touches, la DEL verte doit rester allumée).
2Appuyez sur la touche .
3Appuyez sur la touche dont vous voulez restaurer la fonction. Ça y est, la
touche va transmettre le signal préprogrammé.
– Si vous voulez restaurer toutes les fonctions de touches d'un mode en
particulier, suivez alors les consignes indiquées ci-dessous:
1Appuyez à la fois les touches et et maintenez les enfoncées pendant
environ 3 secondes jusqu'à ce que la DEL verte s'allume. (Relâchez les
touches, la DEL verte doit rester allumée).
2Appuyez sur la touche . Ça y est, les touches viennent de retrouver leur
fonction d'origine.
TRUCS ET ASTUCES PERFECTIONNÉS
Le RU460 peut être programmé dans sa bibliothèque quelque soit la
combinaison d'appareils préprogrammé. Vous trouverez ci-après un exemple. Il
est évident qu'il existe bien d'autres combinaisons.
Changement dumode AUDIO2 pourpiloter undeuxièmetéléviseur par exemple.
On utilise le mode AUDIO2 de cette télécommande pour piloter un matériel
supplémentaire. Elle est préréglée en usine pour piloter un amplificateur, mais
il est également possible de modifier ce réglage, par exemple, pour piloter un
deuxième téléviseur.
Avant de commencer, appuyez sur la touche pour sélectionner AUDIO2
et veillez à ce que le deuxième téléviseur soit bien allumé.
1Appuyez à la fois sur les touches et et maintenez ces touches
enfoncées pendant environ 3 secondes jusqu'à ce que la DEL verte s'allume.
(Relâchez les touches, la DEL verte doit rester allumée).
2Appuyez plusieurs fois sur la touche jusqu'à ce que la DEL verte
s'allume une deuxième fois. ) Sélectionnez le mode TV après que le témoin
lumineux vert DEL se soit allumé.
3Si vous connaissez la marque de votre deuxième téléviseur, tapez le code de
3 chiffres en utilisant le pavé numérique. La DEL verte clignotera deux fois.
Vous y êtes! Appuyez maintenant sur quelques touches de votre télécommande de
manière à vérifier que le deuxième téléviseur fonctionne correctement. Si ce n'est
pas le cas ou, si toutes les touches ne fonctionnent pas correctement, recommen-
cez l'opération à partir de l'étape no.1 en utilisant le code suivant de la liste.
Dans le cas extrêmement rare où, aucun des codes ne fonctionne, reportez-vous
alors aux consignes indiquées ci-dessous pour démarrer la recherche sans mains:
1Appuyez à la fois sur les touches et et maintenez ces touches
enfoncées pendant environ 3 secondes jusqu'à ce que la DEL verte s'allume.
(Relâchez les touches, la DEL verte doit rester allumée).
2Appuyez plusieurs fois sur la touche jusqu' au moment où la DEL
verte s'allume une deuxième fois. Sélectionnez alors le mode TV.
3Appuyez sur la touche pour démarrer la recherche. Un autre code est
transmis à chaque fois que la DEL verte clignote. Lorsque le bon code a été
trouvé, le deuxième téléviseur s'éteint.
4Appuyez alors immédiatement sur la touche pour arrêter la recherche.
Si vous avez raté le bon code parce que la recherche est allée trop loin,
réallumez alors le deuxième téléviseur. Appuyez ensuite sur la touche pour
transmettre à nouveau le code précédent. Appuyez plusieurs fois sur la
touche jusqu'à ce que le deuxième téléviseur s'éteigne à nouveau.
5Dès que vous aurez trouvé le bon code, appuyez sur la touche pour mettre
le code en mémoire. La DEL verte clignotera deux fois.
P
P
P
P
3
3
1
1
3
3
1
1
6
6
6
6
1
1
7
7
6
6
1
1

13
Français
Vous y êtes! Branchez à nouveau le deuxième téléviseur manuellement et
appuyez ensuite sur quelques touches de la télécommande pour vérifier le bon
fonctionnement du deuxième téléviseur. Dans le cas extrêmement rare où ce ne
serait pas le cas, recommencez l'opération à partir de l'étape no. 1 de manière
à trouver un meilleur code.
Conseil: Inscrivez le code à l'intérieur du compartiment de piles et à la fin de ce
manuel au cas où il vous faudrait à nouveau régler la télécommande.
Pour régler le volume du deuxième téléviseur
Si vous avez installé un deuxième téléviseur en mode AUDIO2, vous pourrez
également régler le volume de ce téléviseur en mode VCR.
Avant de commencer, appuyez sur la touche pour sélectionner VCR.
1Appuyez à la fois sur les touches et et maintenez ces touches
enfoncées (pendant environ 3 secondes) jusqu'à ce que la DEL verte s'allume.
2Appuyez sur la touche du pavé numérique.
3Appuyez plusieurs fois sur la touche jusqu'à ce que la DEL verte DEL
s'allume. Sélectionnez le mode AUDIO2 dès que la DEL verte se sera allumé
une deuxième fois.
4Appuyez sur n'importe quelle touche (à l'exception de ). Vous y êtes!
Maintenant que vous vous trouver en mode VCR, appuyez sur les touches
volume+ et volume- pour régler le volume de votre deuxième TV (AUDIO2).
VOUS AVEZ BESOIN D'AIDE?
Si vous avez des questions concernant votre télécommande ou s'il manque
certaines fonctions sur votre télécommande, il vous suffit d'appeler notre ligne
d'aide téléphonique gratuite! Avant d'appeler, veuillez bien lire votre manuel
avec toute l'attention nécessaire en effet, celui-ci reprend la plupart des
questions. Si toutefois vous ne trouvez pas réponse à vos questions, notez
alors toute information appropriée concernant votre matériel ci-dessous - ceci
facilitera la tâche de l'opérateur qui pourra vous aider plus rapidement.
Recherchez les numéros de modèle qui se trouvent dans le manuel de consignes
du matériel ou à l'arrière du matériel. Mettez-vous en face du matériel ce qui
permettra à l'opérateur de vérifier les fonctions de la télécommande.
la France: 0800-904-013, la Belgique: 0800-723-77,
la Suisse: 0800-554-166
Le numéro de modèle de votre télécommande universelle Philips est le suivant:
SBC RU460 Date de l'achat:
____/____/____
jour/mois/année
Philips vous propose à nouveau une télécommande universelle correspondant à vos besoins au fur
et à mesure que vous ajouterez de nouveaux composants à votre système de divertissement chez
vous. Contactez un revendeur local de télécommandes universelles Philips pour rechercher celle
qui vous convient parmi la gamme complète ci-dessous:
RU 110: Télécommande universelle pour téléviseur, facile à utiliser.
RU 410: 1 en 1 Télécommande universelle pour téléviseurs (TV) avec chiffres et télétexte.
RU 422: 2 en 1 Télécommande universelle pour téléviseurs (TV) et magnétoscopes (VCR).
RU 430: 3 en 1 Télécommande universelle pour téléviseurs (TV), magnétoscopes (VCR) et
récepteurs satellite/ télévision câblée (SAT/CBL).
RU 440: 4 en 1 Télécommande universelle pour téléviseurs (TV), magnétoscopes (VCR),
récepteurs satellite/télévision câblée (SAT/CBL) et magnétophones (AUX).
RU 455: 4 en 1 Télécommande universelle pour téléviseurs (TV), magnétoscopes (VCR),
récepteurs satellite/télévision câblée (SAT/CBL) et (AUX) pour un deuxième appareil
avec éclairage de fond très pratique.
RU 460: 6 en 1 Télécommande universelle - préprogrammée et capable d'apprendre.
Un autre produit très attractif de Philips: le jeu d'extension de télécommande SBC LI510 qui est
l'extension sans fil de votre télécommande à infrarouge (IR)! Ce système vous permet de
commander tout appareil piloté par infrarouge (à savoir récepteurs satellite, magnétoscopes ou
chaînes Hi-Fi) quelque soit l'endroit à l'intérieur ou à l'extérieur de votre domicile.
3
3
6
6
1
1
Matériel
TV
VCR
SAT
CD
AUDIO 1
AUDIO 2
Marque
Numéro de
modèle
No. de modèle de la
télécommande d'origine
Code

14
Deutsch
Bedienungsanleitung Deutsch
Sie haben mit dem Kauf dieser Universal-Fernbedienung von Philips eine gute
Wahl getroffen! Dieses Gerät ersetzt nicht weniger als sechs Einzelfern-
bedienungen und ist für die Bedienung der am häufigsten benutzten
Funktionen nahezu jeder Marke von Fernsehgeräten, Videorecordern,
Satellitenempfängern und Kabeldecodern, CD-Spielern und Audioempfängern
vorprogrammiert. Wollen Sie ein anderes Gerät bedienen, oder finden Sie Ihr
Gerät nicht in der Codeliste, bietet Ihnen die RU460 die Möglichkeit, die Code
Ihrer Originalfernbedienung zu kopieren. Und das Beste ist, daß sich das Gerät
schnell programmieren läßt, großen Bedienungskomfort bietet und mit seiner
grünen Hintergrundbeleuchtung sogar in schwach beleuchteten Räumen
benutzt werden kann! Und das geht so...
AUF EINEN BLICK
Sind die Batterien einmal eingesetzt, ist die Fernbedienung in Kombination
mit jedem Fernsehgerät, Videorecorder oder Satellitenempfänger, CD-Spieler,
Empfänger und Verstärker von Philips sofort betriebsbereit. Drücken Sie
einfach - wie nachstehend beschrieben - auf die Betriebsartwahltaste und
wählen Sie auf diese Weise das Philips-Gerät aus, das Sie bedienen möchten,
und drücken Sie zum Testen einige Tasten. Für Geräte anderer Marken muß die
Fernbedienung zunächst eingestellt werden, siehe dazu ‘Los geht's’.
Wählen Sie zwischen TV, VCR, SAT/CBL, CD, AUDIO1 oder AUDIO2 aus. Die
Fernbedienung verfügt über 6 Betriebsarten: Fernsehgerät (TV), Videorecorder
(VCR), Satellitenempfänger (SAT/CBL), CD-Spieler und andere Geräte (AUDIO1
& AUDIO2). Das grüne LED zeigt die aktivierte Betriebsart an. Durch
Betätigung der Taste können Sie in eine andere Betriebsart
umschalten. Durch einmaliges Betätigen wird die Betriebsart aktiviert und
durch nochmaliges Betätigen die nächste ausgewählt.
123
456
7
S
89
0
P
—VOLUME—
MENU
P
CD
AUDIO2
SAT/CBL
AUDIO1
VCR
TV
Die Ein/Aus-Taste schaltet Ihr Gerät aus (und ein, wenn
dies mit Ihrer Originalfernbedienung möglich ist).
Mit der Betriebsartwahltaste wählen Sie aus, ob Sie TV,
VCR, SAT/CBL, CD, AUDIO1 oder AUDIO2 bedienen.
Menü schaltet das Menü ein (und aus, wenn dies mit Ihrer
Originalfernbedienung möglich ist).
Kanal auf schaltet auf den nächsten Kanal um.
Kanal ab schaltet auf den vorigen Kanal um.
Lautstärke auf erhöht die Lautstärke.
Lautstärke ab senkt die Lautstärke.
Tastenfeld für Direktwahl der Kanäle und anderer Funktionen.
Stumm schaltet den Ton des Fernsehgerätes ab und wieder ein.
Shift: Diese Taste während der Betätigung anderer Tasten
festhalten, um auf Zusatzfunktionen zuzugreifen
(falls an Ihren Geräten vorhanden). Zum Beispiel:
Shift - P+: Helligkeit+/Menü aufwärts
Shift - P- : Helligkeit-/Menü abwärts
Shift - Lautstärke +: Farbe+/Menü rechts
Shift - Lautstärke -: Farbe-/Menü links
Probieren Sie diese und andere Kombinationen an Ihren
Geräten, um auf diese Weise herauszufinden, welche
Funktionen vorhanden sind.
1/2 Digits schaltet von der ein- auf die zweistellige
Kanalwahl und Wiedergabe um.
für TV FastText für VCR
rot Rückspulen
grün Stopp
gelb Wiedergabe
blau Vorspulen
weiß Pause
Aufnahme
Teletext Off schaltet den Teletext aus
Teletext On schaltet den Teletext ein.
Teletext Enlarge vergrößert die Teletext-Seite auf dem Bildschirm.
Teletext Hold sorgt dafür, daß die aktuelle Teletext-Seite
auf dem Bildschirm verbleibt.
Backlighting schaltet die Hintergrundbeleuchtung der Fern-
bedienung ein bzw. aus; die Beleuchtung schaltet sich vier
Sekunden nach dem letzten Drücken der Taste automatisch wieder aus.

15
Deutsch
RU240- page 15
Probieren Sie es aus! Die einfachste Weise herauszufinden, wie Ihre neue
Fernbedienung funktioniert: Betätigen Sie einfach einige Tasten und warten
Sie ab, was passiert. Keine Sorge, Sie können damit keinen Schaden
anrichten! Der größte Teil der Tasten funktioniert wie auf Ihrer
Originalfernbedienung. Wenn Ihr Fernsehgerät oder Videorecorder nicht über
eine bestimmte Funktion verfügt, wird die Betätigung der entsprechenden
Taste natürlich auch keinen Effekt haben.
DENKEN SIE AN DIE BATTERIEN!
Sie benötigen zwei Batterien 1,5 V - aber nur
vom Typ UM3, LR6 oder AA. Setzen Sie sie so
ein:
Denken Sie daran, die Batterien mindestens
einmal jährlich zu ersetzen. Die RU460
besitzt die einzigartige Funktion, daß die
programmierten oder erlernten Code bei
leeren Batterien nicht verloren gehen.
LOS GEHT'S
Diese Fernbedienung ist in Kombination mit jedem RC5 Fernseher,
Videorecorder, Satellitenempfänger, CD-Spieler, Empfänger und Verstärker
von Philips sofort betriebsbereit. Für Geräte anderer Marken muß die
Fernbedienung erst eingestellt werden. Dank der intelligenten
Installationshilfe von Philips, dem sogenannten ‘Simple System Setup’,
benötigen Sie dazu nur wenige Sekunden!
Kontrollieren Sie vorher, ob die richtige Betriebsart für das Gerät, das Sie
einrichten möchten, aktiviert ist (TV, VCR, SAT/CBL, CD, AUDIO1, AUDIO2).
Die grüne LED zeigt die ausgewählte Betriebsart an. Durch Betätigung der
Taste können Sie in eine andere Betriebsart umschalten. Durch
einmaliges Betätigen wird die Betriebsart aktiviert und durch nochmaliges
Betätigen die nächste ausgewählt. Überzeugen Sie sich auch davon, daß das
Gerät eingeschaltet ist. Setzen Sie sich dem Gerät genau gegenüber.
Wenn Ihnen die Marke Ihres Gerätes bekannt ist und es sich bei Ihrem
Gerät um einen Fernseher, Satellitenempfänger, Kabeldecoder, einen CD-
Spieler, Verstärker oder Empfänger handelt, können Sie in der am Schluß
dieses Hefts befindlichen Code-Liste den ersten dreistelligen Code für Ihr
Gerät nachschlagen. Ist Ihr Gerät nicht in der Liste angeführt, befolgen Sie
die Anweisungen im Abschnitt ‘Kopieren der Code von Ihrer
Originalfernbedienung’.
1 Die Tasten und gleichzeitig drücken und circa 3 Sekunden
gedrückt halten, bis die grüne LED aufleuchtet. (Bei Loslassen der
Tasten muß die grüne LED weiterhin leuchten.)
2 Den dreistelligen Code über das Tastenfeld eingeben. Die grüne LED
blinkt zweimal.
Das ist alles! Betätigen Sie nun einige Tasten auf der Fernbedienung, um
die korrekte Reaktion des Gerätes zu prüfen. Sollte dies nicht der Fall sein
oder reagieren nicht alle Tasten korrekt, dann versuchen Sie es nochmals
mit Hilfe des nächsten Codes in der Liste. In seltenen Fällen, in denen
keiner der Codes korrekt funktioniert, befolgen Sie die Anweisungen des
nächsten Abschnitts.
Tip: Für den Fall, daß die Fernbedienung erneut eingestellt werden muß,
notieren Sie sich an der Innenseite des Batterieschachts und hinten in
diesem Heft den Code.
Auch wenn Ihnen die Marke Ihres Gerätes nicht bekannt ist oder Sie es
nicht in der Code-Liste finden können, läßt sich die Fernbedienung im
Handumdrehen programmieren. Die patentierte Suchfunktion ‘Handsfree
Autosearch’ von Philips prüft der Reihe nach alle Codes und findet den
richtigen für Sie heraus! Die Suchzeit beträgt durchschnittlich circa 90
Sekunden. (Die maximale Suchzeit beträgt für TV 5 Minuten, für VCR 2
Minuten, für SAT 4 Minuten, für CD 1 Minute und für Empfänger/Verstärker 1
Minute.)
3
3
1
1
+
+
-
+

16
Deutsch
RU240- page 16
Kontrollieren Sie, ob das Fernsehgerät, der Videorecorder, etc.
eingeschaltet ist. Bei einem Videorecorder eine Videokassette einlegen und
die Wiedergabe starten. Bei dem richtigen Code wird das Gerät bzw. bei
einem Videorecorder die Wiedergabe ausgeschaltet.
1 und gleichzeitig drücken und circa 3 Sekunden gedrückt halten,
bis die grüne LED aufleuchtet. (Bei Loslassen der Tasten muß die grüne
LED weiterhin leuchten.)
2 drücken, um die Suche zu starten. Jedesmal, wenn die grüne LED
blinkt, wird ein anderer Code übertragen. Sobald der richtige Code
gefunden ist, wird das Gerät ausgeschaltet (bei einem Videorecorder
schaltet sich die Wiedergabe aus).
3 Sofort drücken, um die Suche abzubrechen.
Wenn Sie den richtigen Code verpaßt haben, da die Suchaktion zu weit
gegangen ist, das Gerät erneut einschalten, anschließend drücken, um
den vorigen Code erneut zu übertragen. wiederholt drücken, bis sich das
Gerät wieder ausschaltet.
4 Haben Sie den richtigen Code gefunden, drücken Sie zum Abspeichern
des Codes. Die grüne LED blinkt zweimal.
Das ist alles! Schalten Sie das Gerät jetzt von Hand wieder ein und
betätigen Sie anschließend einige Tasten auf der Fernbedienung, um die
korrekte Reaktion des Gerätes zu prüfen. In seltenen Fällen, in denen dies
nicht gelingt, zur Ermittlung eines besseren Codes den Vorgang ab Schritt 1
wiederholen.
In Fällen, in denen keiner der Code funktioniert oder Sie weiterhin
bestimmte Funktionen Ihrer Originalfernbedienung vermissen, probieren Sie
die Lösung aus, die wir Ihnen im Abschnitt ‘Kopieren der Code von Ihrer
Originalfernbedienung’ anbieten, oder rufen Sie kostenlos unsere Helpline
an, die Ihnen gerne bei allen Problemen helfen wird.
Notieren Sie den Code! Zur Zeitersparnis oder für den Fall, daß eine
erneute Einstellung erforderlich sein sollte, den richtigen Code an der
Innenseite des Batterieschachts und hinten in diesem Heft notieren. Falls
Sie vergaßen, den Code zu notieren, können Sie den Code von der
Fernbedienung 'ablesen'. Dies geschieht wie folgt:
1 Die Auswahl der korrekten Betriebsart kontrollieren .
Anschließend gleichzeitig und drücken
und circa 3 Sekunden gedrückt halten, bis die grüne LED aufleuchtet.
(Bei Loslassen der Tasten muß die grüne LED weiterhin leuchten.)
2 drücken. Die grüne LED erlischt.
3 drücken und zählen, wie oft die grüne LED blinkt. Dies ist die
erste Ziffer des dreistelligen Codes. (Wenn die grüne LED keinmal
blinkt, bedeutet dies, daß die Ziffer Null ist.)
4 drücken und zählen, wie oft die grüne LED aufleuchtet. Dies ist
die zweite Code-Ziffer.
5 drücken und zählen, wie oft die grüne LED aufleuchtet. Dies ist
die dritte Code-Ziffer.
Kopieren der Code von Ihrer Originalfernbedienung
Ist Ihr Gerät nicht in der Code-Liste angeführt oder fehlen bestimmte
Code in Ihrer Fernbedienung, bietet die RU460 die Lösung an. Sie kann bis
zu 100 Code Ihrer Originalfernbedienungen kopieren und wiederholen. So
geht's ...
Kontrollieren Sie vorher, ob die richtige Betriebsart für das Gerät, das Sie
einrichten möchten, aktiviert ist (TV, VCR, SAT/CBL, CD, AUDIO1, AUDIO2).
Die grüne LED zeigt die ausgewählte Betriebsart an. Durch Betätigung der
Taste können Sie auf eine andere Betriebsart umschalten. Durch
einmaliges Betätigen wird die Betriebsart aktiviert und durch nochmaliges
Betätigen die nächste ausgewählt.
3
3
2
2
1
1
6
6
1
1
P
P
P
P
3
3
1
1

17
Deutsch
RU240- page 17
BEACHTE:
Sie können die RU460 kann ganz nach Ihren Bedürfnissen programmieren. Mit der
RU460 können Sie Funktionen einer beliebigen Kombination von Geräten kopieren
und sie jeder gewünschten Betriebsart zuweisen. Sie können zum Beispiel
Funktionen Der Fernbedienung Ihres zweiten Videorecorders unter AUDIO2
kopieren oder Funktionen Ihrer DVD Fernbedienung unter SAT/CBL kopieren.
Plazieren Sie Ihre Originalfernbedienung so, daß
die Vorderseite dem Infrarotsensorfenster der
RU460 gegenüber liegt. Legen Sie beide
Fernbedienungen in einem Abstand von 3,8 cm
auf einen flachen Untergrund. Stellen Sie sicher,
daß in beide Fernbedienungen frische Batterien
eingesetzt wurden.
Kopieren der Code von Ihrer Originalfernbedienung
und gleichzeitig drücken und circa 3 Sekunden lang gedrückt halten,
bis die grüne LED der RU460 aufleuchtet. (Bei Loslassen der Tasten muß die
grüne LED weiterhin leuchten.)
1 Drücken Sie eine Taste auf der RU460, unter die Sie eine Funktion Ihrer
Originalfernbedienung kopieren möchten. Die grüne LED blinkt einmal, um
anzuzeigen, daß die RU460 für den Empfang eines Signals bereit ist.
2 Drücken Sie die Taste auf Ihrer Originalfernbedienung, deren Funktion Sie in
die RU460 kopieren möchten, und halten Sie diese gedrückt, bis die grüne
LED der RU460 dreimal blinkt und anschließend erlischt. Lassen Sie die Taste
los, die Funktion der ausgewählten Taste wurde erfolgreich kopiert.
Das war's! Sie haben jetzt eine Funktion in die RU460 kopiert, die betreffende
Taste überträgt jetzt die gleiche Funktion wie die Ihrer Originalfernbedienung.
Wollen Sie weitere Funktionen Ihrer Originalfernbedienung kopieren, beginnen
Sie erneut mit Schritt 1.
Tips: Wählen Sie Tasten aus, die den Tasten Ihrer Originalfernbedienung
entsprechen, um sich diese leichter merken zu können.
Blinken die LEDs einmal, hat die RU460 das Signal nicht korrekt empfangen.
– Prüfen Sie, ob die Fernbedienungen korrekt positioniert sind und probieren Sie
es erneut ab Schritt 3.
– Stellen Sie sicher, daß in beide Fernbedienungen frische Batterien eingesetzt
wurden.
– Versuchen Sie, Ihre Code unter anderen Lichtbedingungen zu kopieren. Licht
von Leuchtstoffröhren kann das Signal beeinflussen, das Sie kopieren.
BEACHTE:
In seltenen Fällen, in denen die RU460 nicht reagiert oder nicht mehr
funktioniert, nehmen Sie die Batterien aus und legen Sie sie nach 2 Sekunden
wieder ein. Die Fernbedienung sollte jetzt wieder korrekt funktionieren.
Unsere RU460 wurde eingehend getestet und ist darauf ausgelegt, fast alle
Infrarot-Fernbedienungssignale zu kopieren. In einigen seltenen Fällen benutzen
Hersteller Infrarotsignale, die in keine Fernbedienung kopiert werden können.
Probieren Sie aber bitte mit der ‘Handsfree Autosearch’, ob der betreffende Code in
unserer vorprogrammierten Bibliothek enthalten ist.
Stehen nicht mehr ausreichend Tasten auf der RU460 zur Verfügung, oder
wollen Sie weniger wichtige Funktionen kopieren, können Sie diese unter
Shift kopieren. So geht's:
Stellen Sie sicher, daß sich die Fernbedienung in der richtigen Betriebsart für
das Gerät befindet, das sie einrichten möchten, und positionieren Sie die
Fernbedienungen wie vorhergehend beschrieben.
1 und gleichzeitig drücken und circa 3 Sekunden gedrückt halten, bis
die grüne LED der RU460 aufleuchtet. (Bei Loslassen der Tasten muß die
grüne LED weiterhin leuchten.)
2Drücken Sie zuerst und halten Sie diese gedrückt. Drücken Sie dann die
Taste auf der RU460, unter die Sie eine Funktion von Ihrer
Originalfernbedienung kopieren möchten. Die grüne LED blinkt einmal, um
anzuzeigen, daß die RU460 für den Empfang eines Signals bereit ist. Lassen
Sie beide Tasten los.
3Drücken Sie die Taste auf Ihrer Originalfernbedienung, deren Funktion Sie in
die RU460 kopieren möchten, und halten Sie diese gedrückt, bis die grüne
LED der RU460 dreimal blinkt und anschließend erlischt. Lassen Sie die Taste
los, die Funktion der ausgewählten Taste wurde erfolgreich kopiert.
S
S
6
6
4
4
6
6
4
4
3 - 8

18
Deutsch
BEACHTE:
Wenn Sie eine Funktion unter eine bestimmte Taste der RU460 kopieren,
wird das alte Signal gelöscht.
– Möchten Sie die ursprüngliche Funktion einer bestimmten Taste
wiederherstellen, befolgen Sie bitte nachstehende Anweisungen:
1 und gleichzeitig drücken und circa 3 Sekunden gedrückt halten,
bis die grüne LED aufleuchtet. (Bei Loslassen der Tasten muß die grüne
LED weiterhin leuchten.)
2 drücken.
3Drücken Sie die Taste, deren Funktion Sie wiederherstellen möchten. Das
war's, die Taste überträgt wieder das vorprogrammierte Signal.
– Möchten Sie die Funktion aller Tasten in einer bestimmten
Betriebsart wiederherstellen, gehen Sie bitte wie folgt vor:
1 und gleichzeitig drücken und circa 3 Sekunden gedrückt halten,
bis die grüne LED aufleuchtet. (Bei Loslassen der Tasten muß die grüne
LED weiterhin leuchten.)
2 drücken. Das war's, Sie haben jetzt alle Tasten wieder auf ihre
ursprünglichen Funktionen eingestellt.
TIPS UND TRICK FÜR FORTGESCHRITTENE
Die RU460 kann für jede beliebige Kombination von Geräten programmiert
werden, die in Ihrer Bibliothek vorprogrammiert sind. Nachfolgend ein
Beispiel, aber natürlich sind andere Kombinationen ebenfalls möglich.
Änderung der Betriebsart AUDIO2, zum Beispiel zur Bedienung eines
zweiten Fernsehgerätes.
Die AUDIO2 Betriebsart dieser Fernbedienung wird zur Bedienung eines
zusätzlichen Geräts benutzt. Sie ist werksseitig auf die Bedienung eines
Verstärkers eingerichtet, Sie können sie jedoch in eine andere Betriebsart
umprogrammieren, zum Beispiel zur Bedienung eines zweiten Fernsehgeräts.
Drücken Sie zuerst , um AUDIO2 auszuwählen, und prüfen Sie, ob
das zweite Fernsehgerät eingeschaltet ist.
1 und gleichzeitig drücken und circa 3 Sekunden gedrückt halten,
bis die grüne LED aufleuchtet. (Bei Loslassen der Tasten muß die grüne
LED weiterhin leuchten.)
2 wiederholt drücken, bis die zweite LED aufleuchtet. Die TV
Betriebsart mit der zweiten LED auswählen.
3Kennen Sie die Marke Ihres zweiten Fernsehgeräts, geben Sie über das
Tastenfeld den dreistelligen Code ein. Die grüne LED blinkt zweimal.
Das ist alles! Drücken Sie jetzt einige Tasten der Fernbedienung, um zu
prüfen, ob das zweite Fernsehgerät korrekt reagiert. Ist das nicht der Fall
oder reagieren nicht alle Tasten korrekt, versuchen Sie es erneut ab Schritt
1 mit dem nächsten Code in der Liste. In dem seltenen Fall, daß keiner der
Code korrekt funktioniert, befolgen Sie bitte die nachstehenden
Anweisungen zum Starten der ‘Handsfree Autosearch’:
1 und gleichzeitig drücken und circa 3 Sekunden gedrückt halten,
bis die grüne LED aufleuchtet. (Bei Loslassen der Tasten muß die grüne
LED weiterhin leuchten.)
2 wiederholt drücken, bis die zweite LED aufleuchtet. Mit der
zweiten LED die TV Betriebsart auswählen.
3Drücken Sie , um die Suche zu starten. Bei jedem Blinken der grünen
LED wird ein anderer Code übertragen. Wurde der korrekte Code gefunden,
schaltet sich das zweite Fernsehgerät aus.
4Sofort drücken, um die Suche abzubrechen.
Wenn Sie den richtigen Code verpaßt haben, da die Suchaktion zu weit
gegangen ist, das zweite Fernsehgerät erneut einschalten, anschließend
drücken, um den vorigen Code erneut zu übertragen. wiederholt
drücken, bis sich das zweite Fernsehgerät wieder ausschaltet.
5Haben Sie den richtigen Code gefunden, drücken Sie zum Abspeichern
des Codes. Die grüne LED blinkt zweimal.
Das ist alles! Schalten Sie das zweite Fernsehgerät jetzt von Hand wieder
ein und betätigen Sie anschließend einige Tasten auf der Fernbedienung,
um die korrekte Reaktion des zweiten Fernsehgerätes zu prüfen. In den
seltenen Fällen, in denen dies nicht gelingt, zur Ermittlung eines besseren
Codes den Vorgang ab Schritt 1 wiederholen.
P
P
P
P
3
3
1
1
3
3
1
1
6
6
6
6
1
1
7
7
6
6
1
1

19
Deutsch
Tip: Für den Fall, daß die Fernbedienung erneut eingestellt werden muß,
notieren Sie sich an der Innenseite des Batterieschachts und hinten in
diesem Heft den Code.
Lautstärkeregelung des zweiten Fernsehgerätes
Wenn Sie ein zweites Fernsehgerät unter AUDIO2 programmiert haben,
können Sie auch die Lautstärke dieses Fernsehgerätes bei aktivierter VCR-
Betriebsart regeln.
Zuerst drücken, um VCR auszuwählen.
1 und gleichzeitig drücken und gedrückt halten, bis die grüne LED
aufleuchtet (circa 3 Sekunden).
2Mit dem Tastenfeld eingeben.
3 wiederholt drücken, bis die zweite LED aufleuchtet. Mit der
zweiten LED AUDIO2 auswählen.
4Eine beliebige Taste drücken (außer ). Das ist alles!
Stellen Sie jetzt bei aktivierter VCR-Betriebsart mit (Lautstärke+ bzw.
Lautstärke- die Lautstärke des zweiten (AUDIO2) Fernsehgerätes ein.
SIE BRAUCHEN HILFE?
Sollten Sie zu Ihrer Fernbedienung Fragen haben oder Ihrer Fernbedienung
bestimmte Funktionen fehlen, rufen Sie kostenlos unseren Helpline an! Lesen
Sie vor Ihrem Anruf die Anleitung bitte sorgfältig durch. Die meisten Fragen
sind darin beantwortet. Falls Sie keine Antwort auf Ihre Fragen finden, tragen
Sie einige wichtige Angaben zu Ihren Geräten in die nachstehende Tabelle
ein. Damit können Ihnen die Mitarbeiter Helpline schneller behilflich sein.
Schlagen Sie die Modellnummern in der Bedienungsanleitung der Geräte nach
oder schauen Sie auf der Rückseite der Geräte nach. Stellen Sie sich vor das
Gerät - auf diese können unsere Mitarbeiter helfen, die Funktionalität Ihrer
Fernbedienung zu prüfen.
In Deutschland unter der Rufnummer 0130 818 387, in der Schweiz 0800 554
166 und in Österreich 0660 6814.
Die Modellnummer Ihrer Philips Universal-Fernbedienung lautet:
SBC RU460 Kaufdatum:
____/____/____
Tag/Monat/Jahr
Auch dann, wenn Sie Ihr Home Entertainment-System um neue Komponenten er-
weitern, bietet Philips eine auf Ihren neuerlichen Bedarf abgestimmte Universal-
Fernbedienung an. Schauen Sie sich bei einem Händler in Ihrer Nähe das folgende,
einzigartige Komplettsortiment an Universal-Fernbedienungen von Philips an.
RU 110: Einfache Universal-Fernbedienung für Fernsehgeräte
RU 410: ’1 in 1’ Universal-Fernbedienung für Fernsehgeräte mit Ziffern und Teletext.
RU 422: ’2 in 1’ Universal-Fernbedienung für Fernsehgeräte und Videorecorder
RU 430: ’3 in 1’ Universalfernbedienung für Fernsehgeräte, Videorecorder und
Satellitenempfänger/Kabeldecoder
RU 440: ’4 in 1’ Universal-Fernbedienung für Fernsehgeräte, Videorecorder,
Satellitenempfänger/Kabeldecoder und Audio
RU 455: ’4 in 1’ Universal-Fernbedienung für Fernsehgeräte, Videorecorder,
Satellitenempfänger/Kabeldecoder und AUX für ein zweites Gerät, mit
bequemer Hintergrundbeleuchtung
Ein weiteres erstklassiges Produkt von Philips ist die erweiterte Fernbedienung SBC
LI510, die drahtlose Erweiterung Ihrer Infrarot- (IR-) Fernbedienung! Dieses System
ermöglicht Ihnen die Bedienung jedes IR-gesteuerten Geräts (d.h. Satellitenempfänger,
Videorecorder oder Hi-Fi-Geräte) von jeder beliebigen Stelle im oder um
Ihr Heim aus.
3
3
6
6
1
1
Gerät
TV
VCR
SAT
CD
AUDIO 1
AUDIO 2
Marke Modell nr.
Modell nr. der
Originalfernbedienung
Code

20
Nederlands
Gebruiksaanwijzing Nederlands
U heeft zojuist een uitstekende keuze gemaakt bij het aanschaffen van deze
universele Philips-afstandsbediening! Deze afstandsbediening vervangt zes
verschillende afstandsbedieningen en is voorgeprogrammeerd om de meest
gebruikte functies van zowat elk merk tv, videorecorder, satellietontvanger,
decoder, cd-speler en audioreceiver te bedienen. Wilt u er een ander apparaat
mee bedienen of is uw apparaat niet in de codelijst opgenomen dan biedt de
RU460 de mogelijkheid om de codes van uw oorspronkelijke afstandsbediening te
kopiëren (te leren). Maar het allerbeste is nog dat de afstandsbediening
eenvoudig te programmeren en makkelijk te bedienen is, en dankzij de groene
achtergrondverlichting zelfs in een verduisterde kamer! Zo gaat u te werk...
IN HET KORT
Z
odra u de batterijen in de afstandsbediening geplaatst heeft, kunt u met de
afstandsbediening elke Philips-tv, -videorecorder, -satellietontvanger, -cd-speler, -
tuner en -versterker met RC5-code bedienen. Druk eerst - zoals hieronder
beschreven - op de bronkeuzetoets die bij het Philips-apparaat hoort dat u wilt
bedienen, en druk vervolgens op enkele toetsen om te testen. Voor andere
merken moet u de afstandsbediening eerst programmeren (zie ‘Aan de slag’)
Kies TV, VCR, SAT/CBL, CD, AUDIO1 of AUDIO2. De afstandsbediening geeft u
de keuze tussen 6 apparaten: tv (TV), videorecorder (VCR), satellietontvanger
(SAT/CBL), cd-speler (CD) en andere apparatuur (AUDIO1 & AUDIO2). De
groene indicator geeft aan welk apparaat u gekozen heeft. Om een ander
apparaat te kiezen drukt u eerst eenmaal op om te activeren en
vervolgens drukt u opnieuw op deze toets om het volgende apparaat te kiezen.
123
456
7
S
89
0
P
—VOLUME—
MENU
P
CD
AUDIO2
SAT/CBL
AUDIO1
VCR
TV
‘Aan-/uit’ voor het uitzetten van uw apparaat (en aanzetten,
indien dit ook mogelijk was met uw oude afstandsbediening)
Met de ‘Bronkeuzetoets’ kiest u het apparaat dat u wilt
bedienen: TV, VCR, SAT/CBL, CD, AUDIO1 of AUDIO2
Met ‘Menu’ zet u het menu aan (en uit, indien dit ook
mogelijk was met uw oude afstandsbediening)
Met ‘Zender omhoog’ kiest u de volgende zender
Met ‘Zender omlaag’ kiest u de vorige zender
‘Volume omhoog’ zet het geluid van de tv harder
‘Volume omlaag’ zet het geluid van de tv zachter
De Cijfertoetsen dienen voor het rechtstreeks kiezen van
een zender en andere functies
‘Klank uit’ zet het geluid aan en uit
Shift: houd deze toets ingedrukt terwijl u op een andere toets drukt
voor extra functies (indien aanwezig op uw apparatuur). Bijvoorbeeld:
- Shift - P+: helderheid+/menu omhoog
- Shift - P- : helderheid-/menu omlaag
- Shift - volume+: kleur+/menu naar rechts
- Shift - volume-: kleur-/menu naar links
Door deze en andere combinaties op uw apparaat uit te
proberen, kunt u ontdekken welke functies beschikbaar zijn.
1/2 Cijfers: om het zendernummer met 1 of 2 cijfers in te
toetsen en weer te geven
voor TV FastText voor VCR
rood Terugspoelen
groen Stop
geel Afspelen
blauw Vooruitspoelen
wit Pauze
Opnemen
‘Teletekst uit’ zet de teletekst uit
‘Teletekst aan’ zet de teletekst aan
‘Teletekst vergroten’ vergroot de teletekstpagina
‘Teletekst vasthouden’ houdt de huidige pagina vast op het scherm
‘
‘
'Achtergrondverlichting’ zet de verlichting van de toetsen aan
en uit; de verlichting blijft 4 seconden branden nadat u de
laatste keer op een toets gedrukt heeft.
Sidan laddas...
Sidan laddas...
Sidan laddas...
Sidan laddas...
Sidan laddas...
Sidan laddas...
Sidan laddas...
Sidan laddas...
Sidan laddas...
Sidan laddas...
Sidan laddas...
Sidan laddas...
Sidan laddas...
Sidan laddas...
Sidan laddas...
Sidan laddas...
Sidan laddas...
Sidan laddas...
Sidan laddas...
Sidan laddas...
Sidan laddas...
Sidan laddas...
Sidan laddas...
Sidan laddas...
Sidan laddas...
Sidan laddas...
Sidan laddas...
Sidan laddas...
Sidan laddas...
Sidan laddas...
Sidan laddas...
Sidan laddas...
Sidan laddas...
Sidan laddas...
Sidan laddas...
Sidan laddas...
Sidan laddas...
Sidan laddas...
Sidan laddas...
Sidan laddas...
Sidan laddas...
Sidan laddas...
Sidan laddas...
Sidan laddas...
Sidan laddas...
Sidan laddas...
Sidan laddas...
Sidan laddas...
Sidan laddas...
Sidan laddas...
Sidan laddas...
Sidan laddas...
Sidan laddas...
Sidan laddas...
Sidan laddas...
Sidan laddas...
Sidan laddas...
Sidan laddas...
Sidan laddas...
Sidan laddas...
Sidan laddas...
Sidan laddas...
Sidan laddas...
Sidan laddas...
Sidan laddas...
Sidan laddas...
Sidan laddas...
Sidan laddas...
Sidan laddas...
-
 1
1
-
 2
2
-
 3
3
-
 4
4
-
 5
5
-
 6
6
-
 7
7
-
 8
8
-
 9
9
-
 10
10
-
 11
11
-
 12
12
-
 13
13
-
 14
14
-
 15
15
-
 16
16
-
 17
17
-
 18
18
-
 19
19
-
 20
20
-
 21
21
-
 22
22
-
 23
23
-
 24
24
-
 25
25
-
 26
26
-
 27
27
-
 28
28
-
 29
29
-
 30
30
-
 31
31
-
 32
32
-
 33
33
-
 34
34
-
 35
35
-
 36
36
-
 37
37
-
 38
38
-
 39
39
-
 40
40
-
 41
41
-
 42
42
-
 43
43
-
 44
44
-
 45
45
-
 46
46
-
 47
47
-
 48
48
-
 49
49
-
 50
50
-
 51
51
-
 52
52
-
 53
53
-
 54
54
-
 55
55
-
 56
56
-
 57
57
-
 58
58
-
 59
59
-
 60
60
-
 61
61
-
 62
62
-
 63
63
-
 64
64
-
 65
65
-
 66
66
-
 67
67
-
 68
68
-
 69
69
-
 70
70
-
 71
71
-
 72
72
-
 73
73
-
 74
74
-
 75
75
-
 76
76
-
 77
77
-
 78
78
-
 79
79
-
 80
80
-
 81
81
-
 82
82
-
 83
83
-
 84
84
-
 85
85
-
 86
86
-
 87
87
-
 88
88
-
 89
89


på andra språk
- italiano: Philips SBCRU460/85 Manuale utente
- Deutsch: Philips SBCRU460/85 Benutzerhandbuch
- português: Philips SBCRU460/85 Manual do usuário
- français: Philips SBCRU460/85 Manuel utilisateur
- dansk: Philips SBCRU460/85 Brugermanual
- Nederlands: Philips SBCRU460/85 Handleiding
Relaterade papper
-
Philips sbc ru 430 Användarmanual
-
-
-
-
-
Philips sbc ru 110 Användarmanual
-
-
-
-