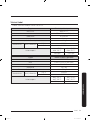
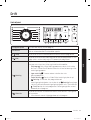
Samsung WW70J5535MW Bruksanvisning
- Kategori
- Tvättmaskiner
- Typ
- Bruksanvisning
Denna manual är också lämplig för

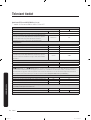
Washing Machine
User manual
WW8*J5**5**/WW7*J5**5**
Untitled-2 1 2017-03-04 3:22:47
Sidan laddas...


English4
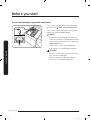
Safety information
Congratulations on your new Samsung washing machine. This manual contains important
information on the installation, use and care of your appliance. Please take some time to
read this manual to take full advantage of your washing machine’s many benets and
features.
What you need to know about the safety instructions
Please read this manual thoroughly to ensure that you know how to safely and efciently
operate the extensive features and functions of your new appliance. Please store the
manual in a safe location close to the appliance for future reference. Use this appliance
only for its intended purpose as described in this instruction manual.
Warnings and Important Safety Instructions in this manual do not cover all possible
conditions and situations that may occur. It is your responsibility to use common sense,
caution and care when installing, maintaining and operating your washing machine.
Because the following operating instructions cover various models, the characteristics of
your washing machine may differ slightly from those described in this manual and not
all warning signs may be applicable. If you have any questions or concerns, contact your
nearest service centre or nd help and information online at www.samsung.com.
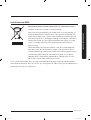
Important safety symbols
What the icons and signs in this user manual mean:
WARNING
Hazards or unsafe practices that may result in severe personal injury, death and/or
property damage.
CAUTION
Hazards or unsafe practices that may result in personal injury and/or property damage.
NOTE
Indicates that a risk of personal injury or material damage exists.
Safety information
Untitled-2 4 2017-03-04 3:22:47
Sidan laddas...

Safety information
English6
Safety information
4. If the supply cord is damaged, it must be replaced by the
manufacturer, its service agent or similarly qualied persons in
order to avoid a hazard.
5. The new hose-sets supplied with the appliance are to be used and
old hose-sets should not be reused.
6. For appliances with ventilation openings in the base, a carpet must
not obstruct the openings.
7. For use in Europe: Children of less than 3 years should be kept
away unless continuously supervised.
8. CAUTION: In order to avoid a hazard due to inadvertent resetting
of the thermal cut-out, this appliance must not be supplied through
an external switching device, such as a timer, or connected to a
circuit that is regularly switched on and off by the utility.
Critical installation warnings
WARNING
The installation of this appliance must be performed by a qualied technician or service
company.
• Failure to do so may result in electric shock, re, an explosion, problems with the
product, or injury.
The appliance is heavy, therefore take care when lifting it.
Plug the power cord into a wall socket that meets local electrical specications. Use the
socket for this appliance only, and do not use an extension cord.
• Sharing a wall socket with other appliances using a power strip or extending the power
cord may result in electric shock or re.
• Ensure that the power voltage, frequency, and current are the same as those of the
product specications. Failure to do so may result in electric shock or re. Plug the
power plug into the wall socket rmly.
Remove all foreign substances such as dust or water from the power plug terminals and
contact points using a dry cloth on a regular basis.
• Unplug the power plug and clean it with a dry cloth.
Untitled-2 6 2017-03-04 3:22:47
Sidan laddas...
Sidan laddas...
Sidan laddas...
Sidan laddas...
Sidan laddas...
Sidan laddas...
Sidan laddas...
Sidan laddas...
Sidan laddas...

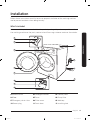
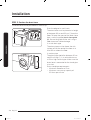
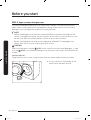
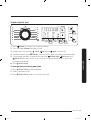
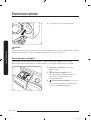
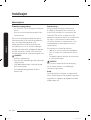
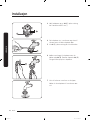
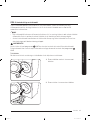
Installation
English16
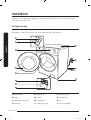
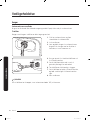
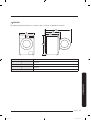
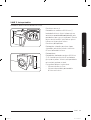
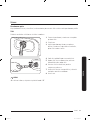
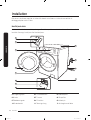
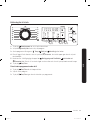
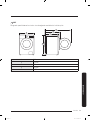
Installation
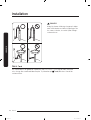
Spanner Bolt caps Hose guide
Cold water hose Hot water hose Liquid detergent guide
NOTE
• Bolt caps: The provided number (3 to 6) of bolt caps depends on the model.
• Hot water hose: Applicable models only.
• Liquid detergent guide: Applicable models only.
Untitled-2 16 2017-03-04 3:22:49

English 17
Installation
Installation requirements
Electrical supply and grounding
• AC 220-240 V / 50 Hz fuse or circuit
breaker is required.
• Use an individual branch circuit specic
to the washing machine.
To ensure proper grounding, the washing
machine comes with a power cord
featuring a three-prong grounding plug for
use in a properly installed and grounded
outlet.
Check with a qualied electrician or
service person if you are not sure about
the grounding.
Do not modify the provided plug. If it does
not t the outlet, call a qualied electrician
to install a proper outlet.
WARNING
• Do NOT use an extension cord.
• Use only the power cord that comes
with the washing machine.
• Do NOT connect the ground wire to
plastic plumbing, gas lines, or hot water
pipes.
• Improperly connected grounding
conductors may cause electric shock.
Water supply
A proper water pressure for this washing
machine is between 50 kPa and 800
kPa. Water pressure less than 50 kPa
may cause the water valve not to close
completely. Or, it may take longer to ll
the drum, causing the washing machine to
turn off. Water taps must be within 120
cm from the rear of the washing machine
so that the provided inlet hoses reach the
washing machine.
To reduce the risk of leaks:
• Make sure water taps are easily
accessible.
• Turn off the taps when the washing
machine is not in use.
• Check for any leaks at the water inlet
hose ttings on a regular basis.
CAUTION
Before using the washing machine for
the rst time, check all connections at the
water valve and taps for any leaks.
Drain
Samsung recommends a standpipe in
height of 60-90 cm. The drain hose must
be connected through the hose clip to the
standpipe, and the standpipe must fully
cover the drain hose.
Untitled-2 17 2017-03-04 3:22:49
Sidan laddas...

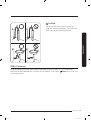
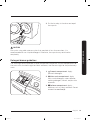
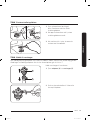
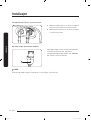
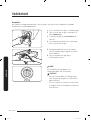
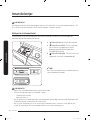
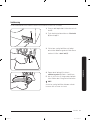
English 19
Installation
Step-by-step installation
STEP 1 Select a location
Location requirements:
• Solid, level surface without carpeting or ooring that may obstruct ventilation
• Away from direct sunlight
• Adequate room for ventilation and wiring
• The ambient temperature is always higher than the freezing point (0 °C)
• Away from a heat source
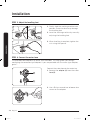
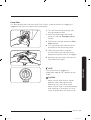
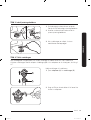
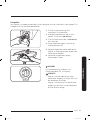
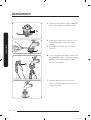
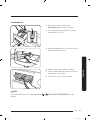
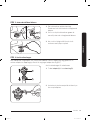
STEP 2 Remove the shipping bolts
Unpack the product package and remove
all shipping bolts.
1. Loosen all shipping bolts on the rear of
the machine using the supplied spanner.
2. Fill the holes with the supplied plastic
bolt caps.
Keep the shipping bolts for future use.
WARNING
Packaging materials can be dangerous to children. Dispose all packaging material (plastic
bags, polystyrene, etc.) out of children’s reach.
Untitled-2 19 2017-03-04 3:22:49
Sidan laddas...
Sidan laddas...
Sidan laddas...
Sidan laddas...
Sidan laddas...

English 25
Installation
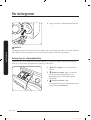
CAUTION
Do not put the drain hose in places of
stagnant water or ponding. The water may
ow back to the washing machine.
STEP 6 Power on
Plug the power cord into a wall socket featuring an AC 220-240 V / 50 Hz approved
electrical outlet protected by a fuse or circuit breaker. Then, press
Power to turn on the
washing machine.
Untitled-2 25 2017-03-04 3:22:51
Sidan laddas...
Sidan laddas...
Sidan laddas...
Sidan laddas...
Sidan laddas...
Sidan laddas...
Sidan laddas...
Sidan laddas...
Sidan laddas...
Sidan laddas...
Sidan laddas...
Sidan laddas...
Sidan laddas...

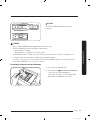
English 39
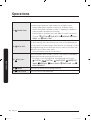
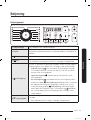
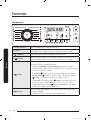
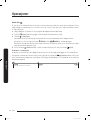
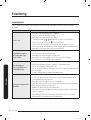
Operations
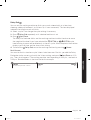
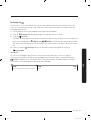
Delay End
You can set the washing machine to nish your wash automatically at a later time,
choosing a delay of between 1 to 24 hours (in 1 hour increments). The hour displayed
indicates the time the wash will nish.
1. Select a cycle. Then change the cycle settings if necessary.
2. Press
Delay End repeatedly until a desired end time is set.
3. Press
Start/Pause.
The Delay End indicator blinks and the washing machine tumbles the drum to sense
the weight of the load if you have selected the
COTTON or COTTON cycle.
Load sensing is preset and enabled only in these 2 cycles. When complete, the machine
displays your set time and the timer starts ticking.
4. To cancel the
Delay End, restart the washing machine by pressing Power.
Real-life case
You want to nish a two-hour cycle 3 hours later from now. For this, you add the Delay
End option to the current cycle with the 3-hour setting, and press
Start/Pause at 2:00
p.m. Then, what happens? The washing machine starts operating at 3:00 p.m., and ends at
5:00 p.m. Provided below is the time line for this example.
2:00 pm
Set the Delay End to 3 hours
3:00 pm
Start
5:00 pm
End
Untitled-2 39 2017-03-04 3:22:57
Sidan laddas...
Sidan laddas...
Sidan laddas...
Sidan laddas...
Sidan laddas...
Sidan laddas...
Sidan laddas...
Sidan laddas...
Sidan laddas...
Sidan laddas...
Sidan laddas...
Sidan laddas...
Sidan laddas...
Sidan laddas...
Sidan laddas...
Sidan laddas...
Sidan laddas...
Sidan laddas...

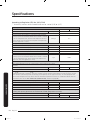
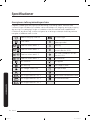
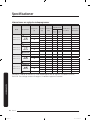
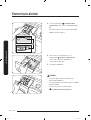
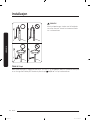
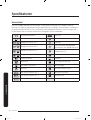
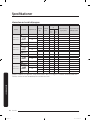
Specications
English58
Specications
NOTE
The design and specications are subject to change without notice for quality
improvement purposes.
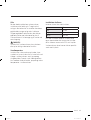
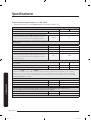
A
B
C
D
E
A 600 mm
B 850 mm
C 550 mm
D 635 mm
E 1075 mm
Untitled-2 58 2017-03-04 3:23:02

English 59
Specications
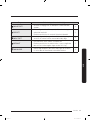
According to Regulation (EU) No. 1061/2010
“*” Asterisk(s) means variant model and can be varied (0-9) or (A-Z).
Samsung
Model Name WW8*J54*5** WW8*J52*5**
Capacity kg 8.0
Energy Efciency on a scale from D (least efcient) to A+++ (most efcient) A+++
Annual energy consumption (It is based on 220 standard
washing cycles for standard cotton course at 60 °C and 40
°C at full and partial load, and the consumption of off and
left-on modes. Actual energy consumption will depend on
how the appliance is used.)
kWh/yr 116
Energy Consumption
The standard 60 °C cotton programme at full load kWh 0.54
The standard 60 °C cotton programme at partial load kWh 0.48
The standard 40 °C cotton programme at partial load kWh 0.48
Weighted power consumption of the off-mode. W 0.48
Weighted power consumption of the left-on mode. W 5.00
Annual water consumption (It is based on 220 standard
washing cycles for standard cotton course at 60 °C and 40
°C at full and partial load. Actual water consumption will
depend on how the appliance is used.)
L/yr 8100
Spin efciency class
Spin-drying efciency class on a scale from G (least efcient) to A (most
efcient)
A B
Maximun Spin Speed rpm 1400 1200
Residual moisture % 44 53
The
COTTON 60 °C and COTTON 40 °C programs are the ‘standard cotton 60 °C program’ and the
‘standard cotton 40 °C program’. They are suitable to clean normally soiled cotton laundry and they are the
most efcient (concerning water and energy consumption) for this type of laundry. In these programs the
actual water temperature may differ from the declared temperature. Please run Calibration Mode after the
installation (refer to the “Run Calibration (recommended)” section on page 26).
Program duration of the standard program
The standard 60 °C cotton programme at full load min 319
The standard 60 °C cotton programme at partial load min 259
The standard 40 °C cotton programme at partial load min 259
The duration of the left-on mode (Tl) min 2
Airborne acoustical noise emissions expressed in dB(A) re 1 pW and rounded to the nearest integer during the
washing and spinning phases for the standard 60 °C cotton programme at full load;
Wash dB (A) re 1 pW 49
Spin dB (A) re 1 pW 74
Free Standing
Untitled-2 59 2017-03-04 3:23:02
Sidan laddas...
Sidan laddas...
Sidan laddas...
Sidan laddas...

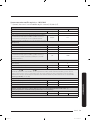
QUESTIONS OR COMMENTS?
COUNTRY CALL OR VISIT US ONLINE AT
DENMARK 70 70 19 70 www.samsung.com/dk/support
FINLAND 030-6227 515 www.samsung.com//support
NORWAY 815 56480 www.samsung.com/no/support
SWEDEN 0771 726 786 www.samsung.com/se/support
DC68-03793U-00
Untitled-2 64 2017-03-04 3:23:03

Vaskemaskine
Brugervejledning
WW8*J5**5**/WW7*J5**5**
Untitled-3 1 2017-03-04 3:30:47
Sidan laddas...


Dansk4
Sikkerhedsinformationer
Tillykke med din nye vaskemaskine fra Samsung. Denne brugervejledning indeholder vigtige
oplysninger om montering, betjening og vedligeholdelse af dit apparat. Tag dig tid til at læse denne
vejledning for at få fuldt udbytte af vaskemaskinens mange fordele og funktioner.
Dette skal du vide om sikkerhedsinstruktionerne
Læs denne vejledning omhyggeligt for at sikre, at du ved, hvordan du sikkert og effektivt bruger
de omfattende muligheder og funktioner i dit nye apparat. Gem vejledningen et sikkert sted tæt
på apparatet til senere brug. Brug kun apparatet til dens beregnede formål som beskrevet i denne
brugervejledning.
Advarslerne og de vigtige sikkerhedsinstruktioner i denne vejledning dækker ikke alle tænkelige
forhold og situationer, som måtte opstå. Det er dit ansvar at udvise almindelig fornuft,
agtpågivenhed og omhu ved installation, vedligeholdelse og brug af din vaskemaskine.
Da følgende betjeningsinstruktioner omfatter forskellige modeller, kan egenskaberne ved din
vaskemaskine være lidt anderledes end de, der beskrives i denne vejledning, og alle advarselstegn
er måske ikke relevante. Hvis du har spørgsmål, bedes du kontakte dit nærmeste servicecenter eller
nde hjælp og information online på www.samsung.com.
Vigtige sikkerhedssymboler
Ikonerne og symbolerne i denne brugervejledning betyder følgende:
ADVARSEL
Risici og andre usikre fremgangsmåder, der kan medføre alvorlig personskade eller beskadigelse af
materiel.
FORSIGTIG
Risici og andre usikre fremgangsmåder, der kan medføre personskade og/eller beskadigelse af
materiel.
BEMÆRK
Angiver at der ndes en risiko for personskade eller skade på materiel.
Sikkerhedsinformationer
Untitled-3 4 2017-03-04 3:30:47
Sidan laddas...
Sidan laddas...
Sidan laddas...
Sidan laddas...
Sidan laddas...
Sidan laddas...
Sidan laddas...
Sidan laddas...
Sidan laddas...
Sidan laddas...

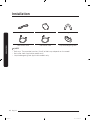
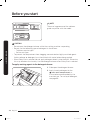
Dansk 15
Installation
Topnøgle Boltdæksler Slangeholder
Koldtvandsslange Varmtvandsslange Beholder til ydende
vaskemiddel
BEMÆRK
• Boltdæksler: Det medfølgende antal boltdæksler (3 til 6) afhænger af modellen.
• Varmtvandsslange: Kun relevante modeller.
• Beholder til ydende vaskemiddel: Kun relevante modeller.
Untitled-3 15 2017-03-04 3:30:49
Sidan laddas...

Dansk 17
Installation
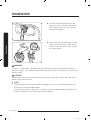
Gulv
For den bedste ydelse bør vaskemaskinen
installeres på et solidt gulv. Trægulve skal
muligvis forstærkes for at mindske vibrationer
og/eller belastninger på grund af ubalance.
Tæpper og bløde isematerialer yder ikke en
god beskyttelse mod vibrationer og kan få
vaskemaskinen til at bevæge sig en anelse ved
centrifugering.
FORSIGTIG
Installer IKKE vaskemaskinen på en platform
eller på en dårlig understøttet struktur.
Vandtemperatur
Installer ikke vaskemaskinen på steder, hvor
vandet kan fryse, da der altid vil være lidt vand
tilbage i vaskemaskinens ventil, pumpe og
slangeområder. Frosset vand i koblingsdelene
kan medføre skade på bælter, pumper og andre
komponenter i vaskemaskinen.
Installation af alkove
Mindste afstand for stabil funktion:
Sider 25 mm
Top 25 mm
Bag 50 mm
Foran 550 mm
Hvis der installeres både en vaskemaskine
og en tørretumbler det samme sted, skal der
foran alkoven være mindst 550 mm fri plads.
Vaskemaskinen alene kræver ikke et specikt
areal med fri plads.
Untitled-3 17 2017-03-04 3:30:49
Sidan laddas...

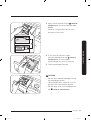
Dansk 19
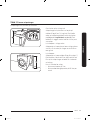
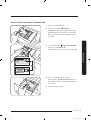
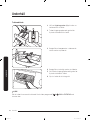
Installation
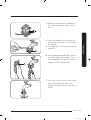
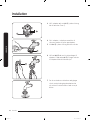
TRIN 3 Indstil justeringsfødderne
1. Skub forsigtigt vaskemaskinen på plads.
Stor kraft kan beskadige justeringsfødderne.
2. Niveller vaskemaskinen ved manuelt at
justere justeringsfødderne.
3. Når nivelleringen er udført, så stram
møtrikkerne med topnøglen.
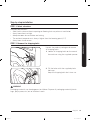
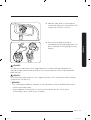
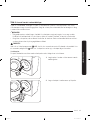
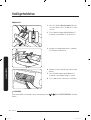
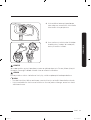
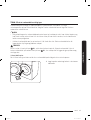
TRIN 4 Tilslut vandslangen
Den medfølgende slangeadapter kan variere afhængigt af model. Dette trin viser, hvordan du
tilslutter vandslangen med en adapter af koblingstypen. Hvis adapteren er af skruetypen, skal du gå
til 7.
A
B
Kobl vandslangen til vandhanen.
1. Fjern adapteren (A) fra vandslangen (B).
2. Brug en Philips-skruetrækker til at løsne re
skruer fra adapteren.
Untitled-3 19 2017-03-04 3:30:49
Sidan laddas...
Sidan laddas...
Sidan laddas...
Sidan laddas...
Sidan laddas...

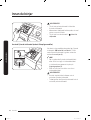
Dansk 25
Inden du starter
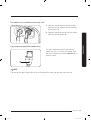
Indledende indstillinger
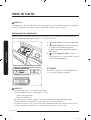
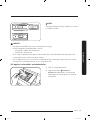
Kør kalibrering (anbefales)
Kalibrering sikrer, at vaskemaskinen registrerer vægt nøjagtigt. Sørg for, at tromlen er tom, inden
du kører Kalibrering.
1. Sluk og tænd derefter for vaskemaskinen.
2. Hold
Temp. nede, og hold samtidig Udskyd sluttid nede i 3 sekunder for at gå i tilstanden
Kalibrering. Meddelelsen “Cb” vises.
3. Tryk på knappen
Start/Pause for at køre programmet Kalibrering.
4. Tromlen roterer med uret og mod uret i ca. 3 minutter.
5. Når programmet er færdigt, vises “0” på displayet, og vaskemaskinen slukker automatisk.
6. Vaskemaskinen er nu klar til brug.
Retningslinjer for vasketøj
TRIN 1 Sorter
Sorter vasketøjet efter disse kriterier:
• Vaskeanvisning: Sortér vasketøjet efter bomuld, blandede bre, syntetiske stoffer, silke, uld og
rayon..
• Kulørt: Hold hvidt adskilt fra kulørt.
• Størrelse: Blander du emner med forskellige størrelser i tromlen, forbedres vaskeevnen.
• Sensitivitet: Vask sarte emner af ny, ægte uld, gardiner og silkegenstande for sig selv. Tjek
mærkaterne på emnerne.
BEMÆRK
Sørg for at tjekke vaskeanvisningen på tøjet, og sorter det derefter inden vaskestart.
Inden du starter
Untitled-3 25 2017-03-04 3:30:51
Sidan laddas...
Sidan laddas...
Sidan laddas...
Sidan laddas...
Sidan laddas...
Sidan laddas...
Sidan laddas...
Sidan laddas...

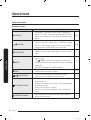
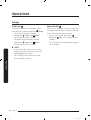
Betjening
Dansk34
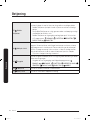
Betjening
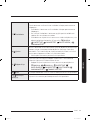
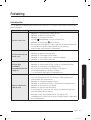
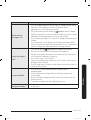
Programoversigt
Standardprogrammer
Program Beskrivelse og maks. kapacitet (kg)
BOMULD
• Til bomuld, sengetøj, duge, undertøj, håndklæder eller
skjorter. Vasketiden og skylningsantallet justeres
automatisk i forhold til vasketøjets vægt.
MAKS
BOMULD
• Optimal ydelse med mindre energi til bomuldsstoffer,
sengetøj, duge, undertøj, håndklæder eller skjorter.
Af hensyn til energibesparelse, kan den faktiske
vasketemperatur være lavere end angivet.
MAKS
SYNTETISK
• Til bluser eller skjorter der er fremstillet af polyester
(diolen, trevira), polyamid (perlon, nylon) eller lignende.
4
ULD
• Specielt til maskinvaskbart uld med en vægt på højst 2,0
kg.
• Programmet
ULD består af blide bevægelser og
gennemvædning for at beskytte uldbrene mod
krympning/ødelæggelse.
• Der anbefales et neutralt vaskemiddel.
2
CENTRIFUGERING
• Giver en ekstra centrifugering for effektivt at erne fugt
fra vasketøjet.
MAKS
SKYL+CENTRIFUGERING
• Giver en ekstra skylning efter der er kommet
skyllemiddel i vasketøjet.
MAKS
ECO DRUM CLEAN
• Rengør tromlen ved at erne snavs og bakterier fra
tromlen.
• Udføres én gang for hver 40 vaske uden vaske- eller
blegemiddel.
• Sørg for, at tromlen er tom.
• Brug ikke rengøringsmidler til rengøring af tromlen.
–
SUPER ECO WASH
• Programmet ecobubble med lav temperatur medvirker
til reduktion af strømforbruget.
4
Untitled-3 34 2017-03-04 3:30:56
Sidan laddas...
Sidan laddas...
Sidan laddas...
Sidan laddas...
Sidan laddas...
Sidan laddas...
Sidan laddas...
Sidan laddas...
Sidan laddas...
Sidan laddas...
Sidan laddas...
Sidan laddas...
Sidan laddas...
Sidan laddas...
Sidan laddas...
Sidan laddas...
Sidan laddas...
Sidan laddas...
Sidan laddas...
Sidan laddas...
Sidan laddas...
Sidan laddas...
Sidan laddas...
Sidan laddas...
Sidan laddas...
Sidan laddas...
Sidan laddas...
Sidan laddas...
Sidan laddas...
Sidan laddas...
Sidan laddas...
Sidan laddas...
Sidan laddas...
Sidan laddas...
Sidan laddas...
Sidan laddas...
Sidan laddas...
Sidan laddas...
Sidan laddas...
Sidan laddas...
Sidan laddas...
Sidan laddas...
Sidan laddas...
Sidan laddas...
Sidan laddas...
Sidan laddas...
Sidan laddas...
Sidan laddas...
Sidan laddas...
Sidan laddas...
Sidan laddas...
Sidan laddas...
Sidan laddas...
Sidan laddas...
Sidan laddas...
Sidan laddas...
Sidan laddas...
Sidan laddas...
Sidan laddas...
Sidan laddas...
Sidan laddas...
Sidan laddas...
Sidan laddas...
Sidan laddas...
Sidan laddas...
Sidan laddas...
Sidan laddas...
Sidan laddas...
Sidan laddas...
Sidan laddas...
Sidan laddas...
Sidan laddas...
Sidan laddas...
Sidan laddas...
Sidan laddas...
Sidan laddas...
Sidan laddas...
Sidan laddas...
Sidan laddas...
Sidan laddas...
Sidan laddas...
Sidan laddas...
Sidan laddas...
Sidan laddas...
Sidan laddas...
Sidan laddas...
Sidan laddas...
Sidan laddas...
Sidan laddas...
Sidan laddas...
Sidan laddas...
Sidan laddas...
Sidan laddas...
Sidan laddas...
Sidan laddas...
Sidan laddas...
Sidan laddas...
Sidan laddas...
Sidan laddas...
Sidan laddas...
Sidan laddas...
Sidan laddas...
Sidan laddas...
Sidan laddas...
Sidan laddas...
Sidan laddas...
Sidan laddas...
Sidan laddas...
Sidan laddas...
Sidan laddas...
Sidan laddas...
Sidan laddas...
Sidan laddas...
Sidan laddas...
Sidan laddas...
Sidan laddas...
Sidan laddas...
Sidan laddas...
Sidan laddas...
Sidan laddas...
Sidan laddas...
Sidan laddas...
Sidan laddas...
Sidan laddas...
Sidan laddas...
Sidan laddas...
Sidan laddas...
Sidan laddas...
Sidan laddas...
Sidan laddas...
Sidan laddas...
Sidan laddas...
Sidan laddas...
Sidan laddas...
Sidan laddas...
Sidan laddas...
Sidan laddas...
Sidan laddas...
Sidan laddas...
Sidan laddas...
Sidan laddas...
Sidan laddas...
Sidan laddas...
Sidan laddas...
Sidan laddas...
Sidan laddas...
Sidan laddas...
Sidan laddas...
Sidan laddas...
Sidan laddas...
Sidan laddas...
Sidan laddas...
Sidan laddas...
Sidan laddas...
Sidan laddas...
Sidan laddas...
Sidan laddas...
Sidan laddas...
Sidan laddas...
Sidan laddas...
Sidan laddas...
Sidan laddas...
Sidan laddas...
Sidan laddas...
Sidan laddas...
Sidan laddas...
Sidan laddas...
Sidan laddas...
Sidan laddas...
Sidan laddas...
Sidan laddas...
Sidan laddas...
Sidan laddas...
Sidan laddas...
Sidan laddas...
Sidan laddas...
Sidan laddas...
Sidan laddas...
Sidan laddas...
Sidan laddas...
Sidan laddas...
Sidan laddas...
Sidan laddas...
Sidan laddas...
Sidan laddas...
Sidan laddas...
Sidan laddas...
Sidan laddas...
Sidan laddas...
Sidan laddas...
Sidan laddas...
Sidan laddas...
Sidan laddas...
Sidan laddas...
Sidan laddas...
Sidan laddas...
Sidan laddas...
Sidan laddas...
Sidan laddas...
Sidan laddas...
Sidan laddas...
Sidan laddas...
Sidan laddas...
Sidan laddas...
Sidan laddas...
Sidan laddas...
Sidan laddas...
Sidan laddas...
Sidan laddas...
Sidan laddas...
Sidan laddas...
Sidan laddas...
Sidan laddas...
Sidan laddas...
Sidan laddas...
Sidan laddas...
Sidan laddas...
Sidan laddas...
Sidan laddas...
Sidan laddas...
Sidan laddas...
Sidan laddas...
-
 1
1
-
 2
2
-
 3
3
-
 4
4
-
 5
5
-
 6
6
-
 7
7
-
 8
8
-
 9
9
-
 10
10
-
 11
11
-
 12
12
-
 13
13
-
 14
14
-
 15
15
-
 16
16
-
 17
17
-
 18
18
-
 19
19
-
 20
20
-
 21
21
-
 22
22
-
 23
23
-
 24
24
-
 25
25
-
 26
26
-
 27
27
-
 28
28
-
 29
29
-
 30
30
-
 31
31
-
 32
32
-
 33
33
-
 34
34
-
 35
35
-
 36
36
-
 37
37
-
 38
38
-
 39
39
-
 40
40
-
 41
41
-
 42
42
-
 43
43
-
 44
44
-
 45
45
-
 46
46
-
 47
47
-
 48
48
-
 49
49
-
 50
50
-
 51
51
-
 52
52
-
 53
53
-
 54
54
-
 55
55
-
 56
56
-
 57
57
-
 58
58
-
 59
59
-
 60
60
-
 61
61
-
 62
62
-
 63
63
-
 64
64
-
 65
65
-
 66
66
-
 67
67
-
 68
68
-
 69
69
-
 70
70
-
 71
71
-
 72
72
-
 73
73
-
 74
74
-
 75
75
-
 76
76
-
 77
77
-
 78
78
-
 79
79
-
 80
80
-
 81
81
-
 82
82
-
 83
83
-
 84
84
-
 85
85
-
 86
86
-
 87
87
-
 88
88
-
 89
89
-
 90
90
-
 91
91
-
 92
92
-
 93
93
-
 94
94
-
 95
95
-
 96
96
-
 97
97
-
 98
98
-
 99
99
-
 100
100
-
 101
101
-
 102
102
-
 103
103
-
 104
104
-
 105
105
-
 106
106
-
 107
107
-
 108
108
-
 109
109
-
 110
110
-
 111
111
-
 112
112
-
 113
113
-
 114
114
-
 115
115
-
 116
116
-
 117
117
-
 118
118
-
 119
119
-
 120
120
-
 121
121
-
 122
122
-
 123
123
-
 124
124
-
 125
125
-
 126
126
-
 127
127
-
 128
128
-
 129
129
-
 130
130
-
 131
131
-
 132
132
-
 133
133
-
 134
134
-
 135
135
-
 136
136
-
 137
137
-
 138
138
-
 139
139
-
 140
140
-
 141
141
-
 142
142
-
 143
143
-
 144
144
-
 145
145
-
 146
146
-
 147
147
-
 148
148
-
 149
149
-
 150
150
-
 151
151
-
 152
152
-
 153
153
-
 154
154
-
 155
155
-
 156
156
-
 157
157
-
 158
158
-
 159
159
-
 160
160
-
 161
161
-
 162
162
-
 163
163
-
 164
164
-
 165
165
-
 166
166
-
 167
167
-
 168
168
-
 169
169
-
 170
170
-
 171
171
-
 172
172
-
 173
173
-
 174
174
-
 175
175
-
 176
176
-
 177
177
-
 178
178
-
 179
179
-
 180
180
-
 181
181
-
 182
182
-
 183
183
-
 184
184
-
 185
185
-
 186
186
-
 187
187
-
 188
188
-
 189
189
-
 190
190
-
 191
191
-
 192
192
-
 193
193
-
 194
194
-
 195
195
-
 196
196
-
 197
197
-
 198
198
-
 199
199
-
 200
200
-
 201
201
-
 202
202
-
 203
203
-
 204
204
-
 205
205
-
 206
206
-
 207
207
-
 208
208
-
 209
209
-
 210
210
-
 211
211
-
 212
212
-
 213
213
-
 214
214
-
 215
215
-
 216
216
-
 217
217
-
 218
218
-
 219
219
-
 220
220
-
 221
221
-
 222
222
-
 223
223
-
 224
224
-
 225
225
-
 226
226
-
 227
227
-
 228
228
-
 229
229
-
 230
230
-
 231
231
-
 232
232
-
 233
233
-
 234
234
-
 235
235
-
 236
236
-
 237
237
-
 238
238
-
 239
239
-
 240
240
-
 241
241
-
 242
242
-
 243
243
-
 244
244
-
 245
245
-
 246
246
-
 247
247
-
 248
248
-
 249
249
-
 250
250
-
 251
251
-
 252
252
-
 253
253
-
 254
254
-
 255
255
-
 256
256
-
 257
257
-
 258
258
-
 259
259
-
 260
260
-
 261
261
-
 262
262
-
 263
263
-
 264
264
-
 265
265
-
 266
266
-
 267
267
-
 268
268
-
 269
269
-
 270
270
-
 271
271
-
 272
272
-
 273
273
-
 274
274
-
 275
275
-
 276
276
-
 277
277
-
 278
278
-
 279
279
-
 280
280
-
 281
281
-
 282
282
-
 283
283
-
 284
284
-
 285
285
-
 286
286
-
 287
287
-
 288
288
-
 289
289
-
 290
290
-
 291
291
-
 292
292
-
 293
293
-
 294
294
-
 295
295
-
 296
296
-
 297
297
-
 298
298
-
 299
299
-
 300
300
-
 301
301
-
 302
302
-
 303
303
-
 304
304
-
 305
305
-
 306
306
-
 307
307
-
 308
308
-
 309
309
-
 310
310
-
 311
311
-
 312
312
-
 313
313
-
 314
314
-
 315
315
-
 316
316
-
 317
317
-
 318
318
-
 319
319
-
 320
320


Samsung WW70J5535MW Bruksanvisning
- Kategori
- Tvättmaskiner
- Typ
- Bruksanvisning
- Denna manual är också lämplig för
på andra språk
Relaterade papper
-
Samsung WW12K8402OW Bruksanvisning
-
Samsung WW80J5426FW Användarmanual
-
Samsung WW80J5525EW Snabbstartsguide
-
Samsung WW60J3283LW1EE Användarmanual
-
Samsung WW12R640U0M Bruksanvisning
-
Samsung WW70K5400UW Användarmanual
-
-
-
-
Samsung WF18T8000GW Användarmanual