
CEL-SP8RA2M0 © CANON INC. 2010
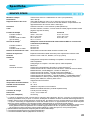
ENGLISH
DANSK
DEUTSCH
ESPAÑOL
FRANÇAIS
ITALIANO
NEDERLANDS
SUOMI
SVENSKA
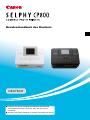
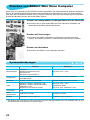
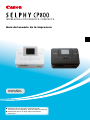
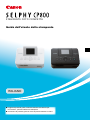
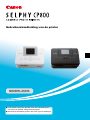
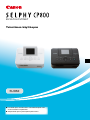
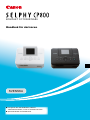
Printer User Guide
Brugervejledning til printeren
Benutzerhandbuch des Druckers
Guía del usuario de la impresora
Guide d’utilisation de l’imprimante
Guida dell'utente della stampante
Gebruikershandleiding van de printer
Tulostimen käyttöopas
Handbok för skrivaren

ENGLISH
Printer User Guide
Make sure you read this guide, including the “Safety
Precautions” section, before using the printer.
Store this guide safely so that you can use it in the future.

2
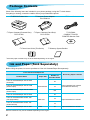
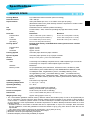
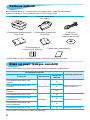
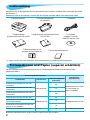
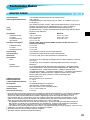
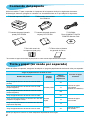
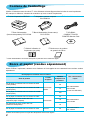
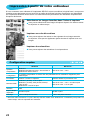
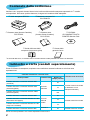
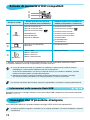
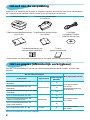
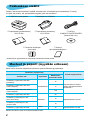
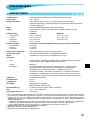
Ink and Paper (Sold Separately)
Before using the printer, be sure to purchase a Color Ink Cassette/Paper Set separately.
Color Ink Cassette/Paper Set
Necessary Paper Cassette
Product Name Paper Size
Number of
Possible Prints
Color Ink Cassette/Paper Set KP-36IP
(Postcard)
Postcard Size
36
Paper Cassette PCP-CP300
(Included with SELPHY)
Color Ink Cassette/Paper Set KP-72IN
(Photo Paper)
72
Color Ink Cassette/Paper Set KP-108IN
(Photo Paper)
108
Color Ink Cassette/Paper Set KC-36IP
Card Size
36
Paper
Cassette PCC-CP300
Color Ink Cassette/Label Set KC-18IF
(Full-page labels)
18
Color Ink Cassette/Label Set KC-18IL
(8-label sheets)
18
Color Ink Cassette/Paper Set KL-36IP L Size 36 Paper
Cassette PCL-CP300
Some accessories may not be available depending on the region.
* Card size paper cassette may not be included depending on the region.
□
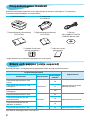
Power Cord
Package Contents
Check if the following items are included in your printer package, using the
□
check boxes.
If anything is missing, contact the retailer where you purchased the printer.
□
Compact Power Adapter
CA-CP200 W
□
SELPHY Printer Unit
□
Paper Cassette (Postcard Size)
PCP-CP300
□
Paper Cassette (Card Size)*
PCC-CP300
□
CD-ROM:
COMPACT PHOTO
PRINTER Solution Disk
□
Printer User Guide (This Guide)
□
Warranty System Booklet

Package Contents ________________________ 2
Ink and Paper (Sold Separately) _____________ 2
Read This First __________________________ 3
Conventions Used in this Guide _____________ 3
Safety Precautions _______________________ 4
Setting Up SELPHY _______________________ 5
Components Guide _______________________ 6
Information Displayed on the Screen _________ 7
Getting Started __________________________ 8
Setting the Display Language _______________ 11
Compatible Memory Cards and
Memory Card Slots _______________________12
Images That Can Be Printed ________________12
Selecting and Printing Images _______________13
Printing All Images ________________________15
Storing the Printed Photos _________________16
Cleaning Up After Printing __________________16
Printing a Variety of Images _________________17
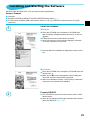
Printing From Your Computer ______________ 22
Installing and Starting the Software __________ 23
Using the Software to Print ________________ 25
Printing From Your Digital Camera __________ 27
Printing Images Using Digital Camera Specied
Settings (DPOF Print) ____________________ 28
Using the Battery Pack ___________________ 29
Printing From Your Mobile Phone ___________ 30
Troubleshooting __________________________31
Specications __________________________ 33
Handling Precautions ____________________ 34
3
Read This First
Warning Against Copyright Infringement
The images printed with this product should be intended for personal use. Do not print images that
infringe upon copyright laws without the prior permission of the copyright holder.
Warranty Limitations
This product’s warranty is only effective in the country of sale. If there is a problem with the printer
while abroad, please return it to the country of sale before proceeding with a warranty claim to a Canon
Customer Support Help Desk.
LCD Monitor (Screen)
The LCD monitor is produced with extremely high-precision manufacturing techniques. More than
99.99% of the pixels operate to specication. However, some pixels may occasionally misre or
appear as red or black dots. This has no effect on the printed image and does not constitute a
malfunction.
The LCD monitor may be covered with a thin plastic lm for protection against scratches during
shipment. If so, remove the lm before using the printer.
Conventions Used in this Guide
This printer will be referred to as “SELPHY” or “printer”.
The various types of memory cards that can be used in this printer are collectively referred to as “memory
cards”.
Icons are used in the text to represent SELPHY’s buttons. For details, refer to “Controls”
(p. 6).
Language that displays on the screen appears inside [ ] (square brackets).
: Things you should be careful about
: Supplemental information
(p. XX) : Reference pages (“XX” stands for a page number)
This guide assumes all functions are at their default settings.
Table of Contents

4
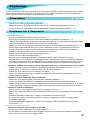
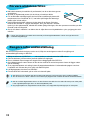
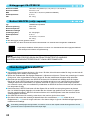
Safety Precautions
Before using the product, please ensure that you read the safety precautions described below. Always
ensure that the product is used correctly.
The safety precautions noted on the following pages are intended to prevent injuries to yourself and other
persons, or damage to the equipment.
Be sure to also check the guides included with any separately sold accessories you use.
Store this equipment out of the reach of children and infants.
Mistakenly putting the power cord around a child’s neck could result in asphyxiation.
Use only recommended power sources.
Do not attempt to disassemble, alter or apply heat to the product.
Avoid dropping or subjecting the product to severe impacts.
To avoid the risk of injury, do not touch the interior of the printer if it has been dropped or otherwise
damaged.
Stop using the product immediately if it emits smoke, a strange smell, or otherwise behaves
abnormally.
Do not use organic solvents such as alcohol, benzine, or thinner to clean the equipment.
Do not let the product come into contact with water (e.g. sea water) or other liquids.
Do not allow liquids or foreign objects to enter the printer.
This could result in electrical shock or re.
If liquid comes into contact with the product, unplug it from the outlet and consult your retailer or a Canon
Customer Support Help Desk.
Do not touch this printer or the power plug during thunderstorms.
This could result in electrical shock or re. Immediately stop using the equipment and distance yourself from it.
Unplug the power cord periodically and wipe away any dust and dirt that has collected on the plug,
the exterior of the power outlet, and the surrounding area with a dry cloth.
Do not handle the power cord with wet hands.
Do not use the equipment in a manner that exceeds the rated capacity of the electrical outlet or
wiring accessories. Do not use if the power cord or plug are damaged, or not fully plugged into the
outlet.
Do not allow dirt or metal objects (such as pins or keys) to contact the terminals or plug.
Do not cut, damage, alter or place heavy items on the power cord.
This could result in electrical shock or re.
Do not play the supplied CD-ROM(s) in any CD player that does not support data CD-ROMs.
Playing the CD-ROM(s) in an audio CD player (music player) could damage the speakers. It is also possible
to suffer hearing loss from listening with headphones to the loud sounds of a CD-ROM played on a music CD
player.
Warning
Denotes the possibility of serious injury or death.
Do not stick any part of your hand into the printer interior.
Be sure to place SELPHY safely so as to avoid tripping over the power cord.
This could lead to injury or damage the printer.
Avoid using, placing or storing the printer in the following places.
Places subject to strong sunlight.
Places subject to temperatures above 40 °C (104 °F).
Humid or dusty areas.
Places subject to strong vibrations.
These could result in electrical shock, burns, re or other injuries.
High temperatures may cause deformation of the adapter or printer casing.
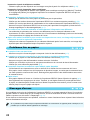
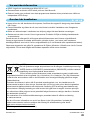
Caution
Denotes the possibility of injury.

5
Caution
Denotes the possibility of damage to the equipment.
Unplug the product from the power outlet when you are not using it.
Do not place anything, such as cloth, on top of the printer while in use.
Leaving the unit plugged in for a long period of time may cause it to overheat and become distorted, resulting
in re.
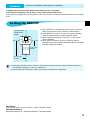
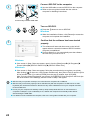
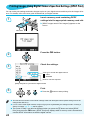
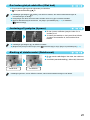
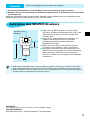
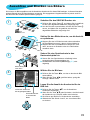
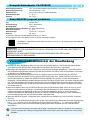
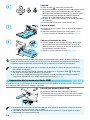
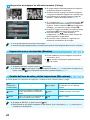
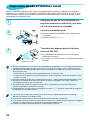
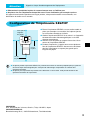
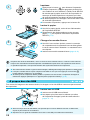
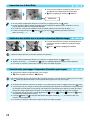
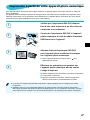
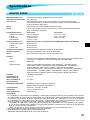
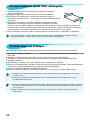
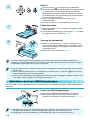
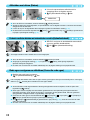
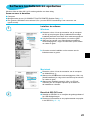
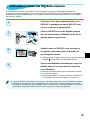
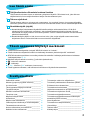
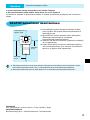
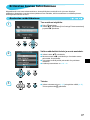
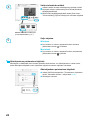
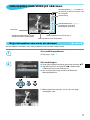
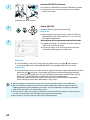
Setting Up SELPHY
Place SELPHY on a stable and even surface, such as a
table. Never place it on an unstable or tilted surface.
Keep SELPHY at least 1 m (3 ft.) from devices emitting
electromagnetic waves or strong magnetic elds.
Make sure there is at least 10 cm (4 in.) of free space
around SELPHY.
Since paper will pass in and out of SELPHY during
printing, make sure the space behind the printer is greater
than the length of the paper.
Never place SELPHY close to motors or other devices that generate strong electromagnetic elds.This
may damage the printer or cause it to malfunction.
Do not place near a television or radio. This may cause the printer to malfunction.
More than the
length of the
paper
10 cm (4 in.)
or more
10 cm (4 in.)
or more
CANON INC.
30-2, Shimomaruko 3-chome, Ohta-ku, Tokyo 146-8501, Japan
CANON EUROPA N.V.
Bovenkerkerweg 59-61, 1185 XB Amstelveen, The Netherlands

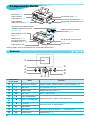
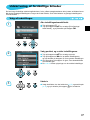
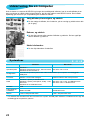
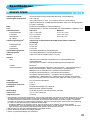
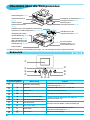
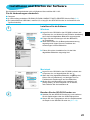
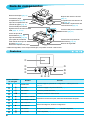
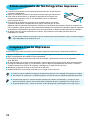
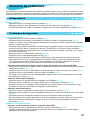
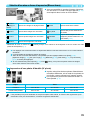
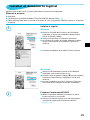
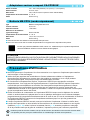
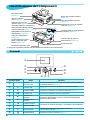
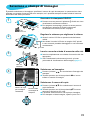
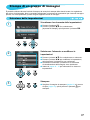
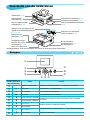
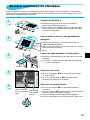
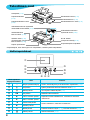
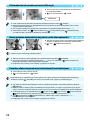
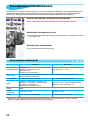
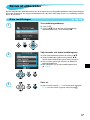
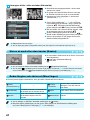
Controls
6
Components Guide
Icons Used
in This Guide
Name Function
— Screen (LCD Monitor) Displays images, settings screens, or error messages (p. 32).
q
ON Button Turns SELPHY on or off (p. 11).
k
MENU Button Displays the menu screen (p. 11).
o
OK Button Sets the selected item.
u
Up/+ COPIES Button
Species number of copies, selects items to set.
d
Down/– COPIES Button
l
Left Button
Switches images, changes settings.
r
Right Button
v
BACK Button Restores the previous screen (p. 7), cancels printing (p. 14).
p
PRINT Button Starts printing (p. 14).
*
Security cables, such as a Kensington lock, can be attached to this slot.
Paper Cassette
Compartment Cover (p. 10)
Card Slots (p. 12)
Paper Cassette
Compartment (p. 10)
Ink Cassette Lock (p. 14)
Ink Cassette Compartment (p. 10)
Ink Cassette Compartment Cover
(p. 10)
Battery Cover (p. 29)
(Air vents are behind
the battery cover (p. 34))
Paper Ejection Slot
USB Terminal for Computer
Connection (p. 24)
DC IN (Power Input) Terminal
(p. 10)
Security Slot*
USB Terminal for Digital Camera/
USB Flash Memory Connection
(pp. 14, 27, 30)
Battery/Battery Cover
Lock (p. 29)

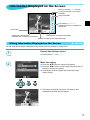
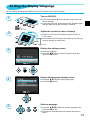
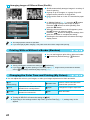
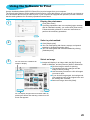
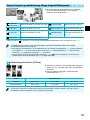
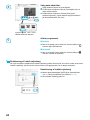
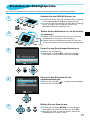
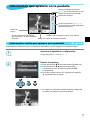
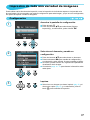
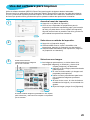
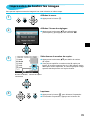
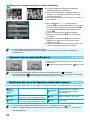
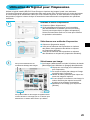
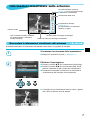
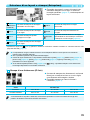
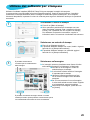
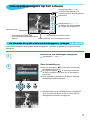
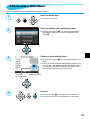
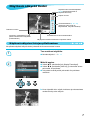
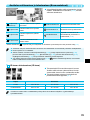
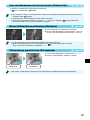
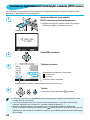
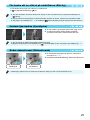
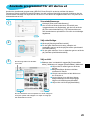
Hiding Information Displayed on the Screen
1
2
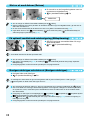
7
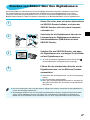
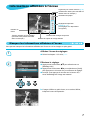
Memory card slot (p. 12) currently
in use (An SD card is used in this
example)
Print settings (pp. 18 – 21)
(Settings that are not available are
grayed out)
Total number of images to be printed
File number
Installed ink cassette type
(Postcard size is used in this example)
Number of copies for the displayed image
Paper orientation
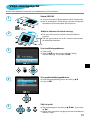
Information Displayed on the Screen
You can hide the information displayed on the screen and view images at a larger size.
Make the setting.
Press the
ud
buttons to select [Info Display].
Press the
l
r
buttons to select [Off], then press the
v
button to complete the setting.
Pressing the
v
button again will restore the image
display screen.
Display the settings screen.
Follow Steps 1 – 3 on p. 11.
The image will display full screen, and a frame that
indicates the printing area will appear.

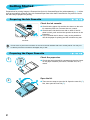
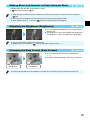
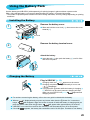
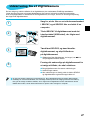
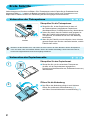
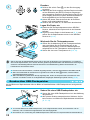
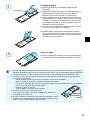
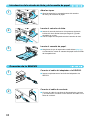
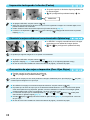
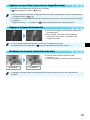
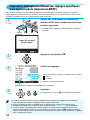
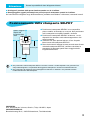
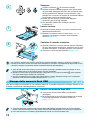
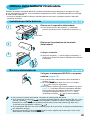
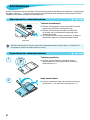
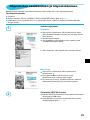
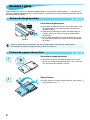
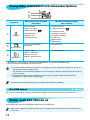
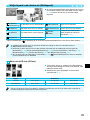
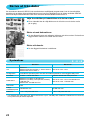
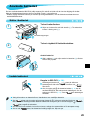
Preparing the Paper Cassette
Preparing the Ink Cassette
1
2
8
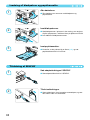
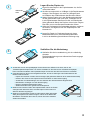
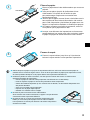
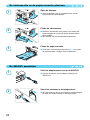
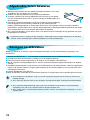
Open the lid.
There are two steps to open the lid. Open the outer lid (
)
rst, then open the inner lid (
).
Check the paper size.
Check that the prepared ink cassette and the size shown
on the paper cassette (Card size, Postcard size, etc.)
match.
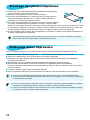
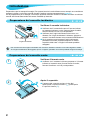
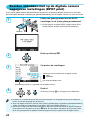
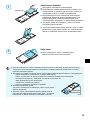
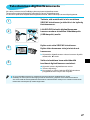
Getting Started
Preparations for printing images. A Postcard size Color Ink Cassette/Paper Set (sold separately) (p. 2) will be
used as an example, however Color Ink Cassette/Paper Sets other than Postcard size may also be used in
the same way to prepare for printing.
Check the ink cassette.
Check that the paper size and the size shown on the color
ink cassette (Card size, Postcard size etc.) match.
Check that the ink sheet is taut with no slack. If the ink
sheet is slack, push and turn the sprocket as shown in the
illustration.
If you overwind the ink sheet, it may not be possible to
use all the paper for printing and the ink sheet may tear.
Do not touch or pull on the ink sheet. Do not touch the ink cassette with wet or sweaty hands. You may not
be able to print if the ink sheet is damaged, dirty or wet.
Ink sheet

3
4
9
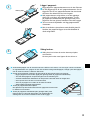
Use only dedicated paper for use in SELPHY CP series printers included in the genuine Canon brand
Color Ink Cassette/Paper Sets. Regular printing paper, regular postcards, or dedicated paper for SELPHY
ES series printers cannot be used.
Never do the following, as it may result in failure or cause the printer to malfunction:
reverse the paper (the shiny side is the print side)
bend or separate the paper at the perforations before printing
use label sheets that have begun to peel or label sheets with portions peeled back
write on a sheet before printing
print on already printed paper
reuse a spent ink cassette
Do not touch the springs of the paper cassette.
If the springs are bent or deformed, paper will not feed correctly into
SELPHY.
Do not touch or scratch the print surface (shiny side), or touch the
paper with wet hands. If the print surface becomes dirty or wet, you
will not be able to make clean prints.
-
-
-
-
-
-
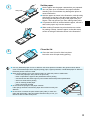
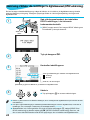
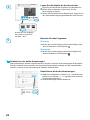
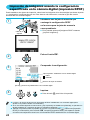
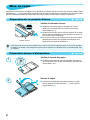
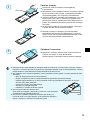
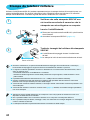
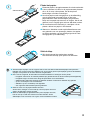
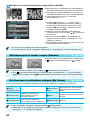
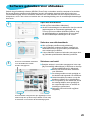
Set the paper.
Set the paper into the paper cassette that you prepared.
You can place up to 18 sheets in the paper cassette.
Inserting 19 or more sheets may damage the printer or
cause malfunction.
Hold the paper as shown in the illustration, with the shiny
side facing up and put it into the paper cassette. Do not
touch the print side (shiny side) of the paper with your
ngers. This may prevent you from making clean prints.
If a protective sheet is included with the paper, remove it
and set the paper only into the cassette.
When making Postcard size prints that have a section
for pasting a stamp, insert the paper so that the stamp
section is facing the direction shown in the illustration.
Close the lid.
Close the inner lid until it clicks into place.
Leave the outer lid open during printing.
Shiny side
Spring

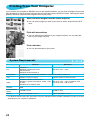
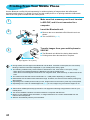
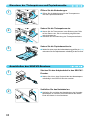
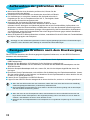
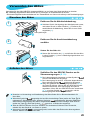
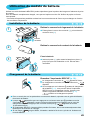
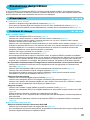
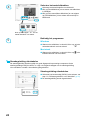
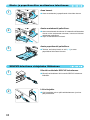
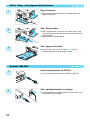
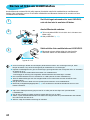
Inserting the Ink and Paper Cassettes
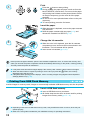
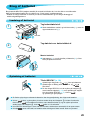
Connecting SELPHY
1
2
3
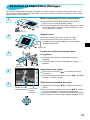
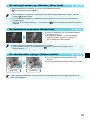
1
2
10
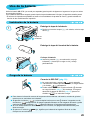
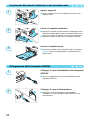
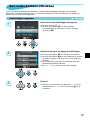
Open the covers.
Open the covers for the ink cassette and paper cassette
compartments.
Insert the ink cassette.
Insert the ink cassette into the printer in the direction
indicated by the arrow on the cassette until it clicks and
locks into place.
Close the ink cassette compartment cover.
Insert the paper cassette.
Make sure that the outer lid is open (p. 8) and insert the
paper cassette all the way into the compartment.
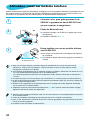
Plug the adapter cord into SELPHY.
Fully insert the adapter plug into SELPHY.
Connect the power cord.
Connect the power cord to the compact power adapter,
then plug the other end into a power outlet.

1
3
2
4
5
11
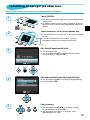
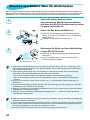
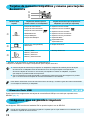
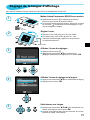
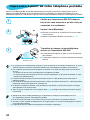
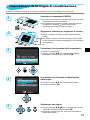
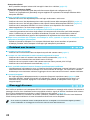
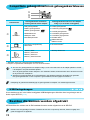
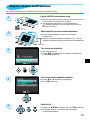
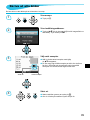
Turn on SELPHY.
Press and hold the
q
button until the screen shown at
the left displays.
To turn the power off, press and hold the
q
button again
until the displayed screen changes or turns off.
Display the settings screen.
Press the
k
button.
Press the
ud
buttons to select [Printer Setup], then
press the
o
button.
Display the language settings screen.
Press the
ud
buttons to select [Language].
Press the
o
button.
Select a language.
Press the
udl
r
buttons to select a language, then
press the
o
button.
Pressing the
v
button twice will restore the screen in
Step 1.
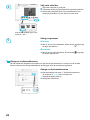
Setting the Display Language
You can change the language displayed in the LCD monitor menus and messages.
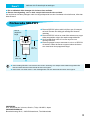
Adjust the screen for ease of viewing.
Raise the LCD monitor and adjust until the screen is
easily visible.
Do not raise the LCD monitor more than 45° as this may
result in damage or malfunction.
Approx. 45°

About USB Flash Memory
12
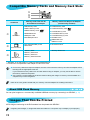
Compatible Memory Cards and Memory Card Slots
Card Slots
Memory Cards That Can be
Used Without an Adapter
Memory Cards That Require an Adapter
(commercially available)
SD/MMC
+
SD Memory Card
SDHC Memory Card
SDXC Memory Card
MultiMediaCard
MMCplus Card
HC MMCplus Card
miniSD Memory Card
miniSDHC Memory Card
microSD Memory Card
microSDHC Memory Card
microSDXC Memory Card
RS-MMC Card *
1
MMCmobile Card
MMCmicro Card
CF/microdriv e
CF (CompactFlash) Card
Microdrive
xD-Picture Card
*
2
MS/MS Duo
Memory Stick
Memory Stick PRO
Memory Stick Duo
Memory Stick PRO Duo
Memory Stick micro
*
1
“RS-MMC” is an abbreviation of “Reduced-Size MultiMediaCard”.
*
2
Purchase the CompactFlash Card Adapter for xD-Picture Card.
For memory cards that require an adapter, be sure to rst insert the memory card into the adapter before
inserting into the appropriate card slot.
If you insert the memory card into a card slot without using an adapter, you may not be able to remove
the memory card from the printer.
Use a memory card formatted in the device used for taking the images. A memory card formatted on a
computer may not be recognized.
Refer to the user guide included with your memory card and adapter for handling instructions.
You can print images on a commercially available USB ash memory by connecting it to SELPHY (p. 14).
Images That Can Be Printed
JPEG images conforming to the Exif standard can be printed with SELPHY.
Irregularly sized images, or images that have been edited on a computer may not display or print properly.

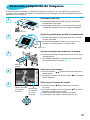
3
4
5
1
2
13
Insert a single memory card into the slot.
Insert a memory card fully into the appropriate slot.
The screen in Step 4 below (image display screen) (p. 7)
will display.
Select an image.
Press the
l
r
buttons to select an image to print.
If you press and hold one of the
l
r
buttons, the display
jumps by 5 images.
Select the number of copies.
Press the
ud
buttons to select the number of copies.
If you press and hold one of the
ud
buttons, the number
increases or decreases by 5 copies.
You can select up to 99 copies per image.
To print another image, repeat Steps 4 and 5.
Number of copies
for the displayed
image
Total number
of images to be
printed
Label side
Selecting and Printing Images
You can select an image and specify the number of copies for printing. In this section, an SD memory card
will be used as an example, but you can print from other memory cards using the same steps.
Turn on SELPHY.
Press and hold the
q
button until the screen shown at
the left displays.
To turn the power off, press and hold the
q
button again
until the displayed screen changes or turns off.
Adjust the screen for ease of viewing.
Raise the LCD monitor and adjust until the screen is
easily visible.
Do not raise the LCD monitor more than 45° as this may
result in damage or malfunction.
Approx. 45°

6
7
8
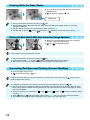
Printing From USB Flash Memory
14
Print.
Press the
p
button to start printing.
During printing, the paper will pass in and out from the
back of SELPHY several times. Do not touch the paper
until printing has nished and the printed sheets collect
on the print output tray (on the outer lid of the paper
cassette).
Do not let 19 or more printed sheets collect on the print
output tray.
To cancel printing, press the
v
button.
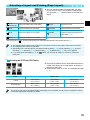
Change the ink cassette.
When the color ink is depleted, open the ink cassette
compartment cover and move the lock as shown in the
illustration. The ink cassette will be ejected.
Insert a new ink cassette (pp. 8, 10).
Never pull out the paper cassette, open the ink cassette compartment cover, or remove the memory card
while you can hear the printer’s operation sounds immediately after turning on the printer, or during printing.
This may cause the printer to malfunction.
It may take some time before images display if the memory card contains a large number of images.
When the total number of copies for printing is set to 0 and you press the
p
button, the currently
displayed image will print once.
If the [Start DPOF printing] screen displays, refer to “Printing Images Using Digital Camera Specied
Settings (DPOF Print)” (p. 28).
Insert the paper.
When the paper is depleted, remove the paper cassette
from SELPHY.
Rell the paper cassette with new paper (p. 8), and
reinsert the cassette into SELPHY (p. 10).
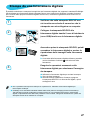
Just like images on memory cards, images on commercially available USB ash memory can also be printed.
Insert a USB ash memory.
Insert a USB ash memory as shown.
All further steps are the same as those used for printing
images from memory cards (pp. 13 – 14).
Depending on the brand of USB ash memory used, it may be difcult to insert or remove, and it may not
operate properly.
Refer to the user guide included with your USB ash memory for operating instructions.

1
2
3
4
15
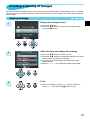
Display the menu.
Press the
k
button.
Display the settings screen.
Press the
ud
buttons to select [Print All Images], then
press the
o
button.
Select the number of copies.
Press the
ud
buttons to set the number of copies.
You can select up to 99 copies per image. If there are
more than 1000 images on the card, only 999 copies will
be printed in order of the most recent by shooting date.
Number of sheets
required
Number of copies
Print.
Press the
p
button to start printing.
To cancel printing, press the
v
button.
Printing All Images
You can print all images on a memory card at once.

16
Cleaning Up After Printing
After you nish printing, follow the steps below to clean up and store SELPHY.
Turn off SELPHY (p. 11), then remove the memory card or USB ash memory.
Lower the screen (LCD monitor) completely for storage.
Unplug the power cord from the power outlet and disconnect the adapter plug from SELPHY.
If the compact power adapter is hot, wait until it has cooled down before you store it.
Remove the paper cassette and close the paper cassette compartment cover. Keep the remaining paper
inside the cassette and store the cassette in a dark place free from dust.
Keep the ink cassette inside SELPHY.
Store SELPHY horizontally, in a dark place free from dust.
When not using SELPHY, make sure to store the printer with the screen (LCD monitor) completely
lowered.
If dust enters SELPHY and sticks to the paper or color ink, print quality will deteriorate.
When you have more than one ink cassette, keep one inside SELPHY, and put the other inside the
original packaging or a bag to protect it from dust, and store it in a dark place.
When storing new paper and ink cassettes, leave them in unopened packages, and keep them in a dark
place.
Storing the Printed Photos
When both edges of a print have perforations, you can remove the edges
by bending them.
Use an oil-based pen to write on prints.
To prevent discoloration, do not store prints in places subject to
temperatures of over 40 °C (104 °F), humid or dusty places, or in direct
sunlight.
Avoid the following actions as they may result in color change, color
fading or color bleeding: Sticking any type of adhesive tape on a print
surface, allowing print surfaces to come into contact with vinyl or plastic, applying alcohol or other volatile
solvents to a print surface, or leaving the print surface tightly pressed against other surfaces or objects for
prolonged periods.
If you wish to mount prints in an album, select an album with photo covers made of nylon, polypropylene or
cellophane.
Color may change over time or depending on storage conditions. Canon assumes no liability for color
changes.

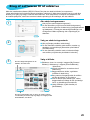
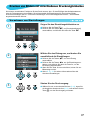
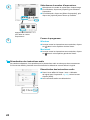
Making Settings
1
2
3
17
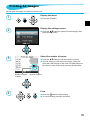
Printing a Variety of Images
You can use various printing features, such as imprinting the shooting date or adjusting the color of an image.
You do not need to repeat the settings for each image because once the settings are made, they are applied
for all images.
Display the settings screen.
Press the
k
button.
Press the
ud
buttons to select [Print Settings], then
press the
o
button.
Select the item and change the settings.
Press the
ud
buttons to select an item.
Press the
l
r
buttons to change the settings, then press
the
v
button to complete the setting.
Pressing the
v
button again will restore the image
display screen.
Refer to pp. 18 – 21 for information about each setting.
Print.
Select an image for printing (p. 13) and the number of
copies (p. 13), then press the
p
button to print.

Printing With the Date (Date)
Getting the Best Results With Auto Correction (Image Optimize)
Correcting Red Eyes and Printing (Correct Red-Eye)
18
Correct images with red-eye.
Off (Default setting) / On
Portions other than the eyes may be mistakenly corrected. Set [Correct Red-Eye] to [ On] only when
printing images with red-eye.
If SELPHY is turned off or the memory card is removed, the setting will return to [ Off].
Red-eye may not be automatically detected or optimally corrected when faces appear extremely small,
large, dark or bright in relation to the overall image, with faces turned to the side or diagonally, or faces
with a portion hidden.
Red-eye correction is not available if [ 2-up], [ 4-up], [ 8-up], or [ Index] is selected in [Page
Layout] (p. 19).
When [ Sepia] or [ B/W] is selected in [My Colors] (p. 20), red-eye correction will not be applied.
The level of correction will change depending on the page layout and paper size.
SELPHY will automatically correct the image to
achieve optimum image quality.
Off / On (Default setting)
Some images may not be adjusted correctly.
Turning off SELPHY will return the setting to [ On].
When [Page Layout] (p. 19) is set to [ Index], [Image Optimize] will not be applied.
The level of correction will change depending on the page layout and paper size.
Turning off SELPHY will return the setting to [ Off].
Since the date printed will be the date the image was recorded by the digital camera, it cannot be
changed on SELPHY.
You can change the style of the printed date in [Date Format] (p. 21).
The date will not print if [ Index], [
ID Photo] or [
Shufe] is selected in [Page Layout] (p. 19).
You can print the shooting date recorded by the
digital camera.
Off (Default setting) / On
08/08/2010

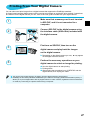
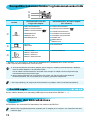
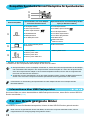
Selecting a Layout and Printing (Page Layout)
19
You can set the number of images that you want
to print on one sheet. The number of images that
you specied (p. 13) will be printed in the selected
layout.
1-up
(Default setting)
Prints one image using a full sheet Index Prints as an index
2-up Prints two images on one sheet
ID Photo
Prints ID photos on one sheet
4-up Prints four images on one sheet
Shufe
Automatically arranges images in
a variety of sizes for printing on a
single sheet (p. 20)
8-up* Prints eight images on one sheet
* Set the layout to [ 8-up] when using Color Ink Cassette/Label Set KC-18IL (8-label sheet) (p. 2).
The settings will be retained even if SELPHY is turned off or the memory card is removed from the slot.
The image position cannot be specied.
Depending on the selected layout, the settings made in [Date] (p. 18), [Image Optimize] (p. 18), [Correct
Red-Eye] (p. 18), [Borders] (p. 20), [Smooth Skin] (p. 21), or [Brightness] (p. 21) may not be applied.
If you select [Print All Images] (p. 15) in [ Index], you can print all images on a memory card as an
index print.
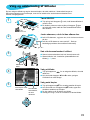
Printing an ID Photo (ID Photo)
Prints two ID photos each in three different sizes for
a total of six photos on a single sheet, as shown in
the picture at the left.
Prints can be made on L size or Postcard size paper
(p. 2).
Paper Picture Size
L Size
45 x 35 mm
(1.8 x 1.4 in.)
40 x 30 mm
(1.6 x 1.2 in.)
30 x 24 mm
(1.2 x 0.9 in.)
Postcard Size
60 x 51 mm
(2.4 x 2.0 in.)
45 x 35 mm
(1.8 x 1.4 in.)
40 x 30 mm
(1.6 x 1.2 in.)
The ID photo may not be accepted ofcially, depending on the institution the ID photo is required for. Please
contact the appropriate institution for details.
Sidan laddas...
Sidan laddas...
Sidan laddas...
Sidan laddas...
Sidan laddas...
Sidan laddas...
Sidan laddas...
Sidan laddas...
Sidan laddas...
Sidan laddas...
Sidan laddas...
Sidan laddas...
Sidan laddas...
Sidan laddas...
Sidan laddas...
Sidan laddas...
Sidan laddas...
Sidan laddas...
Sidan laddas...
Sidan laddas...
Sidan laddas...
Sidan laddas...
Sidan laddas...
Sidan laddas...
Sidan laddas...
Sidan laddas...
Sidan laddas...
Sidan laddas...
Sidan laddas...
Sidan laddas...
Sidan laddas...
Sidan laddas...
Sidan laddas...
Sidan laddas...
Sidan laddas...
Sidan laddas...
Sidan laddas...
Sidan laddas...
Sidan laddas...
Sidan laddas...
Sidan laddas...
Sidan laddas...
Sidan laddas...
Sidan laddas...
Sidan laddas...
Sidan laddas...
Sidan laddas...
Sidan laddas...
Sidan laddas...
Sidan laddas...
Sidan laddas...
Sidan laddas...
Sidan laddas...
Sidan laddas...
Sidan laddas...
Sidan laddas...
Sidan laddas...
Sidan laddas...
Sidan laddas...
Sidan laddas...
Sidan laddas...
Sidan laddas...
Sidan laddas...
Sidan laddas...
Sidan laddas...
Sidan laddas...
Sidan laddas...
Sidan laddas...
Sidan laddas...
Sidan laddas...
Sidan laddas...
Sidan laddas...
Sidan laddas...
Sidan laddas...
Sidan laddas...
Sidan laddas...
Sidan laddas...
Sidan laddas...
Sidan laddas...
Sidan laddas...
Sidan laddas...
Sidan laddas...
Sidan laddas...
Sidan laddas...
Sidan laddas...
Sidan laddas...
Sidan laddas...
Sidan laddas...
Sidan laddas...
Sidan laddas...
Sidan laddas...
Sidan laddas...
Sidan laddas...
Sidan laddas...
Sidan laddas...
Sidan laddas...
Sidan laddas...
Sidan laddas...
Sidan laddas...
Sidan laddas...
Sidan laddas...
Sidan laddas...
Sidan laddas...
Sidan laddas...
Sidan laddas...
Sidan laddas...
Sidan laddas...
Sidan laddas...
Sidan laddas...
Sidan laddas...
Sidan laddas...
Sidan laddas...
Sidan laddas...
Sidan laddas...
Sidan laddas...
Sidan laddas...
Sidan laddas...
Sidan laddas...
Sidan laddas...
Sidan laddas...
Sidan laddas...
Sidan laddas...
Sidan laddas...
Sidan laddas...
Sidan laddas...
Sidan laddas...
Sidan laddas...
Sidan laddas...
Sidan laddas...
Sidan laddas...
Sidan laddas...
Sidan laddas...
Sidan laddas...
Sidan laddas...
Sidan laddas...
Sidan laddas...
Sidan laddas...
Sidan laddas...
Sidan laddas...
Sidan laddas...
Sidan laddas...
Sidan laddas...
Sidan laddas...
Sidan laddas...
Sidan laddas...
Sidan laddas...
Sidan laddas...
Sidan laddas...
Sidan laddas...
Sidan laddas...
Sidan laddas...
Sidan laddas...
Sidan laddas...
Sidan laddas...
Sidan laddas...
Sidan laddas...
Sidan laddas...
Sidan laddas...
Sidan laddas...
Sidan laddas...
Sidan laddas...
Sidan laddas...
Sidan laddas...
Sidan laddas...
Sidan laddas...
Sidan laddas...
Sidan laddas...
Sidan laddas...
Sidan laddas...
Sidan laddas...
Sidan laddas...
Sidan laddas...
Sidan laddas...
Sidan laddas...
Sidan laddas...
Sidan laddas...
Sidan laddas...
Sidan laddas...
Sidan laddas...
Sidan laddas...
Sidan laddas...
Sidan laddas...
Sidan laddas...
Sidan laddas...
Sidan laddas...
Sidan laddas...
Sidan laddas...
Sidan laddas...
Sidan laddas...
Sidan laddas...
Sidan laddas...
Sidan laddas...
Sidan laddas...
Sidan laddas...
Sidan laddas...
Sidan laddas...
Sidan laddas...
Sidan laddas...
Sidan laddas...
Sidan laddas...
Sidan laddas...
Sidan laddas...
Sidan laddas...
Sidan laddas...
Sidan laddas...
Sidan laddas...
Sidan laddas...
Sidan laddas...
Sidan laddas...
Sidan laddas...
Sidan laddas...
Sidan laddas...
Sidan laddas...
Sidan laddas...
Sidan laddas...
Sidan laddas...
Sidan laddas...
Sidan laddas...
Sidan laddas...
Sidan laddas...
Sidan laddas...
Sidan laddas...
Sidan laddas...
Sidan laddas...
Sidan laddas...
Sidan laddas...
Sidan laddas...
Sidan laddas...
Sidan laddas...
Sidan laddas...
Sidan laddas...
Sidan laddas...
Sidan laddas...
Sidan laddas...
Sidan laddas...
Sidan laddas...
Sidan laddas...
Sidan laddas...
Sidan laddas...
Sidan laddas...
Sidan laddas...
Sidan laddas...
Sidan laddas...
Sidan laddas...
Sidan laddas...
Sidan laddas...
Sidan laddas...
Sidan laddas...
Sidan laddas...
Sidan laddas...
Sidan laddas...
Sidan laddas...
Sidan laddas...
Sidan laddas...
Sidan laddas...
Sidan laddas...
Sidan laddas...
Sidan laddas...
Sidan laddas...
Sidan laddas...
Sidan laddas...
Sidan laddas...
Sidan laddas...
Sidan laddas...
Sidan laddas...
Sidan laddas...
Sidan laddas...
Sidan laddas...
Sidan laddas...
Sidan laddas...
Sidan laddas...
Sidan laddas...
Sidan laddas...
Sidan laddas...
Sidan laddas...
Sidan laddas...
Sidan laddas...
Sidan laddas...
Sidan laddas...
Sidan laddas...
Sidan laddas...
Sidan laddas...
Sidan laddas...
Sidan laddas...
Sidan laddas...
Sidan laddas...
Sidan laddas...
Sidan laddas...
Sidan laddas...
Sidan laddas...
Sidan laddas...
Sidan laddas...
Sidan laddas...
Sidan laddas...
Sidan laddas...
Sidan laddas...
Sidan laddas...
Sidan laddas...
Sidan laddas...
Sidan laddas...
Sidan laddas...
Sidan laddas...
Sidan laddas...
Sidan laddas...
Sidan laddas...
Sidan laddas...
-
 1
1
-
 2
2
-
 3
3
-
 4
4
-
 5
5
-
 6
6
-
 7
7
-
 8
8
-
 9
9
-
 10
10
-
 11
11
-
 12
12
-
 13
13
-
 14
14
-
 15
15
-
 16
16
-
 17
17
-
 18
18
-
 19
19
-
 20
20
-
 21
21
-
 22
22
-
 23
23
-
 24
24
-
 25
25
-
 26
26
-
 27
27
-
 28
28
-
 29
29
-
 30
30
-
 31
31
-
 32
32
-
 33
33
-
 34
34
-
 35
35
-
 36
36
-
 37
37
-
 38
38
-
 39
39
-
 40
40
-
 41
41
-
 42
42
-
 43
43
-
 44
44
-
 45
45
-
 46
46
-
 47
47
-
 48
48
-
 49
49
-
 50
50
-
 51
51
-
 52
52
-
 53
53
-
 54
54
-
 55
55
-
 56
56
-
 57
57
-
 58
58
-
 59
59
-
 60
60
-
 61
61
-
 62
62
-
 63
63
-
 64
64
-
 65
65
-
 66
66
-
 67
67
-
 68
68
-
 69
69
-
 70
70
-
 71
71
-
 72
72
-
 73
73
-
 74
74
-
 75
75
-
 76
76
-
 77
77
-
 78
78
-
 79
79
-
 80
80
-
 81
81
-
 82
82
-
 83
83
-
 84
84
-
 85
85
-
 86
86
-
 87
87
-
 88
88
-
 89
89
-
 90
90
-
 91
91
-
 92
92
-
 93
93
-
 94
94
-
 95
95
-
 96
96
-
 97
97
-
 98
98
-
 99
99
-
 100
100
-
 101
101
-
 102
102
-
 103
103
-
 104
104
-
 105
105
-
 106
106
-
 107
107
-
 108
108
-
 109
109
-
 110
110
-
 111
111
-
 112
112
-
 113
113
-
 114
114
-
 115
115
-
 116
116
-
 117
117
-
 118
118
-
 119
119
-
 120
120
-
 121
121
-
 122
122
-
 123
123
-
 124
124
-
 125
125
-
 126
126
-
 127
127
-
 128
128
-
 129
129
-
 130
130
-
 131
131
-
 132
132
-
 133
133
-
 134
134
-
 135
135
-
 136
136
-
 137
137
-
 138
138
-
 139
139
-
 140
140
-
 141
141
-
 142
142
-
 143
143
-
 144
144
-
 145
145
-
 146
146
-
 147
147
-
 148
148
-
 149
149
-
 150
150
-
 151
151
-
 152
152
-
 153
153
-
 154
154
-
 155
155
-
 156
156
-
 157
157
-
 158
158
-
 159
159
-
 160
160
-
 161
161
-
 162
162
-
 163
163
-
 164
164
-
 165
165
-
 166
166
-
 167
167
-
 168
168
-
 169
169
-
 170
170
-
 171
171
-
 172
172
-
 173
173
-
 174
174
-
 175
175
-
 176
176
-
 177
177
-
 178
178
-
 179
179
-
 180
180
-
 181
181
-
 182
182
-
 183
183
-
 184
184
-
 185
185
-
 186
186
-
 187
187
-
 188
188
-
 189
189
-
 190
190
-
 191
191
-
 192
192
-
 193
193
-
 194
194
-
 195
195
-
 196
196
-
 197
197
-
 198
198
-
 199
199
-
 200
200
-
 201
201
-
 202
202
-
 203
203
-
 204
204
-
 205
205
-
 206
206
-
 207
207
-
 208
208
-
 209
209
-
 210
210
-
 211
211
-
 212
212
-
 213
213
-
 214
214
-
 215
215
-
 216
216
-
 217
217
-
 218
218
-
 219
219
-
 220
220
-
 221
221
-
 222
222
-
 223
223
-
 224
224
-
 225
225
-
 226
226
-
 227
227
-
 228
228
-
 229
229
-
 230
230
-
 231
231
-
 232
232
-
 233
233
-
 234
234
-
 235
235
-
 236
236
-
 237
237
-
 238
238
-
 239
239
-
 240
240
-
 241
241
-
 242
242
-
 243
243
-
 244
244
-
 245
245
-
 246
246
-
 247
247
-
 248
248
-
 249
249
-
 250
250
-
 251
251
-
 252
252
-
 253
253
-
 254
254
-
 255
255
-
 256
256
-
 257
257
-
 258
258
-
 259
259
-
 260
260
-
 261
261
-
 262
262
-
 263
263
-
 264
264
-
 265
265
-
 266
266
-
 267
267
-
 268
268
-
 269
269
-
 270
270
-
 271
271
-
 272
272
-
 273
273
-
 274
274
-
 275
275
-
 276
276
-
 277
277
-
 278
278
-
 279
279
-
 280
280
-
 281
281
-
 282
282
-
 283
283
-
 284
284
-
 285
285
-
 286
286
-
 287
287
-
 288
288
-
 289
289
-
 290
290
-
 291
291
-
 292
292
-
 293
293
-
 294
294
-
 295
295
-
 296
296
-
 297
297
-
 298
298
-
 299
299
-
 300
300
-
 301
301
-
 302
302
-
 303
303
-
 304
304
-
 305
305
-
 306
306
-
 307
307
-
 308
308
-
 309
309
-
 310
310
-
 311
311
-
 312
312
-
 313
313
-
 314
314
-
 315
315
-
 316
316
-
 317
317
-
 318
318
-
 319
319
-
 320
320
-
 321
321
-
 322
322
-
 323
323
-
 324
324
-
 325
325
-
 326
326


på andra språk
- italiano: Canon Selphy CP800 Manuale del proprietario
- español: Canon Selphy CP800 El manual del propietario
- Deutsch: Canon Selphy CP800 Bedienungsanleitung
- français: Canon Selphy CP800 Le manuel du propriétaire
- English: Canon Selphy CP800 Owner's manual
- dansk: Canon Selphy CP800 Brugervejledning
- suomi: Canon Selphy CP800 Omistajan opas
- Nederlands: Canon Selphy CP800 de handleiding
Relaterade papper
-
Canon SELPHY CP780 Bruksanvisning
-
-
Canon SELPHY CP760 Bruksanvisning
-
-
Canon SELPHY CP810 Användarmanual
-
Canon SELPHY CP900 Användarmanual
-
-
Canon MAXIFY MB2750 Användarmanual
-
Canon MAXIFY MB5155 Användarmanual
-
Canon PIXMA TS8251 Bruksanvisning
Andra dokument
-
Hama 00114728 Bruksanvisning
-
DeLOCK 61771 Datablad
-
Nikon PD-10 Användarmanual
-
Panasonic DMCFZ8 Bruksanvisningar
-
HP Color LaserJet 5500 Printer series Installationsguide
-
Sony CPPM-NR40 Användarmanual
-
Sagem EASY 110 Bruksanvisning
-
Epson WORKFORCE PRO WF-R8590 DTWF Bruksanvisning
-
Dymo XTL™ 500 Kit Användarmanual
-