
PN:16166000A28347
Candy-MC-IF7251J1-A IF7251J1-A
20220715
180X250mm
KRCDJ642

Instructions Manual For Induction Hob ENGLISH
Manuale di istruzioni per il piano cottura a induzione ITALIANO
Návod k pRXåLWí pro indukþní varnou desku ýEŠTINA
Návod na obsluhXLQGXNþnej varnej dosky SLOV(1ý,1$
Bedienungsanleitung für Induktionskochfeld DEUTSCH
Manuel d’utilisation de la table de cuisson à induction FRANÇAIS
ȱɧɫɬɪɭɤɰɿɹɡɟɤɫɩɥɭɚɬɚɰɿʀɞɥɹɿɧɞɭɤɰɿɣɧɨʀɜɚɪɢɥɶɧɨʀɩɨɜɟɪɯɧɿ ɍɄɊȺȲɇɋɖɄȺ
Navodila za uporabo indukcijskeNXKDOQHSORãþH SLOVENŠý,1$
Ɋɴɤɨɜɨɞɫɬɜɨɡɚɭɩɨɬɪɟɛɚɧɚ ɢɧɞɭɤɰɢɨɧɟɧɩɥɨɬ ȻɔɅȽȺɊɋɄɂ
Uputstvo za upotrebu indukcLRQHSORþH]DNXYDQMH SRPSKI
Ɋɭɤɨɜɨɞɫɬɜɨ ɩɨ ɷɤɫɩɥɭɚɬɚɰɢɢ ɢɧɞɭɤɰɢɨɧɧɨɣ ɜɚɪɨɱɧɨɣ ɩɚɧɟɥɢ ɊɍɋɋɄɂɃ
Instrukcja oEVáXJLSáyty indukcyjnej POLSKI
Brugsanvisning til induktionskogesektion DANSK
Bruksanvisning för induktionshäll SVENSKA
Induktiolieden käyttöohje SUOMI
Bruksanvisning for induksjonstopp NORSK
3ULUXþQLNV uputama za indukciMVNXSORþX]DNXKDQMH HRVATSKI
Manual de instruc܊iuni pentru plita de inGXF܊LH ROMÂ1Ă
Használati utasítás az indukciós fĘ]ĘODShoz MAGYAR
Manual de instruções para placa de indução PORTUGUÊS
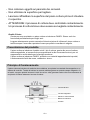
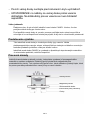
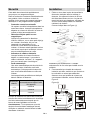
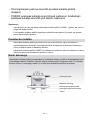
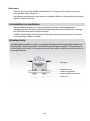
Thank you for purchasing the Candy induction hob. Please read this instruction manual
carefully before using the hob and keep it in a safe place for future reference.
KRCDJ642

EN-2

EN-3

EN-4

FP FP
FP FP
EN-5

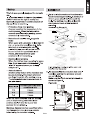
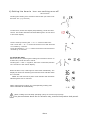
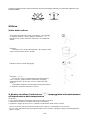
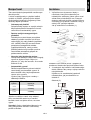
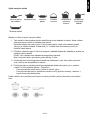
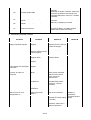
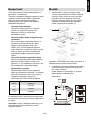
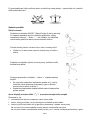
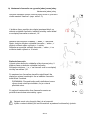
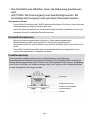
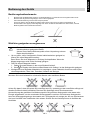
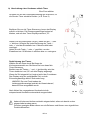
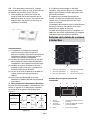
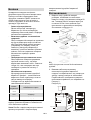
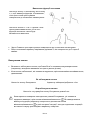
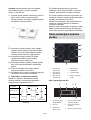
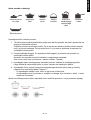
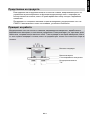
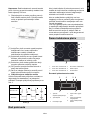
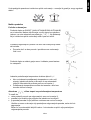
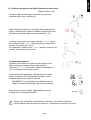
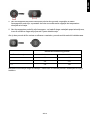
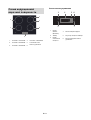
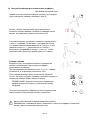
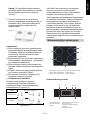
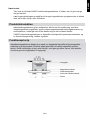
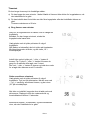
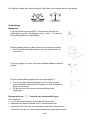
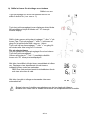
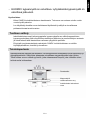
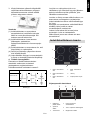
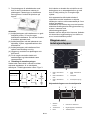
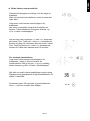
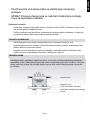
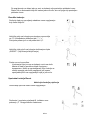
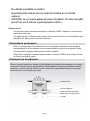
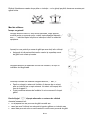
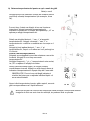
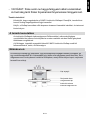
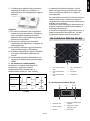
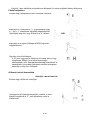
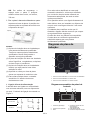
1. Max. 1300/1500W zone
2. Max. 2300/2600W zone
3. Max. 1800/2000W zone
4. Max. 1800/2000W zone
5. Glass plate
6. Control panel
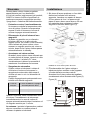
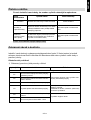
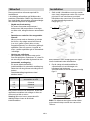
1.On/Off control
2.Timer control
3.Boost
4.Heating zone selection controls
5. Power / Timer regulating key
6. Keylock control
four
EN-6

EN-7

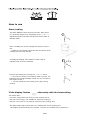
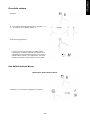
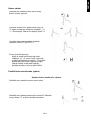
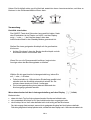
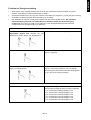
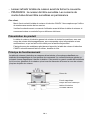
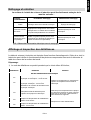
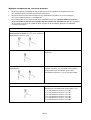
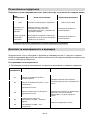
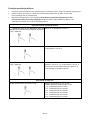
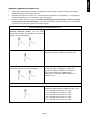
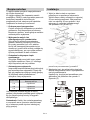
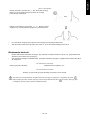
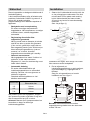
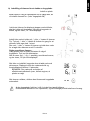
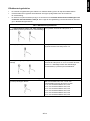
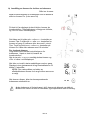
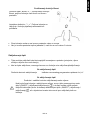
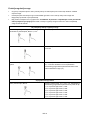
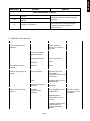
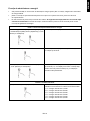
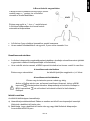
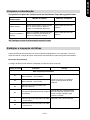
How to use
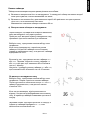
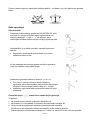
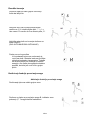
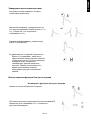
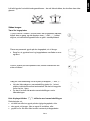
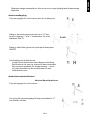
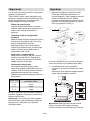
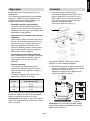
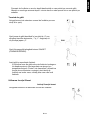
Start cooking
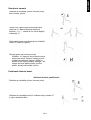
7RXFKWKH212))FRQWUROIRUWKUHHVHFRQGV$IWHUSRZHU
RQWKHEX]]HUEHHSVRQFHDOOGLVSOD\VVKRZ³±´RU³±±´
LQGLFDWLQJWKDWWKHLQGXFWLRQKREKDVHQWHUHGWKHVWDWHRI
VWDQGE\PRGH
3ODFHDVXLWDEOHSDQRQWKHFRRNLQJ]RQHWKDW\RXZLVKWR
XVH
0DNHVXUHWKHERWWRPRIWKHSDQDQGWKHVXUIDFHRIWKH
FRRNLQJ]RQHDUHFOHDQDQGGU\
7RXFKLQJWKHKHDWLQJ]RQHVHOHFWLRQFRQWURODQGDQ
LQGLFDWRUQH[WWRWKHNH\ZLOOIODVK
Select a heat setting by touching the “-”or “+” control.
•If you don’t choose a heat setting within 1 minute, the
Induction hob will automatically switch off. You will need to
start again at step 1.
• You can modify the heat setting at any time during
cooking.
If the display flashes alternately with the heat setting
This means that:
• you have not placed a pan on the correct cooking zone or,
• the pan you’re using is not suitable for induction cooking or,
• the pan is too small or not properly centered on the cooking zone.
No heating takes place unless there is a suitable pan on the cooking zone.
The display will automatically turn off after 1 minute if no suitable pan is placed on it.
EN-8

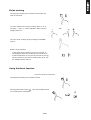
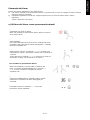
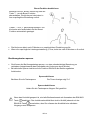
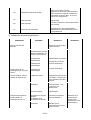
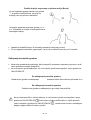
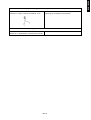
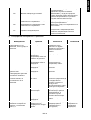
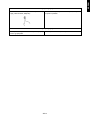
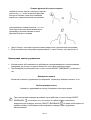
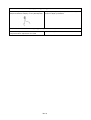
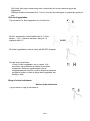
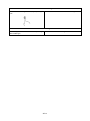
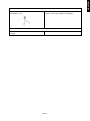
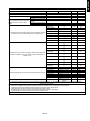
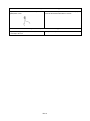
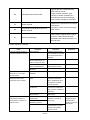
Finish cooking
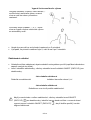
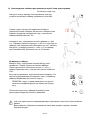
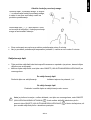
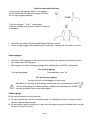
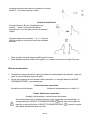
Using the Boost function
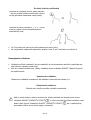
Touching the heating zone selection control that you
wish to switch off
Turn the cooking zone off by scrolling down to “0” or
touching “-” and “+” control together. Make sure the
display shows “0”.
Turn the whole cooktop off by touching the ON/OFF
control.
Beware of hot surfaces
Hwill show which cooking zone is hot to touch. It
will disappear when the surface has cooled down to
a safe temperature. It can also be used as an energy
saving function if you want to heat further pans, use
the hotplate that is still hot.
25
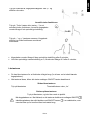
Activate the boos t fun ctio n
7RXFKLQJWKHKHDWLQJ]RQHVHOHFWLRQFRQWURO
7RXFKLQJWKHERRVWFRQWURO WKH]RQHLQGLFDWRUVKRZ
³3´DQGWKHSRZHUUHDFK0D[
EN-9

x7KHFRRNLQJ]RQHUHWXUQVWRLWVRULJLQDOVHWWLQJDIWHUPLQXWHV
x,IWKHRULJLQDOKHDWVHWWLQJHTXDOVLWZLOOUHWXUQWRDIWHUPLQXWHV
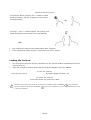
Locking the Controls
x<RXFDQORFNWKHFRQWUROVWRSUHYHQWXQLQWHQGHGXVHIRUH[DPSOHFKLOGUHQDFFLGHQWDOO\WXUQLQJWKH
FRRNLQJ]RQHVRQ
x:KHQWKHFRQWUROVDUHORFNHGDOOWKHFRQWUROVH[FHSWWKH212))FRQWURODUHGLVDEOHG
7RORFNWKH FRQ WURO V
7RXFKWKHORFNFRQWURO 7KHWLPHULQGLFDWRUZLOOVKRZ³/R³
7RXQ ORF N WKH FRQWUR OV
7RXFKDQGKROGWKHORFNFRQWUROIRUDZKLOH
:KHQWKHKRELVLQWKHORFNPRGHDOOWKHFRQWUROVDUHGLVDEOHH[FHSWWKH212)) \RXFDQDOZD\V
WXUQWKHLQGXFWLRQKRERIIZLWKWKH212)) FRQWUROLQDQHPHUJHQF\EXW\RXVKDOOXQORFNWKHKREILUVW
LQWKHQH[WRSHUDWLRQ
&DQF HOWKH %RR VWIX QF WLRQ
7RXFKLQJWKH%RRVWFRQWURORUWKH³´EXWWRQWRFDQFHO
WKH%RRVWIXQFWLRQWKHQWKHFRRNLQJ]RQHZLOOUHYHUWWR
LWVRULJLQDOVHWWLQJ
7RXFKLQJ³´DQG³´FRQWUROWRJHWKHU7KHFRRNLQJ]RQH
VZLWFKRIIDQGWKHERRVWIXQFWLRQFDQFHODXWRPDWLFDOO\
25
EN-10

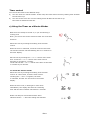
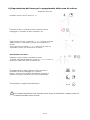
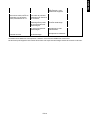
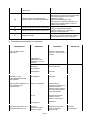
Timer control
<RXFDQXVHWKHWLPHULQWZRGLIIHUHQWZD\V
D <RXFDQXVHLWDVDPLQXWHPLQGHU,QWKLVFDVHWKHWLPHUZLOOQRWWXUQDQ\FRRNLQJ]RQHRIIZKHQ
WKHVHWWLPHLVXS
E <RXFDQVHWLWWRWXUQRQHRUPRUHFRRNLQJ]RQHVRIIDIWHUWKHVHWWLPHLVXS
7KHWLPHURIPD[LPXPLVPLQ
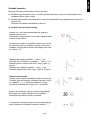
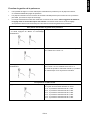
a) Using the Timer as a Minute Minder
Make sure the cooktop is turned on, if you are selecting a
cooking zone
Note: you can use the minute minder at least one zone shall
be active.
Select the zone by touching the heating zone selection
control.
When the zone is confirmed, touch the control of the timer.
The minder indicator will start flashing and “10” will show in
the timer display.
Set the time by touching the “-” or “+” control of the timer
Hint: Touch the “-” or “+” control of the timer once to
decrease or increase by 1 minute.
Touch and hold the “-” or “+” control of the timer to decrease
or increase by 10 minutes.
To cancel the minute minder
Select the zone by touching the heating zone selection
control.In a short time, touch the timer control.
Touching the “-” and “+” together, the timer
is cancelled, and the “00” will show in the minute
display.
When the time is set, it will begin to count down
immediately. The display will show the remaining
time and the timer indicator will flash for 5 seconds.
Buzzer will beep for 30 seconds and the timer
indicator shows “- -” when the setting time finished.
EN-11

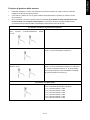
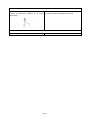
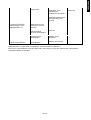
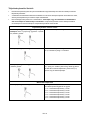
E 6HWWLQ JW KHWLPHUWR WX UQ RQHFRRNLQ J]R QHRII
6HWRQH]RQH
:KHQFRRNLQJWLPHUH[SLUHVWKHFRUUHVSRQGLQJFRRNLQJ]RQH
ZLOOEHVZLWFKHGRIIDXWRPDWLFDOO\
2WKHUFRRNLQJ]RQHZLOONHHSRSHUDWLQJLIWKH\DUHWXUQHGRQSUHYLRXVO\
7KHSLFWXUHVVKRZQDERYHDUHIRUUHIHUHQFHRQO\DQGWKHILQDOSURGXFWVKDOOSUHYDLO
Touching the heating zone selection control that you want to set
the timer for. (e.g. zone 3#)
In short time, before the display stops flashing, touch the timer
control. The minder indicator will start flashing and “10” will show
in the timer display.
Set the time by touching the ”–“ or “+” control of the timer
Hint: Touch the “-” or “+” control of the timer once will decrease
or increase by 1 minute.
Touch and hold the “-” or “+” control of the timer will decrease or
increase by 10 minutes.
To cancel the timer
Select the zone by touching the heating zone selection control.In
a short time, touch the timer control.
Touching the “-” and “+” together, the timer is cancelled, and the
“00” will show in the minute display.
When the time is set, it will begin to count down immediately. The
display will show the remaining time and the timer indicator flash
for 5 seconds.
NOTE: The red dot next to power level indicator will illuminate
indicating that zone is selected.
EN-12

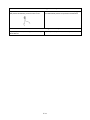
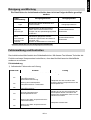
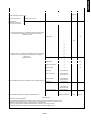
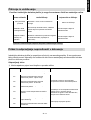
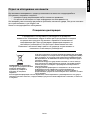
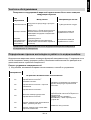
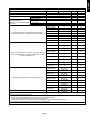
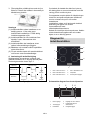
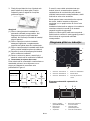
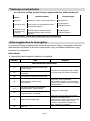
Power Management Function
it is possible to set a maximum power absorption level for the induction hob, choosing up to different
power ranges.
induction hobs are able to limit themselves automatically in order to work at lower power, to avoid
the risk of overloading.
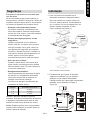
It is not necessary to put any pots on the heating zones. We suggest to start setting within 5
seconds after connecting the power. You need to enter the power setting mode within 60
seconds to enter Power Management Function.
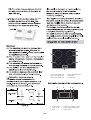
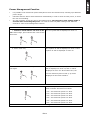
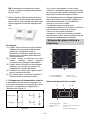
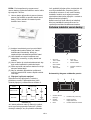
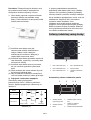
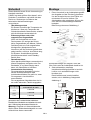
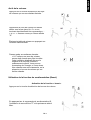
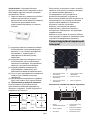
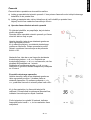
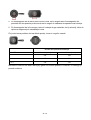
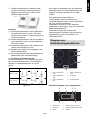
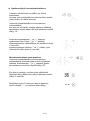
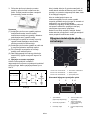
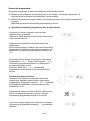
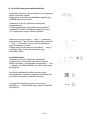
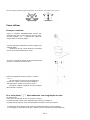
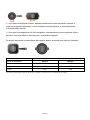
To enter Power Management Function
1. Please be noted that do not turn on the
hob. At this stage, press “Boost” and “Lock” at the
same time.
The “S” symbol will be displayed on zone #1.
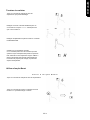
2. Press “Lock” key. The symbol “S” will be displayed on zone #1 and
symbol “E” will be displayed on zone #2.
3. Press “Boost” and “Lock” keys at the same
time again.
The symbol “S” will be displayed on zone #1, “E”
will be displayed on zone #2, and “t” will be
displayed on zone #3. At the same time, the
current maximum power mode (7.2) will be
displayed on the timer indicator.
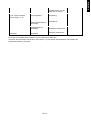
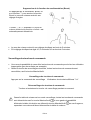
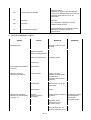
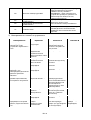
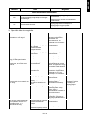
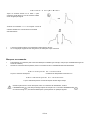
To switch to another level
short press the “Boost” key
Confirmation Power Management Function
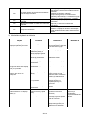
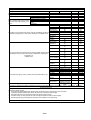
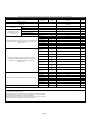
There are 6 power levels, from “7.2” to “2.5”. The
timer indicator will show one of them.
“7.2” : the maximum power is 7.2kW.
“6.5” : the maximum power is 6.5kW.
“5.5” : the maximum power is 5.5kW.
“4.5” : the maximum power is 4.5kW.
“3.5” : the maximum power is 3.5kW.
“2.5” : the maximum power is 2.5kW.
EN-13

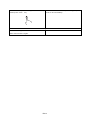
After the desired power setting mode is selected,
please press “Lock” key
When the timer indicator stops flickering, the power
mode is set successfully.
Exit Power Management Function
After the setting, make sure to dis-
connect the
power and connect it again.
Then the hob will be turned off.
EN-14

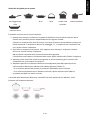
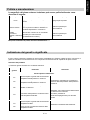
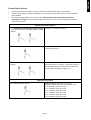
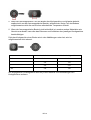
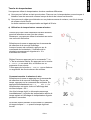
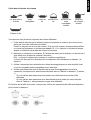
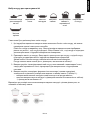
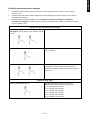
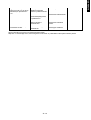
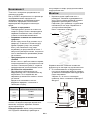
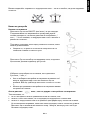
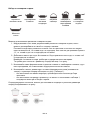
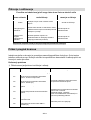
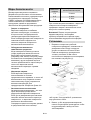
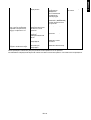
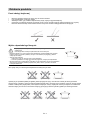
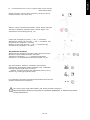
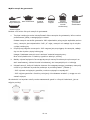
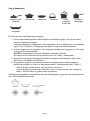
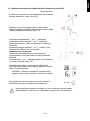
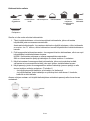
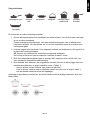
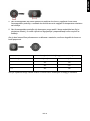
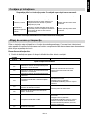
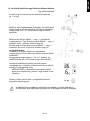
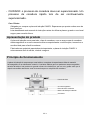
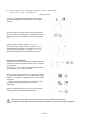
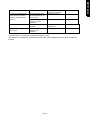
You may have a number of different cooking vessels
1. This induction hob can identify a variety of cooking vessels, which you can test by
one of the following methods:
Place the vessel on the cooking zone. If the corresponding cooking zone displays a
power level, then the vessel is suitable. If “U” flashes, then the vessel is not
suitable for use with the induction hob.
2. Hold a magnet to the vessel. If the magnet is attracted to the vessel is suitable for
use with the induction hob.
NB: The base of the vessel must contain magnetic material.
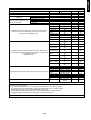
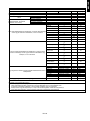
It must have flat bottom with a diameter according to the table 1 below.
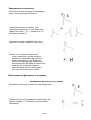
3. Use only ferromagnetic cookwares made from enameled steel, cast iron or stainless
steel but compatible with induction
4. Use pans whose diameter of the ferromagnetic area (base of the pan) is in the range
of dimensions in the table below. (Table 1)
- If you use smaller pots, performance could be affected
- If you use pot with a diameter smaller than the one indicated in the table 1, pots
may not be detected
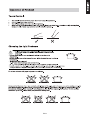
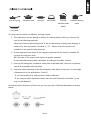
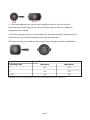
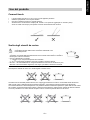
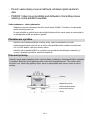
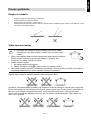
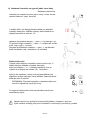
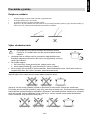
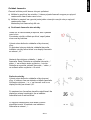
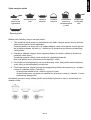
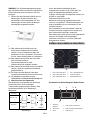
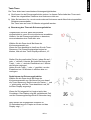
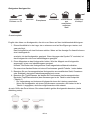
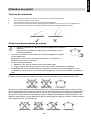
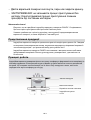
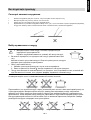
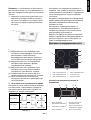
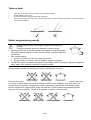
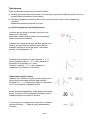
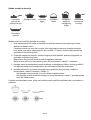
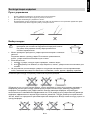
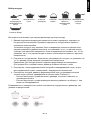
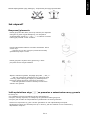
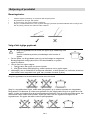
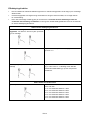
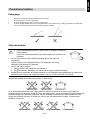
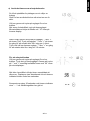
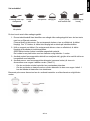
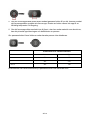
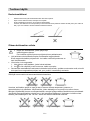
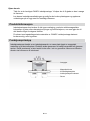
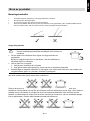
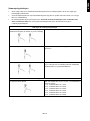
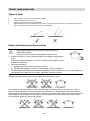
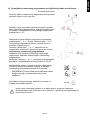
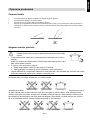
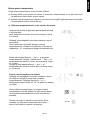
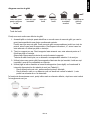
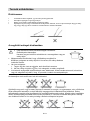
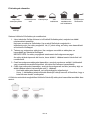
According to the dimension of the zone you can use pots of different diameters as picture
below:
Iron oil frying Stainless steel Iron pan Iron kettle
Enamel
stainless steel
kettle
Enamel cooking
utesil
Iron plate
EN-15

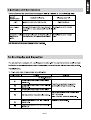
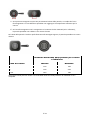
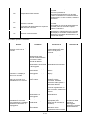
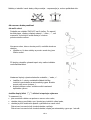
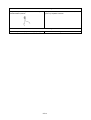
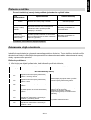
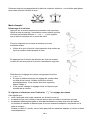
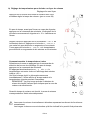
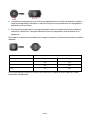
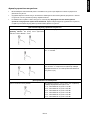
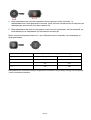
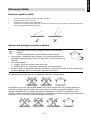
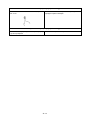
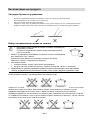
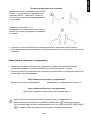
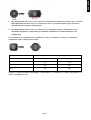
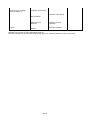
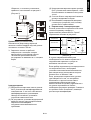
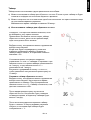
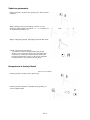
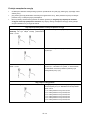
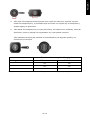
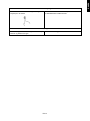
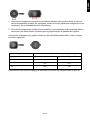
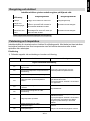
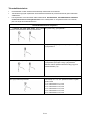
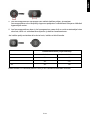
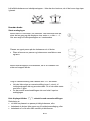
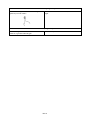
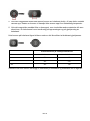
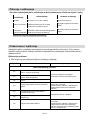
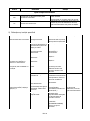
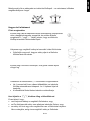
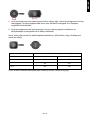
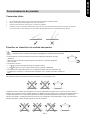
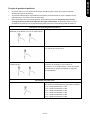
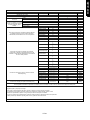
5. If the ferromagnetic part covers only partially the base of the pan, only the
ferromagnetic area will heat up, the rest of the base may not heat up a sufficient
temperature for cooking.
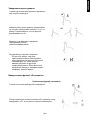
6. If the ferromagnetic area is not homogeneous, but presents others material such as
aluminum this may affect the heating up and the pan detection.
If the base of the pan is similar to the pictures below the pan could be not detected.
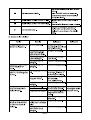
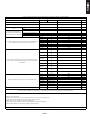
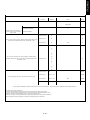
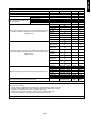
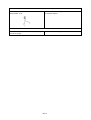
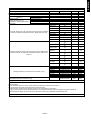
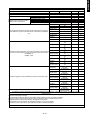
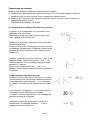
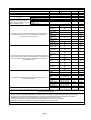
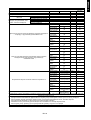
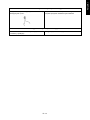
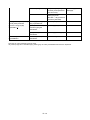
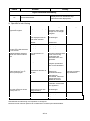
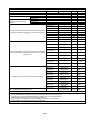
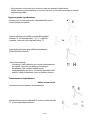
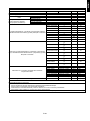
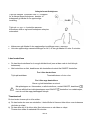
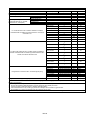
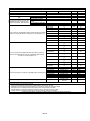
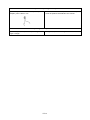
The base diameter of induction cookware
Cooking zone
Minimum Maximum
7KHDERYHPD\YDU\DFFRUGLQJWRWKHVL]HRIWKHSDQDQGWKHPDWHULDOLWLVPDGHIURP
EN-16

EN-17

EN-18

EN-19
Sidan laddas...
Sidan laddas...
Sidan laddas...
Sidan laddas...
Sidan laddas...
Sidan laddas...
Sidan laddas...
Sidan laddas...
Sidan laddas...
Sidan laddas...
Sidan laddas...
Sidan laddas...
Sidan laddas...
Sidan laddas...
Sidan laddas...
Sidan laddas...
Sidan laddas...
Sidan laddas...
Sidan laddas...
Sidan laddas...
Sidan laddas...
Sidan laddas...
Sidan laddas...
Sidan laddas...
Sidan laddas...
Sidan laddas...
Sidan laddas...
Sidan laddas...
Sidan laddas...
Sidan laddas...
Sidan laddas...
Sidan laddas...
Sidan laddas...
Sidan laddas...
Sidan laddas...
Sidan laddas...
Sidan laddas...
Sidan laddas...
Sidan laddas...
Sidan laddas...
Sidan laddas...
Sidan laddas...
Sidan laddas...
Sidan laddas...
Sidan laddas...
Sidan laddas...
Sidan laddas...
Sidan laddas...
Sidan laddas...
Sidan laddas...
Sidan laddas...
Sidan laddas...
Sidan laddas...
Sidan laddas...
Sidan laddas...
Sidan laddas...
Sidan laddas...
Sidan laddas...
Sidan laddas...
Sidan laddas...
Sidan laddas...
Sidan laddas...
Sidan laddas...
Sidan laddas...
Sidan laddas...
Sidan laddas...
Sidan laddas...
Sidan laddas...
Sidan laddas...
Sidan laddas...
Sidan laddas...
Sidan laddas...
Sidan laddas...
Sidan laddas...
Sidan laddas...
Sidan laddas...
Sidan laddas...
Sidan laddas...
Sidan laddas...
Sidan laddas...
Sidan laddas...
Sidan laddas...
Sidan laddas...
Sidan laddas...
Sidan laddas...
Sidan laddas...
Sidan laddas...
Sidan laddas...
Sidan laddas...
Sidan laddas...
Sidan laddas...
Sidan laddas...
Sidan laddas...
Sidan laddas...
Sidan laddas...
Sidan laddas...
Sidan laddas...
Sidan laddas...
Sidan laddas...
Sidan laddas...
Sidan laddas...
Sidan laddas...
Sidan laddas...
Sidan laddas...
Sidan laddas...
Sidan laddas...
Sidan laddas...
Sidan laddas...
Sidan laddas...
Sidan laddas...
Sidan laddas...
Sidan laddas...
Sidan laddas...
Sidan laddas...
Sidan laddas...
Sidan laddas...
Sidan laddas...
Sidan laddas...
Sidan laddas...
Sidan laddas...
Sidan laddas...
Sidan laddas...
Sidan laddas...
Sidan laddas...
Sidan laddas...
Sidan laddas...
Sidan laddas...
Sidan laddas...
Sidan laddas...
Sidan laddas...
Sidan laddas...
Sidan laddas...
Sidan laddas...
Sidan laddas...
Sidan laddas...
Sidan laddas...
Sidan laddas...
Sidan laddas...
Sidan laddas...
Sidan laddas...
Sidan laddas...
Sidan laddas...
Sidan laddas...
Sidan laddas...
Sidan laddas...
Sidan laddas...
Sidan laddas...
Sidan laddas...
Sidan laddas...
Sidan laddas...
Sidan laddas...
Sidan laddas...
Sidan laddas...
Sidan laddas...
Sidan laddas...
Sidan laddas...
Sidan laddas...
Sidan laddas...
Sidan laddas...
Sidan laddas...
Sidan laddas...
Sidan laddas...
Sidan laddas...
Sidan laddas...
Sidan laddas...
Sidan laddas...
Sidan laddas...
Sidan laddas...
Sidan laddas...
Sidan laddas...
Sidan laddas...
Sidan laddas...
Sidan laddas...
Sidan laddas...
Sidan laddas...
Sidan laddas...
Sidan laddas...
Sidan laddas...
Sidan laddas...
Sidan laddas...
Sidan laddas...
Sidan laddas...
Sidan laddas...
Sidan laddas...
Sidan laddas...
Sidan laddas...
Sidan laddas...
Sidan laddas...
Sidan laddas...
Sidan laddas...
Sidan laddas...
Sidan laddas...
Sidan laddas...
Sidan laddas...
Sidan laddas...
Sidan laddas...
Sidan laddas...
Sidan laddas...
Sidan laddas...
Sidan laddas...
Sidan laddas...
Sidan laddas...
Sidan laddas...
Sidan laddas...
Sidan laddas...
Sidan laddas...
Sidan laddas...
Sidan laddas...
Sidan laddas...
Sidan laddas...
Sidan laddas...
Sidan laddas...
Sidan laddas...
Sidan laddas...
Sidan laddas...
Sidan laddas...
Sidan laddas...
Sidan laddas...
Sidan laddas...
Sidan laddas...
Sidan laddas...
Sidan laddas...
Sidan laddas...
Sidan laddas...
Sidan laddas...
Sidan laddas...
Sidan laddas...
Sidan laddas...
Sidan laddas...
Sidan laddas...
Sidan laddas...
Sidan laddas...
Sidan laddas...
Sidan laddas...
Sidan laddas...
Sidan laddas...
Sidan laddas...
Sidan laddas...
Sidan laddas...
Sidan laddas...
Sidan laddas...
Sidan laddas...
Sidan laddas...
Sidan laddas...
Sidan laddas...
Sidan laddas...
Sidan laddas...
Sidan laddas...
Sidan laddas...
Sidan laddas...
Sidan laddas...
Sidan laddas...
Sidan laddas...
Sidan laddas...
Sidan laddas...
Sidan laddas...
Sidan laddas...
Sidan laddas...
Sidan laddas...
Sidan laddas...
Sidan laddas...
Sidan laddas...
Sidan laddas...
Sidan laddas...
Sidan laddas...
Sidan laddas...
Sidan laddas...
Sidan laddas...
Sidan laddas...
Sidan laddas...
Sidan laddas...
Sidan laddas...
Sidan laddas...
Sidan laddas...
Sidan laddas...
Sidan laddas...
Sidan laddas...
Sidan laddas...
Sidan laddas...
Sidan laddas...
Sidan laddas...
Sidan laddas...
Sidan laddas...
Sidan laddas...
Sidan laddas...
Sidan laddas...
Sidan laddas...
Sidan laddas...
Sidan laddas...
Sidan laddas...
Sidan laddas...
Sidan laddas...
Sidan laddas...
Sidan laddas...
Sidan laddas...
Sidan laddas...
Sidan laddas...
Sidan laddas...
Sidan laddas...
Sidan laddas...
Sidan laddas...
Sidan laddas...
Sidan laddas...
Sidan laddas...
Sidan laddas...
Sidan laddas...
Sidan laddas...
Sidan laddas...
Sidan laddas...
Sidan laddas...
Sidan laddas...
Sidan laddas...
Sidan laddas...
Sidan laddas...
Sidan laddas...
Sidan laddas...
Sidan laddas...
Sidan laddas...
Sidan laddas...
Sidan laddas...
Sidan laddas...
Sidan laddas...
Sidan laddas...
Sidan laddas...
Sidan laddas...
Sidan laddas...
Sidan laddas...
Sidan laddas...
Sidan laddas...
Sidan laddas...
Sidan laddas...
Sidan laddas...
Sidan laddas...
Sidan laddas...
Sidan laddas...
Sidan laddas...
Sidan laddas...
Sidan laddas...
Sidan laddas...
Sidan laddas...
Sidan laddas...
Sidan laddas...
Sidan laddas...
Sidan laddas...
Sidan laddas...
Sidan laddas...
Sidan laddas...
Sidan laddas...
Sidan laddas...
Sidan laddas...
Sidan laddas...
Sidan laddas...
Sidan laddas...
Sidan laddas...
Sidan laddas...
Sidan laddas...
Sidan laddas...
Sidan laddas...
Sidan laddas...
Sidan laddas...
Sidan laddas...
Sidan laddas...
Sidan laddas...
Sidan laddas...
Sidan laddas...
Sidan laddas...
Sidan laddas...
Sidan laddas...
Sidan laddas...
Sidan laddas...
Sidan laddas...
Sidan laddas...
Sidan laddas...
Sidan laddas...
Sidan laddas...
Sidan laddas...
Sidan laddas...
Sidan laddas...
Sidan laddas...
-
 1
1
-
 2
2
-
 3
3
-
 4
4
-
 5
5
-
 6
6
-
 7
7
-
 8
8
-
 9
9
-
 10
10
-
 11
11
-
 12
12
-
 13
13
-
 14
14
-
 15
15
-
 16
16
-
 17
17
-
 18
18
-
 19
19
-
 20
20
-
 21
21
-
 22
22
-
 23
23
-
 24
24
-
 25
25
-
 26
26
-
 27
27
-
 28
28
-
 29
29
-
 30
30
-
 31
31
-
 32
32
-
 33
33
-
 34
34
-
 35
35
-
 36
36
-
 37
37
-
 38
38
-
 39
39
-
 40
40
-
 41
41
-
 42
42
-
 43
43
-
 44
44
-
 45
45
-
 46
46
-
 47
47
-
 48
48
-
 49
49
-
 50
50
-
 51
51
-
 52
52
-
 53
53
-
 54
54
-
 55
55
-
 56
56
-
 57
57
-
 58
58
-
 59
59
-
 60
60
-
 61
61
-
 62
62
-
 63
63
-
 64
64
-
 65
65
-
 66
66
-
 67
67
-
 68
68
-
 69
69
-
 70
70
-
 71
71
-
 72
72
-
 73
73
-
 74
74
-
 75
75
-
 76
76
-
 77
77
-
 78
78
-
 79
79
-
 80
80
-
 81
81
-
 82
82
-
 83
83
-
 84
84
-
 85
85
-
 86
86
-
 87
87
-
 88
88
-
 89
89
-
 90
90
-
 91
91
-
 92
92
-
 93
93
-
 94
94
-
 95
95
-
 96
96
-
 97
97
-
 98
98
-
 99
99
-
 100
100
-
 101
101
-
 102
102
-
 103
103
-
 104
104
-
 105
105
-
 106
106
-
 107
107
-
 108
108
-
 109
109
-
 110
110
-
 111
111
-
 112
112
-
 113
113
-
 114
114
-
 115
115
-
 116
116
-
 117
117
-
 118
118
-
 119
119
-
 120
120
-
 121
121
-
 122
122
-
 123
123
-
 124
124
-
 125
125
-
 126
126
-
 127
127
-
 128
128
-
 129
129
-
 130
130
-
 131
131
-
 132
132
-
 133
133
-
 134
134
-
 135
135
-
 136
136
-
 137
137
-
 138
138
-
 139
139
-
 140
140
-
 141
141
-
 142
142
-
 143
143
-
 144
144
-
 145
145
-
 146
146
-
 147
147
-
 148
148
-
 149
149
-
 150
150
-
 151
151
-
 152
152
-
 153
153
-
 154
154
-
 155
155
-
 156
156
-
 157
157
-
 158
158
-
 159
159
-
 160
160
-
 161
161
-
 162
162
-
 163
163
-
 164
164
-
 165
165
-
 166
166
-
 167
167
-
 168
168
-
 169
169
-
 170
170
-
 171
171
-
 172
172
-
 173
173
-
 174
174
-
 175
175
-
 176
176
-
 177
177
-
 178
178
-
 179
179
-
 180
180
-
 181
181
-
 182
182
-
 183
183
-
 184
184
-
 185
185
-
 186
186
-
 187
187
-
 188
188
-
 189
189
-
 190
190
-
 191
191
-
 192
192
-
 193
193
-
 194
194
-
 195
195
-
 196
196
-
 197
197
-
 198
198
-
 199
199
-
 200
200
-
 201
201
-
 202
202
-
 203
203
-
 204
204
-
 205
205
-
 206
206
-
 207
207
-
 208
208
-
 209
209
-
 210
210
-
 211
211
-
 212
212
-
 213
213
-
 214
214
-
 215
215
-
 216
216
-
 217
217
-
 218
218
-
 219
219
-
 220
220
-
 221
221
-
 222
222
-
 223
223
-
 224
224
-
 225
225
-
 226
226
-
 227
227
-
 228
228
-
 229
229
-
 230
230
-
 231
231
-
 232
232
-
 233
233
-
 234
234
-
 235
235
-
 236
236
-
 237
237
-
 238
238
-
 239
239
-
 240
240
-
 241
241
-
 242
242
-
 243
243
-
 244
244
-
 245
245
-
 246
246
-
 247
247
-
 248
248
-
 249
249
-
 250
250
-
 251
251
-
 252
252
-
 253
253
-
 254
254
-
 255
255
-
 256
256
-
 257
257
-
 258
258
-
 259
259
-
 260
260
-
 261
261
-
 262
262
-
 263
263
-
 264
264
-
 265
265
-
 266
266
-
 267
267
-
 268
268
-
 269
269
-
 270
270
-
 271
271
-
 272
272
-
 273
273
-
 274
274
-
 275
275
-
 276
276
-
 277
277
-
 278
278
-
 279
279
-
 280
280
-
 281
281
-
 282
282
-
 283
283
-
 284
284
-
 285
285
-
 286
286
-
 287
287
-
 288
288
-
 289
289
-
 290
290
-
 291
291
-
 292
292
-
 293
293
-
 294
294
-
 295
295
-
 296
296
-
 297
297
-
 298
298
-
 299
299
-
 300
300
-
 301
301
-
 302
302
-
 303
303
-
 304
304
-
 305
305
-
 306
306
-
 307
307
-
 308
308
-
 309
309
-
 310
310
-
 311
311
-
 312
312
-
 313
313
-
 314
314
-
 315
315
-
 316
316
-
 317
317
-
 318
318
-
 319
319
-
 320
320
-
 321
321
-
 322
322
-
 323
323
-
 324
324
-
 325
325
-
 326
326
-
 327
327
-
 328
328
-
 329
329
-
 330
330
-
 331
331
-
 332
332
-
 333
333
-
 334
334
-
 335
335
-
 336
336
-
 337
337
-
 338
338
-
 339
339
-
 340
340
-
 341
341
-
 342
342
-
 343
343
-
 344
344
-
 345
345
-
 346
346
-
 347
347
-
 348
348
-
 349
349
-
 350
350
-
 351
351
-
 352
352
-
 353
353
-
 354
354
-
 355
355
-
 356
356
-
 357
357
-
 358
358
-
 359
359
-
 360
360
-
 361
361
-
 362
362
-
 363
363
-
 364
364
-
 365
365
-
 366
366
-
 367
367
-
 368
368
-
 369
369
-
 370
370
-
 371
371
-
 372
372
-
 373
373
-
 374
374
-
 375
375
-
 376
376
-
 377
377
-
 378
378
-
 379
379
-
 380
380
-
 381
381
-
 382
382
-
 383
383
-
 384
384
-
 385
385
-
 386
386
-
 387
387
-
 388
388
-
 389
389
-
 390
390
-
 391
391
-
 392
392
-
 393
393
-
 394
394
-
 395
395
-
 396
396
-
 397
397
-
 398
398
-
 399
399


på andra språk
- português: Candy KRCDJ642 Manual do usuário
- română: Candy KRCDJ642 Manual de utilizare
Andra dokument
-
Panasonic NRBN31CX2 Bruksanvisningar
-
Panasonic NRBN31AX2 Bruksanvisningar
-
EMS AirFlow Master Operating Instructions Manual
-
Soehnle Comfort 2-Zone Bruksanvisning
-
Pioneer PD-50AE Bruksanvisning
-
Dremel 8200 Original Instructions Manual
-
Soehnle COMFORT Bruksanvisning
-
Soehnle Comfort Duo Bruksanvisning
-
Panasonic TX14S4TCV Bruksanvisningar
-
Skov DOL 2400/2300 Alarm System Bruksanvisning