
1
CobraNet Discovery Quick Guide (For CobraNet Compatible product from Yamaha)
CobraNet Discovery Quick Guide
(For CobraNet compatible products from Yamaha)
Foreword
When using CobraNet compatible products from Yamaha (other than the MY16-C), a software
application such as the NetworkAmp Manager or CobraNet Manager Lite for Yamaha must be used to
set up the audio routing. Both of these applications, however, are designed to run under Windows
XP/2000 and operation is not guaranteed under Windows Vista or later operating systems.
This guide describes how CobraNet Discovery can be used to set up CobraNet compatible products
from Yamaha. CobraNet Discovery supports the latest Windows operating systems.
Special Notice
All copyrights of this quick guide are proprietary to Yamaha Corporation.
Copying and reproduction of this quick guide in whole or in part by any means is expressly forbidden without the
written consent of Yamaha Corporation.
Yamaha makes no representations or warranties with regard to the use of this quick guide and cannot be held
responsible for the results of the use of this guide.
The illustrations and LCD screens as shown in this quick guide are for instructional purposes only, and may appear
somewhat different from those on the final specifications.
“CobraNet” and “CobraNet Discovery” are registered trademarks of Cirrus Logic, Inc.
Ethernet is a trademark of Xerox Corporation.
Windows is a registered trademark of Microsoft Corporation in the United States and other countries.
All company names and product names are trademarks or registered trademarks of their respective companies.
EN

2
CobraNet Discovery Quick Guide (For CobraNet Compatible product from Yamaha)
About CobraNet Discovery
CobraNet Discovery is a software application that can be used to set up CobraNet devices provided by
Cirrus Logic, Inc. CobraNet Discovery can set up the following parameters, which can also be set up by
CobraNet Manager Lite for Yamaha or NetworkAmp Manager applications.
• Audio routing between CobraNet compatible devices (bundle settings)
• Audio latency and bit depth
• Serial data bridge
• Conductor priority
CobraNet Discovery can be downloaded from the following website:
http://cobranet.info/
Refer to license agreement displayed when downloading the software for software license terms and
conditions.
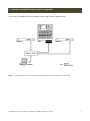
Setup Procedure Using CobraNet Discovery
A system consisting of the following components will be used as an example throughout this quick guide.
• Computer (Windows 7)
• CobraNet Discovery 4.0.5
• MY16CII (CobraNet Firmware V2.11.11)
• LS9-16 (Firmware V1.30)
• DME4io-C (Firmware V3.84)

3
CobraNet Discovery Quick Guide (For CobraNet Compatible product from Yamaha)
1. Connect CobraNet Devices to the Computer
Connect the CobraNet devices to a network switch using Ethernet straight cables.
NOTE A CobraNet device can be connected directly to the computer via an Ethernet crossover cable.

4
CobraNet Discovery Quick Guide (For CobraNet Compatible product from Yamaha)
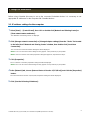
2. Assign IP Addresses
Before using CobraNet Discovery to set up the connected CobraNet devices it is necessary to set
appropriate IP addresses for the computer and CobraNet devices.
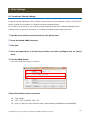
2-1. IP address settings for the computer
1
Select [Start] → [Control Panel], then click or double-click [Network and Sharing Center] or
[View network status and tasks].
The “Network and Sharing Center” is displayed.
2 Click [Manage network connection] or [Change Adapter settings] from the “Tasks” list located
in the left side of “Network and Sharing Center” window, then double-click [Local Area
Connection].
The “Local Area Connection Status” dialog box will be displayed.
NOTE The “User Account Control” dialog box may appear. Click [Continue] or [Yes] button.
NOTE If the “Local Area Connection properties” dialog box appears, skip ahead to step 4.
3 Click [Properties].
The “Local Area Connection properties” dialog box will be displayed.
NOTE The “User Account Control” dialog box may appear. Click [Continue] or [Yes] button.
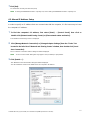
4 In the [Network] tab, choose [Internet Protocol Version 4 (TCP/IPv4)], and click the [Properties]
button.
The “Internet Protocol Version 4 (TCP/IPv4) Properties” dialog box will be displayed.
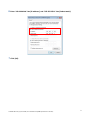
5 Click [Use the Following IP Address].

5
CobraNet Discovery Quick Guide (For CobraNet Compatible product from Yamaha)
6 Enter “192.168.0.100” into [IP address], and “255.255.255.0” into [Subnet mask].
7 Click [OK].

6
CobraNet Discovery Quick Guide (For CobraNet Compatible product from Yamaha)
2-2. Assign IP Addresses to the CobraNet Devices
Use CobraNet Discovery to assign appropriate IP addresses to all CobraNet devices on the network.
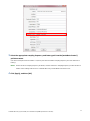
1 Select [Options…] from the [Tools] menu in the Discovery window (the Discovery window is
the first window that appears when CobraNet Discovery is initially launched).
The “Options” dialog box will appear.
2 Select the adapter you will use from the “Network Adapter” menu.
3 Click [Enable Auto Assignment] so that a checkmark appears in the checkbox.
IP addresses will automatically be assigned to newly discovered CobraNet devices. When IP addresses are properly
assigned all CobraNet devices on the network will be listed in the Discovery window.


8
CobraNet Discovery Quick Guide (For CobraNet Compatible product from Yamaha)
3. Audio Routing Between CobraNet Devices
The procedure for setting up audio routing via CobraNet Discovery is described below. For this example
we’ll route the channel 1 through 8 outputs from the MY16-CII card installed in the LS9-16 console to
DME4io-C inputs 1 through 8.
3-1. Sampling Frequency and Latency Settings
The sampling frequency and latency of the transmitting and receiving devices must be set to the same
values.
■3-1-1. Transmitting Device(MY16-CII)Settings
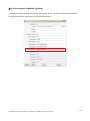
1 Select the MY16-CII in the Discovery window, then select [Configure…] from the [Tools] menu.
2 Click [Advanced].
The “Advanced Configuration” dialog box will appear.

9
CobraNet Discovery Quick Guide (For CobraNet Compatible product from Yamaha)
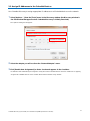
3 Select the appropriate sampling frequency and latency pair from the [modeRate Control]
pull-down menu.
(The above example shows the 48 kHz + 2 2/3 mS pair selected: 48 kHz sampling frequency and 2.67 millisecond
latency).
NOTE Set the MY16-CII sampling frequency to 48 kHz, and the host device sampling frequency to either 48 kHz or
96 kHz. Other settings will result in a CobraNet Discovery “Invalid Mode Rate Value” error.
4 Click [Apply], and then [OK].

10
CobraNet Discovery Quick Guide (For CobraNet Compatible product from Yamaha)
■3.1.2. Receiving Device(DME4io-C)Settings
Following the same procedure used for the transmitting device, set the receiving device [modRate
Control] field values to match those of the transmitting device.

11
CobraNet Discovery Quick Guide (For CobraNet Compatible product from Yamaha)
4. Audio Routing Settings
Transmit and receive device bundle numbers must be properly matched in order to transfer audio data
over a CobraNet network.
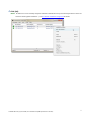
4-1. Transmit Bundle Settings
1 Select the MY16-CII in the Discovery window, and then select [Configure] from the [Tools]
menu.
Four transmit bundles and eight receive bundles will be shown in a list.
2 Double click transmit bundle number 1, or select it and then click [Configure].

12
CobraNet Discovery Quick Guide (For CobraNet Compatible product from Yamaha)
3 Enter an appropriate bundle number in the “Bundle” field.
NOTE Enter a number that is not already used as a transmit bundle number anywhere else on the network.
4 Select the bit depth to be used for audio transfer from the “SubFormat” pull-down menu.
Check the [All Same] checkbox to set all channels in the bundle, and all bundles for the device, to the same value. Bit
depth only needs to be set for the transmitting device. No bit depth setting is required for the receiving device.
When latency is set to 5.33 msecs and bit depth is set to 24 bits, the maximum number of channels that can be
transmitted per bundle is limited to seven. In such cases set the SubCount field to “7”. Refer to the MY16-CII or
DME8i-C/DME8o-C/DME4io-C owner’s manual for details on the relationship between bit depth and the number of
channels that can be handled per bundle.
5 Click [Apply] and then [OK].

13
CobraNet Discovery Quick Guide (For CobraNet Compatible product from Yamaha)
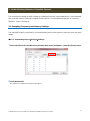
4-2. Receive Bundle Settings
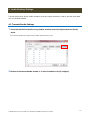
1 Select the DME4io-C (the receiving device) in the Discovery window, and then select
[Configure] from the [Tools] window.
2 Select receive bundle number 1, and then click [Configure].
3 Enter the same bundle number as set for the MY16-CII.
The settings made thus far enable audio data transfer from the MY16-CII installed in the LS9-16 console to the
DME4io-C satellite unit. The green indicators on the right side of the window shown above will appear when audio data
is being properly received.
4 Click [Apply] and then [OK].

14
CobraNet Discovery Quick Guide (For CobraNet Compatible product from Yamaha)
5. Serial Bridge Settings
The serial bridge settings described below allow asynchronous serial data communication between
CobraNet devices. In this example serial bridging will be used to allow DME4io-C head amp gain control
from the LS9-16 via the CobraNet network. Only the CobraNet Discovery settings will be discussed here.
Refer to the LS9-16 and DME4io-C owner’s manuals for details on setting up those devices for remote
head amp control.
5-1. Transmitting Device (MY16-CII) Settings
1 Select the MY16-CII in the Discovery window, and then select [Configure] from the [Tools]
menu.
2 Click [Advanced].
The [Advanced Configuration] dialog box will appear.
3 Referring to the chart below, set the serial channel numbers in the SerialTxMAC (transmit) and
SerialRxMAC (receive) fields so that they match.
NOTE The SerialTxMAC and SerialRxMAC field values must be entered in MAC address format, corresponding to
serial channels 1 through 15.

15
CobraNet Discovery Quick Guide (For CobraNet Compatible product from Yamaha)
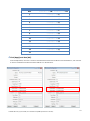
Serial Channel SerialRxMAC SerialTxMAC
OFF 01:60:2B:FF:88:AF 01:60:2B:FF:88:AE
1
01:60:2B:FF:88:81
2
01:60:2B:FF:88:82
3
01:60:2B:FF:88:83
4
01:60:2B:FF:88:84
5
01:60:2B:FF:88:85
6
01:60:2B:FF:88:86
7
01:60:2B:FF:88:87
8
01:60:2B:FF:88:88
9
01:60:2B:FF:88:89
10
01:60:2B:FF:88:8A
11
01:60:2B:FF:88:8B
12
01:60:2B:FF:88:8C
13
01:60:2B:FF:88:8D
14
01:60:2B:FF:88:8E
15
01:60:2B:FF:88:8F
4 Click [Apply] and then [OK].
In the example below, channel 2 is used for serial data transmission from the MY16-CII to the DME4io-C, and channel 1
is used for serial data transmission from the DME4io-C to the MY16-CII.

16
CobraNet Discovery Quick Guide (For CobraNet Compatible product from Yamaha)
6. Other Settings
6.1. Conductor Priority Settings
Conductor priority determines which network node functions as the conductor. Refer to the MY16-CII
owner’s manual for information on CobraNet conductors and performers.
It is normally not necessary to set conductor priority manually. Refer to the CobraNet Manager Lite for
Yamaha owner’s manual for information on conditions that make manual setup necessary.
1 In the Discovery window, select [Preference] in the [Tools] menu.
2 Check the [Enable SNMP] checkbox.
3 Click [OK].
4 Select the target device in the Discovery window, and select [Configure] from the [Tools]
menu.
5 Click the [SNMP] button.
The [Generic SNMP R/W] dialog box will appear.
6
Enter the following values in each field.
Type:Integer
OID:1.3.6.1.4.1.2680.1.3.3.3.1.2.2
Enter “0” (Zero) for Auto, otherwise enter a value between 0x80000000 and 0x800000ff.

17
CobraNet Discovery Quick Guide (For CobraNet Compatible product from Yamaha)
7 Click [Put].
To confirm the currently set value click [Get].
NOTE A setting of 0x80000000 results in a priority of 0, and a setting of 0x80000001 results in a priority of 1.
6-2. Manual IP Address Setup
In order to specify an IP address that can communicate with the computer, it is first necessary to know
the computer’s IP address.
1 To find the computer’s IP address, first select [Start] → [Control Panel], then click or
double-click [Network and Sharing Center] or [View network status and tasks].
The “Network and Sharing Center” is displayed.
2 Click [Manage Network Connection] or [Change Adapter Settings] from the “Tasks” list
located in the left side of “Network and Sharing Center” window, then double-click [Local
Area Connection].
The “Local Area Connection Status” dialog box will be displayed.
NOTE “User Account Control” dialog box may appear. Click [Continue] or [Yes] button.
3 Click [Details …].
The “Network Connection Details” dialog box will be displayed.
The “IPv4 Address” shown in the details list is the computer’s IP address.

18
CobraNet Discovery Quick Guide (For CobraNet Compatible product from Yamaha)
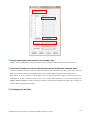
4 Right-click the device you want to update in the Discovery window, and select [New IP
Address] from the pop-up menu.
The IP assignment dialog box will be displayed.
5 Enter the IP address.
The first three numbers should be the same as the computer’s IP address. For example, if the computer’s IP address is
“192.168.0.100”, then the first three numbers of the new IP address should be “192.168.0”. The fourth number can be
any number from 1 through 254 that is not the same as the fourth number of the computer’s IP address. If the fourth
number of the computer’s IP address is “100”, for example, you could use “102.”
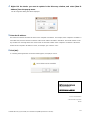
6 Click [OK].
If a warning message like the one shown below appears, click [OK] to close it.
C.S.G., Pro Audio Division
© 2013 Yamaha Corporation
305-A0
Yamaha Pro Audio global web site:
http://www.yamahaproaudio.com/
Yamaha Manual Library:
http://www.yamaha.co.jp/manual/
-
 1
1
-
 2
2
-
 3
3
-
 4
4
-
 5
5
-
 6
6
-
 7
7
-
 8
8
-
 9
9
-
 10
10
-
 11
11
-
 12
12
-
 13
13
-
 14
14
-
 15
15
-
 16
16
-
 17
17
-
 18
18


på andra språk
- italiano: Yamaha 8B Guida utente
- čeština: Yamaha 8B Uživatelská příručka
- español: Yamaha 8B Guía del usuario
- Deutsch: Yamaha 8B Benutzerhandbuch
- polski: Yamaha 8B instrukcja
- português: Yamaha 8B Guia de usuario
- français: Yamaha 8B Mode d'emploi
- Türkçe: Yamaha 8B Kullanici rehberi
- English: Yamaha 8B User guide
- dansk: Yamaha 8B Brugervejledning
- suomi: Yamaha 8B Käyttöohjeet
- Nederlands: Yamaha 8B Gebruikershandleiding
- română: Yamaha 8B Manualul utilizatorului