
3-071-929-04 (1)
© 2001 Sony Corporation Printed in Japan
RM-DR1
Remote Commander
Operating Instructions
Mode d’emploi
Bedienungsanleitung
Manual de instrucciones
Gebruiksaanwijzing
Bruksanvisning
Istruzioni per l’uso
Manual de instruções
Инструкция по эксплуатации
ACC
A
B
C
D
E
English
THIS CLASS B DIGITAL DEVICE COMPLIES WITH PART
15 OF THE FCC RULES AND THE CANADIAN ICES-003,
OPERATION IS SUBJECT TO THE FOLLOWING TWO
CONDITIONS : (1) THIS DEVICE MAY NOT CAUSE
HARMFUL INTERFERENCE, AND (2) THIS DEVICE
MUST ACCEPT ANY INTERFERENCE RECEIVED,
INCLUDING INTERFERENCE THAT MAY CAUSE
UNDESIRED OPERATION.
CET APPAREIL NUMÉRIQUE DE LA CLASSE B EST
CONFORME À LA NORME NMB-003 DU CANADA.
For the Customers in USA
Caution
You are cautioned that any changes or modifications not
expressly approved in this manual could void your
authority to operate this equipment.
Note
This equipment has been tested and found to comply with
the limits for a Class B digital device, pursuant to Part 15
of the FCC Rules. These limits are designed to provide
reasonable protection against harmful interference in a
residential installation. This equipment generates, uses,
and can radiate radio frequency energy and, if not
installed and used in accordance with the instructions,
may cause harmful interference to radio communications.
However, there is no guarantee that interference will not
occur in a particular installation. If this equipment does
cause harmful interference to radio or television reception,
which can be determined by turning the equipment off
and on, the user is encouraged to try to correct the
interference by one or more of the following measures:
– Reorient or relocate the receiving antenna.
– Increase the separation between the equipment and
receiver.
– Connect the equipment into an outlet on a circuit
different from that to which the receiver is connected.
– Consult the dealer or an experienced radio/TV
technician for help.
For the customers in Germany
Directive: EMC directive 89/336/EEC, 92/31/EEC
This equipment complies with EMC regulations when
used under the following circumstances:
•Residential area
•Business district
•Light-industry district
(This equipment complies with the EMC standard
regulations EN55022 ClassB.)
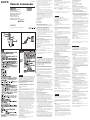
Identificación de las piezas
A Botón del disparador
B Palanca del zoom
C Lámpara POWER (encendido)
D Interruptor POWER (encendido)
E Cable remoto
Preparación de la cámara digital fija
Prepare la cámara para grabar imágenes. Consulte el
manual de instrucciones de la cámara digital fija para
obtener más información.
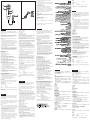
Conexión a la cámara digital fija
Conecte el cable remoto E del mando a distancia al
terminal de ACC de la cámara digital fija.
Utilización del mando a distancia para grabar
1 Para encender la cámara, deslice el interruptor POWER
(encendido)
D hacia abajo como indica la marca de la
flecha. La lámpara POWER (encendido)
C se
iluminará con una luz verde.
2 Pulse ligeramente el botón del disparador A para
comprobar la imagen. La imagen todavía no se habrá
grabado.
3 Pulse completamente el botón del disparador A hacia
abajo. La imagen se habrá grabado.
4
Para apagar la cámara, deslice el interruptor POWER
(encendido)
D
hacia abajo como indica la marca de la
flecha. La lámpara POWER (encendido)
C
se apagará.
Utilización de la función del zoom
Deslice la palanca del zoom B hacia el lado W o el lado T.
Si la desliza lentamente, la imagen se acercará o alejará
lentamente y si la desliza más deprisa, la imagen se
acercará o alejará rápidamente.
Lado T (para telefoto): la imagen aparece más cerca.
Lado W (para gran angular): la imagen aparece más lejos.
* Algunos modelos no disponen de la función de zoom.
Utilización del asa
Si utiliza un trípode, puede colgar el mando a distancia
del mango de panorámica del trípode cuando no lo utilice.
Especificaciones
Dimensiones: 35 × 89 × 23 mm (an/al/prf)
Cable remoto: 1,5 m
Peso: Aprox. 60 g
Accesorios: Manual de instrucciones (1)/asa (1)/bolsa
(1)
Consulte el manual de instrucciones de la cámara digital
fija para obtener más información.
Nederlands
Dit apparaat is getest en er is geconstateerd dat het
voldoet aan de limieten die zijn opgenomen in de EMC-
richtlijn voor het gebruik van verbindingskabels die
korter zijn dan 3 meter.
De RM-DR1 Remote Commander is ontworpen om een
Sony digitale camera met ACC aansluiting te bedienen.
Zo kan de camera vanop afstand worden bediend.
Opmerkingen
•Laat de Remote Commander niet vallen noch nat
worden.
•Laat de Remote Commander niet in de volle zon, bij een
verwarmingstoestel of op een zeer vochtige plaats
liggen.
•Zet de afstandsbediening af en wacht een tijdje alvorens
u ze weer aanzet. Door de POWER schakelaar D
herhaaldelijk te bedienen kan hij worden beschadigd en
kan de afstandsbediening niet goed werken.
•Bij het aansluiten of loskoppelen van het
afstandsbedieningssnoer E via ACC op het digitale
fototoestel moet u de stekker altijd recht houden. Indien
u dat niet doet, kunnen de afstandsbediening of het
toestel beschadigd raken.
Onderdelen
A Sluiterknop
B Zoomschakelaar
C POWER lampje
D POWER schakelaar
E Snoer
De Digital Still Camera gebruiksklaar maken
Stel de camera in voor opname. Raadpleeg de
gebruiksaanwijzing van de digitale camera voor meer
informatie.
Aansluiting op de Digital Still Camera
Sluit het snoer E van de Remote Commander aan op
ACC op de Digital Still Camera.
Opnemen met de Remote Commander
1 Schuif de POWER schakelaar D omlaag in de richting
van het pijltje om de camera aan te schakelen. Het
POWER lampje C wordt groen.
2 Druk de sluiterknop A lichtjes in om het beeld te
controleren. Het beeld wordt nog niet opgenomen.
3 Druk de sluiterknop A helemaal in. Het beeld wordt
opgenomen.
4 Schuif de POWER schakelaar D omlaag in de richting
van het pijltje om de camera uit te schakelen. Het
POWER lampje C dooft.
In- en uitzoomen
Schuif de zoomschakelaar B naar W of T. Door traag te
schuiven gaat het zoomen traag en door snel te schuiven
gaat het zoomen snel.
T-kant (telestand): onderwerp lijkt dichterbij.
W-kant (groothoekstand): onderwerp lijkt verderaf.
* Sommige modellen hebben geen zoomfunctie.
Gebruik van de lus
Wanneer u met een statief werkt, kunt u de Remote
Commander aan de zwenkhandle van het statief hangen
wanneer u hem niet gebruikt.
Technische gegevens
Afmetingen: 35 × 89 × 23 mm (b/h/d)
Snoer: 1,5 m
Gewicht: Ongeveer 60 g
Toebehoren: Gebruiksaanwijzing (1)/Lus (1)/Tasje (1)
Raadpleeg ook de gebruiksaanwijzing van de digitale
camera voor meer informatie.
This product has been tested and found compliant with
the limits sets out on the EMC Directive for using
connection cables shorter than 3 meters.
The RM-DR1 Remote Commander is designed to operate
a Sony digital still camera equipped with an ACC
terminal. You can operate the camera remotely.
Notes
•Be sure not to drop the Remote Commander or spill
liquid on it.
•
Do not leave the Remote Commander under direct
sunlight, near a heater or in locations with high humidity.
•
When you turn the Remote Commander off, wait a while
before turning it on again. Operating the POWER switch
D
repeatedly may damage it, and the Remote Commander
may not turn on properly.
•
When inserting or pulling the remote cord
E
out of the
ACC terminal of the Digital Still Camera, be sure to do so
in a straight line. Performing this operation incorrectly
may damage either the remote cord or the camera.
Identifying the parts
A Shutter button
B Zoom lever
C POWER lamp
D POWER switch
E Remote cord
Preparing the Digital Still Camera
Set the camera to record images. Refer to the operation
manual of the digital still camera for further information.
Connecting to the Digital Still Camera
Connect the remote cord E of the Remote Commander to
the ACC terminal of the Digital Still Camera.
Using the Remote Commander to record
1
Slide the POWER switch
D
down along the arrow mark to
turn on the camera. The POWER lamp
C
turns green light.
2 Press the shutter button A lightly to check the image.
The image is not recorded yet.
3
Press the shutter button A fully down. The image is
recorded.
4
Slide the POWER switch
D
down along the arrow mark
to turn off the camera. The POWER lamp
C
turns off.
Using the zoom feature
Slide the zoom lever B to either the W or T side. Sliding
slowly zooms slowly and sliding faster zooms fast.
T side (for telephoto): subject appears closer.
W side (for wide-angle): subject appears farther away.
* Some models do not have the zoom function.
Using the strap
When using a tripod, you can hang the Remote Commander
on the pan handle of the tripod when you are not using it.
Specifications
Dimensions: 35 × 89 × 23 mm
(1 7/16 × 3 5/8 × 29/32 inches) (w/h/d)
Remote cord: 1.5 m (4.9 feet)
Mass: Approx. 60 g (2 oz)
Accessories:
Operating Instructions (1)/Strap (1)/Pouch (1)
Refer to the operation manual of the digital still camera
for further information as well.
Français
THIS CLASS B DIGITAL DEVICE COMPLIES WITH PART
15 OF THE FCC RULES AND THE CANADIAN ICES-003,
OPERATION IS SUBJECT TO THE FOLLOWING TWO
CONDITIONS : (1) THIS DEVICE MAY NOT CAUSE
HARMFUL INTERFERENCE, AND (2) THIS DEVICE
MUST ACCEPT ANY INTERFERENCE RECEIVED,
INCLUDING INTERFERENCE THAT MAY CAUSE
UNDESIRED OPERATION.
CET APPAREIL NUMÉRIQUE DE LA CLASSE B EST
CONFORME À LA NORME NMB-003 DU CANADA.
Ce produit a été testé et déclaré conforme aux limites définies
dans la directive CEM concernant l’utilisation de câbles de
connexion dont la longueur est inférieure à 3 mètres.
La télécommande RM-DR1 est conçue pour commander un
appareil photo numérique Sony équipé d’une borne ACC. Vous
pouvez ainsi faire fonctionner l’appareil photo à distance.
Remarques
•Faire attention de ne pas renverser de liquide sur la
télécommande et de ne pas la faire tomber.
•Ne pas laisser la télécommande dans un endroit exposé
aux rayons directs du soleil, à une forte humidité ou à
côté d’un chauffage.
•Après avoir mis la télécommande hors tension, attendre
quelques instants avant de la remettre sous tension. La
manipulation répétée de l’interrupteur POWER D
risque de l’endommager, ainsi que de provoquer un
démarrage incorrect de la télécommande.
•Lors du branchement ou du débranchement du cordon
de la télécommande E à la borne ACC de l’appareil
photo numérique, toujours insérer et retirer le cordon en
ligne droite. Une manipulation incorrecte risque
d’endommager le cordon de la télécommande ou
l’appareil photo lui-même.
Identification des différents éléments de la télécommande
A Bouton déclencheur
B Levier du zoom
C Témoin POWER (alimentation)
D Interrupteur POWER (Marche/Arrêt)
E Cordon de la télécommande
Préparation de l’appareil photo numérique
Réglez l’appareil photo sur la fonction d’enregistrement
d’images. Pour de plus amples informations, reportez-
vous au mode d’emploi de l’appareil photo numérique.
Raccordement à l’appareil photo numérique
Branchez le cordon E de la télécommande sur une borne
ACC de l’appareil photo numérique.
Utilisation de la télécommande pour l’enregistrement
1 Faites coulisser le interrupteur POWER D dans le rail
le long de la flèche pour mettre l’appareil photo en
marche. Le témoin POWER C s’allume en vert.
2
Appuyez légèrement sur le bouton déclencheur
A
pour
vérifier l’image. L’image n’est pas encore enregistrée.
3 Appuyez à fond sur le bouton déclencheur A. L’image
est enregistrée.
4 Faites coulisser le interrupteur POWER
D dans le rail
le long de la flèche pour éteindre l’appareil photo. Le
témoin POWER C s’éteint.
Utilisation de la fonction de zoom
Faites coulisser le levier du zoom
B
vers l’indication W ou
T. Si vous faites coulisser lentement, le zoom est lent et si
vous faites coulisser rapidement, le zoom est plus rapide.
Vers le T (téléobjectif) : le sujet semble plus rapproché.
Vers le W (grand angle) : le sujet semble plus éloigné.
*
Certains modèles ne sont pas équipés de la fonction de zoom.
Utilisation de la courroie
Lorsque vous ne vous servez pas du manche pour tête
panoramique du trépied que vous êtes en train d’utiliser,
vous pouvez y accrocher la télécommande.
Spécifications
Dimensions : 35 × 89 × 23 mm
(1 7/16 × 3 5/8 × 29/32 pouces) (l/h/p)
Cordon de la télécommande : 1,5 m (4,9 pieds)
Poids : Env. 60 g (2 on)
Accessoires : Mode d’emploi (1)/Courroie (1)/Housse de
rangement (1)
Pour de plus amples informations, reportez-vous également
au mode d’emploi de l’appareil photo numérique.
Deutsch
Für Kunden in Deutschland
Richtlinie:EMV-Richtlinie 89/336/EWG.92/31/EWG
Dieses Gerät erfüllt die europäischen EMV-
Bestimmungen für die Verwendung in folgenden
Umgebungen:
•Wohngegenden
•Gewerbegebiete
•Leichtindustriegebiete
Das Gerät erfüllt die Bestimmungen der Norm EN55022,
Klasse B.
Dieses Produkt wurde getestet und hält die Grenzwerte
ein, die in der EMV-Richtlinie für die Verwendung von
Verbindungskabeln vorgeschrieben sind, die kürzer als
3 Meter sind.
Die Fernbedienung RM-DR1 kann zum Steuern einer
digitalen Standbildkamera von Sony verwendet werden,
die mit einem Anschluß ACC ausgestattet ist. So können
Sie die Kamera fernsteuern.
Hinweise
•Lassen Sie die Fernbedienung nicht fallen, und
verschütten Sie keine Flüssigkeiten darauf.
•
Schützen Sie die Fernbedienung vor direktem
Sonnenlicht, und lassen Sie sie nicht in der Nähe von
Wärmequellen oder an Orten mit hoher Luftfeuchtigkeit.
•Wenn Sie die Fernbedienung ausschalten, warten Sie
eine Weile, bevor Sie sie wieder einschalten. Wenn Sie
den Schalter POWER D wiederholt drücken, kann
dieser beschädigt werden, und die Fernbedienung
schaltet sich möglicherweise nicht ordnungsgemäß ein.
•Wenn Sie das Fernbedienungskabel E mit dem
Anschluß ACC der digitalen Standbildkamera
verbinden oder es von diesem Anschluß trennen, richten
Sie den Steckerstift gerade am Anschluß aus. Wenn Sie
den Stecker in einem Winkel zum Anschluß halten, kann
das Fernbedienungskabel oder die digitale
Standbildkamera beschädigt werden.
Lage und Funktion der Teile und Bedienelemente
A Auslöser
B Zoom-Hebel
C Netzanzeige POWER
D Schalter POWER
E Fernbedienungskabel
Vorbereiten der digitalen Standbildkamera
Stellen Sie die Kamera zum Aufnehmen von Bildern ein.
Weitere Informationen finden Sie in der
Bedienungsanleitung zu der digitalen Standbildkamera.
Anschließen an die digitale Standbildkamera
Schließen Sie das Fernbedienungskabel
E
der Fernbedienung
an den Anschluß ACC der digitalen Standbildkamera an.
Starten der Aufnahme mit der Fernbedienung
1
Schieben Sie den Schalter POWER
D
entlang der
Pfeilmarkierung nach unten, um die Kamera
einzuschalten. Die Netzanzeige POWER
C
leuchtet grün.
2
Drücken Sie leicht auf den Auflöser
A
, um das Bild zu
überprüfen. Das Bild wird noch nicht aufgenommen.
3 Drücken Sie den Auslöser A ganz nach unten. Das
Bild wird aufgenommen.
4 Schieben Sie den Schalter POWER D entlang der
Pfeilmarkierung nach unten, um die Kamera
auszuschalten. Die Netzanzeige POWER C erlischt.
Der Zoom
Schieben Sie den Zoom-Hebel B in Richtung W oder T.
Wenn Sie den Hebel langsam verschieben, wird langsam
gezoomt, wenn Sie ihn schneller verschieben, erfolgt der
Zoom schnell.
T (Telephoto): Motiv erscheint näher.
W (Weitwinkel): Motiv erscheint weiter entfernt.
*
Nicht alle Modelle sind mit der Zoom-Funktion ausgestattet.
Der Riemen
Wenn Sie ein Stativ verwenden und die Ferbedienung
nicht benötigen, können Sie sie am Schwenkarm des
Stativs befestigen.
Technische Daten
Abmessungen:
35 × 89 × 23 mm (B/H/T)
Fernbedienungskabel:
1,5 m
Gewicht: ca. 60 g
Zubehör:
Bedienungsanleitung (1)/Riemen (1)/Beutel (1)
Weitere Informationen finden Sie auch in der
Bedienungsanleitung zu der digitalen Standbildkamera.
Español
Este producto se ha comprobado y cumple con los límites
expuestos en la Directiva EMC sobre el uso de cables de
conexión de una longitud inferior a 3 metros.
El mando a distancia RM-DR1 se ha diseñado para
controlar una cámara digital fija Sony equipada con un
terminal de ACC y hacer funcionar la cámara de manera
remota.
Notas
•No deje caer el mando a distancia ni vierta líquido
encima del mismo.
•No exponga el mando a distancia a la luz solar directa.
No lo coloque cerca de fuentes de calor ni en lugares con
mucha humedad.
•Si apaga el mando a distancia, espere unos minutos
antes volverlo a encender. La utilización excesiva del
interruptor POWER (encendido)
D puede dañarlo, de
modo que el mando a distancia presente problemas de
encendido.
•Al insertar o extraer el cable remoto E del terminal de
ACC de la cámara digital, asegúrese de hacerlo en línea
recta. Si no realiza esta operación correctamente, el cable
remoto o la cámara pueden dañarse.
사용설명서

Svenska
Produkten har provats och befunnits uppfylla kraven i
EMC-reglerna för användning med anslutningsledningar
kortare än 3 meter.
Fjärrkontrollen RM-DR1 är avsedd för Sonys digitala
stillbildskamera, som är utrustad med en ACC-terminal.
Med fjärrkontrollen kan du fjärrstyra kameran.
Obs!
•Se till att du inte tappar fjärrkontrollen eller spiller
vätska på den.
•Lämna inte fjärrkontrollen i direkt solljus, nära ett
värmeelement eller på platser där det är mycket fuktigt.
•När du slagit av fjärrkontrollen bör du vänta en stund
innan du slår på den igen. Använder du POWER-
omkopplaren D gång på gång i tät följd kan
fjärrkontrollen skadas, vilket kan leda till att den inte
slås på som den ska.
•När du ansluter eller kopplar ur fjärrkontrollkabeln E
från ACC-terminalen på den digitala stillbildskameran,
måste du dra kontakten rakt utåt. Om du drar ut den
snett kan du skada fjärrkontrollkabeln eller kameran.
Fjärrkontrollens delar
A Slutarknapp
B Zoomreglage
C POWER (ström), lampa
D POWER (ström), omkopplare
E Anslutningskabel
Förbereda den digitala stillbildskameran
Ställ in kameran för att ta bilder. Mer information finns i
kamerans bruksanvisning.
Ansluta till den digitala stillbildskameran
Anslut fjärrkontrollkabeln E till ACC-terminal på den
degitala stillbildskameran.
Använda fjärrkontrollen för att ta bilder
1 Slå på kameran genom att skjuta POWER-
omkopplaren D nedåt längs pilmarkeringen. POWER-
lampan C tänds och lyser grönt.
2 Tryck först ned slutarknappen A helt lätt för att
kontrollera bilden. Bilden har ännu inte tagits.
3 Tryck sedan ned slutarknappen A helt och hållet. Då
lagras bilden.
4 Stäng av kameran genom att skjuta POWER-
omkopplaren D nedåt längs pilmarkeringen. POWER-
lampan C slocknar.
Använda zoomfunktionen
Skjut zoomreglaget B mot antingen W eller T. När du
skjuter reglaget långsamt utförs zoomningen långsamt,
när du skjuter den snabbare utförs zoomningen snabbare.
T-sida (tele): motivet verkar ligga närmare.
W-sida (vidvinkel): motivet verkar ligga längre bort.
* Vissa modeller saknar zoomfunktion.
Bärremmen
När du använder stativ kan du hänga fjärrkontrollen på
stativets panoreringshantag när du inte använder den.
Specifikationer
Dimensioner: 35 × 89 × 23 mm (b/h/d)
Anslutningskabel:
1,5 m
Vikt: Cirka 60 g
Tillbehör: Bruksanvisning (1)/Rem (1)/Bärväska (1)
Mer information finns i bruksanvisningen till den digitala
stillbildskameran.
Italiano
A seguito di specifici collaudi, questo prodotto è risultato
conforme alle limitazioni stabilite dalla Direttiva EMC
relativa all’utilizzo di cavi di collegamento di lunghezza
inferiore a 3 metri.
Il telecomando RM-DR1 è stato progettato per il controllo
di una macchina fotografica ferma digitale Sony dotata di
terminale ACC. È possibile controllare la macchina
fotografica a distanza.
Note
•
Assicurarsi di non fare cadere il telecomando né di bagnarlo.
•Non conservare il telecomando in luoghi soggetti a luce
solare diretta, in prossimità di fonti di calore o in luoghi
soggetti a umidità eccessiva.
•Quando il telecomando viene disattivato, attendere
qualche istante prima di attivarlo di nuovo. L’uso
ripetuto dell’interruttore POWER
D potrebbe
danneggiare il telecomando causandone l’errata
attivazione.
•Assicurarsi di inserire o estrarre il cavo del telecomando
E dal terminale ACC della macchina fotografica ferma
digitale in modo diritto ed evitando di creare angoli. Se
tale operazione viene eseguita in modo errato, è
possibile che il cavo del telecomando o la macchina
fotografica vengano danneggiati.
ACC
A
B
C
D
E
Identificazione delle parti
A Tasto dell’otturatore
B Leva dello zoom
C Spia POWER
D Interruttore POWER
E Cavo del telecomando
Preparazione della macchina fotografica ferma digitale
Impostare la macchina fotografica sul modo di
registrazione delle immagini. Per ulteriori informazioni,
fare riferimento al manuale delle istruzioni della macchina
fotografica ferma digitale.
Collegamento alla macchina fotografica ferma digitale
Collegare il cavo del telecomando E al terminale ACC
della macchina fotografica ferma degitale.
Uso del telecomando per le registrazioni
1
Premere l’interruttore POWER
D
facendolo scorrere in
direzione della freccia per accendere la macchina
fotografica. Il colore della spia POWER
C
diventa verde.
2 Premere leggermente il tasto dell’otturatore A per
controllare l’immagine. L’immagine non viene ancora
registrata.
3 Premere a fondo il tasto dell’otturatore A. L’immagine
viene registrata.
4 Premere l’interruttore POWER D facendolo scorrere in
direzione della freccia per spegnere la macchina
fotografica. La spia POWER C viene disattivata.
Uso della funzione di zoom
Spostare la leva dello zoom
B
in direzione del lato W o T.
Spostandola lentamente, l’ingrandimento viene effettuato
gradualmente, mentre spostandola più rapidamente,
l’ingrandimento viene effettuato in un tempo ridotto.
Lato T (per teleobiettivo): il soggetto viene visualizzato
più da vicino.
Lato W (per grandangolo): il soggetto viene visualizzato
in lontananza.
* Alcuni modelli non sono dotati della funzione di zoom.
Uso della cinghia
Se viene utilizzato un treppiede, è possibile appendere il
telecomando alla maniglia di panoramica del treppiede,
nel caso in cui non sia necessario utilizzarlo.
Caratterisitiche tecniche
Dimensioni: 35 × 89 × 23 mm (l/a/p)
Cavo del telecomando:
1,5 m
Peso: Circa 60 g
Accessori: Istruzioni per l’uso (1)/Cinghia (1)/
Custodia (1)
Per ulteriori informazioni, fare inoltre riferimento al
manuale delle istruzioni della macchina fotografica ferma
digitale.
Português
Este produto foi testado e está em conformidade com os
limites definidos na Directiva EMC para utilização de
cabos de ligação com menos de 3 metros.
O telecomando RM-DR1 destina-se a ser utilizado com
uma câmara digital da Sony equipada com um terminal
ACC. Pode comandar a câmara remotamente.
Notas
•Não deixe cair o telecomando nem o molhe.
•Não deixe o telecomando exposto à luz solar directa,
junto de um aquecedor ou em locais muito húmidos.
•Depois de desligar o telecomando, aguarde alguns
instantes antes de voltar a ligá-lo. A utilização contínua
do selector POWER D pode danificá-lo e fazer com que
o telecomando não funcione correctamente.
•Quando introduzir ou retirar o cabo do telecomando E
do terminal ACC da câmara digital, não o faça em linha
recta. Se não efectuar esta operação correctamente, pode
danificar o cabo do telecomando ou a câmara digital.
Identificar as peças
A Botão do obturador
B Botão de zoom
C Indicador luminoso POWER
D Selector POWER
E Cabo do telecomando
Preparar a câmara digital
Prepare a câmara para gravar imagens. Para obter mais
informações, consulte o manual de instruções da câmara.
Fazer as ligações à câmara digital
Ligue o cabo remoto E do telecomando ao terminal ACC
da câmara digital.
Utilizar o telecomando para gravar
1 Para ligar a câmara, empurre o selector POWER D na
direcção indicada pela seta. O indicador luminoso de
POWER C acende-se com uma luz verde.
2 Carregue ligeiramente no botão A do obturador para
verificar a imagem. A gravação da imagem ainda não é
efectuada.
3 Carregue no botão
A do obturador até abaixo. A
imagem é gravada.
4 Para desligar a câmara, empurre o selector POWER D
na direcção indicada pela seta. O indicador luminoso
POWER C apaga-se.
Utilizar a função de zoom
Empurre o botão de zoom B para o lado W ou T. Se
empurrar devagar executa o zoom lentamente, se o
empurrar mais depressa executa o zoom rapidamente.
Lado T (para teleobjectiva): o motivo aparece mais perto.
Lado W (para grande-angular): o motivo aparece mais
afastado.
* Alguns modelos não têm a função de zoom.
Utilizar a correia
Quando utilizar um tripé, pode pendurar o telecomando
no manípulo de panorâmica do tripé, quando não estiver
a utilizá-lo.
Características técnicas
Dimensões: 35 × 89 × 23 mm (l/a/p)
Cabo remoto: 1,5 m
Peso: Aprox. 60 g
Acessórios: Manual de instruções (1)/Correia (1)/Bolsa
(1)
Para obter mais informações, consulte também o manual
de instruções da câmara digital.
Pyccкий
Дaнноe издeлиe пpошло иcпытaния и cоотвeтcтвyeт
пpeдeлaм, ycтaновлeнным в Диpeктивe EMC в
отношeнии cоeдинитeльныx кaбeлeй, длинa котоpыx
нe пpeвышaeт 3 мeтpов.
Пyльт диcтaнционного yпpaвлeния RM-DR1
пpeднaзнaчeн для yпpaвлeния цифpовой
фотокaмepой Sony, оcнaщeнной paзъeмом ACC.
Кaмepой можно yпpaвлять нa paccтоянии.
Пpимeчaния
• He pоняйтe пyльт диcтaнционного yпpaвлeния и нe
пpоливaйтe нa нeго никaкиx жидкоcтeй.
• He оcтaвляйтe пyльт диcтaнционного yпpaвлeния в
мecтax, кyдa попaдaют пpямыe cолнeчныe лyчи,
pядом c обогpeвaтeлeм или в мecтax c повышeнной
влaжноcтью.
•Пpи отключeнии пyльтa диcтaнционного yпpaвлeния
нe включaйтe eго cpaзy, a подождитe нeкотоpоe
вpeмя. Пpи чacтом иcпользовaнии пepeключaтeля
POWER D он можeт быть повpeждeн, a пyльт
диcтaнционного yпpaвлeния можeт нe включaтьcя.
• Пpи подключeнии кaбeля пyльтa диcтaнционного
yпpaвлeния E к paзъeмy ACC цифpовой
фотокaмepы и отключeнии от нeго нe пepeгибaйтe
кaбeль. Heпpaвильноe выполнeниe этой опepaции
можeт пpивecти к повpeждeнию кaбeля пyльтa
диcтaнционного yпpaвлeния или кaмepы.
Oбознaчeниe чacтeй
A Кнопкa зaтвоpa
B Pычaг пpиводa тpaнcфокaтоpa
C Индикaтоp POWER
D Пepeключaтeль POWER
E Кaбeль пyльтa диcтaнционного yпpaвлeния
Подготовкa цифpовой фотокaмepы
Hacтpойтe фотокaмepy для зaпиcи изобpaжeний.
Дополнитeльнyю инфоpмaцию cм. в pyководcтвe по
экcплyaтaции цифpовой фотокaмepы.
Подключeниe к цифpовой фотокaмepe
Подключите кабель пульта дистанционного управления
E
к разъему АСС на цифровой фотокамере.
Иcпользовaниe пyльтa диcтaнционного
yпpaвлeния для зaпиcи
1 Пepeдвиньтe пepeключaтeль POWER D вниз по
cтpeлкe, чтобы включить кaмepy. Индикaтоp
POWER C зaгоpитcя зeлeным цвeтом.
2 Cлeгкa нaжмитe кнопкy зaтвоpa A, чтобы
пpовepить изобpaжeниe. Изобpaжeниe покa eщe нe
зaпиcывaeтcя.
3 Полноcтью нaжмитe кнопкy зaтвоpa A.
Изобpaжeниe зaпишeтcя.
4 Пepeдвиньтe пepeключaтeль POWER D вниз по
cтpeлкe, чтобы выключить кaмepy. Индикaтоp
POWER C погacнeт.
Иcпользовaниe фyнкции тpaнcфокaции
Пepeмecтитe pычaг пpиводa тpacфокaтоpa
B
в cтоpонy
W или T. Пpи мeдлeнном пepeмeщeнии тpaнcфокaция
выполняeтcя мeдлeнно, пpи быcтpом - быcтpee.
Cтоpонa T (тeлeфото): объeкт пpиближaeтcя.
Cтоpонa W (шиpокоyгольнaя): объeкт yдaляeтcя.
*
Heкотоpыe модeли нe имeют фyнкции тpaнcфокaтоpa.
Иcпользовaниe peмeшкa
Пpи иcпользовaнии штaтивa пyльт диcтaнционного
yпpaвлeния можно повecить нa pyкояткy штaтивa,
когдa он нe иcпользyeтcя.
Texничecкиe xapaктepиcтики
Paзмepы: 35 × 89 × 23 мм (ш/в/г)
Кaбeль пyльтa диcтaнционного yпpaвлeния:
1,5 мм
Macca: Пpиблизит. 60 г
Дополнитeльныe пpинaдлeжноcти:
Инcтpyкции по экcплyaтaции (1)/
Peмeшок (1)/Фyтляp (1)
Дополнитeльнyю инфоpмaцию cм. тaкжe в
pyководcтвe по экcплyaтaции цифpовой фотокaмepы.
× ×
한글
이 기기는 3미터 이하의 케이블 접속으로 사용하는데 있
어서 필요한 EMC 규제의 허용치를 준수하고 있음이 테스
트의 결과 증명되었습니다.
이 RM-DR1 리모트 커맨더는 ACC터미널이 있는 소니
디지털 스틸카메라를 작동시키기 위해 사용됩니다. 카메
라를 원격 조정할 수 있습니다.
주의
• 리모트 커맨더를 떨어뜨리거나 물기에 젖지 않게 하십시
오.
• 리모트 커맨더를 직사광선, 열기구 근처 또는 습기가 많
은 곳에 방치하지 마십시오.
• 리모트 커맨더를 껐다가 다시 켤 경우에는 약간의 시간
간격을 두어야 합니다. POWER 스위치 D를 빈번히 사
용하면 손상되거나 리모트 커맨더가 올바르게 켜지지 않
을 수 있습니다.
• 디지털 스틸카메라의 ACC단자에 리모트 코드 E를 끼
우거나 뺄 때는 코드를 일직선으로 하여 작동하십시오.
그렇지 않으면 리모트 코드 또는 카메라가 손상을 입을
수 있습니다.
부분 명칭
A 셔터 버튼
B 줌 레버
C POWER 램프
D POWER 스위치
E 리모트 코드
디지털 스틸카메라를 준비
화상을 녹화하기 위해 카메라를 설정합니다. 자세한 내용
은 디지털 스틸카메라의 사용설명서를 참조하십시오.
디지털 스틸카메라와 연결하기
리모트 커맨더의 리모트 코드 E 를 디지털 스틸카메라의
ACC터미널에 끼웁니다.
리모트 커맨더로 녹화하기
1 POWER스위치 D 를 화살표 방향으로 밀어 카메라를
켭니다. POWER 램프 C 에 초록색 불이 들어옵니다.
2 셔터 버튼 A 를 살짝 눌러 화상을 확인합니다. 이 상태
에서는 아직 화상이 녹화되지 않습니다.
3 셔터 버튼 A 를 완전히 누릅니다. 화상이 녹화됩니다.
4 POWER스위치 D 를 화살표 방향으로 밀어 카메라를
끕니다. POWER 램프 C 가 꺼집니다.
줌 기능 사용하기
줌 레버 B 를 W 또는 T쪽으로 밉니다. 천천히 밀면 천천
히 줌이 되고 빨리 밀면 빨리 줌이 됩니다.
T쪽(텔레포토하려면):물체가 가까이 나타납니다.
W쪽(와이드앵글하려면):물체가 멀리 나타납니다.
*줌 기능이 없는 모델도 있습니다.
스트랩 사용하기
3각을 사용할 경우, 리모트 커맨더를 사용하지 않을 때는
3각의 손잡이에 걸어둘 수 있습니다.
사양
크기: 35 × 89 × 23 mm (w/h/d)
리모트 코드: 1.5 m
무게: 약 60 g
부품: 사용설명서(1), 스트랩(1), 소형가방(1)
자세한 내용은 디지털 스틸카메라의 사용설명서를 참조하
십시오.
•
•
•
D
• E
A
B
C
D
E
E
1 D
C
2 A
3 A
4 D
C
B
× ×
•
•
•
D
• E
A
B
C
D
E
E
1 D
C
2 A
3 A
4 D
C
B
-
 1
1
-
 2
2


på andra språk
- italiano: Sony RM-DR1 Manuale del proprietario
- español: Sony RM-DR1 El manual del propietario
- Deutsch: Sony RM-DR1 Bedienungsanleitung
- português: Sony RM-DR1 Manual do proprietário
- français: Sony RM-DR1 Le manuel du propriétaire
- English: Sony RM-DR1 Owner's manual
- русский: Sony RM-DR1 Инструкция по применению
- Nederlands: Sony RM-DR1 de handleiding